Let’s discuss Enable or Disable Share Experience Policy in MS Edge Browser using M365 Admin Center. Using Microsoft 365 admin center policy you can create policy to enhance the sharing experience on your organizations.
Today I would like to share my experience of share experience policy creation. Using this policy admins can manage how users share content within the organization and externally. It includes controlling sharing permissions for files, folders, calendars, and other resources across Microsoft 365 apps.
By configuring sharing permissions, organizations can limit unauthorized access to sensitive data, ensuring that external sharing is controlled and secure. Admins can configure this policy on OneDrive and SharePoint Settings.
This policy determins how users share their calendars with external parties. Admins can set rules for what level of calendar details can be shared. Here you will get the step by step guidance to enable or disable sharing experience policy.
Table of Contents
Which are the Microsoft Apps Sharing can be Controlled with this Policy?
Share experience policy allows admins to manage the sharing experience. You can share files, folders, calendars acroos different Microsoft 365 apps like OneDrive, SharePoint, and Exchange Online.
Enable or Disable Share Experience Policy in MS Edge Browser using M365 Admin Center
Share Experience Policy is completely customizable. Admins can customize sharing settings to meet specific organizational needs. This policy is very benefical for your organization. Follow the steps which is explained on this post.
- Enable or Disable Default Share Additional OS Region in MS Edge Browser using M365 Admin Center Policy
- How to Configure Friendly URL Format Policy in MS Edge Browser using M365 Admin Center
- Enable or Disable Pin Browser Essentials Toolbar Button Policy in MS Edge Browser using M365 Admin Center
Steps to Enable Disable Share Experience Policy
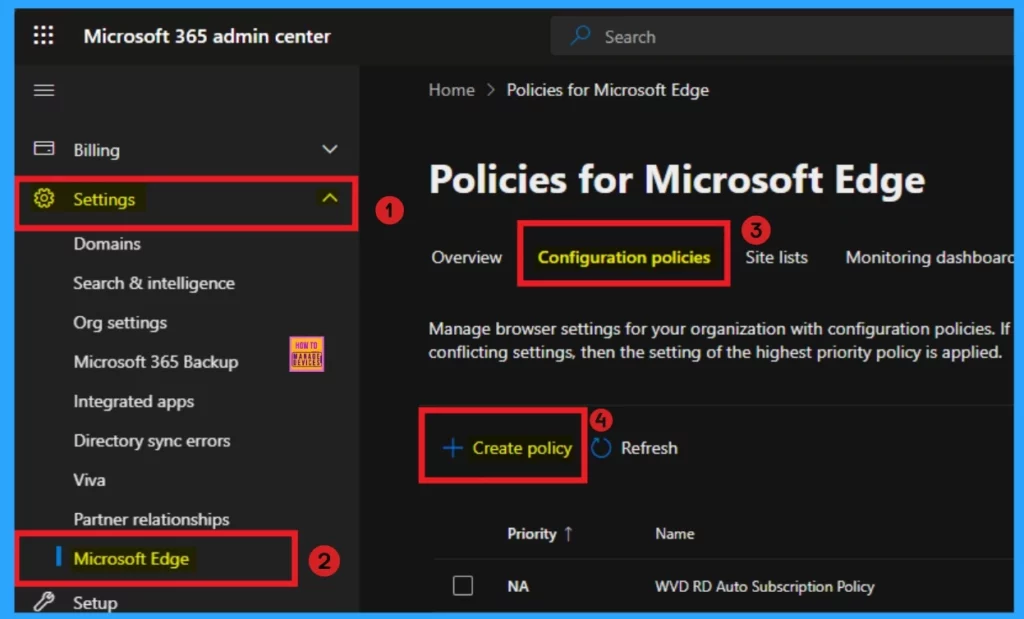
Using Microsoft 365 admin center, you can easily configure a policy to enable disable Pin Browser Essentials Toolbar Button. To access and configure this policy Open Microsoft 365 admin center. Go to Settings and select Microsoft Edge. After that, select Configuration Policies tab. Click on the +Create policy.
Basic Tab
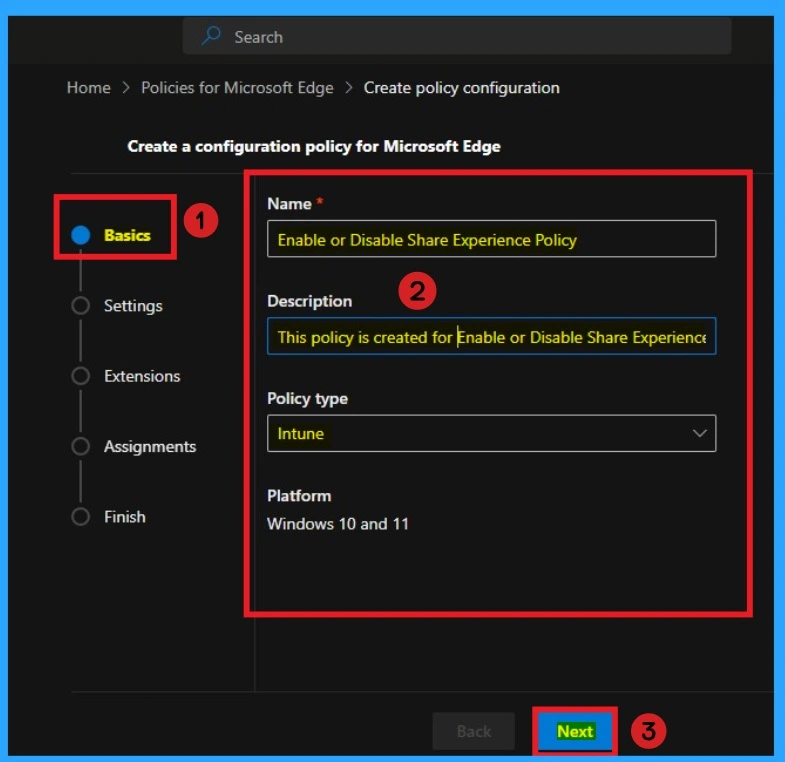
Basic tab is the essential section in policy creation. On the Basic tab you can add Name and Description for the policy. Name is a mandatory field and you should add a proper name for the policy. Description is not compulsory, but is better to add the description for the policy. Here the Policy Type and Platform are automatically added.
- Name – Enable or Disable Share Experience
- Description – This policy used to Enable or Disable Disable Share Experience
- Policy Type – Intune
- Platform – Windows 10 and 11
- Click on the Next button
Settings Tab
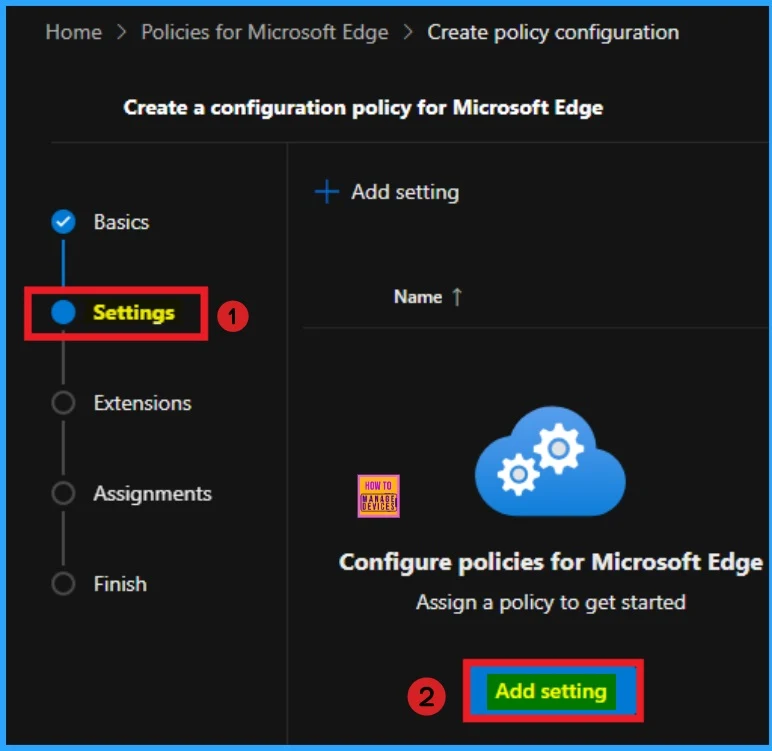
The Settings tab is very important while creating policy. Click the Add setting option in the window below to add a setting. There are 2 option you can see to add settings. You can choose any of these.
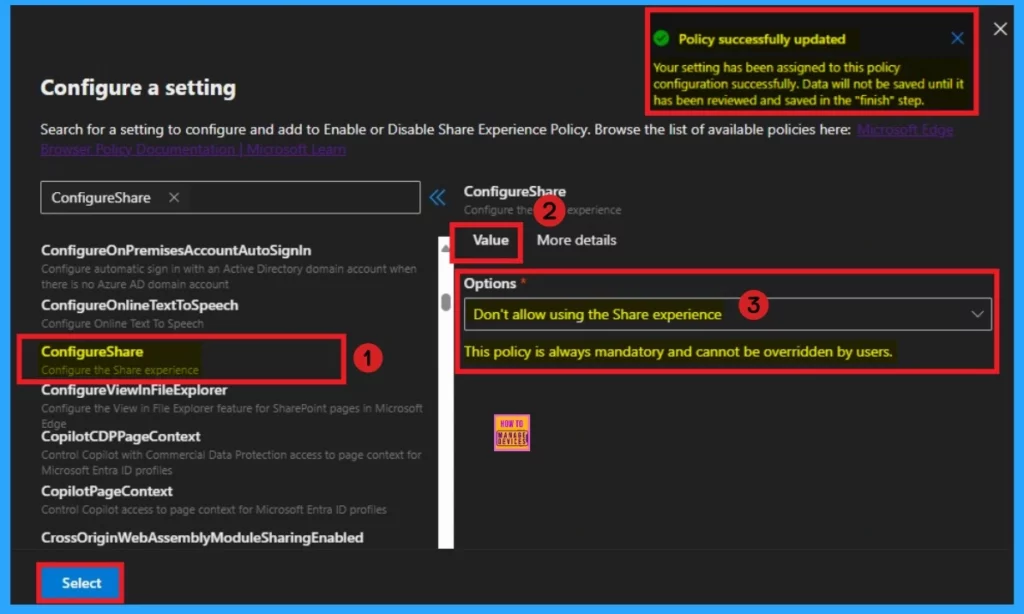
After that you will get the Configure a setting page, Here you can see different categories to select settings. Here I choose Additional Settings and select ConfigureShare. There are 2 value options you can see on this policy. The default value is Allow using the share experience. If you want to go with it click on the Create button.
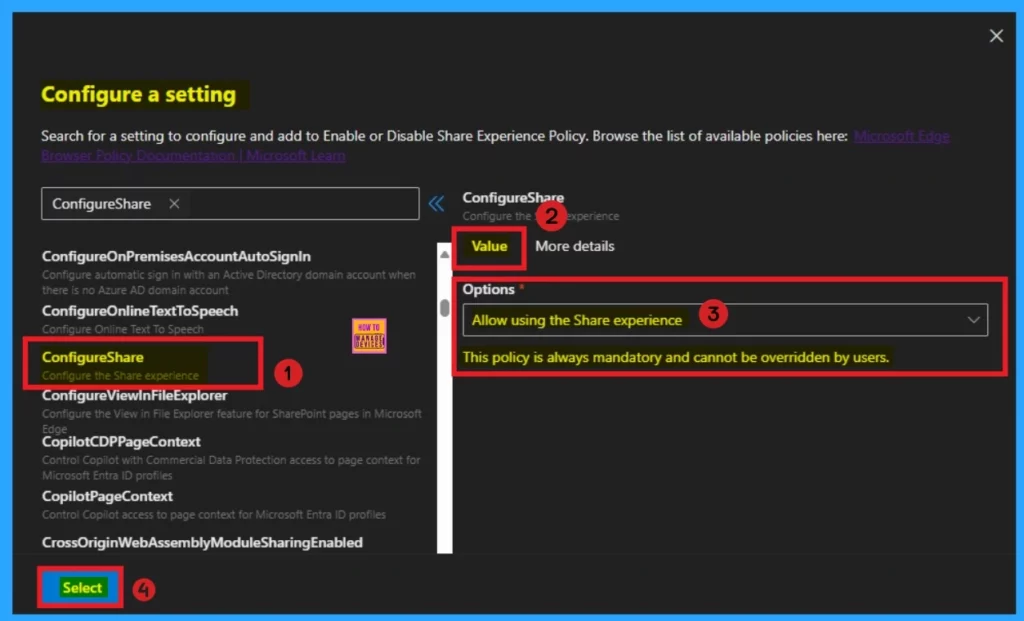
Here I would like to select Disable Share experience policy. To disable this policy, I select Don’t allow using the Share experience value. Then I click on the Create button and I got the success notification.
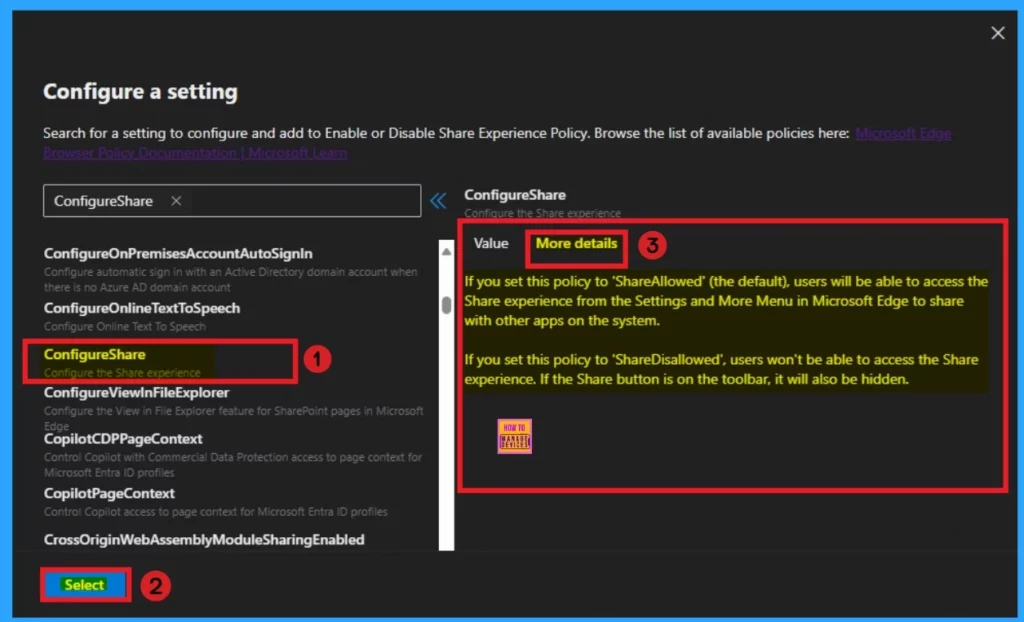
Before you select the value you can check the More details of the Selected policy. It helps you to know more about the policy. The below table shows the informations on the More details tab.
| Enable | Disable |
|---|---|
| If you set this policy to ‘ShareAllowed’ (the default), users will be able to access the Share experience from the Settings and More Menu in Microsoft Edge to share with other apps on the system. | If you set this policy to ‘ShareDisallowed’, users won’t be able to access the Share experience. If the Share button is on the toolbar, it will also be hidden. |
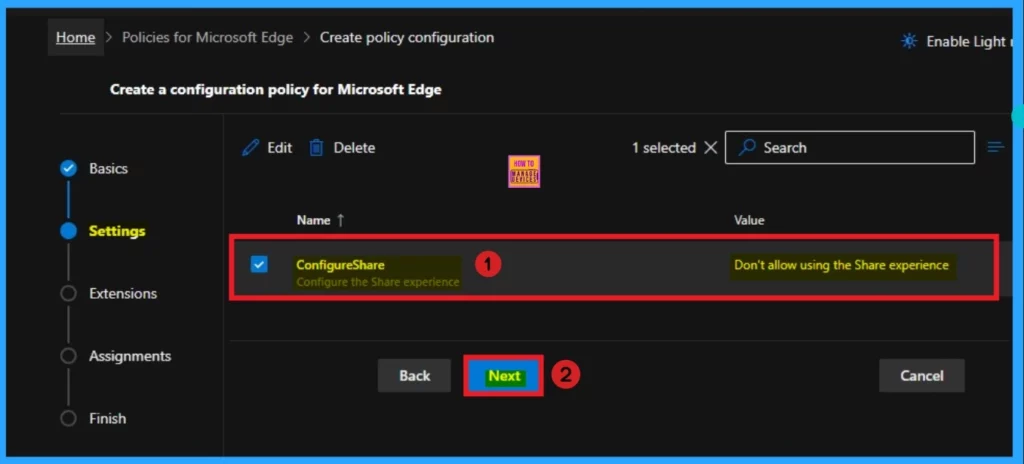
Then you can close the configuration settings window. Then the created policy shown on the Settings page. Click on the Next button. Look at the below window for more clarity.
Extensions
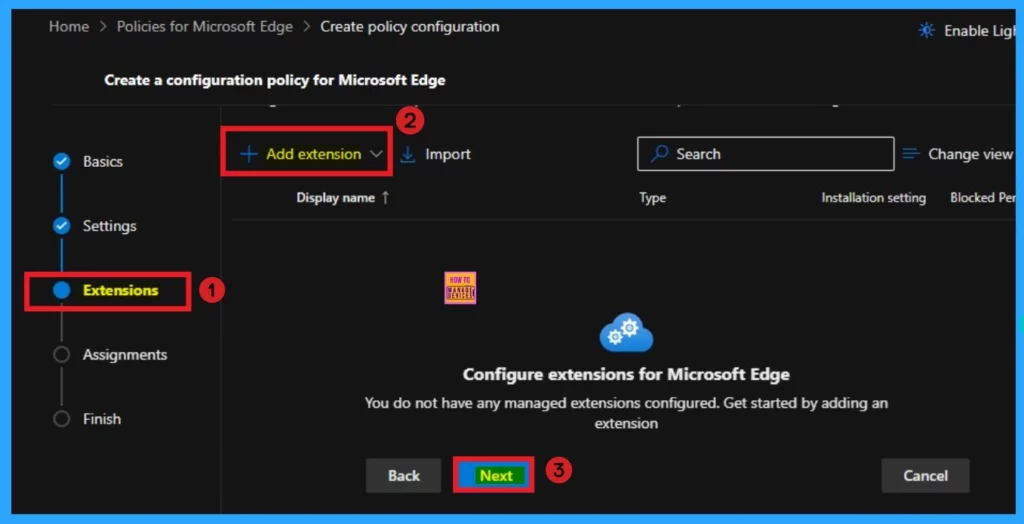
The extensions tab helps you add extensions like Edge Add-on, Sidebar app, External extension, etc. This is optional for your policy. You can add an extension. Here, I skip this section and click on the Next button.
Assignments Tab
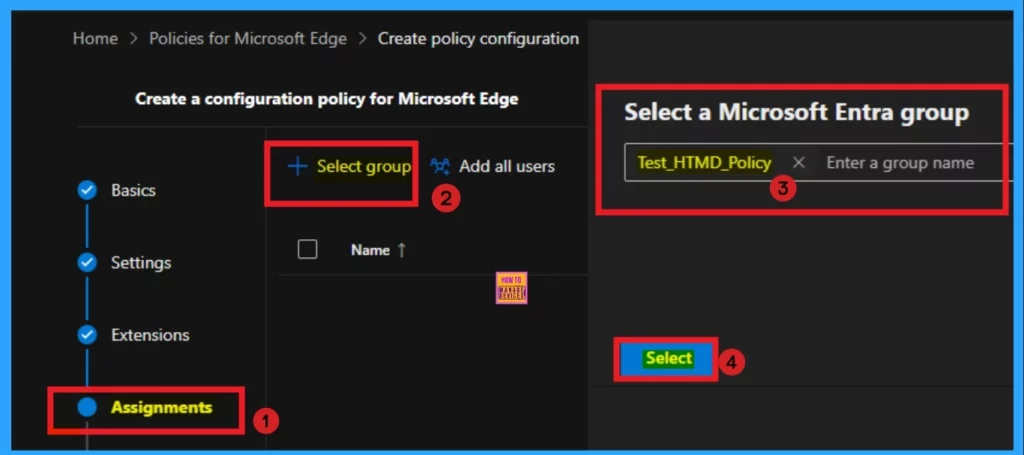
The assignments tab is the most important; it helps you select groups to add to the policy chosen. You can use different groups for this. Here I select 1 group. Click on the +Select group and select a Microsoft Entra group.
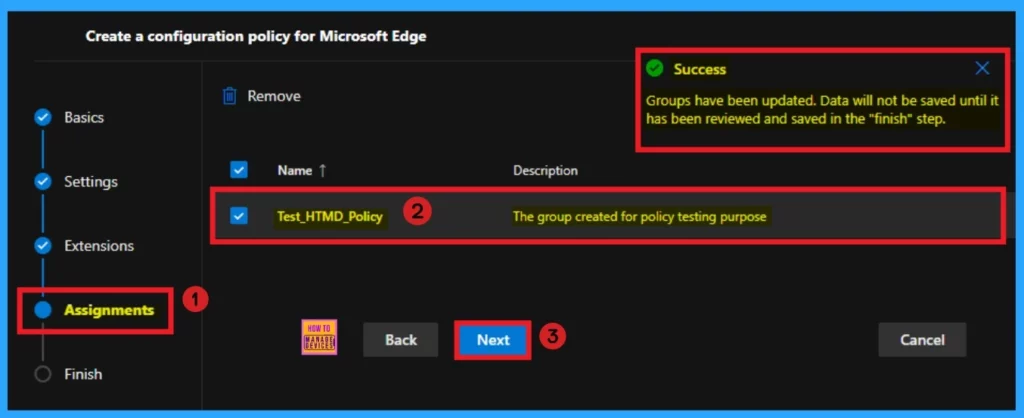
After the group selected you can see the success notification on the Portal. The Notification s like, Group have been updated. Data will not be saved until it has been reviewed and saved in the “finish” step. The selected group will shown on the Assignment tab. Click on the Next button.
Finish Tab
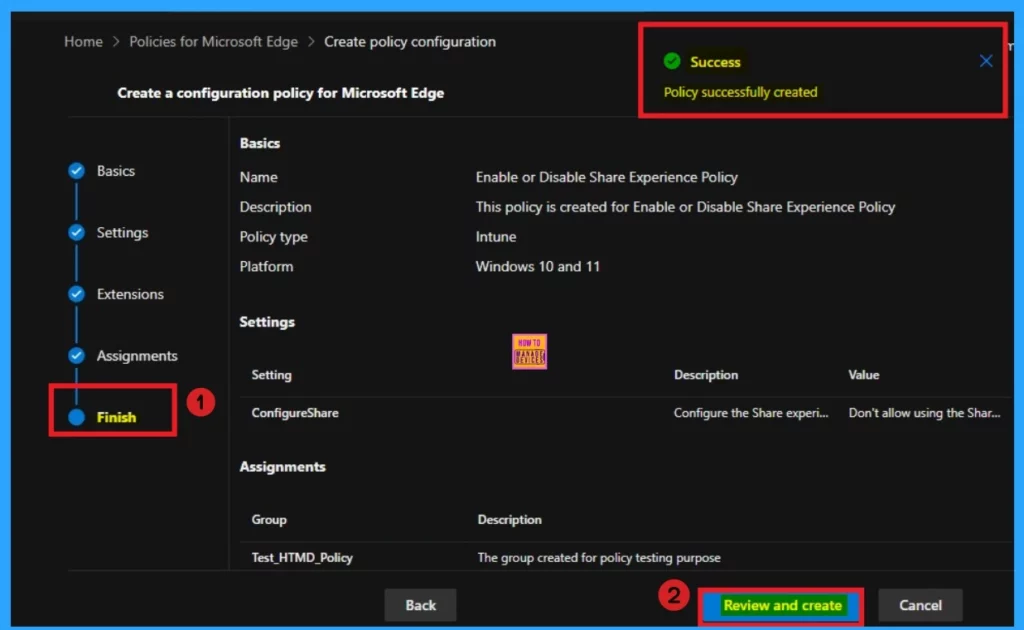
The Finish Tab shows all the information that is added on the previous tabs. Here, you can verify all the sections and bring changes quickly. After confirming the details, click on the Review and Create button. The screenshot below will help you. After that, you will receive a success notification on the portal.
Monitoring Status
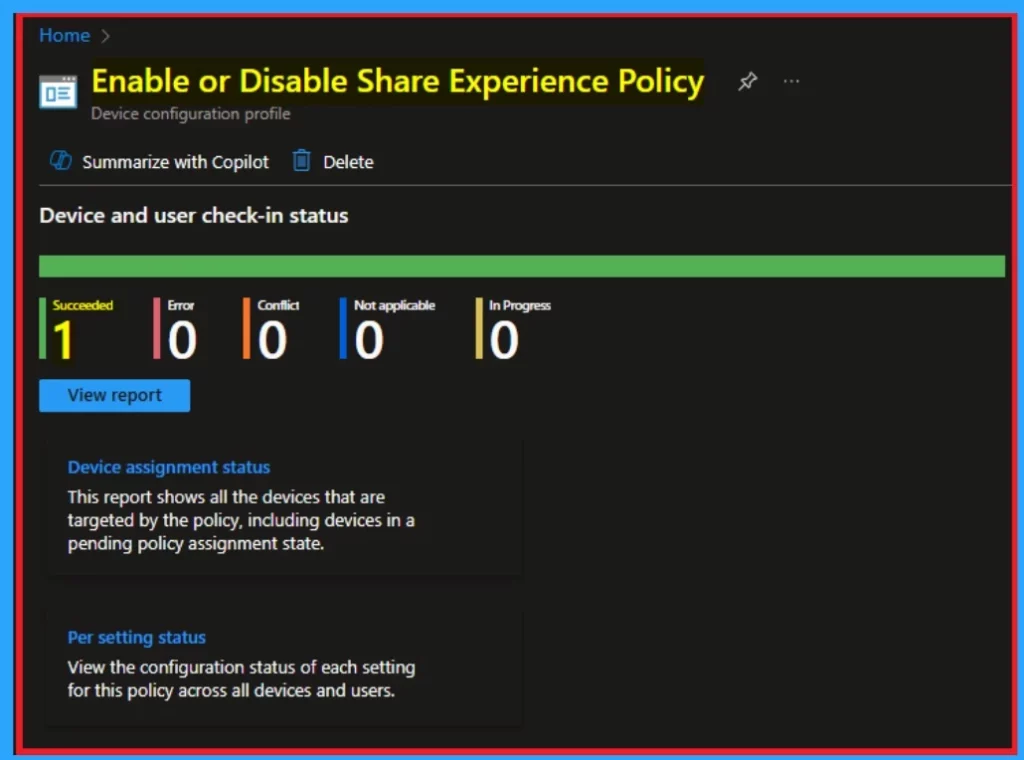
After getting the success result, you should sync the device on the Company Portal It helps you to easily completed deployment. After that you can check the Monitoring Status on the Intune Portal. The created polcies Platform is Intune. That;s why we can check the monitoring status on Intune Portal.
- Here the Policy is succeeded on 1 Device
Client Side Verification – Event Viewer
After completing the policy creation the policy you should complete the client side Verification. To do this, you can use Event Viewer. Follow the below list to access the event viewer.
- Click on the Start Menu, Search Event Viewer, and open it.
- On the User Account Control window, click on the Yes button
- On the Event Viewer Navigate > Applications and Services Logs > Microsoft > Windows > DeviceManagement- Enterprise-Diagnostics-Provider > Admin
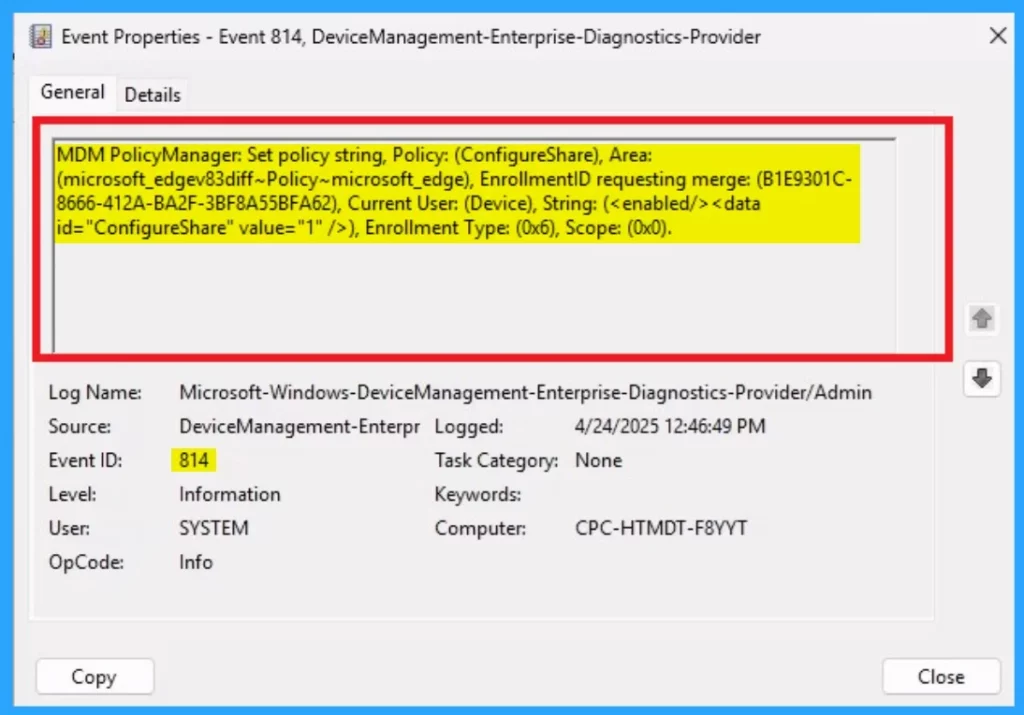
- The success result can be seen on the Event ID 814
MDM PolicyManager: Set policy string, Policy: (ConfigureShare), Area:
(microsoft_edgev83diff~Policy~microsoft_edge), EnrollmentID requesting merge: (B1E9301C-
8666-412A-BA2F-3BF8A55BFA62), Current User: (Device), String: ( ), Enrollment Type: (0x6), Scope: (0x0).
End Result
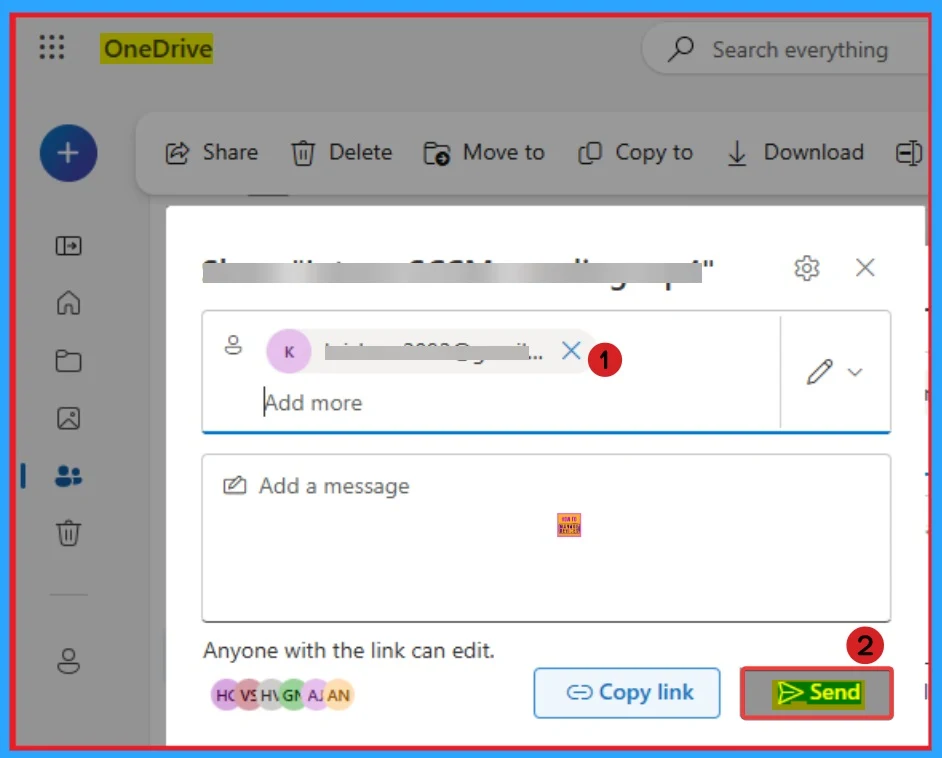
To see the end result, I open the OneDrive on the Assigned group. Here i tried to share a file from OneDrive on the assigned group and the Share button is disabled.
Need Further Assistance or Have Technical Questions?
Join the LinkedIn Page and Telegram group to get the latest step-by-step guides and news updates. Join our Meetup Page to participate in User group meetings. Also, Join the WhatsApp Community to get the latest news on Microsoft Technologies. We are there on Reddit as well.
Author
Anoop C Nair has been Microsoft MVP from 2015 onwards for 10 consecutive years! He is a Workplace Solution Architect with more than 22+ years of experience in Workplace technologies. He is also a Blogger, Speaker, and leader of the Local User Group Community. His primary focus is on Device Management technologies like SCCM and Intune. He writes about technologies like Intune, SCCM, Windows, Cloud PC, Windows, Entra, Microsoft Security, Career, etc.
