Hey there, let’s discuss on the topic Enable or Disable Application Bound Encryption Policy in MS Edge Browser using M365 Admin Center. Application Bound Encryption (ABE) is a security feature that ensures only the specific app that created the encrypted data can access it.
This prevents unauthorized access, even if the data is extracted or the device is compromised. So, unlike regular encryption where any app with the right permissions can open up the stored data, ABE ties the encryption keys to the identity of the authorized app, such as its package name or signing certificate.
This means that even if some malicious software gets into the encrypted files, it can’t crack them open without the original app’s cryptographic keys. ABE is commonly used in banking, healthcare, and enterprise apps to protect sensitive user data from theft or tampering.
ABE enhances security by using specific protections from the platform, such as Android’s Keystore or iOS’s Secure Enclave, to protect encryption keys. Here we are going to know more about the process of installing Application Bound Encryption in our PC through this post.
Table of Contents
Why is ABE Important?

ABE enhances security by restricting decryption to only the intended app, protecting sensitive data from malware or unauthorized apps and preventing data leaks even if the device is compromised.
Enable or Disable Application Bound Encryption Policy in MS Edge Browser
If we uninstall the app, we might permanently lose our keys, and it depends on the implementation, which means we won’t be able to get our old data back unless we have the right login info. We need to sign in to the Microsoft 365 Admin Center.
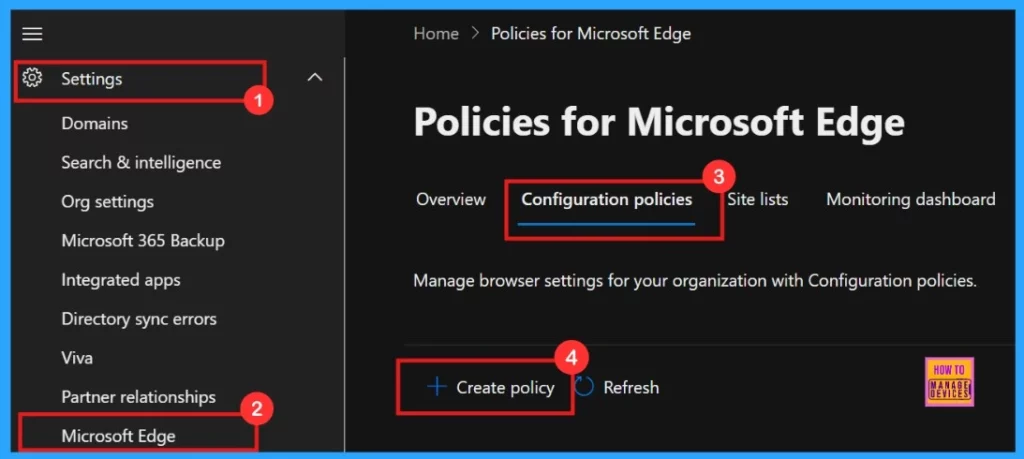
Then, go to the Settings, select Microsoft Edge, and click on Configuration Policies. In the Configuration Policies section, select the + Create Policy option.
- Microsoft Edge Drop to Share files in Windows Android and iOS
- Enable or Disable Audio Sandbox to Run Policy in MS Edge Browser using M365 Admin Center
- Enable Disable Screenshot Policies in Edge using Microsoft 365 Admin Center Policy
Basics
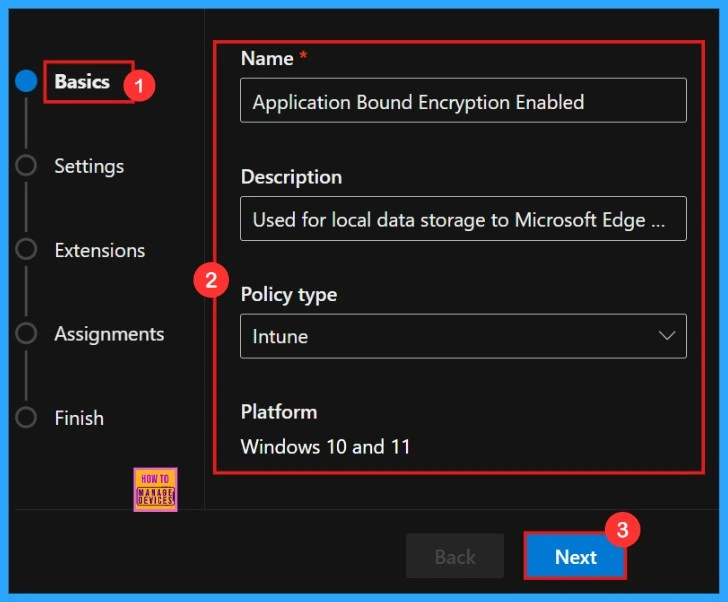
In the Basics tab, we need to enter basic details of the policy, such as the name, description, policy type, and platform. Here the policy type is set to Intune, and the platform is Windows 10 and 11. Platform selection is default here. After entering the name and description, click Next.
Settings
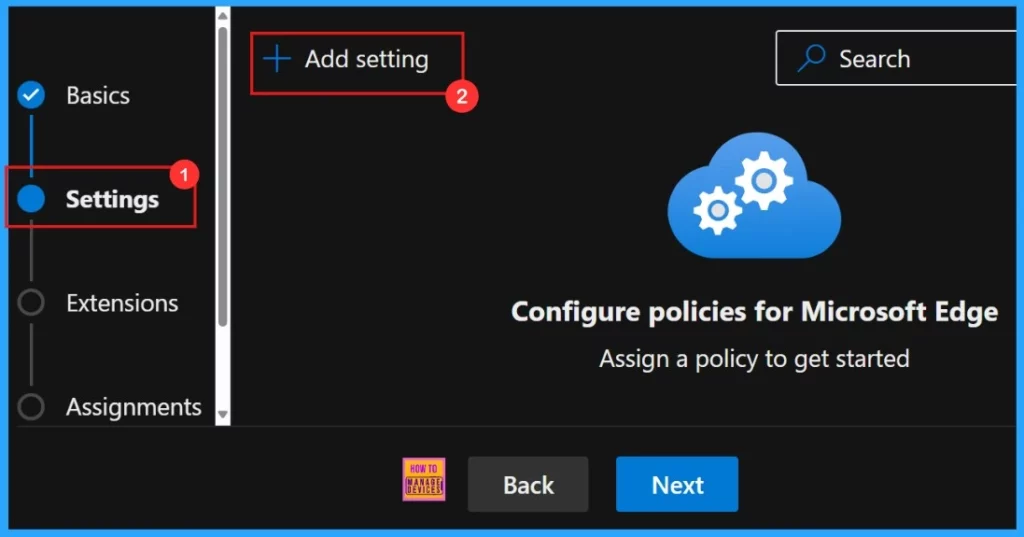
After completing the Basics tab, the next step is Settings. In this section, we need to add settings to the policy. we can see an Add Setting option. Click on “Add Setting” and the Settings Policy page will open.
Configure a Setting
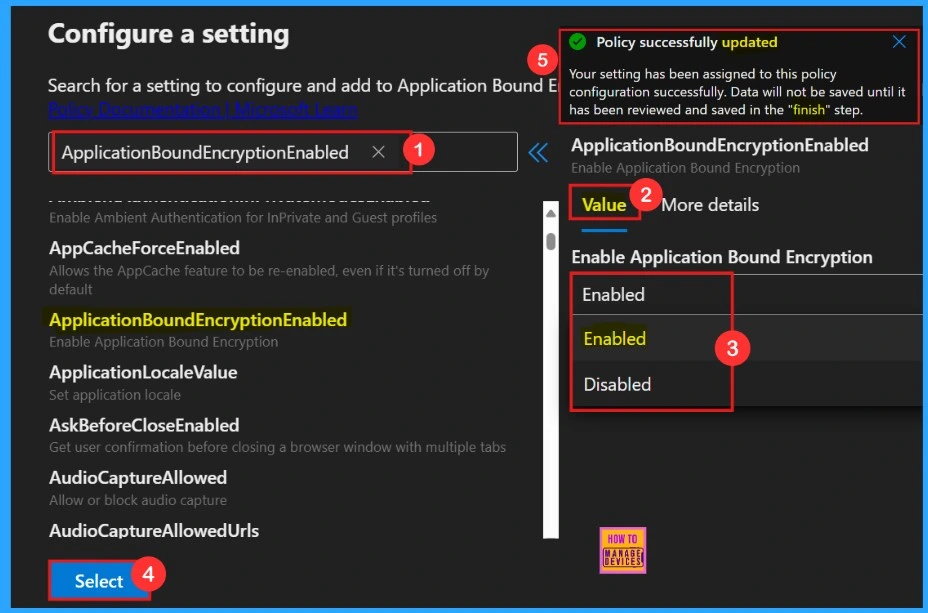
When the Settings page opens, we need to search for the policy name. We can either use the search bar or browse through categories such as Additional Settings, Application Guard Settings, etc. Here we searched for the policy name, and the policy settings were available under the Additional Settings.
Another window will open here, there we can see the “Value tab”. Here we can choose the option, “enable or disable”. We need to select the “Enabled” option because we want to enable the Application Bound Encryption in the Edge. After selecting “Enabled,” clicked “Select,” then we will be notified that the policy has been successfully updated.
More Details
The More Details tab is an important one. If we don’t know much about the policy, we can see a brief description that helps us understand its purpose. If we are going to deploying a policy, do not skip this section, because, it may helpful to understand more about that policy and it’s purpose.
| Enabled | Disabled |
|---|---|
| Enabling this policy or leaving it unset binds the encryption keys used for local data storage to Microsoft Edge whenever possible. | Disabling this policy has a detrimental effect on Microsoft Edge’s security because unknown and potentially hostile apps can retrieve the Encryption keys are used to secure data. |

Settings
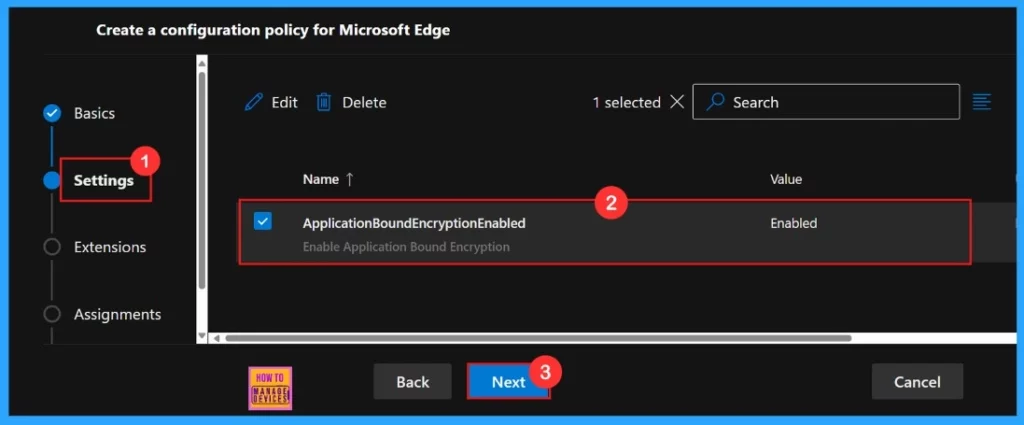
We need to close the configuration settings window, then the created policy shown on the Settings page. Need to tick the check box and Click on the Next button. Below screenshot gives us more clarity.
Extensions
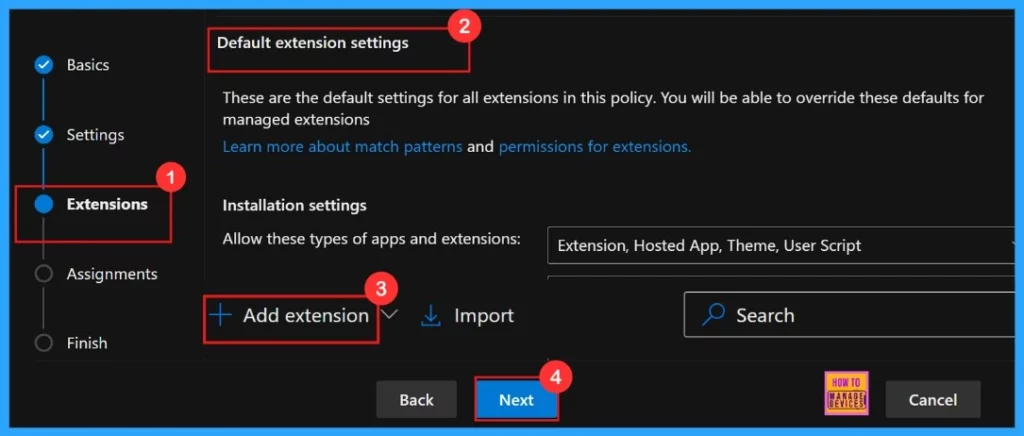
The next step is Extensions, this lets us customize our policy by adding specific extensions, including settings for installation, permissions, and URLs. If we need more features, just click + Add extension to include them. As it is not mandatory we are going to skip this section.
Assignments
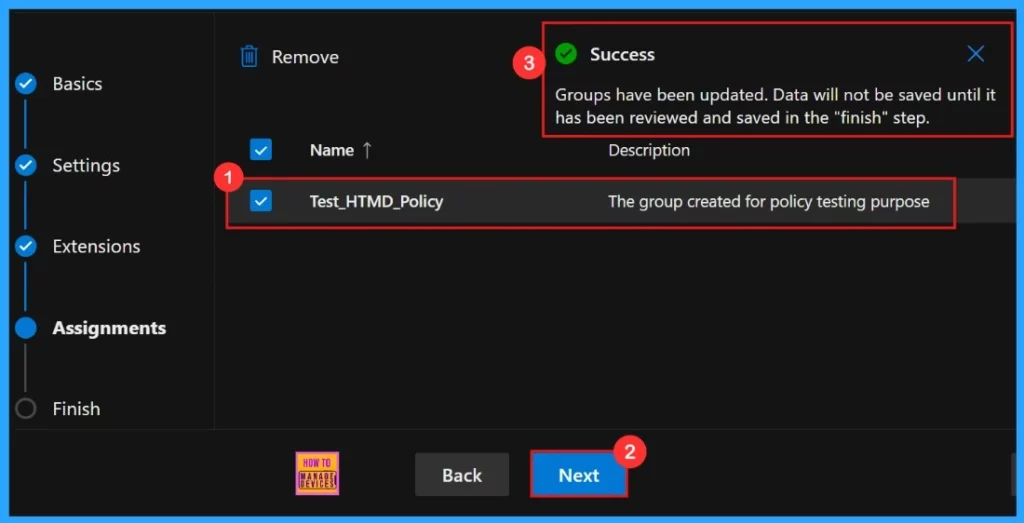
In the Assignments , we choose which groups get this policy. Click Select group and pick from the available Microsoft Entra groups. We selected the Test HTMD Policy group. After selecting the group, click Next to continue the procedure.
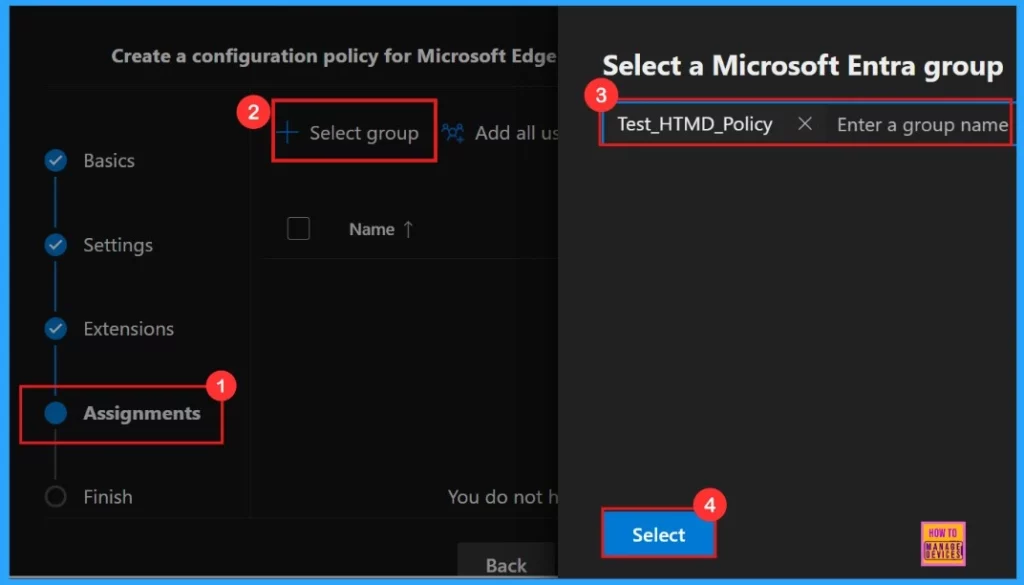
After selecting the Test HTMD Policy group, a success message will appear as ” Groups have been updated. Data will not be saved until it has been reviewed and saved in the “finish” step.” Then, click Next to continue.
Finish
The next step is Finish, and this is the last and final stage of policy creation. We can review and edit all the details we have given, such as the basic information, settings, assignment details, etc. If anything is missing or we want to make changes, go back to the previous steps and edit.

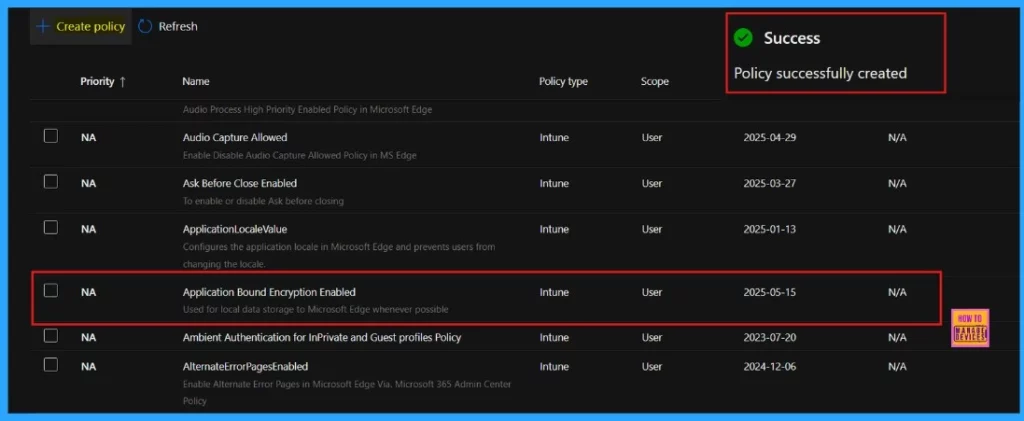
We will receive a pop-up message that the “policy successfully created” on the portal. After creating the policy, we can find the policy name in the Configuration policies. We can also check the Created policy in the Intune Portal.
Client-Side Verification
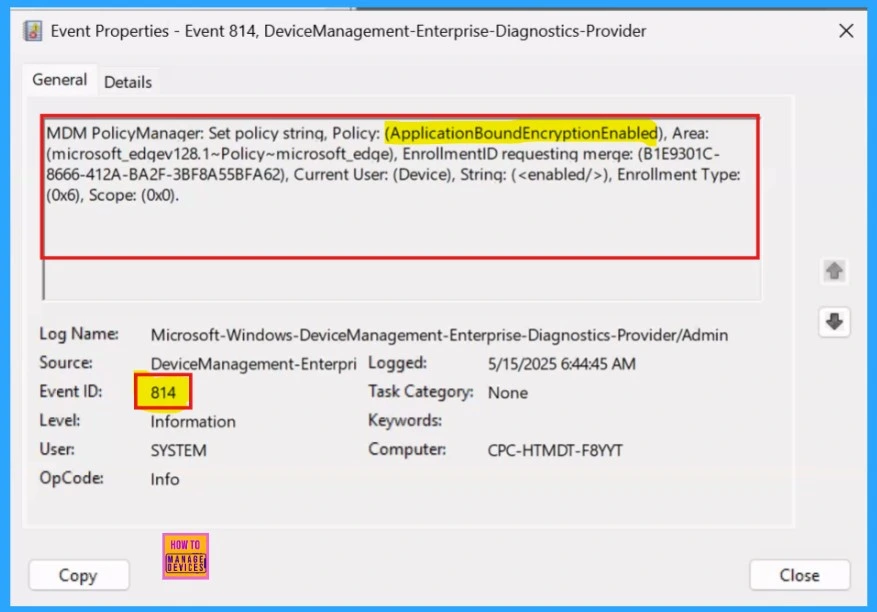
In the Event viewer, success result will be seen as Event ID 814. To verify client-side compliance, go to Applications and Services Logs > Microsoft > Windows > DeviceManagement-Enterprise-Diagnostics-Provider > Admin > and then filter with Event ID 814.
Monitoring Status
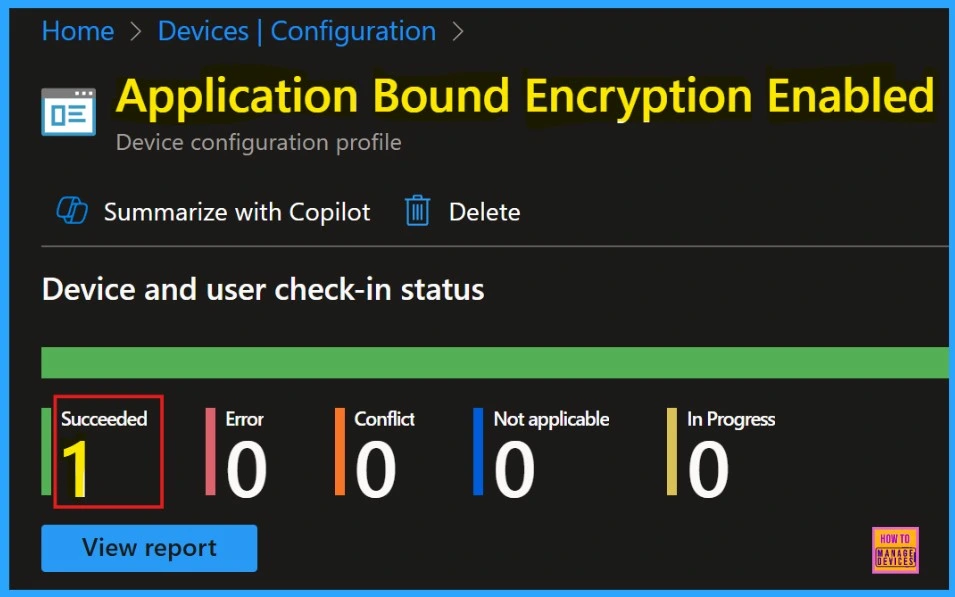
After getting the success result, need to sync the device on the Company Portal It helps us to complete deployment immediately. The device and user check in status shows the succeeded 1 result.
Need Further Assistance or Have Technical Questions?
Join the LinkedIn Page and Telegram group to get the latest step-by-step guides and news updates. Join our Meetup Page to participate in User group meetings. Also, Join the WhatsApp Community to get the latest news on Microsoft Technologies. We are there on Reddit as well.
Author
Anoop C Nair has been a Microsoft MVP for 10 consecutive years from 2015 onwards. He is a Workplace Solution Architect with more than 22+ years of experience in Workplace technologies. He is a Blogger, Speaker, and Local User Group Community leader. His primary focus is on Device Management technologies like SCCM and Intune. He writes about technologies like Intune, SCCM, Windows, Cloud PC, Windows, Entra, Microsoft Security, Career, etc.

