Hey there, let’s discuss about the topic How to Configure Only On-Premises Implicit Sign-in Policy in MS Edge Browser using M365 Admin Center. The only on-premises Implicit Sign-in is a security feature in Microsoft Edge designed for enterprise environments.
It makes sure that we only get logged into your work or school accounts automatically when we are connected to our company’s network, such as a corporate intranet. It helps prevent any accidental logins or unauthorized access when employees are outside the corporate network, which reduces the risk of credential exposure or unauthorized access.
Administrators can enforce this setting via Group Policy or some registry edits, giving organizations greater control over identity management while maintaining a seamless sign-in experience within the trusted network perimeter.
When enabled, this feature blocks Edge from automatically signing users into Microsoft services like Office 365 or Azure AD when they are on public or untrusted networks. However, users can still manually sign in when off-premises, ensuring productivity without compromise in maintaining security.
Table of Contents
Why Do We Use Only On-Premises Implicit Sign-in?

We use Only on-Premises Implict Sign-in for enhance security by preventing automatic sign-ins outside the corporate network, maintain better control over corporate identity management and comply with data governance policies that restrict authentication to internal networks.
Only On-Premises Implicit Sign-in Policy in MS Edge Browser
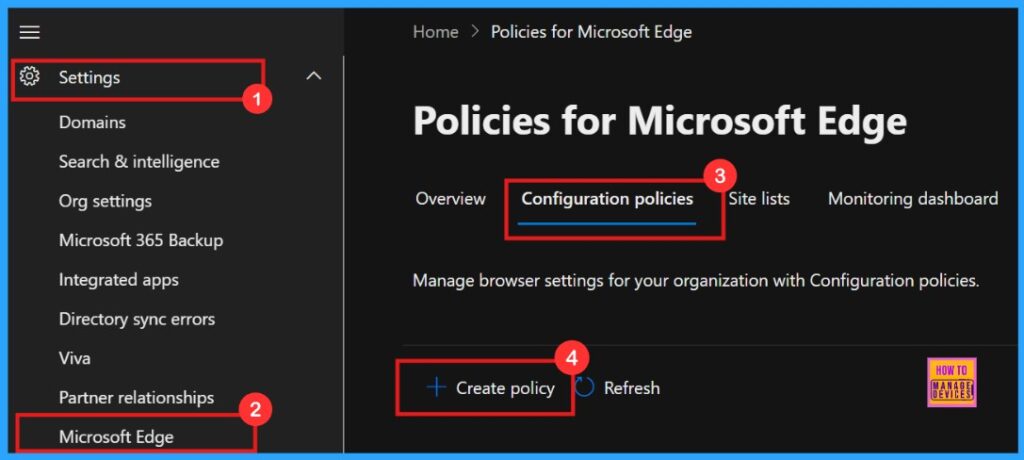
In this post we are going to explain the step-by-step guidance on deploying Only on Premises Implicit Sign in policy in Microsoft Edge through the Microsoft 365 Admin Center. For this, we need to log in to the Microsoft 365 Admin Center.
- Microsoft 365 Admin Center > Settings > Microsoft Edge > Configuration Policies > Create policy.
- Microsoft Adds Anti-Spoofing Update to Intune for On-Premises Comanaged Devices
- Application to Get Files Copied Between Azure On-Premises without a VPN Connection
- How to Set Up White Dark Theme Sign-In Experience Passkeys and Enhanced Authentication
Basics
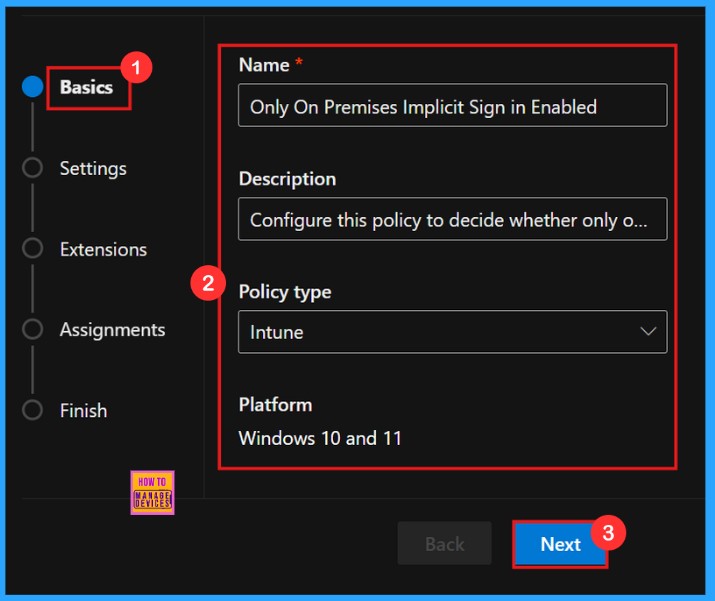
In a Policy configuration, it is important to assign a clear name to the policy and provide a detailed description for the policy. While description of the policy is not mandatory but, name of the policy is important.
| Name | Description | Policy Type | Platform |
|---|---|---|---|
| Only on Premises Implicit Sign in Enabled | Configure this policy to decide whether only on-premises accounts are enabled for implicit sign-in | Intune | Windows 10 and 11 |
Settings and Add Settings
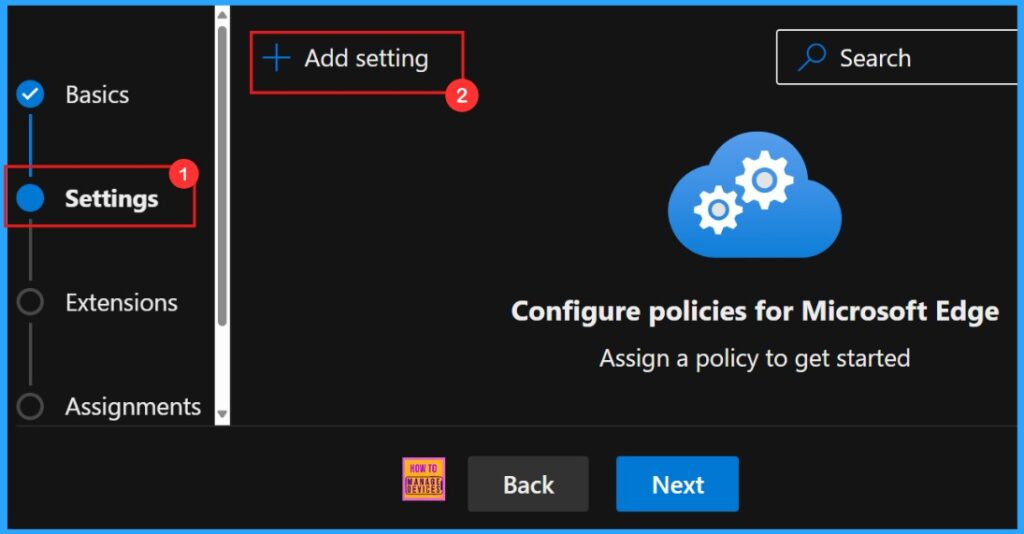
In Settings tab, we need to click “Add settings“. This is important to choose a configuration setting for deploying a policy. So we need to search for the policy we want to deploy from Additional settings by clicking +Add Settings.
Clicking Add Settings takes us to the Configure a Settings page. Here, we can find the policy by searching its name or find through categories. Each policy usually has two sections: one to change its Value setting and another with More details.
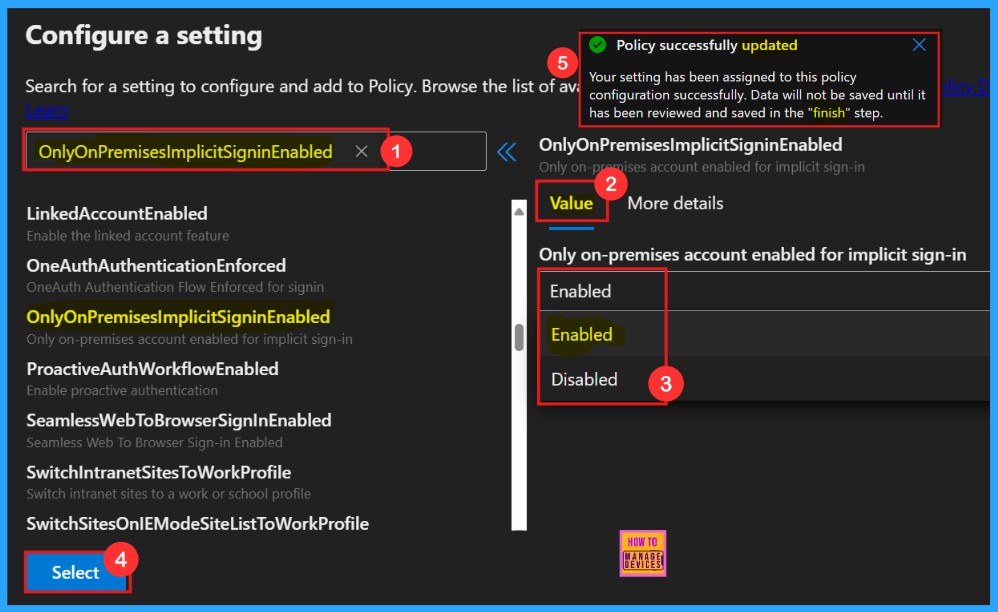
More Details
More details tab helps us to know more about the policy’s purpose and functionality. Click “More Details” to view its complete description, including technical specifications and implementation guidance. Here we need to understand the impotant informations about the policy.

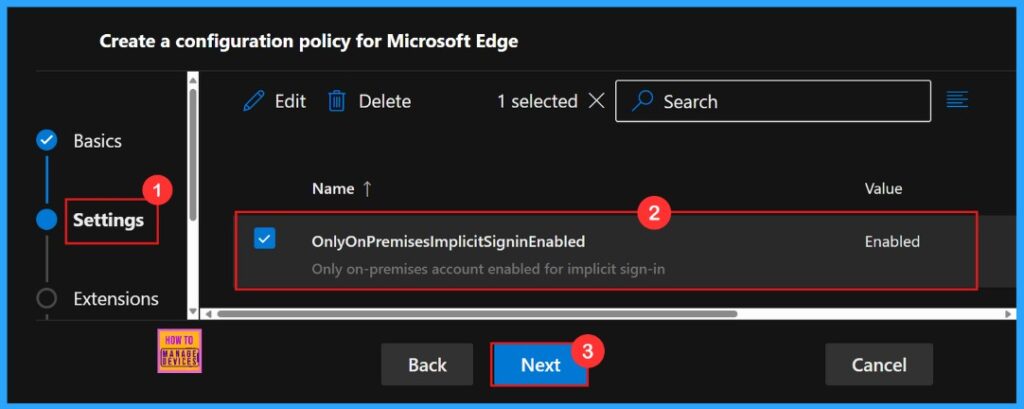
Settings
To enable the policy, just tick the check box next to its name in the list, then click Next to continue with the configuration process. This step confirms our choice and proceed in the policy setup workflow. If we wish we can edit or delete the policy settings here.
Extensions
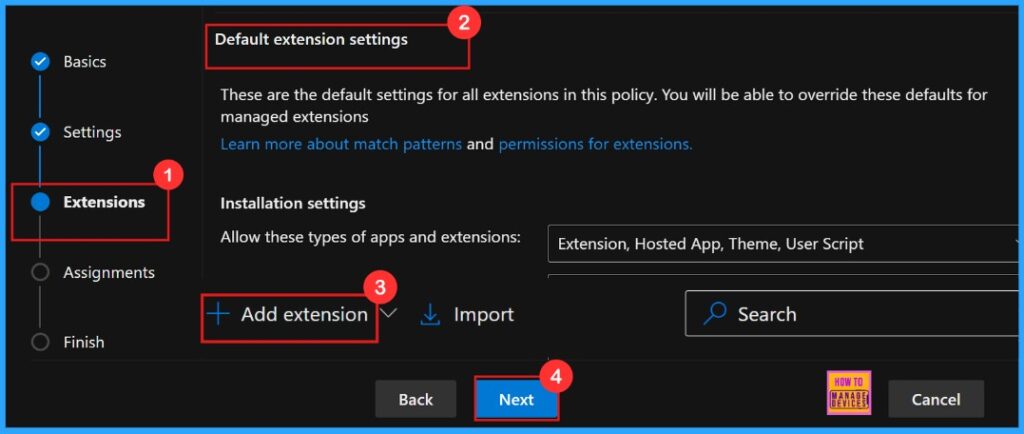
In the Extensions section, we can control how extensions customize through various policies, including installation settings and permissions, and URLs. If we need more features, click + Add extension to include them. If we don’t need any extensions to be added, we can proceed with default extension.
Assignments
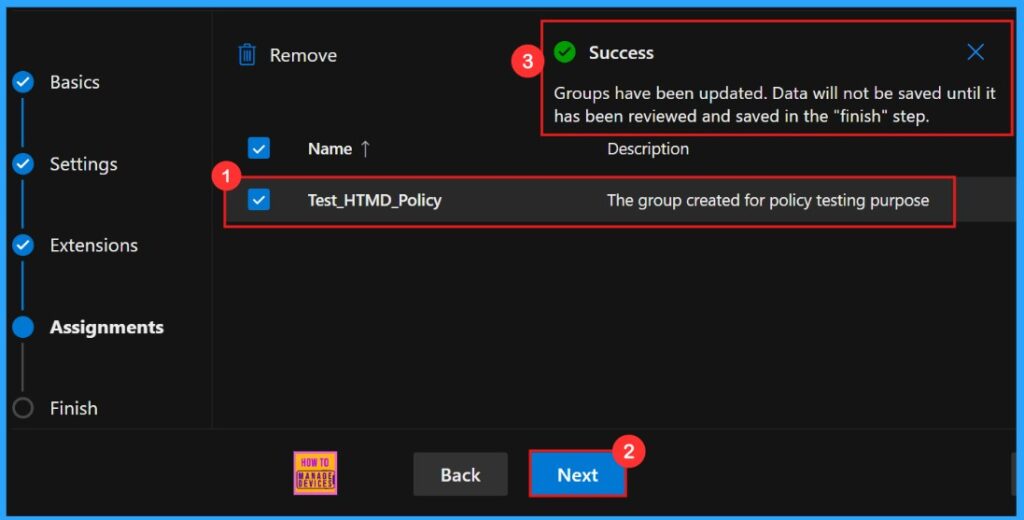
The next important step is Assignments, where we can choose to whom we assign this policy. To assign it, click + Select group and choose the appropriate group from the available Microsoft Entra groups.
- Click + Select group
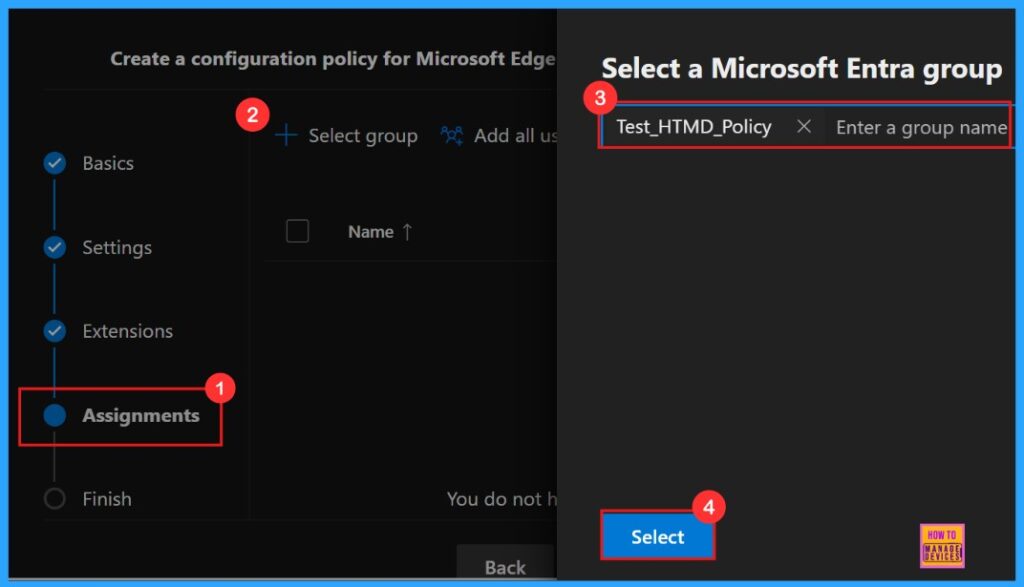
The Assignments tab is where we manage who gets our policy. So after the selection of the group from the Microsoft Entra groups, a pop-up notification will appear on the page confirming that the group has been updated. Here we assigned the group Test_HTMD_Policy.
Finish
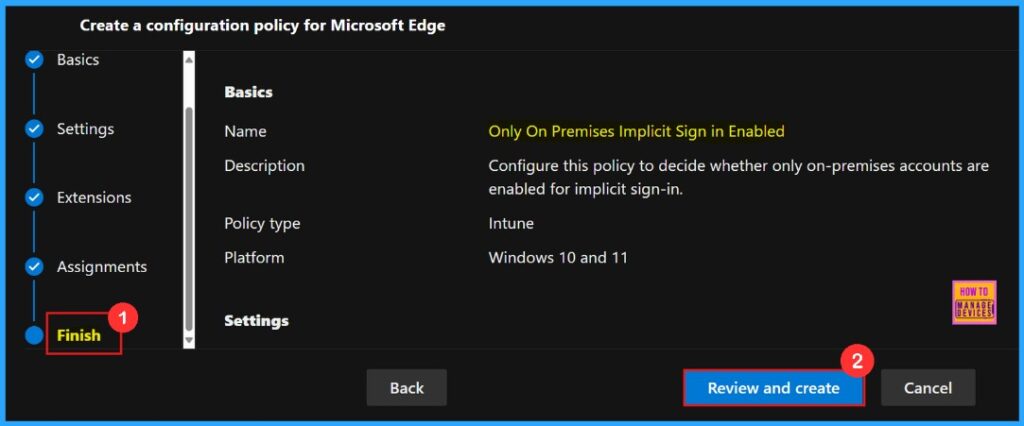
To finish setting up the policy, click Review + create to check all our settings before the policy going to be installed. The summary screen shows the options we have configured, like assignments, rules, and exceptions, which lets us do a final quality check. Once we are sure everything is okay, click Create.
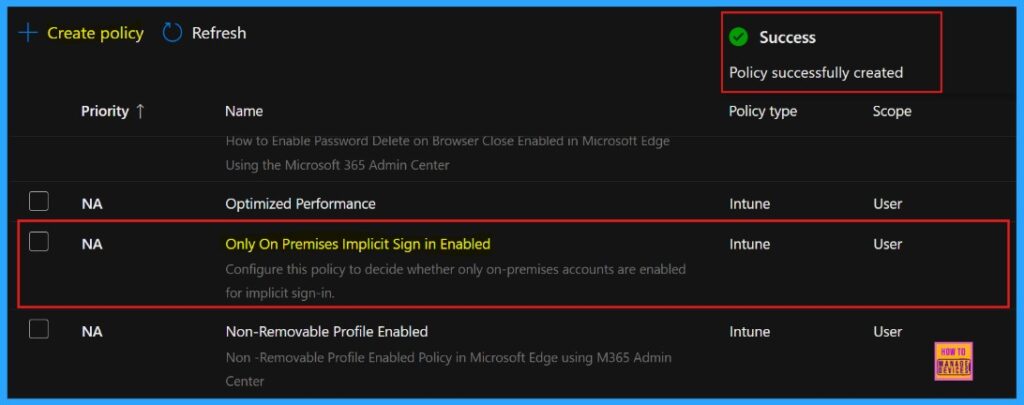
Here the portal will display a success message confirming that the policy has been created successfully. The new policy will then be visible in the Configuration Policies section.
- Settings> Microsoft Edge> Configuration Policies > Policy name.
We can get the policy in Intune portal also, because we choose the policy type as “Intune“
Client-Side Verification
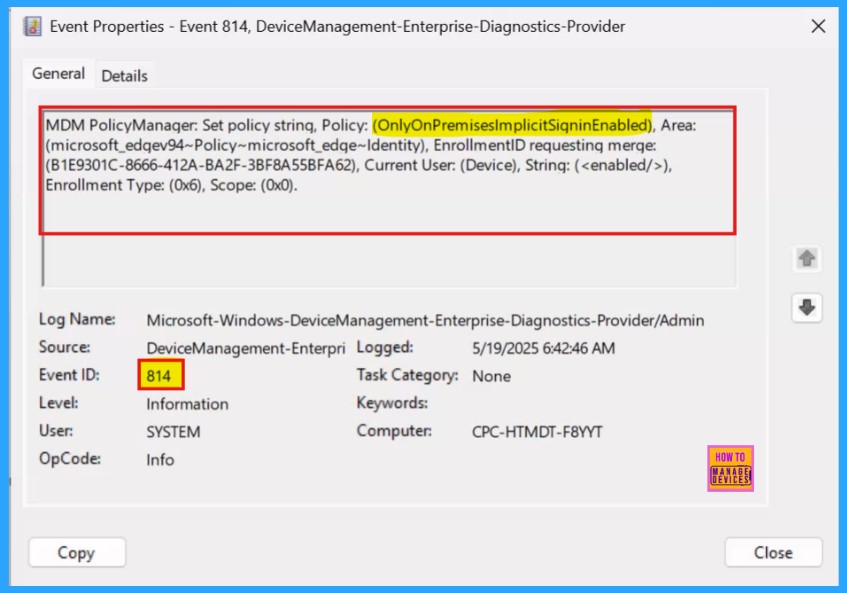
We can check the policy status using the Windows Event Viewer. Navigate to Applications and Services Logs > Microsoft > Windows > DeviceManagement-Enterprise-Diagnostics-Provider > Admin and look for Event ID 814.
MDM PolicyManager: Set policy string, Policy: (OnlyOnPremiseslmplicitSigninEnabled), Area: (microsoft_edqev94~Policy~microsoft_edqe~Identity), EnrollmentlD requestinq merqe: (B1E9301C-8666-412A-BA2F-3BF8A55BFA62), Current User: (Device), String: (), Enrollment Type: (0x6), Scope: (0x0).
Device and User Check-in Status
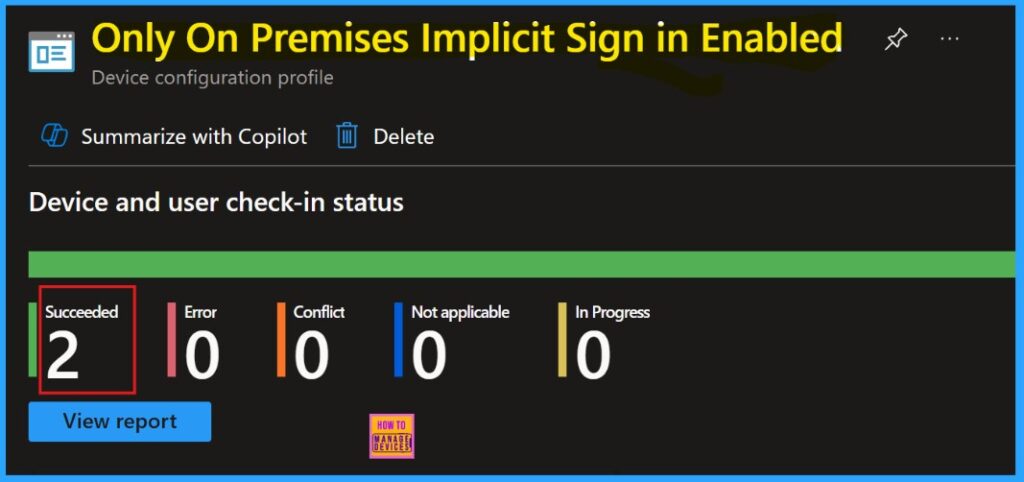
For making sure that the new policy is applied to devices, we need to do manual sync via the Company Portal. After syncing, the policy will be visible in Microsoft Intune. To verify its successful installation, check the policy’s status in the Intune Portal.
- Go to Devices > Configuration, locating your policy in the Policies tab, and confirming a succeeded (2) status.
Need Further Assistance or Have Technical Questions?
Join the LinkedIn Page and Telegram group to get the latest step-by-step guides and news updates. Join our Meetup Page to participate in User group meetings. Also, Join the WhatsApp Community to get the latest news on Microsoft Technologies. We are there on Reddit as well.
Author
Anoop C Nair has been Microsoft MVP for 10 consecutive years from 2015 onwards. He is a Workplace Solution Architect with more than 22+ years of experience in Workplace technologies. He is a Blogger, Speaker, and Local User Group Community leader. His primary focus is on Device Management technologies like SCCM and Intune. He writes about technologies like Intune, SCCM, Windows, Cloud PC, Windows, Entra, Microsoft Security, Career, etc.

