Let’s discuss How to Configure Do Not Track Policy in MS Edge Browser using M365 Admin Center. Microsoft Edge Provide users more control over their online privacy with Edge Policy. Using the Microsoft 365 admin center policies, you can configure this policy.
To control online privacy with edge browser, Microsoft designed a policy called Do Not Track. This policy allows users to avoid tracking of browser content. Do Not Track requests let the websites you visit know that you don’t want your browsing activity to be tracked.
Tracking refers to how websites, advertisers, and third-party content providers collect data about your online activity. It includes the pages you click, Links you click, Products you buy or review, etc. We have a post that is related to configuring Do Not Track policy using Intune.
In this blog post I will help you to know more about Enable or Disable Do Not Track Policy. This policy is designed to ensure the data privacy of users in Microsoft Edge Browser. You can configure the policy according to the preferences.
Table of Contents
What are the Benefits of Do Not Track Policy?
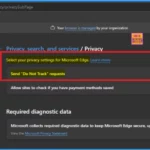
Do Not Track Policy provides many benefits for your organization. It enhances security by sends a request to websites asking them not to track your browsing activity.
1. Reduced Targeted Ads
2. Less Data Collection
3. Greater control
Do Not Track Policy in MS Edge Browser using M365 Admin Center
Enabling of Do Not Track Policy does not guarantee that websites will honor your request, as compliance depends on individual sites’ privacy policies. Any way this policy is benefical for organizations.
- Enable Disable Web Search Suggestions Policy in MS Edge Browser using M365 Admin Center
- Enable or Disable Super Drag Drop Policy in MS Edge Browser using M365 Admin Center
- How to Configure Generative AI Local Foundational Model Settings in MS Edge Browser using M365 Admin Center
Steps to Configure Do Not Track Policy
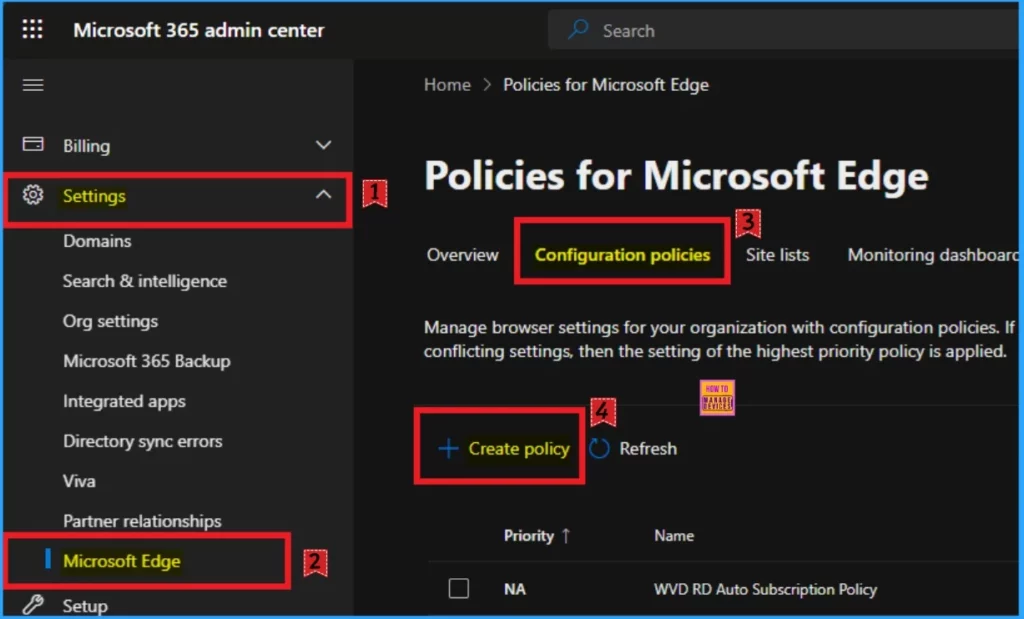
Do Not Track Policy can be easily configured with some simple steps. To start policy creation, Open the Microsoft 365 admin center. Go to Settings > Microsoft Edge > Configuration Policies > + New Policy.
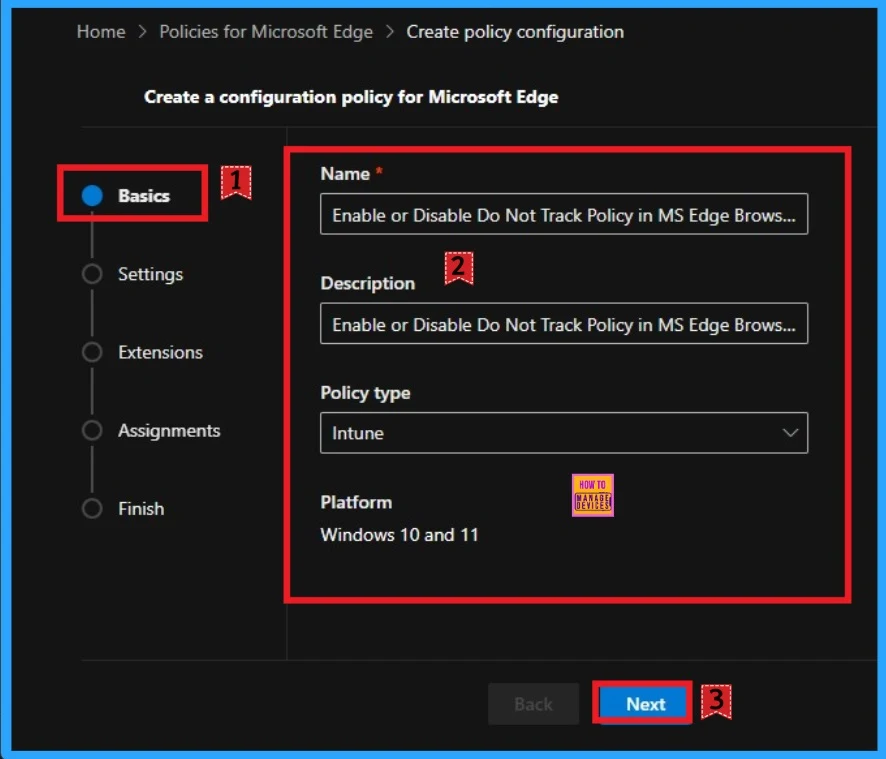
Basic Tab
On the Basic tab, You can add policy name and description according to the Policy. The Name field is very important and mandatory but Description is not necessary. The profile type and platform are automatically added. Click on the Next button.
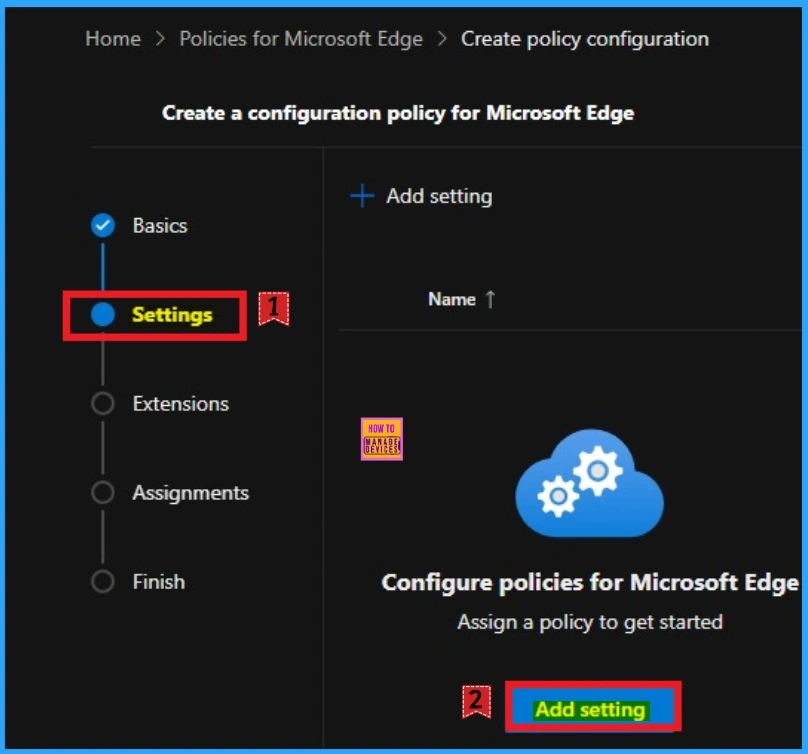
Settings Tab
The Settings tab is very crucial while creating policy. Click the Add setting option in the window below to add a setting. There are 2 options you can see to add settings. You can choose any of these.
From the Configure a setting page, you can select settings different categories which are showing. Here I choose Additional Settings and select Do Not Track Policy. There are 2 value options you can see on this policy. You can enable or disable this If you want to go with this policy.
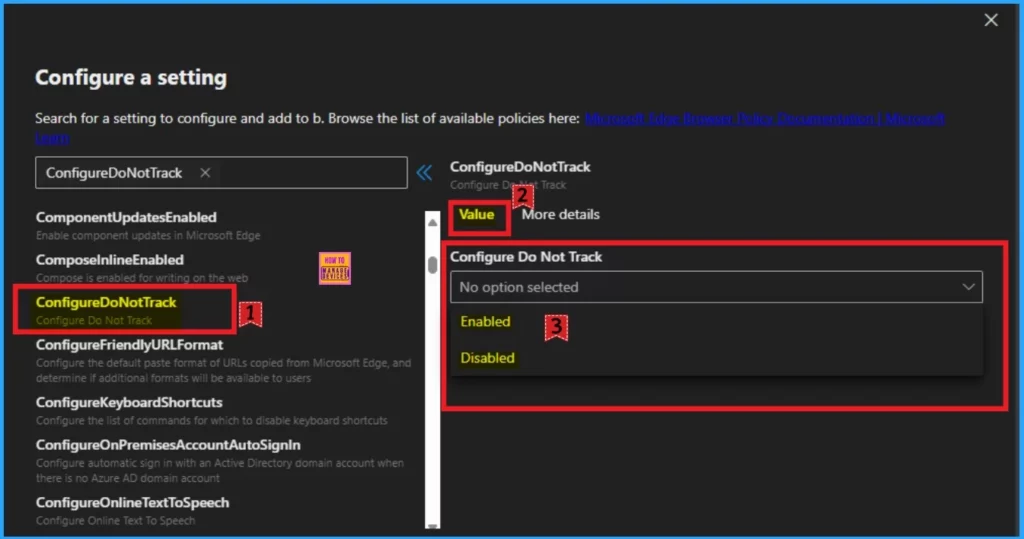
More Details
The More details tab shows the important informations of Do Not Track feature. Specify whether to send Do Not Track requests to websites that ask for tracking info. Do Not Track requests let the websites you visit know that you don’t want your browsing activity to be tracked. By default, Microsoft Edge doesn’t send Do Not Track requests, but users can turn on this feature to send them.
| Enable | Disable | Don’t Configure |
|---|---|---|
| If you enable this policy, Do Not Track requests are always sent to websites asking for tracking info. | If you disable this policy, requests are never sent. | If you don’t configure this policy, users can choose whether to send these requests. |

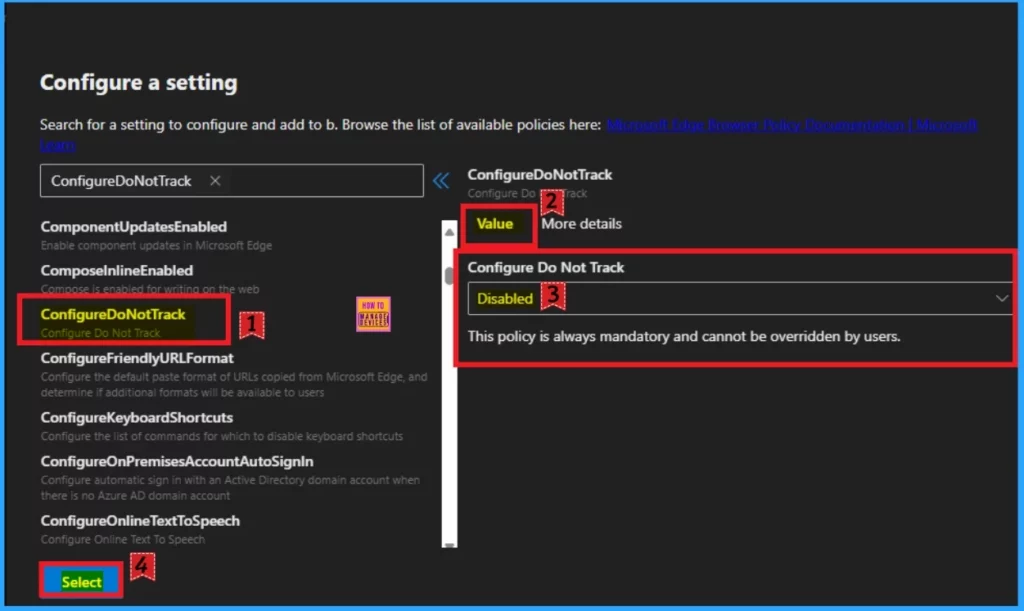
If you wasn’t to disable Do Not Track select Disable option from the below screenshot. After disabling Do Not Track requests are never sent. Click on the Select button and I got the success notification.
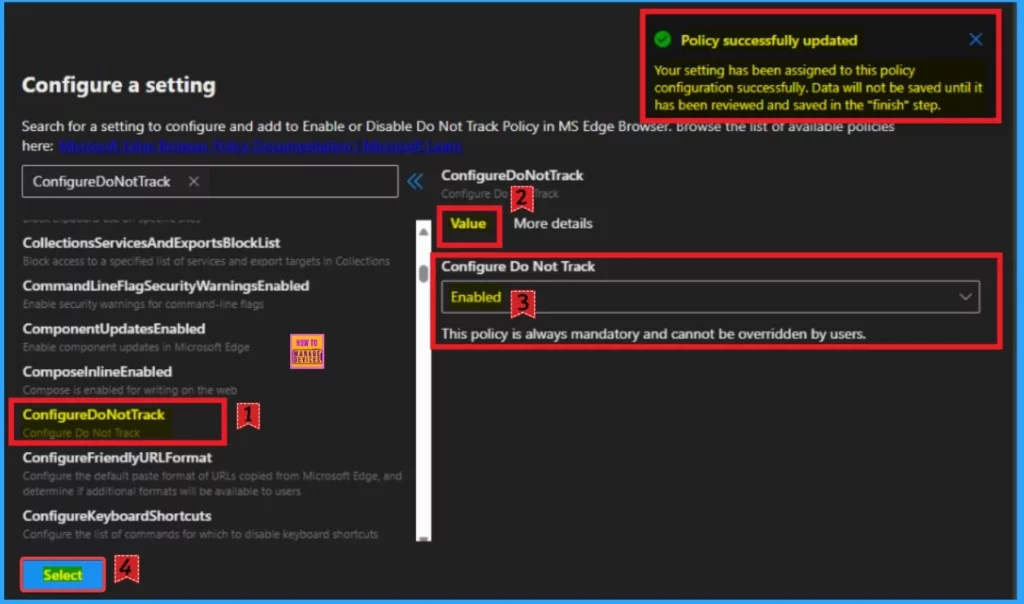
Here I would like to select Enable Do Non’t Track Policy. So I select Enable value then I click on the Select button and I got the success notification. Look at the below window.
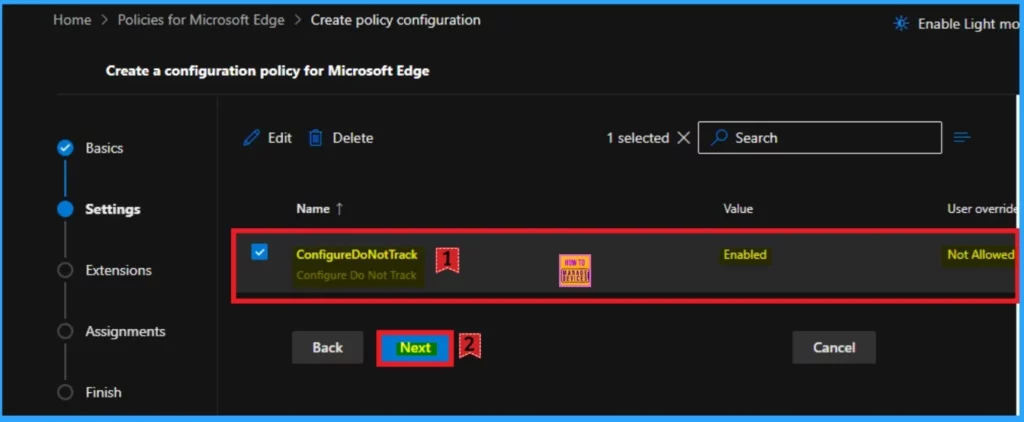
Then you can close the configuration settings window. Then the created policy shown on the Settings page. Click on the Next button. Look at the below window for more clarity.
Extensions
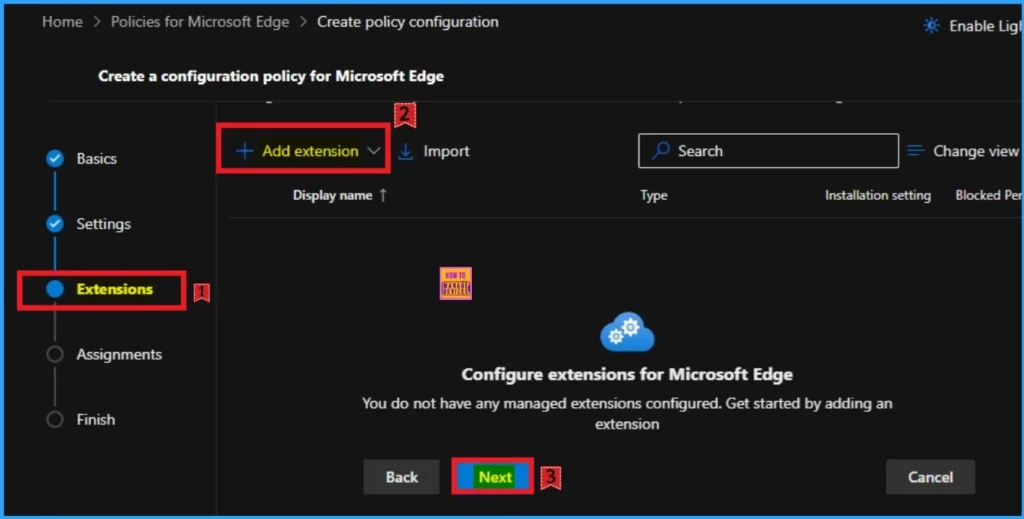
The extensions tab helps you add extensions like Edge Add-on, Sidebar app, External extension, etc. This is optional for your policy. You can add an extension. Here, I skip this section and click on the Next button.
Assignments Tab
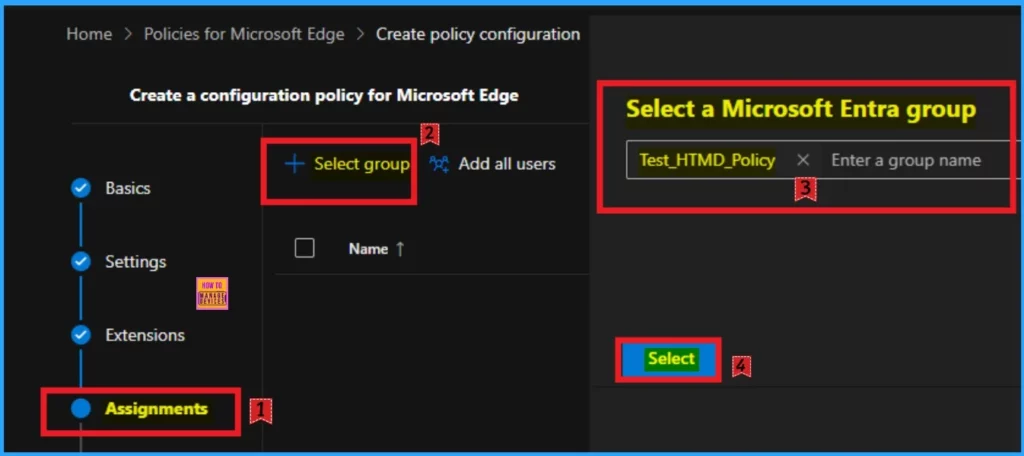
The assignments tab is the most important; it helps you select groups to add to the policy chosen. You can use different groups for this. Here I select 1 group. Click on the +Select group and select a Microsoft Entra group.
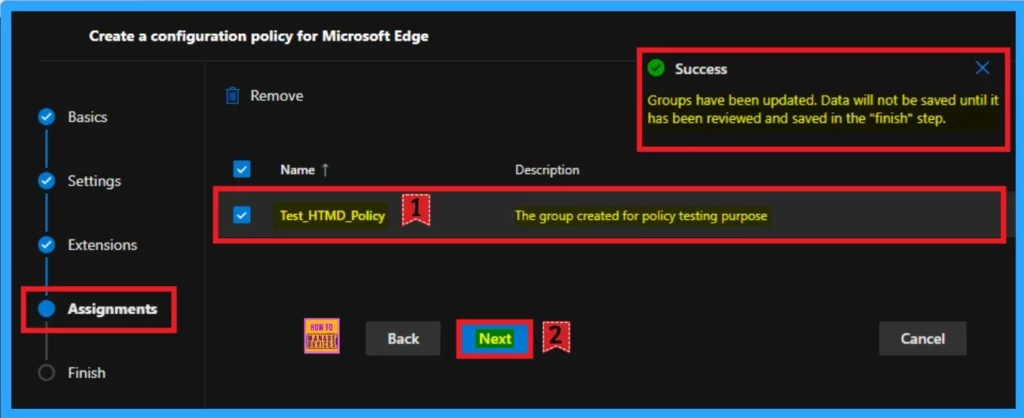
After the group selected you can see the success notification on the Portal. The Notification is like that the “Group have been updated. Data will not be saved until it has been reviewed and saved in the “finish” step. The selected group will shown on the Assignment tab. Click on the Next button.
Finish Tab
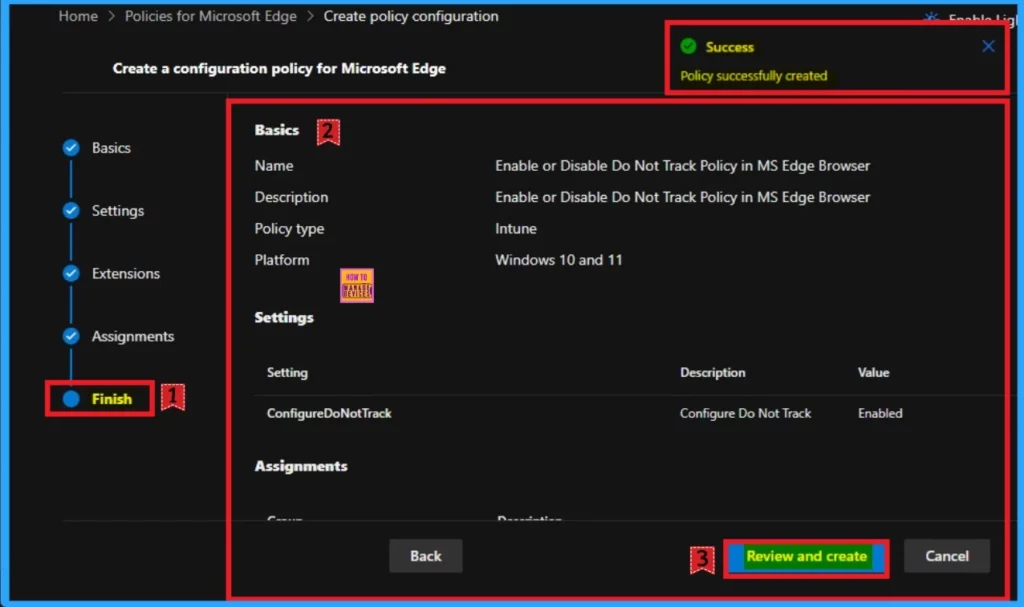
The Finish Tab shows all the information that is added on the previous tabs. Here, you can verify all the sections and bring changes quickly. After confirming the details, click on the Review and Create button. The screenshot below will help you. After that, you will receive a success notification on the portal.
Monitoring Status
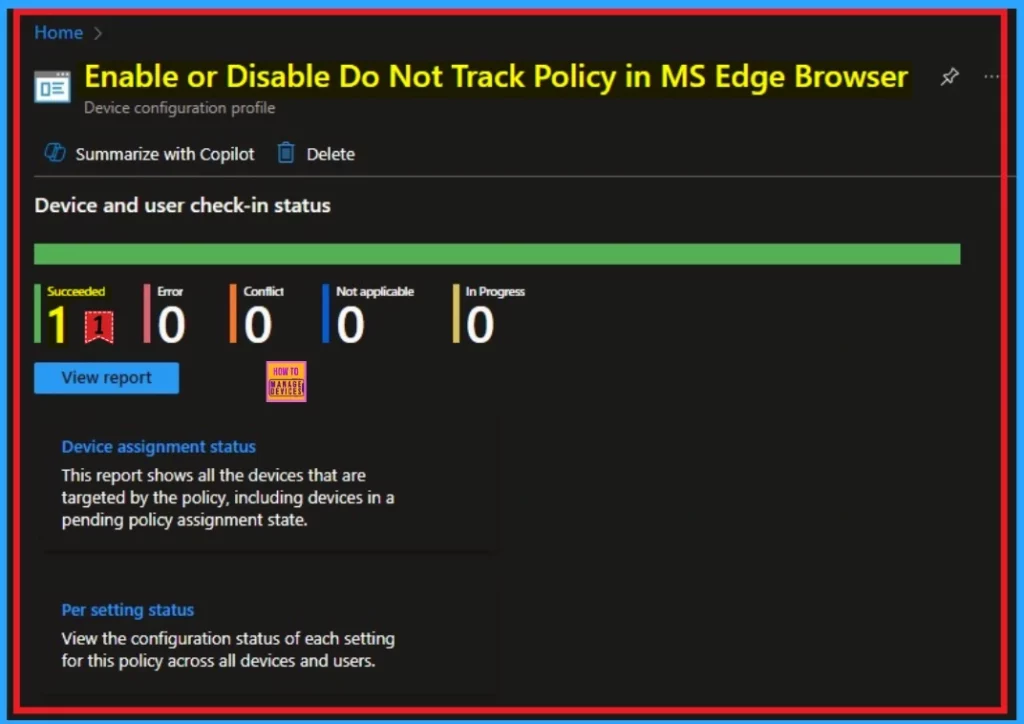
After getting the success result, you should sync the device on the Company Portal It helps you to easily completed deployment. After that you can check the Monitoring Status on the Intune Portal. The created policies Platform is Intune. That’s why we can check the monitoring status on Intune Portal.
Client Side Verification – Event Viewer
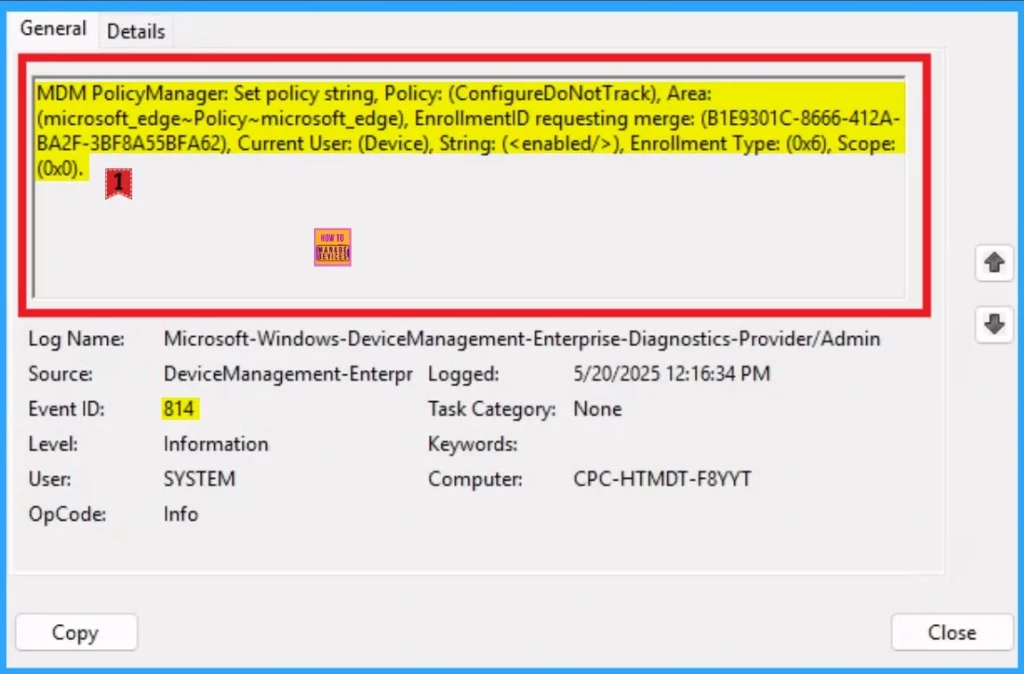
After completing the policy creation the policy you should complete the client side Verification. To do this, you can use Event Viewer. Follow the below list to access the event viewer. Click on the Start Menu, Search Event Viewer, and open it. On the User Account Control window, click on the Yes button. On the Event Viewer Navigate > Applications and Services Logs > Microsoft > Windows > DeviceManagement- Enterprise-Diagnostics-Provider > Admin.
- The success result can be seen on the Event ID 814
MDM PolicyManager: Set policy string, Policy: (ConfigureDoNotTrack), Area:
(microsoft_edge~Policy~microsoft_edge), EnrollmentID requesting merge: (B1E9301C-8666-412A-
BA2F-3BF8A55BFA62), Current User: (Device), String: (), Enrollment Type: (0x6), Scope:
(0x0).
End Result – Do Not Track
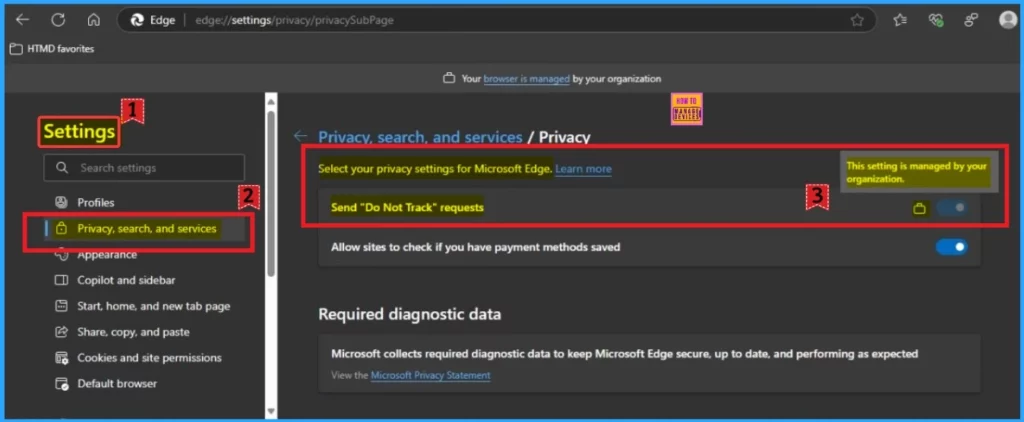
After enabling Do Not Track policy Do Not Track requests are always sent to websites asking for tracking info. You can easily check the policy is success or not on the Edge Settings on the Assigned device.
- Open the Edge Browser on the Assigned Device
- Go to Settings and More
- Select Settings > Privacy, search and services
- Open Privacy Settings
- Do Not Track feature is enabled here
- Here you can see Lock symbol near Send “Do Not Track” Request option. This setttings is managed by your organization.
Need Further Assistance or Have Technical Questions?
Join the LinkedIn Page and Telegram group to get the latest step-by-step guides and news updates. Join our Meetup Page to participate in User group meetings. Also, Join the WhatsApp Community to get the latest news on Microsoft Technologies. We are there on Reddit as well.
Author
Anoop C Nair has been Microsoft MVP from 2015 onwards for 10 consecutive years! He is a Workplace Solution Architect with more than 22+ years of experience in Workplace technologies. He is also a Blogger, Speaker, and leader of the Local User Group Community. His primary focus is on Device Management technologies like SCCM and Intune. He writes about technologies like Intune, SCCM, Windows, Cloud PC, Windows, Entra, Microsoft Security, Career, etc.
