Today we are discussing on a new topic for Allow or Block Prevents Files from Being Uploaded While in Application Guard Policy using Intune Policy. As we all know, Microsoft Intune allows different kinds of policies in settings catalog and for Microsoft browsers there are various types of policies available.
So here we are discussing how to prevent files from being uploaded whine in application Guard policy in Edge. Microsoft Edge has a security feature called Application Guard. It opens certain websites in a special, protected window to keep your Device safe from harmful sites.
In that case its very crusial when a important data of organizations are to be uploaded in any webside may it happens accidently but its very critical upload private or sensitive files to a unknown website. . To prevent that, IT admins can turn on a setting that blocks file uploads when Edge is running in this secure mode.
When this policy is turned on, it stops people from sending any files from their computer into that special secure browser window. So, even if a website tries to ask for a file, you won’t be able to upload anything from your PC. In concept we can lets look how Prevents Files from being Uploaded While in Application Guard Policy enabled or Disabld.
Table of Contents
What Happens When the “Prevent Files From Being Uploaded Policy” is Enabled in Microsoft Edge Application Guard?
If you enable this policy, users will not be able to upload files in Application Guard. ,users are blocked from uploading any files from their computer to websites. This is done to protect important or private information, so it doesn’t accidentally get sent to unsafe sites.
Prevents Files from Being Uploaded While in Application Guard Policy
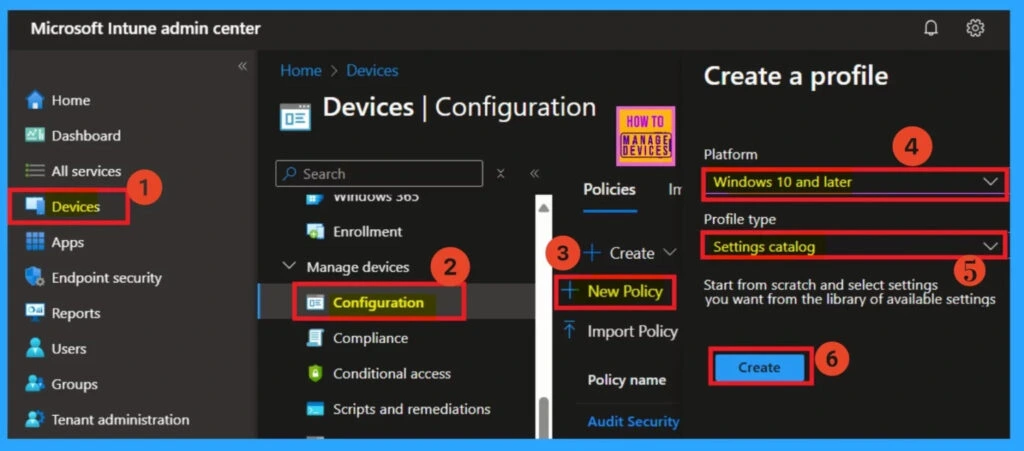
To deploy a policy in Intune, begin by sign in to the Microsoft Intune admin center. From the left menu, go to Devices > Configuration Policies, and select Create profile. In the “Create a Profile” window that appears, choose Windows 10 and later as the Platform, and set the Profile type to Settings Catalog.
- Once you’ve made these selections, click Create to continue with the configuration.
- Enable or Disable Efficiency Mode Policy in MS Edge Browser using M365 Admin Center
- How to Enable or Disable Media Autoplay for Websites in Microsoft Edge Browser
- Easy way to Block Pause Updates Ability in Windows Update for Business via Intune
Basics
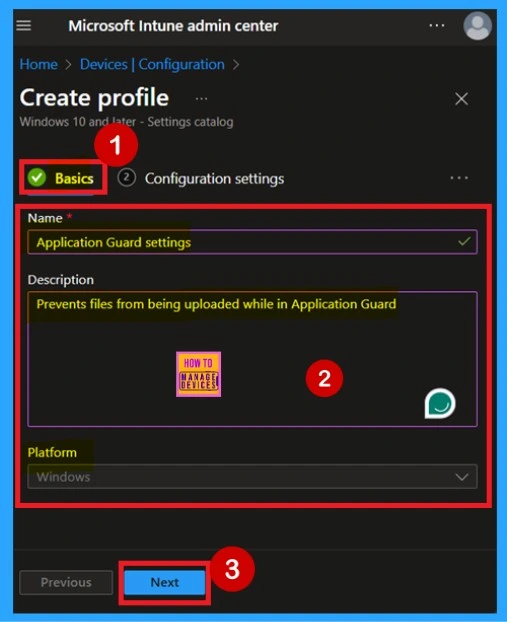
The Basics step plays a crucial role in setting up the policy. Here, you’ll need to fill in the essential information. Start by entering a Name for the policy and this is important for easily recognizing it later among other configuration profiles. It’s also helpful to add a Description to clarify the policy’s purpose.
- The Platform field will already set as Windows that based on your previous selection, so no changes are needed there.
- For this example, the policy has been named Application Guard Settings. Once you’ve entered the details, click Next to proceed.
Configuration Settings – Settings Picker
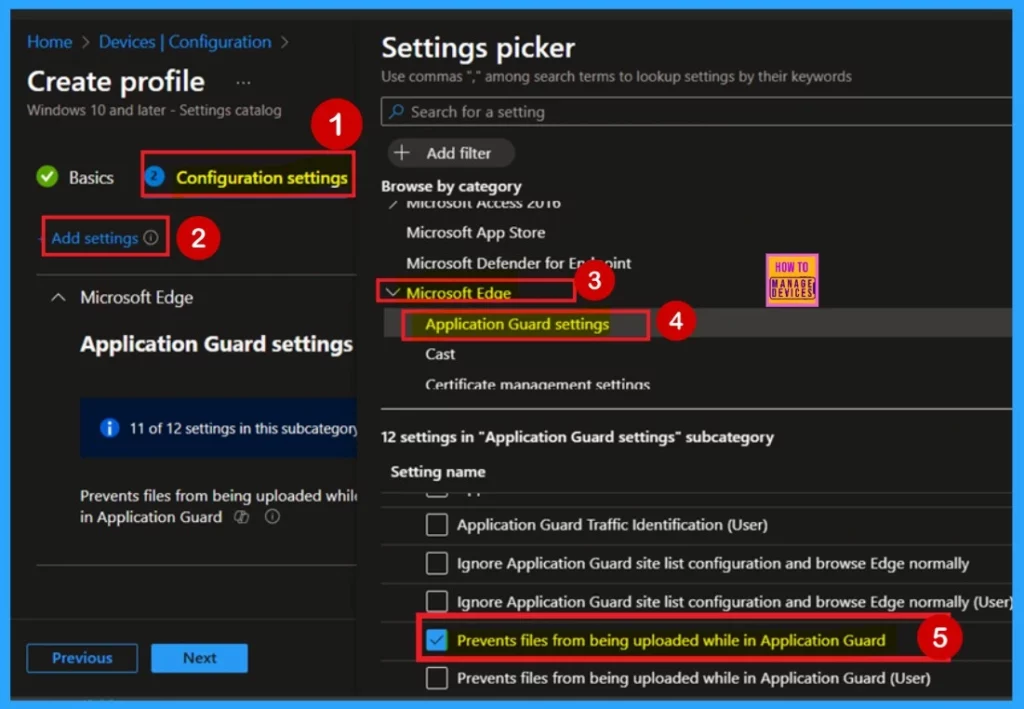
The Configuration settings step is critical for deploying the policy, especially for a policy deployment. In this step, you’ll see an “Add settings” option highlighted in blue labelled click on it. This opens a new window titled Settings picker. In the Settings picker, begin by selecting the Microsoft Edge category. When you expand Microsoft Edge, you’ll find a section called Application Guard Settings Click on it.
Within the Application Guard Setting section, you will see a list of available policy settings. From there, choose Prevents files from being uploaded while in Application Guard. This setting helps enforce control over file transfers when users are browsing in a protected environment.
Disabled
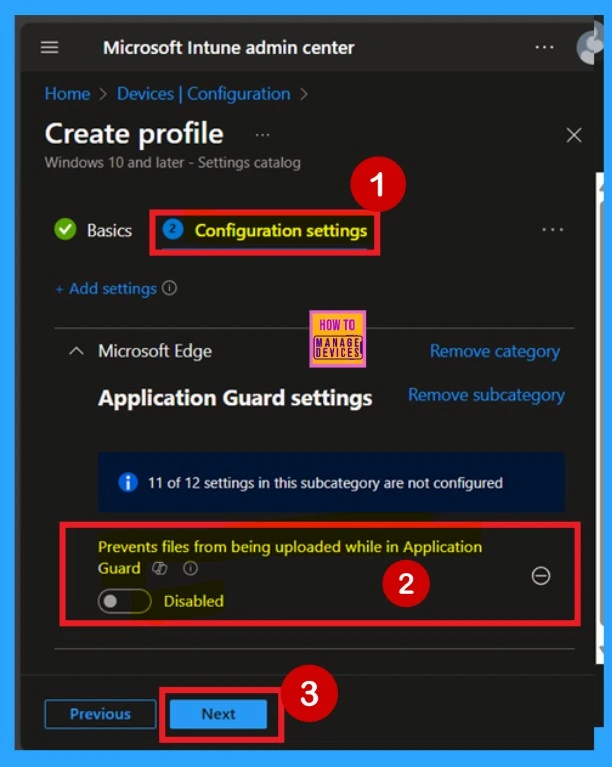
Basically the policy is Disabled by the Default. If you want to enable the policy you can easily do that. First you can see that the policy now in the configuration page and it is disabled and the toggled pan in grey color. If you want to continue the policy in a disable mode you can simply click on the Next button.
Enable the Policy
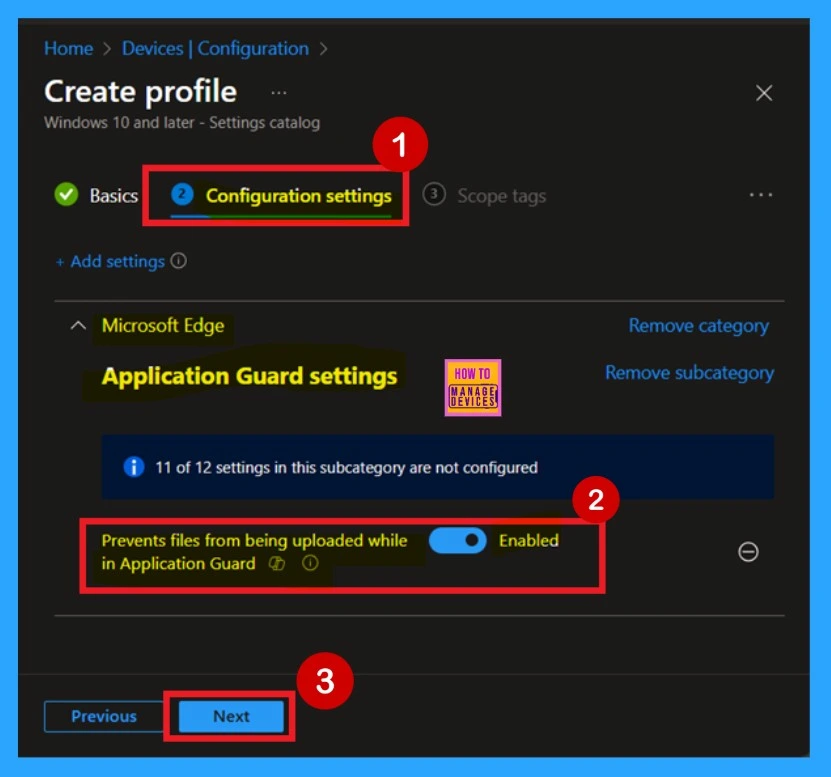
If you want to Enable the policy you can asily turn the disable mode to enable. For that you have to toggle the pane to the left to right so the policy toggled pane convert in greay to blue color and it now indicates Enabled. Thebnn you can click on the Next to Continue.
Scope Tags
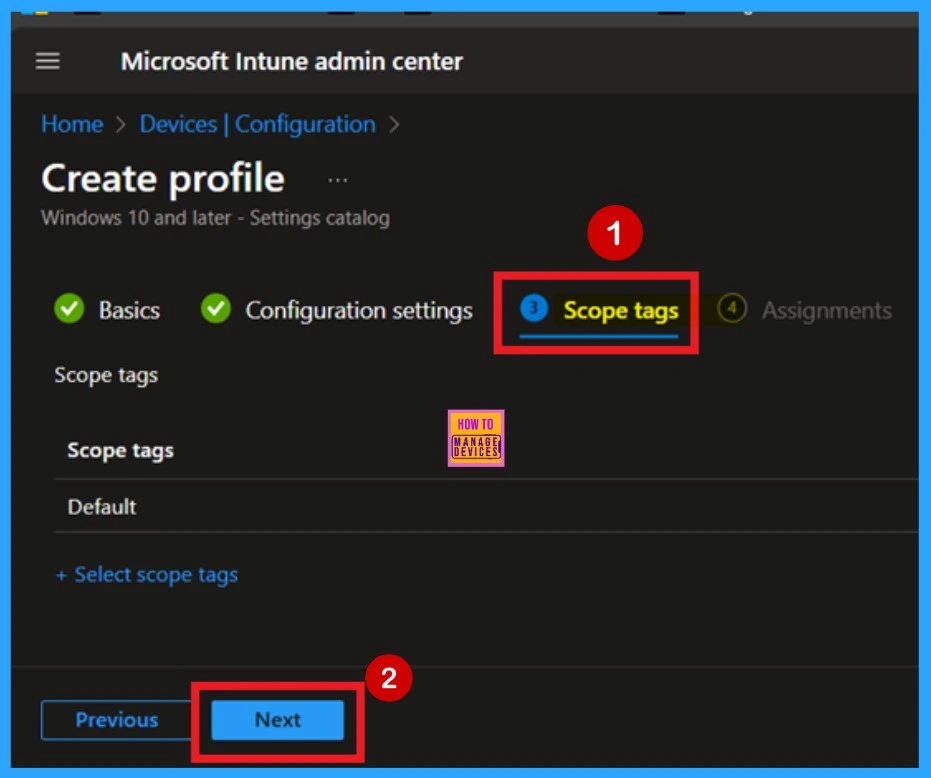
In Intune, the Scope Tags feature is used to manage and control access to policies more effectively. While scope tags can help with organization and, they are optional. If you don’t need to assign any scope tags, you can simply click Next to continue without adding them.
Assignments
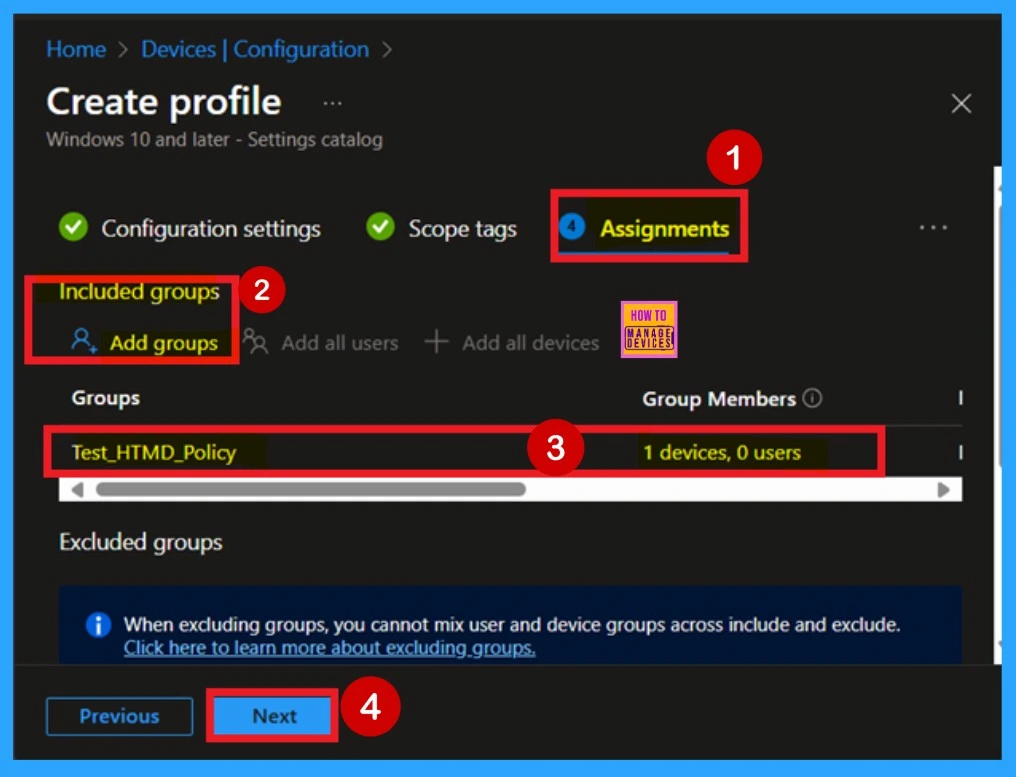
The next step is the Assignments tab, which is essential for deploying the policy. In this section, you’ll define the group that the policy should be applied to. Click Add Groups under the Include Groups section. A list of available groups will appear select the group you want to assign the policy to. After select your choices, click Next to continue.
Review + Create
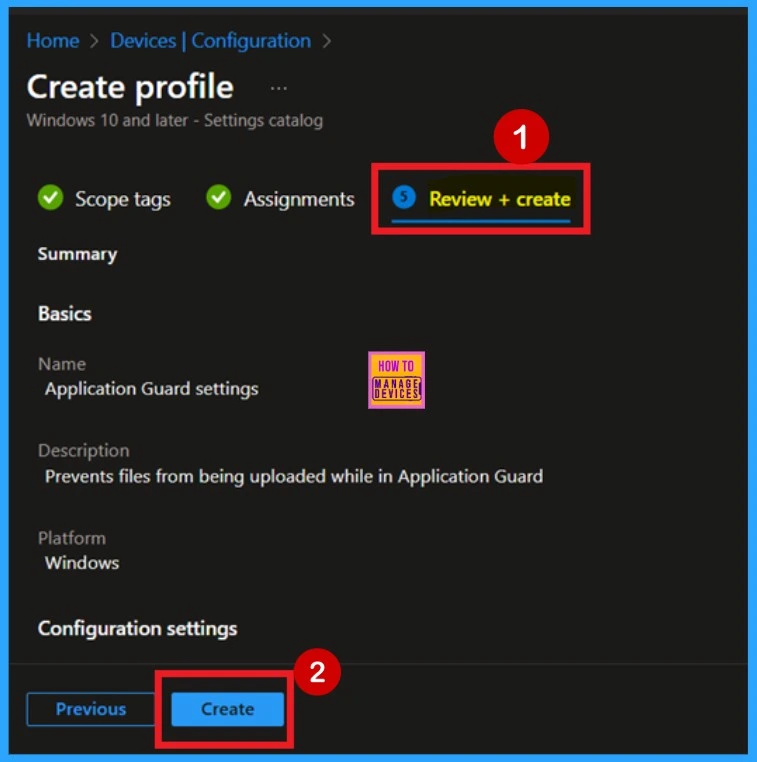
The final step in creating the policy is the Review + Create stage. Here, you’ll find a complete summary of all the configurations you’ve made, including the Basics, Configuration Settings, Assignments, and other details. Take a moment to carefully review everything. If you notice anything that needs changes, you can easily return to any previous step and make the necessary edits.
- Once you’re satisfied with the configuration, click the Create button.
- This is a crucial step, as it finalizes and deploys the policy.
- After clicking Create, you’ll see a confirmation notification indicating that the policy has been successfully created.
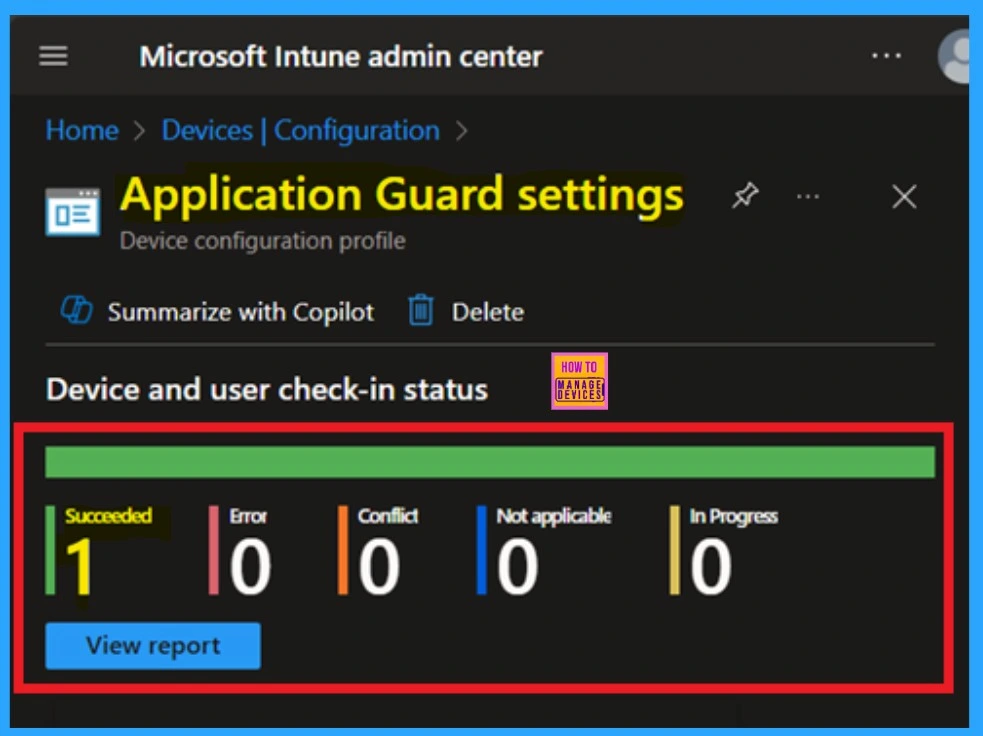
Device and User Check in Status
Once the policy is created, the next step is to ensure it has been successfully deployed. Normally, it may take up to 8 hours for the policy to apply automatically and this is the minimum time limit. However, you can speed up the process by manually syncing the device through the Company Portal.
- Sign in to the Microsoft Intune Admin Center.
- Go to Devices > Configuration Policies
- In the list of configuration policies, locate the one you just created.
- Click on the policy to open its details and view the deployment status.
Client-Side Verification
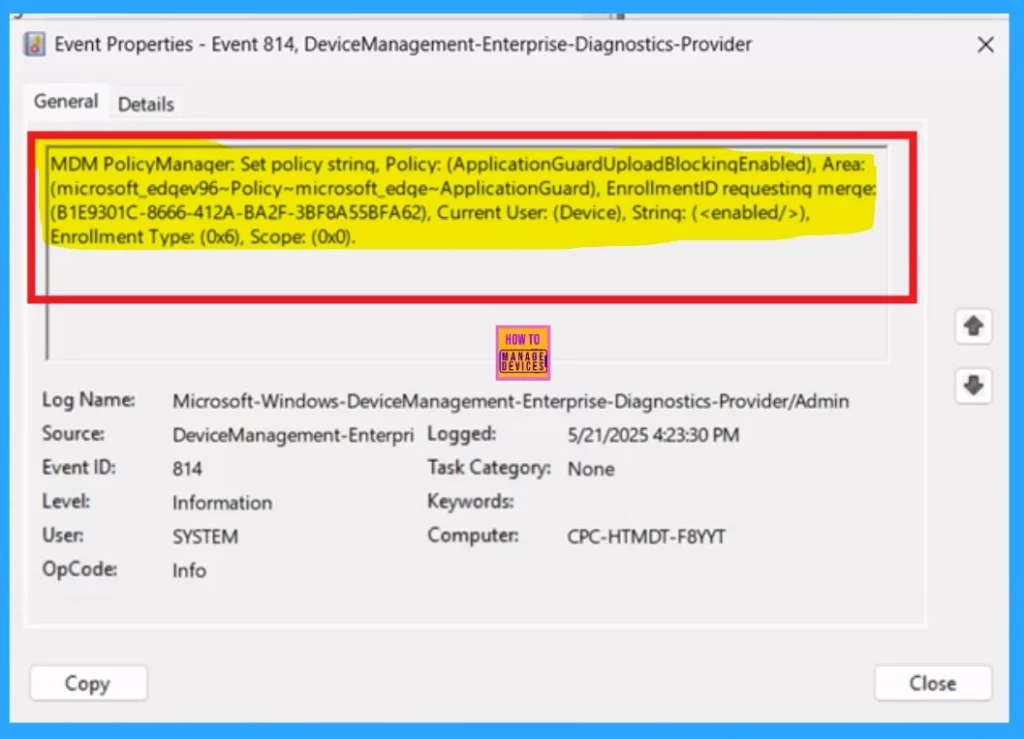
To verify the policy on the client side, open Event Viewer and navigate to Applications and Services Logs > Microsoft > Windows > Device Management > Enterprise Diagnostic Provider > Admin. Once you’re in the admin log, use the Filter Current Log option found in the right pane. This allows you to quickly locate specific results related to the policy, Mostly the results are on the 814 and 813 Event ID.
| Policy Details |
|---|
| MDM PolicyManaqer. Set policy string, Policy: (ApplicationGuardUploadBlockinqEnabled), Area: (microsoft_edqev96~Policy~microsoft_edqe~ApplicationGuard), EnrollmentID requestinq merqe: (B1E9301C-8666-412A-BA2F-3BF8A55BFA62), Current User: (Device), Strinq: (), Enrollment Type: (0x6), Scope: (0x0). |
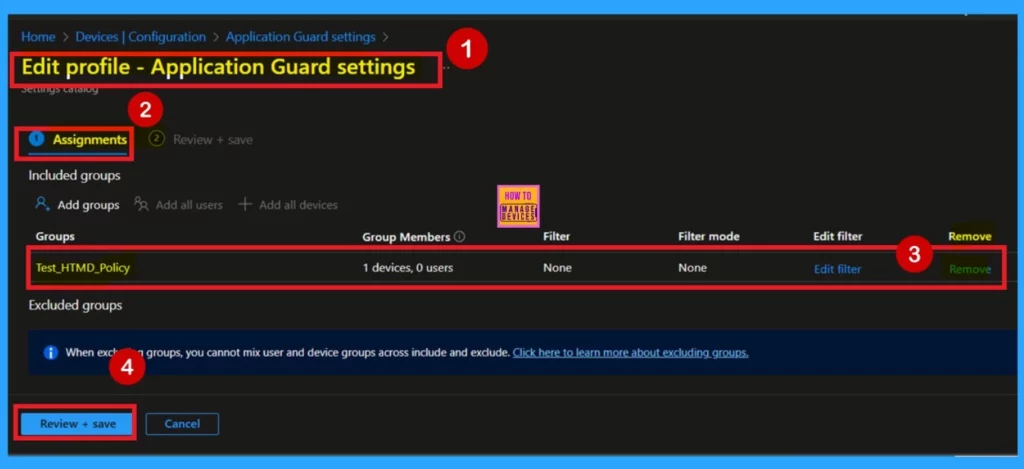
Remove Group of Allow or Block Prevents Files from Being Uploaded While in Application Guard Policy
If you want to remove a policy group, you can easily do that. For that search for the policy in the Device configuration then search for the policy you created (Allow or Block Prevents Files from Being Uploaded While in Application Guard). In the policy when you scroll down you will get the edit assignments option here you can get the remove option.
- After that click on the Review + Create.
Delete- Prevents Files from Being Uploaded While in Application Guard Policy
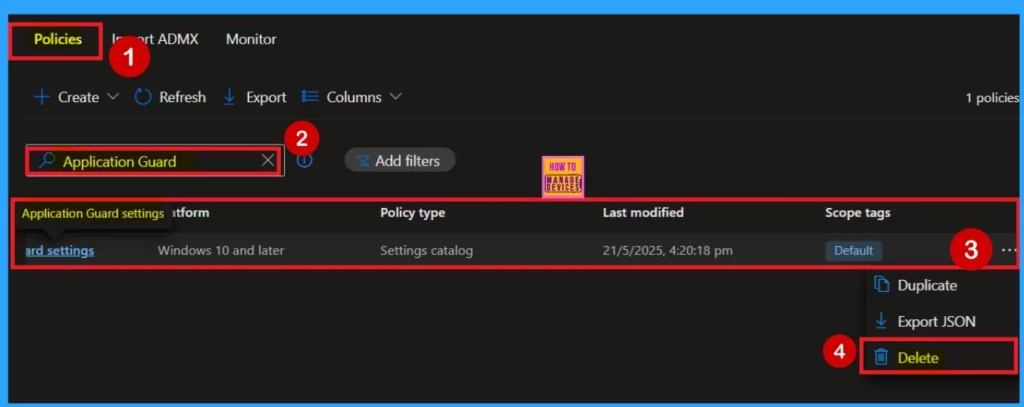
If you need to delete a policy, the process is simple. Start by navigating to the configuration section and searching for the policy name. Once you locate it, click the 3-dot menu icon next to the policy. This will allow a menu with three options: Duplicate, Export, and Delete.
- Select Delete, and the policy will be permanently removed.
Need Further Assistance or Have Technical Questions?
Join the LinkedIn Page and Telegram group to get the latest step-by-step guides and news updates. Join our Meetup Page to participate in User group meetings. Also, Join the WhatsApp Community to get the latest news on Microsoft Technologies. We are there on Reddit as well.
Author
Anoop C Nair has been Microsoft MVP for 10 consecutive years from 2015 onwards. He is a Workplace Solution Architect with more than 22+ years of experience in Workplace technologies. He is a Blogger, Speaker, and Local User Group Community leader. His primary focus is on Device Management technologies like SCCM and Intune. He writes about technologies like Intune, SCCM, Windows, Cloud PC, Windows, Entra, Microsoft Security, Career, etc.

