Let’s discuss how to Enable or Disable Media Autoplay for websites on Microsoft Edge. Media Autoplay helps you to block websites from automatic Media playback audio and video media to play automatically on sites opened in MS Edge browser.
As you know, Microsoft Edge is a popular browser that provides users with unique features. It is a proprietary cross-platform web browser created by Microsoft. Microsoft Edge replaces most of the other browsers with its capabilities.
Users may unintentionally allow access to unsafe websites and Media, affecting their privacy. These websites automatically play audiovisual content, which can affect concentration. Autoplay for Websites helps users allow permission for selected websites.
Users can avoid these media playback using Enable or Disable Media Autoplay for Websites in Microsoft Edge. Microsoft Edge is dedicated to ensuring users’ experience with this feature. This blog post will help you learn more about how to Enable or Disable Media Autoplay for Websites in Microsoft Edge.
Table of Contents
What are the Advantages of Media Autoplay on Microsoft Edge?
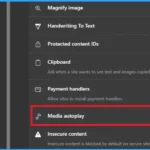
Media Autoplay is one of the best features on Microsoft Edge. This feature allows users to disable the autoplay of videos and audio of websites. The following are the advantages of Media Autoplay.
1. It helps users allow selected websites to media autoplay
2. Helps to concentrate on your work by disabling websites
3. It helps to enhance users experience
How to Enable or Disable Media Autoplay for Websites in Microsoft Edge
As I mentioned above, users can ensure safety on Edge browsers by allowing safe websites with these features. Different methods are available to enable and disable Media Autoplay for Websites in Microsoft Edge. The table below shows the methods.
| Different Methods to Enable Disable Media AutoPlay for Websites |
|---|
| Allow, Limit, or Block Media Autoplay for Websites in Microsoft Edge for Current User |
| Allow or Limit Media Autoplay for Websites in Microsoft Edge for All Users |
| Enable Disable Media Autoplay for Websites in Microsoft Edge Using Edge Flag |
| Enable Disable Media Autoplay for Websites in Microsoft Edge Using Registry Editor |
| GPO to Enable or Disable AutoPlay for All Drives in Windows 11 |
| Enable Disable AutoPlay in Windows 11 using Intune |
- Add Remove Web Pages from Favorites Bar in Microsoft Edge Browser and Set Visibility Registry Method
- Allow or Block Push Notifications for Sites in Microsoft Edge
- Translate Real-Time Video with Microsoft Edge for Business
- Method to Start Close Read Aloud in Microsoft Edge
Allow, Limit, or Block Media Autoplay for Websites in Microsoft Edge for Current User
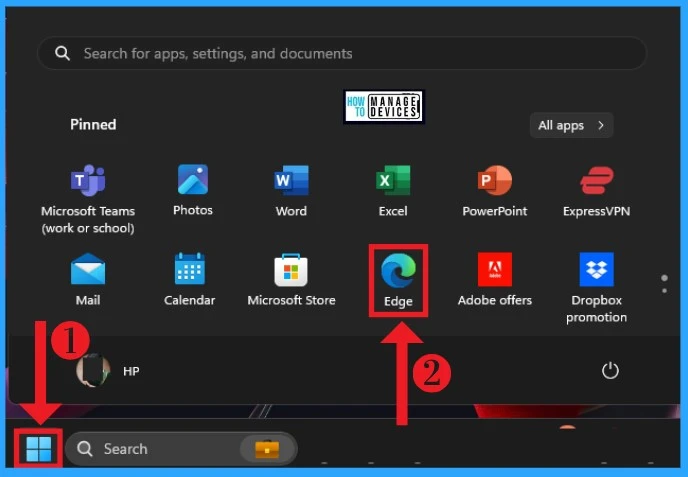
Microsoft Edge allows users to allow, limit, or block Media Autoplay for Websites in Microsoft Edge for the Current User. To do this, Open Microsoft Edge from the Start Menu.
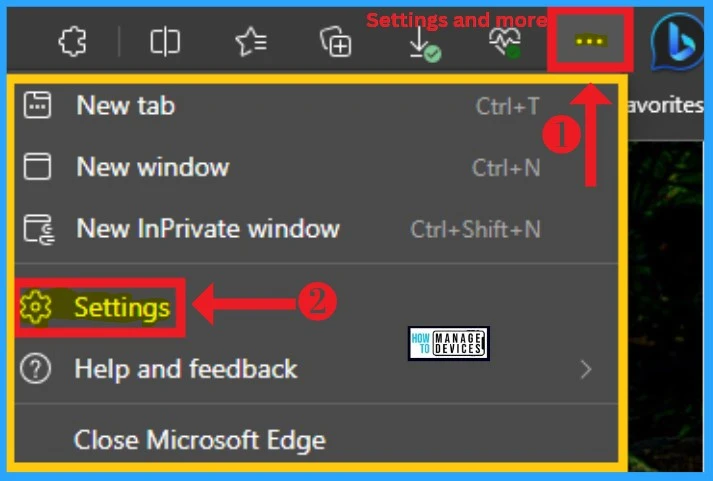
In the Edge browser, you can see the three-dot option(Settings and More) at the top right side. You can easily access Microsoft Edge’s settings from Settings and More. Click on the three-dot option and select Settings.
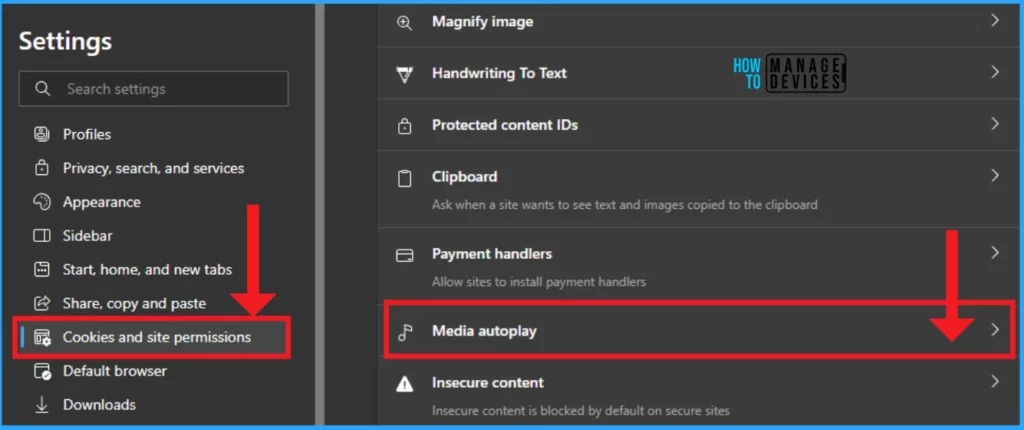
The Settings window shows different Microsoft Edge settings that can be easily managed. On the left side of Microsoft Edge, select Cookies and Site permissions and then select Media Autoplay.
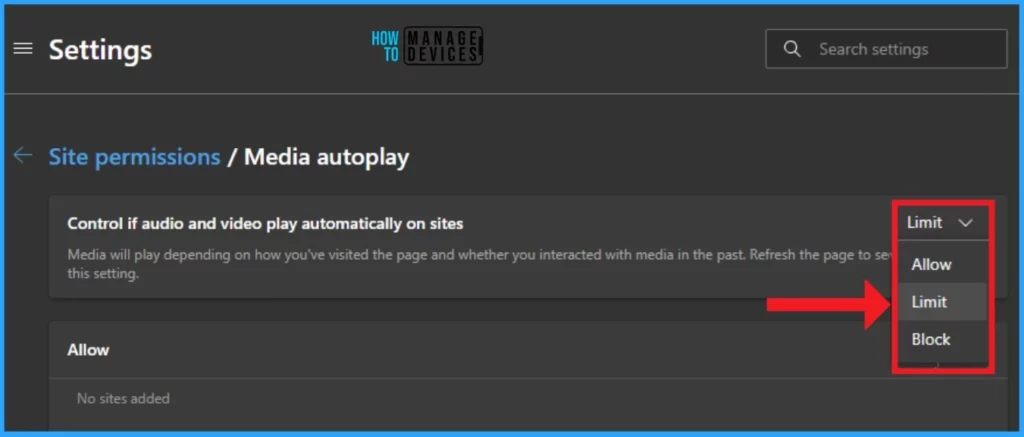
The Media autoplay window allows you to control whether audio and video play automatically on sites. Click on the arrow near this feature to expand options such as Allow, Limit, and Block. You can select these options according to your preferences.
- Guide to Enable Efficiency Mode in Microsoft Edge using Intune
- Easy to Change Display Language in Microsoft Edge
- Enable Disable Copilot Rewrite Feature on Microsoft Edge
Allow or Limit Media Autoplay for Websites in Microsoft Edge for All Users
Users can easily Allow or Limit Media Autoplay for Websites in Microsoft Edge for All Users through Edge Settings.
- Microsoft Edge > Settings and more > Settings > Cookies and site permissions > Media autoplay
- Select the Allow option and and click on the Add option
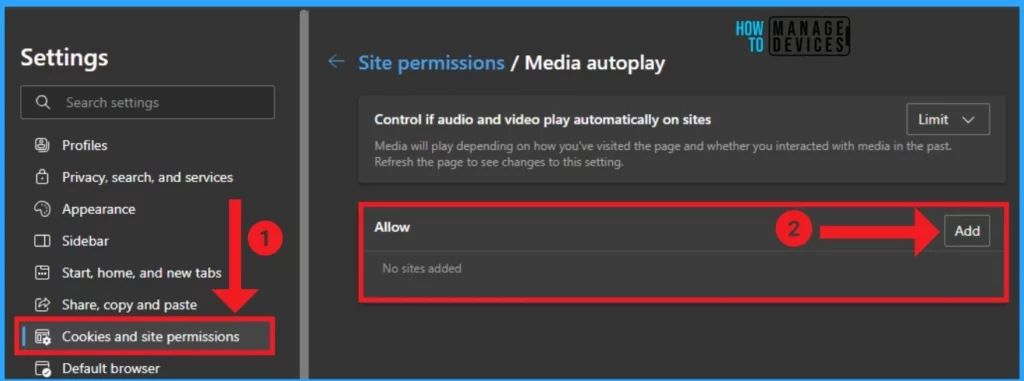
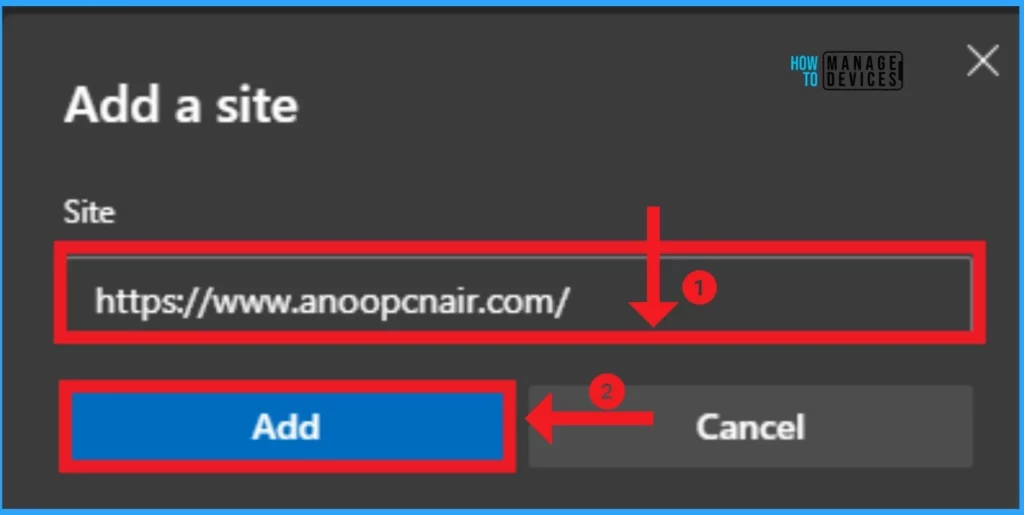
The Add option helps you to add your preferred websites. Paste the URL in the Add a site window and click the Add button.
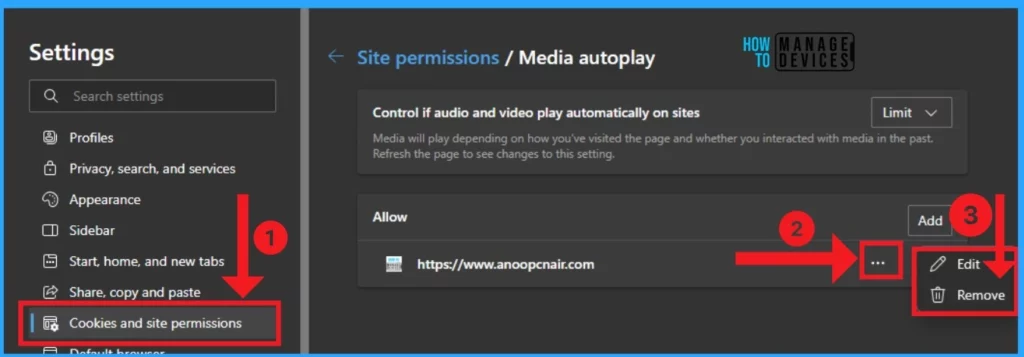
After adding the website link, you can see the 3 dot option on the right side of the website link. Click on the 3 dot option to see the Edit and Remove options. You can click on the Remove option to remove the website, and Edit option helps to edit the website URL.
Enable Disable Media Autoplay Using Edge Flags
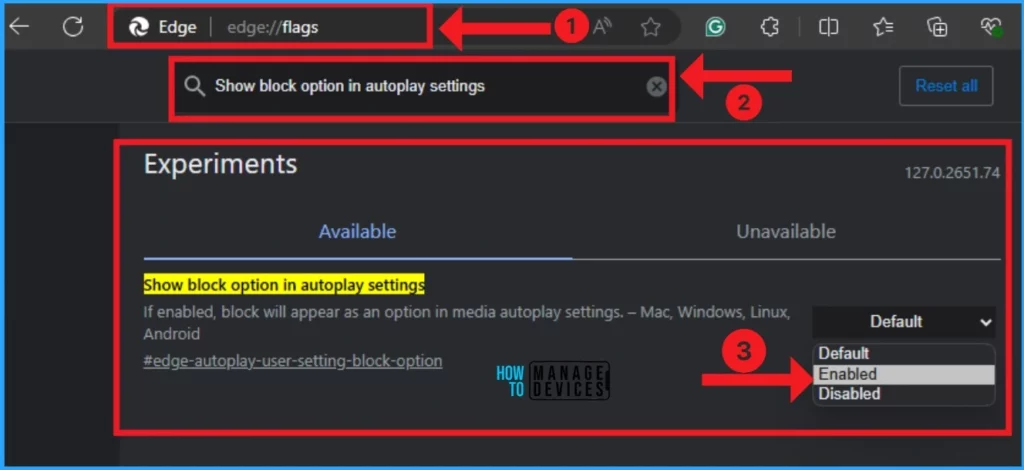
You can easily enable disable Media Autoplay using Edge Flags. As you know that Edge flags are experimental features that allow you to customize and enhance your browsing experience.
- Launch Microsoft Edge and open the edge://flags page.
- Find the “Show block option in autoplay settings” flag and set it to Enabled.
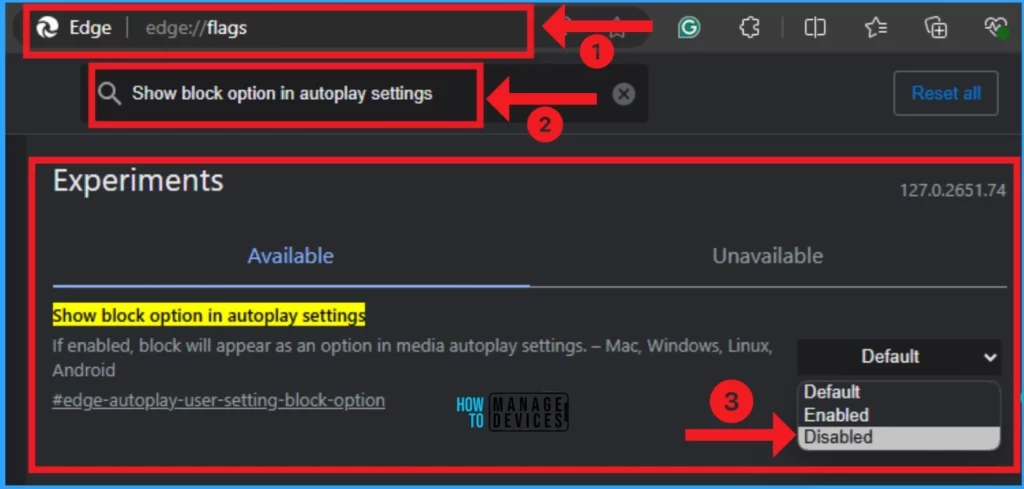
You can easily disable autoplay using Edge flags. To do this, Launch Microsoft Edge and open the edge://flags page. Find the “Show block option in autoplay settings” flag and set it to Disable.
Enable Disable Media Autoplay for Websites in Microsoft Edge Using Registry Editor
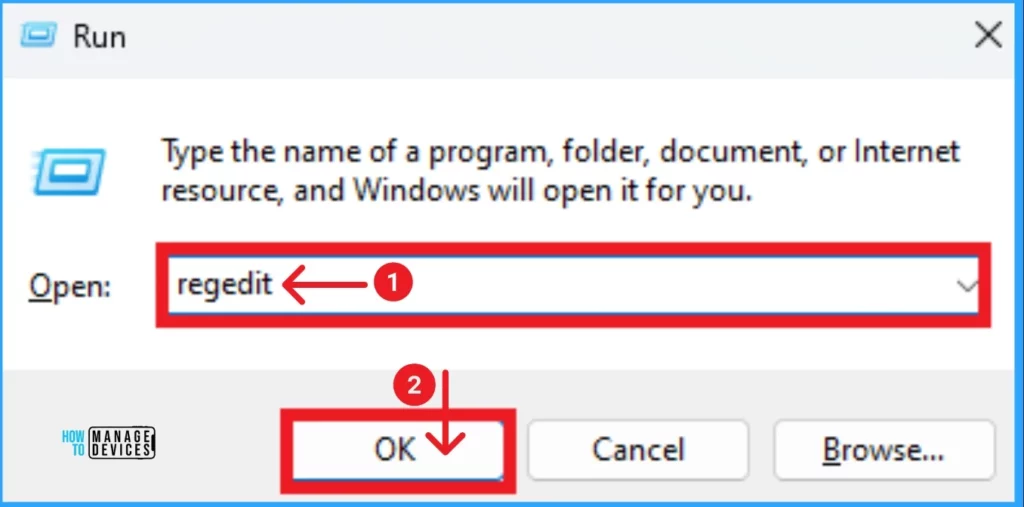
Registry Editor also helps to Enable Disable Autoplay for Websites in Microsoft Edge. You can access Registry Editor using Run command.
- Press Win +R on your PC.
- Type regedit in the text box and click on the OK button.
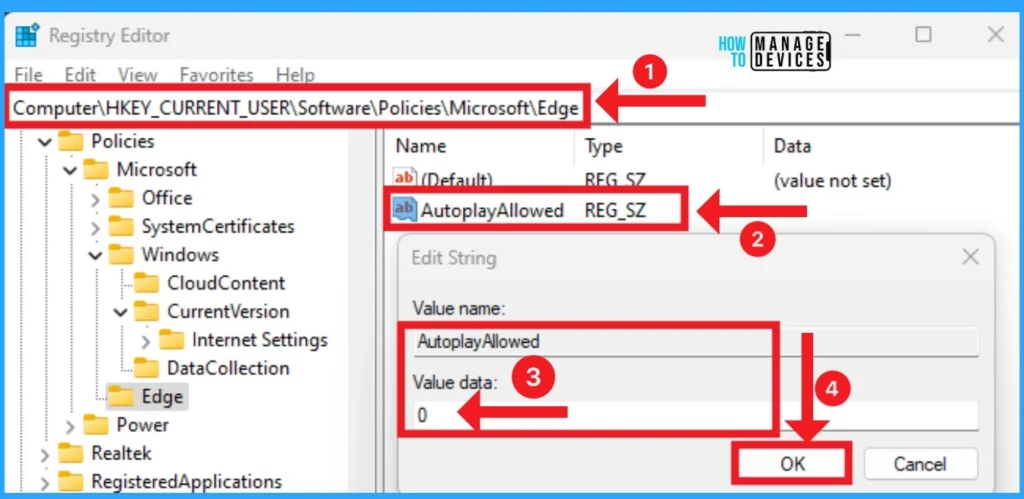
After that, you can see the Registry Editor window. You can access Screen Saver by using the path like Computer\HKEY_CURRENT_USER\Software\Policies\Microsoft\Edge. Double Click on the AutoplayAllowed and edit the value data as 1 to enable this feature.
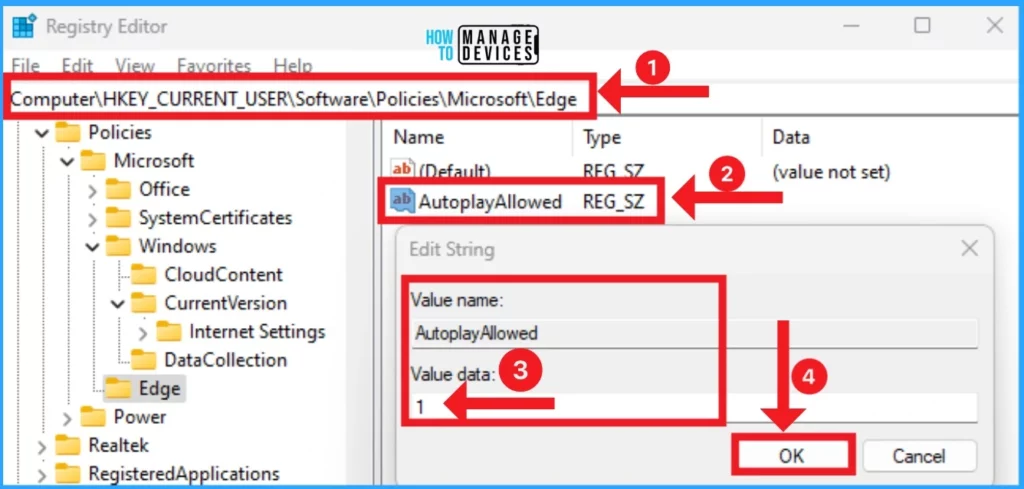
To disable Autoplay using the path like Computer\HKEY_CURRENT_USER\Software\Policies\Microsoft\Edge. Double Click on the AutoplayAllowed and edit the value data as 0 to disable this feature.
GPO to Enable or Disable AutoPlay for All Drives in Windows 11
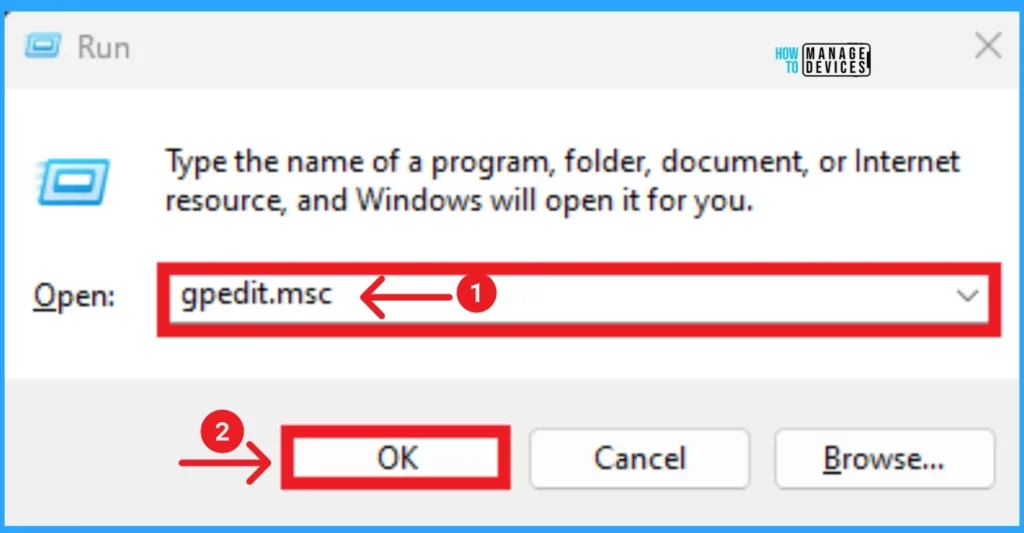
You can easily enable disable autoplay for all drives in Windows 11 using GPO also. To do this open Group Policy Editor using run command.
- Press Win +R on your PC
- Type gpedit.msc in the text box and click on the OK button.
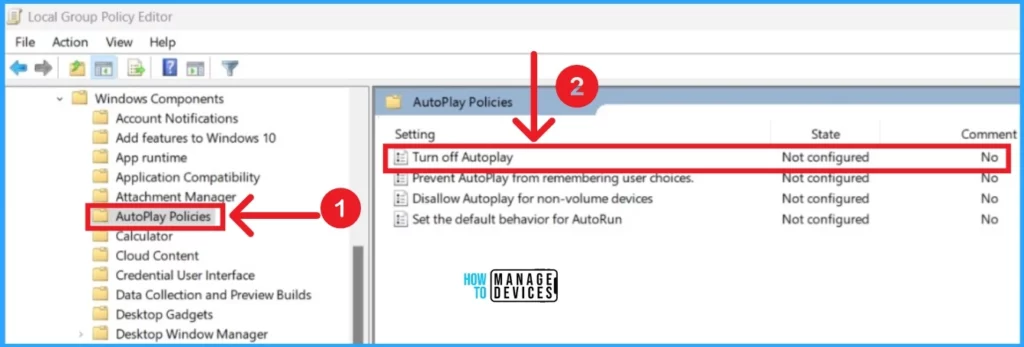
In the Group Policy editor, you can easily enable or disable AutoPlay for drives. To do this, navigate to the policy location shown below.
- Computer Configuration\Administrative Templates\Windows Components\AutoPlay Policies
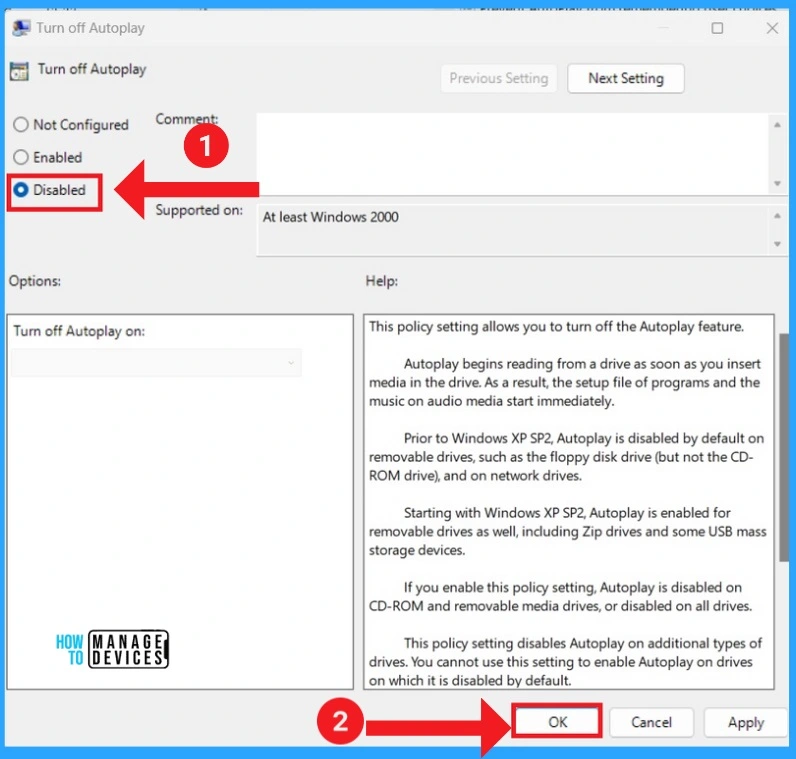
- Click on the Turn Off Autoplay option on the Group Policy Editor
If you want to Enable the AutoPlay option for drives, click on the Enable option, select All drives and then click on the OK button.
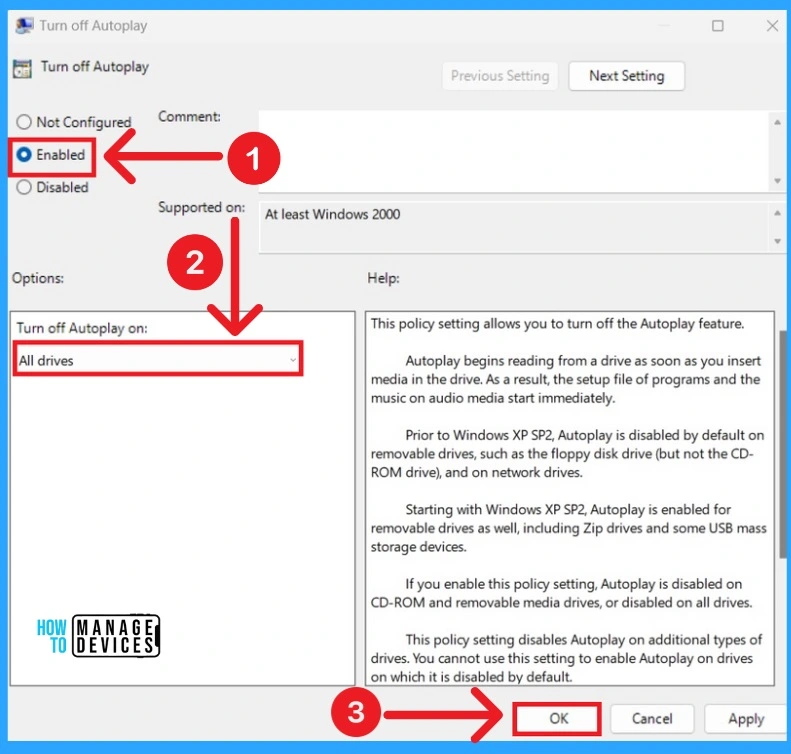
If you want to disable the AutoPlay option for drives, click on the Enable option, select All drives and then click on the OK button.
Enable Disable AutoPlay in Windows 11 using Intune
You can use the Intune Settings Catalog to create the policy to disable or enable the Autoplay feature option on Windows 11 devices. The below list shows the steps.
- Sign in to the Microsoft Intune admin center
- Select Devices > Configuration profiles > Create profile
- In Create Profile, select Platform: Select Windows 10 and later
- Profile: Select Settings catalog. Then click on the Create button.
- In Basics, specify a descriptive name for the profile and a description (optional), then select Next.
- The settings catalog contains thousands of settings. Use the built-in features to make it easier to find specific settings.
Use Add Settings> Search for Autoplay in your policy to find specific settings. You can search by category or keyword, as shown below. The following are the Autoplay related policies available in Intune Settings Catalog.
Disallow Autoplay for non-volume devices
Disallow Autoplay for non-volume devices (User)
Set the default behavior for AutoRun
Set the default behavior for AutoRun (User)
Turn off Autoplay
Turn off Autoplay on:
Turn off Autoplay (User)
Turn off Autoplay on: (User)
- Select Autoplay policies from the browse by category option.
- Enable the check mark on any of the following options –
- Turn Off Autoplay – This is for disabling the context menu for the device (all users).
- Enabling this policy enables the Autoplay feature in Windows 11.
So this is the process to disable the context menu option in Windows 11 using Intune. A more detailed post on creating Intune policies using Settings Catalog is explained in our previous post – Create Intune Settings Catalog Policy.

We are on WhatsApp now. To get the latest step-by-step guides, news, and updates, Join our Channel. Click here. HTMD WhatsApp.
Author
Anoop C Nair has been Microsoft MVP from 2015 onwards for 10 consecutive years! He is a Workplace Solution Architect with more than 22+ years of experience in Workplace technologies. He is also a Blogger, Speaker, and leader of the Local User Group Community. His main focus is on Device Management technologies like SCCM and Intune. He writes about technologies like Intune, SCCM, Windows, Cloud PC, Windows, Entra, Microsoft Security, Career, etc.
