Let’s discuss how to Configure Let Apps Access Microphone Policy in Privacy using Intune. Intune’s Privacy Settings let administrators control what apps on Windows 10 and later devices can access. This helps improve user privacy and protects their data. You can set these up using the Settings catalog, Templates, or the Settings Picker.
This setting controls whether Windows applications can use the microphone. Users can configure microphone access either by setting a default for all apps or by specifying a Package Family Name for individual apps to override that default. To find an app’s Package Family Name, use the Get-AppPackage command in Windows PowerShell.
If you pick User is in control, employees can decide for themselves if Windows apps can use the microphone. They will do this through the device’s Settings > Privacy. Choosing Force Allow lets all Windows apps use the microphone, and employees can’t change this setting.
When you select Force Deny, Windows apps are blocked from accessing the microphone, and employees in your organization would not be able to alter this setting. The most restrictive value is 2 to deny apps access to the microphone.
Table of Contents
What are the Different Options for Controlling Microphone Access for Windows Apps?
There are three different options for controlling microphone access for Windows apps.
> User is in control: Employees can decide microphone access through device settings.
> Force Allow: Apps are always allowed access, and employees cannot change this.
> Force Deny: Apps are always denied access, and employees cannot change this. This is the most restrictive setting (value 2).
CSP Details of Privacy
Windows 10 and 11 have a special tool called the Policy Configuration Service Provider (CSP). It helps companies set up and enforce rules for how their computers should work, keeping everything consistent.
Description Framework Properties
The Description Framework Properties in Microsoft Intune’s Settings Catalog provide essential information about each setting, including its purpose, required input, function, and default value, simplifying configuration.
The following table shows the description framework properties of the Let Apps Access Microphone policy.
| Property Name | Property Value |
|---|---|
| Format | int |
| Access Type | Add, Delete, Get, Replace |
| Default Value | 0 |
Allowed Values
In Intune, when you configure a setting, the Allowed Values are the only available options. These choices directly control the setting’s behavior on a device. The following table shows the Allowed Values for the Let Apps Access Microphone policy.
There are three different options for controlling microphone access for Windows apps. You can choose to let user control microphone access, force it to be allowed, or force it to be denied for Windows apps.
| Value | Description |
|---|---|
| 0 (Default) | User in control |
| 1 | Force allow |
| 2 | Force deny |
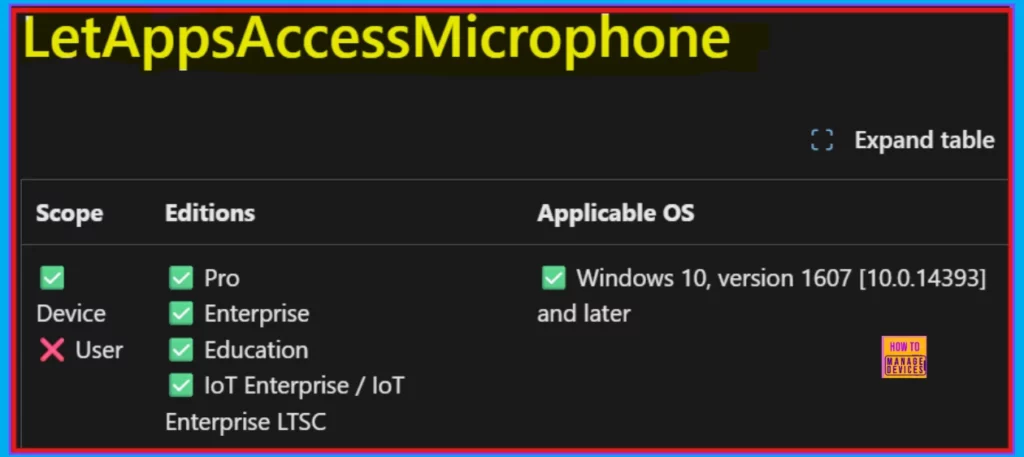
./Device/Vendor/MSFT/Policy/Config/Privacy/LetAppsAccessMicrophone
- 32 Privacy Settings For Windows 11 | 99 Intune Privacy Settings Policies
- Best Guide To Deploy And Update Visual Studio Code Using Intune
- How To Troubleshoot Microsoft Edge Browser Location Access Issues Managed Using Intune
OMA-URI Settings to Configure the Let Apps Access Microphone Privacy Policy
You can easily configure the Let Apps Access Microphone policy on Windows devices using either Microsoft Intune or by setting a custom OMA-URI. Here’s a step-by-step guide to help you:
- Sign in to Microsoft Intune
- Go to Devices > Configuration
- Click Create, and then the new policy.
- Choose the platform as Windows 10 or later.
- For Profile type, select Templates and then choose Custom.
- Provide a Name – e.g. Let Apps Access Microphone
- Add a Description if needed.
- Click on + Add under OMA-URI Settings to configure the specific setting.
- To Configure the OMA-URI Setting, do the following
- Enter a name for this setting, such as Let Apps Access Microphone.
- Briefly describe the setting, e.g., This policy setting controls whether Windows applications can use the microphone.
- Enter the following OMA-URI path.
- ./Device/Vendor/MSFT/Policy/Config/Privacy/LetAppsAccessMicrophone
- Set the Data type to Integer.
- Enter the value
- 1 to Force allow the Let Apps Access Microphone policy.
- 2 to Force deny the Let Apps Access Microphone policy.
- After entering the above details, click the Save button.
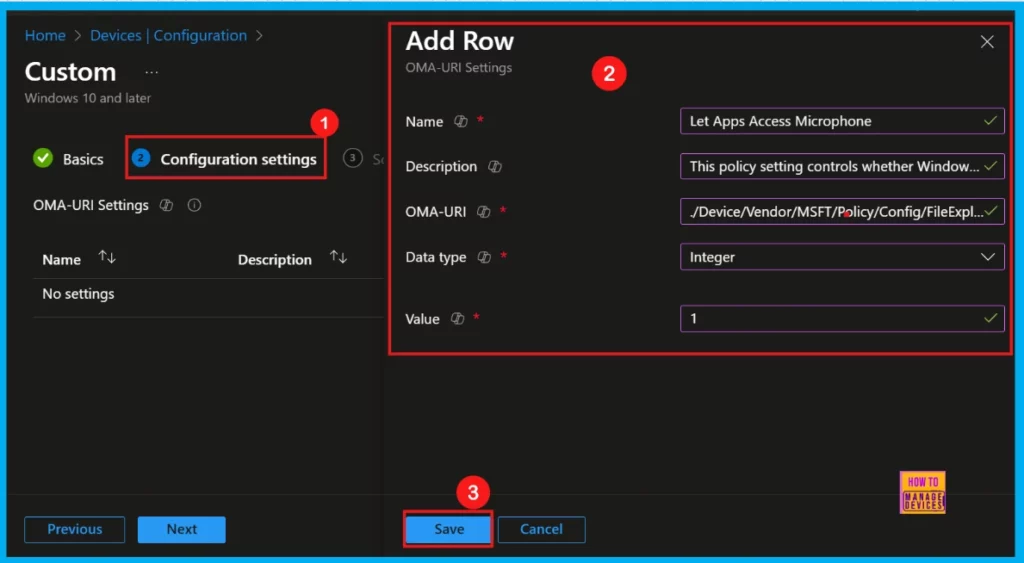
Configuring the Let Apps Access Microphone Policy using Intune
This policy controls microphone access for Windows apps, letting you set a general rule or specific ones for individual apps. If this policy is disabled or not configured, employees retain control over microphone access via device settings. If an app is open when this Group Policy object is applied, employees will need to restart the app or device for the changes to take effect.
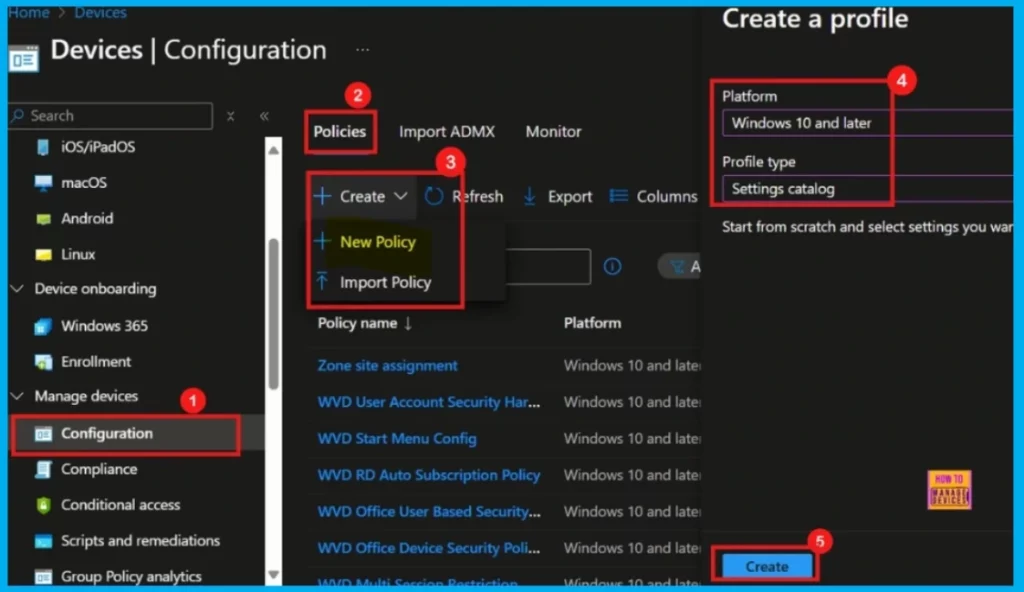
To begin deploying a policy in Intune, simply sign in to the Microsoft Intune Admin Center. Once there, navigate to Devices > Configuration profiles > Create New Policy. In the Create a Profile window:
- Select Windows 10 and later for the Platform.
- Choose Settings catalog as the Profile type.
- Finally, click Create to proceed.
Basics
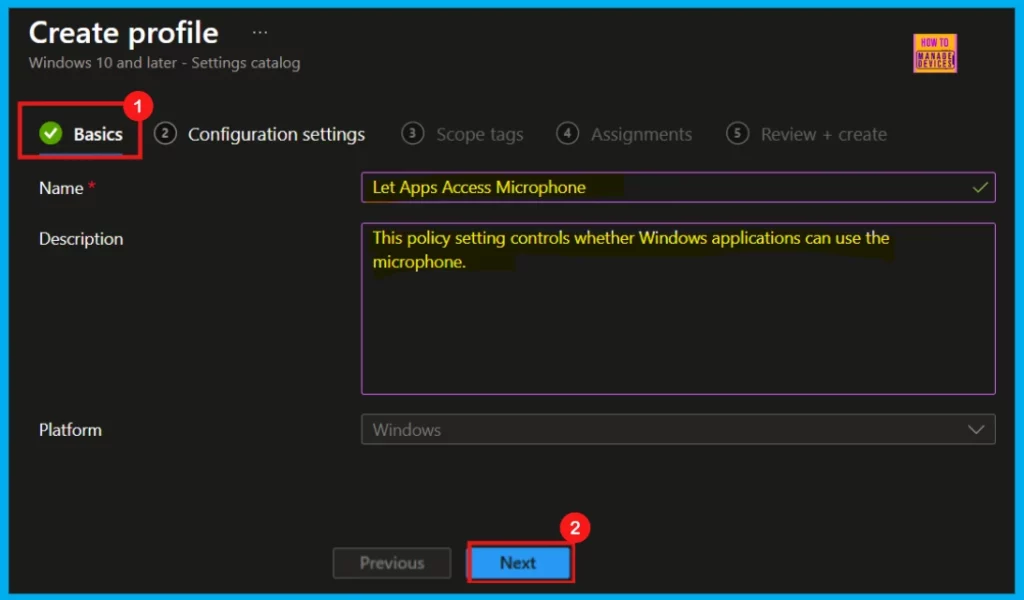
This is the first stage to configure a policy in Intune. In the Basics step, you will simply name your policy and briefly describe what it does. The Platform setting is already filled in for you.
- Policy Name: Let Apps Access Microphone
- Description: This policy setting controls whether Windows applications can use the microphone.
- Platform: Windows
Configuration Settings
Now we are at Configuration Settings, which is where you will define exactly what this policy will do. Click Add Settings to open the Settings Picker. In the search bar, type Privacy, then choose Let Apps Access Microphone.
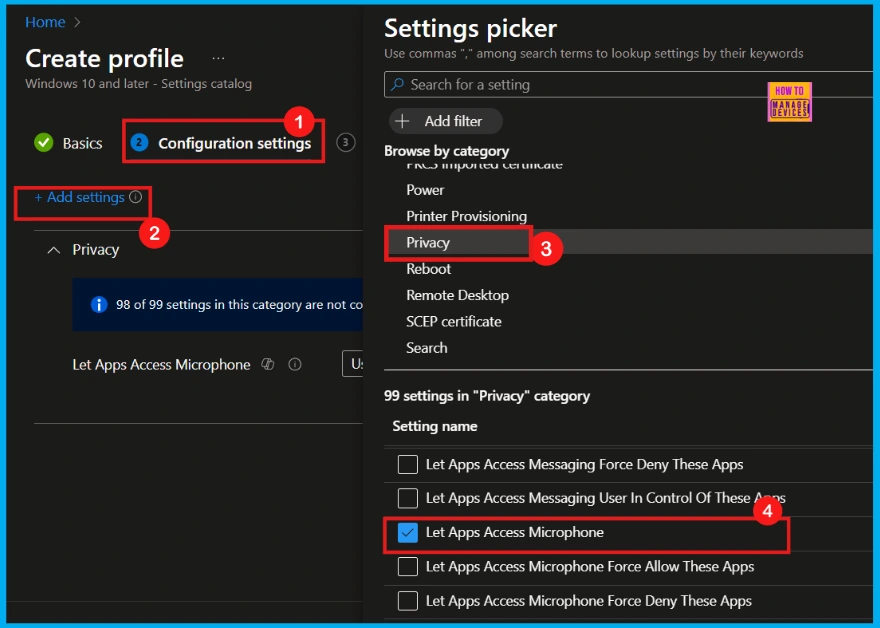
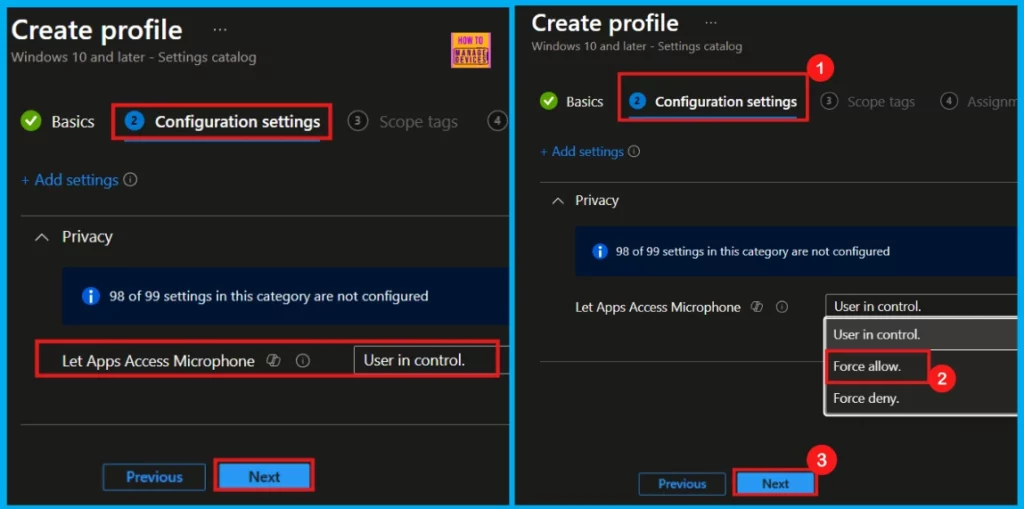
Once you have selected Let Apps Access Microphone and closed the Settings Picker, you will see it listed on the Configuration Settings page. By default, it will be set to User is in Control. Click the dropdown menu and choose either Force allow or Force deny, depending on your organization’s requirements (for details, refer to Table 2).
Here, I choose Force Allow (1) to configure this policy.
- Click Next to move on.
Scope Tags
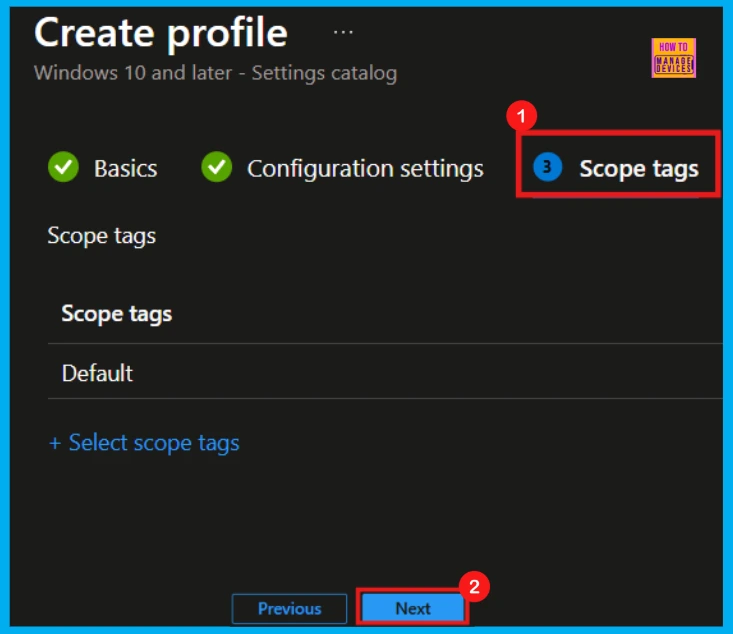
In Intune, Scope Tags help control who can see and modify this policy, acting as an organizational and access management tool. However, assigning them is optional, so you can simply click Next if they are not needed for your current setup.
Assignments
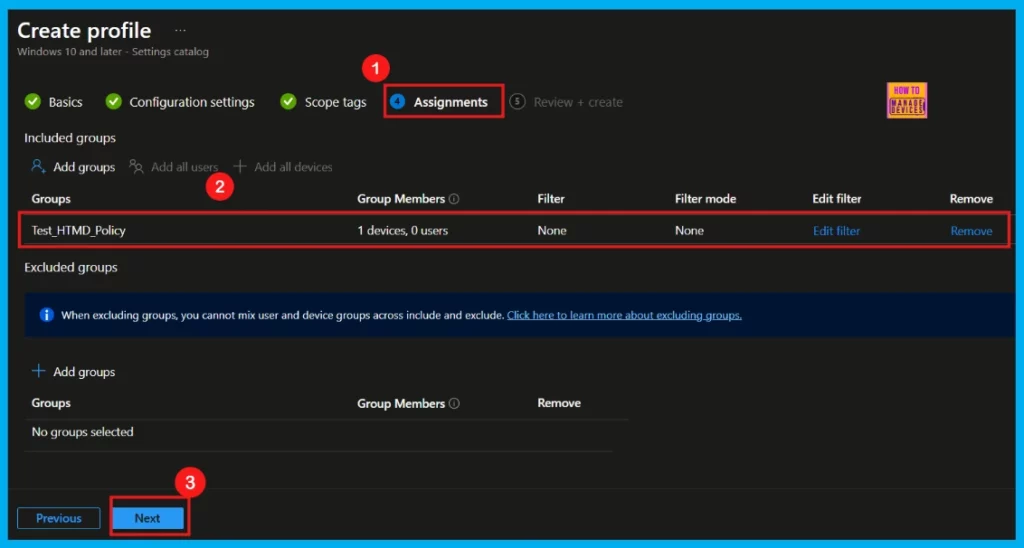
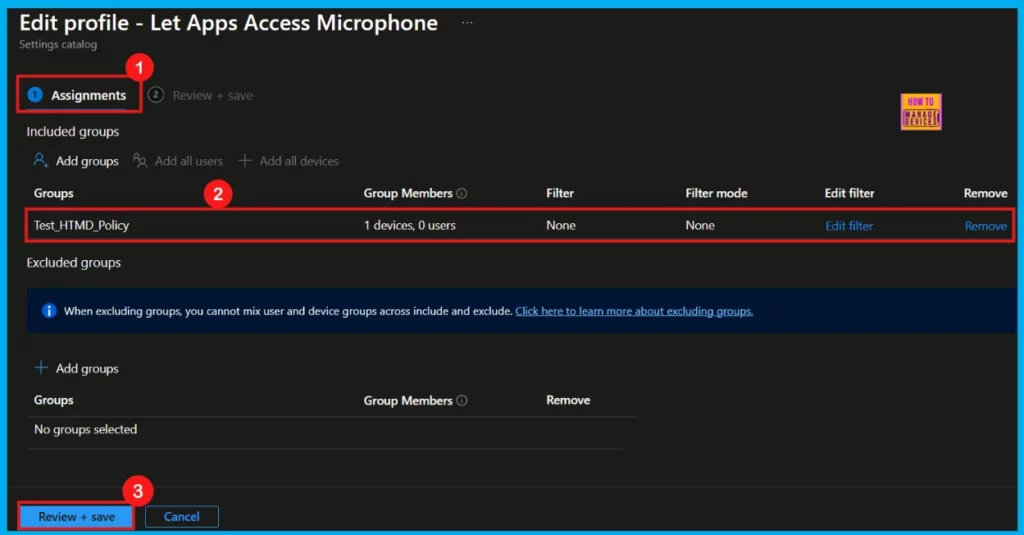
The Assignments tab is where you decide which users or devices will receive this policy. Under Include Groups, click Add Groups. A list of your available groups will appear. Select the one you want the policy to apply to. Once chosen, the group (for example, Test_HTMD_Policy) will be listed under your assignments. Then, click Next to continue.
Review + Create
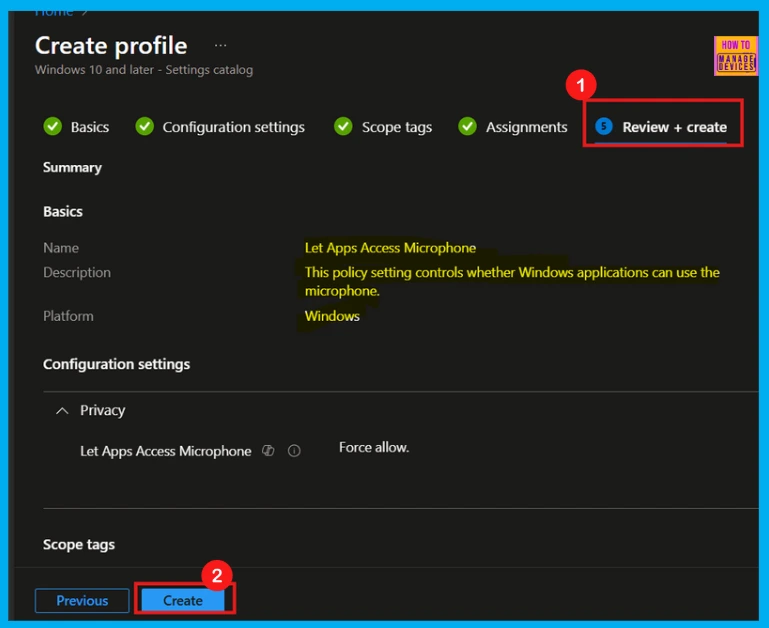
Now you have reached the final Review + Create step. This screen gives you a full overview of your new profile, summarizing all the settings you configured earlier. You can easily review every detail here. If you need to make any changes, just click Previous to go back to any section.
- After reviewing your profile, click Create to finalize it.
Device and User Check-in Status
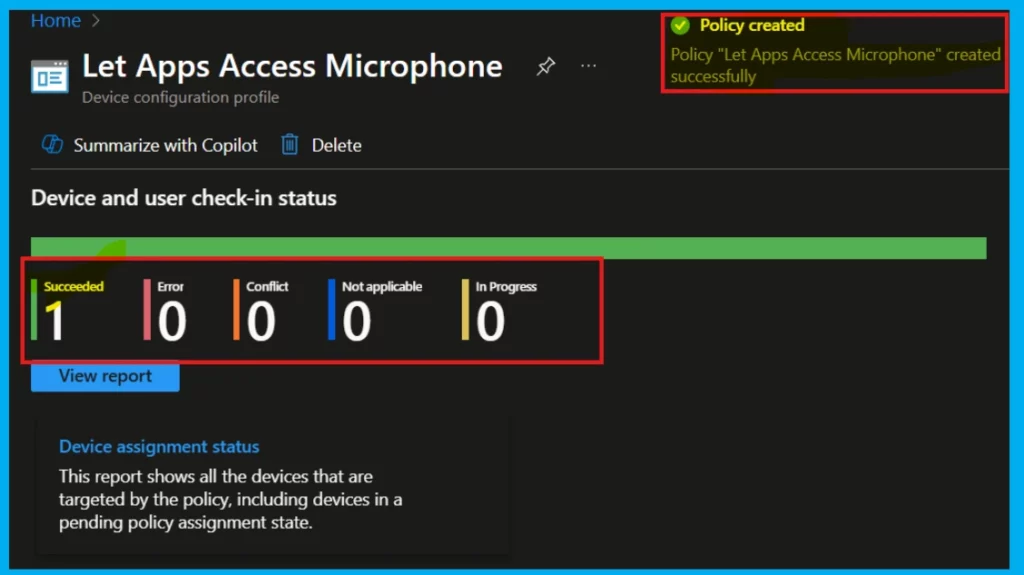
Upon clicking Create, you will then receive a confirmation that the Let Apps Access Microphone policy has been successfully created.
You can verify the policy’s status in the Intune Portal. Typically, policies take around 8 hours to be created. If you are experiencing delays, you can manually sync your device using the Company Portal app’s Sync option and then recheck the policy status.
- Go to Devices, then Configuration.
- Click on the policy to view its details.
- For instance, here the Let Apps Access Microphone policy status is succeeded(1).
Client Side Verification
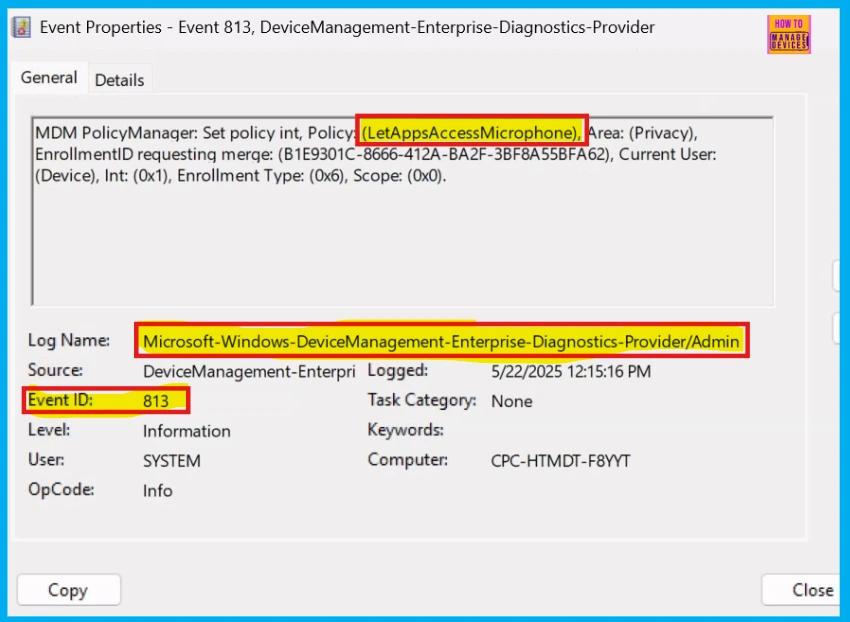
To confirm if the policy has been applied, you can check the Event Viewer on the client device. Follow the following path within the Event Viewer to navigate to the relevant logs:
Applications and Services Logs > Microsoft > Windows > Device Management > Enterprise Diagnostic Provider > Admin.
- You will see a list of policies.
- To find the one you want, use the Filter Current Log on the right.
- Look for Intune event 813
MDM PolicyManager: Set policy int, Policy: (Let Apps Access Microphone), Area: (Privacy), EnrollmentID requesting merge: (B1E9301C-8666-412A-BA2F-3BF8A55BFA62), Current User: (Device), Int: (0x1), Enrollment Type: (0x6), Scope: (0x0).
How to Remove Group of Let Apps Access Microphone Privacy Policy
To remove an Intune policy, simply go to the Configuration area and open the policy. Then, in the Assignment tab, click Edit, and finally, hit the Remove button to delete the policy assignment.
For detailed information, you can refer to our previous post – Learn How to Delete or Remove App Assignment from Intune using by Step-by-Step Guide.
How to Delete Let Apps Access Microphone Policy
To delete the Let Apps Access Microphone policy in Intune, follow these simple steps. For more information, you can refer to our previous post – How to Delete Allow Clipboard History Policy in Intune Step by Step Guide.
- Navigate to Devices > Configurations.
- In the list of policies, use the search bar to locate Let Apps Access Microphone.
- Once you find it, click the three dots (…) next to the policy name.
- Select Delete from the menu to remove it.

Need Further Assistance or Have Technical Questions?
Join the LinkedIn Page and Telegram group to get the latest step-by-step guides and news updates. Join our Meetup Page to participate in User group meetings. Also, Join the WhatsApp Community to get the latest news on Microsoft Technologies. We are there on Reddit as well.
Author
Anoop C Nair has been a Microsoft MVP for 10 consecutive years from 2015 onwards. He is a Workplace Solution Architect with more than 22+ years of experience in Workplace technologies. He is a Blogger, Speaker, and Local User Group Community leader. His primary focus is on Device Management technologies like SCCM and Intune. He writes about technologies like Intune, SCCM, Windows, Cloud PC, Windows, Entra, Microsoft Security, Career, etc.


