Hi all, today we are discussing Enable Disable Implicit Sign-in Policy in Microsoft Edge Browser using Intune Policy. As we all know, Settings Catalog is one of the key features in Microsoft Intune, and it is used to deploy different types of settings for organizations.
Most of the settings under the Microsoft Edge category are related to organizational security. So today, we will focus on a specific security policy in Microsoft Edge called Implicit Sign-in. The enable disable Implicit Sign-in policy in Microsoft Edge controls whether users are automatically signed into their Edge browser using their Windows login.
This helps make browsing easier but also affects security, especially in offices or schools where user sign-in needs to be managed. Enable the implicit sign-in makes things easier for users. But disabling gives IT teams more control over which accounts are used in the browser.
Implicit Sign-in policy helps protect an organization by giving control over who gets signed into Microsoft Edge automatically. Deploying this policy helps organizations manage user access, control data syncing, and enforce security standards.
Table of Contents
What will Happen when We Enable the Policy?
If you enable or don’t configure this setting, implicit sign-in will be enabled, Edge will attempt to sign the user into their profile based on what and how they sign in to their OS. If you disable this setting, implicit sign-in will be disabled.
Implicit Sign-in Microsoft Edge Browser – Create a Profile
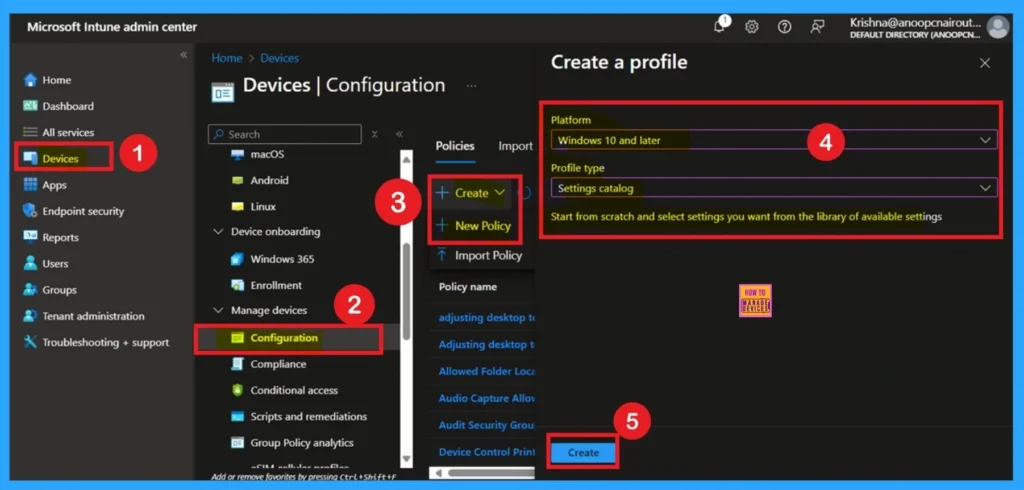
Earlier, we discussed various aspects of the Implicit Sign-In policy in Microsoft Edge. Now, let’s look at how to deploy this policy using the Microsoft Intune Admin Center. To begin, sign in to the Microsoft Intune Admin Center and navigate to the Devices section. Under Devices, go to Configuration, and click on the + Create option to set up a new profile.
In the setup window, select Windows 10 and later as the platform and choose Settings catalog as the profile type. Once these options are selected, click on Create to continue with the policy configuration.
- Enable Fast First Sign In Policy under Authentication in Intune Settings Catalog
- How to Configure Check for Signatures before Running Scan Policy using Intune
- 3 Ways To Configure Microsoft Defender Antivirus Policies For Windows 11 Using Group Policy Intune Policy
How to Add Basic Details
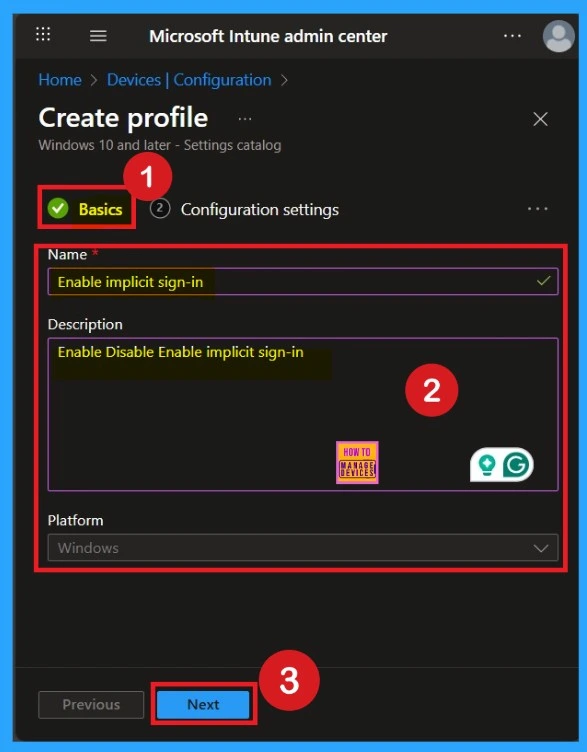
This is very important step, because this section gives the policy to be identified through a name. Here you have to give an appropriate name and description. Also, the platform is set as Windows, and it is set by default
How to Configure Settings Picker
The next step is the Basics section. In this section, you need to provide essential details such as the name, description, and platform. It’s important to choose a meaningful name for the policy, as the name serves as an identifier and helps you easily distinguish this policy from others in the list.
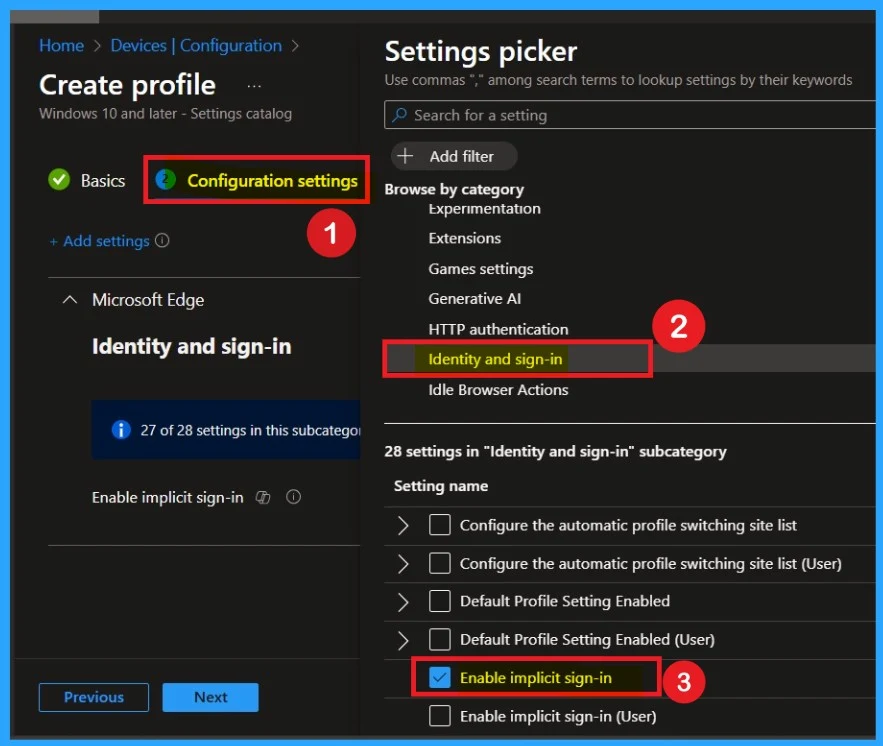
You may also add a description to give more context, which can be useful for understanding the policy’s purpose later. The platform will already be set to Windows, so you can proceed by clicking Next.. The following section is Configuration settings, also known as the Settings picker. Here, click on the + Add settings option. Once you click it, you will see a list of categories.
- From these categories, select Microsoft Edge. When you expand Microsoft Edge, you’ll see multiple setting groups. Choose the Identity and sign-in option.
- This group contains 28 settings.
- From these, select Enable Implicit Sign-In and then close the settings picker.
Policy Disabled by Default
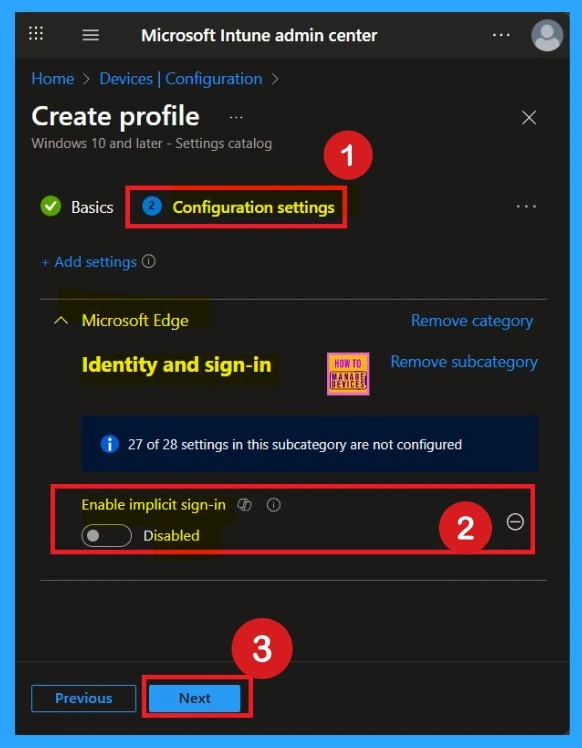
After selecting the Enable Implicit Sign-In option, you will be directed to the Configuration settings main page. Here, you will notice that the policy is disabled by default. If you wish to proceed without making changes, simply click Next.
Enable the Implicit Sign-in Microsoft Edge Browser Policy
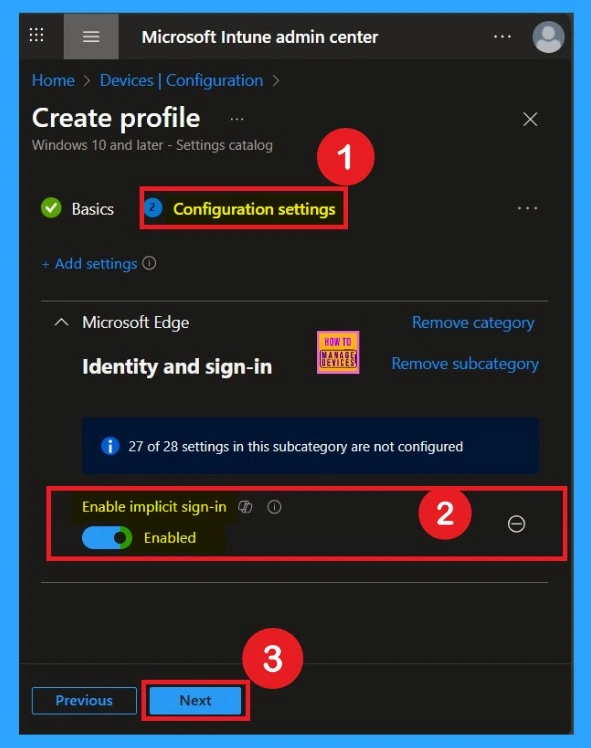
If you want to enable the policy, you can easily do that for that. You have to toggle the Pan left to the right then, it turn to be blue color and its labelled. Now enabled, then click on the next to continue with the procedure.
Scope Tags
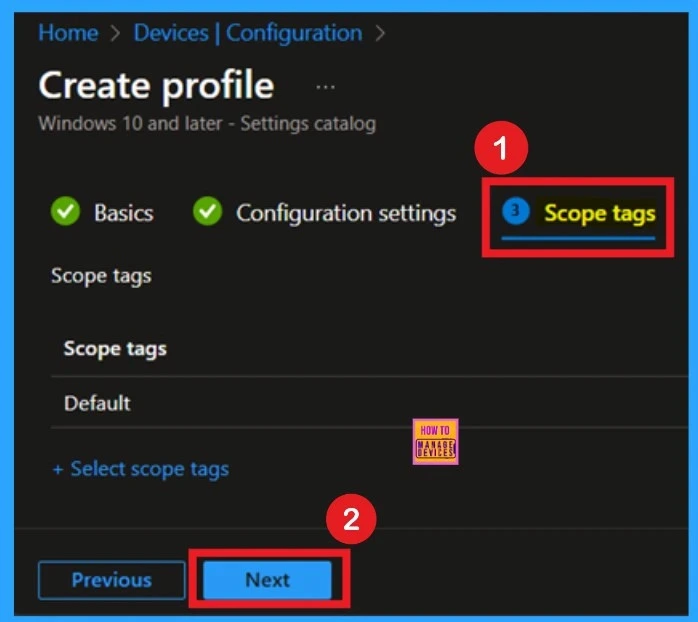
The next step is Scope tags, which help you organize and manage access to the policy, such as for the department or location. This section is optional, so if you don’t want to apply the Scope tags, just click Next to continue.
Know Assignments
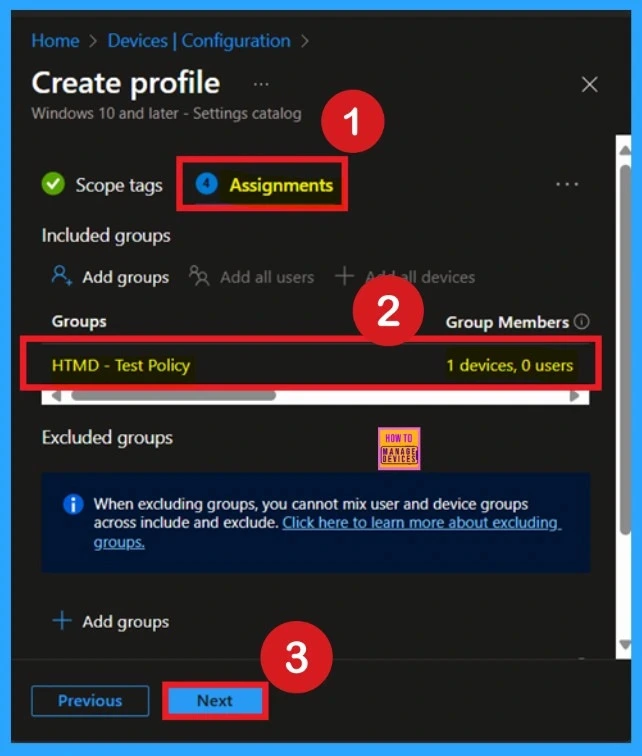
Assignment is another important step you need to complete, just like Configuration settings. In this step, you have to decide which group you want to deploy the policy to. First, click on Add groups under the Include groups section, and select the group to which you want to apply the policy. Then, click Next to continue.
What is Review + Create Tab
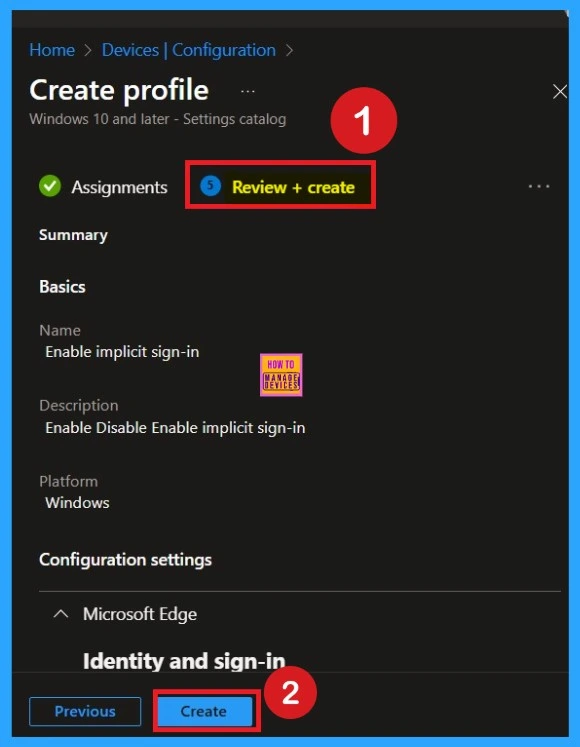
Review + Create is the final step in the policy creation process. You will reach this section after completing the Assignment step. This section acts like a summary page, showing all the steps, you have previously completed. If you notice any mistakes, this is your final chance to edit them. If everything looks correct, click on the Create button.
Device and user Check in Status
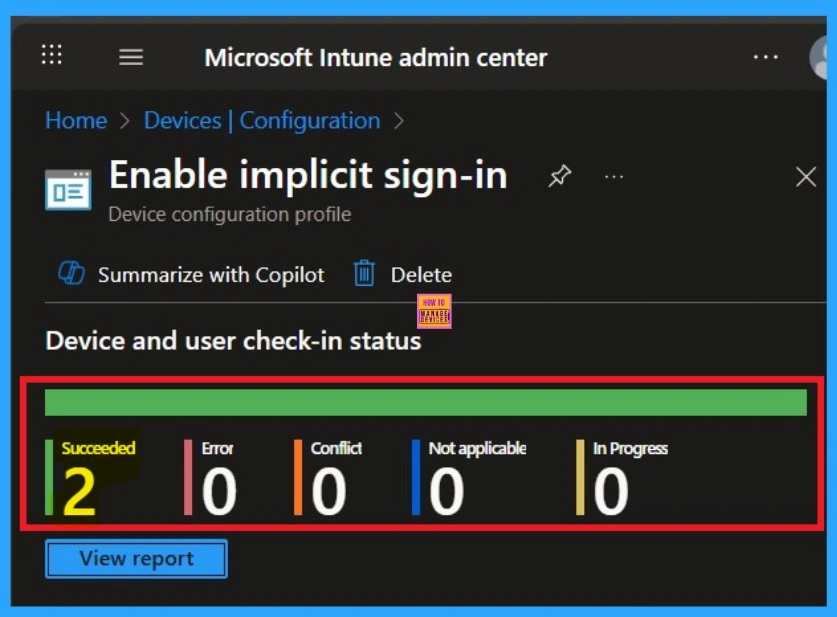
After creating the policy, the next step is to check if it was applied successfully. Always remember that it can take up to 8 hours for the policy to be fully deployed. If you’ve synced the policy through the Company Portal, you can check its status easily. Just go to Devices > Configuration, then search for the name of your policy in the list.
Click on the policy to see the Device check-in status for both devices and users. In the screenshot below, you’ll see it says “Succeeded: 2” this means the policy was deployed successfully.
Monitoring Status
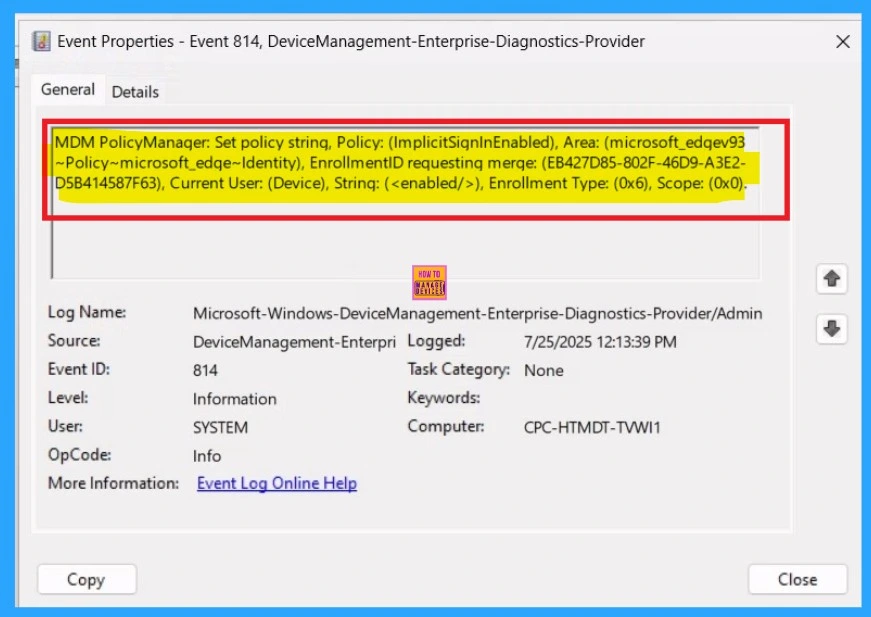
You can check the confirmation in the Event Viewer. To do this, open Event Viewer and look for Event ID 813 or 814. Go to: Applications and Services Logs > Microsoft > Windows > Device Management Enterprise Diagnostic Provider > Admin.
There, you’ll see a list of policy-related events. In my case, I found the policy details in the Event ID 814.
| Policy Details |
|---|
| MDM PolicyManager: Set policy string, Policy: (ImplicitSiqnlnEnabled), Area: (microsoft_edqev93 ~Policy~microsoft_edqe~Identity), EnrollmentID requesting merqe: (EB427D85-802F-46D9-A3E2- D5B414587F63), Current User: (Device), Strinq: (), Enrollment Type: (0x6), Scope: (0x0). |
Remove the Implicit Sign-in Microsoft Edge Browser Policy
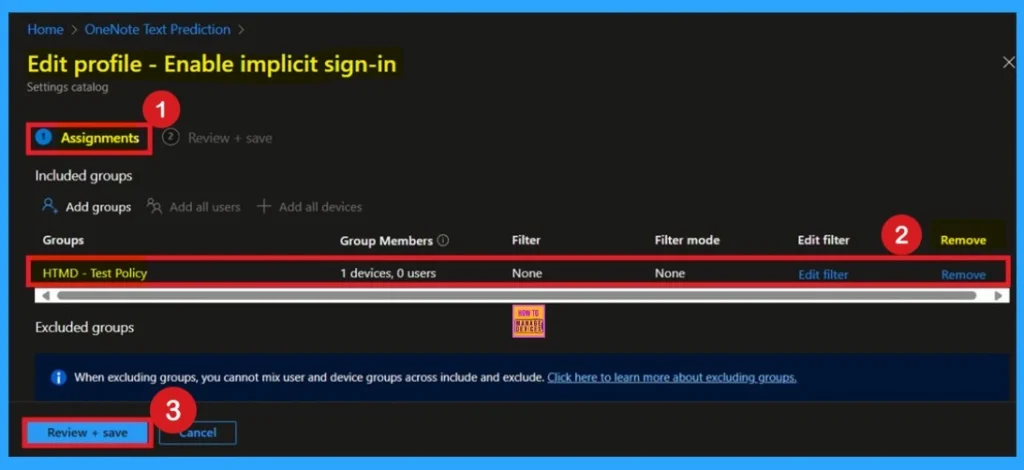
If you want to remove any group from your policy after the policy creation you can easily do that. First go to the Device Configuration then search the policy name and now you get the policy monitoring status page. Here you have to scroll down, and you will get the Assignment section there you will get an edit option. In the Assignment page you can see the Remove Option Click on that for removing the Policy.
Delete Implicit Sign-in Microsoft Edge Browser Policy
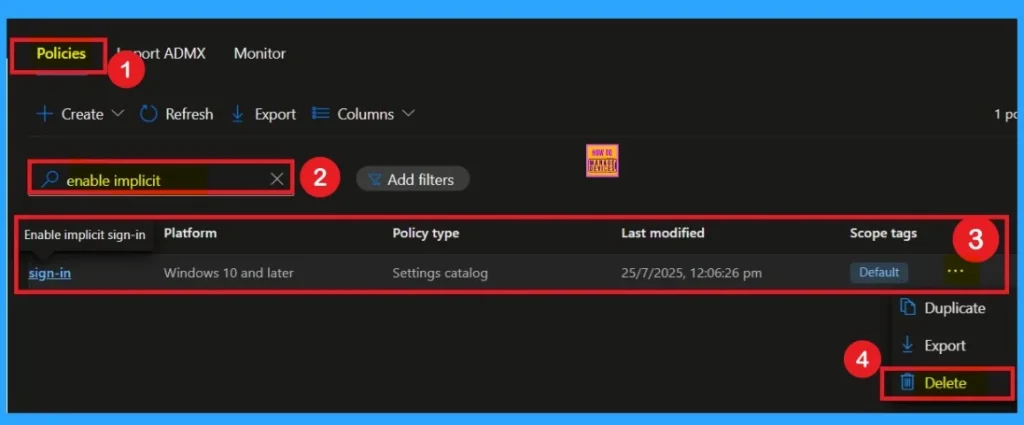
If you want to delete the policy of Implicit Sign-in Microsoft Edge Browser Policy that you created, you can easily do that. First go to the Device Configuration then search the policy name and now you get the policy here click on the 3-dot menu of the policy then clicks on the Delete and the policy Deleted permanently.
Need Further Assistance or Have Technical Questions?
Join the LinkedIn Page and Telegram group to get the latest step-by-step guides and news updates. Join our Meetup Page to participate in User group meetings. Also, Join the WhatsApp Community to get the latest news on Microsoft Technologies. We are there on Reddit as well.
Author
Anoop C Nair has been Microsoft MVP from 2015 onwards for 10 consecutive years! He is a Workplace Solution Architect with more than 22+ years of experience in Workplace technologies. He is also a Blogger, Speaker, and Local User Group Community leader. His primary focus is on Device Management technologies like SCCM and Intune. He writes about technologies like Intune, SCCM, Windows, Cloud PC, Windows, Entra, Microsoft Security, Career, etc.

