Let’s learn the 3 Ways to Configure Microsoft Defender Antivirus Policies for Windows 11 using Group Policy Intune Policy. A Virus is a small program or malicious software designed to cause damage to your computer by gaining access to it. A virus is a malware that copies your data or slows your computer down.
In this post, I explained the Windows settings, Group Policy settings, and Intune settings for Microsoft Defender Antivirus. A computer virus spreads by duplicating and attaching itself to a program or file. The Virus also enables it to spread from one computer to another.
There is so much Antivirus software to protect your Windows 11 computer. An antivirus is a software program used to detect, prevent, and eliminate malware and viruses and it works for all types of devices. The aim of computer viruses is to disrupt systems, cause major operational issues, and result in data loss and leakage.
Microsoft Defender is an anti-malware component of Microsoft Windows. Microsoft Defender is an Antivirus formerly known as Windows Defender, it not only protects against all types of malware but also manages numerous other security features.
- Unlock Windows 11 Files using Lock Hunter Application
- Best Ways to Change Keyboard Layouts in Windows 11
What are the Advantages of Microsoft Defender in Windows 11?

Microsoft defender helps you detect malware files, block exploits, network-based attacks, etc. The following are the advantages of Microsoft defender in Windows 11.
1. Helps to safeguard a system from malware
2. Helps to fight unauthorized access
3. Helps to protect Windows computers from unwanted software
4. It is a free built-in antivirus for Windows operating system
5. It is an antimalware solution to protect your computer
Settings App – Microsoft Defender in Windows 11
Windows security is very important because that provides the latest antivirus protection in Windows 11. You can easily protect your data and devices with the help of windows security. The following are the steps to protect your computer from viruses.
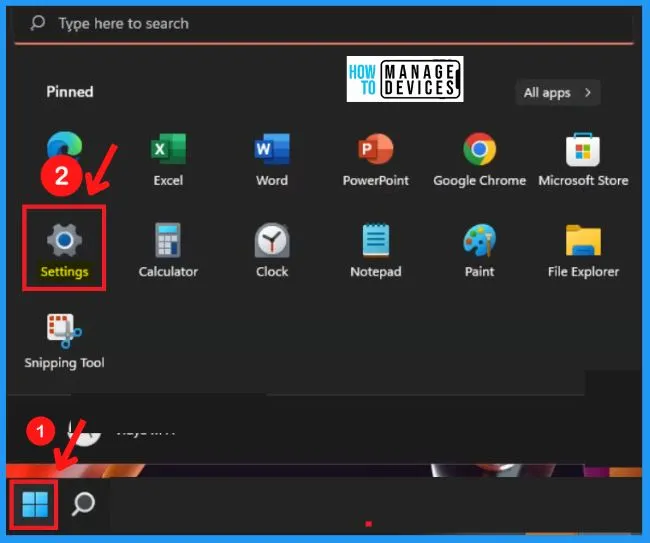
- Select Settings from the Start menu
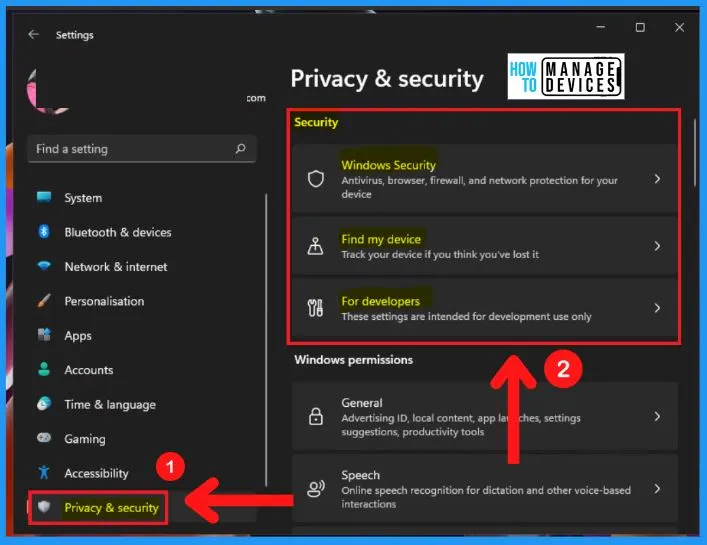
The privacy & security page shows the Windows security, permission, and App permissions. Windows security offers the options such as Windows security, Find my device, and for developers.
- Select the Privacy & Security tab from the left side of the Settings page
- How to Install Additional Language in Windows 11| Keyboard Layout
- Windows 11 Enhanced Password Phishing Protection
Windows Security in Windows 11
Windows Security is a free and default antivirus program provided by Microsoft that helps you to protect your PC from outside threats. The privacy & security tab of the settings window shows the Windows security.
Windows Defender is also called Windows Security, Microsoft Defender, Windows Defender Antivirus, or Microsoft Defender Antivirus. Windows defender helps you to protect your computer against security threats like malware, spyware, viruses, etc.
- Start menu > Settings > Privacy & Settings > Windows security

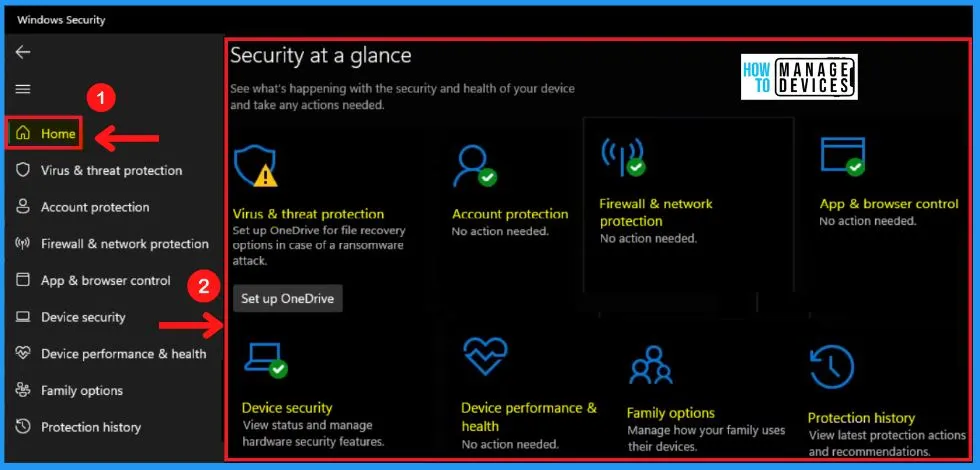
Microsoft Defender Antivirus is now very capable and well-rated. Windows Security includes the following features for free.
- Virus & threat protection
- Account protection
- Firewall & Network Protection
- App & browser control
- Device security
- Device performance & health
- Family options
- Protection History
A. Virus & Threat Protection in Windows Security
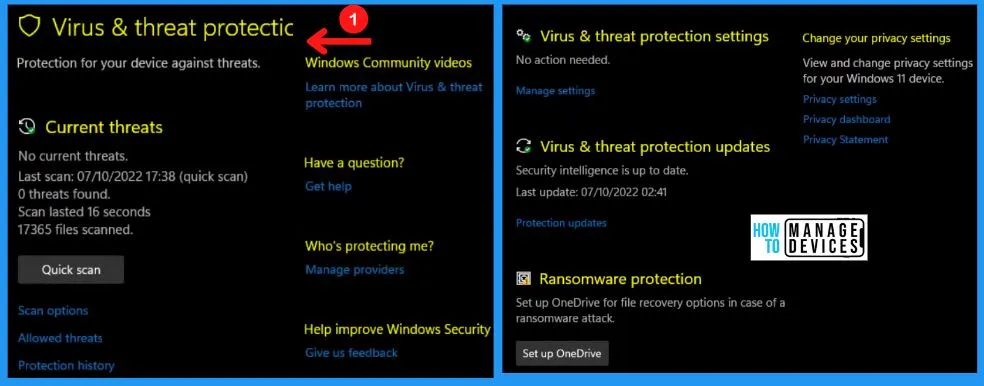
Virus & threat protection in Windows Security helps you scan for threats on your device. Virus & threat protection in Windows Security includes the Current threats, Virus & threat protection settings, Virus & threat protection updates, and Ransomware protection.
- Current threats
- Virus & threat protection settings
- Virus & threat protection updates
- Ransomware protection
1. Current Threats
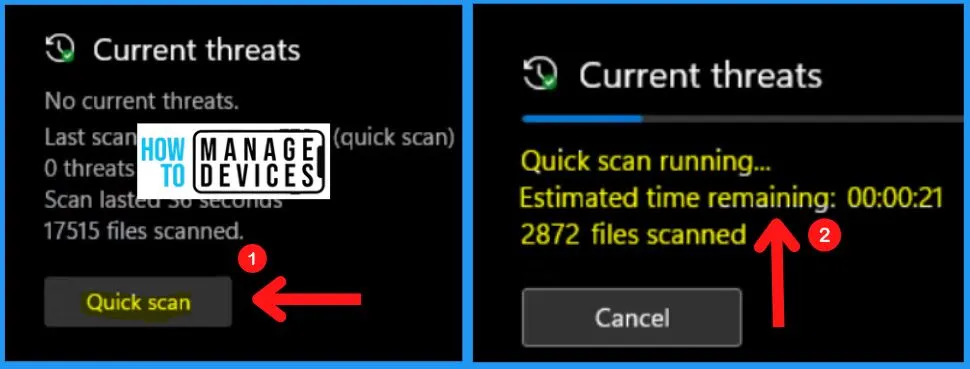
The Current threats of Viruses and threats protection in Windows 11 include the Quick scan button. The quick scan helps you to a fast scan viruses & threats. The Current threats result shows in the below screenshot that there are no current threats, the date and time of the last scan, the number of files scanned, etc.
- Click the Quick scan button from the below screenshot
- You can see the current threats in the below screenshot
2. Virus & Treat Protection Settings
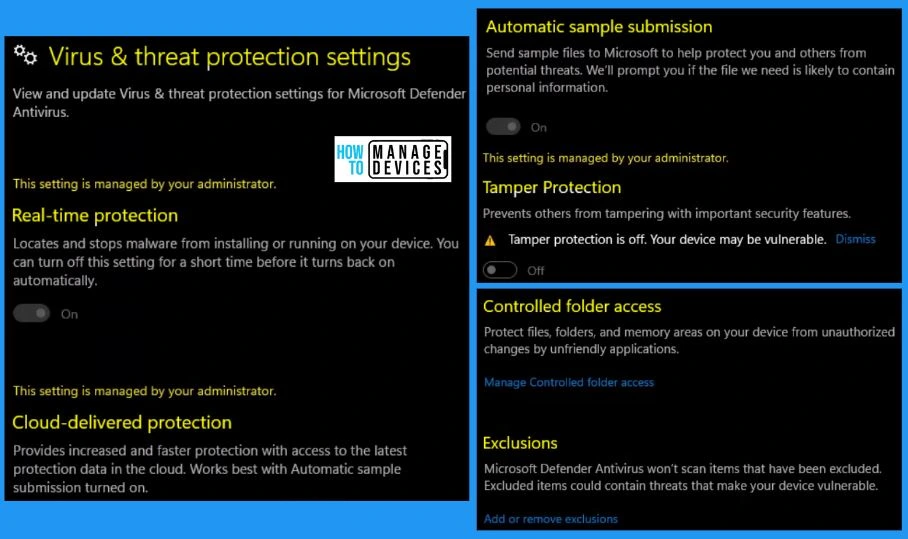
You can easily view and update virus & threat protection settings for Microsoft Defender Antivirus. The virus & threat protection settings include real-time Protection, cloud-delivered Protection, automatic sample submission, Tamper protection, Controlled folder access, and Exclusion.
- Privacy & security > Windows security > Virus & threat protection > Virus & threat protection settings
| Virus & threat protection settings | Uses |
|---|---|
| Real-time Protection | It helps to locate and stop malware from installing or running on your device. |
| Cloud-delivered Protection | Provides increased and faster Protection with access to the latest protection data in the cloud |
| Automatic sample submission | It helps to send sample files to Microsoft to help protect you and others from potential threats |
| Tamper protection | It helps to prevent others from tampering with important security features |
| Controlled folder access | It helps to protect files, folders, and memory areas on your device from unauthorized changes by unfriendly applications |
| Exclusions | Microsoft defender antivirus would not scan items that have been excluded. Excluded items could contain threats that make your device vulnerable |
Note! – Turn off the Real-time protection toggle switch to disable Microsoft Defender Antivirus temporarily; the Antivirus will temporarily disable its Protection to install apps or make specific system changes without unwanted conflicts. After restarting the computer, the Antivirus will enable again automatically.
3. Virus & Threat Protection Updates
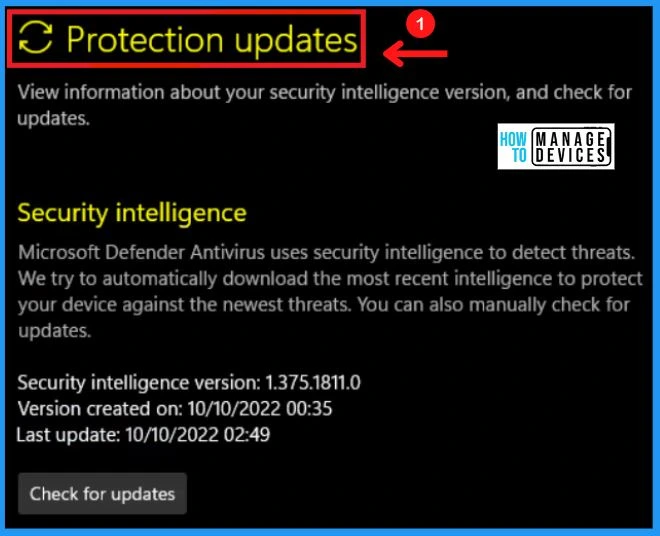
You can easily view information about the security intelligence version and check for updates in the protection updates. Microsoft defender antivirus uses security intelligence to detect threats. It also helps you to download the most recent intelligence to protect your device against the newest threats.
4. Ransomware Protection
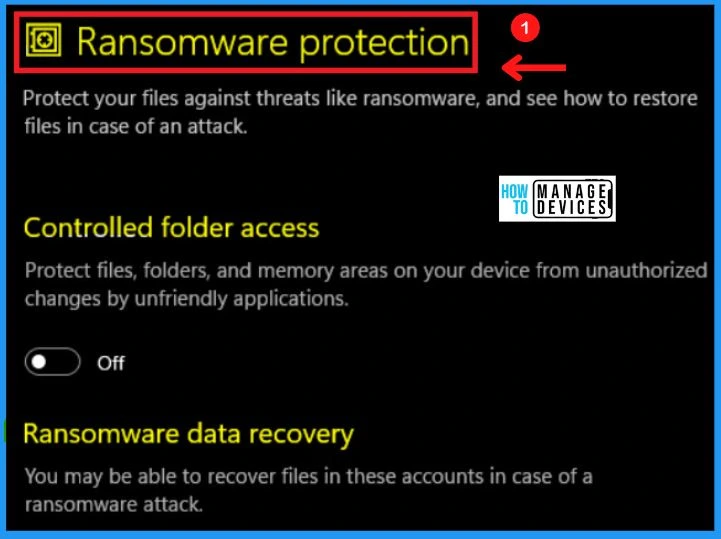
Ransomware protection helps you protect your files against threats like ransomware and enables you to see how to restore files in case of an attack. Ransomware protection includes controlled folder access and ransomware data recovery.
- Controlled folder access – Helps you to protect files, folders, and memory areas on your device from unauthorized changes by unfriendly applications
- Ransomware data recovery – Helps you to recover files in these accounts in case of a ransomware attack
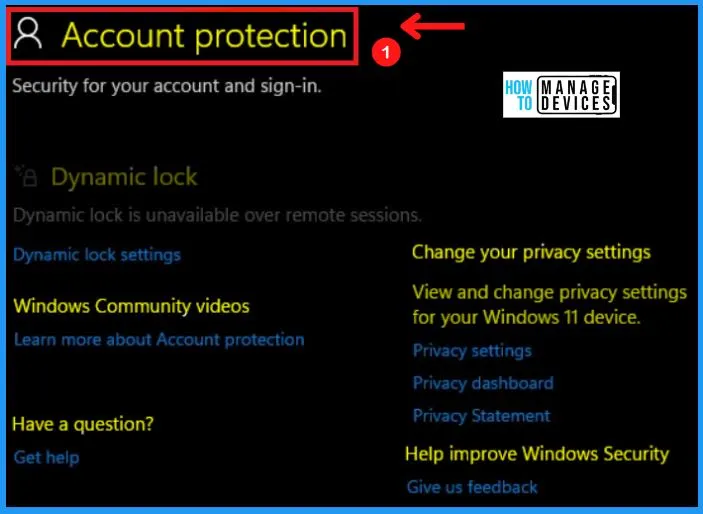
B. Account Protection in Windows 11
Once you start up Windows 11 for the first time, the Windows Defender antivirus is enabled and actively helping to protect your device by scanning for malware, viruses, and security threats. The Account Protection section contains settings for your Protection, such as Microsoft Account, Windows community videos, and Dynamic Lock.
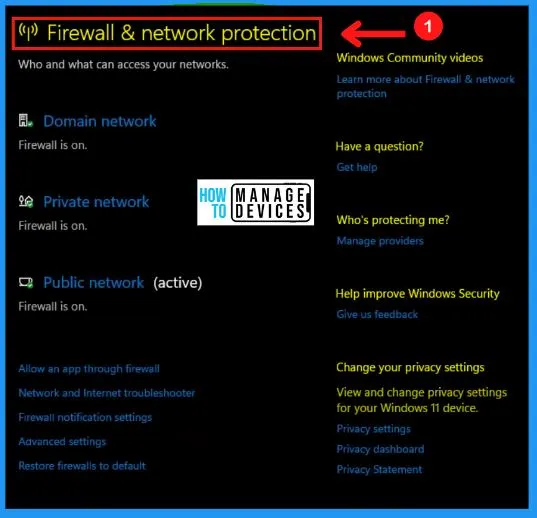
C. Firewall & Network Protection
Firewall & network protection in Windows Security in Windows 11 helps you view the Microsoft Defender Firewall status and see what networks your device is connected to. You can easily Turn ON or OFF the Microsoft defender firewall. The following network types include the advanced access of Microsoft defender firewall.
- Domain (Workplace) networks
- Private (Discoverable) networks
- Public (Non- discoverable) networks
Note! – Turning off the firewall may increase your device or data risk. We recommend leaving it on unless you need to turn it off.
D. App & Browser Control in Windows Security
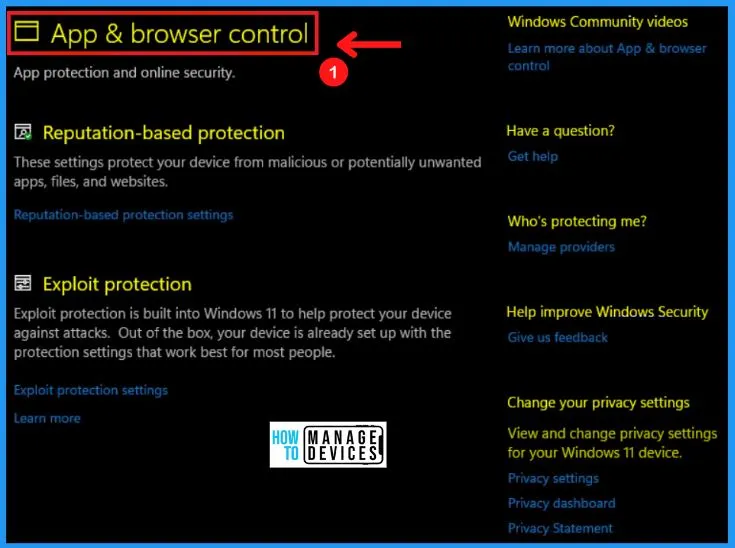
The App & browser control is a part of Windows Security that helps you to provide the settings for Microsoft Defender SmartScreen, which allows you to protect your device from potentially dangerous apps, files, websites, and downloads.
The Apps & browser control includes reputation-based Protection and exploits Protection. It is an important security and privacy feature that helps you to block certain applications and websites on your PC.
- Reputation-based Protection – This helps you to protect your device from malicious or potentially unwanted apps, files, and websites
- Exploit Protection – Helps you to protect your device against attacks
E. Device Security
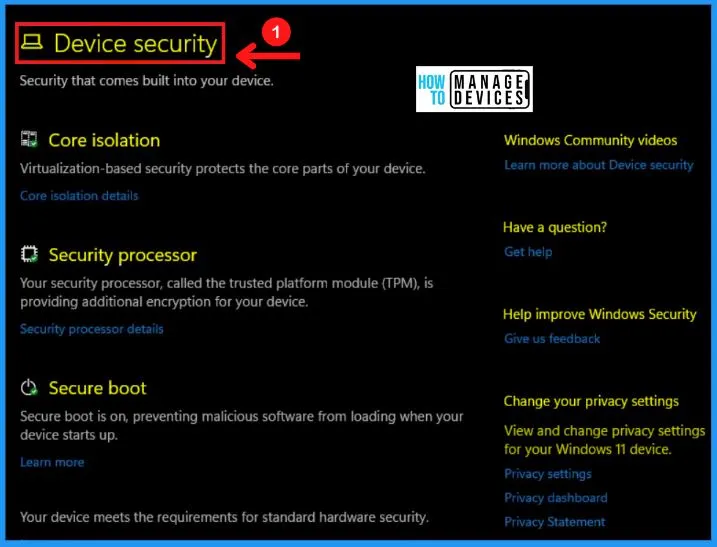
The device security on Windows 11 helps you to provide the latest antivirus protection. The following are the features available in the device security on Windows 11.
- Core isolation – Helps to protect the core parts of your devices
- Security processor – Helps you to provide additional encryption for your device
- Secure boot – Helps you to prevent malicious software from loading when your device starts up
- Security processor – provides other encryption features
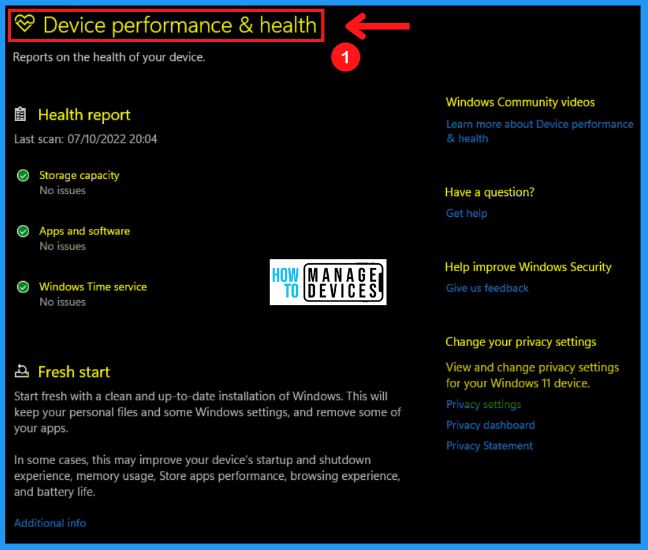
F. Device Performance & Health
The Device performance & health section contains information about hardware, devices, and drivers related to the machine. The device performance & health section helps you scan your computer and notify you of potential problems, including storage capacity, apps & software, battery life, and Windows time service.
You can easily scan the Health report; It includes the storage capacity, apps, and software, windows time service. The fresh start help to keep your files and some windows settings and remove some of your apps.
Fresh start helps improve your device’s startup and shutdown experience, memory usage, store app performance, browsing experience, and battery life.
G. Family Options
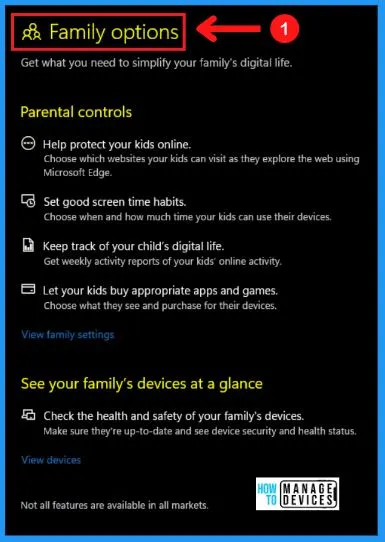
The family option in Windows security helps you to manage your children’s digital life. The following are the steps to open the family option in Windows security.
- Go to the Start menu
- Select Settings from the Start menu
- Select the Privacy & Security tab from the settings page
- Select Windows security from Privacy & Security
- Select the Family option; it is the 7th section in the Windows security
H. Protection History Section in Windows Security
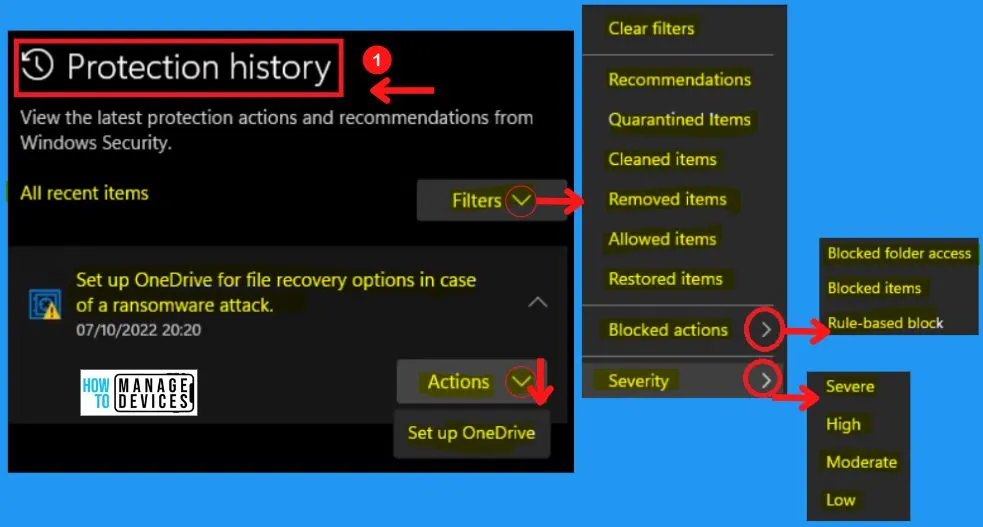
The protection history section in Windows security helps you to view the latest protection actions and recommendations from Windows security. The protection history shows the Filter options;
It includes options such as Clear filters, recommendations, quarantined items, cleaned, removed, allowed, restored, blocked actions, and severity.
- Clear filters
- Recommendations
- Quarantined items
- Cleaned items
- Removed Items
- Allowed items
- Restored items
- Blocked actions
- Blocked folder access
- Blocked items
- Rule-based Block
- Severity
- Severe
- High
- Moderate
- Low
I. Settings Option in Windows Security
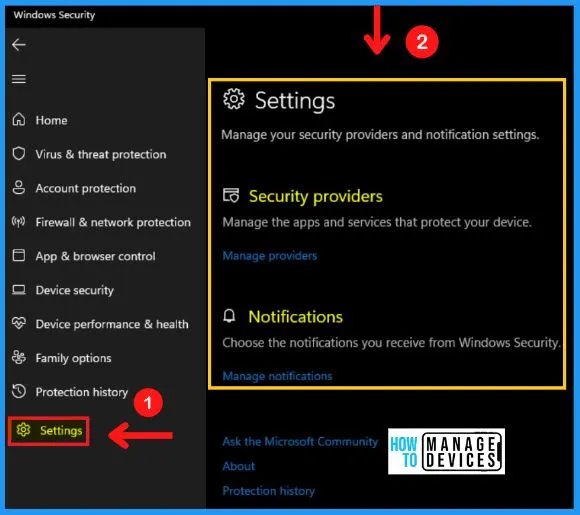
The Windows security settings help you to manage your security providers and notification settings. Windows security includes security providers and notifications.
Security providers help you to manage the apps and services that protect your device, and the notification allows you to choose the notifications you receive from windows security. The following are the steps for Windows security settings.
- Start menu > Settings > Privacy & security > windows security > Settings
Find My Device in Windows 11
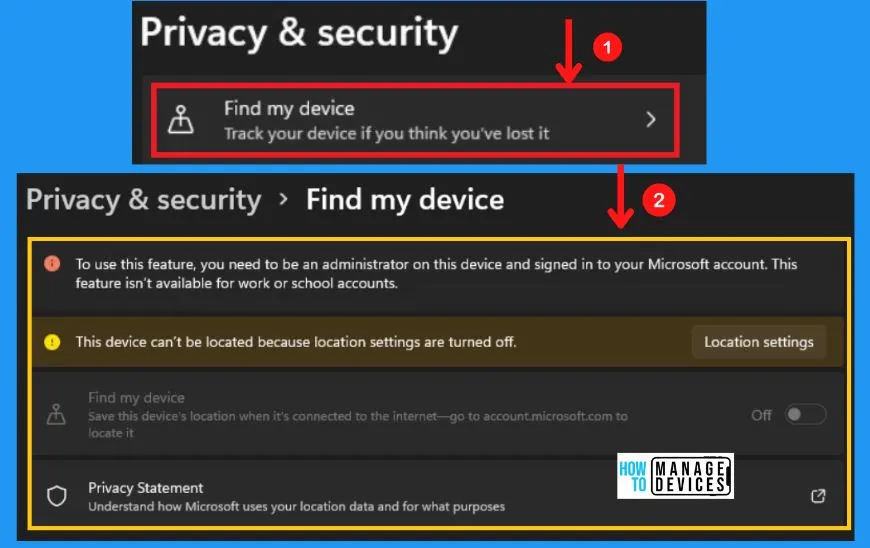
Find my device in Windows security helps track your device if you think you have lost it. To use this find my device feature, you need to be an administrator on this device and sign in to your Microsoft account. This feature is not available for work or school accounts.
Location settings in windows security help you to save this location when it’s connected to the internet. Find my device privacy statement allows you to understand how Microsoft uses your location data and what its purpose is for it.
The following are the steps to get find my device in Windows security.
- Start menu > Settings > Privacy & Security
- Select Find my device from Privacy & Security
For Developers in Windows 11
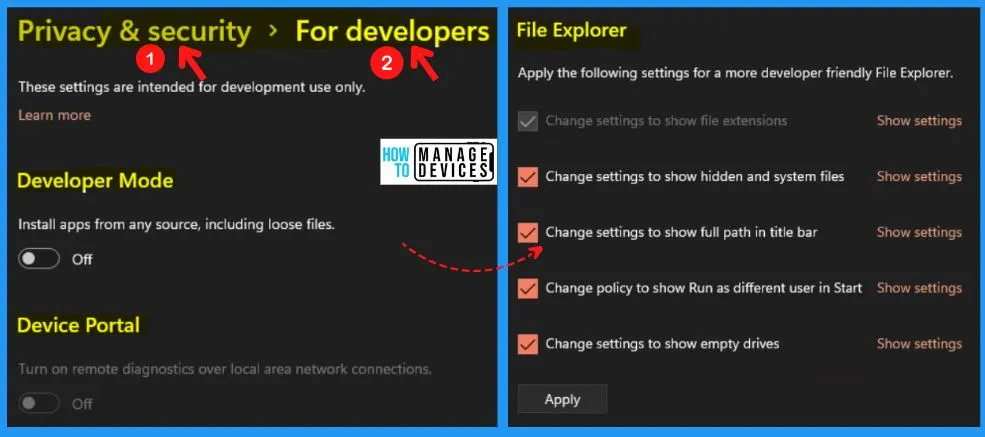
These settings are intended for development use only. The “For developers” in Windows security includes the Developer mode, Device portal, File explorer, Remote desktop, Terminal, and Powershell. The developer mode helps you to install apps from any source, including loose files.
- Device portal – Helps you to diagnostics over local area network connections
- File explorer – Helps you to apply the following settings for a more developer-friendly file explorer
- Change settings to show hidden and system files
- Change settings to show hidden and system files
- Change settings to show the full path in the title bar
- Change policy to show Run as a different user at the start
- Change settings to show empty drives
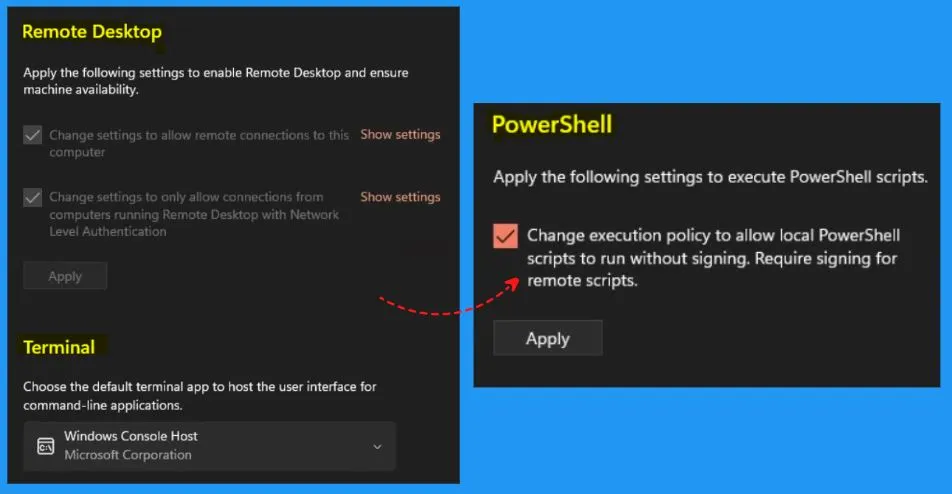
For Developers in Windows, Security includes the Remote desktop, Terminal, and Powershell. In Remote desktop, you should apply the following settings to enable Remote desktop and ensure machine availability.
- Change settings to allow remote connections to this computer
- Change settings to only allow connections from computers running Remote desktops with network-level authentication
- Terminal – Helps you to choose the default terminal app to host the user interface for command line applications
- Powershell – Apply the following settings to execute PowerShell scripts
- Change execution policy to allow local PowerShell scripts to run without signing required signing for remote scripts
Windows Permissions in Privacy and security
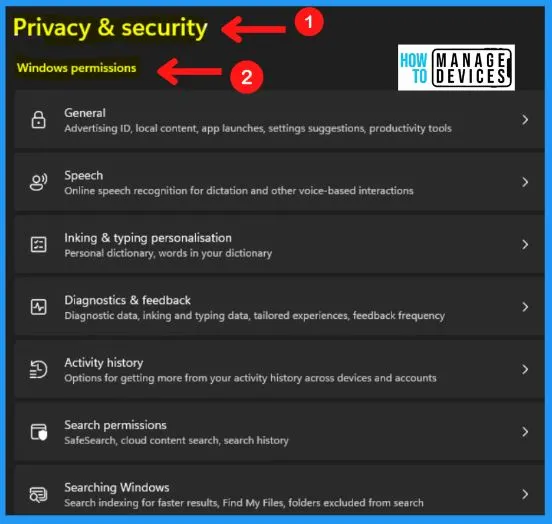
When you set permissions, you specify what users are allowed to do within that folder, such as save and delete files or create a new folder. The Windows permission in privacy & security includes the following features.
- General – The general Windows permission cover the advertising ID, local content, app launches, settings suggestions, productivity tools
- Speech – Online speech recognition for dictation and voice-based interactions
- Linking & typing personalization – It includes a personal dictionary and words in your dictionary
- Diagnostics & feedback – It includes diagnostic data, inking and typing data, tailored experiences, feedback frequency
- Activity history – Helps you to get more from your activity history across devices and accounts
- Search permissions – Helps you to safe search, cloud content search and search history
- Searching Windows – Helps you to search indexing for faster results, find my files, folders excluded from the search
App Permissions in Privacy and Security
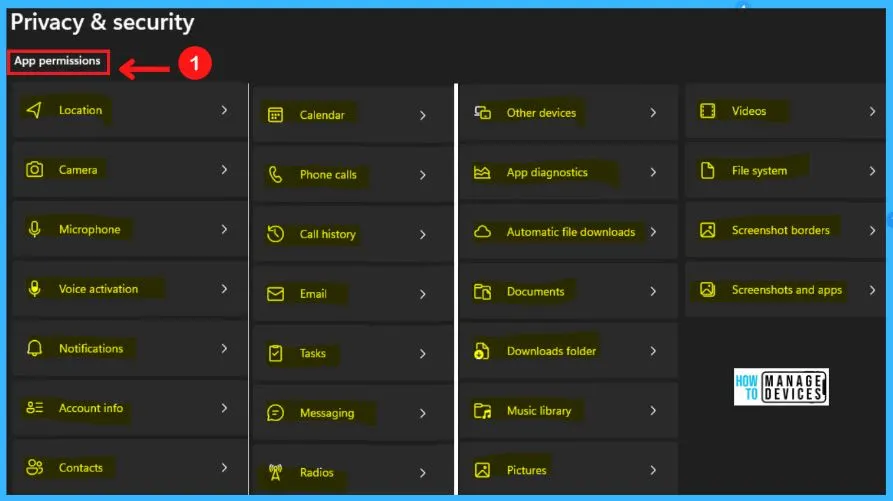
App permission in privacy & settings is another way to control and improve your privacy. App permission shows the location, camera, microphone, voice activation, notification, etc.
You can easily check and modify the app permission by clicking the pointing arrow next to the section. The following steps show the App permissions in privacy & security in Windows 11.
- Start menu > Settings > Privacy & Security
- Select App permissions from Privacy & Security
- Clicking the pointing arrow next to the section will help you to set the permission in that selected app
- Windows 11 Photos App Features and User Guide
- Latest Features of Windows 11 22H2 and Advanced Features
Group Policy Settings – Microsoft Defender Antivirus Policies for Windows 11
Let’s check the Group Policy settings options for windows security or Microsoft defender antivirus. You can use GPEIDIT.MSC from the run box to manage group policy settings. Group Policy setting is a configuration management technology.
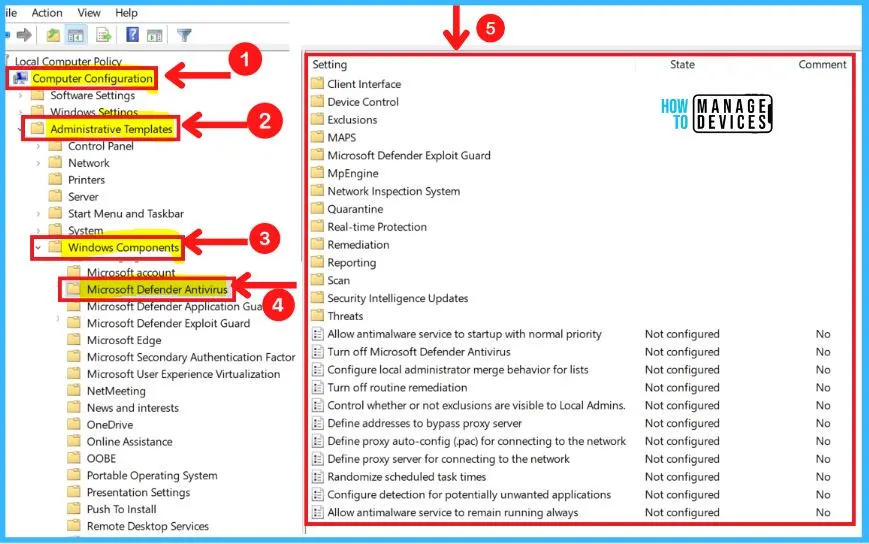
Group policy settings are part of the Windows server active directory. Group Policy is an infrastructure that helps specify managed configurations for users and computers through Group Policy settings and Preferences. The group policy settings for Microsoft Defender settings options available for Windows 11 as listed below:
- Client interface
- Device control
- Exclusions
- MAPS
- Microsoft Defender Exploit Guard
- MqEngine
- Quarantine
- Real-time Protection
- Remediation
- Reporting
- Scan
- Security Intelligence Updates
- Threats
- Allow antimalware service to startup with normal priority
- Turn off Microsoft Defender Antivirus
- Configure local administrator merge behavior for lists
- Turn off routine remediation
- Control whether or not exclusions are visible to Local Admins
- Define addresses to bypass the proxy server
- Define proxy auto-config (.pac) for connecting to the network
- Define proxy server for connecting to the network
- Randomize scheduled task times
- Configure detection for potentially unwanted applications
- Allow antimalware service to remain running always
Microsoft Defender Antivirus is antivirus software that helps you to protect your device from viruses, malware, and other threats. The below screenshot and steps show how to choose Microsoft Defender Antivirus from Group policy settings.
- Right-click the Start menu
- Select Run from the Start menu
- Type GPEIDIT.MSC in the run box
- Select Computer Configuration from the Group policy editor
- Computer Configuration > Administrative Templates > Windows Components > Microsoft Defender Antivirus
A. Client Interface
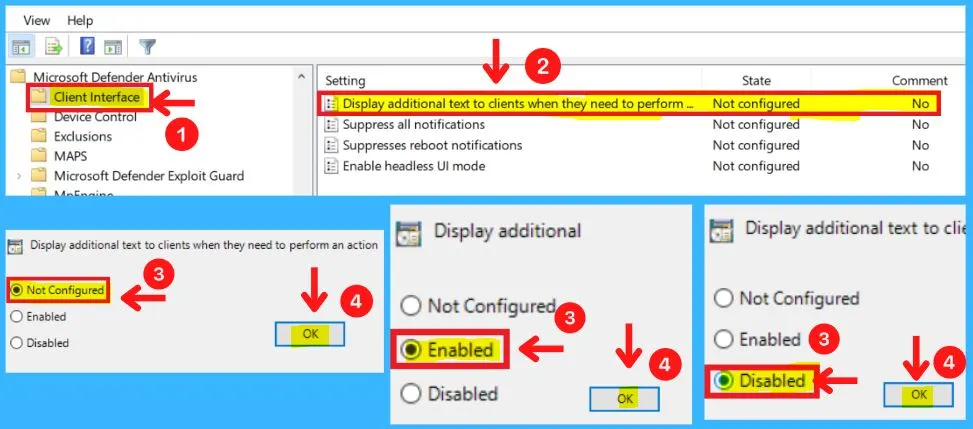
This policy setting allows you to configure whether or not to display additional text to clients when they need to perform an action. The text displayed is a custom administrator-defined string. The Client interface includes the following.
- Display additional text to clients when they need to perform an action
- Suppress all notifications
- Suppresses reboot notifications
- Enable Headless UI Mode
For example, the phone number to call the company help desk. The client interface will only display a maximum of 1024 characters. Longer strings will be truncated before display.
- Microsoft Defender Antivirus > Client interface > Display additional text to clients when they need to perform an action
- Enabled – If you enable this setting, the additional text specified will be displayed
- Disabled – If you disable or do not configure this setting, there will be no additional text displayed
2. Suppress All Notifications in the Client Interface
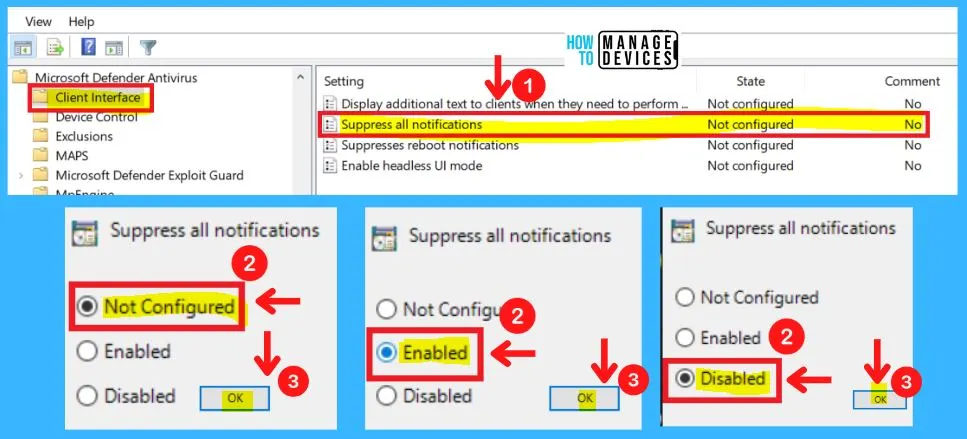
You can use this Group policy setting to specify if you want Microsoft Defender Antivirus notifications to display on clients. You can choose from three settings to Suppress all notifications in Microsoft Defender Antivirus, they are as follows.
- Microsoft Defender Antivirus > Client interface > Suppress all notifications
- Disable – If you disable or do not configure this setting, Microsoft Defender Antivirus notifications will display on clients
- Enable – If you enable this setting, Microsoft Defender Antivirus notifications will not display on clients
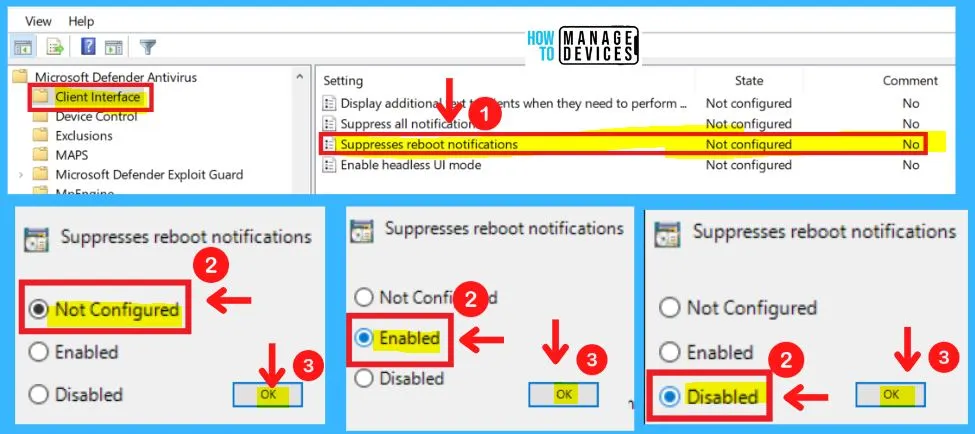
3. Suppresses Reboot Notifications in the Client Interface
Suppresses reboot notifications in the Group Policy setting, and allows the user to suppress reboot notifications in UI-only mode (for cases where UI can’t be in lockdown mode).
- Microsoft Defender Antivirus > Client interface > Suppresses reboot notifications
- Enable – If you enable this setting AM UI won’t show reboot notifications
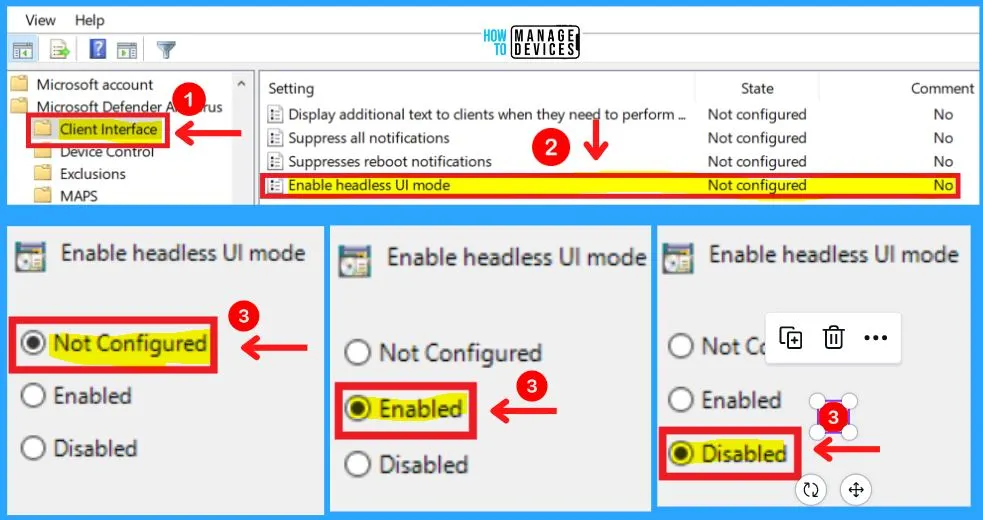
4. Enabled Headless UI Mode in the Client Interface
This policy setting allows you to configure whether or not to display AM UI to the users. You can choose from three settings to Enable headless UI mode in the Client Interface.
- Enable – If you enable this setting AM UI won’t be available to users
B. Device Control in MS Defender Antivirus
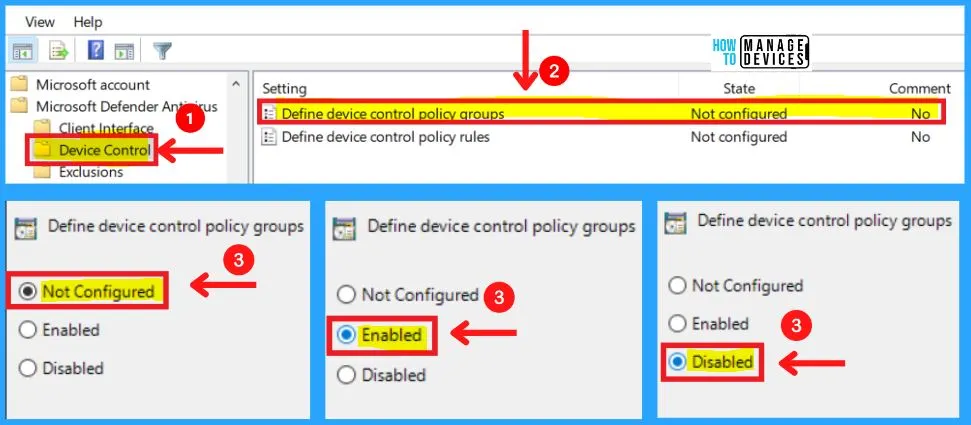
The Device control in MS Defender antivirus includes two settings as Define device control policy groups and Define device control policy rules. You can choose the Define device control policy groups in three settings: Enabled, Disabled, and Not configured.
- Microsoft Defender Antivirus >Device control > Define device control policy groups
- Please follow the device control policy groups XML schema to fill out the policy groups’ data
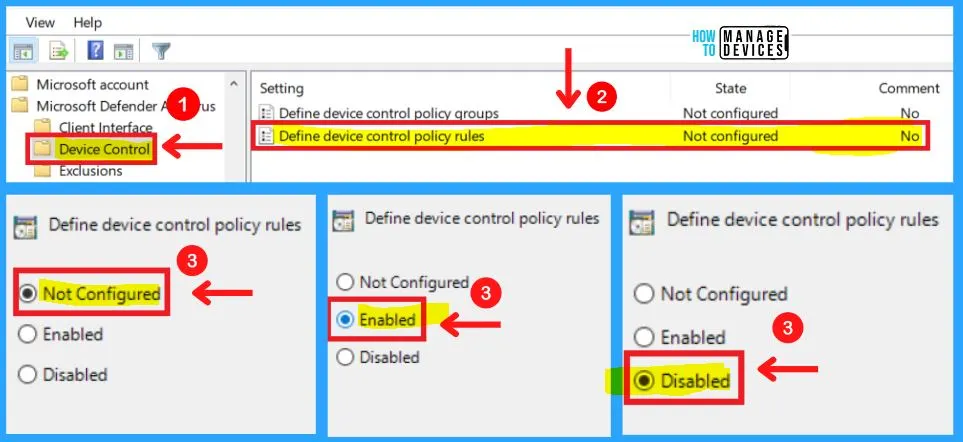
2. Define Device Control Policy Rules in Device Control
You can choose from three settings Define device control policy rules in Device control. Please follow the device control policy rules XML schema to fill out the policy rules data.
- Microsoft Defender Antivirus >Device control > Define device control policy rules
C. Exclusions in MS Defender Antivirus
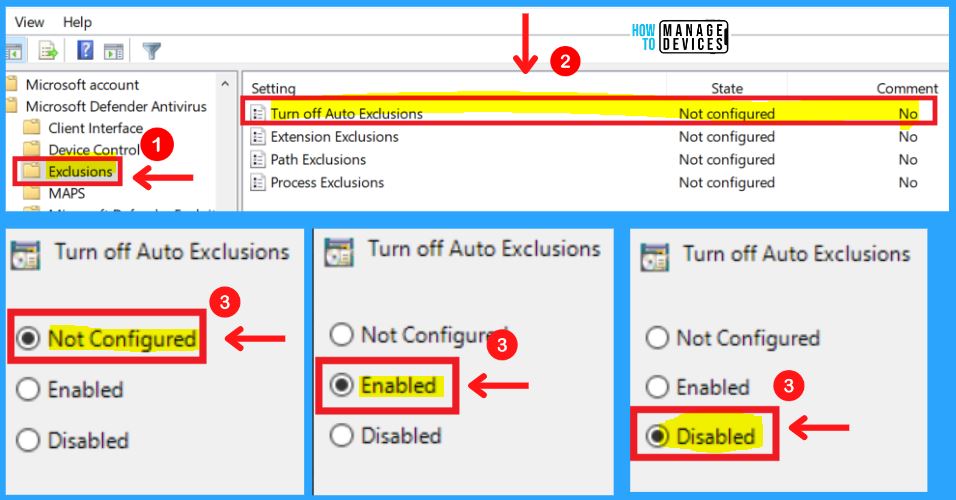
The Exclusions in MS Defender Antivirus include the Turn off Auto Exclusions, Extension Exclusions, Path Exclusions, and Process Exclusions. Turn off Auto Exclusions allows an administrator to specify if the Automatic Exclusions feature for Server SKUs should be turned off.
- Disabled (Default) – Microsoft Defender will exclude a pre-defined list of paths from the scan to improve performance
- Enabled – Microsoft Defender will not exclude a pre-defined list of paths from scans. This can impact machine performance in some scenarios
- Not configured – Same as Disabled
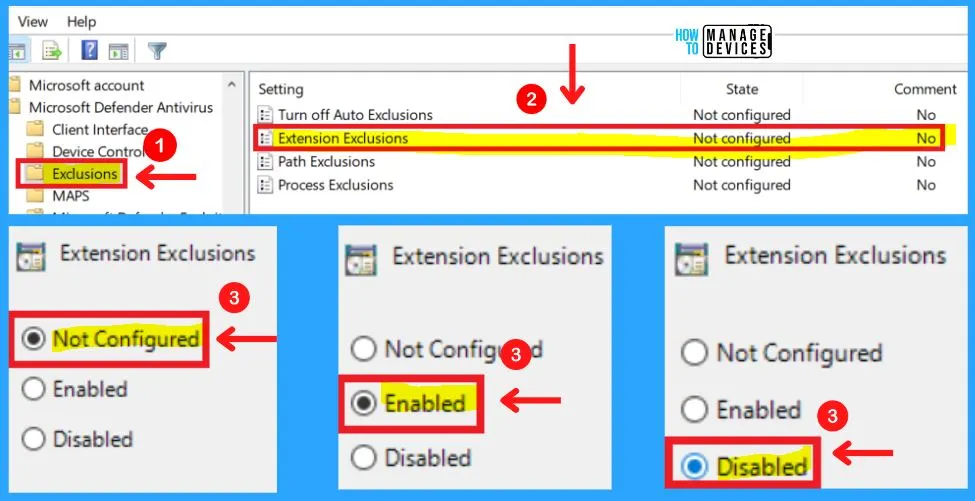
2. Extension Exclusions
This policy setting allows you to specify a list of file types that should be excluded from scheduled, custom, and real-time scanning. File types should be added under the Options for this setting.
Each entry must be listed as a name-value pair, where the name should be a string representation of the file type extension (such as “obj” or “lib”). The value is not used and it is recommended that this be set to 0.
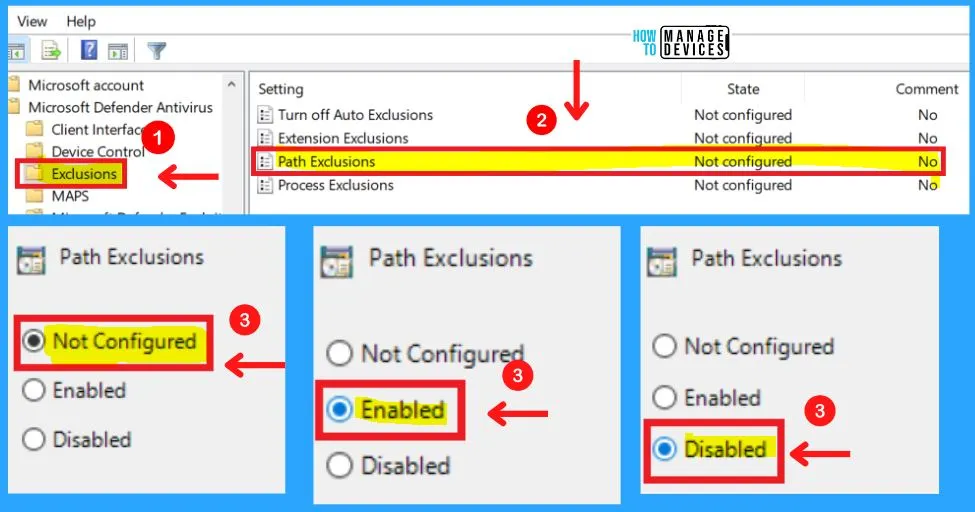
3. Path Exclusions
This policy allows you to disable scheduled and real-time scanning for files under the specified paths or fully qualified resources. Paths should be added under the Options for this setting. Each entry must be listed as a name-value pair, where the name should be a string representation of a path or a fully qualified resource name.
As an example, a path might be defined as “c:\Windows” to exclude all files in this directory. A fully qualified resource name might be defined as: “C:\Windows\App.exe“. The value is not used and it is recommended that this be set to 0.
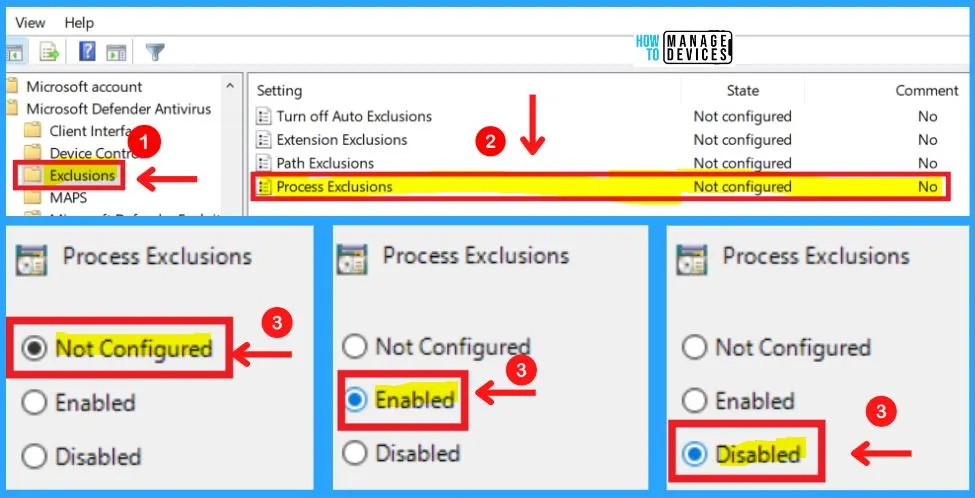
4. Process Exclusions
This policy setting allows you to disable scheduled and real-time scanning for any file opened by any of the specified processes. The process itself will not be excluded. To exclude the process, use the Path exclusion. Processes should be added under the Options for this setting.
Each entry must be listed as a name-value pair, where the name should be a string representation of the path to the process image. Note that only executables can be excluded. For example, a process might be defined as: “c:\windows\app.exe”. The value is not used and it is recommended that this be set to 0.
D. MAPS in MS Defender Antivirus
Microsoft Active Protection Service (MAPS) is now called Windows Defender Antivirus cloud protection service. The MAPS in MS Defender Antivirus includes the following settings.
- Configure the block-at-first-sight feature
- Join Microsoft MAPS
- Configure local setting override for reporting to Microsoft MAPS
- Send files sample when further analysis is required
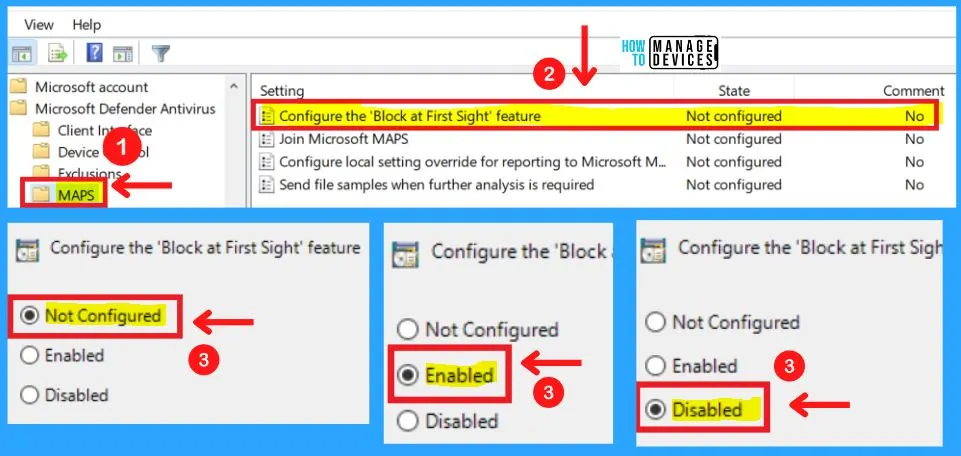
1. Configure the Block-at-First-Sight Feature
Configure the block-at-first-sight feature ensures the device checks in real-time with the Microsoft Active Protection Service (MAPS) before allowing certain content to be run or accessed. If this feature is disabled, the check will not occur, which will lower the protection state of the device.
- Enabled – The Block at First Sight setting is turned on
- Disabled – The Block at First Sight setting is turned off
Configure the Block at first sight feature requires these Group Policy settings to be set as follows:-
- MAPS -> The “Join Microsoft MAPS” must be enabled or the “Block at First Sight” feature will not function
- MAPS -> The “Send file samples when further analysis is required” should be set to 1 (Send safe samples) or 3 (Send all samples). Setting it to 0 (Always Prompt) will lower the protection state of the device. Setting to 2 (Never send) means the “Block at First Sight” feature will not function
- Real-time Protection -> The “Scan all downloaded files and attachments” policy must be enabled or the “Block at First Sight” feature will not function
- Real-time Protection -> Do not enable the “Turn off real-time protection” policy or the “Block at First Sight” feature will not function
2. Join Microsoft MAPS
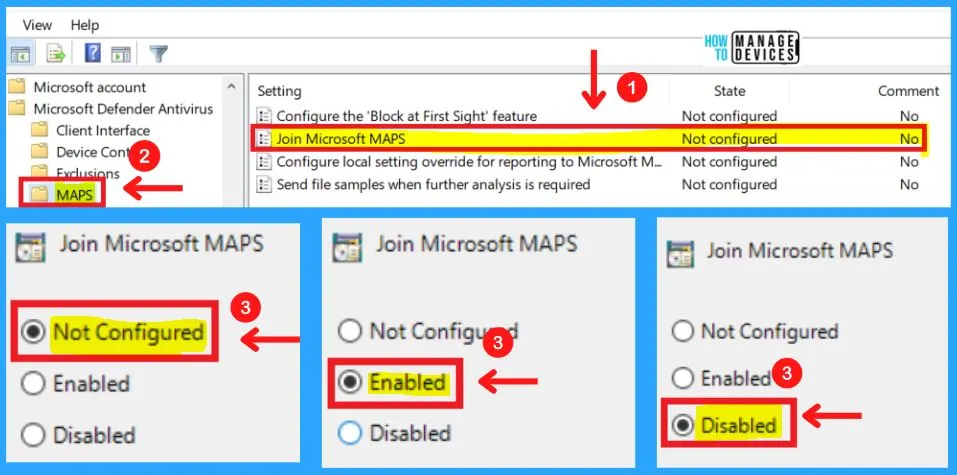
This policy setting allows you to join Microsoft MAPS. Microsoft MAPS is the online community that helps you choose how to respond to potential threats. The community also helps stop the spread of new malicious software infections.
You can choose to send basic or additional information about detected software. Additional information helps Microsoft create new security intelligence and help to protect your computer. This information can include things like the location of detected items on your computer if harmful software was removed.
The information will be automatically collected and sent. In some instances, personal information might unintentionally be sent to Microsoft. However, Microsoft will not use this information to identify or contact you.
Possible options are:
(0x0) Disabled (default)
(0x1) Basic membership
(0x2) Advanced membership
Basic membership will send basic information to Microsoft about software that has been detected, including where the software came from, the actions that you apply or that are applied automatically, and whether the actions were successful.
Advanced membership, in addition to basic information, will send more information to Microsoft about malicious software, spyware, and potentially unwanted software, including the location of the software, file names, how the software operates, and how it has impacted your computer.
- If you enable this setting, you will join Microsoft MAPS with the membership specified
- If you disable or do not configure this setting, you will not join Microsoft MAP
Note! – In Windows 10, Basic membership is no longer available, so setting the value to 1 or 2 enrolls the device into Advanced membership.
3. Configure Local Setting Override for Reporting to Microsoft MAPS
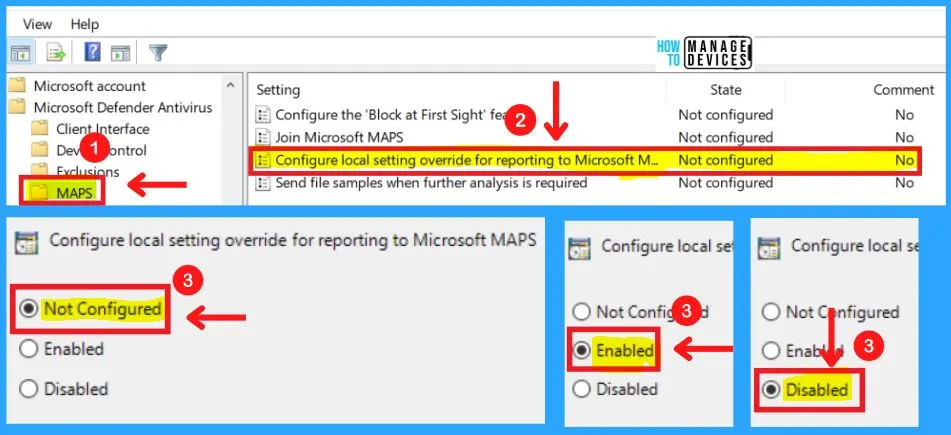
This policy setting configures a local override for the configuration to join Microsoft MAPS. Group Policy can only set this setting.
- If you enable this setting, the local preference setting will take priority over Group Policy
- If you disable or do not configure this setting, Group Policy will take priority over the local preference setting
4. Send Files Sample When Further Analysis is Required
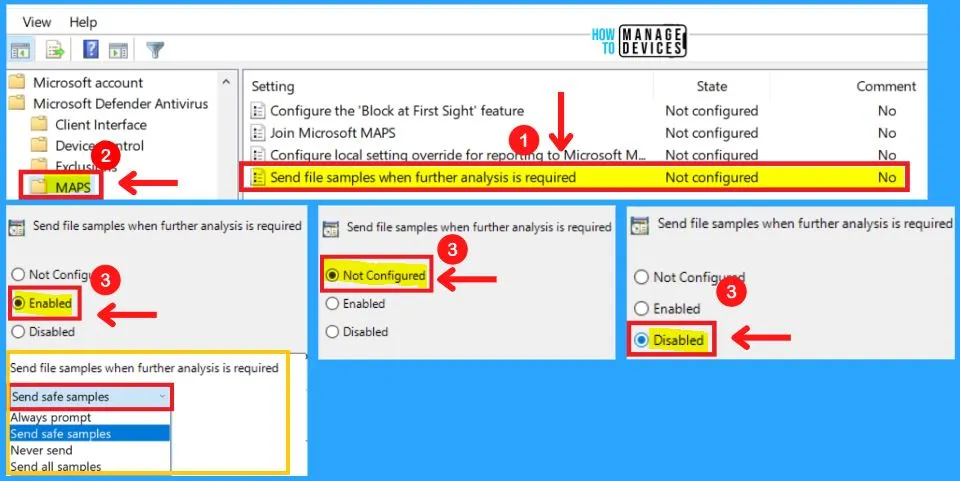
This policy setting configures the behavior of sample submission when opt-in for MAPS telemetry is set. You can choose from three settings to send file samples when further analysis is required in MAPS.
Possible options are:
(0x0) Always prompt
(0x1) Send safe samples automatically
(0x2) Never send
(0x3) Send all samples automatically
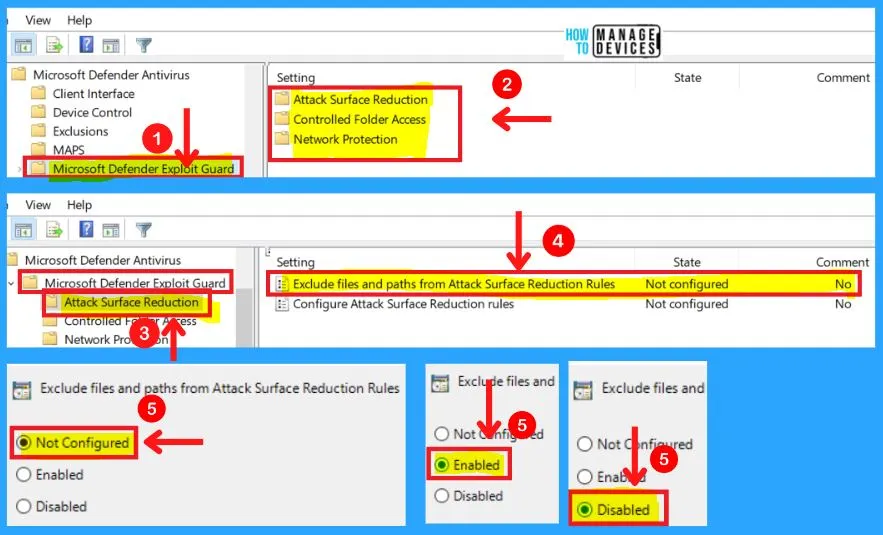
E. Microsoft Defender Exploit Guard
The Microsoft defender exploits guard includes three main settings: Attack surface reduction, Controlled folder access, and Network protection. The Attack surface reduction in MS defender exploit guard consists of two settings.
- Exclude files and paths from Attack Surface Reduction rules
- Configure Attack Surface Reduction rules
1. Exclude Files and Paths from Attack Surface Reduction Rules
You can choose from three settings to Exclude files and paths from Attack Surface Reduction rules in MS Defender exploit guard. They are as follows.
- Enabled – Specify the folders or files and resources that should be excluded from ASR rules in the Options section
Enter each rule on a new line as a name-value pair:
– Name column: Enter a folder path or a fully qualified resource name. For example, “”C:\Windows”” will exclude all files in that directory. “”C:\Windows\App.exe”” will exclude only that specific file in that specific folder
– Value column: Enter “”0″” for each item
- Disabled – No exclusions will be applied to the ASR rules
- Not configured – Same as Disabled
Note! – You can configure ASR rules in the Configure Attack Surface Reduction rules GP setting
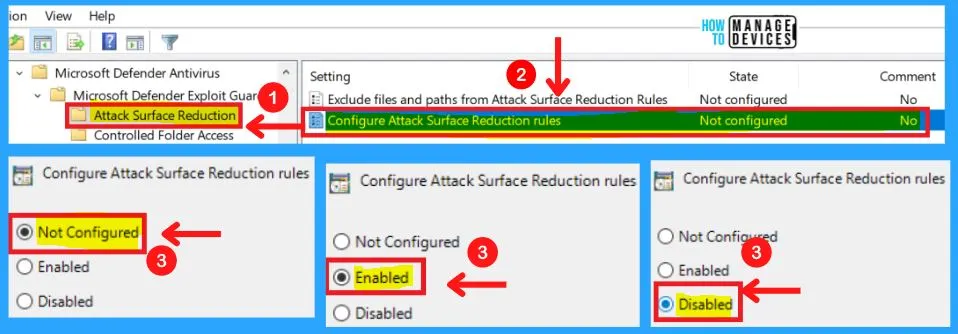
2. Configure Attack Surface Reduction Rules
Set the state for each Attack Surface Reduction (ASR) rule. After enabling this setting, you can set each rule to the following in the Options section.
- Block: the rule will be applied
- Audit Mode: if the rule would normally cause an event, then it will be recorded (although the rule will not actually be applied)
- Off: the rule will not be applied
You can choose from three settings to configure attack surface reduction rules in Microsoft Defender exploit guard.
- Enabled – Specify the state for each ASR rule under the Options section for this setting
- Enter each rule on a new line as a name-value pair:
- Name column: Enter a valid ASR rule ID
- Value column: Enter the status ID that relates to the state you want to specify for the associated rule
The following status IDs are permitted under the value column:
– 1 (Block)
– 0 (Off)
– 2 (Audit)
Example:
xxxxxxxx-xxxx-xxxx-xxxx-xxxxxxxxxxxx            0
xxxxxxxx-xxxx-xxxx-xxxx-xxxxxxxxxxxx            1
xxxxxxxx-xxxx-xxxx-xxxx-xxxxxxxxxxxx 2- Disabled – No ASR rules will be configured
- Not configured – Same as Disabled
Note! – You can exclude folders or files in the “”Exclude files and paths from Attack Surface Reduction Rules”” GP setting.
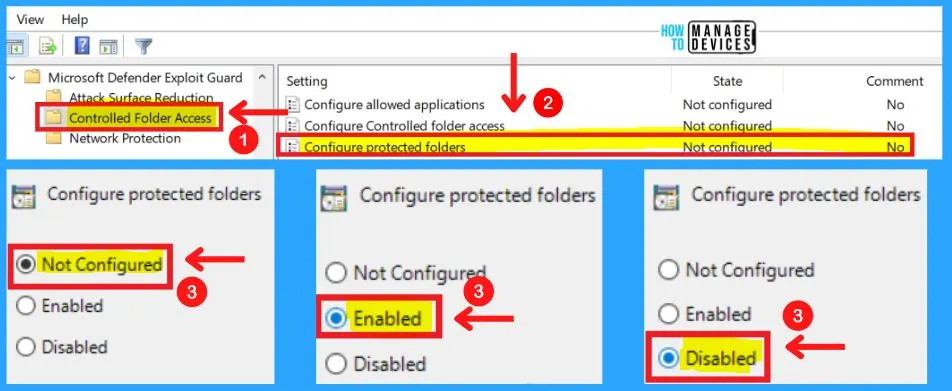
Controlled Folder Access in MS Defender Exploit Guard
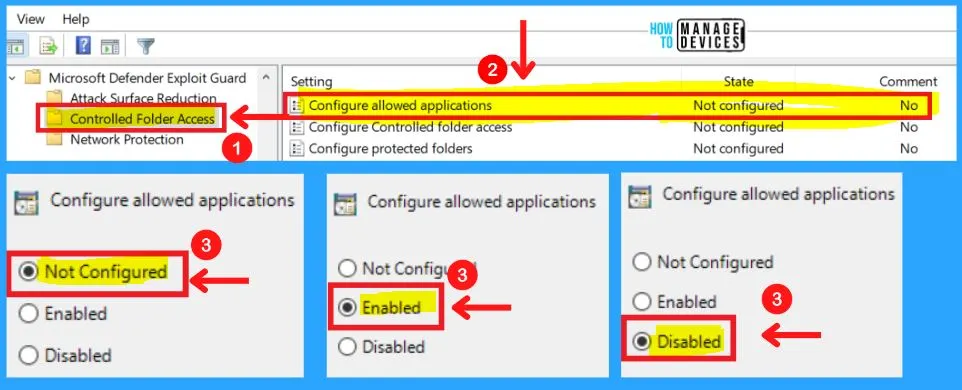
Group Policy settings that disable local administrator list merging will override controlled folder access settings. The Controlled folder access in Microsoft Defender exploit guard includes the following settings.
- Configure allowed applications
- Configure controlled folder access
- Configure protected folders
1. Configure Allowed Applications
Add additional applications that should be considered “trusted” by controlled folder access. These applications are allowed to modify or delete files in controlled folder access folders.
Microsoft Defender Antivirus automatically determines which applications should be trusted. You can configure this setting to add additional applications.
- Enabled – Specify additional allowed applications in the Options section
- Disabled – No additional applications will be added to the trusted list
- Not configured – Same as Disabled
You can enable controlled folder access in the Configure controlled folder access GP setting. Default system folders are automatically guarded, but you can add folders in the configured protected folder’s GP setting.
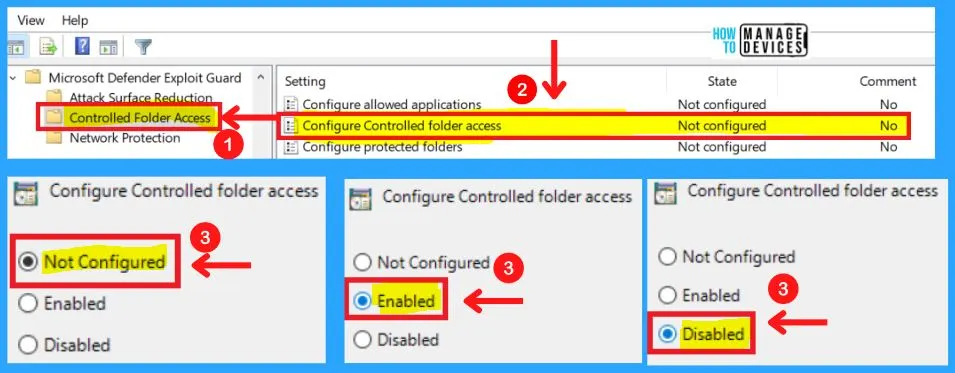
2. Configure Controlled Folder Access
Enable or disable controlled folder access for untrusted applications. You can choose to block, audit, or allow attempts by untrusted apps to Modify or delete files in protected folders, such as the Documents folder, Write to disk sectors.
You can also choose to only Block or audit writes to disk sectors while still allowing the modification or deletion of files in protected folders. Microsoft Defender Antivirus automatically determines which applications can be trusted. You can add additional trusted applications in the Configure allowed applications GP setting.
Default system folders are automatically protected, but you can add folders in the Configure protected folders GP setting.
Default system folders are automatically protected, but you can add folders in the Configure protected folders GP setting. Block: The following will be blocked –
- Attempts by untrusted apps to modify or delete files in protected folders
- Attempts by untrusted apps to write to disk sectors
- The Windows event log will record these blocks under Applications and Services Logs > Microsoft > Windows > Windows Defender > Operational > ID 1123
Disabled: The following will not be blocked and will be allowed to run –
- Attempts by untrusted apps to modify or delete files in protected folders
- Attempts by untrusted apps to write to disk sectors
- These attempts will not be recorded in the Windows event log
Audit Mode: The following will not be blocked and will be allowed to run-
- Attempts by untrusted apps to modify or delete files in protected folders
- Attempts by untrusted apps to write to disk sectors
- The Windows event log will record these attempts under Applications and Services Logs > Microsoft > Windows > Windows Defender > Operational > ID 1124
Block disk modification only: The following will be blocked-
- Attempts by untrusted apps to write to disk sectors
- The Windows event log will record these attempts under Applications and Services Logs > Microsoft > Windows > Windows Defender > Operational > ID 1123
The following will not be blocked and will be allowed to run-
- Attempts by untrusted apps to modify or delete files in protected folders
- These attempts will not be recorded in the Windows event log
Audit disk modification only: The following will not be blocked and will be allowed to run-
- Attempts by untrusted apps to write to disk sectors
- Attempts by untrusted apps to modify or delete files in protected folders
- Only attempts to write to protected disk sectors will be recorded in the Windows event log (under Applications and Services Logs > Microsoft > Windows > Windows Defender > Operational > ID 1124)
Note! – Attempts to modify or delete files in protected folders will not be recorded
Not configured – Same as Disabled.
3. Configure Protected Folders
Specify additional folders that should be guarded by the Controlled folder access feature. Files in these folders cannot be modified or deleted by untrusted applications.
Default system folders are automatically protected. You can configure this setting to add additional folders. The list of protected default system folders is shown in Windows Security.
- Enabled – Specify additional folders that should be protected in the Options section
- Disabled – No additional folders will be protected
- Not configured – Same as Disabled
You can enable controlled folder access in the Configure controlled folder access GP setting. Microsoft Defender Antivirus automatically determines which applications can be trusted. You can add additional trusted applications in the Configure allowed applications GP setting.
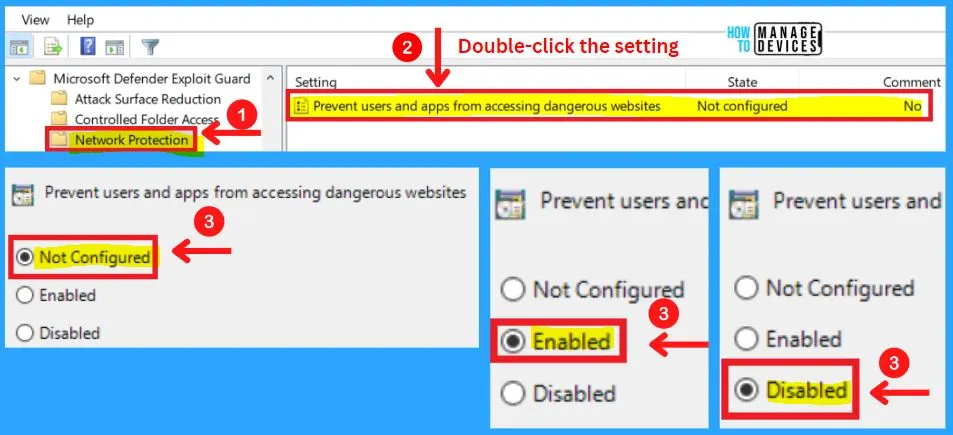
Network Protection in MS Defender Exploit Guard
Preventing users and apps from accessing dangerous websites setting is included in the Network protection of MS Defender exploit guard. Network protection helps you to enable layer the network layer of blocking URLs and IP addresses.
Enable or disable Microsoft Defender Exploit Guard network protection to prevent employees from using any application to access dangerous domains that may host phishing scams, exploit-hosting sites, and other malicious content on the Internet.
- Enabled – Specify the mode in the Options section
- Block: Users and applications will not be able to access dangerous domains
- Audit Mode: Users and applications can connect to dangerous domains; however, if this feature would have blocked access if it were set to Block, then a record of the event will be in the event logs
- Disabled – Users and applications will not be blocked from connecting to dangerous domains
- Not configured – Same as Disabled
F. MqEngine
Microsoft Defender is an anti-malware component of Microsoft Windows. The MqEngine of Microsoft defender antivirus includes the following settings.
- Enable file hash computation feature
- Configure extended cloud check
- Select cloud protection level
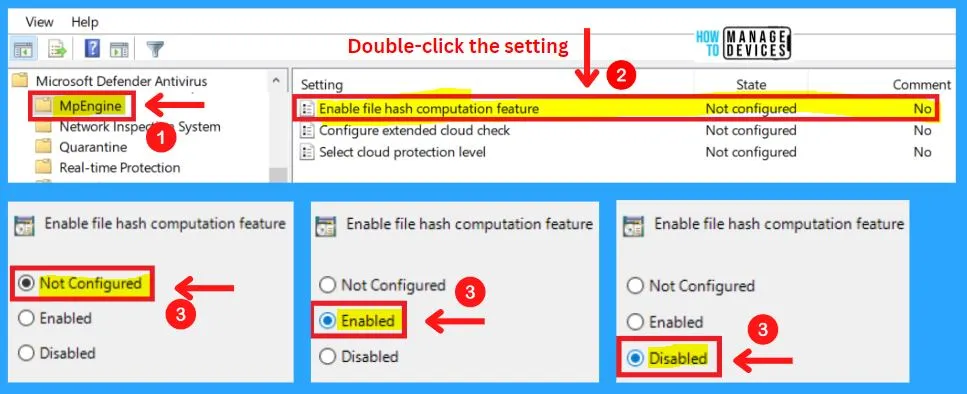
1. Enable File Hash Computation Feature
You can easily Enable or disable the file hash computation feature. You can choose from three settings to enable the file hash computation feature in MD Defender Antivirus.
- Enabled – When this feature is enabled, Microsoft Defender will compute the hash value for files it scans
- Disabled – File hash value is not computed
- Not configured – Same as Disabled
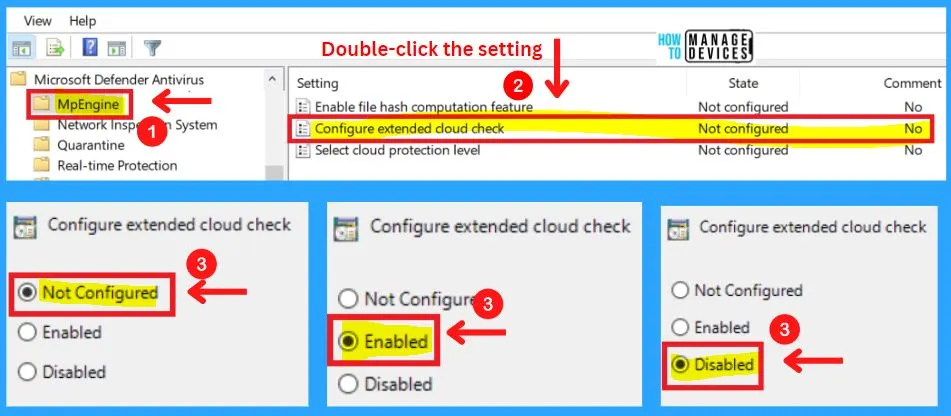
2. Configure Extended Cloud Check
This feature allows Microsoft Defender Antivirus to block a suspicious file for up to 60 seconds and scan it in the cloud to make sure it’s safe. The typical cloud check timeout is 10 seconds. To enable the extended cloud check feature, specify the extended time in seconds, up to an additional 50 seconds.
For example, if the desired timeout is 60 seconds, specify 50 seconds in this setting, which will enable the extended cloud check feature, and will raise the total time to 60 seconds.
Note! – This feature depends on three other MAPS settings – “Configure the ‘Block at First Sight’ feature; “Join Microsoft MAPS”; “Send file samples when further analysis is required” all need to be enabled.
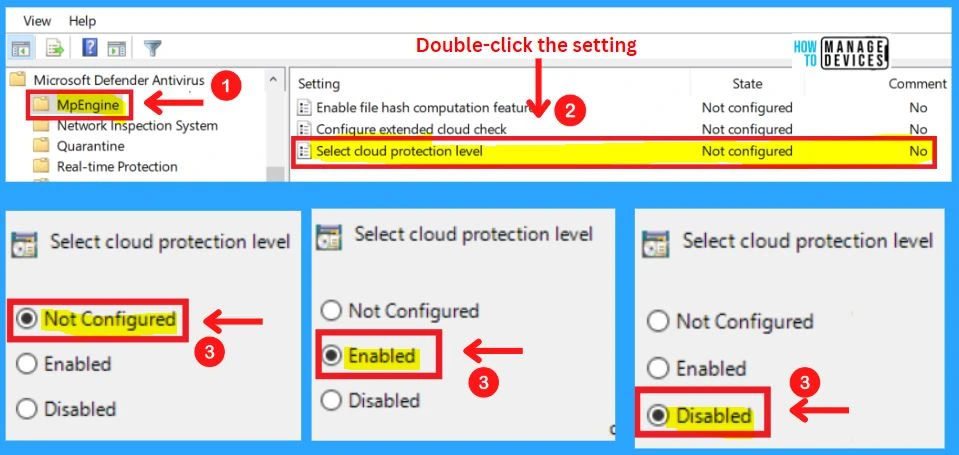
3. Select the Cloud protection level
This policy setting determines how aggressive Microsoft Defender Antivirus will be in blocking and scanning suspicious files.
If this setting is on, Microsoft Defender Antivirus will be more aggressive when identifying suspicious files to block and scan; otherwise, it will be less aggressive and therefore block and scan with less frequency. For more information about specific values that are supported, see the Microsoft Defender Antivirus documentation site.
Note! – This feature requires the “Join Microsoft MAPS” setting enabled in order to function.
Possible options are:-
(0x0) Default Microsoft Defender Antivirus blocking level
(0x1) Moderate Microsoft Defender Antivirus blocking level, delivers verdict only for high confidence detections
(0x2) High blocking level – aggressively block unknowns while optimizing client performance (greater chance of false positives)
(0x4) High+ blocking level – aggressively block unknowns and apply additional protection measures (may impact client performance)
(0x6) Zero tolerance blocking level – block all unknown executables
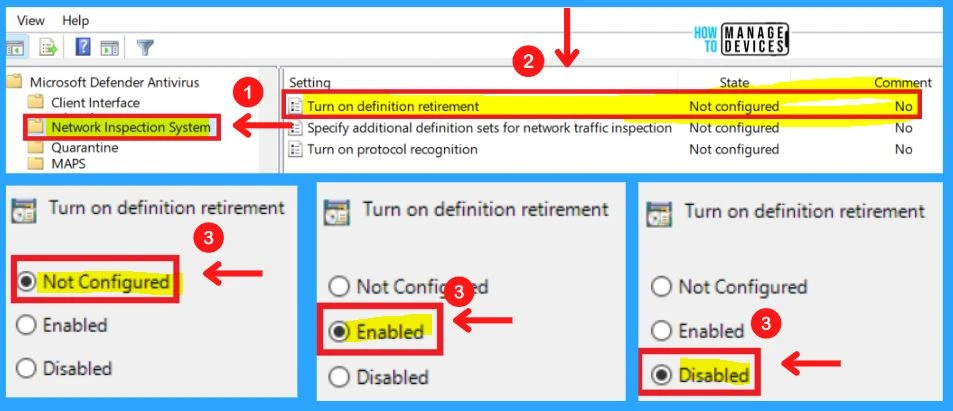
Network Inspection System
The network Inspection system includes the settings such as Turning on definition retirement, Specifying additional definition sets for network traffic inspection, and Turning on protocol recognition.
- Turning to the definition of retirement
- Specifying additional definition sets for network traffic inspection
- Turning on protocol recognition
1. Turning to the Definition of Retirement
This policy setting allows you to configure definition retirement for network protection against exploits of known vulnerabilities. Definition retirement checks to see if a computer has the required security updates necessary to protect it against a particular vulnerability. If the system is not vulnerable to the exploit detected by a definition, then that definition is “retired.”
If all security intelligence for a given protocol is retired, then that protocol is no longer parsed. Enabling this feature helps to improve performance. Network protection will not impact network performance on a computer that is up-to-date with all the latest security updates.
- If you enable or do not configure this setting, definition retirement will be enabled.
- If you disable this setting, the definition of retirement will be disabled
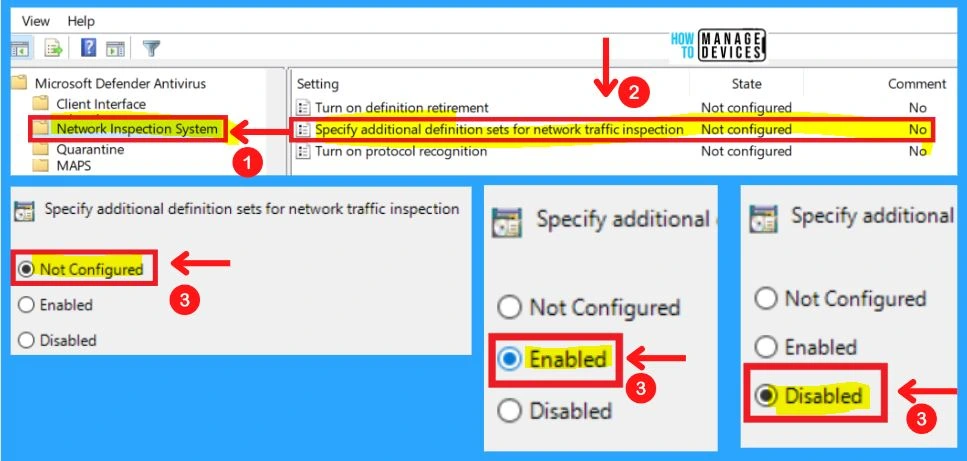
2. Specifying Additional Definition Sets for Network Traffic Inspection
This policy setting defines additional definition sets to enable network traffic inspection. Definition set GUIDs should be added under the Options for this setting. Each entry must be listed as a name-value pair, where the name should be a string representation of a definition set GUID.
As an example, the definition set GUID to enable test security intelligence is defined as: “{b54b6ac9-a737-498e-9120-6616ad3bf590}”. The value is not used and it is recommended that this be set to 0.
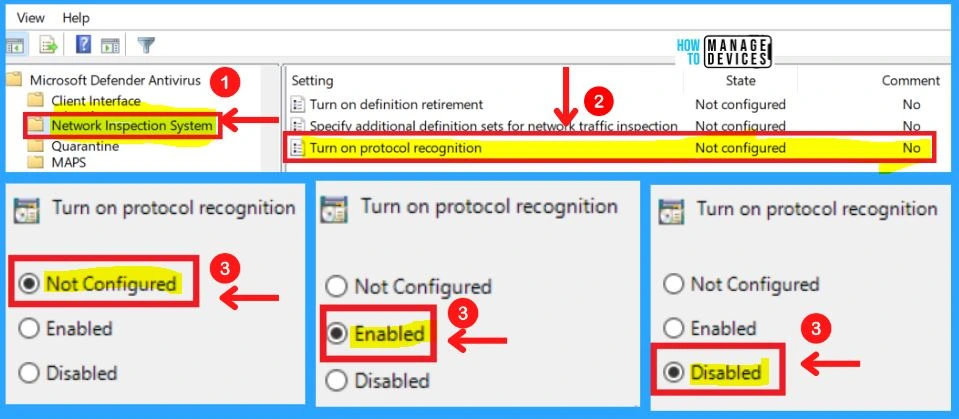
3. Turning on Protocol Recognition
This policy setting allows you to configure protocol recognition for network protection against exploits of known vulnerabilities.
- If you enable or do not configure this setting, protocol recognition will be enabled
- If you disable this setting, protocol recognition will be disabled
Quarantine in MS Defender Antivirus
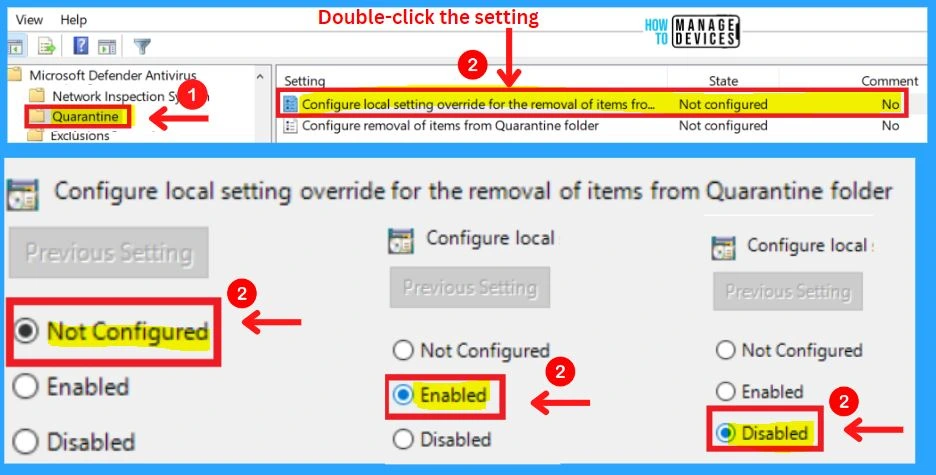
Quarantine includes the settings such as Configure local setting override for removing items from the Quarantine folder and Configure removal of items from the Quarantine folder.
1. Configure local setting override for the removal of items from the Quarantine folder
This policy setting configures a local override for the configuration of the number of days items should be kept in the Quarantine folder before being removed. Group Policy can only set this setting.
- If you enable this setting, the local preference setting will take priority over Group Policy
- If you disable or do not configure this setting, Group Policy will take priority over the local preference setting
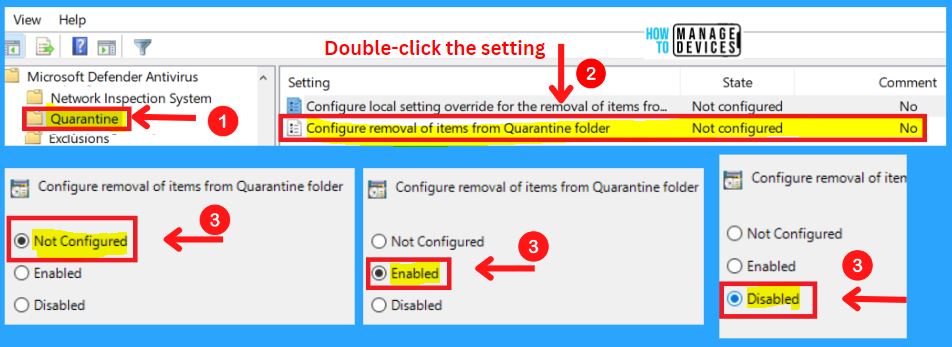
2. Configure the Removal of Items from the Quarantine Folder
This policy defines the number of days items should be kept in the Quarantine folder before removal. If you enable this setting, items will be removed from the Quarantine folder after the number of days specified.
- If you disable or do not configure this setting, items will be kept in the quarantine folder indefinitely and will not be automatically removed
Real-Time Protection
Real-time Protection in MS Defender includes the settings such as Turning off real-time Protection, Turning on behavior, scanning all downloaded files and attachments, and Monitoring files and program activity on your computer.
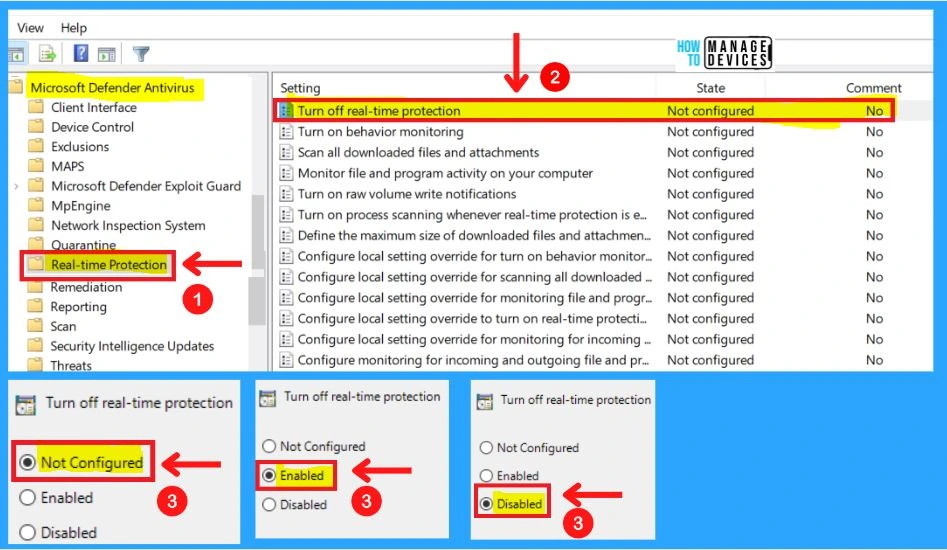
1. Turning Off Real-Time Protection
This policy setting turns off real-time Protection prompts for known malware detection. Microsoft Defender Antivirus alerts you when malware or potentially unwanted software attempts to install or run on your computer.
- If you enable this policy setting, Microsoft Defender Antivirus will not prompt users to take action on malware detection
- If you disable or do not configure this policy setting, Microsoft Defender Antivirus will prompt users to take action on malware detection
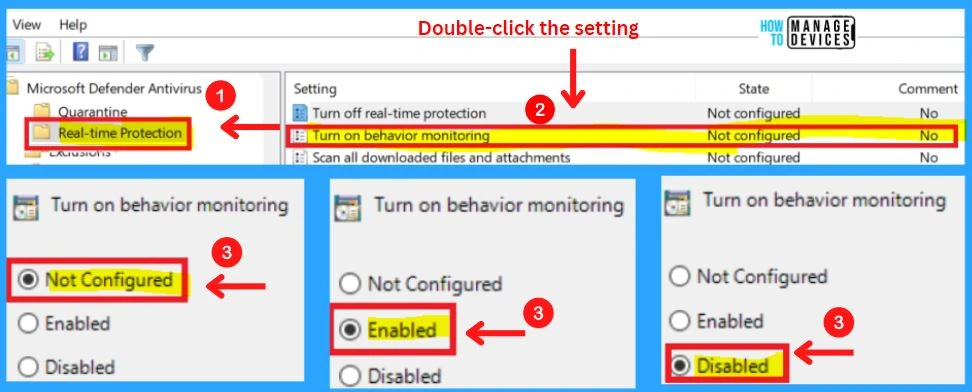
2. Turn On Behavior Monitoring
This policy setting allows you to configure behavior monitoring. Behavior monitoring will be enabled if you enable or do not configure this setting. If you disable this setting, behavior monitoring will be disabled.
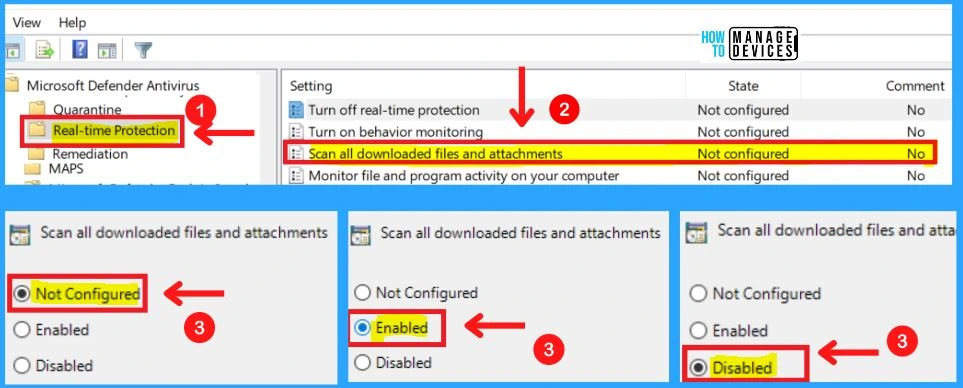
3. Scan All Downloaded Files and Attachments
This policy setting allows you to configure scanning for all downloaded files and attachments. Scanning for all downloaded files and attachments will be enabled if you enable or do not configure this setting. If you disable this setting, scanning for all downloaded files and attachments will be disabled.
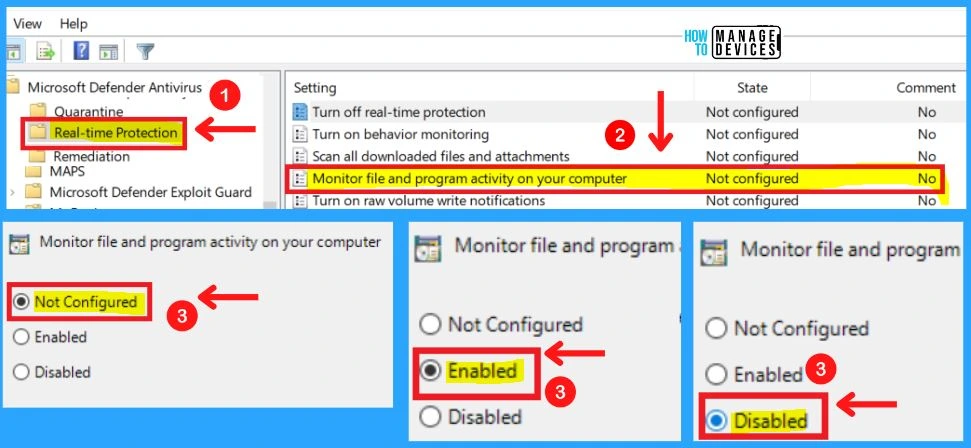
4. Monitor File and Program Activity on your Computer
This policy setting allows you to configure monitoring for file and program activity. If you enable or do not configure this setting, monitoring for file and program activity will be enabled. If you disable this setting, monitoring for file and program activity will be disabled.
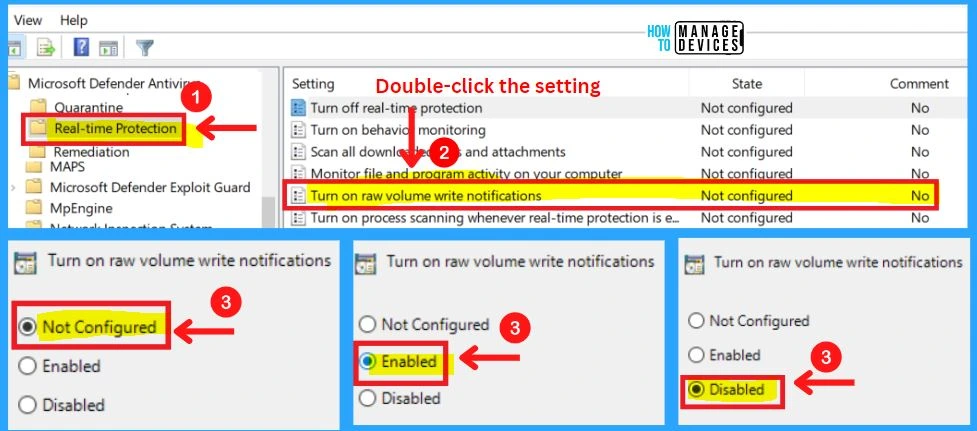
5. Turn on Raw Volume Write Notifications
This policy setting controls whether raw volume writes notifications are sent to behavior monitoring. If you enable or do not configure this setting, raw write notifications will be enabled. If you disable this setting, raw write notifications are disabled.
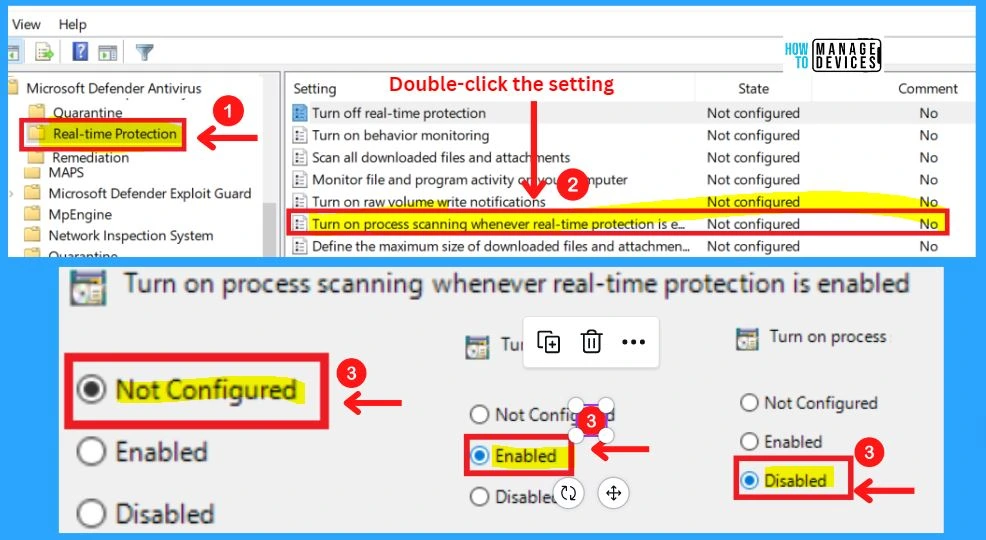
6. Turn on Process Scanning Whenever Real-Time Protection is Enabled
This policy setting allows you to configure process scanning when real-time Protection is turned on. This helps to catch malware which could start when real-time Protection is turned off. If you enable or do not configure this setting, a process scan will be initiated when real-time Protection is turned on.
- If you disable this setting, a process scan will not be initiated when real-time Protection is turned on.
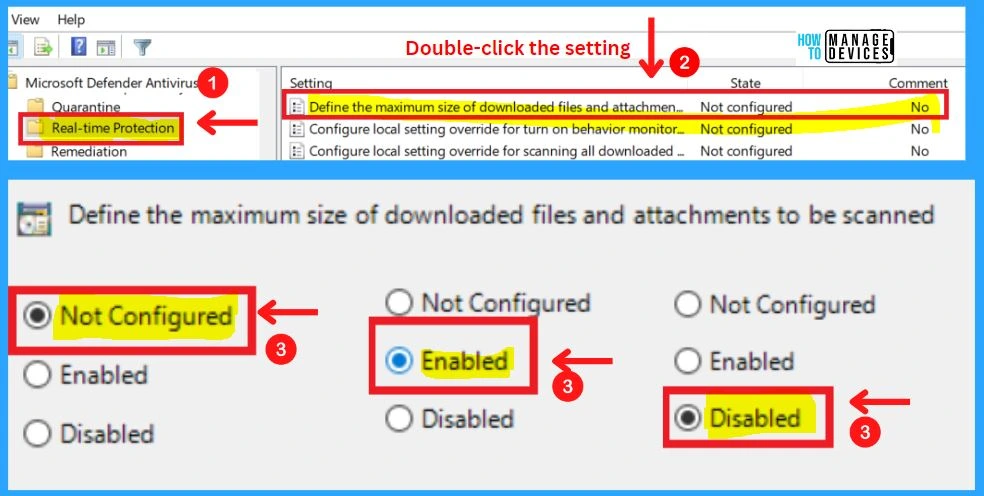
8. Define the Maximum Size of Downloaded Files and Attachments to be Scanned
This policy defines the maximum size (in kilobytes) of downloaded files and attachments that will be scanned. If you enable this setting, downloaded files and attachments smaller than the size specified will be scanned.
- If you disable or do not configure this setting, a default size will be applied.
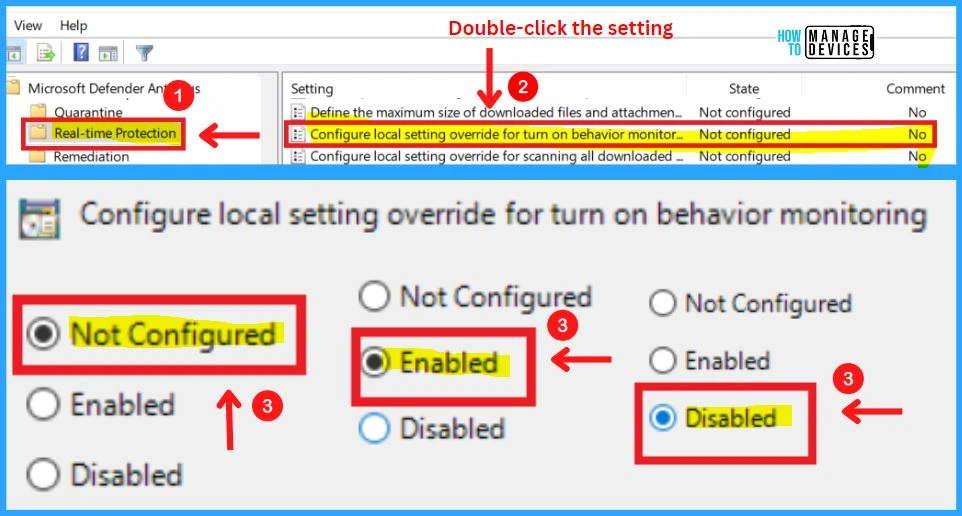
9. Configure Local Settings Override for Turn on Behavior Monitoring
This policy setting configures a local override for the configuration of behavior monitoring. This setting can only be set by Group Policy. If you enable this setting, the local preference setting will take priority over Group Policy.
- If you disable or do not configure this setting, Group Policy will take priority over the local preference setting.
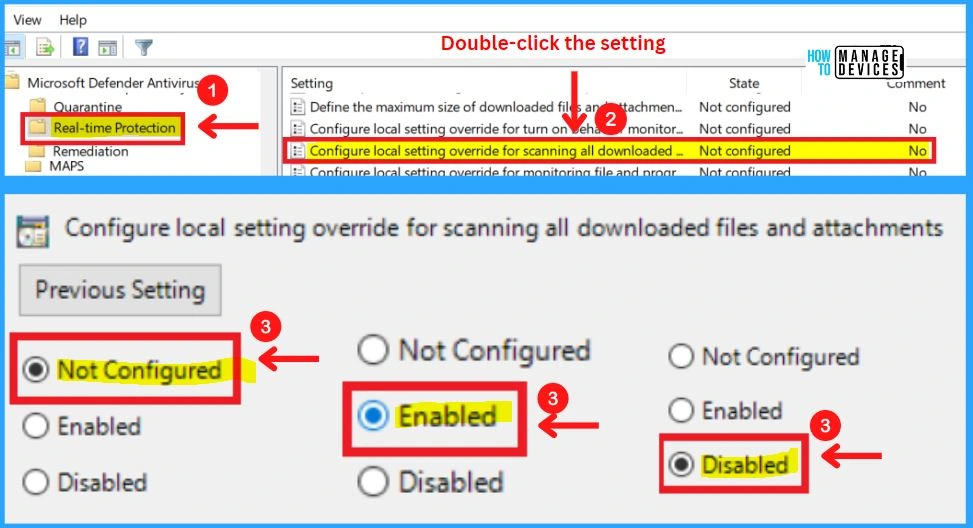
10. Configure Local Setting Override for Scanning All Downloaded Files and Attachments
This policy setting configures a local override for the configuration of scanning for all downloaded files and attachments. This setting can only be set by Group Policy. If you enable this setting, the local preference setting will take priority over Group Policy.
- If you disable or do not configure this setting, Group Policy will take priority over the local preference setting.
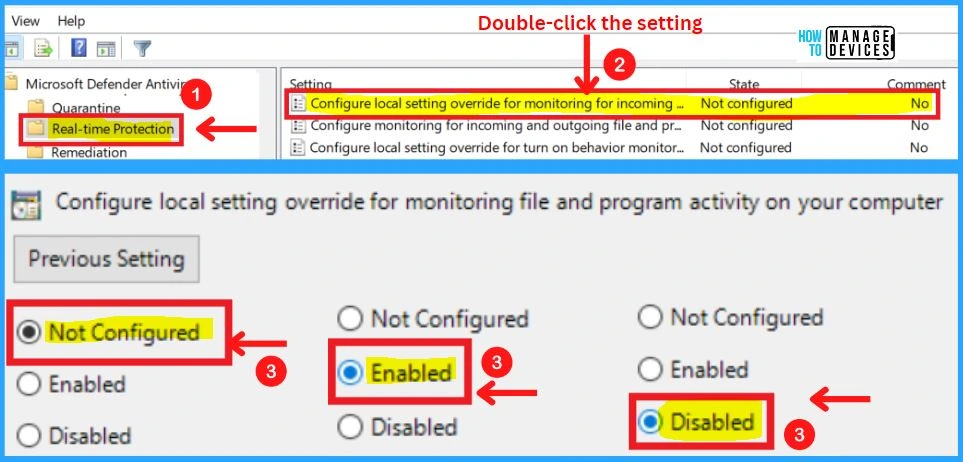
11. Configure Local Setting Override For Monitoring Files and Program Activity on Your Computer
This policy setting configures a local override for the configuration of monitoring for file and program activity on your computer. This setting can only be set by Group Policy. If you enable this setting, the local preference setting will take priority over Group Policy.
- If you disable or do not configure this setting, Group Policy will take priority over the local preference setting.
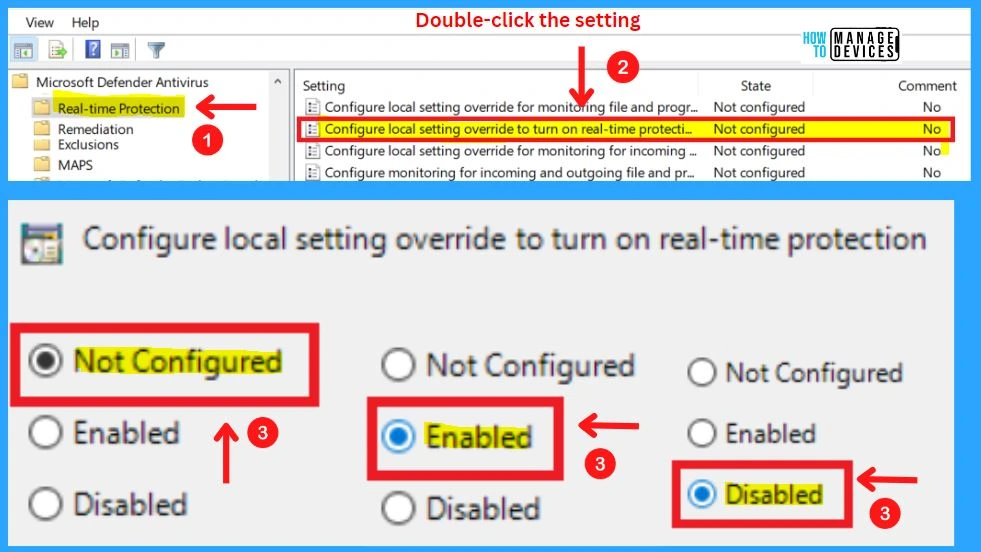
12. Configure Local Setting Override to Turn on Real-time Protection
This policy setting configures a local override for the configuration to turn on real-time Protection. This setting can only be set by Group Policy. If you enable this setting, the local preference setting will take priority over Group Policy.
- If you disable or do not configure this setting, Group Policy will take priority over the local preference setting.
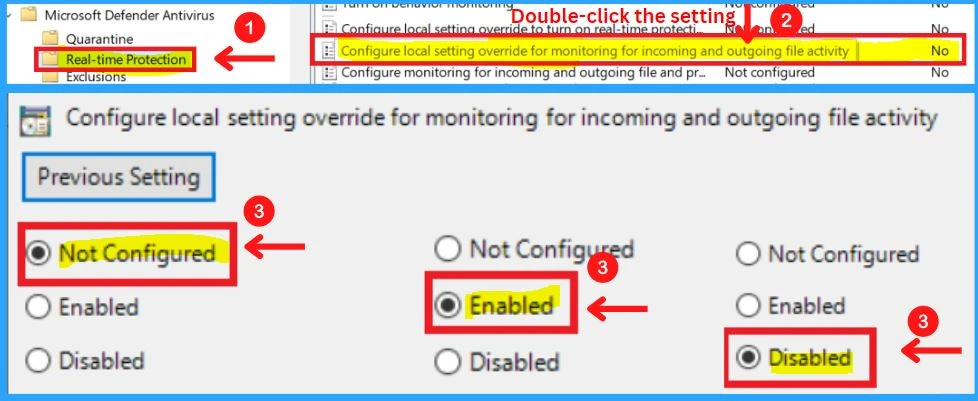
13. Configure Local Settings Override for Monitoring Incoming and Outgoing File and Activity
This policy setting configures a local override for the configuration of monitoring incoming and outgoing file activity. This setting can only be set by Group Policy. If you enable this setting, the local preference setting will take priority over Group Policy.
- If you disable or do not configure this setting, Group Policy will take priority over the local preference setting
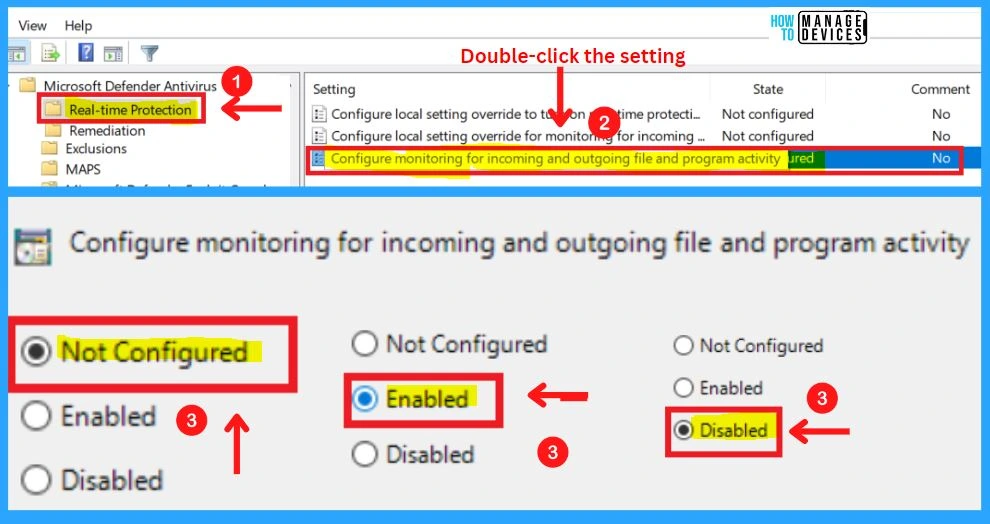
14. Configure Monitoring for Incoming and Outgoing File and Program Activity
This policy setting allows you to configure monitoring for incoming and outgoing files, without having to turn off monitoring entirely. It is recommended for use on servers where there is a lot of incoming and outgoing file activity but for performance, reasons need to have scanning disabled for a particular scan direction. The appropriate configuration should be evaluated based on the server role.
Note! – This configuration is only honored for NTFS volumes. For any other file system type, full file and program activity monitoring will be present on those volumes.
The options for this setting are mutually exclusive:
0 = Scan incoming and outgoing files (default)
1 = Scan incoming files only
2 = Scan outgoing files only
Note! – Any other value, or if the value does not exist, resolves to the default (0)
- If you enable this setting, the specified type of monitoring will be enabled
- If you disable or do not configure this setting, monitoring for incoming and outgoing files will be enabled
- Enable Power Optimization Settings on Windows 11 | Intune | Group Policy
- Top 20 Methods to Increase Windows 11 Performance Optimization
Intune Policy for Microsoft Defender Antivirus
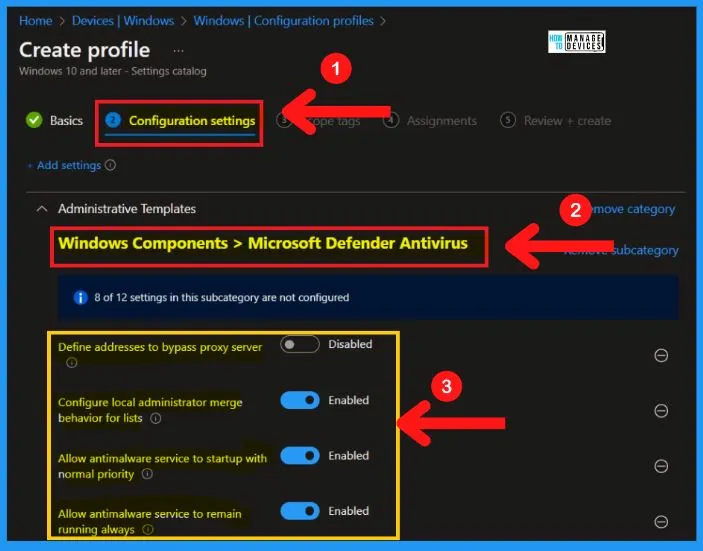
Let’s check the Intune Policy for Microsoft Defender Antivirus. You need to use the Settings Picker menu to find and select the settings for Microsoft Defender Antivirus. The following are the steps to select Microsoft defender Antivirus using Intune policy.
- Search with “Microsoft Defender Antivirus” in the Settings picker search box
- Select the Computer Configuration > Administrative Templates > Windows Componenets > Microsoft Defender Category
- There are different options available as explained below to select the different settings
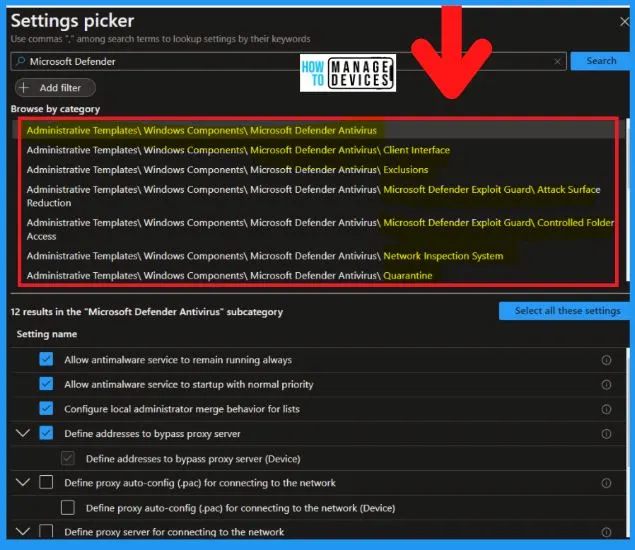
Windows Defender is a software application that helps you to fight unauthorized access and protect Windows computers from unwanted software. The below screenshot and steps show how to choose Microsoft Defender Antivirus from Group policy settings.
- Computer Configuration > Administrative Templates > Windows Componenets > Microsoft Defender Antivirus
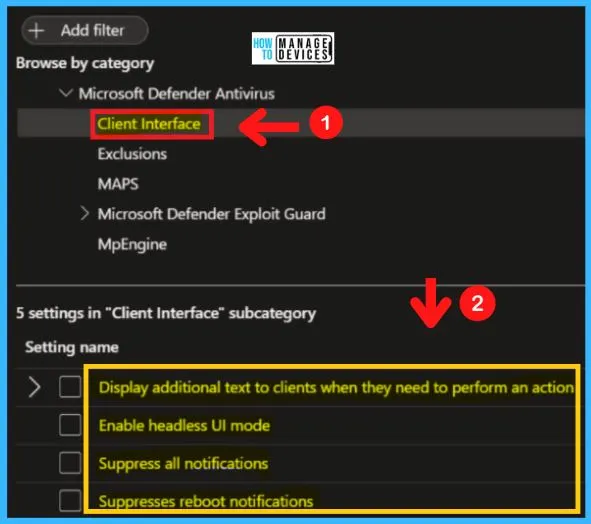
Client Interface in MS Defender Antivirus
This policy setting allows you to configure whether or not to display additional text to clients when they need to perform an action. The text displayed is a custom administrator-defined string. The Client interface includes the following
- Display additional text to clients when they need to perform an action
- Suppress all notifications
- Suppresses reboot notifications
- Enable Headless UI Mode
For example, the phone number to call the company help desk. The client interface will only display a maximum of 1024 characters. Longer strings will be truncated before display. The following are the steps to choose the Client interface in MD Defender Antivirus.
- Computer Configuration > Administrative Templates > Windows Components > Microsoft Defender > Client Interface
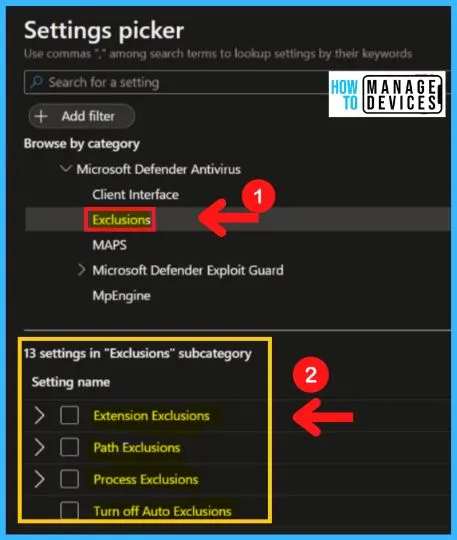
Exclusions Settings in MS Defender Antivirus
The Exclusions in MS Defender Antivirus include the Turn off Auto Exclusions, Extension Exclusions, Path Exclusions, and Process Exclusions. Turn off Auto Exclusions allows an administrator to specify if the Automatic Exclusions feature for Server SKUs should be turned off.
Extension exclusions allow you to specify a list of file types that should be excluded from scheduled, custom, and real-time scanning. File types should be added under the Options for this setting.
Each entry must be listed as a name-value pair, where the name should be a string representation of the file type extension (such as “obj” or “lib”). The value is not used and it is recommended that this be set to 0.
Path Exclusions policy allows you to disable scheduled and real-time scanning for files under the specified paths or the fully qualified resources specified. Paths should be added under the Options for this setting. Each entry must be listed as a name-value pair, where the name should be a string representation of a path or a fully qualified resource name.
Process Exclusions policy setting allows you to disable scheduled and real-time scanning for any file opened by any of the specified processes. The process itself will not be excluded. To exclude the process, use the Path exclusion. Processes should be added under the Options for this setting.
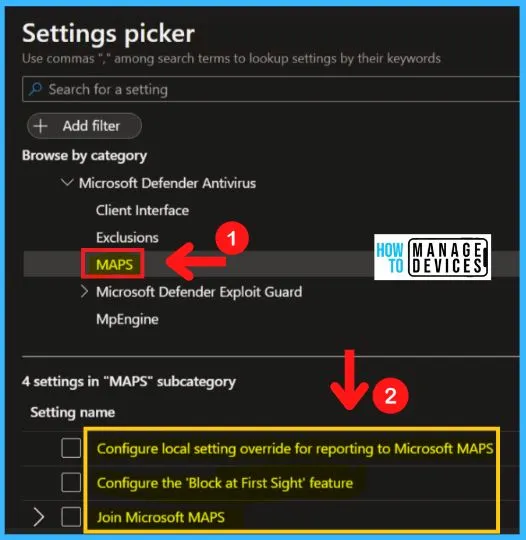
MAPS (Microsoft Active Protection Service)
Microsoft Active Protection Service (MAPS) is now called Windows Defender Antivirus cloud protection service. The MAPS in MS Defender Antivirus includes the following settings.
- Configure the block-at-first-sight feature
- Join Microsoft MAPS
- Configure local setting override for reporting to Microsoft MAPS
- Send files sample when further analysis is required
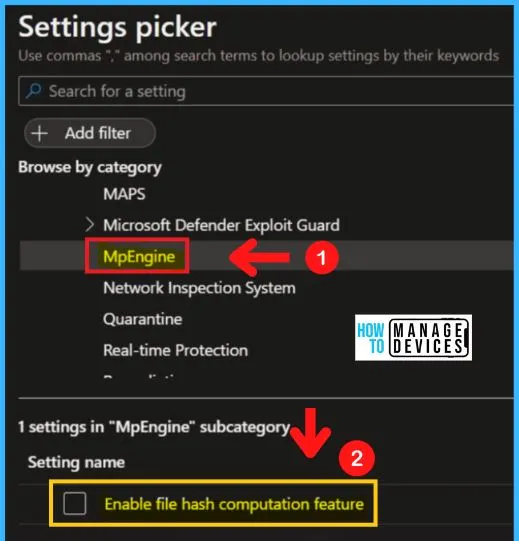
MpEngine – 3 Ways to Configure Microsoft Defender Antivirus Policies for Windows 11 using Intune Policy
You can easily Enable or disable the file hash computation feature. You can choose from three settings to enable the file hash computation feature in MD Defender Antivirus. The MqEngine of Microsoft defender antivirus includes the following settings.
- Enable file hash computation feature
- Configure extended cloud check
- Select cloud protection level
Configure Extended Cloud Check feature allows Microsoft Defender Antivirus to block a suspicious file for up to 60 seconds, and scan it in the cloud to make sure it’s safe. The typical cloud check timeout is 10 seconds. To enable the extended cloud check feature, specify the extended time in seconds, up to an additional 50 seconds.
Selecting the cloud protection level policy setting determines how aggressive Microsoft Defender Antivirus will be in blocking and scanning suspicious files.
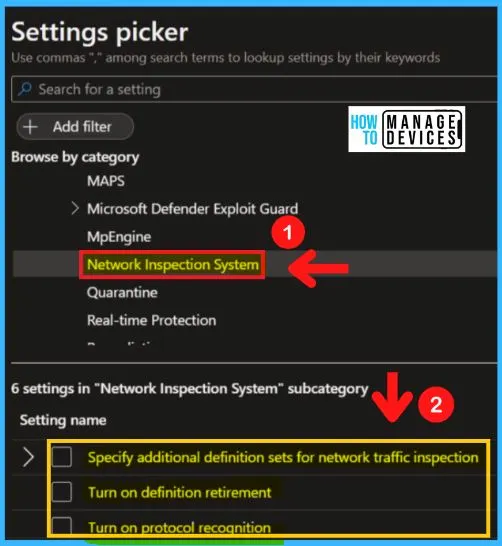
Network Inspection System
Turning to the Definition of Retirement policy setting allows you to configure the definition of retirement for network protection against exploits of known vulnerabilities. Definition retirement checks to see if a computer has the required security updates necessary to protect it against a particular vulnerability.
If the system is not vulnerable to the exploit detected by a definition, then that definition is “retired.” Network Inspection System in MD defender Antivirus includes the following.
- Turning to the definition of retirement
- Specifying additional definition sets for network traffic inspection
- Turning on protocol recognition
Resource -> Windows Security: Defender, Antivirus & More for Windows 11 | Microsoft
Author
About Author – Vidya is a computer enthusiast. She is here to share quick tips and tricks with Windows 11 or Windows 10 users. She is also keen to find solutions to day-to-day tech problems and write about them.
