These are the Top 20 Methods to Increase Windows 11 Performance Optimization. Let’s find out the various Settings Performance Optimization methods in Windows 11. Windows 11 is now generally used instead of Windows 10, along with several new features. You can Customize the Start Menu and edit the Taskbar’s look.
The amazing new User Interface (UI) in Windows 11 is very refreshing to the users. In the performance section, Windows 11 has made many advancements as Microsoft has worked on several factors on CPU and Battery performance, including improvisation of Memory Management, App Prioritization, Disk usage, etc.
The above improvisation of the Windows 11 Operating System (OS) doesn’t reflect all; many of us are using the old configured system running with the new Windows 11 version. Generally, the system’s performance may vary from the latest configured systems, so it needs settings for performance optimization.
I am working on an old PC with the new version of Windows 11 and faced the problem of low performance using it. I found various ways to speed up my PC or settings performance optimization in Windows 11 (2022).
- Enable Optimized Performance of Edge Browser | Windows 11 | Intune | Group Policy
- Windows 11 22H2 Group Policy Settings list Download
Top 20 Methods to Increase Windows 11 Performance
There are many ways to boost an old device’s performance (Speed up). Windows provides hardware changes/upgradation as well as several in-built features to improve the version of the device to work faster. Let’s have a look at the process ahead one by another.
In this post, let’s review the top 20 methods to increase Windows 11 performance optimization. The recommendation is to try this with non-production Windows 11 devices and confirm everything is working fine!
Video – Windows 11 Slowness Advanced Troubleshooting using Performance Monitor
If you still hear issues with Windows 11 performance, such as my computer is very slow, then this is the video that you have to check out. Because in this video, we will share all the details about performance issues and how to troubleshoot Windows 11 performance issues using the Performance Monitor tool.
Method 1: Increasing or Add More Physical Memory to Device (RAM/SSD)
As we all know, physical Memory is used for better system performance. Physical Memory is the most traditional way to make your device faster. You can add/upgrade Random Access Memory (RAM) to your device for faster performance.
Another way to improve the Window’s performance is by upgrading to SATA Solid State Drive (SSD). SATA SSD works faster than your imagination. A Hard Disk Drive (HDD) with a read/write speed of 100 MBps, whereas the SATA SSD with a read/write speed of 500 MBps is 5x faster than an HDD.

- 4 Methods Disable Edge Browser Search Suggestions from Address Bar
- New Windows 11 Configure Hash Algorithms for Certificate Logon Authentication Group Policy for Kerberos
Method 2: Increasing Virtual Memory
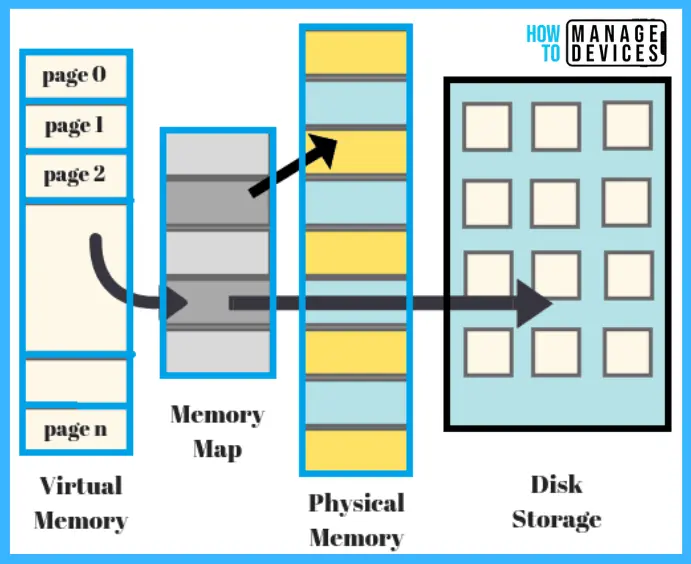
As discussed above, adding physical Memory to a system is not affordable for everyone. So from here, I would like to discuss the in-built features of Windows, which help to make the system faster. Increasing Virtual Memory, which I described earlier, can boost system speed a little.
Method 3: Restart Update
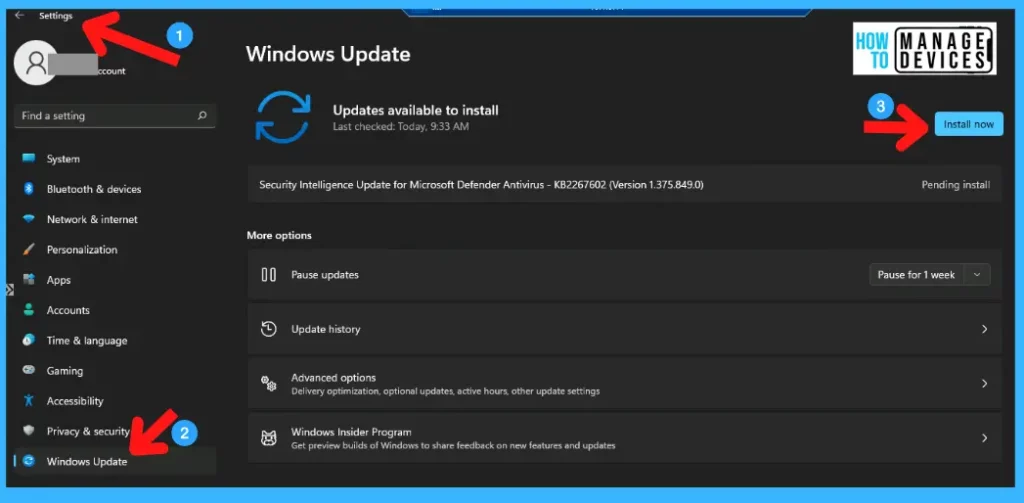
Restart and Update is the easiest way to make your PC perform better and is in the list of Windows in-built features. Now let’s discuss the process of updating windows.
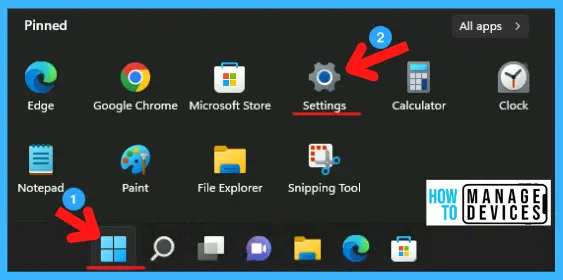
- Click on Windows
- Click Settings
Check for updates; if anything new is there, download and install the updates on the PC and restart it. If your PC is up-to-date, continue it; there is no harm in restarting it; if there is any issue regarding performance, it can be resolved.
Method 4: Changing the Power Mode
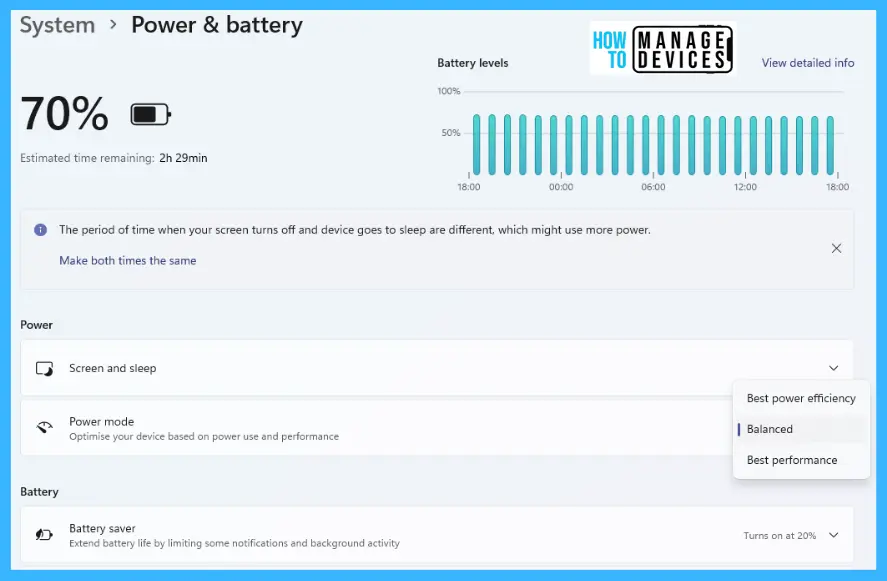
Power consumption is one of the reasons for making your system slow. Hence, changing or adjusting the Power Options settings will give you better battery life and performance for the operation; open the settings menu and refer to fig.3-1 above.
Now, move to the system option in the setting menu and click on Power for PC and Power & Battery for Laptops. Then click on Power Mode; by default, it was set to Balanced. Please put it to Best Performance; it will help boost the performance of windows.
- Windows 11 New LSA Local Security Authority Policies
- Enable Windows 11 Content Adaptive Brightness Control
Method 5: Restartable Apps (Disable)
Windows 11 has some background app features to make your experience faster and smoother if you have the latest configured PC. This startup background app slows down your PC if you have an old PC. Disabling restartable apps from the background may help you speed up the system.
The steps for disabling the background application open settings refer to fig.3-1 above. Click on Accounts available in the settings menu. Then head to sign-in options to perform such modifications.

After clicking on the Sign-in options, you just entered into the sign-in menu, now, choose Additional Settings and click. Now disable the toggle for the option “Automatically save my restartable apps and restart them when I sign back in.” The process is completed.

Method 6: Uninstall Unnecessary/Unwanted Software/Bloatware
If your system has many applications, some of them are unnecessary/unwanted. They are even also the cause for slowing down your device. Those applications are acquired space and may run in the background and put undue pressure on system memory, which causes slowing down performance.
To remove the unwanted files or bloatware, we need to uninstall them from the PC. Open Settings as shown in fig.3-1 above, then select Apps to open the Apps menu.
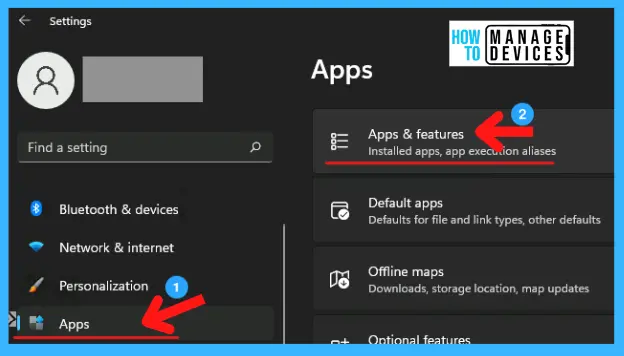
After opening the Apps, click on the Apps & Features option. Now under the Apps & Features option, many applications are shown in a list; click on the application you need to remove, tap on the three-dotted menu, and select Uninstall to remove the software or bloatware.

- Best Steps to Install Local Printer in Windows 11 | Driver Software
- 4 Methods Enable Spellcheck in Microsoft Edge
Method 7: Free up Disk Space of the Device
Updating Windows PC or upgrading Windows 10 to Windows 11, Installing or uninstalling files may cause their leftover files to reserve crucial space in the system. Those leftover files can capture unnecessary space on the PC, which needs to be clear.
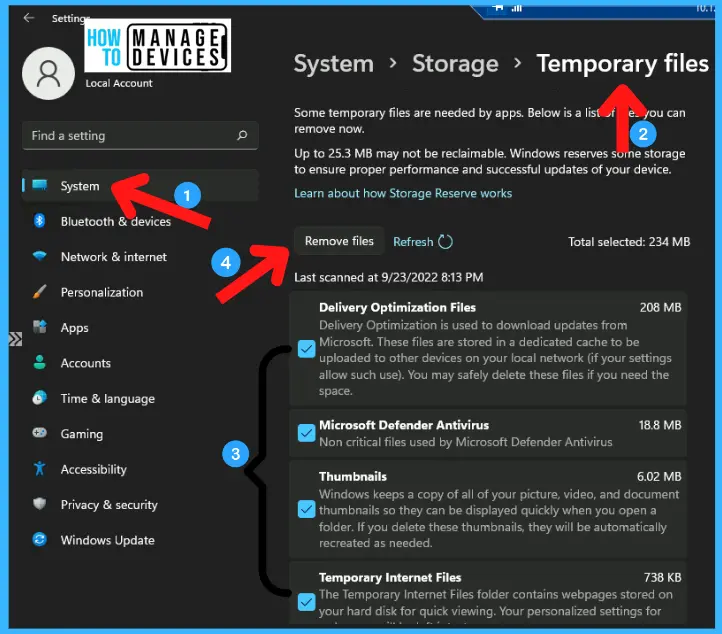
To free up disk space, go to the settings shown in fig.3-1 above and click on Storage under the system menu. Under Storage, select and click on Temporary files and select the unnecessary files and click on Remove files to recover the captured space.
Method 8: Storage Sense making Windows 11 Faster
Storage sense is a process for automatically cleaning up Windows 11 from time to time. In addition to removing temporary files, you can enable Storage sense. As shown in method 7 above, reach to Storage menu, and there is an option as Storage sense toggle to enable (Turn on).

Method 9: Shadow, Animation & Visual Effects (Disable)
Windows 11 provides smooth animation, visual effects, and transparent UI elements, which provides users with a refreshing makeover to Windows 11. If you are using an old PC, then this may be so good for you to disable all the Animation, Visual Effects, etc.; follow the steps.
- Open settings and move to Personalisation and click to open personalization settings.
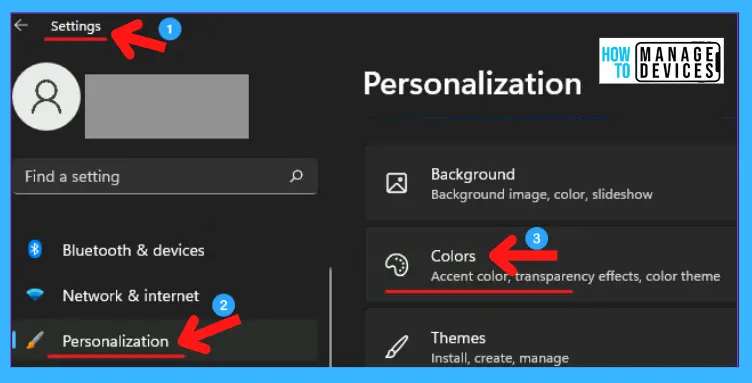
Under the personalization menu, click on Color. Under the color menu, disable by turning off the slider option for Transparency effects.

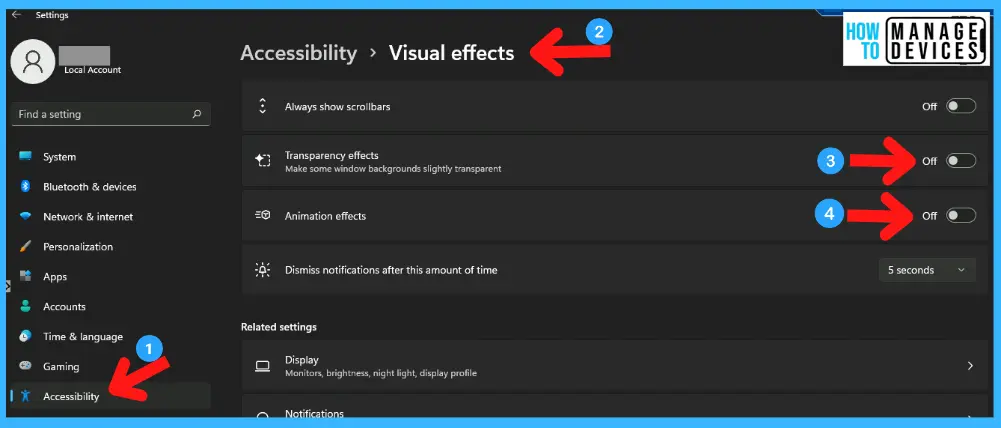
After finishing it, move back to settings and choose the Accessibility option; under the accessibility menu, choose Visual Effects. All related locations of visual effects are open now. Here disable both Transparency effects and Animation effects.
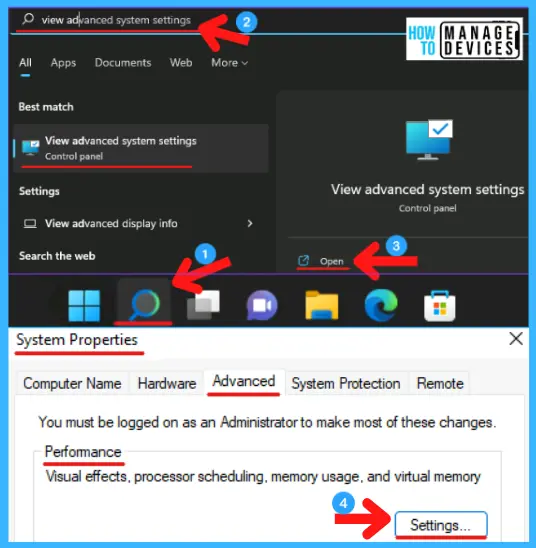
After the above modifications, the last step is to click on the search bar, type View advanced system settings, and open it. A new window pop-up named System Properties. Under the System properties, click on the Advanced tab, and under the advanced tab, open Settings under Performance.
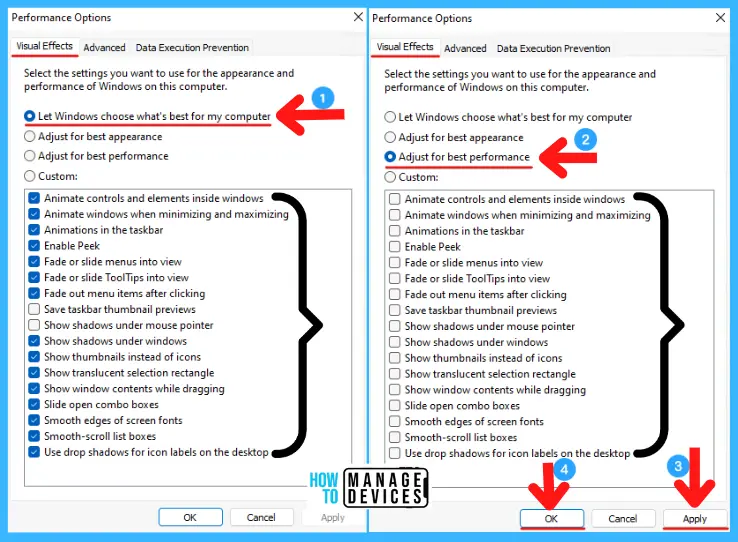
By clicking performance, a new window appears as Performance Options; under it, choose the Visual Effects tab, check “Adjust for best performance,” and click OK. It returns to System properties; click on Apply, then click OK. It defaults to Let Windows choose what’s best for my computer.
- Enable Edge Settings for Unload IE Mode Tabs Before Closing Browser Session
- Enable Edge Mini Menu Feature on Text Selection
Method 10: Notification & Tips (Disable)
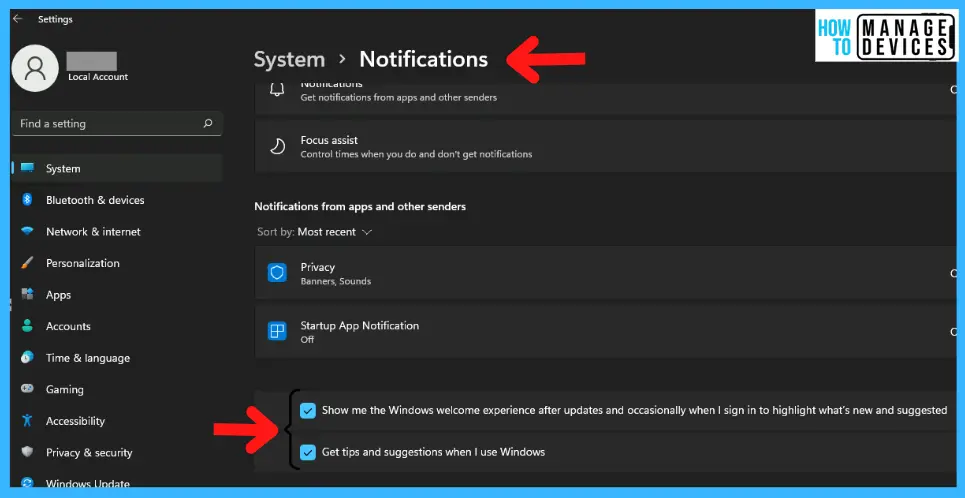
A Notifications and Tips facility is available in Windows 11 to inform the user about any system activity. The system scanned and ran a background application to collect information to provide this. So this may impact system performance; disabling this may help to boost system performance.
Open settings, press Windows key + I (keyboard shortcut) under settings click on System. There is an option named Notifications. Choose and click it. In the Notifications, scroll down. There are two options available: Offer suggestions on how to set up my device and Get tips and guidance when I use windows.
Note! After performing any of the tricks above and from below, it’s necessary to restart your device for the effect of the settings.
Method 11: Game Mode (Disable)
If you are not a gamer or don’t need gaming features to be active in windows, then you should disable such gaming settings from your device. To disable Gaming Mode, open settings, under settings, choose Gaming, and click it.
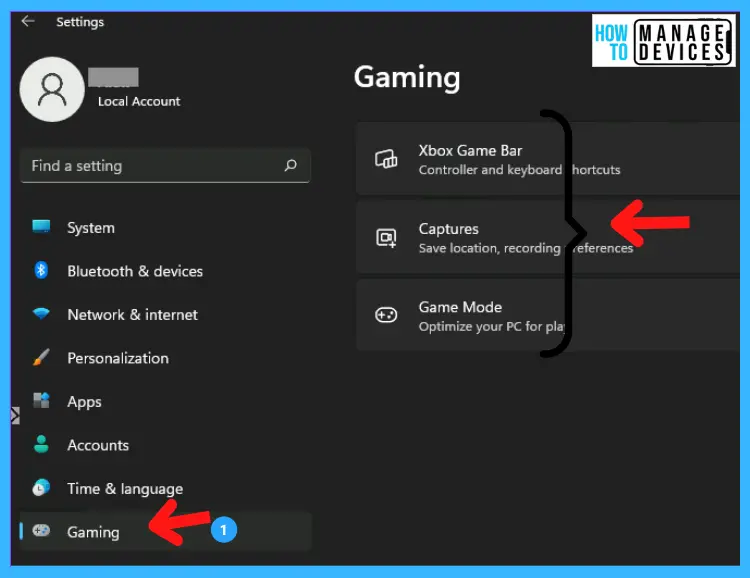
Under Gaming, three options are available: Xbox Game bar, Captures, and Game Mode. Open all possibilities one by one and disable them. Now your system background is no more working for the game option.

Method 12: Installation of Third Party Antivirus Software (Avoid)
The misconception is to install a third-party antivirus on Windows 11 and 10. There was a time when you needed a dedicated antivirus program to protect your device infected by any malware or Virus. However, Microsoft has developed its security for its users, namely Windows Security (aka Windows Defender). This Windows defender is enough to protect our PCs, and Microsoft also regularly updates the virus definitions.
Installing a third-party antivirus slows down your PC. The antivirus programs (Windows Defender and Third-party Antivirus) check file hashes, do integrity checks, etc. It hampers your PC’s performance. So, it is recommended new Windows 11 PC.
NOTE! – Best Antivirus For Windows 11 Microsoft Defender | App Browser Protection | Firewall Protection
To optimize the windows defender system scan process, follow the steps. Open settings; under settings, choose and click on Privacy & Security. The Privacy & Security menu opens in the right panel; select the Windows Security option to open its menu.
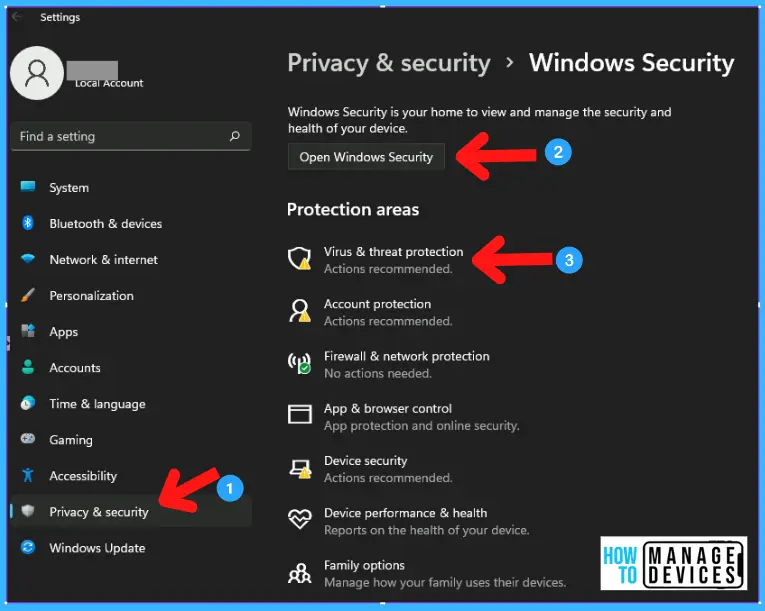
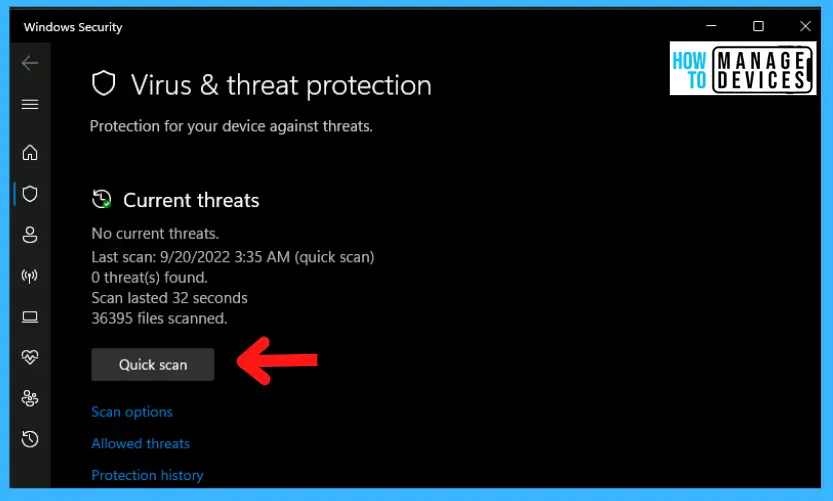
There is a menu under the Windows Security option; click Virus & threat protection to optimize windows. After opening Virus & threat protection, check for updates and run a quick scan for better PC performance.
- All in One Guide OneNote for Windows 11 Detailed Review OneNote Versions
- Configure Tracking Prevention in Microsoft Edge
Method 13: Defragment Hard Drive
Using a PC for a long time, we store many unnecessary files and their related packages, which cause create many collisions in the hard drive, which impact the system’s performance. Windows have an in-built feature to remove those collisions using Defragment tool.
Defragment tool helps to solve the collision issue of the hard drive. To perform defragmentation, click on the Search icon on the taskbar and type Defragment, the Defragment and Optimize Drives will appear; now, click to open.
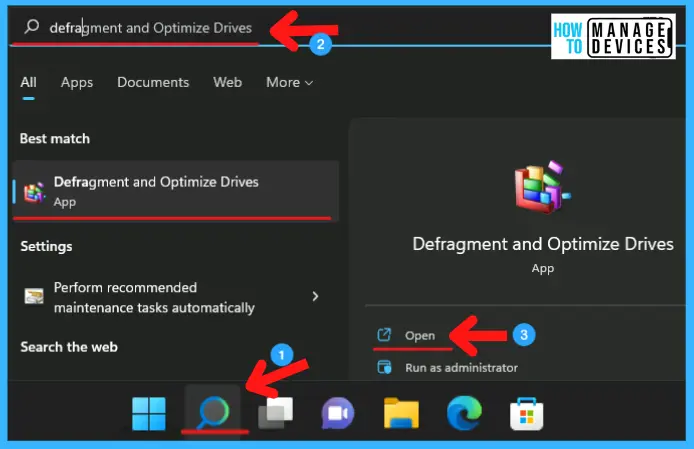
After Defragment and Optimize Drives open, select the desired drive to defrag. We are performing this operation to help reduce unnecessary collisions from the system.
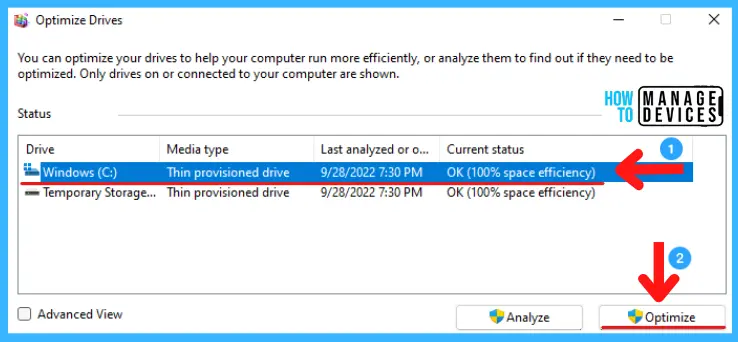
Note! Defragmentation is not recommended, If you are using SATA SSD. Defragment SSD will reduce its life.
Method 14: Delete Temporary Files
When you perform any operation on a Laptop or PC, temporary files are created automatically for the smooth functioning of the processes. These files occupy space in the system, which is the reason for slowing down the PC and needing to be deleted. The process to delete those files is indicated below.
The keyboard shortcut is Windows key + X, and select Run. The hotkey to open the Run command directly is Windows Key + R. When the Run command opens, type “%temp%” and press OK to open the temporary files folder.
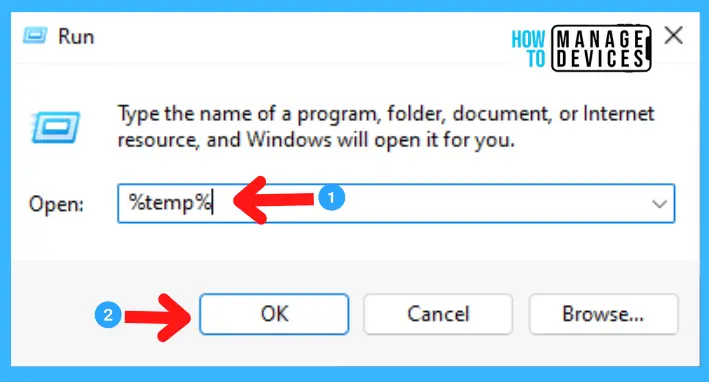
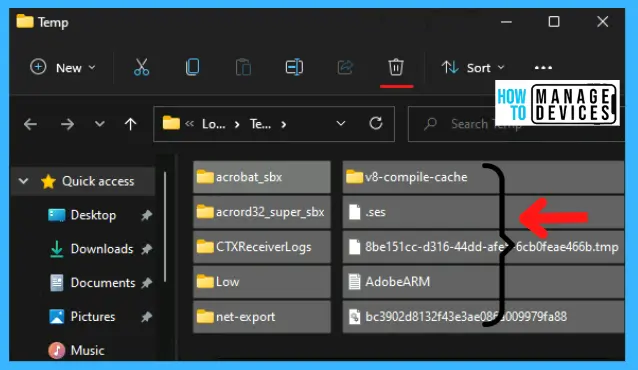
The folder containing the temporary files is open now; select all files and delete them to free up spaces.
Method 15: Background Apps (Disable)
Several applications are running in the background to stay updated. Mailing and calendar apps don’t cause a problem; other unnecessary background apps can slow down the device. Let’s see the process of disabling background apps.
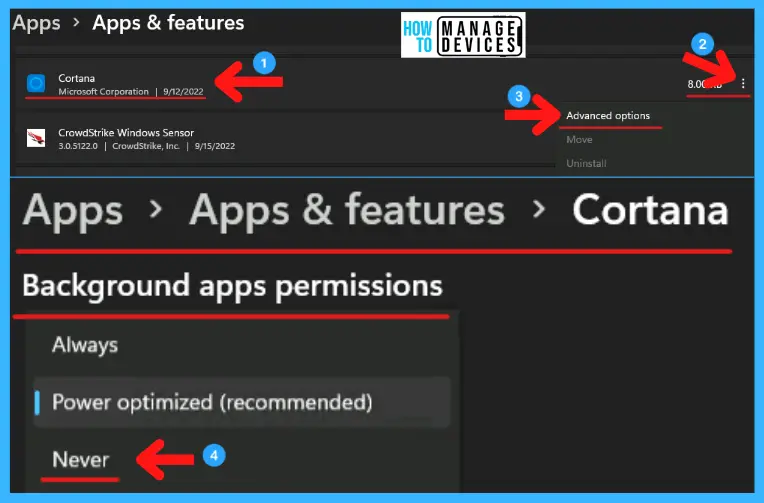
Right-click on the windows key a pop-up menu appears with different options. Click on Apps & Features option to enter into it. Many applications are available inside the Apps & Features option.
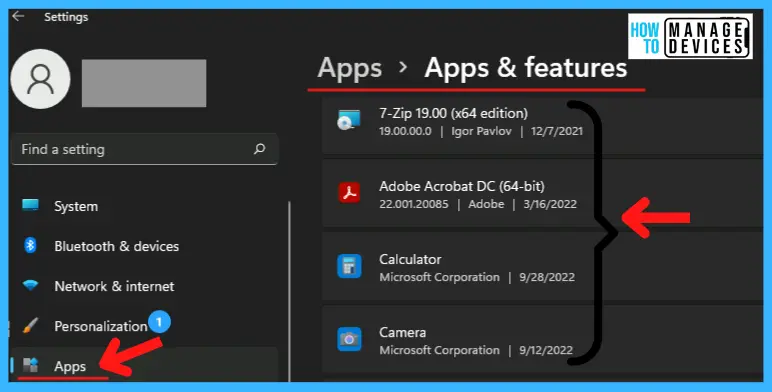
There is a list of applications in the Apps & Features option; click on the three-dot menu next to the application you want to disable. Select Advanced options and scroll down a little to find the Background Apps Permissions option, and Never select from the drop-down menu to complete the task.
- Group Policy to Hide Windows 11 System Requirements not met Watermark
- Enable Warning Prompt on Closing Multiple Tabs In Microsoft Edge
Method 16: Visualization Based Security (VBS) for Gaming (Disable)
Virtualization Based Security (VBS) is a new Windows 11 that protects the Operating System from unsafe code and malware. It’s part of the Hypervisor-Enforced Code Integrity (HVCI) layer. Recent reports say due to virtualization-based security, the performance has dropped from 5% to 25%.
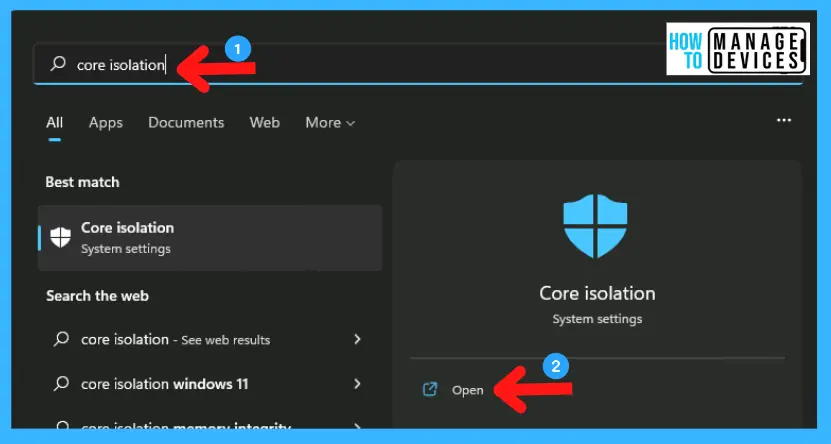
Even Microsoft suggests disabling HVCI for better performance. If you are a gamer, disables VBS for better gaming performance. As discussed earlier, four methods exist to enable or disable VBS on Windows 11. For this process, click on the Search bar and find Core Isolation.
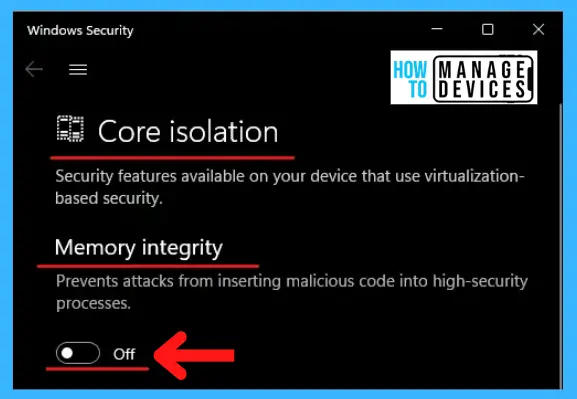
Under the Core Isolation, a Memory Integrity toggle option exists to disable it. By disabling it, now restart the system and see the difference before and after the performance.
Method 17: Start-up Programs (Disable)
You can turn on your system by disabling the startup programs to fasten the boot time on Windows 11. These are the programs that generally start when you turn on your PC. Let’s see how to disable the Startup Programs.
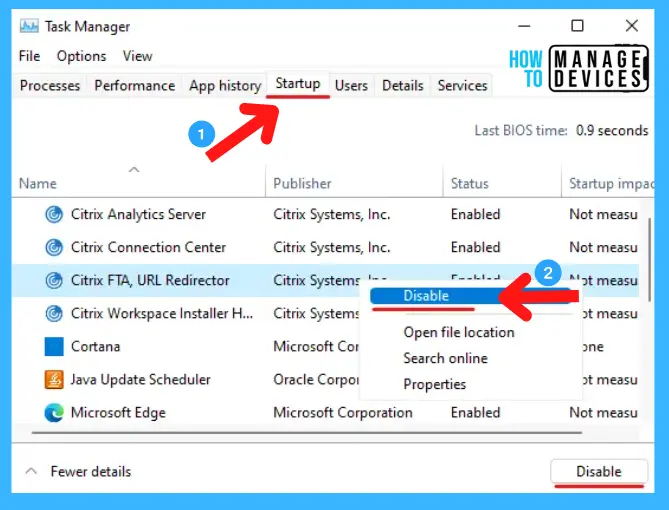
There are three types of processes available to disable startup programs. Click on the Start menu and Select Task Manager to open, or press Ctrl + Shift + Esc (keyboard shortcut) to reach Task Manager directly.
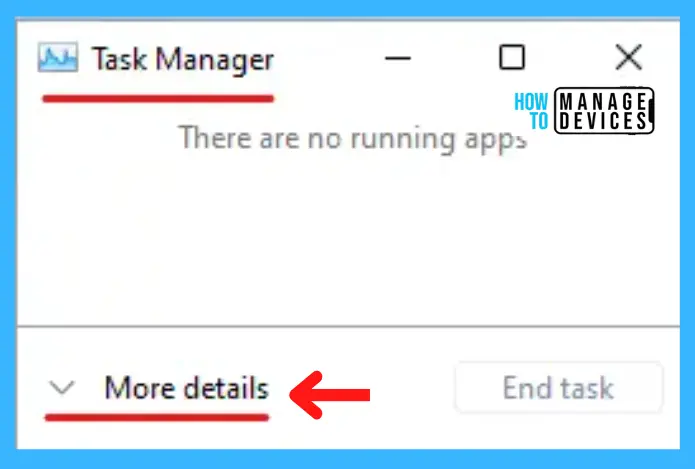
Once the Task Manager opens below, click on the More details option. The task manager opens and selects the Startup tab to enter into. There is a list of startup apps; to disable right, click on the app you want and select Disable.
NOTE! – Check out the details post on Windows 11 Startup programs – How To Enable Or Disable Startup Apps In Windows 11.
- Windows 11 Camera is Blocked because of Privacy Shutter
- Disable Enable TLS 1.0 and 1.1 for Internet Explorer EdgeHTML
Method 18: Debloat Windows 11
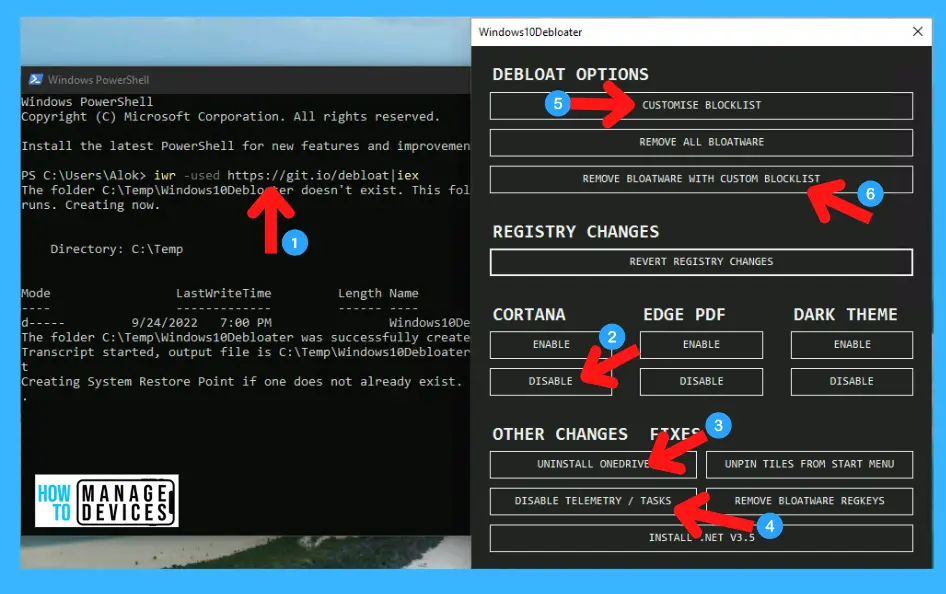
Debloat refers to the process used to remove those unnecessary apps or services from windows 11. Those unnecessary apps waste the system resources so that we can clean all the junk from the device in this process. If you have an old PC, you must perform debloat Windows 11; follow the link below for a detailed strategy.
Method 19: Windows 11 in-built System Scan
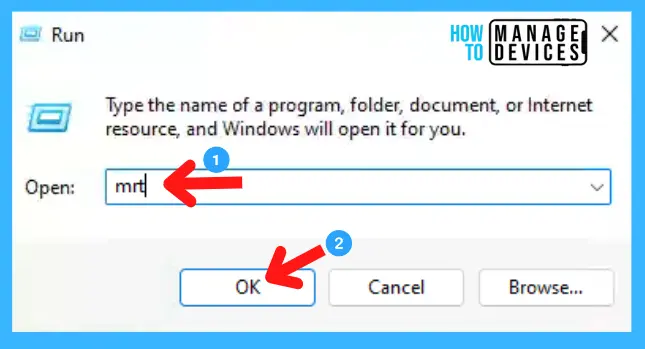
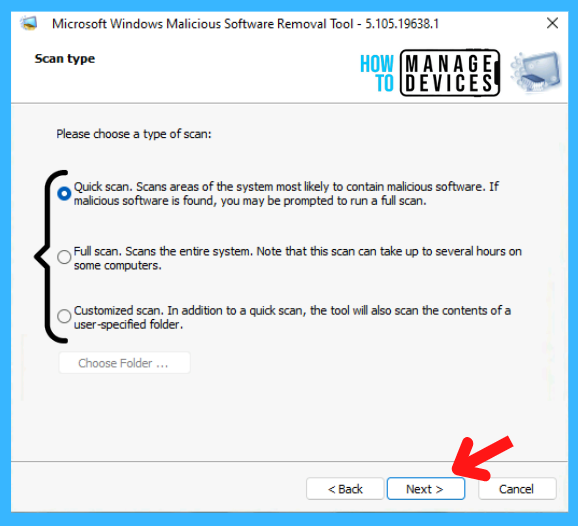
Microsoft has its built-in scan system, which helps clean up the system. This property scans the system in three ways: Quick, Full, and Customize. Let’s check the process. To do this operation, open the run command using the windows key + R (keyboard shortcut), then type “MRT” and click OK.
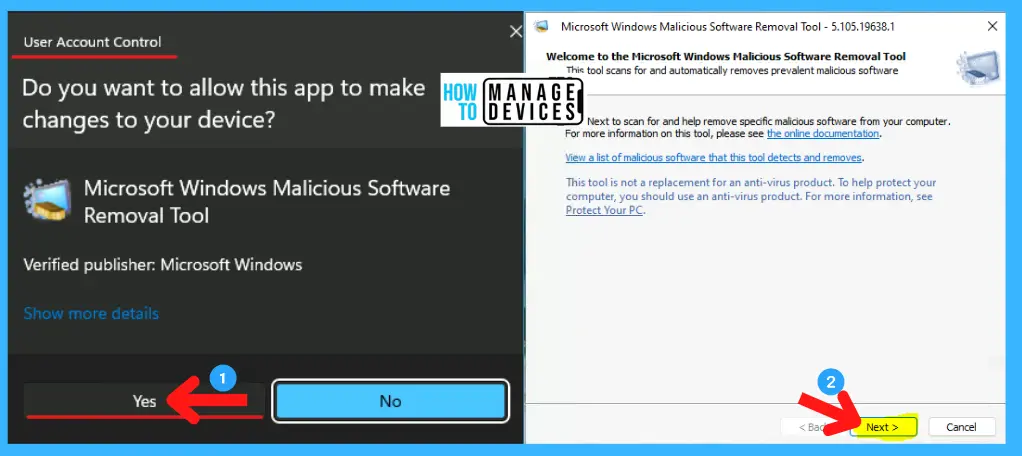
The next Window will pop up, “User Account Control,” and ask permission to make changes in the System; click Yes. The next Window welcomes you to the Microsoft Windows Malicious Software Removal Tools for scanning. To continue, click on Next.
Now the pop-up Window appears and asks for three options to scan the system: Quick Scan, Full Scan, and Customize Scan. Select the desired option and start browsing the system.
Method 20: Enhance the Number of Processors
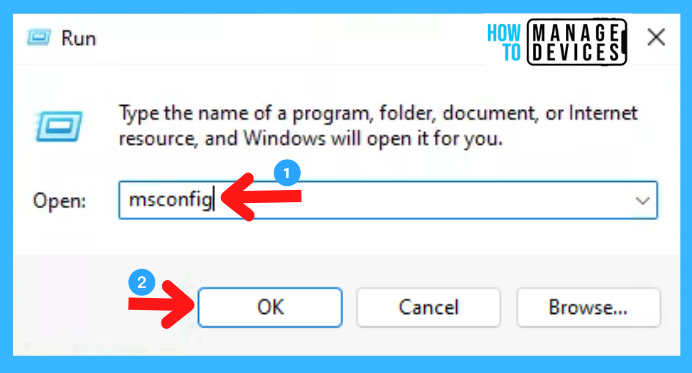
This is also a good trick to speed up your system by enhancing the number of processors in the device. To perform such a task, follow the steps. Open the Run command and type “MSConfig,” and click OK.
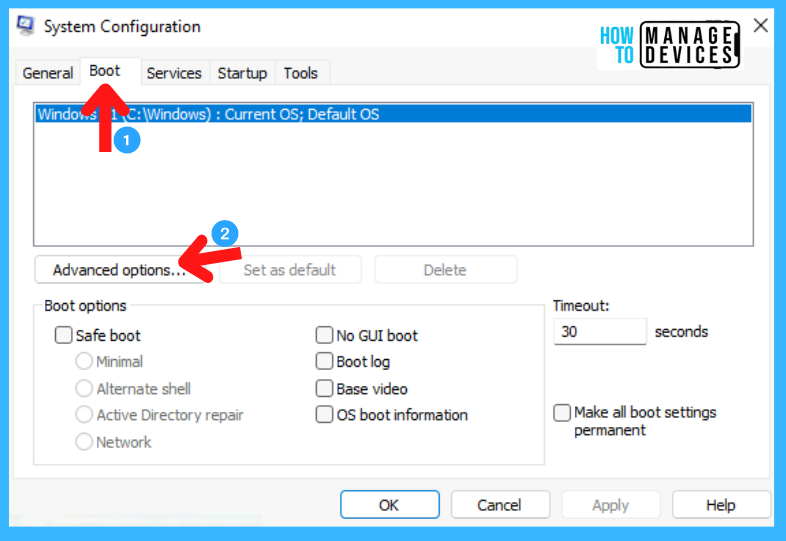
The System Configuration window appears with various tabs; click on the Boot tab to open that option. Now under the boot tab, click on the Advanced Option.
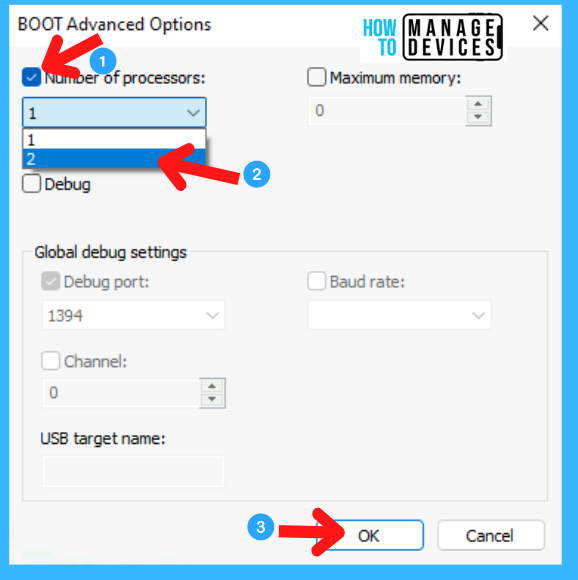
The new Window, namely the BOOT Advanced Option, opens. Check the box of several processors, select the highest processor that appears there, and click OK; then it moves back to the System Configuration window, click Apply, and press OK.
After completion of the process, another pop-up window appears as System Configuration and asks to restart the system and select the restart option.
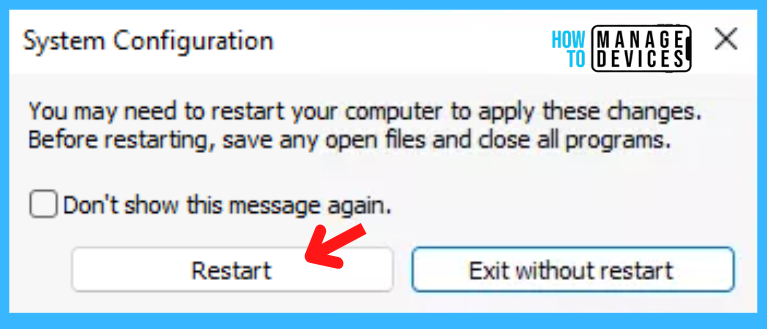
The above settings performance optimization a device to run faster in Windows 11. Don’t forget to restart the system after applying any of the processes.
Author
Alok is a Master of Computer Applications (MCA) graduate. He loves writing on Windows 11 and related technologies. He likes to share his knowledge, quick tips, and tricks with Windows 11 or Windows 10 with the community.

Prioclick for slow pc or laptop