This is an All-in-One Guide OneNote for Windows 11 detailed review post for you. Let’s learn how to use MS Onenote for Windows 11. Microsoft 365 OneNote is converted in this post in detail however the OneNote app available in Microsoft Store is also explained here.
Why OneNote? Nowadays, you need to remember many things; you have a lot of ideas and plans you want to keep safe somewhere; OneNote is a perfect and secure app for capturing all your ideas & valuable information.
OneNote is a part of Microsoft Office Suite and programs like Word, Excel, and PowerPoint. It helps to gather users’ notes, drawings, audio commentaries, screen clippings, etc.
In OneNote, you can easily store text and images in free-form documents, which you can keep private, or you can easily share the notes with other OneNote users over the internet or a network.
With the help of OneNote, you can easily add free move notes around the page, easily organize those pages into sections, and also helps to keep all those sections in one or more notebook.
- Read more – Latest Features of Notepad in Windows 11
What are the Advantages of OneNote for Windows 11?
OneNote is a digital Notebook, and It is the perfect app for capturing all your millions of ideas; with the help of this app, you can do and remember a million things. The advantages of OneNote are as follows.
1. Easily type notes or record audio on your Laptop
2. Help to write a million of your ideas
3. Easy to add pictures
4. Find notes instantly
5. Help to Free move notes around the Page
6. Easily organize those pages into sections
7. Keep all those sections in one or more notebook
8. Easily share your notebook with others
9. Secure storage of valuable information
10. Easy access from any device
11. Supports a wide array of multimedia formats
12. OneNote app doesn’t expire, so you can use OneNote for as long as you like
13. Create notes using your voice
14. Ability to back up all your notes in the cloud, even if your device is not connected to the Internet
15. Capability to draw annotations
Different Versions of OneNote for Windows
There are 3 versions of OneNote available for Windows. All the 3 versions are free to use, and each version stores its notebooks in your OneDrive. They are as follows.
- OneNote is formerly known as OneNote 2016
- OneNote for Windows 10 (In Windows 11, its called OneNote for Windows)
- OneNote for the Web
How to Install OneNote for Windows 11
You can easily Install OneNote for Windows 11 from Microsoft Store. OneNote is a Microsoft Office app used to take notes and store information. The below steps and screenshots show how to Install OneNote for Windows 11.
- Select Microsoft Store from Start Menu
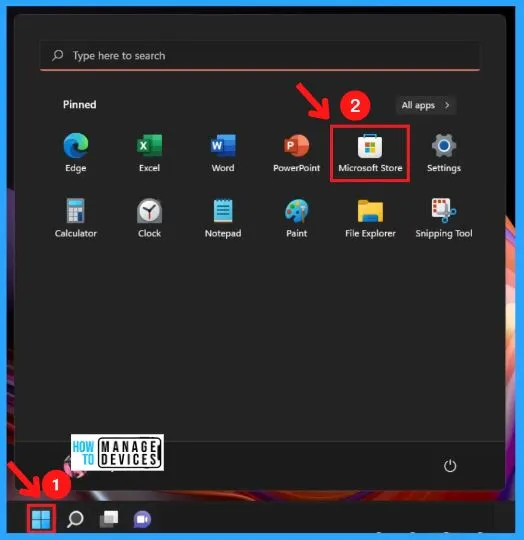
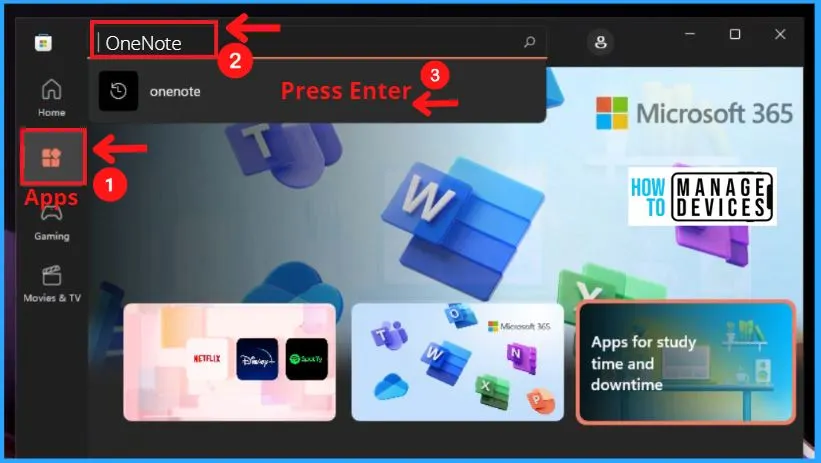
Under MS Store, go to the Apps section on the left side of the Microsoft store and search to find OneNote.
- Go to the Search bar on Microsoft Store
- Type OneNote in the search bar, and
- Hit Enter
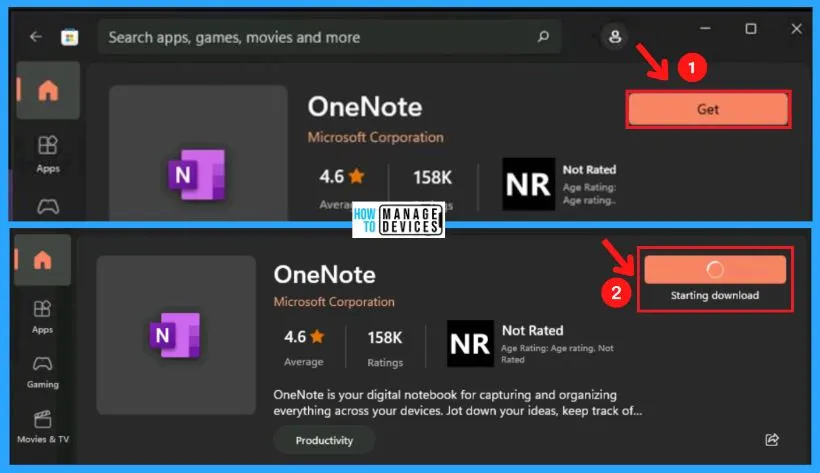
You can click the Get button to start the download (see the below screenshot). After clicking the Get button, the download will start automatically within a few seconds.
- Click the Get button to start the download
- Starting Download (see the below screenshot)
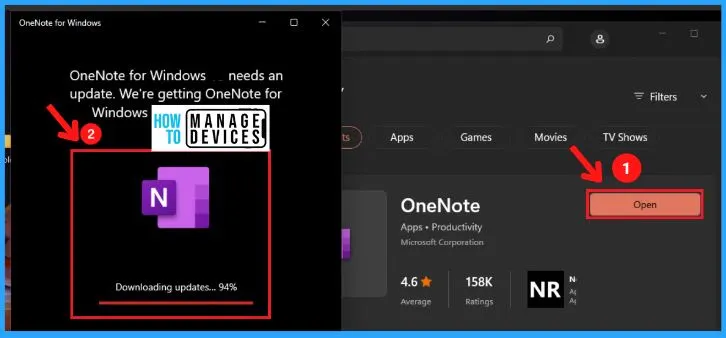
Click the Open button to open the OneNote for Windows 11; it will update automatically if any new updates are available.
- Click the Open button to open the OneNote (If there are any new updates, it will download automatically)
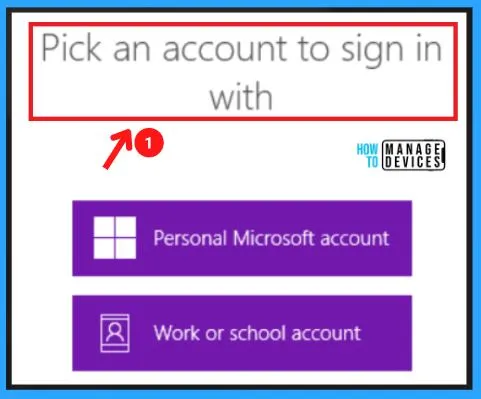
Select an account to sign in with Onenote; it includes the personal Microsoft account, work, or school account.
- Pick an account to sign in with, and you can use the Personal Microsoft Account or Work or School account.
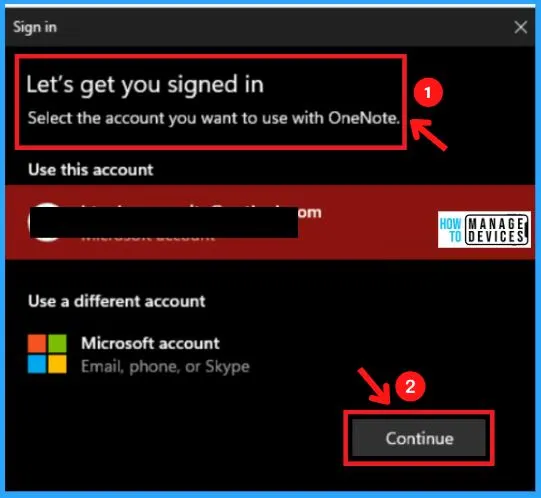
While signed in, you can select the account you want to use with OneNote. You can also use a different account by choosing the “Use a different account” option.
- Select the account you want to use with OneNote
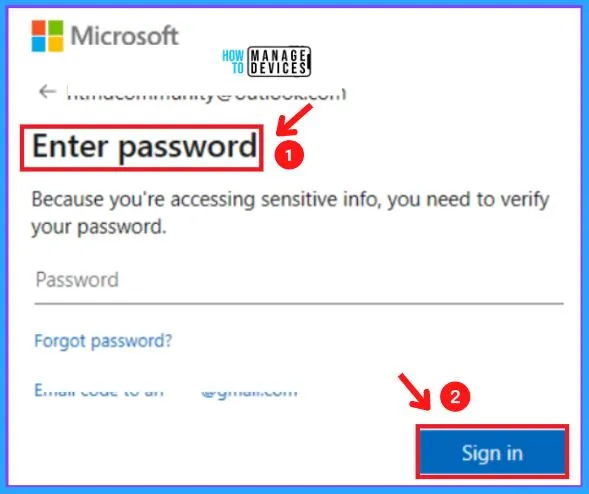
Enter your secret password here to get accessing sensitive info. If you forgot your password, you could select the “Forgot password” option to set a new password.
- Enter your secret password in the below screenshot
- Click the Sign in Button
A. OneNote | Features of OneNote 2016
This OneNote is the Desktop app included in the Office 365 subscription. Office 365 is now Microsoft 365, a new name for the subscription, and through Microsoft 365, you get premium office apps and small existing features.
OneNote 2016 includes the following Features, and the below screenshot shows the OneNote 2016 in Windows.
- Includes most features and the most customization options
- It has the office ribbon interface
- It is the only version of OneNote that can use OneTastic
- It supports local notebooks, exclusively or in addition to cloud storage
- Helps local backups of regional notebooks
- It syncs regional notebooks with cloud notebooks
- OneNote can also be installed as a standalone app (without an office subscription)
B. OneNote for Windows 10/11 | Features of OneNote for Windows
This Version of OneNote is the Microsoft Store app, and it is pre-installed on all editions of Windows 10 and 11. The following are the features of OneNote for Windows 10.
Only a few features and customization options exist in OneNote for Windows 10/11. It also includes the following features, and the below screenshot shows the OneNote for Windows 10/11.
- Microsoft Store app
- Primary OneNote application
- Includes fewer features and customization options
- It has a single-line ribbon interface
- Cannot use OneTastic
- It can be installed as a standalone app
- It can only be updated from Microsoft Store
- It has come very close to OneNote (the desktop app) in features
- OneNote has always had trouble syncing to the cloud
C. OneNote for the Web and Features
OneNote for the Web is the OneNote online Web service. You can easily use OneNote for the Web with any web browser.
OneNote for the Web Includes only a few features and options. The following are the features of OneNote for the Web.
- Use OneNote for the Web with any web browser
- Must have a Microsoft account to use OneNote for the Web
- It has a single-line ribbon interface
- I cannot use OneTastic
A. How to Use OneNote Desktop App in Windows 11 (OneNote 2016)
In this post, I am explaining OneNote 2016, a Desktop app; it includes a large number of Features and the most customized options. It helps you to support local notebooks exclusively or in addition to cloud storage.
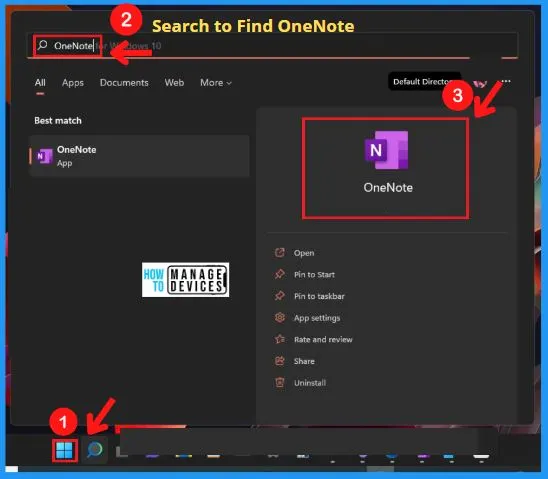
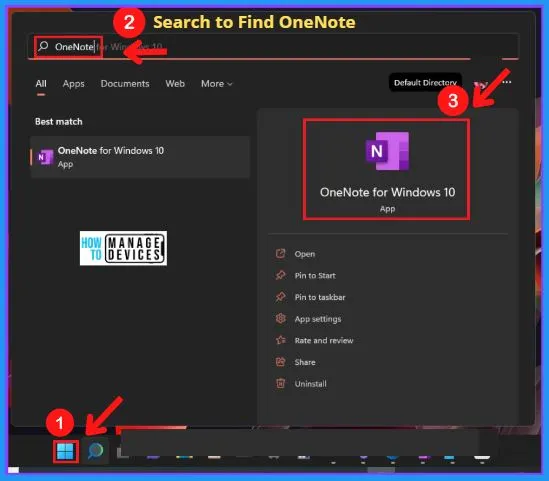
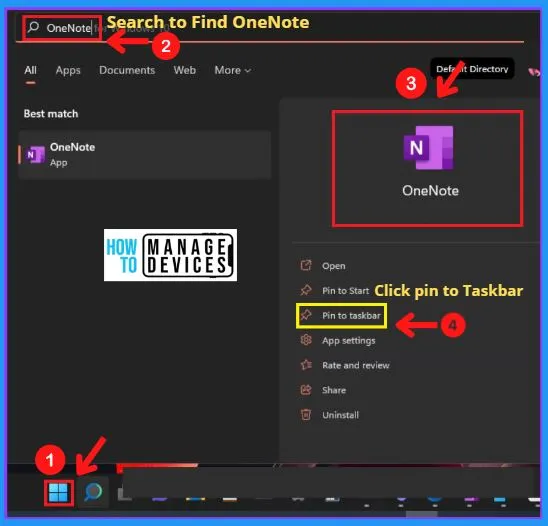
OneNote is a digital notebook that helps you to capture and organize everything across your devices. The steps and screenshot below show how to use OneNote and pin it to Taskbar.
- Click on the Start Menu
- Go to search Box, Type OneNote
- Select OneNote from the Below screenshot
- Click Pin to Taskbar option, It will pin the OneNote app to your Windows Taskbar
NOTE! – This is the OneNote app bundled with Microsoft 365 app (aka Office 365).
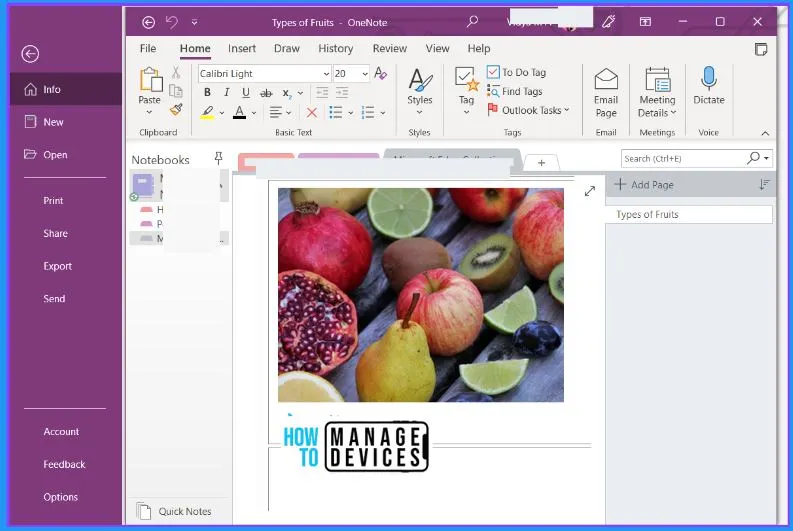
Clicking the OneNote will open the OneNote app. You can easily use OneNote as your digital notebook, which helps you to capture and organize everything across your devices.
How to Create Pages, Sections, or Notebooks in OneNote
OneNote is a digital notebook that helps you to capture and organize everything across your devices. OneNote Notebooks are made up of sections and pages.
Pages in OneNote mean your actual notes, whereas sections in OneNote are a collection of related pages. You can easily add as many pages as you want; pages give more space in your notebook.
Notebook Section in OneNote
Notebook in OneNote contains all the sections and pages. Pages contain your actual notes, whereas sections contain collections of related pages, and the notebook in OneNote is shown on the Left panel lists of OneNote.
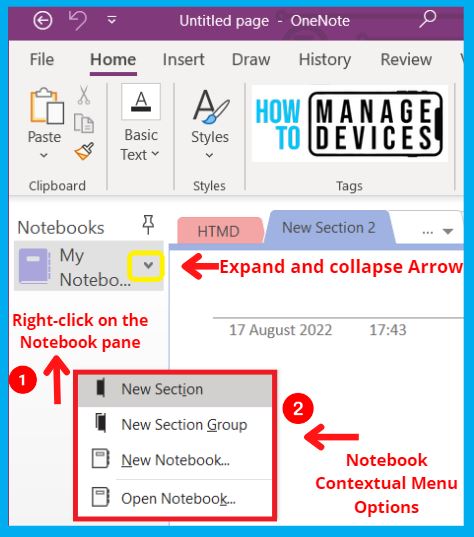
Right-click on the Notebook pane will open a contextual menu, It includes the following options, and the below screenshot shows the contextual Menu in the notebook.
- New Section – Helps to add a New section to your notebook
- New Section Group – Helps to add a New Section Group in your notebook
- New Notebook – Helps to add New Notebook
- Open Notebook – Helps to Open Notebook
4 Different Ways to Add Pages in OneNote
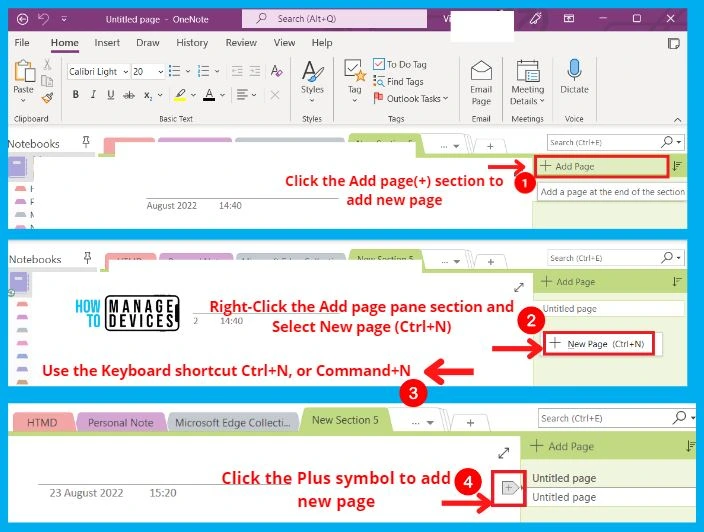
You can easily Add as many new pages as you need in OneNote.The following are the ways to add pages in OneNote, and the below screenshot shows how to add pages in OneNote.
Vertical Page List
You can easily add pages in OneNote using the Vertical page list. Go to the Vertical Page List of OneNote and click the Plus (+) Symbol to add new pages to OneNote.
Plus Symbol next to the page
You can easily add a page by clicking the Plus (+) Symbol next to the page. This is the simple method to add pages in OneNote.
Keyboard Shortcut
Using a Keyboard shortcut is a simple way to add pages in OneNote. You can use the keyboard shortcut Ctrl+N, or Command+N, to create a new page in OneNote.
Right-Click the Page Tabs Pane
You can easily add pages in OneNote by right click anywhere in the page tab pane and selecting Add new page option.
Contextual Menu in Page Tabs Pane
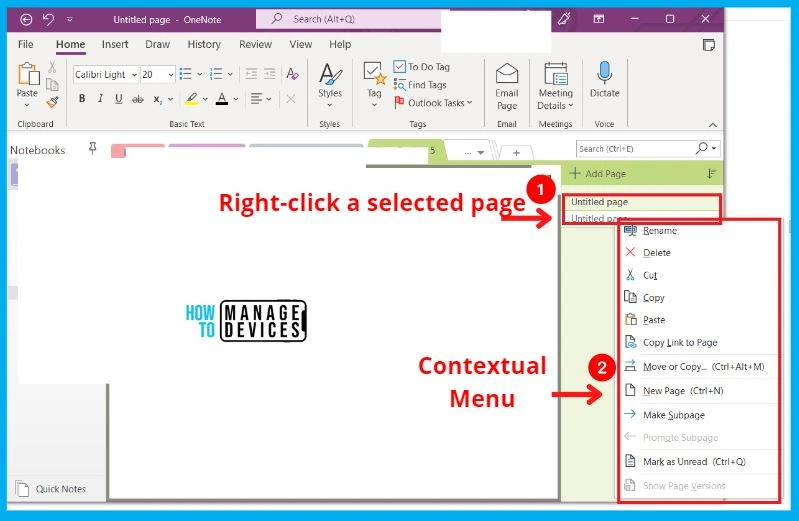
The Contextual Menu in the Page tabs pane includes a set of options related to the OneNote page. The below steps and screenshot shows the Contextual Menu of Page Tabs Pane in OneNote.
- Select one or more pages (Hold down the Shift key to select multiple pages)
- Right-click a Selected Page
- A Contextual Menu will appear; it shows the following options
- Rename – Helps to Rename the Page
- Delete – Helps to Delete the Page
- Cut – Helps to Cut the Page
- Copy – Helps to Copy the Page
- Paste – Helps to Paste the Page
- Copy link to the Page – Helps to copy the link to a page
- Move or copy (Ctrl+Alt+M) – Helps to Move or copy the page
- New Page (Ctrl+N) – Helps to add a new page
- Make subpages – Helps to add subpages
- Promote subpages – Helps to promote the subpage
- Mark as Unread (Ctrl+Q) – Helps to mark the page as unread
- Show page versions – Helps to show the version of the page
Search Box Dropdown Arrow in OneNote
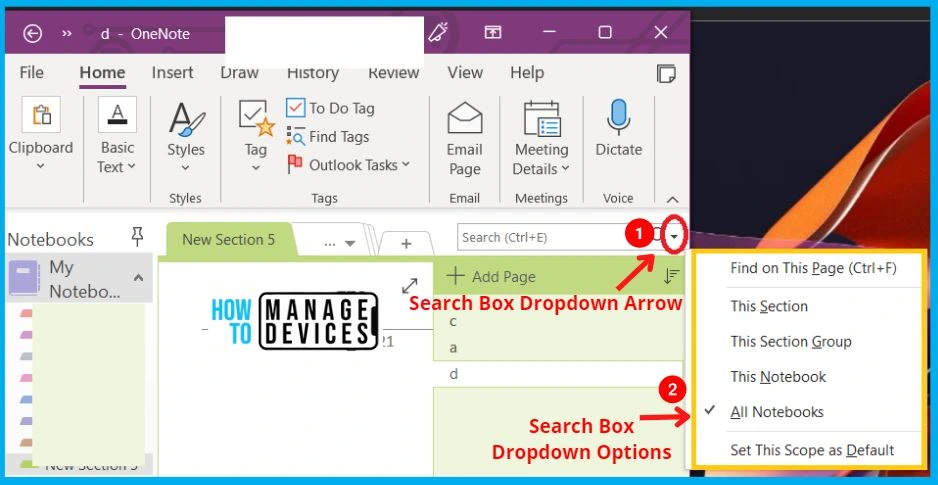
The OneNote search box dropdown arrow shows options such as Find on This Page (Ctrl+F), This Section Group, This Notebooks, All Notebook, and Set This Scope as Default. All the search box options help you find a particular page, Section, Section Group, Notebook, etc.
- The below screenshot shows the OneNote search box dropdown options.
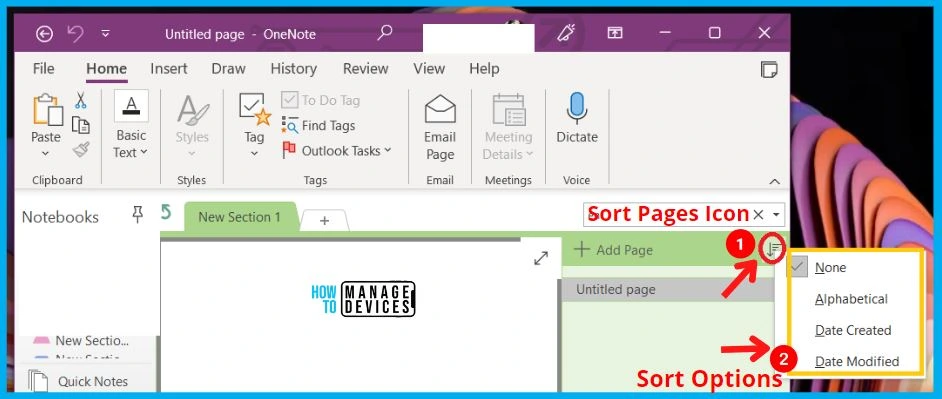
5 Different Ways to Sort Pages in OneNote
There are 5 different ways to Sort pages in OneNote. The following are the options to Sort pages in OneNote, and the below screenshot shows the OneNote sort option.
- None – Leaves the pages in the default sort order
- Alphabetical Sort Order
- Alphabetical sort order includes two options: ascending sort order and descending sort order. Alphabetical(Up Arrow) helps to sort the pages in ascending order, A to Z, and the alphabetical (Down Arrow) helps to sort the pages in descending order, Z to A.
- Date Created Sort Order
- Date created sorting includes two options newest created date to the oldest created date and the old to the new date. The date created (Up Arrow) helps to sort the pages from new to old Date, and the date created (Down Arrow) helps to sort the pages from old to the new date.
- Date Modified Sort Order
- The date-modified sort option includes two options. One is the newest modified date to the oldest modified date, and the other is the oldest modified date to the newest modified date sorting.
- Manually Sort
- You can manually sort the Page in OneNote by dragging and dropping your pages to your preferred positions within the page list.
3 Different Ways to Add Sections in OneNote
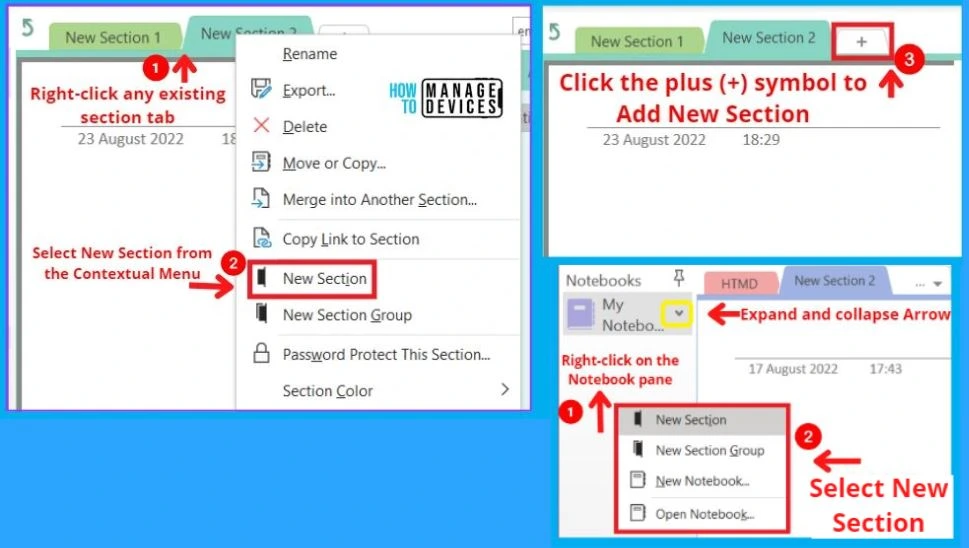
There are 3 different ways to add sections in OneNote. The following are the way to Add sections in OneNote and the below screenshot shows the 3 different ways to add sections in OneNote.
- Right-click any existing section tab in OneNote, and then select New Section
- Click the Plus (+) Symbol next to the Section tab to add a New Section in OneNote
- Right-click the Notebook section and select New Section
OneNote Desktop App in Windows 11
Here I am explaining how to get started with OneNote especially and how to use OneNote for desktops. OneNote includes the menus such as File, Home, Insert, Draw, History, Review, View, and Help.
- File
- Home
- Insert
- Draw
- History
- Review
- View
- Help
1. File Menu Button in OneNote
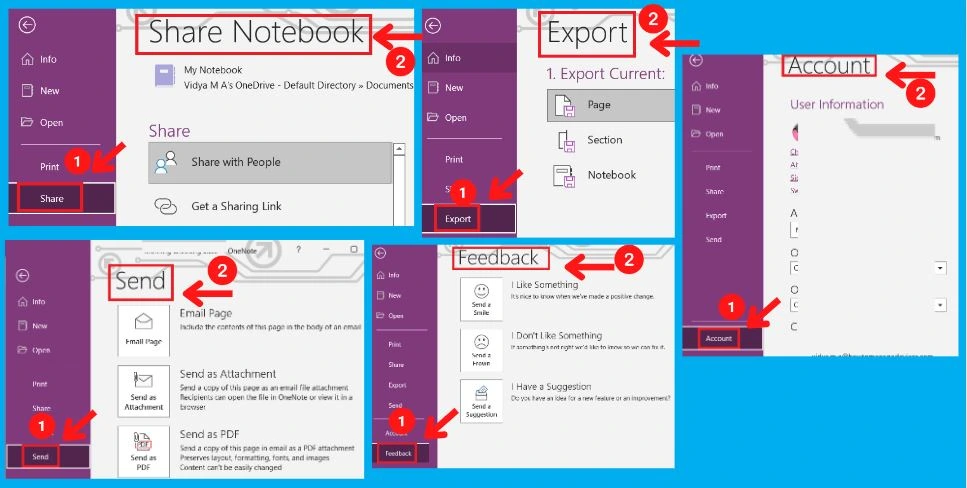
OneNote has a File Menu button at the left top corner of OneNote. File Menu is the First Menu in OneNote, and it includes the options such as Information, New, Open, Print, Share, Export, Send, Account, Feedback, and options.
The file tab is only available in OneNote 2016, including additional OneNote setting options. The below steps and screenshot shows the File menu button in OneNote.
- Select OneNote from Start Menu or Pin OneNote from the Taskbar
- Select File Menu from OneNote (See the below screenshot)

File Menu Button options in OneNote are shown in the below screenshot
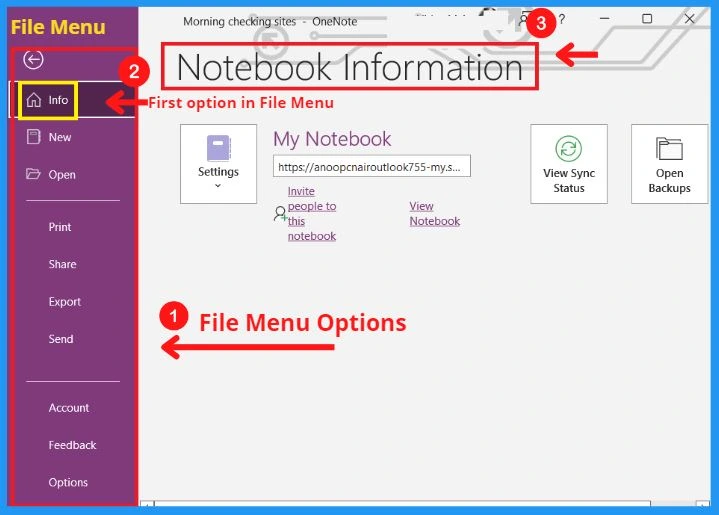
- Information – It gives information about my Onenote; it includes the following options:-
- Share or Move
- Sync
- Close
- Properties
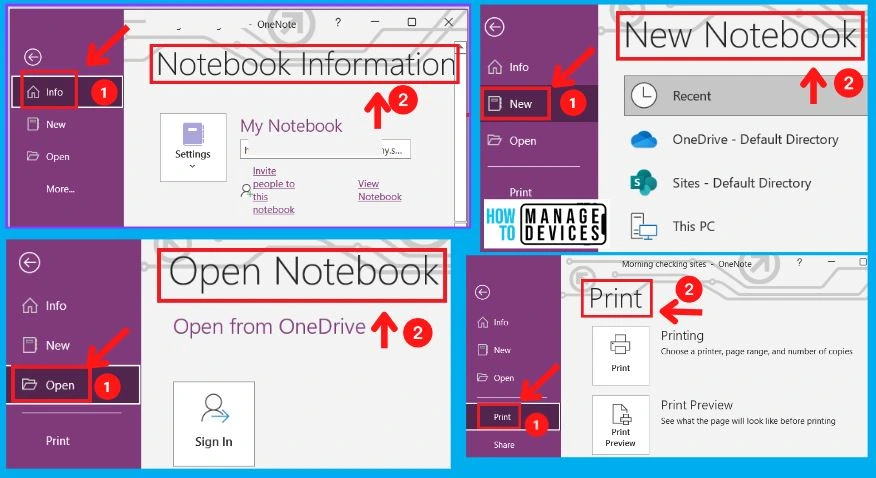
- New – It helps to create New Notebook
- Open – Help to open an existing Notebook from Default Directory and other locations
- Print – It helps to print My OneNote and includes the Printing and Printing Preview options. Printing allows you to choose a printer, page range, and the number of copies and the printing preview helps you see the page’s appearance before printing.
The below screenshot shows the information, New, Open, and Print options in File Menu.
- Share – Helps to share a notebook. The share option includes the following.
- Share with People
- Get a sharing Link
- Share with Meeting
- Move Notebook
Export – Helps to Export current page, section, and Notebook.
- Send – Helps to send my OneNote; it includes the Email page, Sends as Attachment, Sends as PDF, Sends to Word, Sends to Blog.
- Email page – Include the contents of this page in the body of an email
- Send as Attachment – Send a copy of this page as an email file attachment Recipients can open the file in OneNote or view it in a Browser)
- Send as PDF – Send a copy of this page in email as a PDF attachment preserves layout, formatting, fonts, and images content can’t be easily changed)
- Send to Word – Create a new word document with the contents of this page)
- Send to Blog – Create a new blog post with the content of this page; supported blogging sites include SharePoint Blog, WordPress, Blogger, and more
Account: It has User information, Account privacy, Office background, and Connected services, and also consists of Product information, Subscription product, etc.
- Feedback
- Send a smile – I like something – It’s nice to know when we have made a positive change
- Send a frown – I Don’t like something – If something’s not right, we’d like to know so we can fix it
- Send a suggestion – I Have a suggestion – Do you have an idea for a new feature or an improvement?
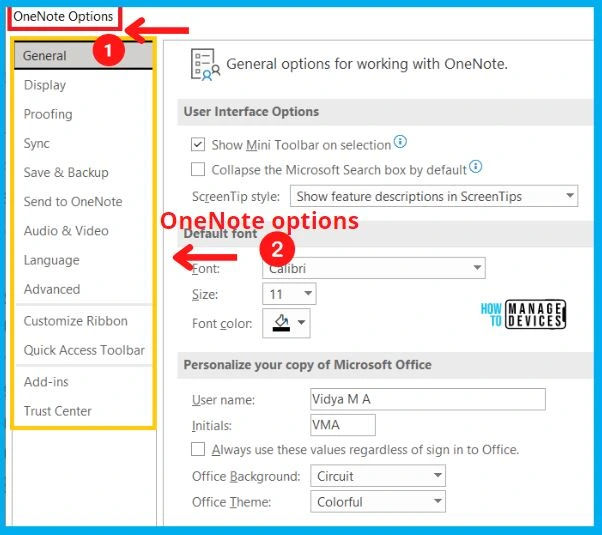
While writing the post, there are 13 options in OneNote for Windows 11. These option menu items are similar to Office 365 app options menu.
- OneNote Options
- General : (General options for working with OneNote)
- Display : (Change how OneNote looks)
- Proofing : (Change how OneNote corrects and formats your text)
- Sync : (Sync your notebooks, Sync all files and images)
- Save & Backup : (Save, Backup, Optimizing files, Cache file location)
- Send to OneNote : (Send to OneNote, Outlook items, Other content)
- Audio &Video : (Audio & Video, Audio recording settings, Video recording settings, Audio search)
- Language : (Office display language, Office authoring languages, and proofing)
- Advanced : (Editing, Linked Notes, Pen, Email sent from OneNote, Battery options, Tags, Password, Text recognition in pictures, Printouts, Other)
- Customize Ribbon : (Helps to Customize the Ribbon)
- Quick Access Toolbar : (Heps to Quick access the toolbar)
- Add-ins : (View and manage Microsoft Office Add-ins)
- Trust Center : (Help keep your documents safe and your computer secure and healthy)
2. Home Menu Button in OneNote
The home tab is the main and important tab in OneNote and is located on the left top side of OneNote.The home page in OneNote displays the Font sizes, colors, Highlighting, etc. The home menu button in OneNote includes the following main options.
- Clipboard
- Basic Text
- Styles
- Tags
- Meeting
- Voice
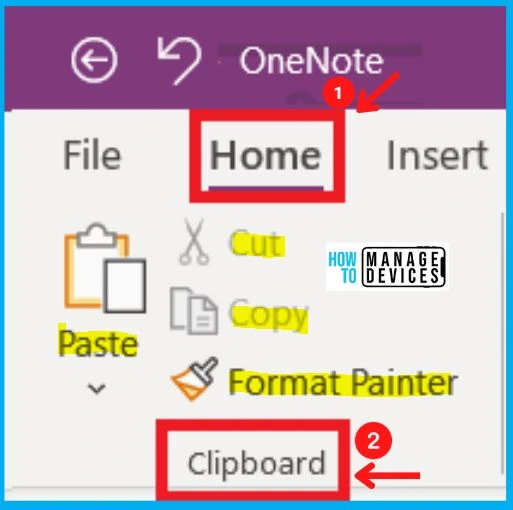
1. Clipboard Options available
The Clipboard in the Home menu shows the Paste, Cut, Copy, and Format Printer options. The paste option is used to paste the copied content to OneNote. The cut option removes the selection and puts it on the Clipboard so that you can paste it elsewhere. The copy is used to copy the selection on the Clipboard so that you can paste it elsewhere.
- Paste (Ctrl+V)
- The OneNote paste option is used to paste the copied content to OneNote. Pick a paste option, such as keeping formatting or pasting only content. Use the keyboard shortcut Ctrl+V for pasting the content to OneNote.
- Cut (Ctrl+X)
- Remove the selection and put it on the Clipboard so you can paste it somewhere else
- Copy (Ctrl+C)
- Please put a copy of the selection on the Clipboard so that you can paste it somewhere else
- Format Printer (Ctrl+Shift+C)
- Follow the below steps to get start the format painter
- Select content with the formatting you like
- Click Format Painter
- Select something else to apply the formatting automatically
- Follow the below steps to get start the format painter
Note! – Double-click the format painter to use the formatting in multiple places.
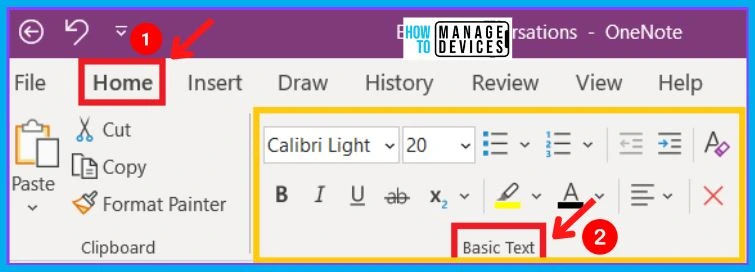
2. Basic Text
- Font – Pick a new font for your text
- Font size – Change the size of your text
- Font color – Change the color of your text
- Bold (Ctrl+B) – Make your text bold
- Italic (Ctrl+I) – Italic your text
- Underline (Ctrl+U) – Underline your text
- Strikethrough (Ctrl+-) – Cross something out by drawing a line through it
- Subscript – Type very small letters just below the line of text
- Bullets (Ctrl+.) – Create a bulleted list – Click the Arrow to change the look of the bullet
- Numbering (Ctrl+/) – Create a numbered list – Click the Arrow for more numbering formats)
- Decrease Indent Position (Alt+Shift+Left) – Decrease the indent level of the paragraph
- Increase Indent Position (Alt+Shift+Right) – Move your section farther away from the margin
- Paragraph Alignment – (Set your text alignment paragraph spacing and text direction)
- Text Highlight Color (Ctrl+Alt+H) – Make your text pop by highlighting it in a bright color
- Clear All Formatting (Ctrl+Shift+N) – Remove all formatting from the selection leaving only the normal unformatted text
- Delete – Delete this item
The Home page in OneNote also shows the Style, Tags, Email, Meeting, and Voice options. All these options are explained in the list below, and the screenshot shows the other Home page options.
- Heading 1 (Ctrl+Alt+1) – Heading 1 (Ctrl+Alt+1)
- Heading 2 (Ctrl+Alt+2) – Heading 2 (Ctrl+Alt+2)
- To-Do (Ctrl+1) – Tag this note (To Do) (Ctrl+1)
- Important (Ctrl+2) – Tag this note (Important) (Ctrl+2)
- Question (Ctrl+3) – Tag this notes (Question) (Ctrl+3)
- To Do Tag – Tag as To Do
- Find Tags – View all tagged notes
- Outlook Tasks – (Add an outlook task to your notes) – The task stays in syn between OneNote and Outlook to help you stay organized
- Email page (Ctrl+Shift+E) – Email a copy of this page
- Meeting Details – Add meeting details from your Outlook calendar – Adds the subject, attendees, date, and location
- Dictate (Alt+’) – Office Dictation powered by Microsoft speech services

Insert Menu in OneNote
Insert Menu is used to place various objects into your document, such as insert space, insert tables, page numbers, pictures, symbols, comments, and other objects. It is also used to create various types of shapes and can be used to save, load, or delete a shape.
Insert Menu is used to insert space, Table, Audio and Video recording, Date and Time, etc. The below steps and screenshot shows the options related to the insert menu.
- Insert
- Insert Space – Insert or Remove Extra Space
- (Click and drag to make space for more notes. Click and drag up to remove space)
- Insert Space – Insert or Remove Extra Space
- Tables
- Add a Table
- Insert a table on the Page; You can also press the Tab key to create a table while typing quickly
- Add a Table
- Files
- File Printout – Add a printout of a file to this Page – OneNote can search text in printouts
- File Attachment – Add a file to the page as an attachment
- Spreadsheet – Add an image of an Excel spreadsheet; you can edit it later using Excel
- Images
- Screen Clipping
- Take a snapshot of part of your screen and add it to the page
- OneNote will hide while you capture webpages, documents, or anything else
- OneNote can search for text in screen clippings
- Pictures
- Insert pictures from your computer or from other computers that you are connected to
- Online Picture
- Find and insert pictures from a variety of online sources
- Screen Clipping
- Media
- Online Video
- Insert videos from a variety of online sources
- Online Video
- Link (Ctrl+K)
- Create a link to webpages, files, or other places in your notes

Recording Options in OneNote
Insert Menu in OneNote includes the Record Audio and Video option. The following are the steps to record Audio in OneNote; Start recording audio; recording will continue until you click stop; when you are done, your notes will link to the time they were taken during the recording.
The recording includes the following steps, Start recording video; recording will continue until you click stop; when you are done, Your notes will link to the time they were taken during the recording. The below screenshot shows the Insert menu option in OneNote.
- Recording
- Record Audio
- Start recording audio
- The recording will continue until you click to stop
- When you are done, your notes will link to the time they were taken during the recording
- Record Video
- Start recording video
- The recording will continue until you click to stop
- When you are done, your notes will link to the time they were taken during the recording
- Record Audio

Time Stamp in Insert Menu helps you to show the Date, Time, and Date and Time. You can easily insert the date by pressing the keyboard shortcut (Alt+Shift+D), which also helps you add today’s date.
The Time option helps insert time; you can also use the keyboard shortcut (Alt+Shift+T) key. The date and Time option allows you to add the date and time.
- Pages – Page Templates – Used to templates the pages
- Symbols
- Symbols – Used to insert symbols
- Equation – Insert Equation (Alt+=)
- Add common mathematical equations to your documents, such as the area of a circle or the quadratic formula
- You can also build your own equations using the library of math symbols and structures
- Stickers – Used to insert Stickers

Draw Menu in OneNote
The Draw menu in OneNote provides a set of drawing tools that helps you to create shapes and draw free-form sketches, and it also allows you to write notes with a mouse. The Draw menu includes the below options.
- Tools
- Shapes
- Edit
- Convert
1. Draw Menu Tools Option
The Tools option includes the Select object, Lasso select, Panning hand, Eraser, and, Color and thickness. All the tool options in the Draw menu are explained below.
- Select
- Select objects or Type Text
- Select objects on the Page or Click to start typing text
- Lasso select
- Select ink by drawing a shape; all ink strokes in the shape will be selected
- Panning Hand
- Drag the page in any direction you want
- Eraser
- Choose an eraser to remove ink strokes or parts of shapes
- Color and Thickness
- Choose the color and thickness of shapes and strokes

Draw Menu Shapes Option
The Shape option in the draw menu contains the following options. The below screenshot shows the shapes in OneNote.
- Line
- Line Arrow
- Line Arrow: Double
- No Arrow
- Single Arrow
- Double Arrow
- Rectangle
- Oval
- Parallelogram
- Triangle
- Diamond
- 2 Dimensions, Positive
- 2 Dimensions, full
- 3 Dimensions

Edit Option in Draw Menu
The Edit option in the draw menu contains the following options. The below screenshot shows the Edit option in the Draw menu.
- Insert Space
- Click and drag down to make space for more notes
- Click and drag up to remove space
- Delete – Delete this item
- Arrange – Bring objects forward or send them backward
- Rotate – Rotate the selected picture, drawing, or shape

Draw Menu Convert Option
The Convert option in the Draw menu includes the Ink to share, Ink to text, and ink to math. The link to share is used to convert ink drawings to shapes Automatically, Ink to Text is used to convert handwriting to text, and Ink to Math is used to Convert handwritten mathematical expressions to text.
- The below screenshot shows the Convert option in Draw Menu.

History Menu in OneNote
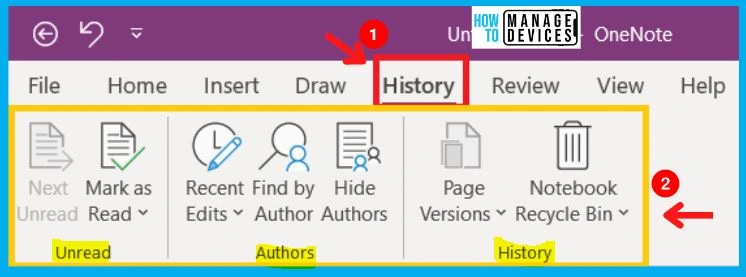
History Menu includes the options such as Unread, Authors, and History. The Unread option consists of the Next Unread, Mark as Read options, the Next Unread option helps you to “jump to the next page with unread notes in this notebook,” and the Mark as Read option allows you to “Mark this page as read or unread.”
- History Menu Authors section includes the options such as Recent Edits, Find by Author, and Hide Authors.
- The Recent Edits option helps you to “See pages in this notebook that have recently changed,”
- Find by Author option allows you to “See who changed what in this notebook,”
- Hide Authors option helps you to “Hide or show other authors’ initials next to their changes in this notebook.”
History menu options in History Menu include Page Versions and Notebook Recycle Bin. The page Versions option helps you identify the “Versions of the Page,” The Notebook Recycle Bin helps to “Recover deleted sections or pages.”
- The below screenshot shows the History Menu in OneNote.
Review Menu in OneNote
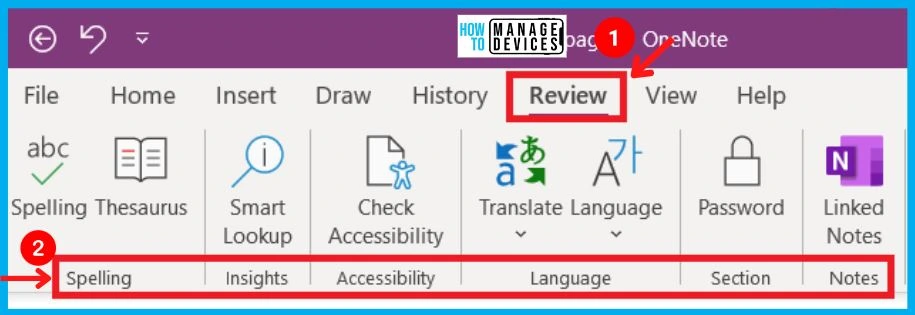
The review option in OneNote includes the options such as Spelling, Insights, Accessibility, Language, Section, and Notes. The Review Spelling section shows the Spelling and Thesaurus.
- Spelling
- Insights
- Accessibility
- Language
- Section
- Notes
Spelling Section in Review Menu
The Spelling option helps you to “write the spelling correctly” in your OneNote and alternatively use the Keyboard shortcut of F7. The Thesaurus option in the spelling section shows “At a loss for words? Let us suggest another way to say what you mean”.
- Spelling – Helps you to write the spelling correctly in your OneNote
- Thesaurus – If you are lost for words, it will suggest another way to say what you mean
The Insights section in Review Menu shows the Smart Lookup option. Smart Lookup helps you to “Search for definitions, images, web pages, and other results from various online sources.”
The Accessibility section in the Review menu shows the “Check Accessibility” option. Check Accessibility helps you “to Make sure that your file follows accessibility best practices and it will also help you to fix issues quickly with easy to follow directions or recommendations.”
Language Section in Review Menu
The language section in Review Menu shows the Translate and Language options. The translate option helps you to “Translate content into a different language using the Microsoft Translator online service,” and the Language option allows you to Choose the language for proofing tools such as spelling checks.
- Translate – Translate content into a different language using the Microsoft Translator online service
- Language – Choose the language for proofing tools such as spelling check
Note! – You can also set other language preferences, including editing, display, Help, and Screen Tips.
The Password section in the Review Menu helps you to “protect the password of this section,” and the Linked Notes section allows you to “Take notes that automatically link to Word documents, Powerpoint presentations or webpages that you have open.” The below screenshot shows the Review Menu options in OneNote.
View Menu in OneNote for Windows
View Menu in OneNote shows the options such as Views, Tools, Page Setup, Zoom, and Window. The View section includes the options such as Normal View, Full Page View, and Dock to Desktop.
- Normal View – Show the ribbon and navigation tabs
- Full Page View – Feelings cluttered, show only the current page
- Dock to Desktop: –
- Keep your notes visible by anchoring this OneNote window to the side of your desktop
- Your notes will stay on top while you work in other programs
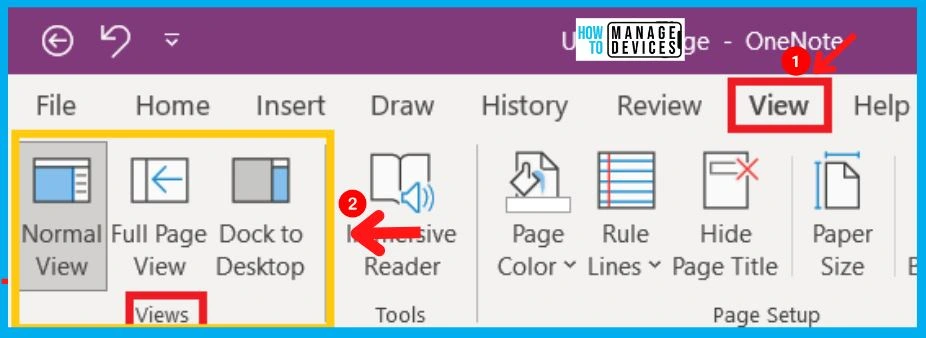
The Tools section in the View menu shows the Immersive Reader; It helps you to Read Immersively. The Page Setup section offers the following options.
- Page color – Add a splash of color to your document by changing the color of the page
- Rule Lines – Add rule lines or gridlines to this page
- Hide Page Title – Show or Hide the Page’s title
- Paper Size – Change the paper and margin size
- Switch Background – View with a dark background – See how the page will look with a dark background

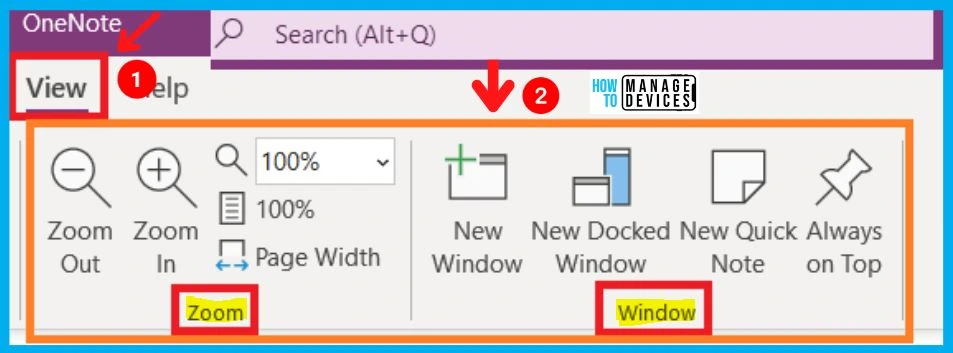
Zoom section in the View menu shows the options such as Zoom Out (Ctrl+Mouse Wheel), Zoom In (Ctrl+Mouse Wheel), Zoom (Specify the zoom level of the publication), 100% (Zoom your document to 100%), Page Width (Zoom the document so that the width of the page matches the width of the window).
The window section in the View menu shows the New window, New Docked Window, New Quick Note, and Always on Top. The below screenshot shows the Zoom and Window section in the View menu.
- New window – (Open a second window for your document so you can work in different places at the same time)
- New Docked Window:-
- Open a new OneNote window, and anchor it to the side of your desktop
- Open notes will stay on top while you work in other programs
- New Quick Note – (Quick jot down your thoughts in a new window)
- Always on top – (Keep this window on top always)
Help Menu Option in OneNote
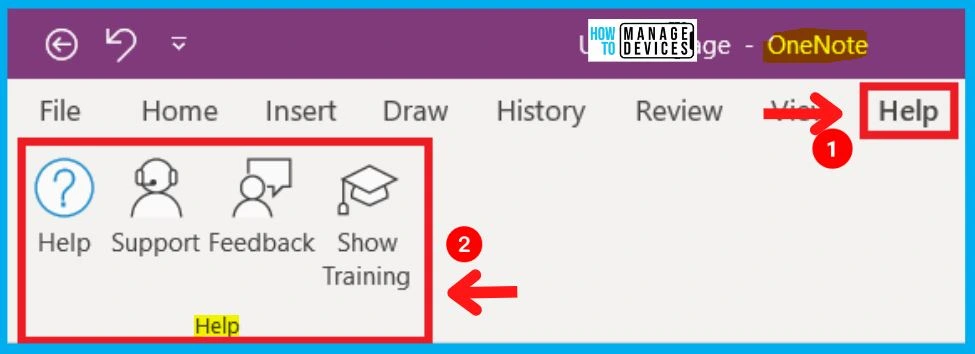
Help Menu in OneNote includes the help section; the Help section consists of the options such as Help, Support, Feedback, and Show Training. Help(F1) helps you to “get help using Microsoft Office,” and Show Training helps you to “show online training and learning content.”
- The below screenshot shows the Help menu options in OneNote.
Author
About Author – Vidya is a computer enthusiast. She is here to share quick tips and tricks with Windows 11 or Windows 10 users. She is also keen to find solutions to day-to-day tech problems and write about them.

In OneNote I’m missing possibility to attach reminder to note. Is there any opportunity to do it? Similar feature is present in Evernote product.