Let’s look at the steps to install local printer in Windows 11 and Driver Software. Printers are the most familiar asset in offices and homes nowadays. To get anything printed on your printer, you must connect a printer to your computer and install the printer driver.
A printer is the most common thing among us to get a hard copy of a document easily. The most common and easy way to access a printer is by using a USB cable. This USB connection is called a local connection, which doesn’t need any network to be connected. I will also cover how to uninstall or remove Windows 11 printer driver software.
If you are unaware of how to install Windows 11 printer driver software through a USB cable, then it’s a guide for you to know the step-by-step procedure of the installation process. I will show you how to connect a printer successfully with a computer.
In the present situation, by the up-gradation of the windows version, there is no need for a particular .exe file to be installed for a printer. Microsoft windows adjusted most of the printer connections without any driver. I am using a printer now with webpack.exe; let’s start to install it on my PC.
- Enable Spellcheck in Microsoft Edge
- All in One Guide OneNote for Windows 11 Detailed Review OneNote Versions
How To Install Local Printer in Windows 11
Printer installation is getting easier nowadays. As the technology developed, any configuration process was made easy daily. There are various ways to install a local printer in windows—the different methods discussed below in brief.
- Install the printer by connecting the USB cable
- Add Printer using Vendor Application (In this post, we are using HP webpack.exe)
- The traditional way of installing a local printer using the CD drive
- Add local printer by using the operating system’s inbuilt features
Install The Printer by Connecting The USB Cable
The easiest process for installing a local printer in Windows 11 is to connect the printer through a USB cable. Windows will automatically detect the printer and find the appropriate installation driver. Then a pop-up window shows the option to launch the printing application.
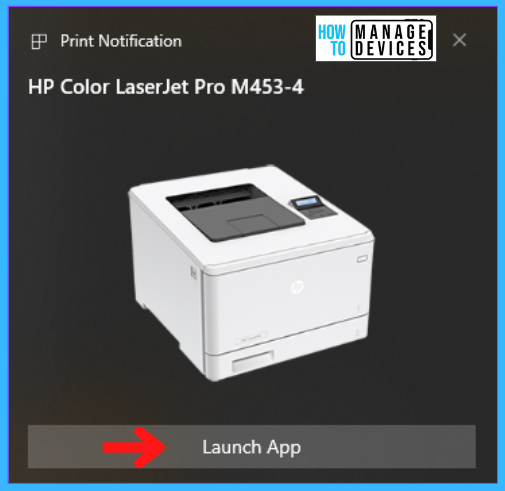
Add Printer using Vendor Application | Driver Software
In this process, you have to download the driver software from the printer brand, such as Brother, Canon, HP, Lexmark, and Sharp, and their models (e.g., DeskJet, LaserJet, Photosmart, etc.).
For example, if I want to install a printer, I have to download the compatible software from the concerned brand portal (here, I am using HP webpack.exe). The webpack.exe is a compatible collection of drivers package for a particular series of printers. After downloading, I can now perform the installation process.

Step 1: As we all know, Windows 11 printer driver software is stored in the “Download” folder when we download something from a website by default. Now move to that folder, and you can access the EXE file by two methods: double-click on it to start or right-click on it and click on Open or Run as Administrator. The downloaded file is namely:
- Full_Webpack-48.6.4642-CLJM453_UWWL_Full_Webpack.exe (Set-up file)
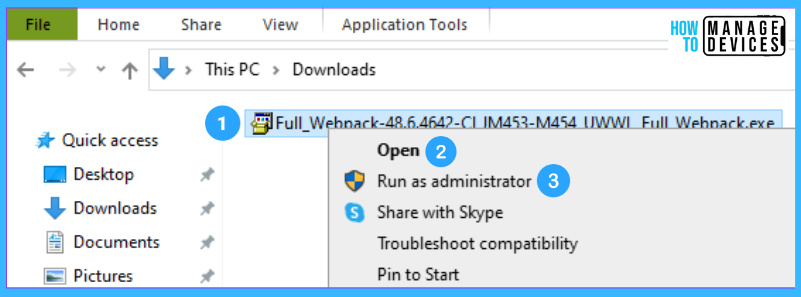
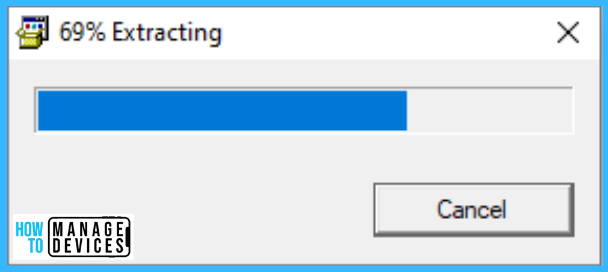
Step 2: From the figure above, choose the option to extract the webpack.exe (HP Windows 11 printer driver software) to start the installation process. This extraction collects all the related software from that EXE file and functions further. The extraction process will take one to two minutes shown below.
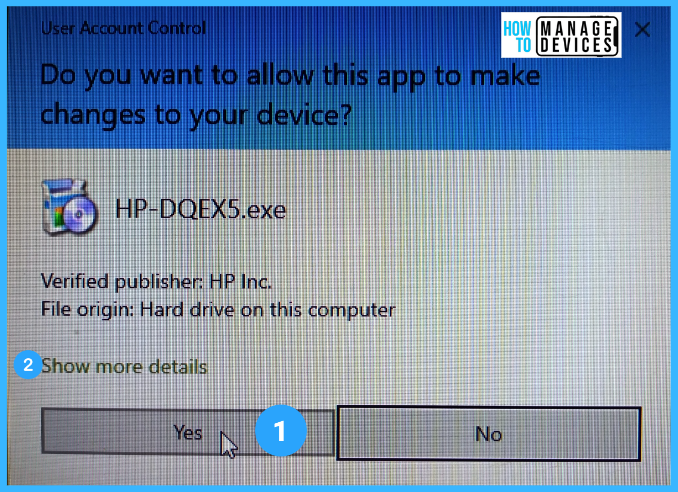
Step 3: When the extraction is completed, it asks permission from the Operating System (it needs administrative permissions) to make some changes to install the local printer. By clicking the Yes button, the extracted file is ready to perform the task by gathering information from the system.
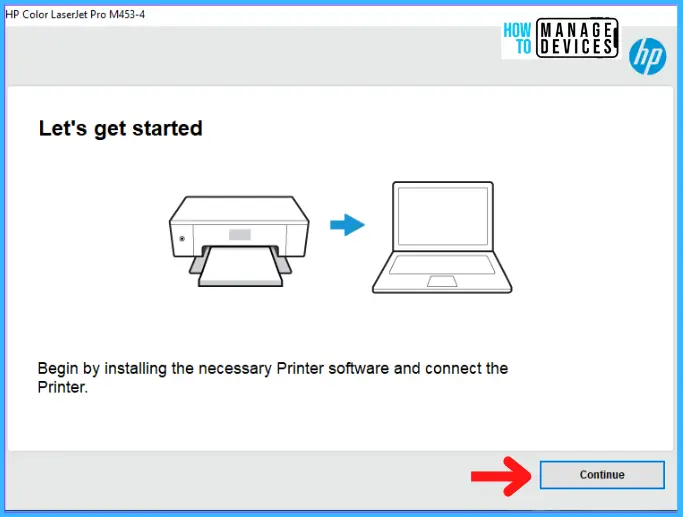
Step 4: It started working on its installation process by permitting the application to make changes to the current device. The new window will appear, namely “Let’s get started” This window will begin by installing the necessary printer software and connecting the printer. Just press Continue for the onward process.
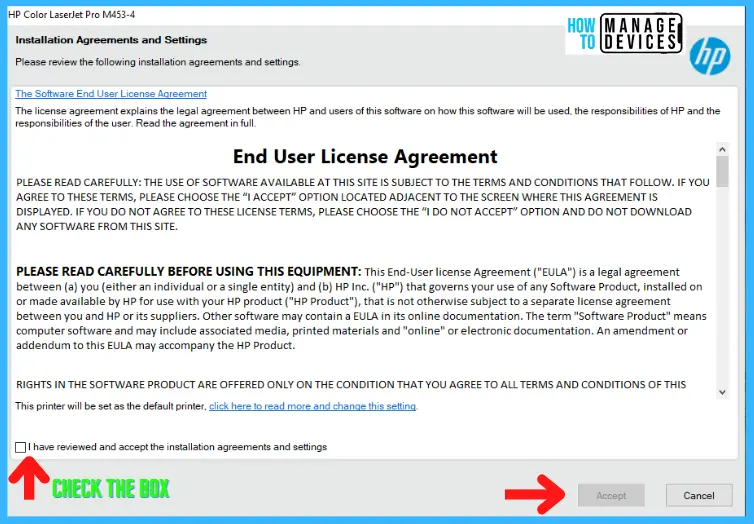
Step 5: After pressing continue, it takes to the new window “Installation Agreement and settings.” This window asks the user to review the installation agreement and settings carefully.
In the left corner below, marked in the image, the box says, “I have reviewed and accepted the installation agreement and settings,” The Accept button enables the further process. Press the Accept button and continue.
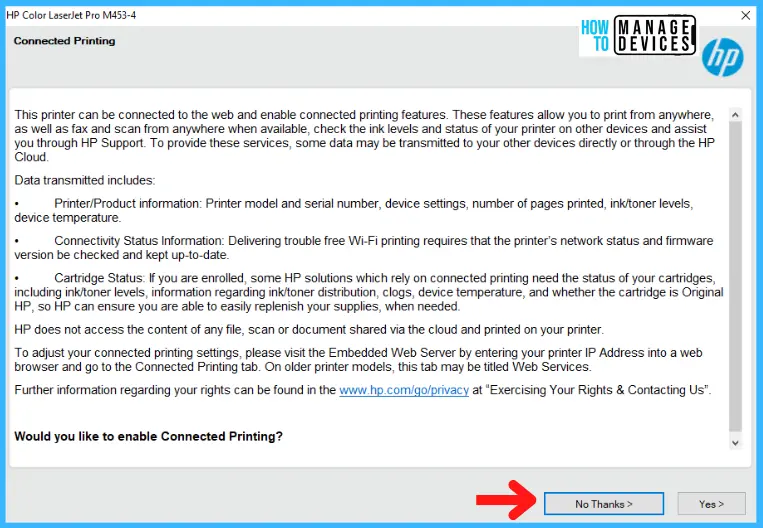
Step 6: Accepting the above user agreement, the next window, “Connected Printing,” will ask you to connect the printer to the network. Though we have installed only a local printer, we should press “No Thanks” for the question asked, “Would you like to enable connected printing ?” and continue to the next step.
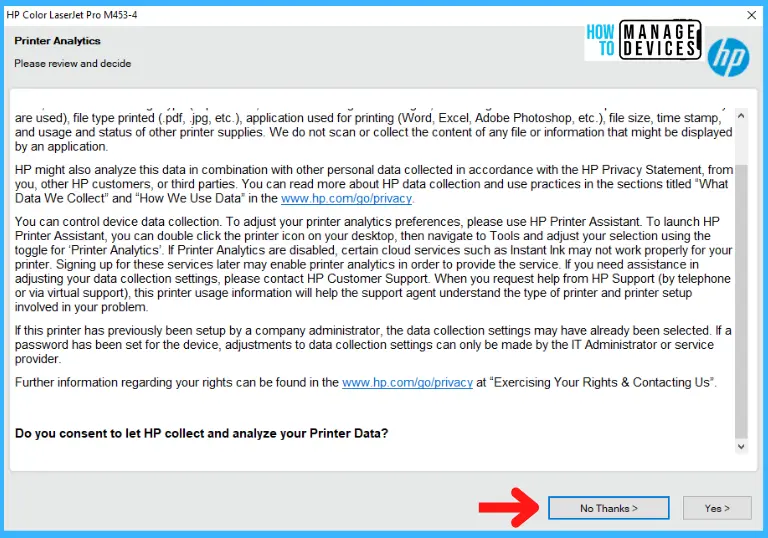
Step 7: Next is “Printer Analytics,” which analyzes the brand’s printer data. To answer, “Do you consent to let HP collect and analyze your printer data ?” press “No Thanks” and move to the next window, as we are installing only the local printer.
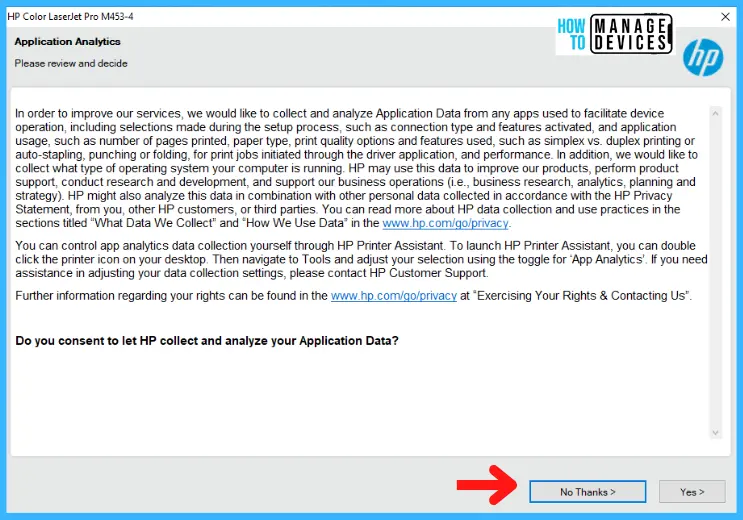
Step 8: Another window, “Application Analytics,” analyzes and collects the data from the printer for improvement and better facilitation of its service. So it asks, “Do you consent to let HP collect and analyze your Application data ?” the same process presses “No Thanks” and moves to the next step.
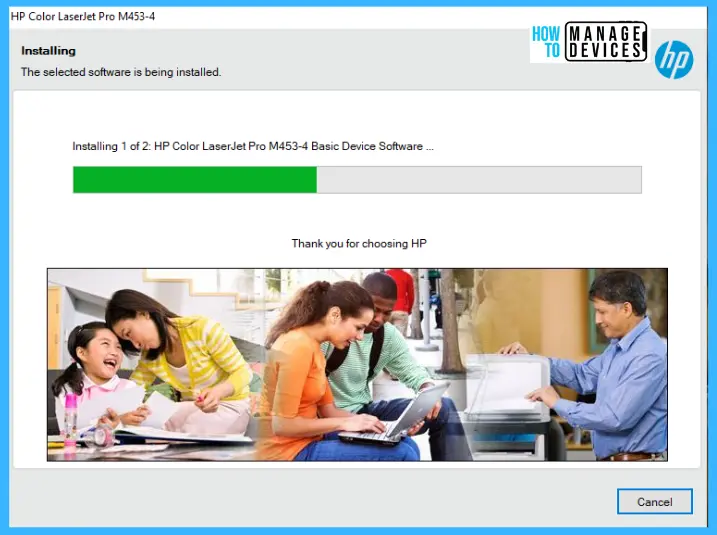
Step 9: After the Application collects the above information, it starts its installation into the device. The next window, “Installing,” says the selected software is installed. It will take around 2 minutes to finish the building with a message as “Thank you for choosing HP.”
Different Methods to Install Windows 11 Printer Driver Software
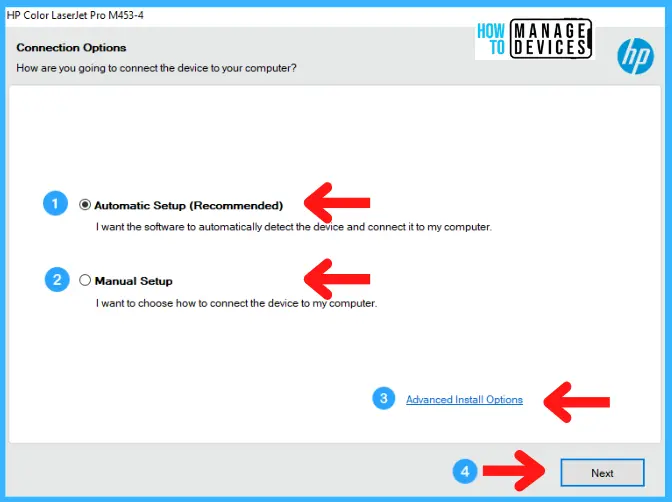
Step 10: Now, the software has been installed successfully. It’s time to connect the printer to the device/computer. The next pop-up window is “Connection Option,” which asks you to choose the preferred option to connect the printer with the computer. There are options available for connection as:
- Automatic Setup (Recommended)
- Manual Setup
- Advanced Install Option
Automatic Setup (Recommended) of Local Printer in Windows 11
By choosing the option Automatic Setup and press Next to continue the process of installation and connecting the printer with the computer. In my opinion, if you don’t have another plan or set up for a printer, choose the Recommended option always.
This is a method to follow when you want to have pretty simple Steps to Install a Local Printer in Windows 11 using vendor Driver Software.
Manual Setup of Local Printer in Windows 11
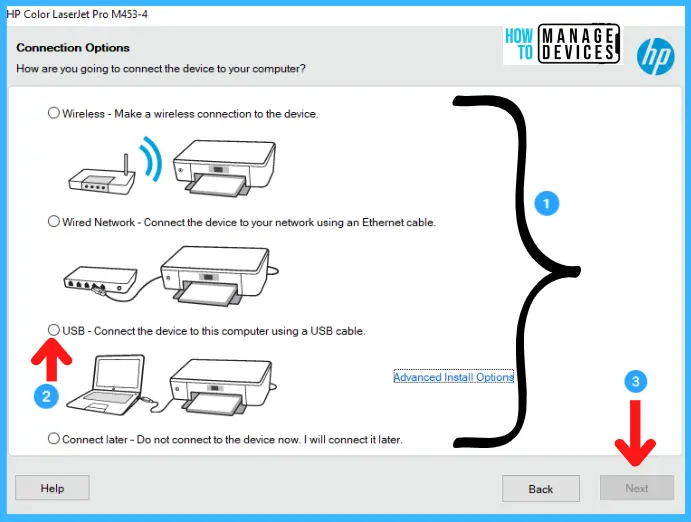
By choosing the manual setup option, it took to the next window asking the user how to connect the device with your computer. Some options are available such as those given below:
- Wireless Connection
- Wired Connection
- USB Connection
- Connect later
Though we need a local printer installation, we must choose the USB Connection. By doing this, the software finds whether the device is connected to the computer using a USB or not connected. Choose USB Connection and press next.
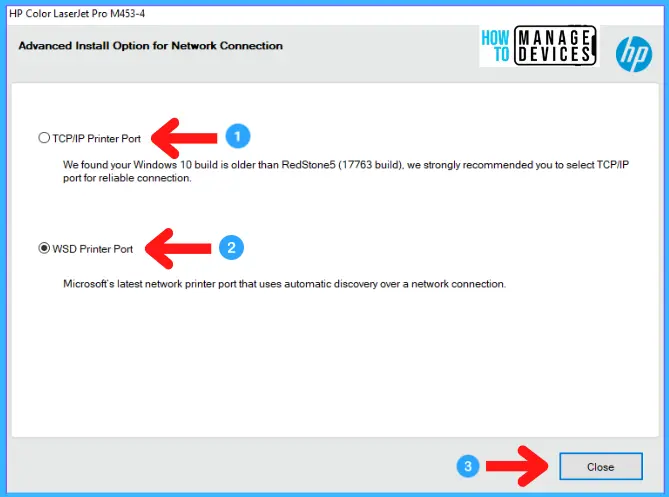
Advanced Printer Install option for Windows 11
This is an extra option for network base connection. If you have an active network connection, choose the option and TCP/IP connection. This helps you to connect with the printer by using the internet. This option is not needed in the local printer installation.
- An advanced install option for Network Connection is not required for local printer installation.
- Click on the Close button.
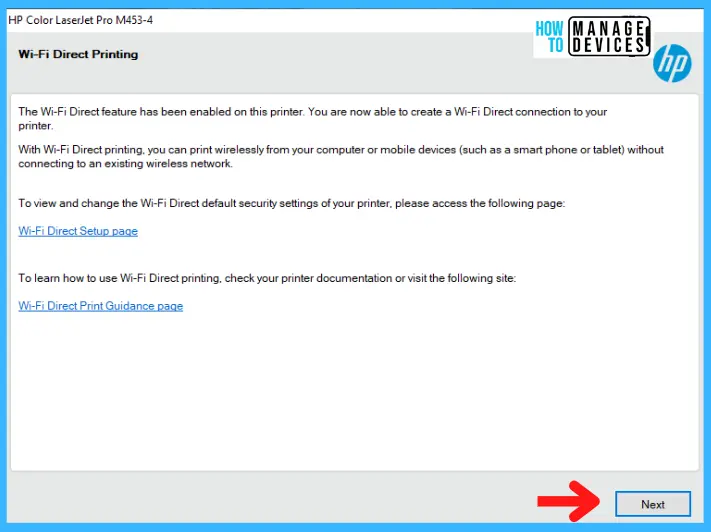
Step 11: The new “Wi-Fi Direct Printing” window will appear. Though this printer has its inbuilt wi-fi Direct feature enabled. You are now able to create a direct wi-fi connection.
- Press Next to continue.
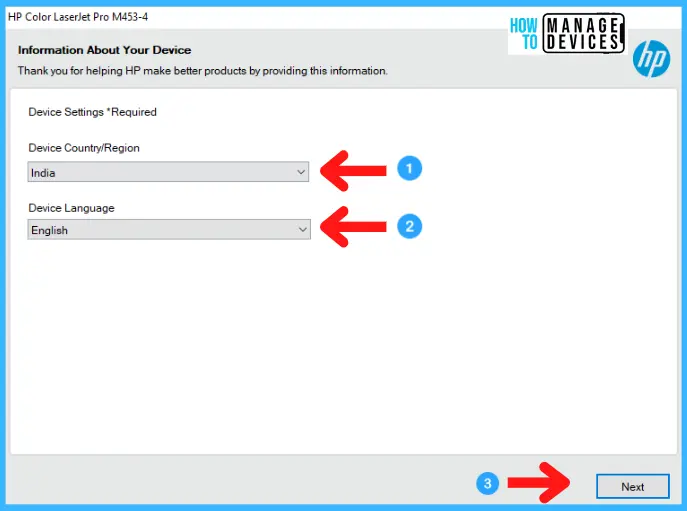
Step 12: The next window will appear, namely “Information About Your Device,” and asks you to put the country and the Language to help the brand to make a better product. The device setting has required this information for future updates. Put the country/region and device language press Next.
- Device Country/Region = India
- Device Language = English
- Click on the Next button
Step 13: After filling up the country and device language, press next to finish it. Your next window appears, namely “Setup Complete,” with a message “Congratulations, you have finished device setup” now close it as shown in the image below.
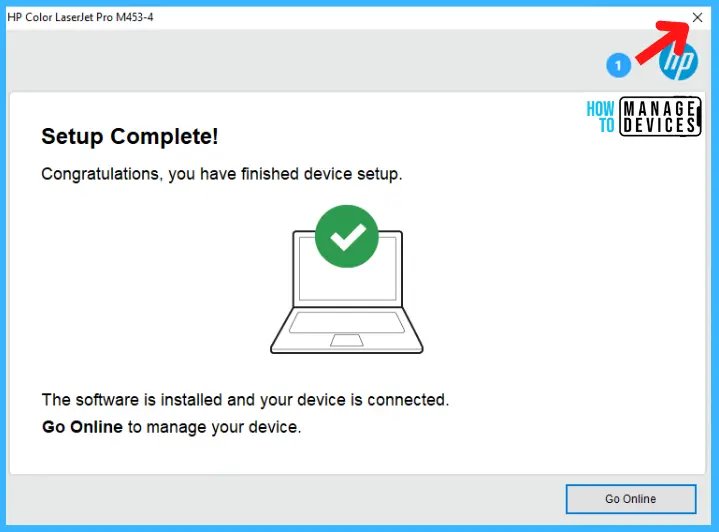
By pressing the cross to close the setup and message window pop-up “close installation software” and ask the user, “Are you sure you want to skip this activation?” press Yes, Skip, and the window will close, and the installation is completed.
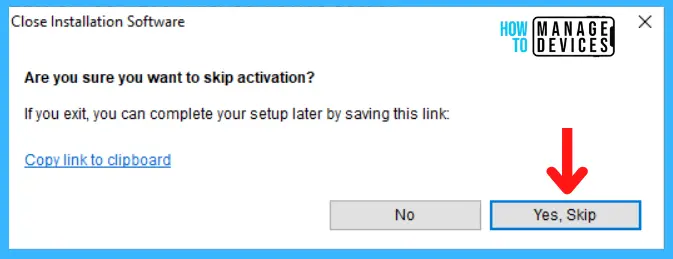
By following the above process, you can install the local printer successfully. The printer is now ready to use. A desktop shortcut was also created for better usage of the printer.
Note! The above process may vary as per the requirement of the user or the system
The Traditional Way to Install a Local Printer on Windows 11 Using the CD Drive
The traditional way of installing printer drivers is using its setup file on a CD. A printer always comes with an installation CD, which contains the design or installation software in it.
- Put the CD into the CD Drive.
- Go to This PC > Double-Click on the CD drive to open.
- Find the Setup.exe or install file and double-click on it.
- Now follow the instructions to set up the wizard to complete the installation.
- Now print a test page to ensure proper installation of the printer.
Add Local Printer by Using The Operating System’s In-built Features
When you connect a printer to your computer or add a new printer to your home network, you can usually start printing. Windows 11 supports most printers, so you don’t need to install the special printer software.
Additional printer drivers and support be available if you update Windows. There are two types of in-built printer installation processes such as:
- To install or add a local printer
- To install or add a network, wireless or Bluetooth printer
To Add or Install Local Printer on Windows 11
In most cases, you must connect it to your PC to set up a printer. Connect the USB cable from your printer to a USB port available on your PC, and turn the printer on
- Click on Start > then click on Settings > open Bluetooth and Devices
- Click on Printer and Scanner > open Printer and Scanner settings
- To add a Printer or Scanner, click on Add Device
- Wait for it to detect the nearby printers and choose the appropriate device you want to use and select Add Device
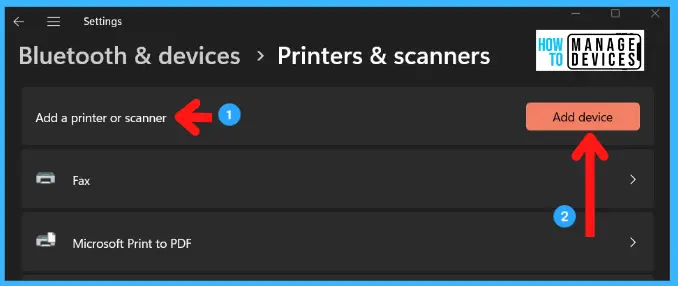
Note! If your printer isn’t on the list, the option The printer that I want isn’t listed, select Add manually and then follow the instructions to add it manually.
To Install or Add Network, Wireless or Bluetooth Printer
If your printer is turned on and connected to a network, Windows will find it easily. Available printers can include all printers on a network, such as Bluetooth and wireless printers or printers plugged into another computer and shared on the web. Permission is needed to install some printers.
- Click on Start > then click on Settings > open Bluetooth and Devices
- Click on Printer and Scanner > open Printer and Scanner settings
- To add a Printer or Scanner, click on Add Device
- Wait for it to detect the nearby printers and choose the appropriate device you want to use and select Add Device
Note! If your printer isn’t in the list, the option The printer that I want isn’t listed, select Add manually and then follow the instructions to add it manually.
How to Uninstall or Remove Local Printer from Windows 11 PC
Learn how to uninstall or remove Local Printer from Windows 11 PC. To change or renew. Removing the driver from the computer is called the uninstallation process. You must follow these steps to remove/uninstall the local printer from Windows 11.
Step 1: To uninstall the printer, click on the Search bar, then type “Control.” The “Control Panel” option appears in the list. Click it to get into the “Adjust your computer’s Setting.”
- Click on Search Bar
- Or you can do the following command from RUN from “Appwiz.CPL“
- Type “Control” to find out Control Panel in the list
- Click on Control Panel to enter into Adjust your computer’s setting
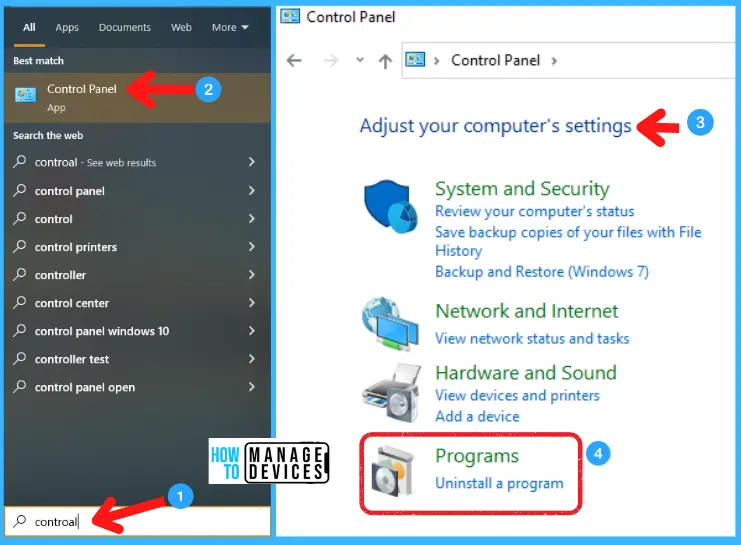
Step 2: When you are in Adjust your computer’s setting menu, in the list of system settings, click on the Programs (Uninstall a program) option, as indicated in the figure above. The programs menu has two options: Programs and Features and Default Programs.
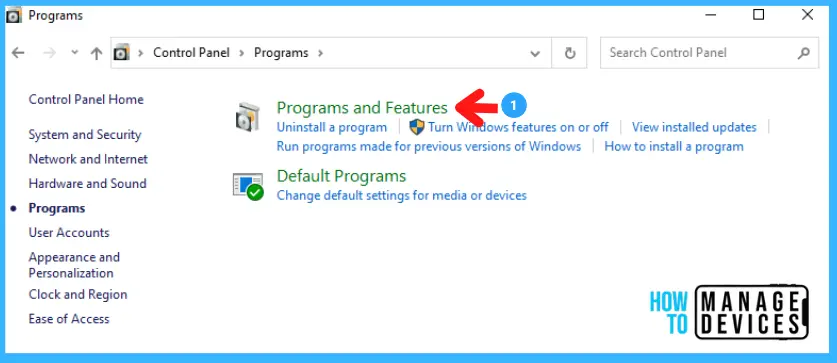
- Click on the Programs and Features option
- It directs to a list of installed programs
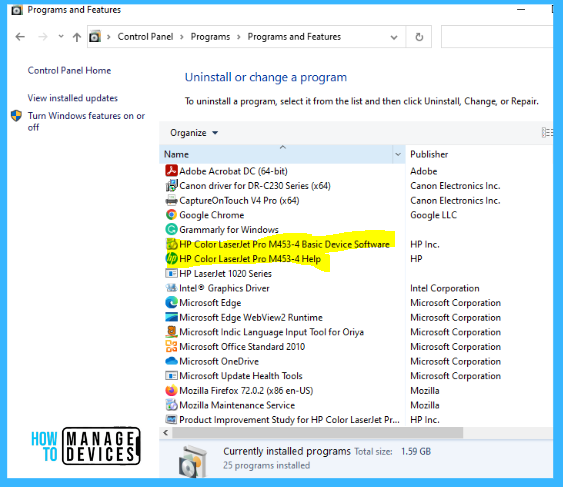
In the list, this particular printer has two installed programs. One is the software another is the help option. They are present in the list serially, one after another. The name of the installed printer is:
- HP Color LaserJet Pro M453-4 Basic Device Software
- HP Color LaserJet Pro M453-4 Help
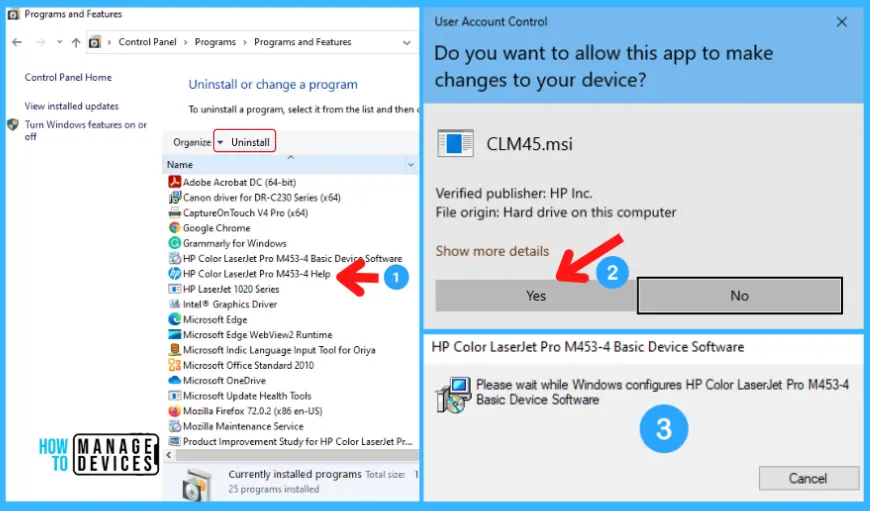
Step 3: Select HP Color LaserJet Pro M453-4 Help and click on Uninstall to remove it from the device. Then, it asks the Admin for permission to continue the uninstallation process; click Yes to continue. Now the package HP Color LaserJet Pro M453-4 Help was uninstalled successfully.
- Select HP Color LaserJet Pro M453-4 Help
- Click on Uninstall
- Click Yes for Admin permission
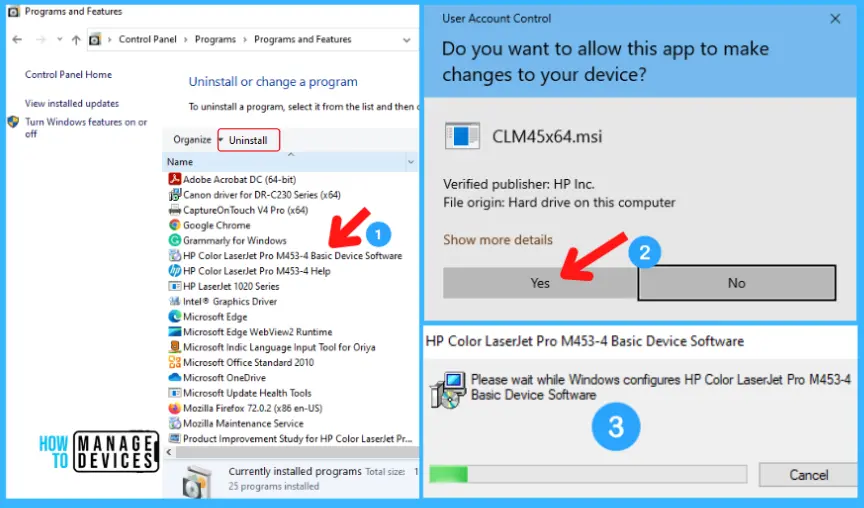
Step 4: Select HP Color LaserJet Pro M453-4 Basic Device Software and click on Uninstall to remove it from the device. Then, it asks the Admin for permission to continue the uninstallation process; click Yes to continue.
- Select HP Color LaserJet Pro M453-4 Basic Device Software
- Click on Uninstall
- Click Yes for Admin permission
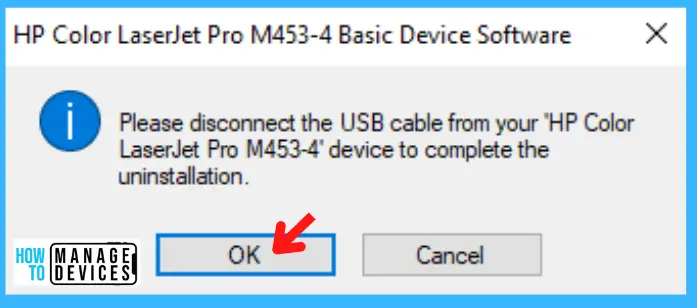
Step 5: Approving the permission for uninstallation as Admin, a pop-up window will appear and asks, Please disconnect the USB cable from the “HP Color LaserJet Pro M453-4” device to complete the uninstallation. Remove the USB cable and press OK to continue Uninstallation.
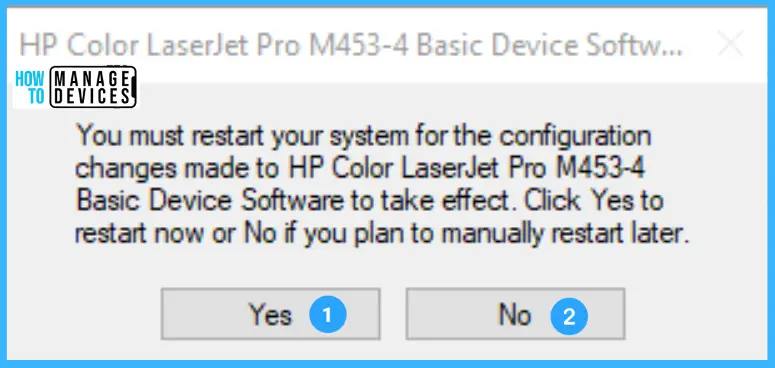
Step 6: Now, the printer has been uninstalled successfully. This is the traditional feature of windows: whenever you install or uninstall any software, windows remind you to restart Windows 11 to the configuration made changes on your system to take effect.
A message pop-up window will appear and ask the user to restart the system to configure changes that take effect or may restart later by clicking on. Yes, the system restarts immediately; clicking on No to restart the system as per user convenience.
- Click YES to Restart immediately
- Click NO to Restart later
Author
Alok is a Master of Computer Applications (MCA) graduate. He loves writing on Windows 11 and related technologies. He likes to share his knowledge, quick tips, and tricks with Windows 11 or Windows 10 with the community.

The detailed instructions and the clear screenshots make the process simple for users. A valuable resource for smooth printer setup.