Let’s learn how to deploy Start Menu Taskbar custom layout settings using Intune. This is a quick post to help you to learn more about Intune device restriction policies. You can customize the Start Menu and Taskbar layout with the help of this post.
As a first step, you have to prepare an XML file as per your requirement, and once the XML file is prepared, you can follow the steps mentioned below to deploy a custom configuration using Intune. The customization of the Start menu and taskbar for Windows 11 is going to be a bit different.
I feel customization of the start menu is straightforward as per my testing. But, the taskbar customization is a bit tricky in my experience. You can read more about this at the end of this post about my test results. Windows 11 Start Menu Layout customization options using JSON file are updated in the below post.
- Customize Windows 11 Start Menu Layout Settings Using Intune
- Windows 11 Start Menu Taskbar Alignment Options | How To Align Center Or Left
- How To Change The Taskbar Size In Windows 11 Easiest Method
- Choose Windows 11 Folders To Appear On Start Next To The Power Button How To Customize
How to Prepare XML to Customize Start Menu & Taskbar
This is the most important and time-consuming task in this exercise. You need to prepare an XML file to deploy these custom settings. The following are some of the important points that you need to be careful about.
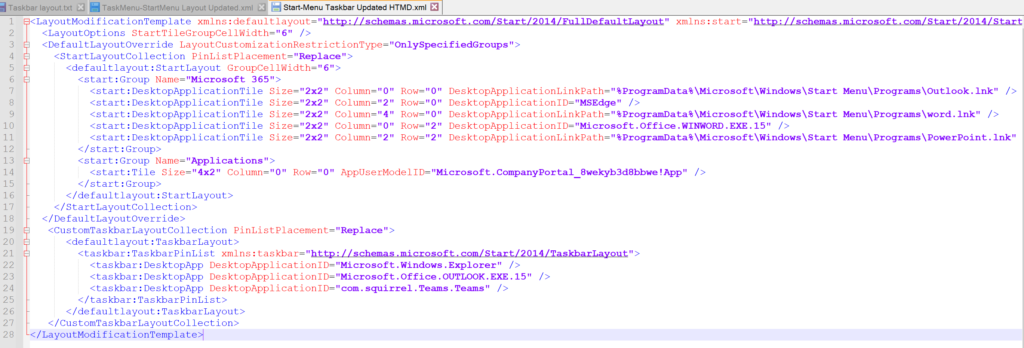
- Always use Notepad++ to edit/develope the XML files.
- Remove
<?xml version="1.0" encoding="utf-8"?>code from sample files that you get from Mcirosoft docs. This line of code won’t work with Intune policies. - You will need to have one XML for both start menu and taskbar layout customizations. You can’t deploy two different XML file for the same policy using Intune.
- If you already deployed Start menu layout XML and you have to deploy taskbar layout now, then you will have to amend the same policy to include taskbar customization XML code as well.
- Try to use StartLayoutCollection PinListPlacement=”Replace” & CustomTaskbarLayoutCollection PinListPlacement=”Replace” to replace the default layouts. Otherwise, you will have default layout and the custom layouts.
- I have taken the start menu customization code from the Microsoft document. Or you can use the following PowerShell command.
- You can take the sample XML for taskbar layout sample from the Microsoft docs site.
- You can use easy way to export the existing start menu layout using the folloing PS command.
Export-StartLayout -UseDesktopApplicationID -Path layout.xml
Export-StartLayout –path <path><file name>.xml
The following is the sample XML code for the customization. I have shared different sets of options in the code to configure custom layouts.
- DesktopApplicationLinkPath – You need use shortcut links with this option (.lnk).
- AppUserModelID – Best option for modern apps.
- DesktopApplicationID – Best option if you want to use the actual executables.
<LayoutModificationTemplate xmlns:defaultlayout="http://schemas.microsoft.com/Start/2014/FullDefaultLayout" xmlns:start="http://schemas.microsoft.com/Start/2014/StartLayout" Version="1" xmlns="http://schemas.microsoft.com/Start/2014/LayoutModification" xmlns:taskbar="http://schemas.microsoft.com/Start/2014/TaskbarLayout">
  <LayoutOptions StartTileGroupCellWidth="6" />
  <DefaultLayoutOverride LayoutCustomizationRestrictionType="OnlySpecifiedGroups">
    <StartLayoutCollection>
      <defaultlayout:StartLayout GroupCellWidth="6">
        <start:Group Name="Microsoft 365">
          <start:DesktopApplicationTile Size="2x2" Column="0" Row="0" DesktopApplicationLinkPath="%ProgramData%\Microsoft\Windows\Start Menu\Programs\Outlook.lnk" />
		  <start:DesktopApplicationTile Size="2x2" Column="2" Row="0" DesktopApplicationID="MSEdge" />
		  <start:DesktopApplicationTile Size="2x2" Column="4" Row="0" DesktopApplicationLinkPath="%ProgramData%\Microsoft\Windows\Start Menu\Programs\word.lnk" />
		  <start:DesktopApplicationTile Size="2x2" Column="0" Row="2" DesktopApplicationID="Microsoft.Office.WINWORD.EXE.15" />
          <start:DesktopApplicationTile Size="2x2" Column="2" Row="2" DesktopApplicationLinkPath="%ProgramData%\Microsoft\Windows\Start Menu\Programs\PowerPoint.lnk" />
        </start:Group>
        <start:Group Name="Applications">
          <start:Tile Size="4x2" Column="0" Row="0" AppUserModelID="Microsoft.CompanyPortal_8wekyb3d8bbwe!App" />
        </start:Group>
      </defaultlayout:StartLayout>
    </StartLayoutCollection>
  </DefaultLayoutOverride>
   <CustomTaskbarLayoutCollection PinListPlacement="Replace">
      <defaultlayout:TaskbarLayout>
        <taskbar:TaskbarPinList xmlns:taskbar="http://schemas.microsoft.com/Start/2014/TaskbarLayout">
          <taskbar:DesktopApp DesktopApplicationID="Microsoft.Windows.Explorer" />
          <taskbar:DesktopApp DesktopApplicationID="Microsoft.Office.OUTLOOK.EXE.15" />
          <taskbar:DesktopApp DesktopApplicationID="com.squirrel.Teams.Teams" />
        </taskbar:TaskbarPinList>
      </defaultlayout:TaskbarLayout>
   </CustomTaskbarLayoutCollection>
</LayoutModificationTemplate>
Customize Start Menu Custom & Taskbar
Here is a quick step-by-step guide to help you to deploy the prepared XML file. This Intune policy helps to customize the start menu and taskbar for Windows 10 devices.
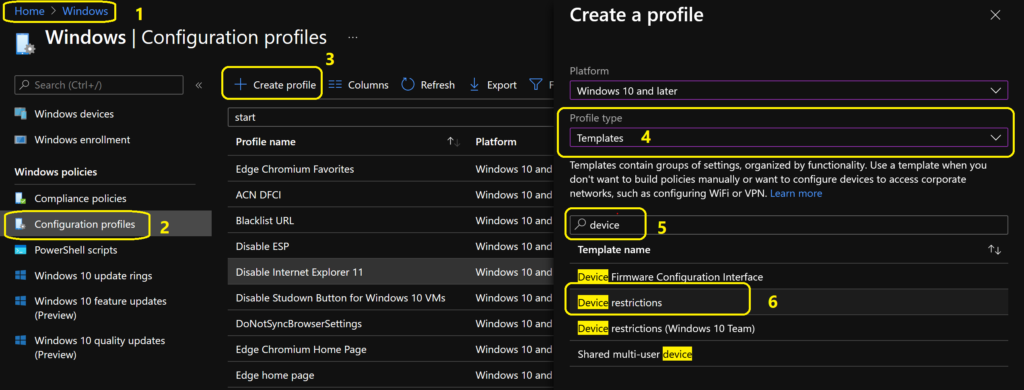
- Logon to Microsoft Endpoint Manager Portal.
- Navigate to Devices -> Windows -> Configuration Profiles.
- Select Platform -> Windows 10 and later.
- Select Profile Type -> Template.
- Search with “device” and select Device Restrictions.
- Click on Create button.
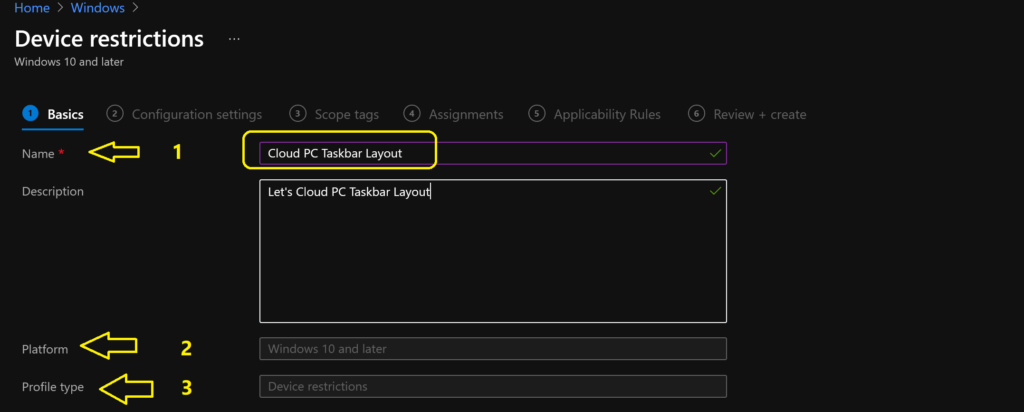
- Enter Name of the Device restriction policy for Windows 10 and later -> Cloud PC Start Menu & Taskbar Layout.
- Enter Description of the policy – What does this policy do?
- Make sure Windows 10 and Later is selected from Platform.
- Make sure Device Restrictions is selected from Profile Type.
- Click on Next to continue.
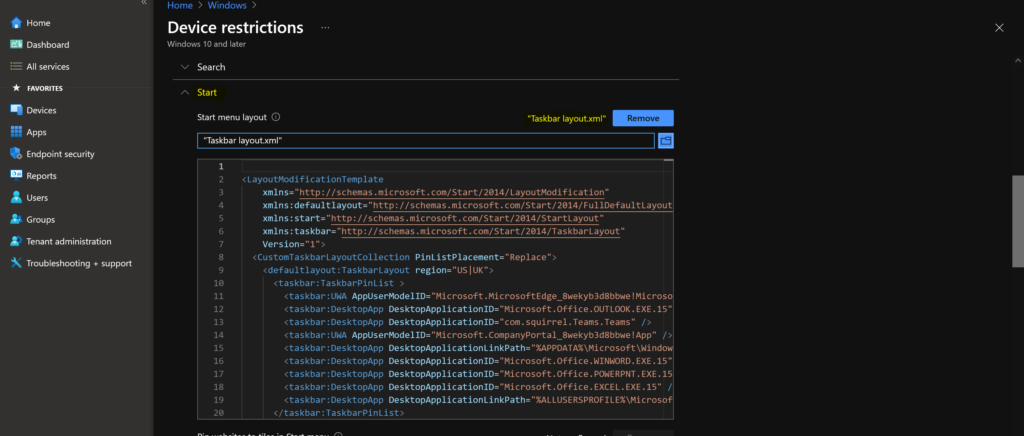
You will need to scroll down and search for the Start Menu configuration item from the device restriction policy. You can click on the FOLDER icon to upload the prepared XML file to customize the layouts.
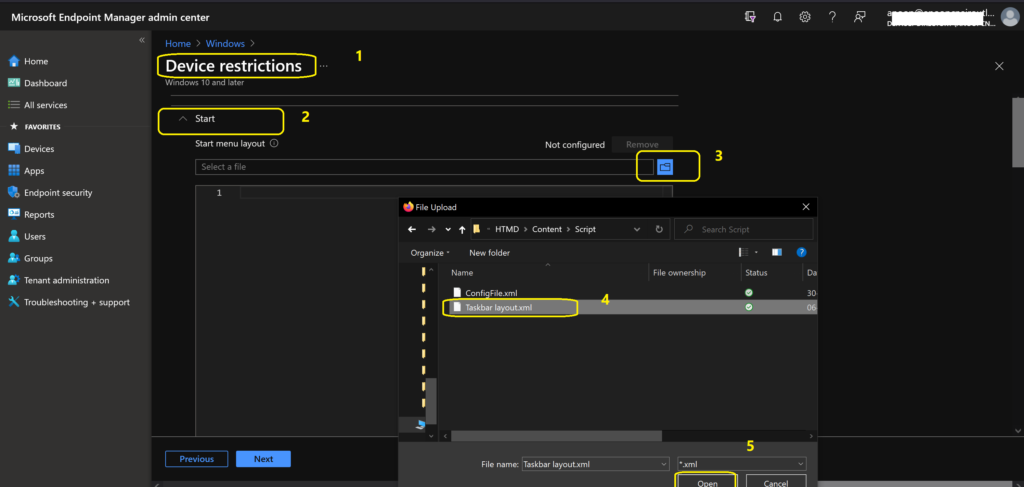
Once the file is uploaded, you can see the following screen. The validation of the XML file syntax happens at the later stage of Intune policy creation wizard. You can click on the Next button to continue.
- You can select the scope tags you want to specific from this page and click on NEXT button to continue. Scope tags are for more towards Intune (MEM) RBAC setup. You can also skip this step and directly go to assignment.
- I have deployed Windows 10 Taskbar layout to All Devices in this example. But you can do it only for Cloud PC devices/Users AAD Group.
- You can deploy either to User group or Device group because taskbar layout settings are user settings some times it’s worth deploying to users group. But I deployed to device group.

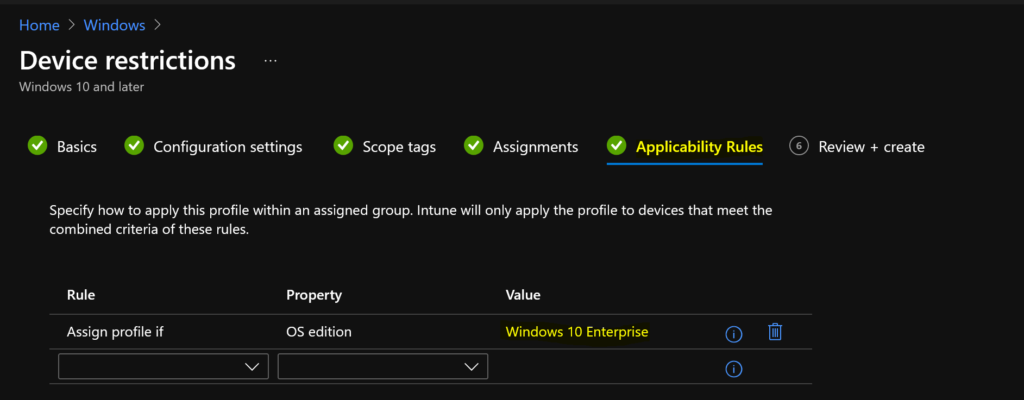
The applicability rules are important because Windows 11 start menu and taskbar layouts are entirely different, so you want to be very specific about Windows 10 taskbar layout should be applicable only to Windows 10 devices and not to Windows 11 devices.
- From applicability rules page – Select Rule -> Assign Profile if:
- Select OS edition from Property from the drop down list.
- Select Windows 10 enterprise as value from the drop down list.
- Click on Next, and Create to complete the creation and deployment of the taskbar layout for Windows 10 Cloud PCs.
NOTE! – You can have multiple applicability rules for the same device restriction policies in MEM Intune.
Results – Start Menu Taskbar Custom Layout Settings
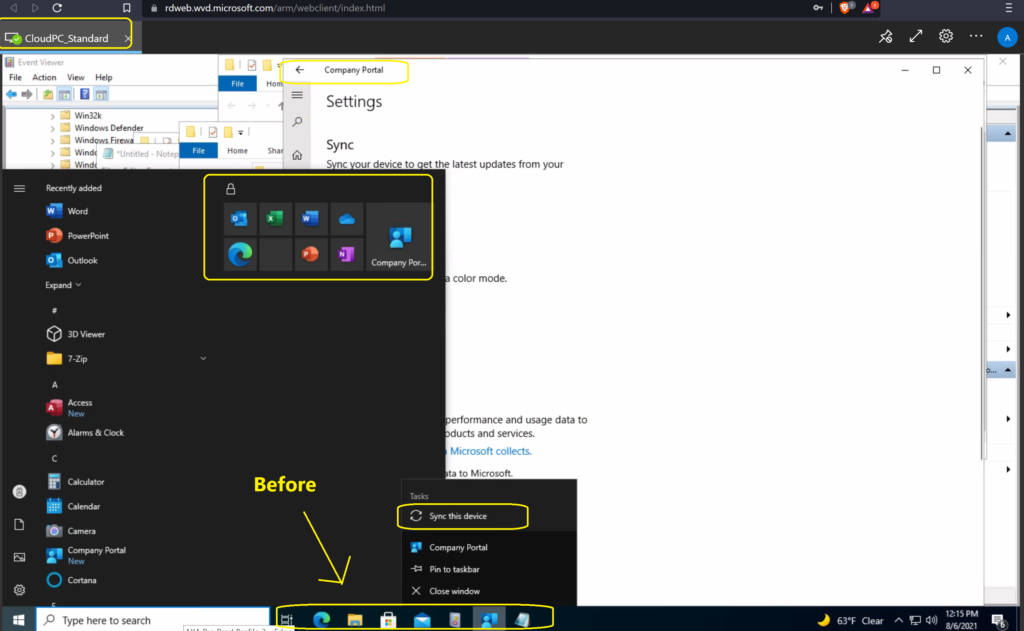
Let’s check the taskbar layout before deploying the taskbar layout policy. If you are like me, initiate an Intune policy sync from the Company portal to immediately receive the policy to Windows 10 Cloud PC.
- Right-click on the Company Portal icon from the taskbar.
- Click on Sync this device option to initiate an immediate sync of Intune MEM policies.
NOTE! – Initially, I received a conflict error because I tried to use different XMLs for Start Menu and Taskbar layouts. I combined the start menu layout and taskbar layout into one XML and updated the policy mentioned above.
NOTE! – I couldn’t make Taskbar settings working with the limited time that I had. I will update the post later if I could make this work on the Windows 365 Cloud PC. Let me know if anyone of you sees a similar behavior/issue with Taskbar customization.

it seems as though it is working for me but that taskbar and start menu get deployed too soon – i have assigned to machine and user group which creates a partial custom start menu and taskbar before some of the apps get installed like for example sccm client or some other custom start menu items that get added via a win32 app. is there a way to have the config profile for the taskbar/ start menu deploy again if it was already delivered successfully.
A bit late to reply but I suggest you make some of the applications required in the Enrollement Statup Page if you use Autopilot for deployment.
The option is:
Block device use until required apps are installed if they are assigned to the user/device
How to add company portal app in start menu..tried the above desktop application id …no luck
Anu suggestion…!!!