Let’s learn about how to Increase Virtual Memory size on windows OS using some tricks. RAM (Random Access Memory) is a limited resource stored on chips with a capacity of 4GB, 6GB, 8GB, etc. (as configured by users). However, increasing RAM capacity by adding more RAM can be expensive.
RAM is a physical memory where operating system data, running programs, and open documents are held. To avoid adding extra RAM, we can increase virtual memory to add some extra volume. It can move data from the RAM to a paging file space. This process allows for RAM to be freed so that a computer can complete the task.
Virtual memory is a feature of an operating system that uses hardware and software to pay off for shortages of physical memory. Virtual memory is a memory management technique where secondary memory can be used as if it were a part of the main memory. It uses both the computer’s software and hardware to work.
Here I will elaborate on my personal experience with this, how Virtual Memory works and what is the step-by-step guide to Increase Virtual Memory.
- Latest Features of Notepad in Windows 11
- Windows 11 Group Policy to Allow Administrator Account Lockout
Difference between Physical and Virtual Memory
Let’s discuss the major difference between Physical and Virtual memory.
| Physical Memory | Virtual Memory |
|---|---|
| 1. Physical memory is the primary memory of computers, and it refers to the RAM. | 1. Virtual memory is a memory management technique performed by the operating system. |
| 2. Physical memory is a volatile memory. | 2. Virtual memory is a logical memory. |
| 3. Physical memory stores the currently executing programs. | 3. Virtual memory creates an illusion for users of larger physical memory. |
How Virtual Memory works
Virtual memory works through a temporary process known as swapping that combines RAM with space on the hard disk. Virtual Memory transfers processes between the RAM and hard disk by copying any files from the RAM that aren’t currently in use and moving them to the hard disk.
Moving unused files to the hard disk frees up space in RAM to perform current tasks, such as opening a new application. If the computer later needs to use its RAM for a more urgent task, it can again swap files to make the most of the available RAM.
Rarely does a message appear that says the virtual memory is running low. It means either more RAM needs to be added, or the paging file size needs to be increased. Naturally, windows will manage this process automatically. It can also be changed manually if the default size of the virtual memory isn’t large enough.
How to Increase Virtual Memory
Let’s check the detailed step-by-step guide to increase virtual memory. To change the page settings or virtual memory, we will divide it into multiple sections. Check the different options to change the page settings.
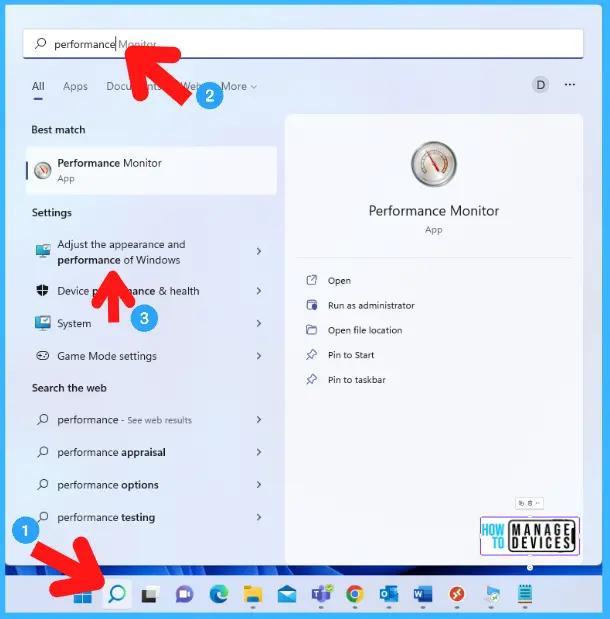
- Go to the “Search option” then type “Performance” in the search bar on the desktop.
There are multiple options will appear in the search option.
- Choose “Adjust the appearance and performance of windows” from the options available in the menu.
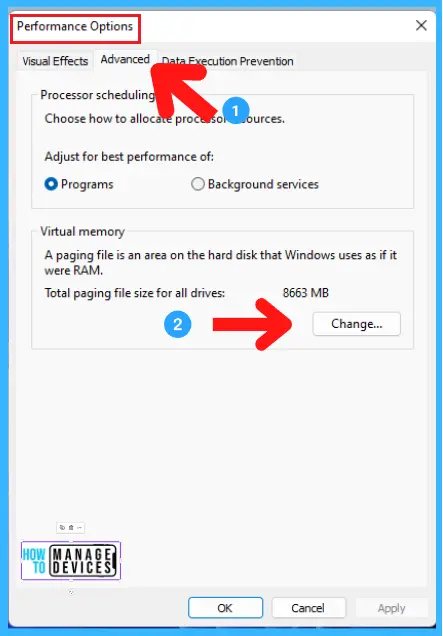
A new window will appear named “Performance Option“. Next step, click the “Advance” tab; it shows below two options.
- Processor Scheduling
- Virtual Memory
From the Virtual Memory option, click on the “Change” tab.
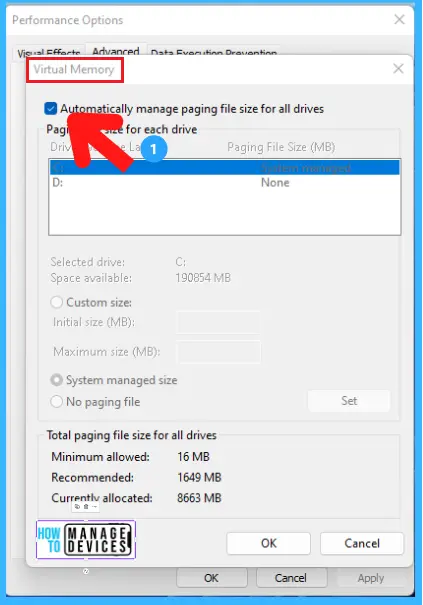
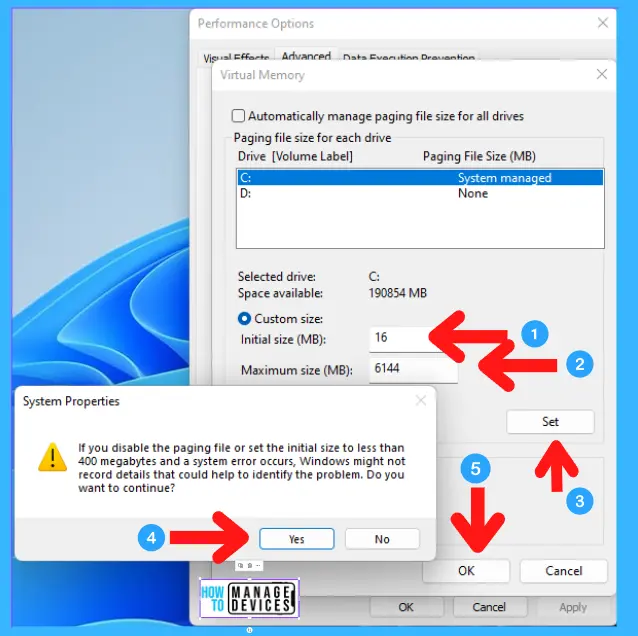
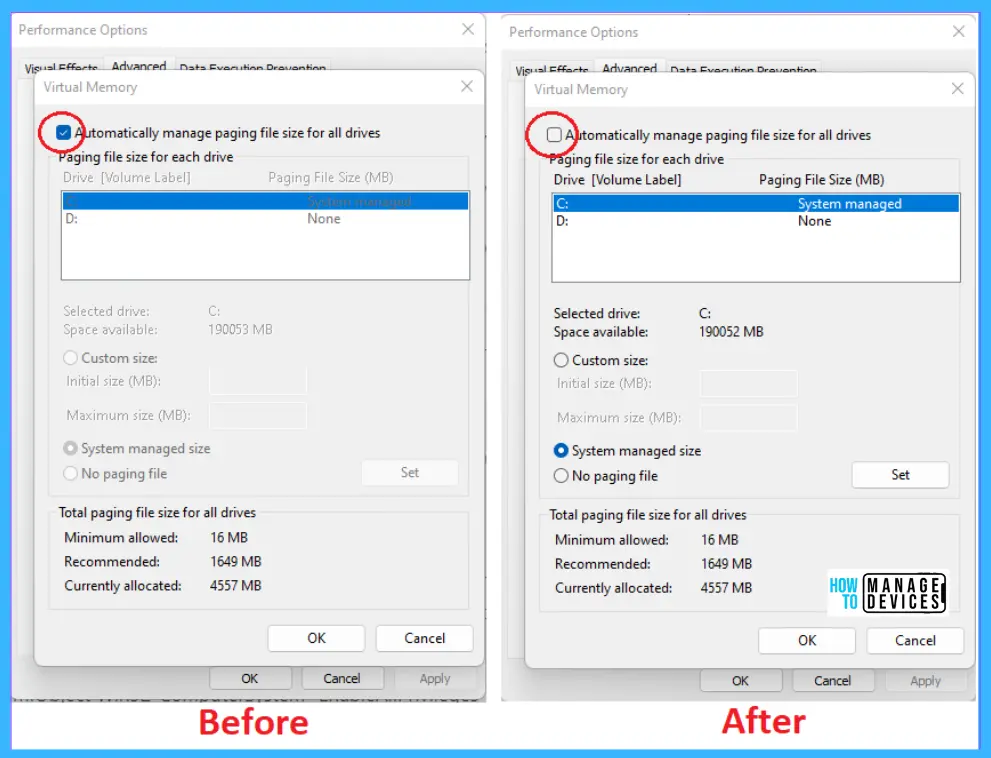
By clicking the “Change” button, a new window appeared as “Virtual Memory”. A box with a tick mark in the check box “Automatically manage paging file size for all drivers” appears; remove the tick mark.
By unchecking the box and checking on the custom size check box to enable the user to set/increase virtual memory manually.
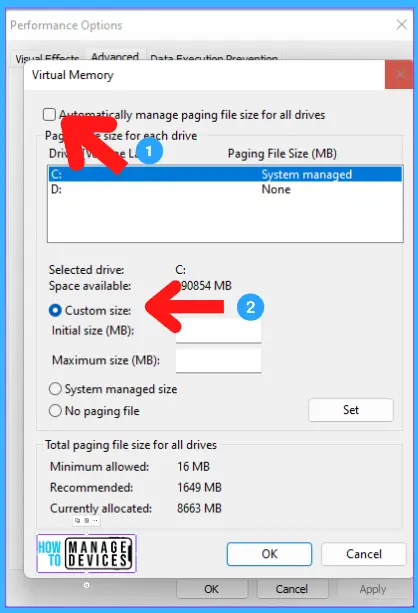
The minimum size of the Virtual Memory is mandatorily fixed at 16, and the user sets the maximum value. For example, if the user wants to increase Virtual Memory by 6GB, then set the minimum to 16 and the maximum to 1024*6= 6144, press set.
- A new warning message tab will pop up “System Properties” will appear to click “Yes“. Then click “OK“.
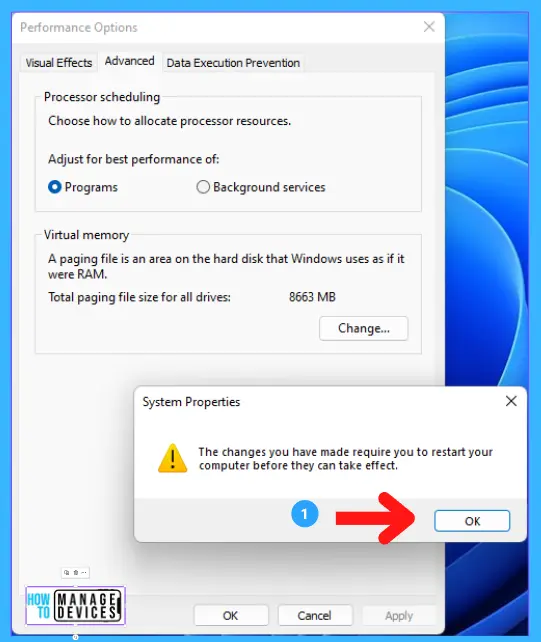
A message appears on the “System Properties” tab as “The changes you have made require you to restart your computer before they can take effect,” and press “OK“.
Note! Here the system will not restart automatically; to apply the changes made by the user has to restart the device manually.
In the “Performance Option” window, click “Apply” and then press “OK“. Your setting is confirmed.
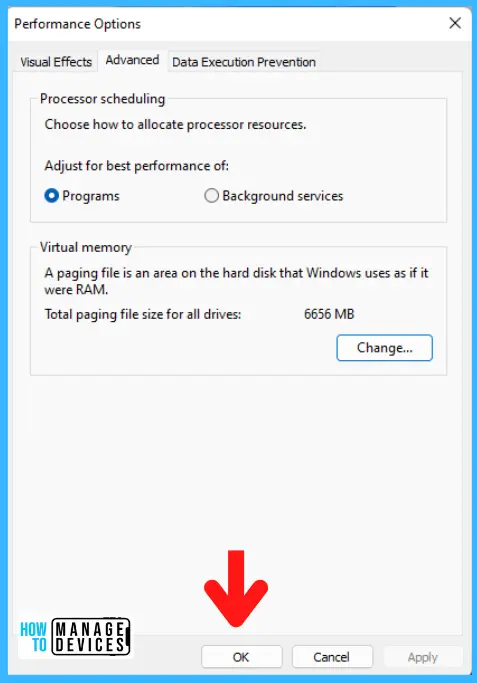
- Now restart the device to apply the changes made manually.
PowerShell Script to Increase Virtual Memory
Now check the option to change the page settings using the PowerShell command line. The Pagefile is managed automatically. To modify the settings, we need to remove the check box. We have already gone through the step-by-step process of how we can achieve this on GUI mode.
- Search PowerShell from the Start menu and “Run as Administrator“
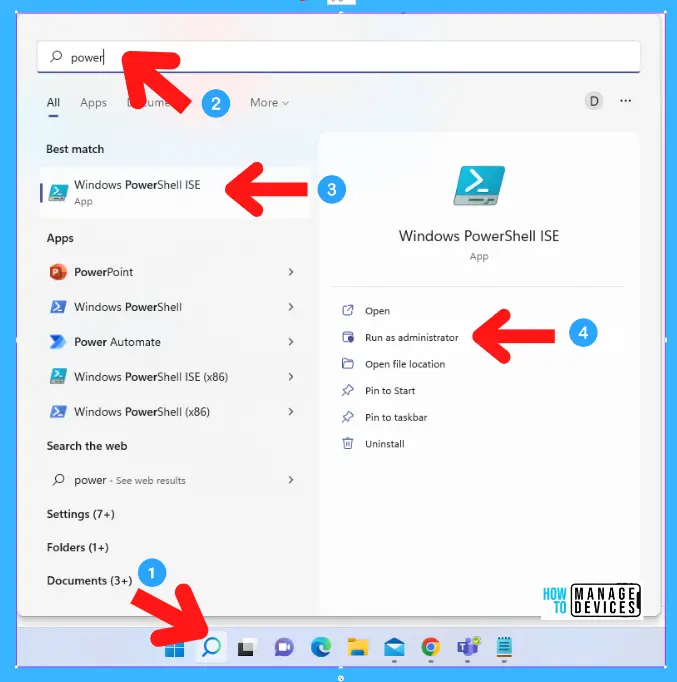
After following the procedure mentioned above, the PowerShell window appears. Now use the following script to Uncheck the options.
$pagefile = Get-WmiObject Win32_ComputerSystem -EnableAllPrivileges
$pagefile.AutomaticManagedPagefile = $false
$pagefile.put() | Out-Null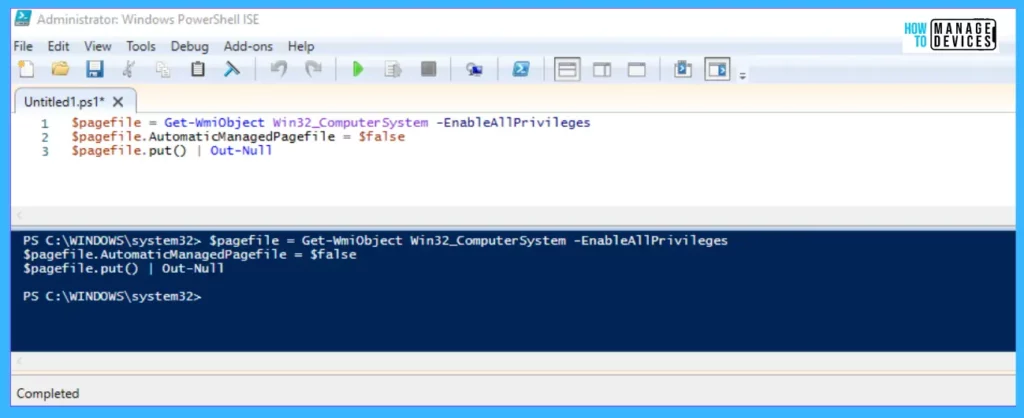
Hence, when the code is executed, the “Automatically manage paging file size for the all drivers” settings will uncheck, and another option will be enabled. See the different results in the following screenshot.
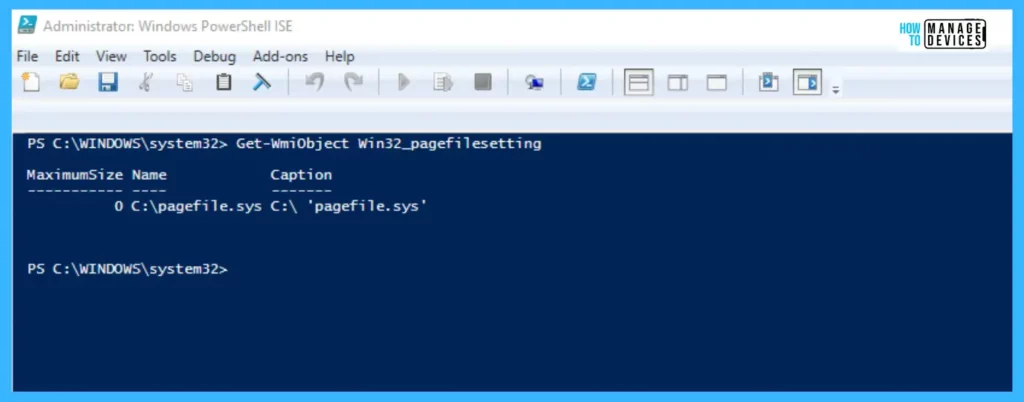
Here we already have the pagefile on the C drive. To check the pagefile, use Get-WmiObject Win32_pagefilesetting in the PowerShell command.
The screenshot above shows no Initial Size and Maximum Size set in the Custom Size check box. To modify the pagefile settings, use the following script to set the initial and maximum values.
$pagefileset = Get-WmiObject Win32_pagefilesetting
$pagefileset.InitialSize = 1024
$pagefileset.MaximumSize = 8192
$pagefileset.Put() | Out-Null
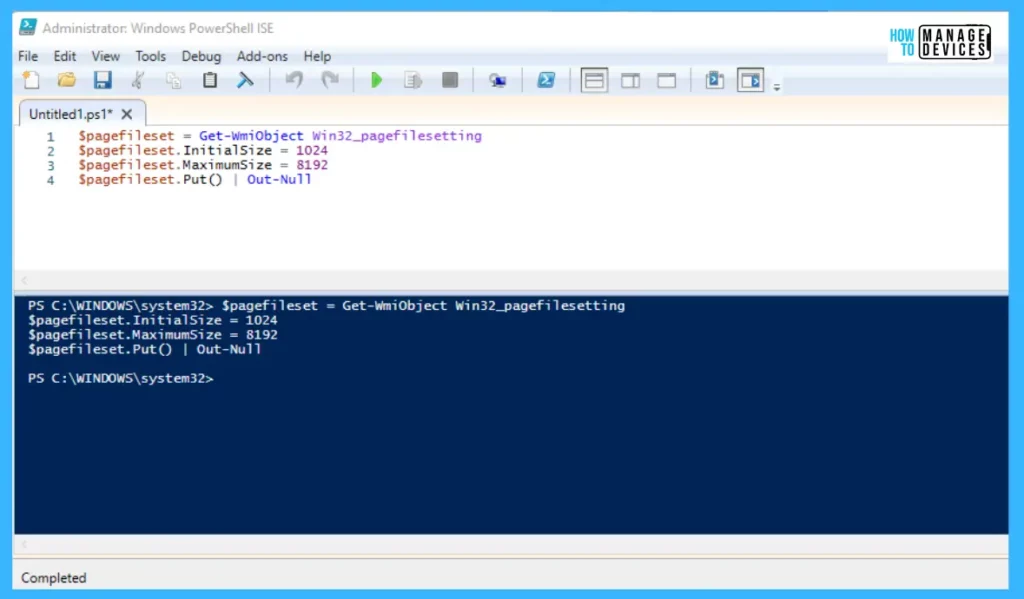
Further, when the PowerShell command runs, we can observe that the Custom Size is checked as well as the Initial size, and the Maximum size will automatically be changed on the C drive. The last step is manually rebooting the system to apply all the changes.
Results Both in GUI & PowerShell
To verify in GUI mode, follow the procedure mentioned above to open the Virtual Memory window and check whether the changes are made or not.
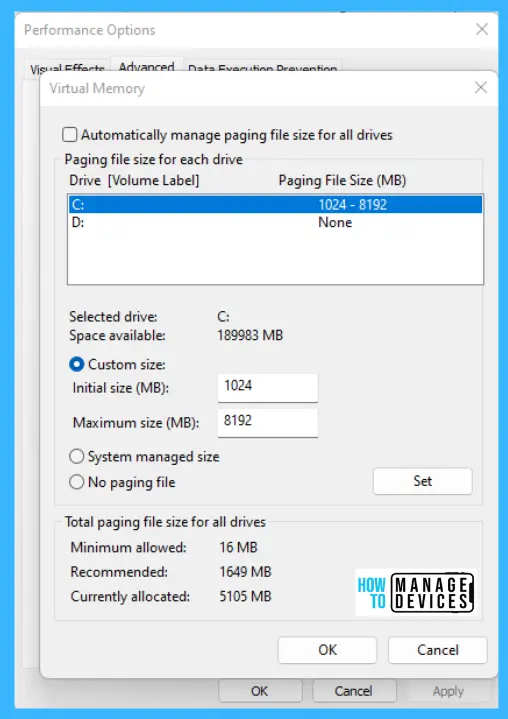
To verify in PowerShell, follow the above procedure to access the PowerShell window, then use the following command and press enter to check the changes made therein.
PS C:\> Gwmi win32_Pagefilesetting | Select Name, InitialSize, MaximumSize
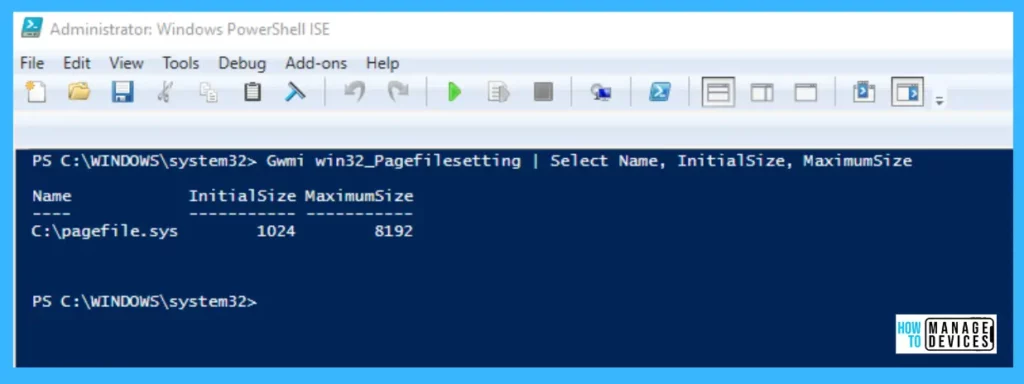
Here we concluded the process with GUI and PowerShell on how we can Increase Virtual Memory in our devices.
Thank you all for your patience in reading this blog. I hope you all enjoyed this blog.
Author
About Author – Alok Kumar Mishra is a computer enthusiast. He likes to share his knowledge, quick tips, and tricks with Windows 11 or Windows 10 with the community. He completed his degree with BCA and master’s with MCA.

Useful
Basically… What I know… In Win10 there is some Cache to build virtual memory or Virtual Ram .. it’s not perform like your Traditional Ram but still.. It runs and Handle your Forground programs, Background Programs even it can Manage Your Traditional Ram’s memory. Basically You can tell the One Ram manage the Memory of Another Ram (which is your Traditional Ram Basically..)
Thank you…