Today, we are discussing how toHow to Enable Roam Recycle Bin in FSLogix using Intune Policy. This feature plays a crucial role in profile management within virtual desktop environments such as Azure Virtual Desktop or Windows 365.
The Roam Recycle Bin policy is particularly useful in non-persistent environments where user data is not stored locally. Without this feature, any deleted files placed in the Recycle Bin would remain on the temporary local disk and be lost when the user logs off. By storing Recycle Bin data inside the FSLogix container, users can retrieve deleted items even after reconnecting to another session or virtual machine.
When the RoamRecycleBin policy is enabled, a redirection is created specifically for the user’s Recycle Bin on the system drive. This means that deleted files from the system drive will no longer remain local to the device but will instead be stored in the user’s virtual hard disk file.
whenever the user logs in to a new session, their Recycle Bin items will be available, just as they were in the previous session. This functionality can help maintain continuity and reduce confusion caused by missing or inconsistent Recycle Bin contents.
Table of Contents
What is the Benefit of Roam Recycle Bin Policy in Organizations?
Enabling Roam Recycle Bin in FSLogix offers several advantages for organizations, especially those using virtual desktop infrastructure. Also, Users can recover deleted files from the Recycle Bin even after switching devices.
How to Enable Roam Recycle Bin in FSLogix using Intune Policy
This Policy helps maintain data consistency by ensuring that users’ deleted files are retained within their FSLogix profile containers, even when they log in from different devices or virtual sessions. This minimizes data loss and reduces helpdesk requests from users who accidentally delete files and are unable to recover them. So, Let’s look how this policy to be deployed.
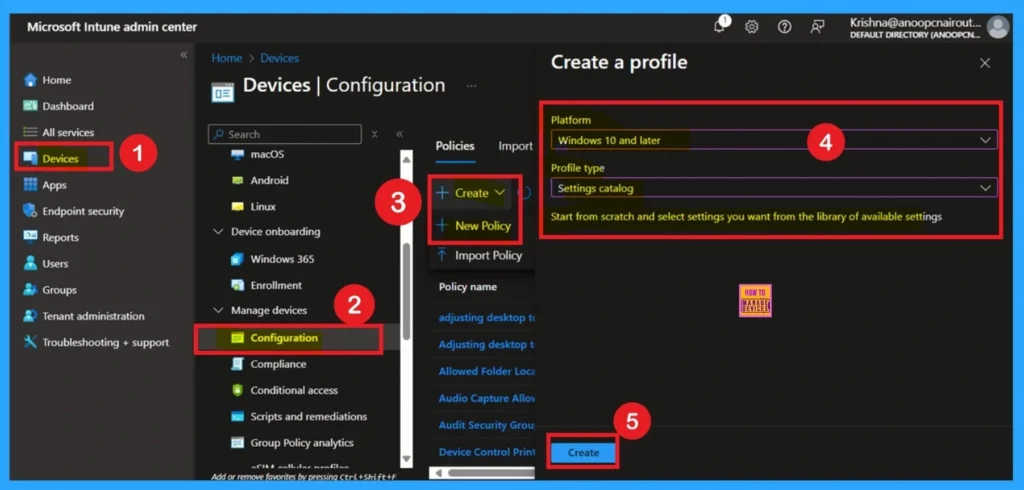
Now, let’s look at how it can be deployed through the Microsoft Intune Admin Center. First, go to the Devices section in the Intune Admin Center. Next, click on Configuration profiles and then select + Create profile.
- When creating the profile, you will need to provide the required details such as the Platform and Profile type.
- For the Platform, select Windows 10 and later.
- For the Profile type, choose Settings catalog. Finally, click on Create to complete the process. This will deploy the policy through Intune.
- FIX Teams Icon is Missing from the Start Menu FSLogix Issue
- TeamsTfwStartupTask Registry Key is not Roamed with FSLogix ODFC Containers
- How to Block App Location Access in Windows using Intune Policy
Start with Basic Step
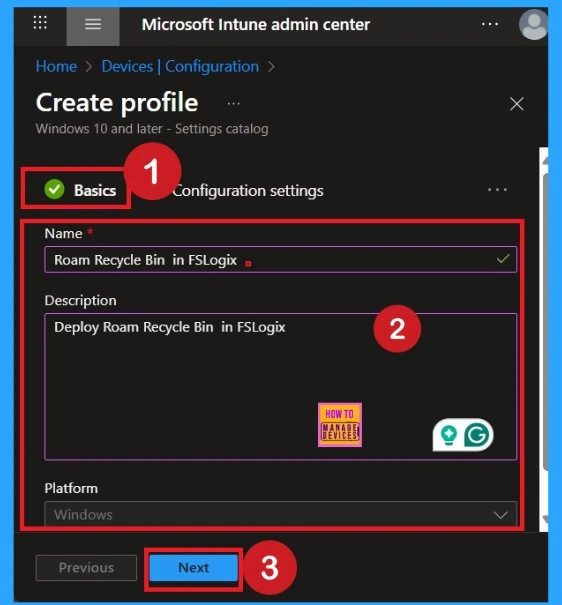
You know, Naming the policy is the first step that help admins to identify the policy later. This is important and necessary step that allows you to know the purpose of the policy. Here is Name is important category, and description is optional in basics.
- After adding this click on the Next button.
What is Configuration Tab
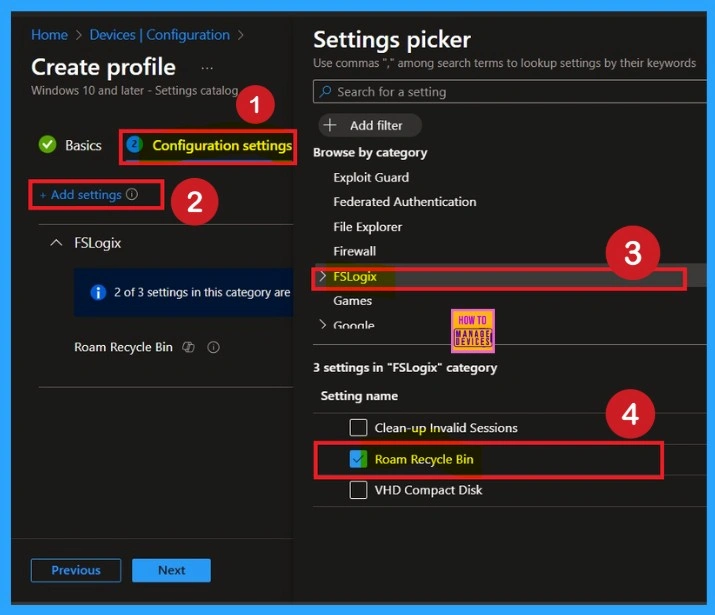
After completing the Basics tab, you will move to the Configuration Settings. To add a setting, click on the Add Setting hyperlink. A Settings Picker window will appear. Here, select the FSLogix category, and then click on the Roam Recycle Bin policy. There are 3 policies in FSLogix category. Click on the Next to continue.
Disabled the Policy Mode
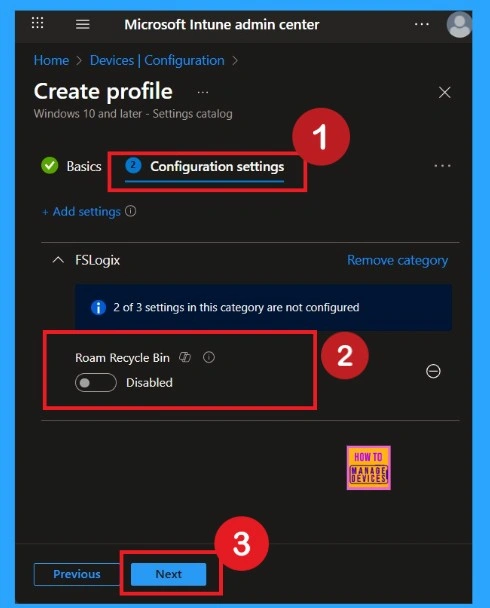
After selecting the configuration settings, you can now close the Settings picker window. Once it is closed, you will see the selected policy listed on the Configuration settings page. By default, the policy is set to Disabled. If you want to proceed with the current settings or make changes later, simply click Next to continue with the policy creation process.
Enable Mode for the Policy
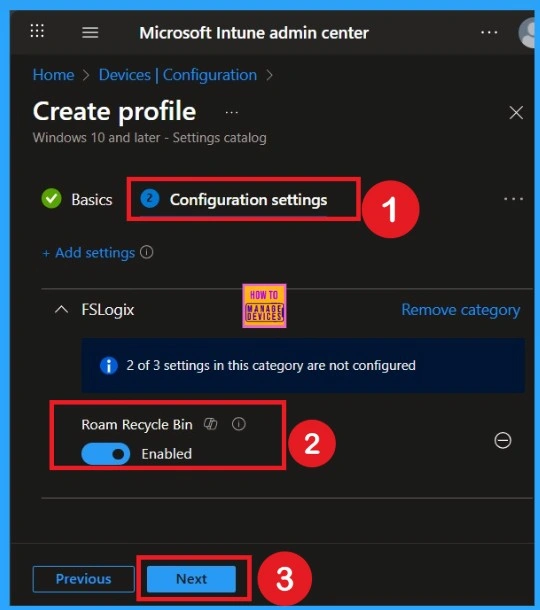
Enabling this policy is very simple. You just need to move the toggle button from left to right, and it will turn blue, indicating that Roam Recycle Bin in FSLogix Policy is enabled. After that, click on Next. You can proceed this policy in enabled mode.
Know the Scope Tags
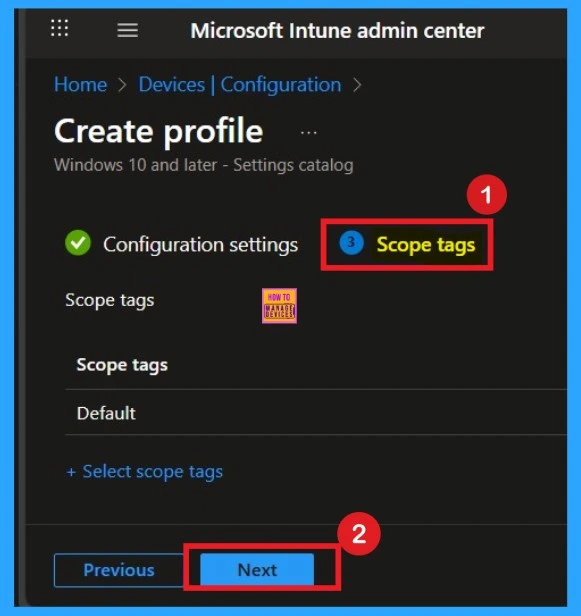
The purpose of scope tags is to categorize and associate your policy with a specific scope, making it easier to manage assignments for particular environments. Here, you can add a scope tag for the policy, although it is not mandatory. Here in this policy creation I skiped this tab by clicking on the Next.
Importance of Assignments
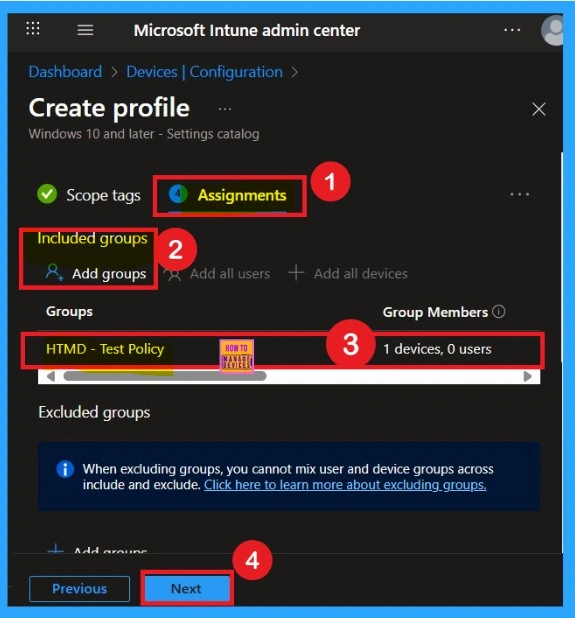
To assign the policy to specific groups, you can use the Assignment Tab. Here I click, +Add groups option under Included groups. I choose a group from the list of groups and click on the Select button. Again, I click on the Select button to continue. Here I selected the HTMD – Test Policy group. If you want to add more groups you can add them easily.
Review + Create Tab
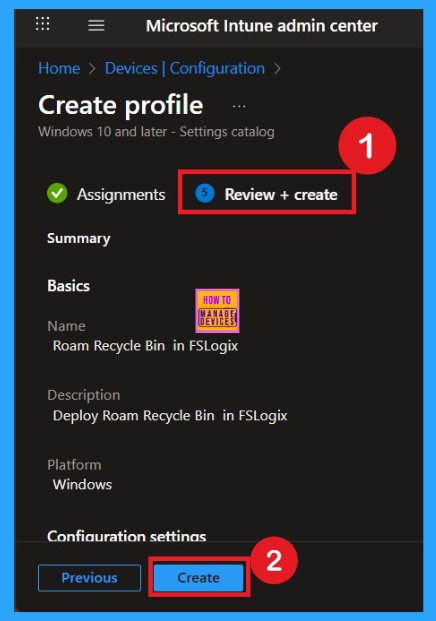
Before completing the policy creation, you can review each tab to avoid misconfiguration or policy failure. After verifying all the details, click on the Create Button. After creating the policy, you will get a success message. This is the final tab that you all know that. We have to do if anything have to changed before clicking on the next after that it is not possible.
Device Check-in Status
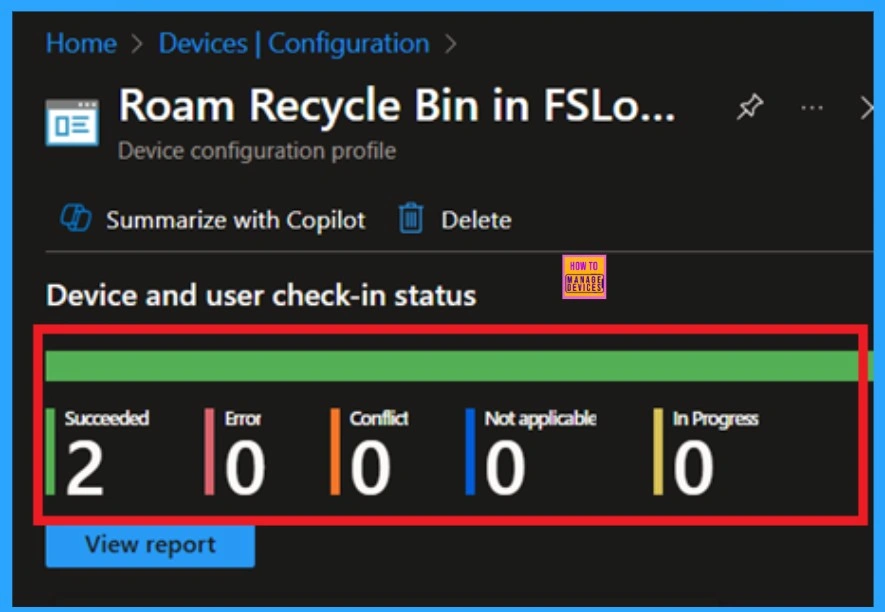
After creating the policy, administrators may want to confirm whether it has been successfully deployed. To check this, go to Devices > Configurations and search for the policy name you created. Once you find the policy, click on it to open the Monitoring Status page.
On this page, you can view the deployment details for both devices and users. The status will show if the policy has been applied successfully. This is the main step that help you to get some clarity over your policy.
Monitoring Status
After creating a policy, we have to monitor that whether the policy was created successfully or not. To check this, you can either wait for up to 8 hours for the policy to apply automatically, or you can reduce the waiting time by manually syncing the policy through the Company Portal.
- If it is as Succeeded, it means the deployment worked as expected.
- You may see 1 or 2 under “Succeeded.” If there are no entries under Error, Conflict, Not Applicable, or In Progress, it indicates that the policy has been deployed without issues.
| Policy Details |
|---|
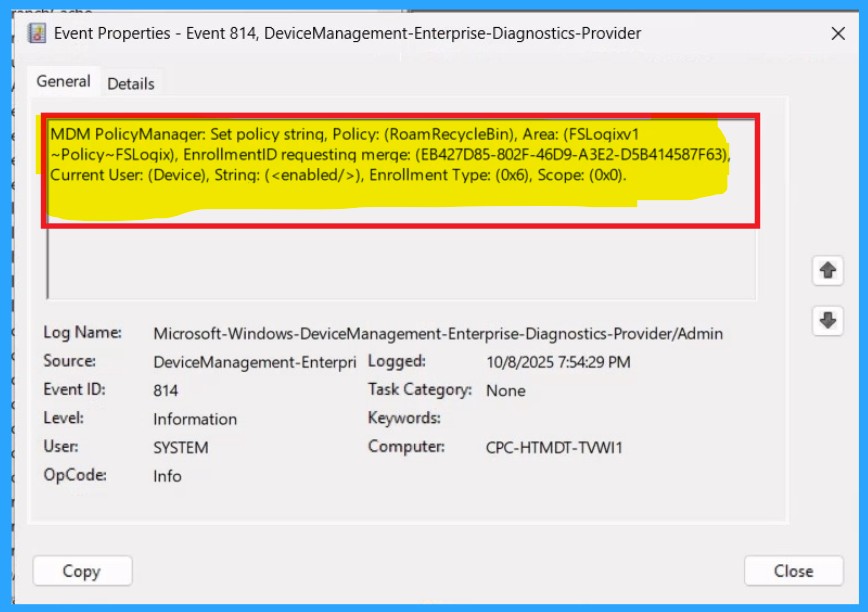
| MDM PolicyManager: Set policy string, Policy: (RoamRecycleBin), Area: (FSLoqixv1 ~Policy~FSLoqix), EnrollmentID requesting merqe: (EB427D85-802F-46D9-A3E2-D5B414587F63), Current User: (Device), Strinq: (), Enrollment Type: (0x6), Scope: (0x0). |
Remove Groups from Polices
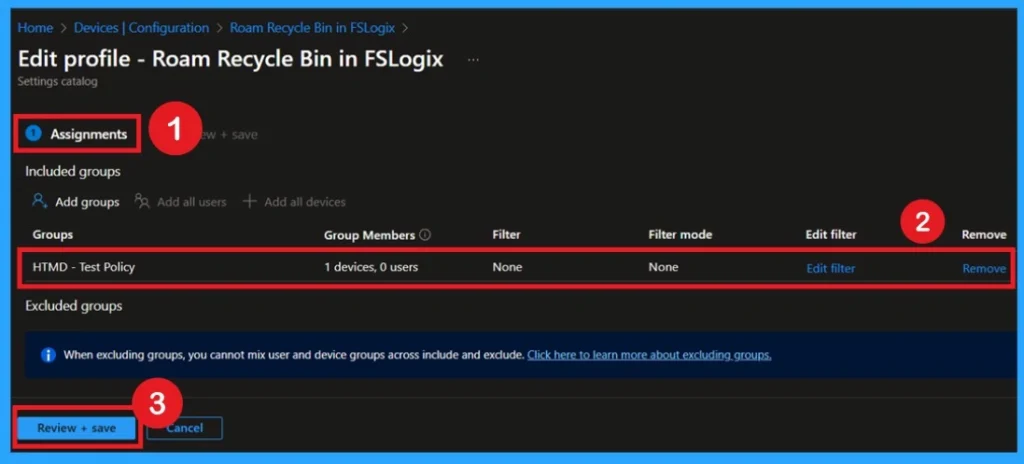
If you want to remove a policy group from the organization, you can do this through the Configuration section. First, select the policy you created, and then go to the Monitoring status page. Scroll down the window until you find the Assignments section and click Edit. From here, you can remove the policy group. Finally, click on Review + Save to apply the changes.
To get more detailed information, you can refer to our previous post – Learn How to Delete or Remove App Assignment from Intune using by Step-by-Step Guide.
Delete the Policy Permanently
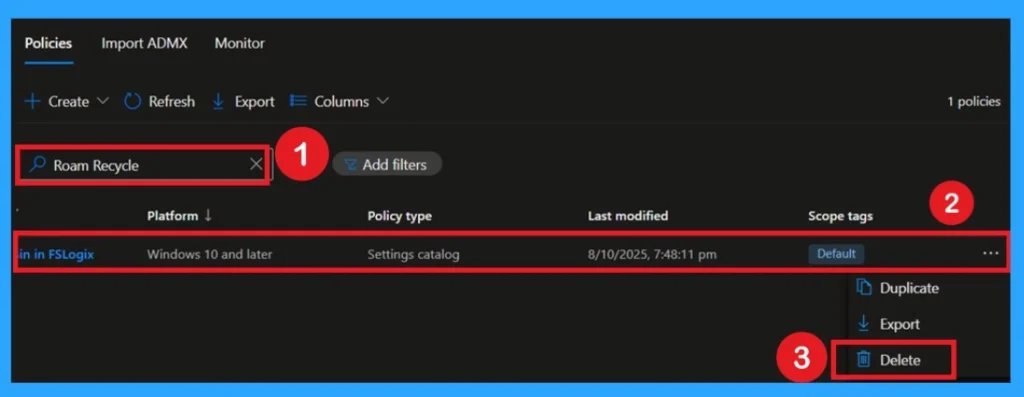
You can easily delete a policy in Microsoft Intune, first sign in to the Microsoft Intune Admin Center. Navigate to Devices and then select Configuration. Locate and select the specific policy you want to remove. Once you’re on the policy details page, click the 3 -dot menu in the top right corner and choose Delete from the available options.
For detailed information, you can refer to our previous post – How to Delete Allow Clipboard History Policy in Intune Step by Step Guide.
Need Further Assistance or Have Technical Questions?
Join the LinkedIn Page and Telegram group to get the step-by-step guides and news updates. Join our Meetup Page to participate in User group meetings. Also, Join the WhatsApp Community to get the latest news on Microsoft Technologies. We are there on Reddit as well.
Author
Anoop C Nair has been Microsoft MVP for 10 consecutive years from 2015 onwards. He is a Workplace Solution Architect with more than 22+ years of experience in Workplace technologies. He is a Blogger, Speaker, and Local User Group Community leader. His primary focus is on Device Management technologies like SCCM and Intune. He writes about technologies like Intune, SCCM, Windows, Cloud PC, Windows, Entra, Microsoft Security, Career, etc.

