Hey, let’s discuss about Stop Spying Take Back Control of your Windows Typing Data using Intune. This policy controls the option to send inking and typing data to Microsoft. It helps improve the language recognition system by collecting information about how users write and type. This makes Windows applications more accurate and responsive to user input.
The importance of this policy is that it helps Microsoft enhance typing and handwriting features. When enabled, it allows better word prediction, autocorrect, and text suggestions. This makes communication faster and easier for users.
For organizations, this policy helps employees work more efficiently with improved language tools. It can be useful in workplaces where digital writing and note-taking are common. For example, in offices using Windows tablets, handwriting recognition can save time and improve accuracy.
From a security point of view, managing this policy ensures that only necessary data is shared. Organizations can choose to disable data sharing to protect privacy. This gives both users and companies control over how their data is used.
What are the Advantages of Enabling this Policy using Intune?
Enabling this policy helps improve the accuracy and efficiency of typing and handwriting features in Windows. It allows Microsoft to collect data that enhances language recognition, word suggestions, and autocorrect features, making typing smoother and more personalized for users.
1. Improves typing and handwriting accuracy
2. Provides better word suggestions and autocorrect
3. Enhances language recognition in apps and services
4. Offers personalized typing experience
5. Saves time and boosts productivity
6. Supports continuous improvement of Microsoft tools
Stop Spying Take Back Control of your Windows Typing Data using Intune
The Allow Linguistic Data Collection policy can be easily configured on Windows devices using either Microsoft Intune or by setting a custom OMA-URI (Open Mobile Alliance Uniform Resource Identifier). This blog post will detail both methods.
- Enable Address Bar Search Suggestion to Optimizing User Experience for Google Chrome Using Intune
- Enable or Disable Text Prediction Policy in MS Edge Browser using M365 Admin Center
- Enable or Disable Touch Keyboard Handwriting Mode Availability in Text Input using Intune Policy
Create a Profile
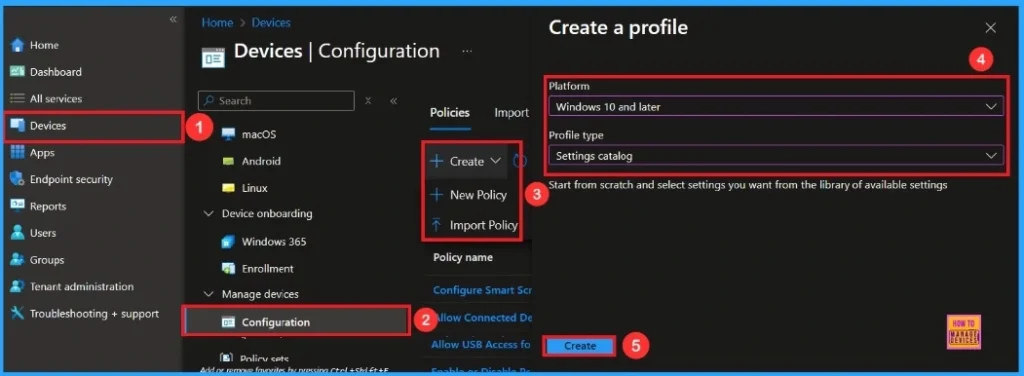
First, log in to Microsoft Intune with your credentials. Then, go to Device >Configurations and click on the + Create >New Policy option. A new window called Create a Profile will appear. Here, you need to select the Platform and Profile Type, and then click on the Create button.
| Create a Profile | Info |
|---|---|
| Platform | Windows 10 and later |
| Profile Type | Setting Catalog |
Basic Step
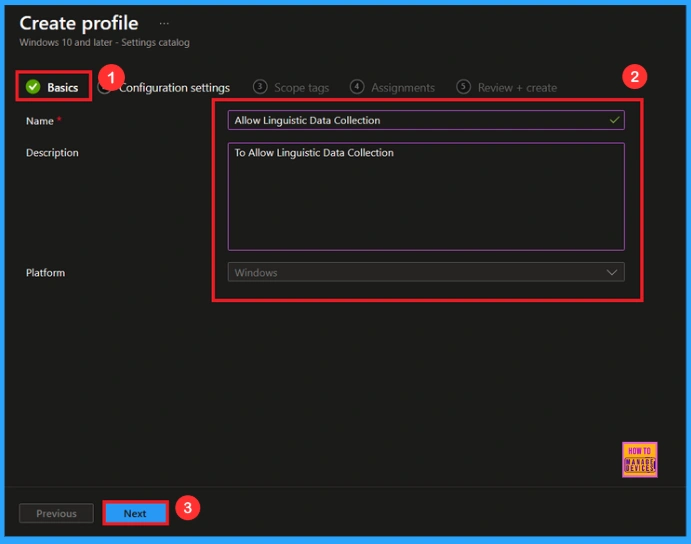
Now, you are on the Basics tab. Here, the only mandatory field is the Name. You need to enter a name for the policy(Allow Linguistic Data Collection) and the Description field is optional.Select the Platform as Windows, and then click Next.
Configuration Settings
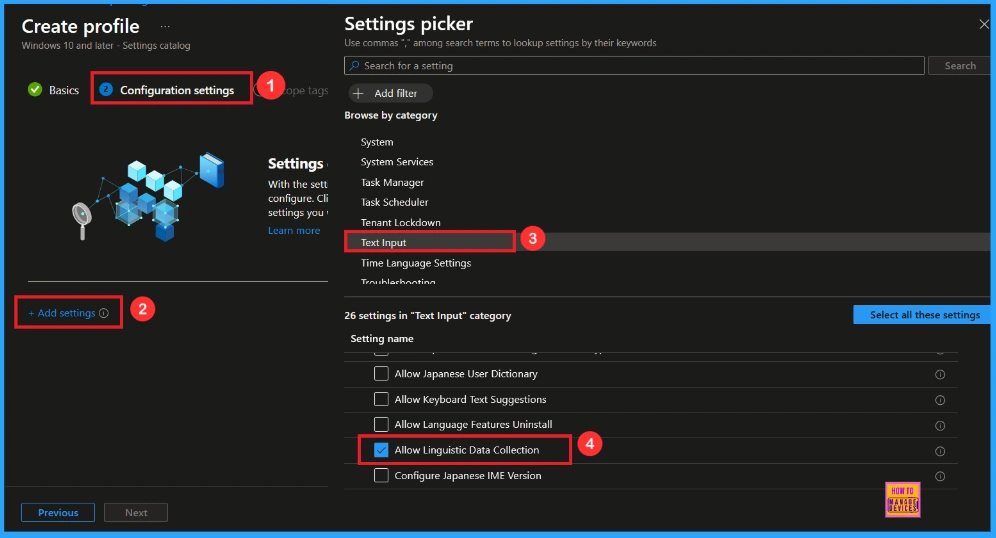
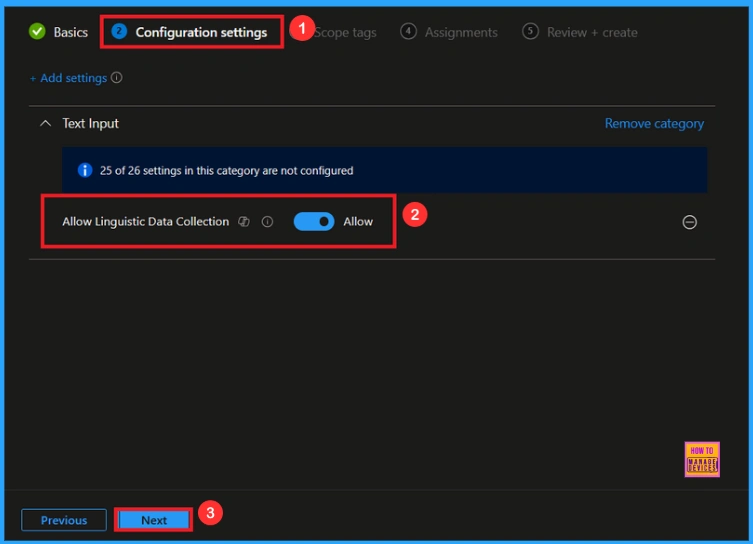
In the Configuration settings, you can see the Add settings button. Click the Add Settings to browse or search the catalog for the settings you want to configure. In the Settings picker, you can search for the Settings quickly. Here, I choose the Text Input category, select Allow Linguistic Data Collection to configure it, and then close the Settings Picker window.
By default, you should understand that a policy can be either Allow or Block. In this case, the policy is Allow by default. If you want to keep it in the allow mode, you have to click Next to continue.
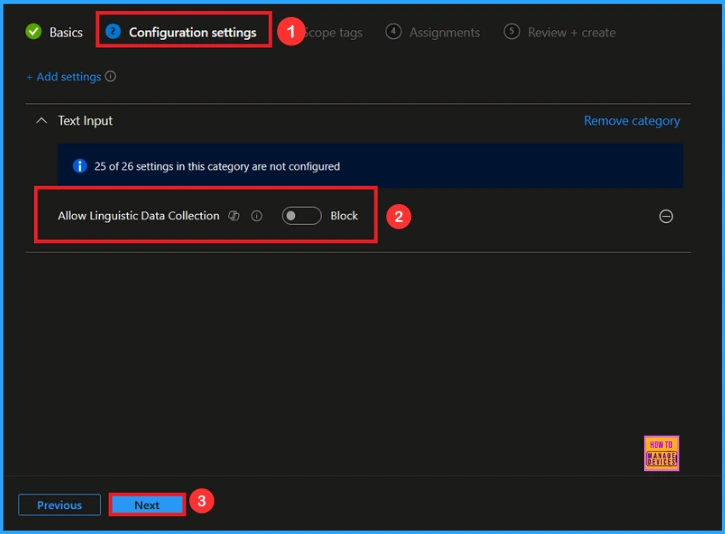
Block Linguistic Data Collection Policy
You can also block a policy that is allowed by default. To do this, toggle the switch from right to left. Then click Next to continue.
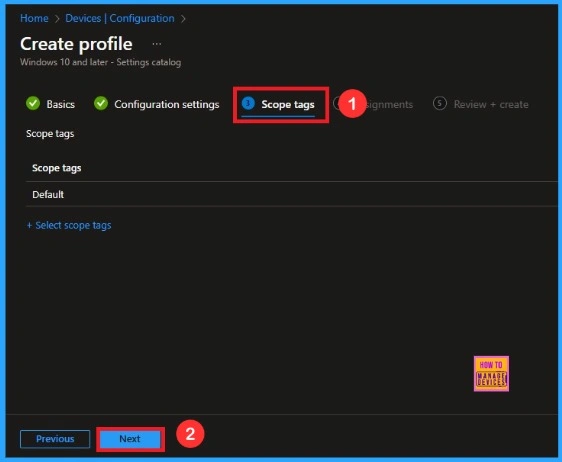
Scope Tag
Scope tags are used to assign policies to specific admin groups for better management and filtering. If needed, you can add a scope tag here. However, for this policy, I chose to skip this section.
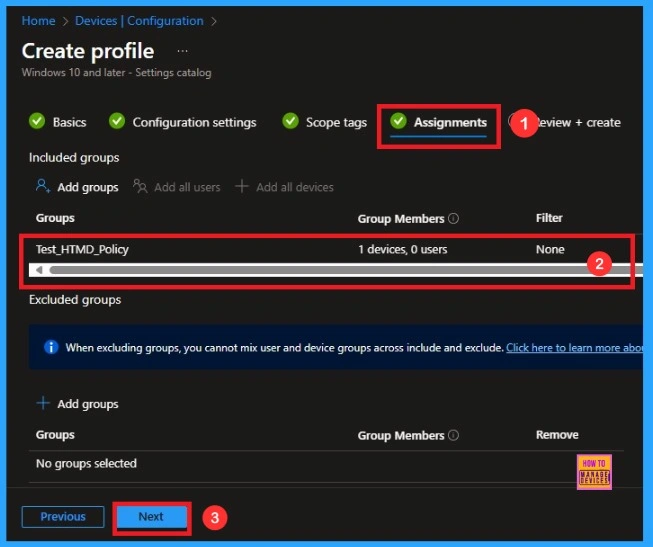
Assignments
Next, you’ll reach the Assignments section, which is a very important step. This is where you decide which user or device groups should receive the policy. In this case, I selected the specific group(Test_HTMD_policy) and click Next to continue.
Final Step
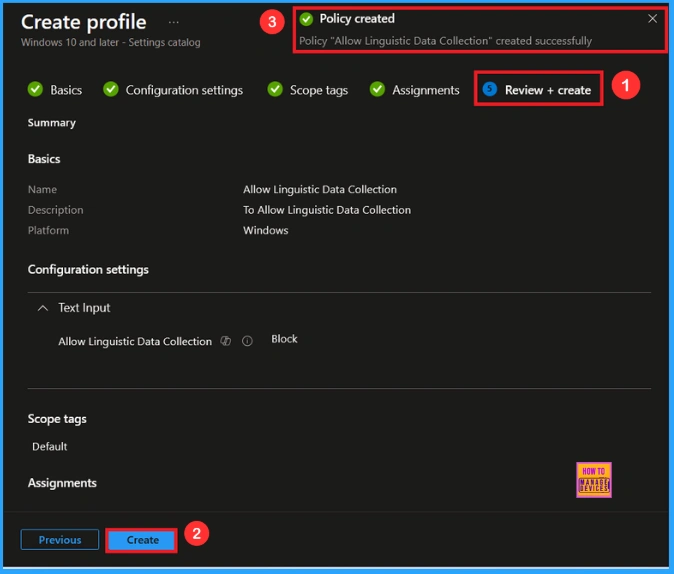
Review + Create is the final stage of policy creation. In this step, you will see a summary of all the details, including Basics, Configuration Settings, Assignments, and more. You can review all the information, and if anything needs to be changed, you can go back to the previous steps and edit them easily. Then click the Create button.
Monitoring Status
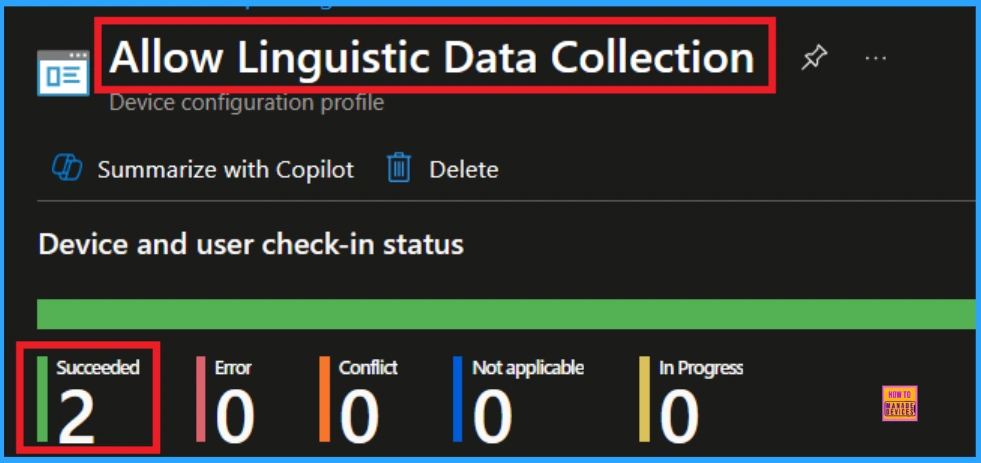
After the policy is created, the main concern is whether it has been successfully deployed. Typically, it can take up to 8 hours for the policy to apply.you can manually sync the policy through the Company Portal, which helps to apply the policy more quickly. To check the monitoring status, go to Devices > Configuration Policies. In the Configuration policies section, search for the policy we created. We can find the result as Succeeded(2).
Client Side Verification
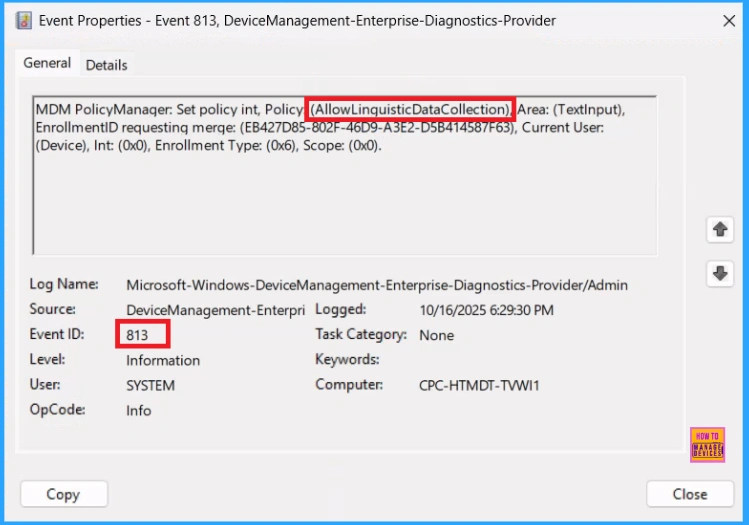
To confirm if a policy has been applied, use the Event Viewer on the client device. Go to Applications and Services Logs > Microsoft > Windows > Device Management > Enterprise Diagnostic Provider > Admin. From the list of policies, use the Filter Current Log option and search for Intune event 813.
MDM PolicyManaqer: Set policy int, Policy (AllowLinquisticDataCollection) Area: (TextInput),
EnrollmentID requesting merqe: (EB427D85-802F-46D9-A3E2-D5B414587F63), Current User:
(Device), Int: (0x0), Enrollment Type: (0x6), Scope: (0x0).
How to Remove Assigned Groups from Linguistic Data Collection Policy
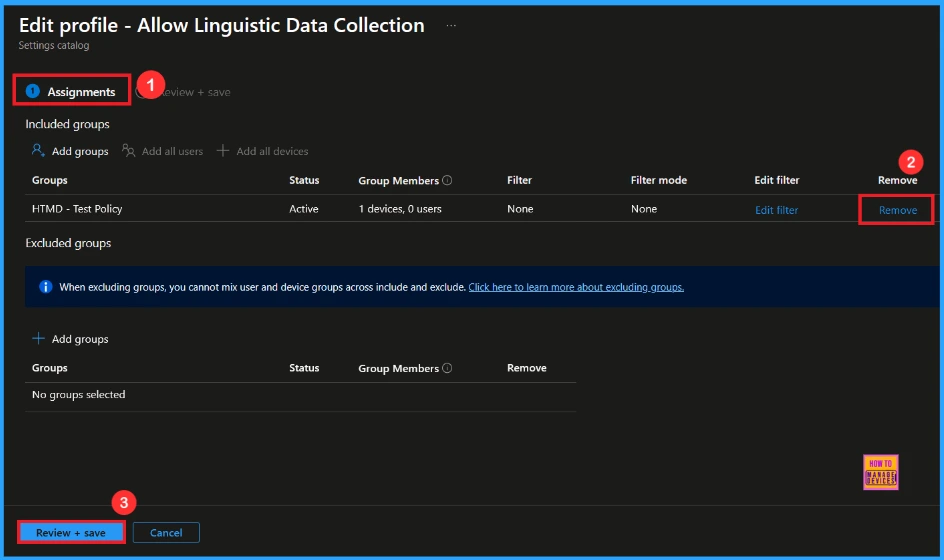
Start by navigating to the Monitoring status page via Devices > Configuration. Search for the policy by name and click on it to open its monitoring details. Scroll down to the Assignments section and click Edit. This will take you back to the policy’s assignment settings. Click on the Remove button on this section to remove the policy. Click Review + Save after making the change.
For detailed information, you can refer to our previous post – Learn How to Delete or Remove App Assignment from Intune using by Step-by-Step Guide.
How to Delete Linguistic Data Collection Policy from Intune
To delete a policy in Microsoft Intune, first sign in to the Microsoft Intune Admin Center. Navigate to Devices and then select Configuration. Search the Policy name(Allow Linguistic Data Collection) and Click the three dots, then click the Delete option.
For detailed information, you can refer to our previous post – How to Delete Allow Clipboard History Policy in Intune Step by Step Guide.

Configuration Service Provider
The Policy Configuration Service Provider (CSP) is a feature used by organisations to manage and control settings on Windows 10 and 11 devices. It explains that the Description framework properties, values and Group policy mapping.
Description Framework Properties
- Format – Int
- Access Type – Add, Delete, Get, Replace
- Default Value – 1
Allowed Values
- 0 – Not allowed
- 1(Default) – Allowed
Group policy mapping
| Name | Value |
|---|---|
| Name | AllowLinguisticDataCollection |
| Friendly Name | Improve inking and typing recognition |
| Location | Computer Configuration |
| Path | Windows Components > Text Input |
| Registry Key Name | Software\Microsoft\Windows\CurrentVersion\Policies\TextInput |
| Registry Value Name | AllowLinguisticDataCollection |
| ADMX File Name | Textlnput.admx |
./Device/Vendor/MSFT/Policy/Config/TextInput/AllowLinguisticDataCollection

OMA-URI Settings
An OMA-URI is a unique string used to configure specific settings on Windows 10 or 11 devices through a Configuration Service Provider (CSP). Its format is determined by the CSP and is used to apply custom device configurations.
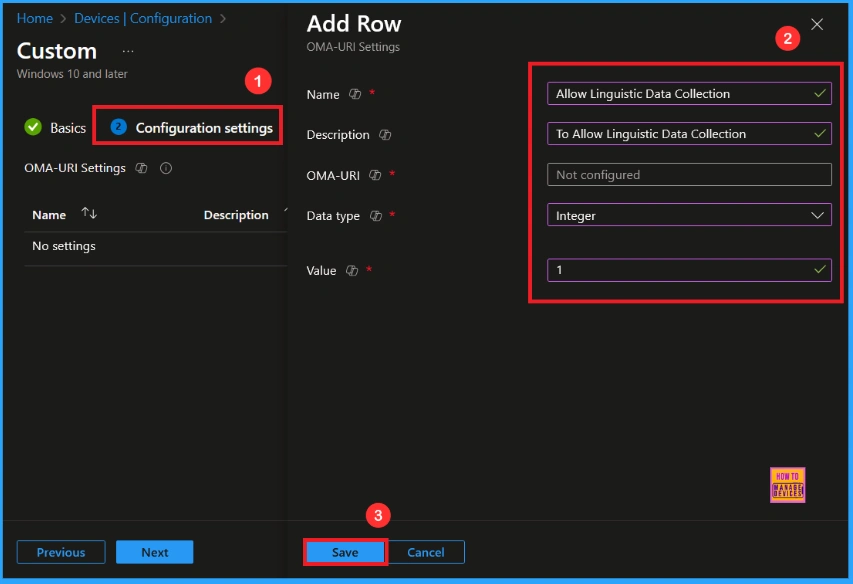
To create a new policy in Microsoft Intune, sign in and navigate to Devices > Configuration. Click on Create to start a new policy. Choose the platform as Windows 10 or later. For the Profile type, select Templates, then choose Custom. Provide a name for the policy and add a description if needed.
- Click on + Add under OMA-URI Settings to configure the specific setting.
- To Configure the OMA-URI Setting, do the following
- Enter a name for this setting, such as Allow Linguisti Data Collection
- Description of the setting: To Allow Linguisti Data Collection
- Enter the following OMA-URI path: ./Device/Vendor/MSFT/Policy/Config/TextInput/AllowLinguisticDataCollection
- Set the Data type to Integer.
- Enter the value
- 1 to Allow Linguisti Data Collection Policy
- 0 to Block Linguisti Data Collection Policy.
- After entering the above details, click the Save button.
Need Further Assistance or Have Technical Questions?
Join the LinkedIn Page and Telegram group to get the latest step-by-step guides and news updates. Join our Meetup Page to participate in User group meetings. Also, Join the WhatsApp Community to get the latest news on Microsoft Technologies. We are there on Reddit as well.
Author
Anoop C Nair has been Microsoft MVP from 2015 onwards for 10 consecutive years! He is a Workplace Solution Architect with more than 22+ years of experience in Workplace technologies. He is also a Blogger, Speaker, and Local User Group Community leader. His primary focus is on Device Management technologies like SCCM and Intune. He writes about technologies like Intune, SCCM, Windows, Cloud PC, Windows, Entra, Microsoft Security, Career, etc.

