Today we are discussing the Remove Documents Icon from the Start Menu using Intune Policy. This policy setting helps organizations control the visibility of the Documents icon that appears in the Start menu and its submenus. By managing this policy, administrators can control access points to user document folders, helping maintain consistency and security across managed devices.
As an IT admins concern, these types of policies are helpful for the security of confidential documents. Also, it can be deployed through the setting catalog in the MS Intune. This Policy is useful in enterprise where security are priorities. When users have too many access paths to their personal or work-related files, it increases the chances of accidental data exposure or mismanagement of a confidentiial documents.
When this policy setting is enabled, the Documents icon is removed completely from the Start menu and its submenus. This means that when users open the Start menu, they will not see any shortcut leading to their Documents folder.
If this policy setting is disabled or not configured, the Documents icon remains visible in the Start menu. This allows users to quickly access their documents directly from the Start menu interface. So let’s look how this policy managed through MS Intune admin center.
Table of Contents
How this Policy Helpful to the Organizations?
This policy setting is highly helpful for organizations because it enhances data security and access control. By limiting visible shortcuts to personal storage folders, it reduces the sensitive data being saved locally or accessed inappropriately.
Remove Documents icon from Start Menu using Intune Policy
Organizations that aim to centralize file storage on cloud platforms like OneDrive or SharePoint can particularly benefit from this policy. By removing local folder shortcuts like Documents, users are encouraged to store and access their files through secure and managed cloud solutions.
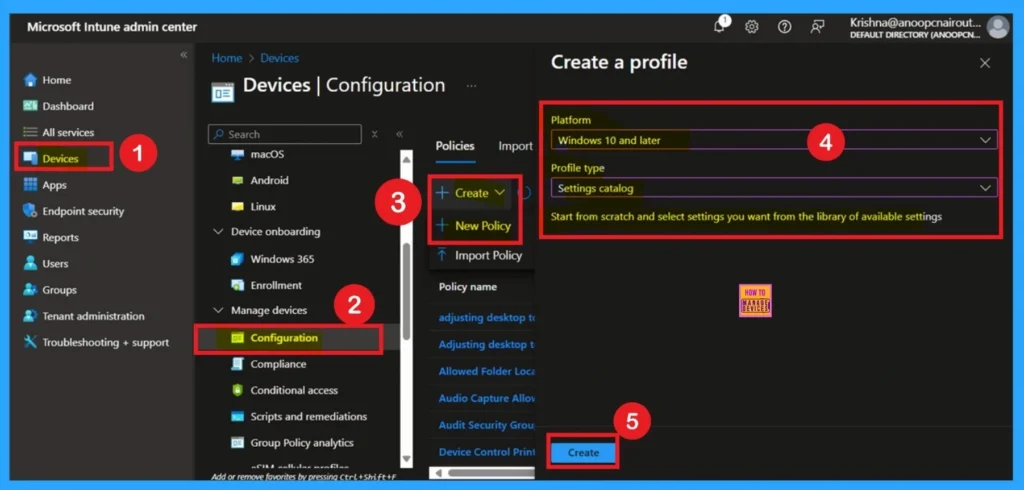
For deploying the Intune policy, we need to create a profile first. Then log in to the Microsoft Intune admin center with our credentials. Then, we need to navigate the Devices section, click Configurations, and create a new policy.
- When we click the New Policy option, the Create Profile window will open.
- Here, we need to select the platform as Windows 10 and later, and the profile type is Settings Catalog from the list.
- Finally, click the Create option to continue.
- How to Show or Hide Switch Account Option in Windows Start Menu using Intune Policy
- Enable or Disable Microsoft Account Connection Policy using Intune
- Intune Allow Microsoft Accounts to be Optional Policy
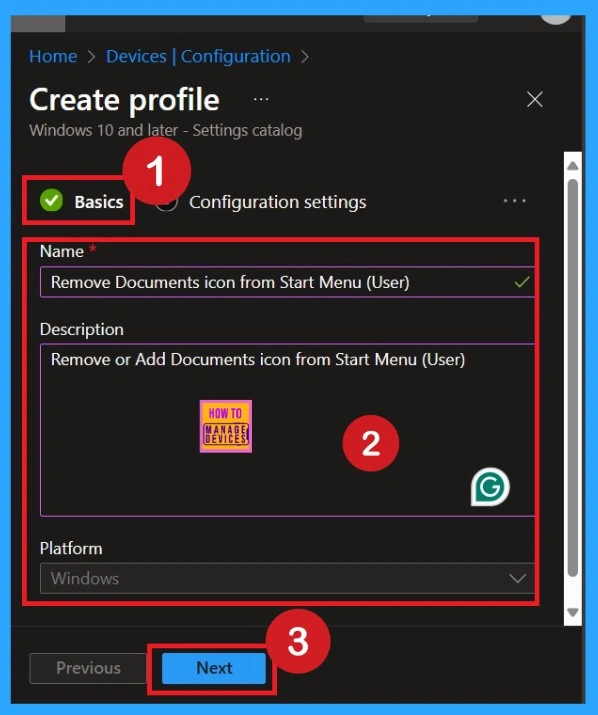
What is a Basic Tab
The Basics tab is the quickest step. Here, you need to enter the basic details such as the Name, Description, and Platform information. Since the platform is already set to Windows, you only need to provide a specific name and description for the policy, then click Next.
Configuration Settings
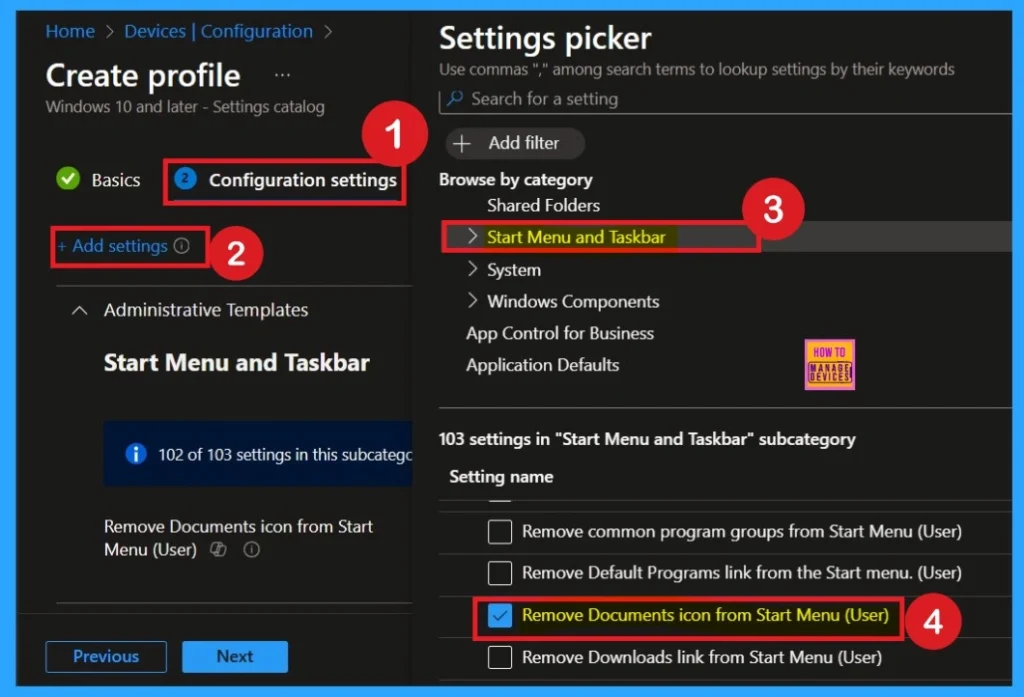
In the Configuration Settings section, you can see the Add Settings option. Click the Add Settings option, and then the Settings Picker window will open. Here you can select the category as Administrative Templates> Start Menu and Taskbar options. In the start menu category you have to concentrate on Remove Documents icon from Start Menu.
Disabled By Default
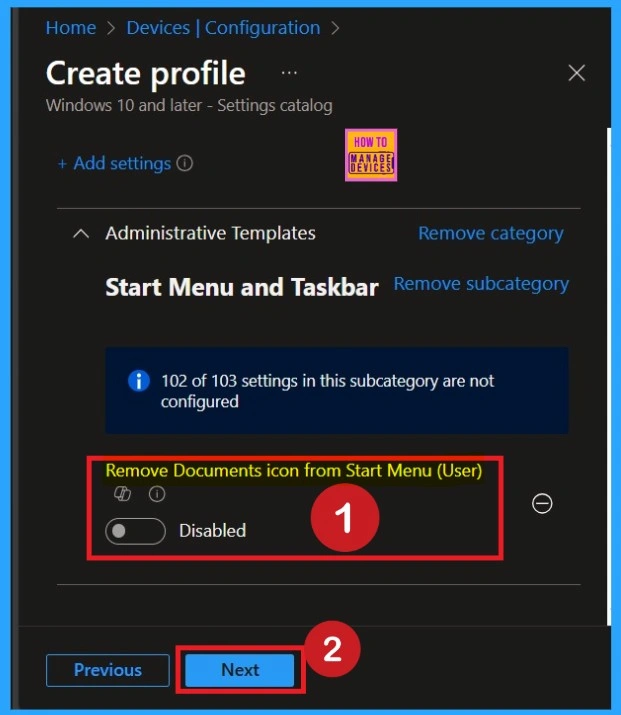
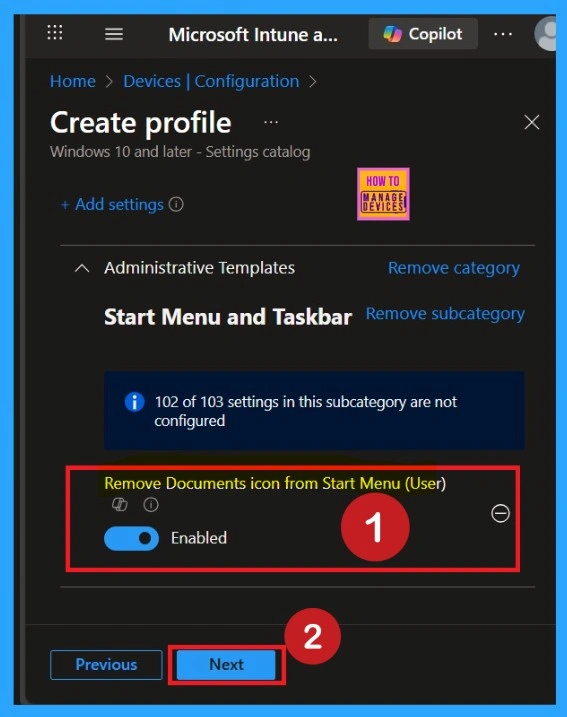
After selecting the settings, close the settings picker window. Now you are on the Configuration Settings main page. You will see that the policy has appeared on your screen. By default, this policy is disabled. If you want to continue with this default setting, you can click Next.
This allows users to quickly access their documents directly from the Start menu interface. For organizations that rely on local document access.
Enable the Policy
By default, this toggle is set to Disabled. To activate the policy, you just drag the toggle from left to right. Once enabled, the toggle will turn blue and change to Enabled. Then click Next to continue.
What is the Scope Tags
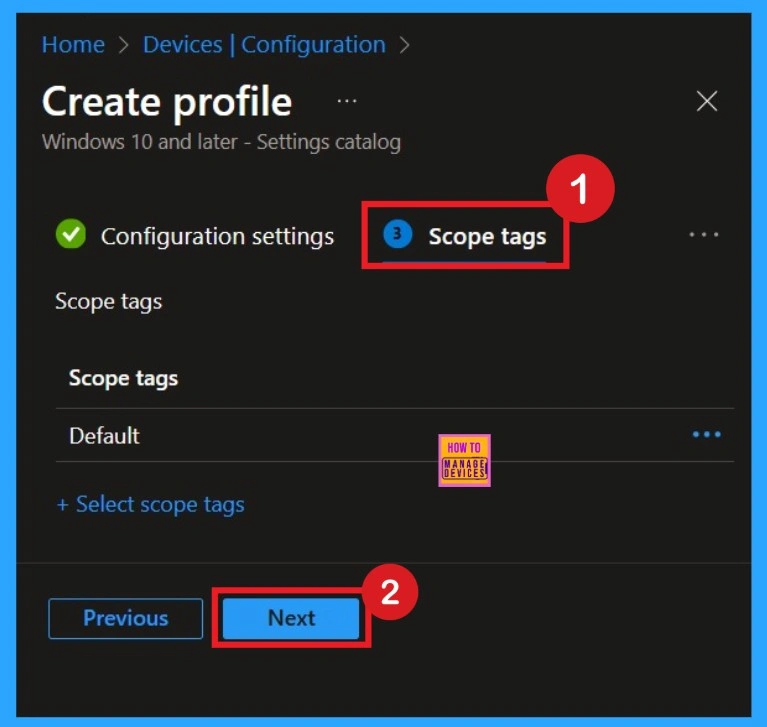
The next section is the scope tag and which is not a compulsory step. Scope Tags are used in Intune to filter and control which IT admins can see and manage a policy. Here, I skip the section and click on the next button. If you want to add Scope tags, click on the +Select Scope tags option. Otherwise, you can continue.
Assign the Policy to Specific Groups
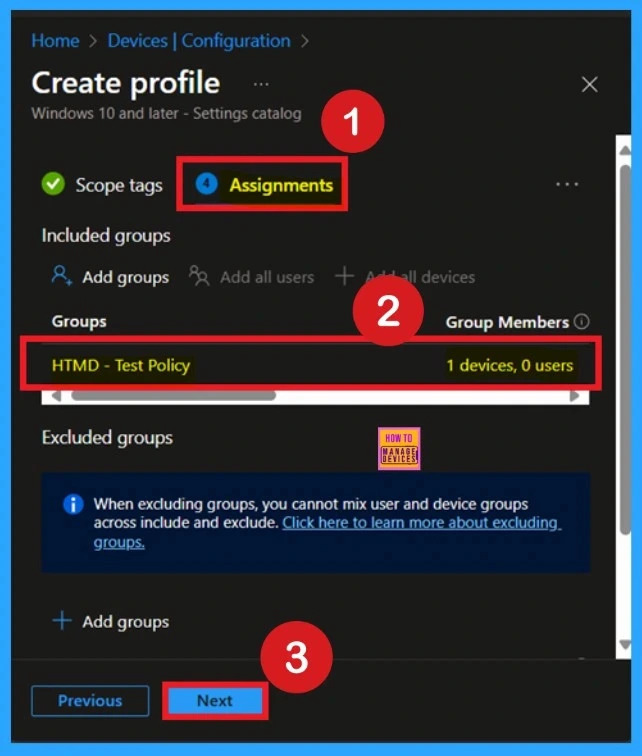
In the Assignments section, choose which user or device groups you want the policy to apply to. You can assign it to all devices or to specific organizational groups, depending on your requirements. On this page I click on the +Add groups option under Included groups. Then i choose one of the group and click on the Select button. Click on the Next Button.
Completing Policy Creation through Review + Create Tab
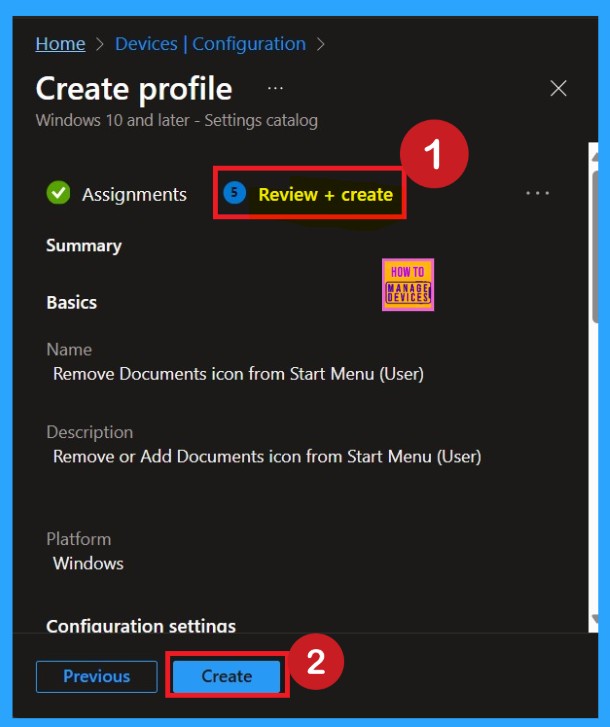
The Review + Create tab is the final stage of policy creation. On this tab, you can verify each and every detail of the policy which are added on the previous steps (basic configuration settings, scope tag assignments s etc. If you want to make any changes, click on the previous button; otherwise, you can click on the create button. Then you will get a success message.
Monitor Status
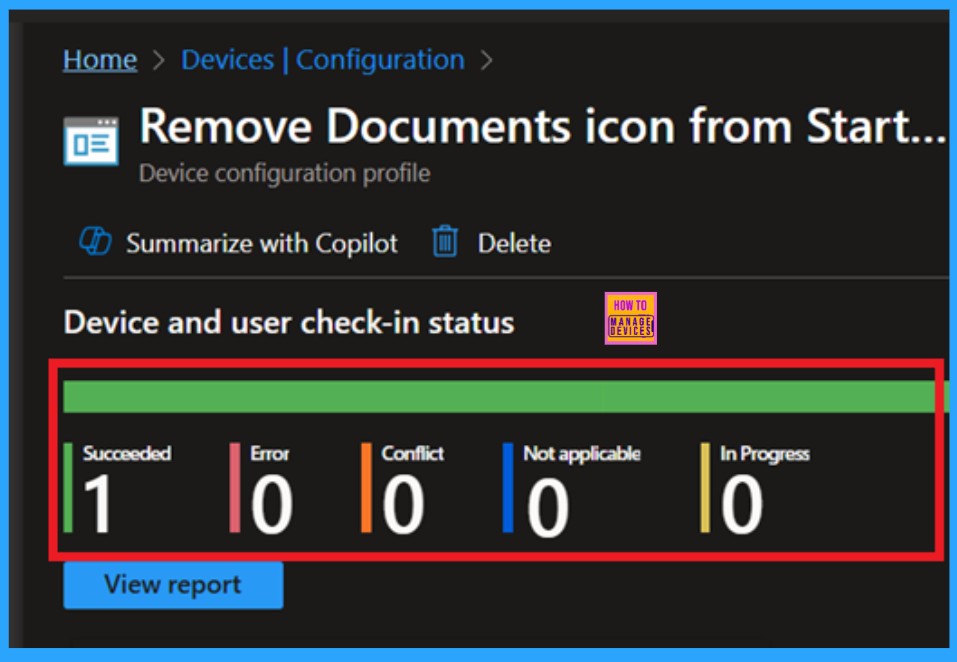
Monitoring a policy’s status after its creation is crucial to ensuring successful implementation and detecting potential errors or conflicts. To check the status, go to the Devices section, navigate to Configurations, and search for the policy you created. Once located, click on the policy to view a status overview. You must wait around 8 hours to receive the monitoring results.
- However, you can speed up this process using the company portal sync option. Otherwise it take 8 hours to get the policy results.
Client Side Verification
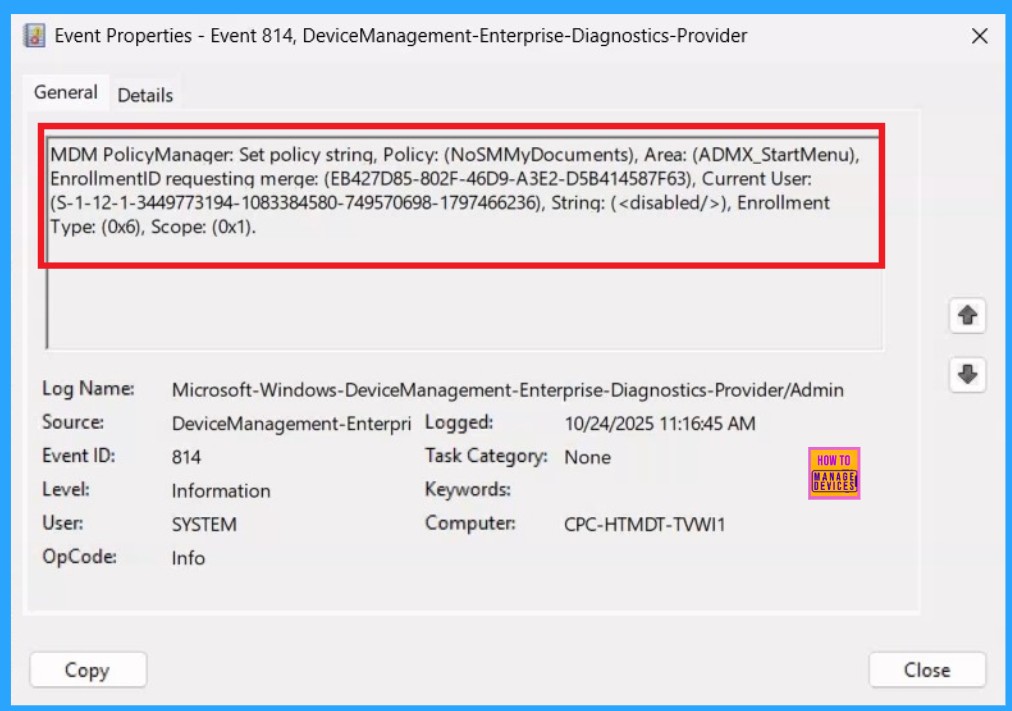
To get a verfication from Client side you can use Event Viwer. It helps to ensure the policy is deployed to client device. Go to Applications and Services Logs > Microsoft > Windows> Device Management > Enterprise Diagnostic Provider > Admin. From the list of policies, use the Filter Current Log option and search for Intune event 814.
| Policy Details |
|---|
| MDM PolicyManager: Set policy string, Policy: (NoSMMyDocuments), Area: (ADMX_StartMenu), EnrollmentID requesting merge: (EB427D85-802F-46D9-A3E2-D5B414587F63), Current User: (S-1-12-1-3449773194-1083384580-749570698-1797466236), Strinq: (), Enrollment Type: (0x6), Scope: (0x1). |
How to Remove a Group From Assignments
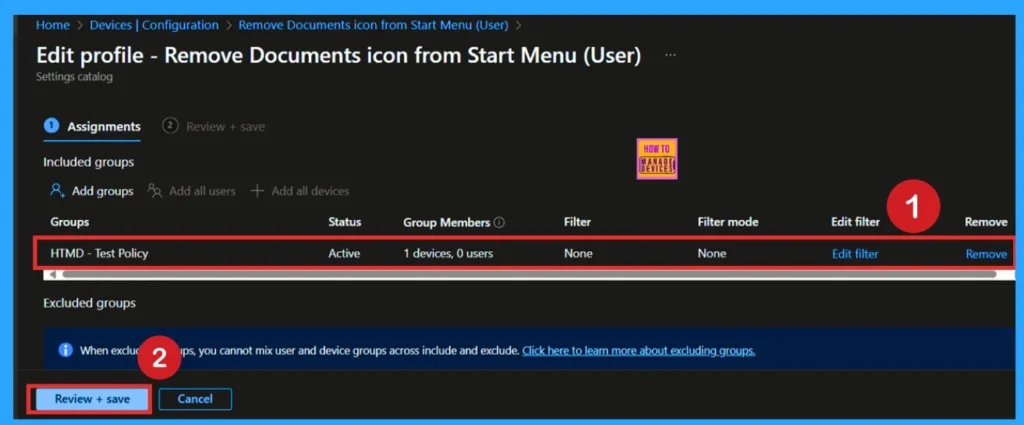
If you accidentally assign the wrong organizational group to a policy, you can easily remove it. First, go to Configuration Profiles in the Intune admin center and search for the policy you created. Open the policy and navigate to the Monitoring Status page.
Scroll down to the Assignments section, and click Edit. Here, you will see the list of assigned groups. Simply select the group you want to remove and click the Remove option. After making the changes, click Review + Save to apply the updated assignments. This ensures that only the correct groups receive the policy.
Delete the Policy Permanantly from your Tenant
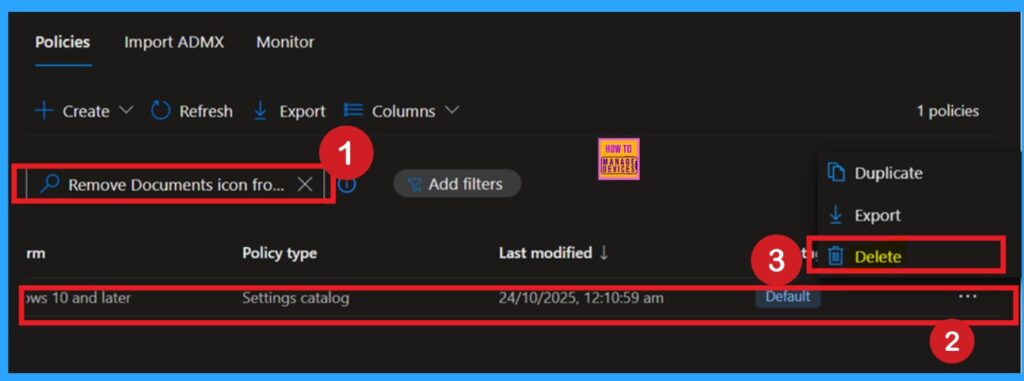
If you want to permanently delete a policy from deployment, you can do so easily. First, go to Device Configuration Profiles in Intune and search for the policy by its name. Once you locate the policy, click on the 3 dots (More options) next to it. You will see a list of options and select Delete. Confirm the action, and the policy will be completely removed from your organization, ensuring it is no longer deployed to any devices.
Need Further Assistance or Have Technical Questions?
Join the LinkedIn Page and Telegram group to get the step-by-step guides and news updates. Join our Meetup Page to participate in User group meetings. Also, Join the WhatsApp Community to get the latest news on Microsoft Technologies. We are there on Reddit as well.
Author
Anoop C Nair has been Microsoft MVP for 10 consecutive years from 2015 onwards. He is a Workplace Solution Architect with more than 22+ years of experience in Workplace technologies. He is a Blogger, Speaker, and Local User Group Community leader. His primary focus is on Device Management technologies like SCCM and Intune. He writes about technologies like Intune, SCCM, Windows, Cloud PC, Windows, Entra, Microsoft Security, Career, etc.

