In this post, you will learn the steps to add Windows Update to Offline Image Using DISM. Offline Servicing is the process to keep your Windows Image (WIM) file updated by injecting the latest SSU/LCU and other Security Updates.
Why do you need to Modify a Windows image using DISM? You can make changes to offline mounted or applied Windows images without booting into the operating system you’re going to modify.
Deployment Image Servicing and Management (DISM) is a command-line tool used to update offline Windows images. There are two ways to install or remove packages offline with DISM. You can either apply an unattend answer file to the offline image, or you can add or remove the package directly from the command prompt.
The best way to service a Windows image is offline with DISM. DISM can be used to install, uninstall, configure, and update drivers, features, and packages in Windows images and Windows Preinstallation Environment (WinPE) images without booting the image.
You can mount and modify multiple images on a single computer. Before you can make changes to your image, you’ll have to mount or apply the image depending on your scenario.
Modify an image offline: Start with an image file (either .wim or .ffu format). Mount the file using DISM. It appears as a group of folders. Modify it using DISM, adding drivers, languages, and more. Use DISM to unmount and commit the changes back to the original image file. Apply it to new devices.

- SCCM Customize Windows Out of Box Experience OOBE Using ConfigMgr
- Windows 10 Version Numbers Build Numbers Major Minor Build Rev
- Upgrade to Windows 10 21H2 using KB5003791 Enablement Package
Identify the Windows Update
The first important phase is to identify the update you will add to Windows Image.
Check Windows 10 or Windows 11 release history from the Microsoft Offical site to ensure the available update for devices running Windows 10, version 2004, 20H2, or 21H1 to Windows 10, version 21H2.
Download Windows Update
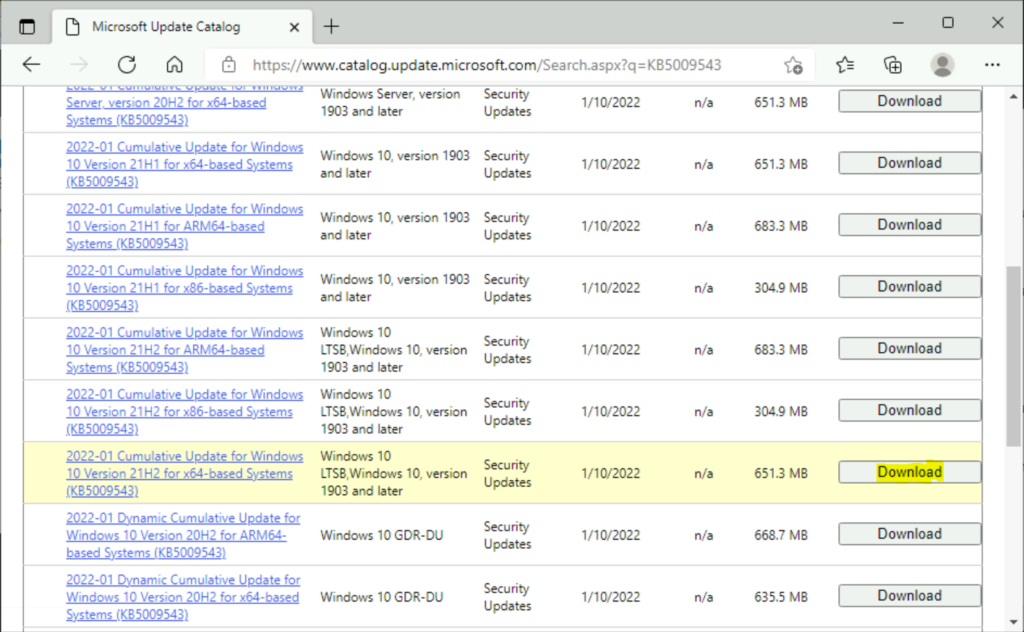
To get the standalone package for the update, Browse to Microsoft Update Catalog https://www.catalog.update.microsoft.com/Home.aspx.
Search for updates from the Windows Update Catalog – To download the latest cumulative update (LCU) for your operating system that you want to apply manually. Put the KB article number and click the Search icon.
Note – While using search, make sure no space between KB<Article Number>. For example KB5009543

Identify the required patch as per the environment. For example, Here’s how you can download the latest cumulative update (LCU) KB5009543, To search for additional updates to download, repeat steps.
Here you can see Search results for “KB5009543”. Browse the displayed list to check and Select the products (Windows Version), Architecture.
Click on Download to download the updates. If the update has any prerequisite updates, get those too.

Important – Identify the image index before you proceed further to add Windows update. You can get more details about the Image Index. Here we are extracting the Windows 10 Enterprise Edition; you must specify /index:3.
Mount an Image
Mount the Windows image (Install.wim) – Use DISM to mount the image into a temporary location on your PC.
- Open a command prompt or DISM (Deployment and Imaging Tools Environment) with administrator privileges.
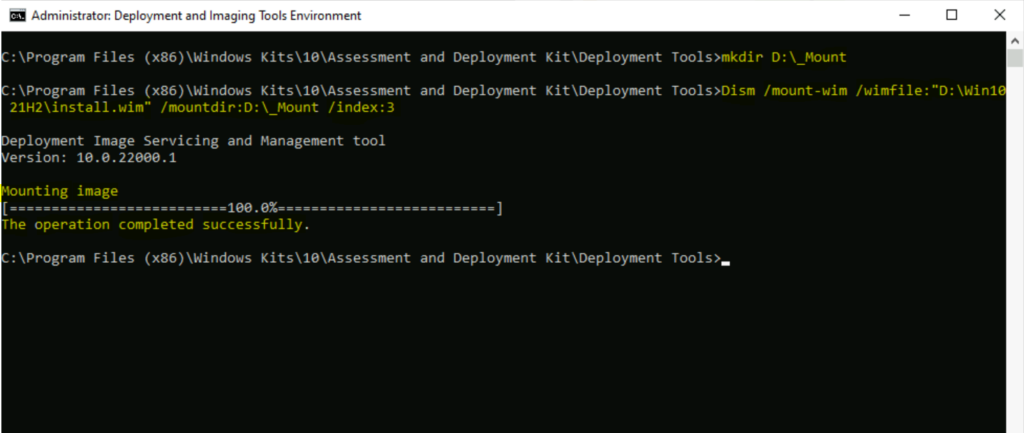
- Type the following command for creating an empty folder/directory to mount the offline Windows image (Wim).
In this example – The directory is created inside the D drive named _Mount and WIM File location “D:\Win10 21H2\install.wim” Make sure that you adjust the paths as per your environment.
Note: Don’t mount images to protected folders, such as your User\Documents folder.
mkdir D:\_Mount

Dism /mount-wim /wimfile:"D:\Win10 21H2\install.wim" /mountdir:D:\_Mount /index:3
Add a Windows update package to an image – To apply the download latest update to your mounted image.
Type the following command to add a specific package to the image. You can add multiple packages on one command line. They will be installed in the order listed in the command line.
💡To add multiple packages, you can type the command – For Example: Dism /Image:“C:\mount\windows” /Add-Package /PackagePath=”C:\WindowsUpdates\windows10.0-kb00001-x64.msu” /PackagePath=”C:\WindowsUpdates\windows10.0-kb00003-x64.msu”
Dism /image:D:\_Mount /add-package /packagepath:"D:\2022-01 Cumulative Update for Windows 10 Version 21H2 for x64-based Systems (KB5009543)\windows10.0-kb5009543-x64_c7b660efcaaa2dd1d55fe91c5cea3d9b209a15cd.msu"Where windows10.0-kb5009543-x64_c7b660efcaaa2dd1d55fe91c5cea3d9b209a15cd.msu” is the name of the update file!

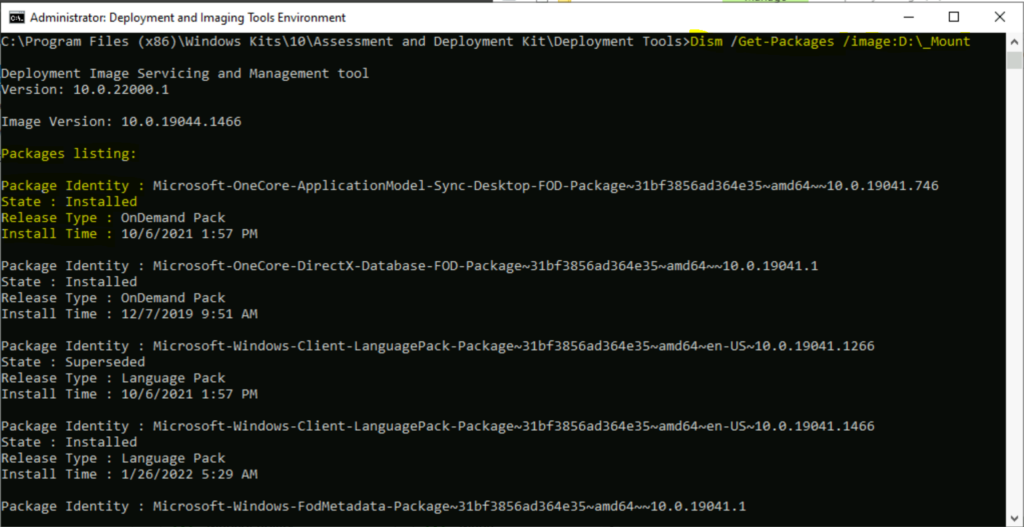
Verify the packages, Review the resulting list of packages and verify that the list contains the package.
Dism /Get-Packages /image:D:\_Mount- Package Identity
- State
- Release Type
- Install Time

Reduce Size
You can also reduce the size of a Windows image. Windows also use internal processes to reduce the size of the WinSxS folder, such as uninstalling and deleting packages with components that other components have replaced with newer versions.
Deleting files from the WinSxS folder or deleting the entire WinSxS folder may severely damage your system so that your PC might not boot and make it impossible to update.
The /Cleanup-Image parameter of Dism.exe provides advanced users more options to further reduce the WinSxS folder’s size.
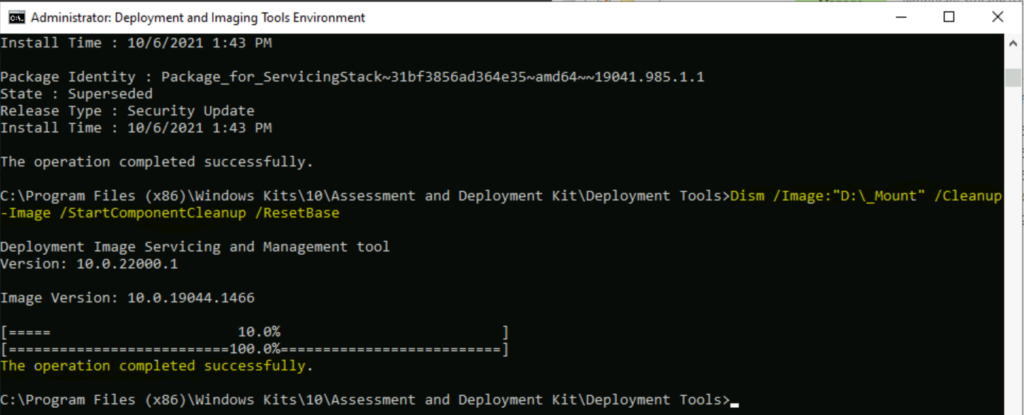
Using the /ResetBase parameter together with the /StartComponentCleanup parameter of DISM.exe on a running version of Windows 10 or later removes all superseded versions of every component in the component store
Dism /Image:"D:\_Mount" /Cleanup-Image /StartComponentCleanup /ResetBase
Unmount Windows Image
After you modify a mounted image, you must unmount it. If you mount your image with the default read/write permissions, you can commit your changes. This makes your modifications a permanent part of the image.
To save changes you make to the image, use the /commit option when you use DISM to unmount the image.
Dism /unmount-wim /mountdir:D:\_Mount /commit

rmdir /Q /S D:\_Mount
DISM Command Line Parameters
Following are the supported DISM command-line parameters.
PS C:\Users\digit> dism /?
Deployment Image Servicing and Management tool
Version: 10.0.22579.1
DISM.exe [dism_options] {Imaging_command} []
DISM.exe {/Image: | /Online} [dism_options]
{servicing_command} []
DESCRIPTION:
DISM enumerates, installs, uninstalls, configures, and updates features
and packages in Windows images. The commands that are available depend
on the image being serviced and whether the image is offline or running.
FFU COMMANDS:
/Capture-Ffu – Captures a physical disk image into a new FFU file.
/Apply-Ffu – Applies an .ffu image.
/Split-Ffu – Splits an existing .ffu file into multiple read-only
split FFU files.
/Optimize-Ffu – Optimizes a FFU file so that it can be applied to storage
of a different size.
WIM COMMANDS:
/Apply-CustomDataImage – Dehydrates files contained in the custom data image.
/Capture-CustomImage – Captures customizations into a delta WIM file on a
WIMBoot system. Captured directories include all
subfolders and data.
/Get-WIMBootEntry – Displays WIMBoot configuration entries for the
specified disk volume.
/Update-WIMBootEntry – Updates WIMBoot configuration entry for the
specified disk volume.
/List-Image – Displays a list of the files and folders in a
specified image.
/Delete-Image – Deletes the specified volume image from a WIM file
that has multiple volume images.
/Export-Image – Exports a copy of the specified image to another
file.
/Append-Image – Adds another image to a WIM file.
/Capture-Image – Captures an image of a drive into a new WIM file.
Captured directories include all subfolders and
data.
/Get-MountedWimInfo – Displays information about mounted WIM images.
/Get-WimInfo – Displays information about images in a WIM file.
/Commit-Wim – Saves changes to a mounted WIM image.
/Unmount-Wim – Unmounts a mounted WIM image.
/Mount-Wim – Mounts an image from a WIM file.
/Remount-Wim – Recovers an orphaned WIM mount directory.
/Cleanup-Wim – Deletes resources associated with mounted WIM
images that are corrupted.
GENERIC IMAGING COMMANDS:
/Split-Image – Splits an existing .wim file into multiple
read-only split WIM (SWM) files.
/Apply-Image – Applies an image.
/Get-MountedImageInfo – Displays information about mounted WIM and VHD
images.
/Get-ImageInfo – Displays information about images in a WIM, a VHD
or a FFU file.
/Commit-Image – Saves changes to a mounted WIM or VHD image.
/Unmount-Image – Unmounts a mounted WIM or VHD image.
/Mount-Image – Mounts an image from a WIM or VHD file.
/Remount-Image – Recovers an orphaned image mount directory.
/Cleanup-Mountpoints – Deletes resources associated with corrupted
mounted images.
IMAGE SPECIFICATIONS:
/Online – Targets the running operating system.
/Image – Specifies the path to the root directory of an
offline Windows image.
DISM OPTIONS:
/English – Displays command line output in English.
/Format – Specifies the report output format.
/WinDir – Specifies the path to the Windows directory.
/SysDriveDir – Specifies the path to the system-loader file named
BootMgr.
/LogPath – Specifies the logfile path.
/LogLevel – Specifies the output level shown in the log (1-4).
/NoRestart – Suppresses automatic reboots and reboot prompts.
/Quiet – Suppresses all output except for error messages.
/ScratchDir – Specifies the path to a scratch directory.
For more information about these DISM options and their arguments, specify an
option immediately before /?.
Examples:
DISM.exe /Mount-Wim /?
DISM.exe /ScratchDir /?
DISM.exe /Image:C:\test\offline /?
DISM.exe /Online /?

HI! this was really useful, I have one question though, I’ve been tasked to update an image from 1903 to the newest 21H2, is it possible to do this via DISM? I’ve been trying all day but I’ve not been successful. I followed your instructive and was able to install a cumulative package, but that’s as far as I got.
I’d really appreciate your response, thanks a lot!
Hi Andres, The best option you have to use Feature Update/Inplace upgrade or Enablement package to offer upgrades from the existing version to the newer version
I’ve been patching an LTSC 2019 image for a few years and recently I’m no longer able to add the latest cumulative update msu package. DISM takes a long time to get to 6% then says it’s successful. When Itry the resulting image on the target machine Windows Update goes and gets the cumulative update all over again. Have you any clues why this would be?
Kind regards,
I use DISM, but not adding software to an image. I was wondering, does adding a package(driver) just include it in the driver section, or does it actually install or update the current driver like Device Manager does, and it gets loaded at boot time?
Hi, Adding the drivers using DISM will be installed along with the Image, You will be able to validate the drivers inside Device Manage if you’re referring to the model’s drivers. Alternatively, you also have an option to validate whether the drivers are part of image or not by using the command line utility.
Thank you, for the insight. I asked this same question, at Microsoft, and keep in mind, only because the DOCs section, doesn’t give to much clarity. The answer I got, from some guy, 10 years MVP, was a link to the exact page that I have just read. I understand what I read, just wanted a deeper clarity. I am aware of querying the mount wim for a list of drivers or the OS using DISM, and to actually back them up from an online OS. From what I read, I am thinking that I can get the drivers from my current OS, and put them in a folder using DISM, and then I could apply the missing drivers to the windows 10 wim that I just downloaded, Correct? And again thanks and most appreciative for your time/answer.
What do you think about DISM++ created by Chuyu Team, that is if you have had the opportunity to check it out?
/Apply-CustomDataImage – Dehydrates files contained in the custom data image. I know you got this term from MS, but the word Dehydrate means the human body has a loss of water. There is no water in a computer file.