
Key Takeaways
- The Admin Host Info setting adds computer information to the macOS login window.
- It gives users a convenient way to view relevant computer details before signing in.
- On macOS 10.10 and later, users can click the time area of the menu bar to toggle through available computer information values.
- The setting can help users and IT administrators identify devices more easily during troubleshooting.
In this post, we are discussing the Use Admin Host Info to Display Computer Details on the macOS Login Window using Intune. Microsoft Intune allows administrators to configure macOS login window behavior through the Settings Catalog. One of the available new settings is Admin Host Info, which can be used to provide additional computer information to users directly from the login window. The Admin Host Info setting is useful when administrators want users to quickly identify or check information about the Mac they are using. Instead of requiring users to sign in first and open system settings or other tools, relevant computer information can be made available from the login window.
Table of Contents
Table of Contents
Use Admin Host Info to Display Computer Details on the macOS Login Window using Intune
On macOS 10.10 and later, this setting provides more flexibility than earlier versions of macOS. When the key is configured with a value, users can click the time area of the menu bar at the login window to switch between available computer information values. This can make information such as the computer name, system version, or IP address easier to access.
- Deploy DDM-Based Line of Business Apps in Microsoft Intune for iOS and iPadOS Devices
- Enforce DDM Software Updates on macOS Device using Intune Settings Catalog
- Display Organizational Messages on macOS Login Screen using Intune
- Manage MacOS Login Background App Experience Using Intune
Open Device configuration to Create a New policy
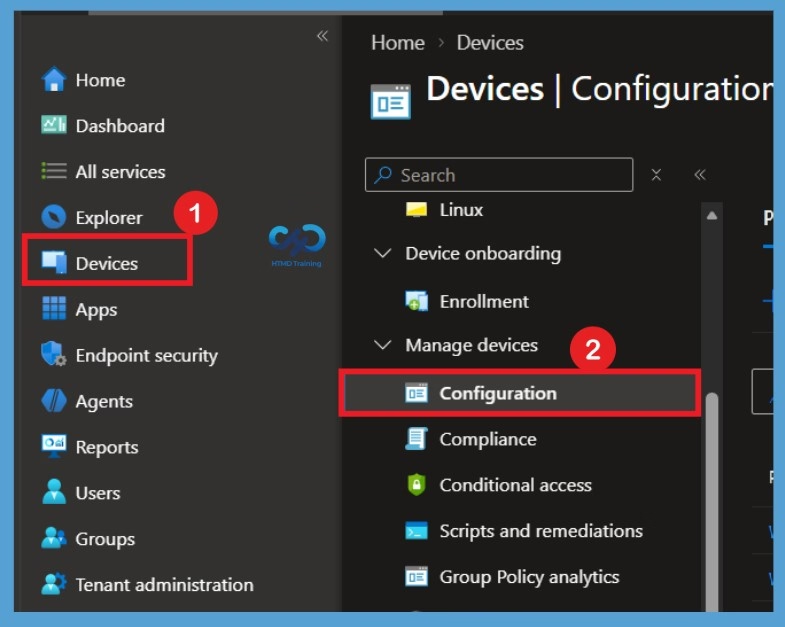
Displaying computer information at the login window can help users and IT teams identify a device more quickly, which can be helpful during troubleshooting, device support, and remote assistance. Sign in to the Microsoft Intune admin center and open the Devices section from the left navigation pane. Under Devices, select Configuration. This section allows administrators to create and manage configuration policies for devices.
Create a Profile
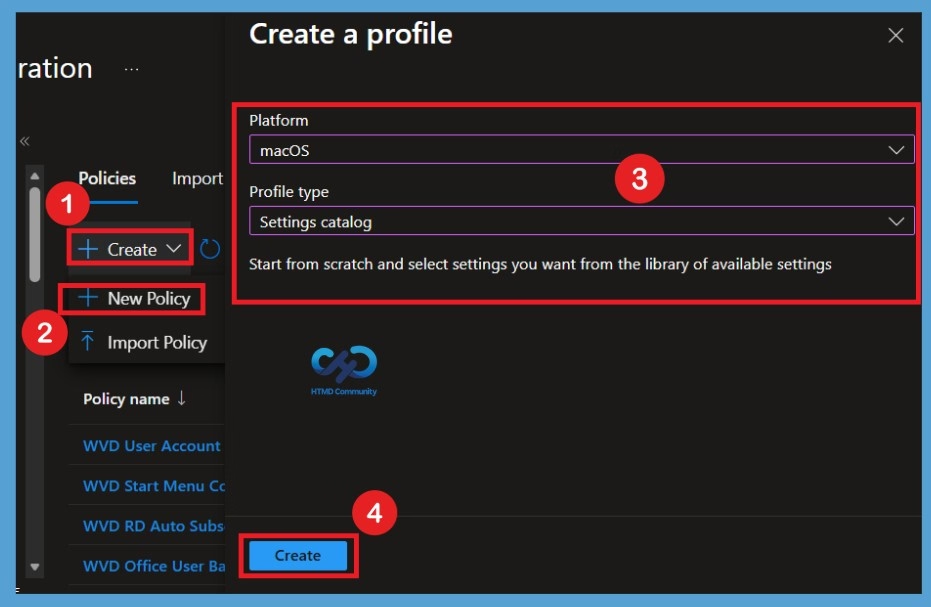
After selecting Configuration, you will be taken to the Create profile page. Select the + Create option to start creating a new configuration profile. You will then see two options, new policy and Import policy. Select New policy to create the policy manually. In the Create a profile window, select macOS under Platform and Settings catalog under Profile type. Once you have selected both options, click Create to continue.

Add the Basic Details for the Admin Host Info Policy
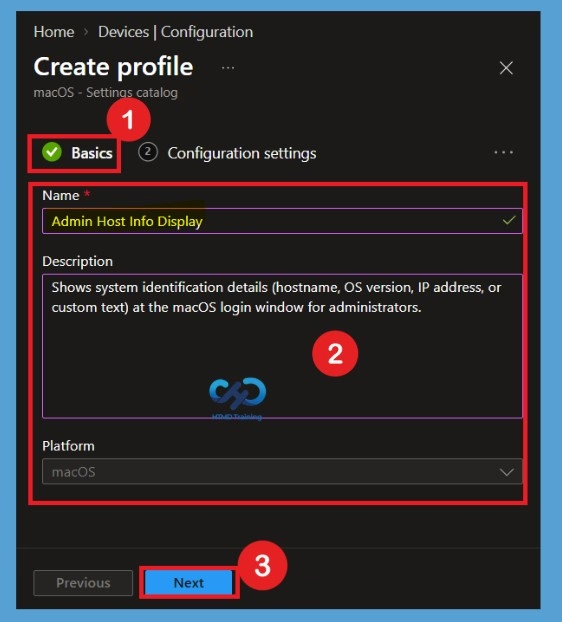
You are now moved to the Basics tab, where you need to enter the basic details of the policy, such as the name and description. In the Name field, enter a suitable name for the policy. For example, you can enter Admin Host Info Display. You can use any name that clearly identifies the purpose of the policy. In the Description field, provide a short explanation of what the policy is used for. For example, “Show system identification details (host name, OS version, IP address, or custom text) at the macOS login window for administrators.”
- After entering the required details, click Next to move to the Configuration settings section.
Select Admin Host Info to Configure Login Window Information
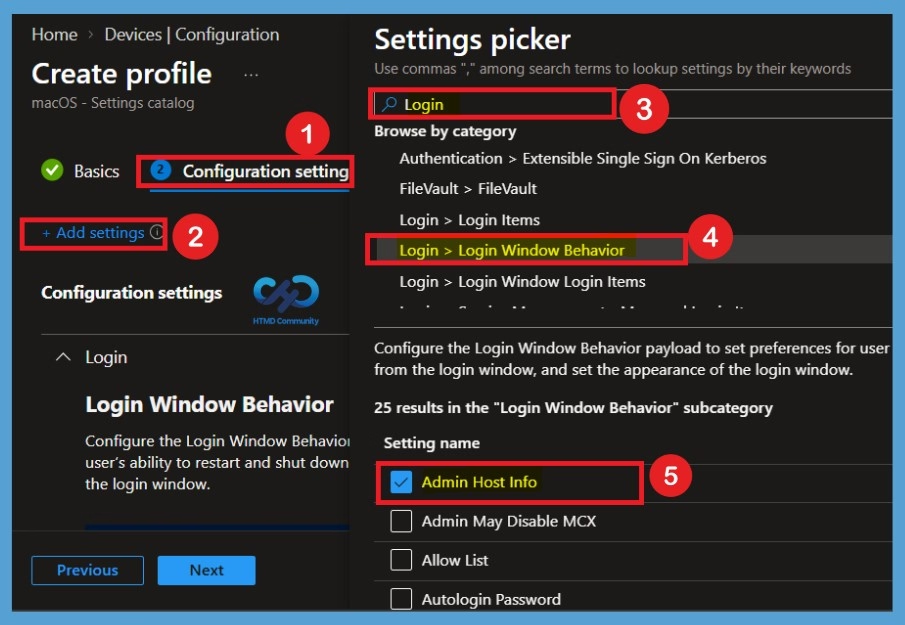
In the Configuration settings section, select the + Add settings option to open the Settings picker window. In the Settings picker, use the search box and enter Login. The available settings will then appear under different categories. From the results, select Login > Login Window Behavior. You will then see the available settings under the Login Window Behavior category. From this list, select Admin Host Info. After selecting Admin Host Info, close the Settings picker window to return to the Configuration settings page.
| Policy Details | Information |
|---|---|
| Admin Host Info | If this key is included in the payload, its value is displayed in the login window as additional computer information. Before macOS 10.10, this string could contain only certain information (host name, system version, or IP address). After macOS 10.10, setting this key to any value allows the user to click the time area of the menu bar to toggle through various computer information values. |
Enter the Information for Admin Host Info
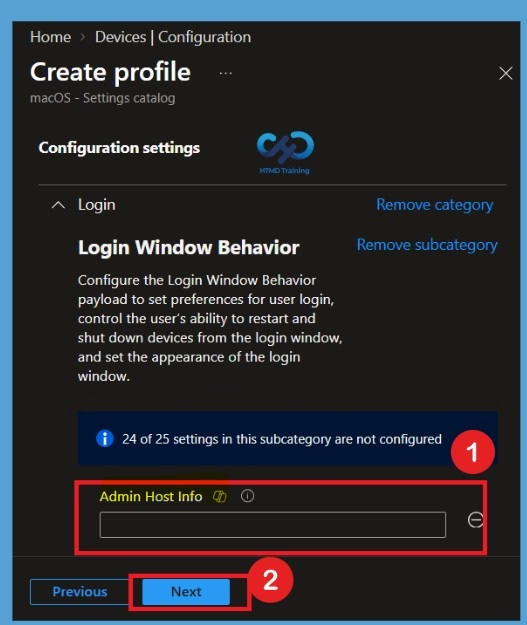
After adding Admin Host Info, you will see the setting displayed under the Configuration settings section with a blank field. Here, you need to enter the value that you want to use for displaying additional computer information at the macOS login window. You can enter the appropriate host information such as the host name, system version, IP address, or another supported value.
Add Value
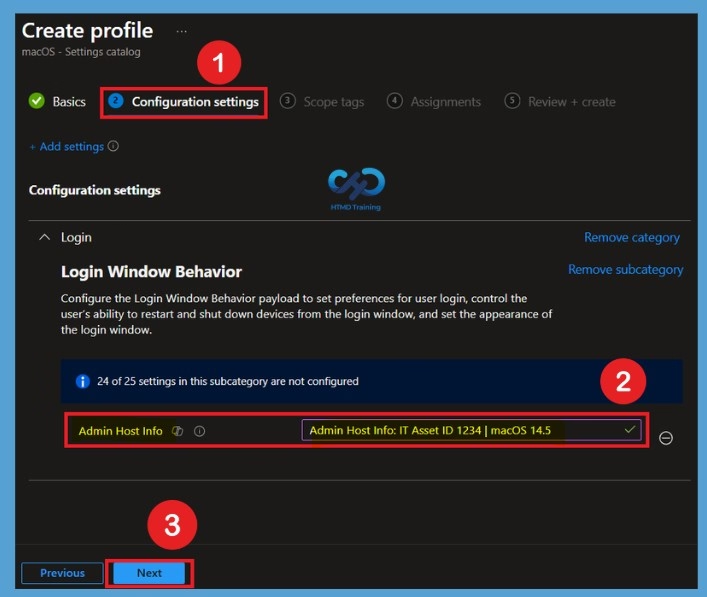
In this example, the value is entered as Admin Host Info: IT Asset ID 1234 | macOS 14.5. You can replace this example with the appropriate host information or custom text required for your organization. Once you have entered the required value, review the setting to make sure it is correct and click Next to continue to the Scope tags section.
Scope Tag
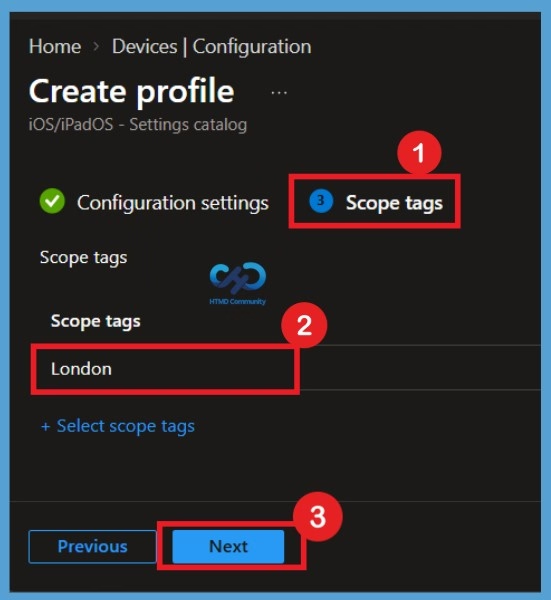
In the Scope tags section, you can add a scope tag to organize and manage the policy based on your organization’s requirements. Adding a scope tag is optional, so you can skip this section if you do not need to use one. For example, you can select London as the scope tag for the policy. After selecting the required scope tag, click Next to continue with the policy creation process.
Assignment Tab
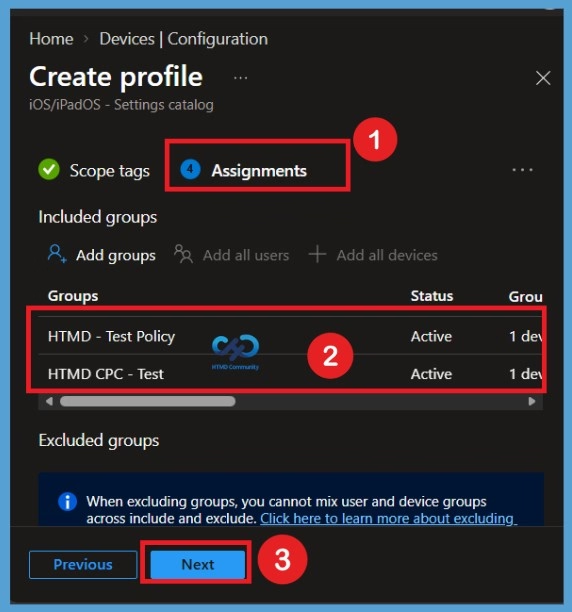
In the Assignments section, you can select the specific device groups to which you want to deploy the policy. Choose the required groups based on which managed Mac devices should receive the Admin Host Info configuration. In this example, the policy is assigned to the HTMD Test Policy and HTMD CPC Test device groups. After adding the required device groups, review the assignments and click Next to continue to the Review + create section.
Review And Create The Admin Host Info Policy
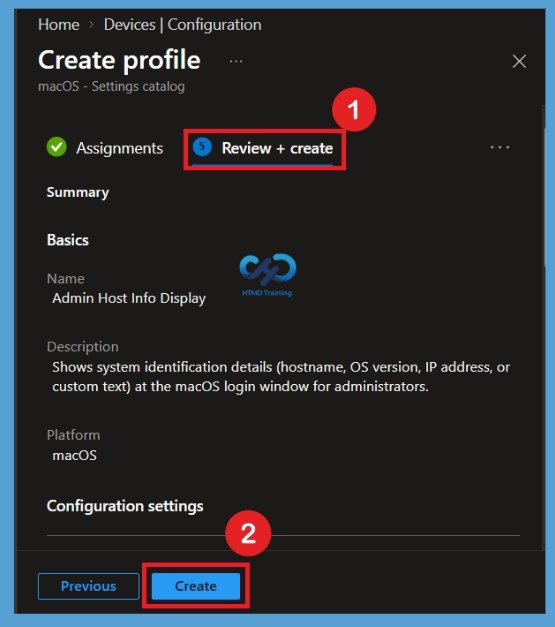
The Review + create page provides a summary of all the details configured for the policy in one place. You can review the policy name, description, configuration settings, scope tags, and assigned device groups before creating the policy. If you need to make any changes, select the Previous button to return to the relevant section and update the required details. If everything looks correct, select Create to finish the policy configuration. A notification will then appear confirming that the policy has been successfully created.
Monitor The Policy Deployment Status
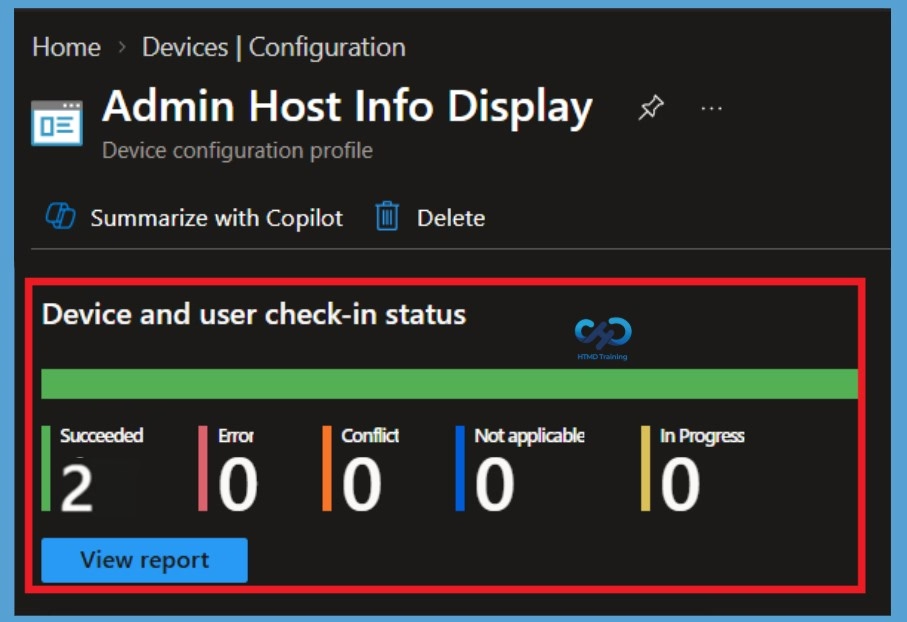
The Monitoring section allows you to check whether the policy has been successfully deployed to the targeted devices. To verify the deployment status, go to Device configuration and search for the policy using the name you had given in when creating it. Select the policy from the search results and open Properties. Here, you can review the deployment status and check whether the policy has been successfully applied to the assigned devices. In this example, the policy shows a Succeeded status for the targeted devices.
Edit or Remove Assigned Device Groups
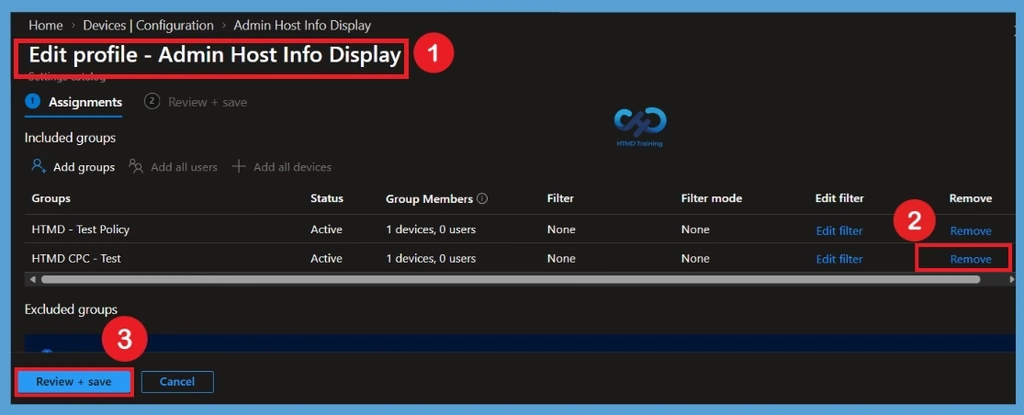
If you want to edit or remove the device groups assigned to the policy, you can make the changes from the policy’s monitoring status page. Scroll down and select the Edit Assignment option to open the Assignments section. Here, you can remove any device group that you no longer want to receive the policy. After making the changes, select Review + Save to apply the updated device group assignments.
Delete The Policy from the Tenant
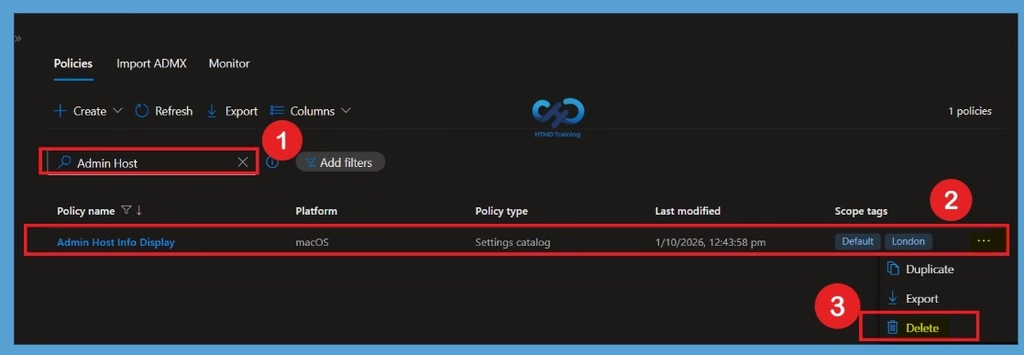
If you no longer need the policy and want to permanently remove it from your Intune tenant, go to Devices and search for the policy using the policy name you created earlier. Select the policy from the search results and click the 3-dot menu to view the available actions. Select Delete and confirm the deletion when prompted. The policy will then be permanently removed from the tenant.
Need Further Assistance or Have Technical Questions?
Join the LinkedIn Page and Telegram group to get the latest step-by-step guides and news updates. Join our Meetup Page to participate in User group meetings. Also, join the WhatsApp Community and the Whatsapp channel to get the latest news on Microsoft Technologies. We are there on Reddit as well.
Author
Anoop C Nair is Workplace Technology solution architect with 25+ years of experience in global enterprise organizations such as JP Morgan, Capgemini, etc. He is Microsoft Certified Trainer. Microsoft MVP from 2015 onwards for consecutive 11 years! He also conducts Intune and modern workplace tech training for enterprise organizations. He is Blogger, Speaker, and Founder of HTMD Community and HTMD Conference. His focus is on Device Management technologies such as Intune, Windows, Cloud PC. He writes about technologies like Intune, SCCM, Windows, Cloud PC, Windows, Entra, Microsoft Security.