Let’s discuss configuring the App Install Control Policy using the Intune Setting Catalog. App Install Control is a Windows Defender SmartScreen feature that helps protect PCs by allowing users to install apps only from the Store. SmartScreen must be enabled for this feature to work properly.
This setting controls where users can install apps from. If enabled, users are restricted to installing apps only from the Store. Disabling it allows app installations from any source, including files downloaded online. Leaving the settings unconfigured allows users to choose their preferred app installation settings.
Microsoft Defender SmartScreen protects you from harmful websites and downloads. It checks web pages for phishing and malware and warns if downloaded files are unsafe. This helps keep your computer safe from online threats.
With App Control for Business, you manage which applications and drivers run on your Windows devices. You create policies to define trusted software to monitor activity or block unauthorized programs. The policies include rules for identifying trusted applications.
Table of Contents
Explain Allowed Values of App Install Control Policy?
Value 0 (Default): Disabling Application Installation Control permits users to install apps from any source, including files downloaded from the internet.
Value 1: Enabling Application Installation Control restricts users to installing apps exclusively from the Microsoft Store.
Value 2: Enabling Application Installation Control with Store suggestions allows users to install apps from any source. However, they will be notified if a similar app is available in the Microsoft Store.
Value 3: Enabling Application Installation Control with warnings allows users to install apps from any source, but they will receive a warning before installing apps from outside the Microsoft Store.
Windows CSP Policy Details – SmartScreen
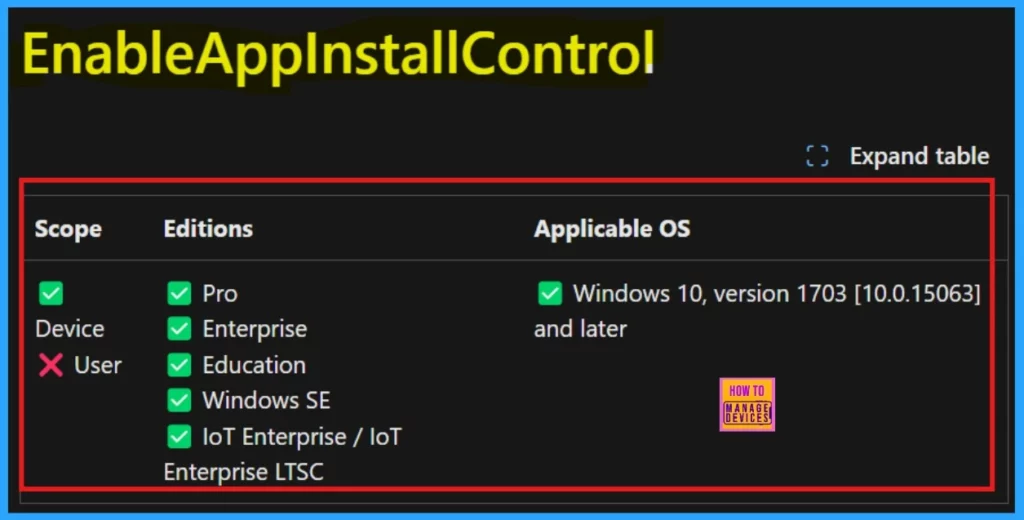
Configuration Service Providers (CSPs) connect desired settings to actual device settings and help administrators manage and control these configurations on Windows client operating systems. The below screenshot will help you to understand the CSP details of the policy.
./Device/Vendor/MSFT/Policy/Config/SmartScreen/EnableAppInstallControl
- Enable Disable Defender SmartScreen For Microsoft Store Apps In Windows 11
- Turn On or Off Microsoft Defender SmartScreen for Microsoft Edge in Windows 11
- How to Allow Direct Memory Access for Data Protection Through Intune Settings Catalog
App Install Control Policy
This policy prevents app installations while the device is online, protecting against malicious downloads. However, to extend this protection to offline scenarios, you must also enable the SmartScreen/PreventOverrideForFilesInShell and SmartScreen/EnableSmartScreenInShell policies.
These additional policies ensure SmartScreen protection is active even when the device isn’t connected to the internet. The overall goal is to safeguard user devices from harmful content downloaded from the internet.
Configure App Install Control Policy using Intune Setting Catalog
First, we should sign in to the Microsoft Intune Admin Center with your admin account to configure App Install Control Policy using Intune Setting Catalog.
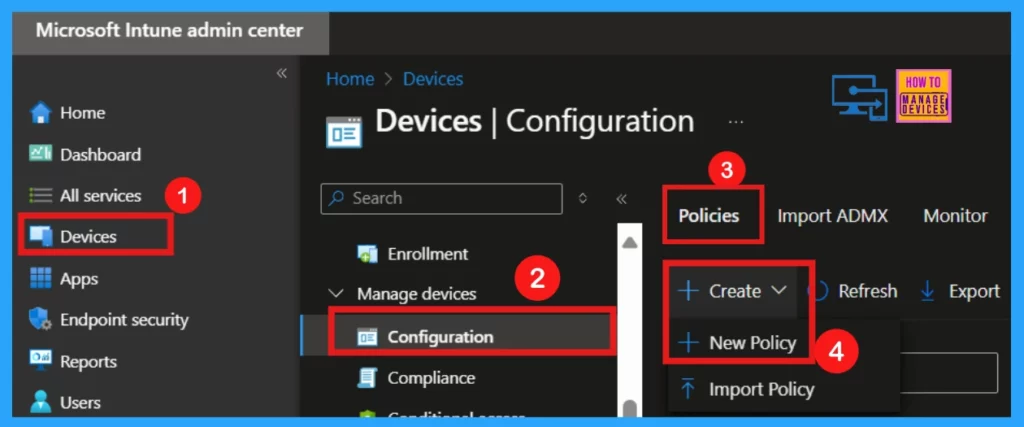
- Then, go to Devices > Windows > Configuration
- Choose +Create and pick the +New policy.
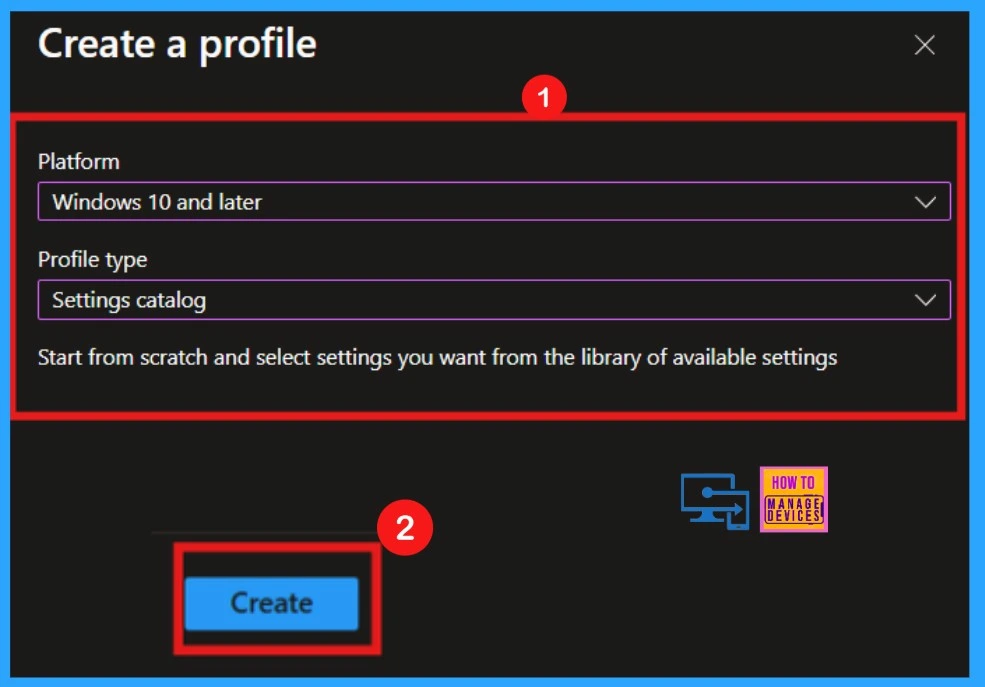
To create a new policy, click New Policy, which opens the Create Profile window. First, you select the platform, in this case, Windows 10 and Later. Then, you choose the profile type as Settings Catalog. Finally, clicking Create initiates the policy creation process.
Basics
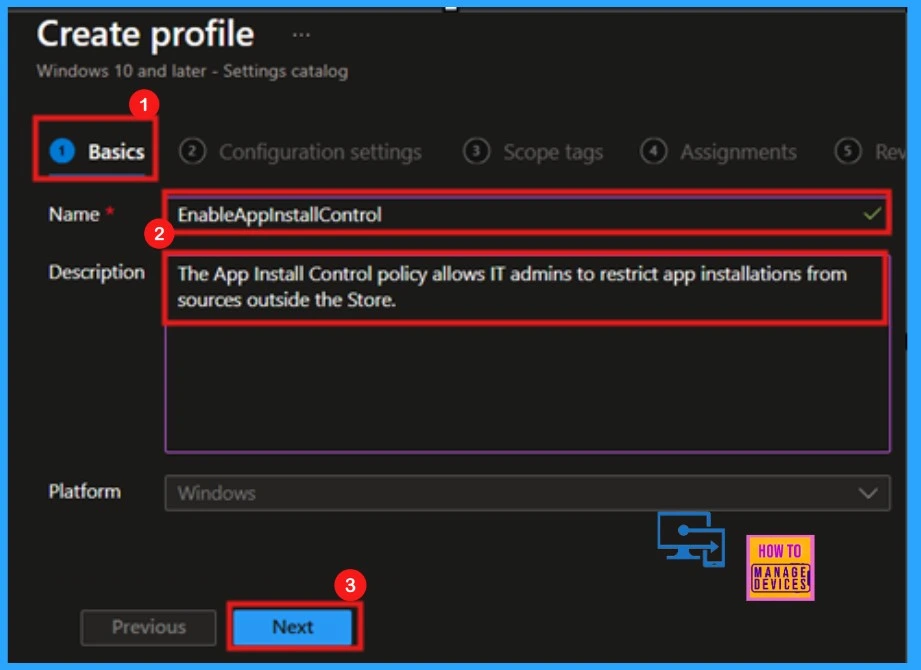
The initial step in creating a profile is the Basics section, where you must provide a descriptive name and a brief explanation for the policy you’re about to deploy. This is a mandatory section, and users must add it to continue creating Profiles.
| Name of the Policy | Description |
|---|---|
| Enable App Install Control (EnableAppInstallControl) | Enable App Install Control allows IT Admins to restrict app installations from sources outside the Store. |
Configuration Settings
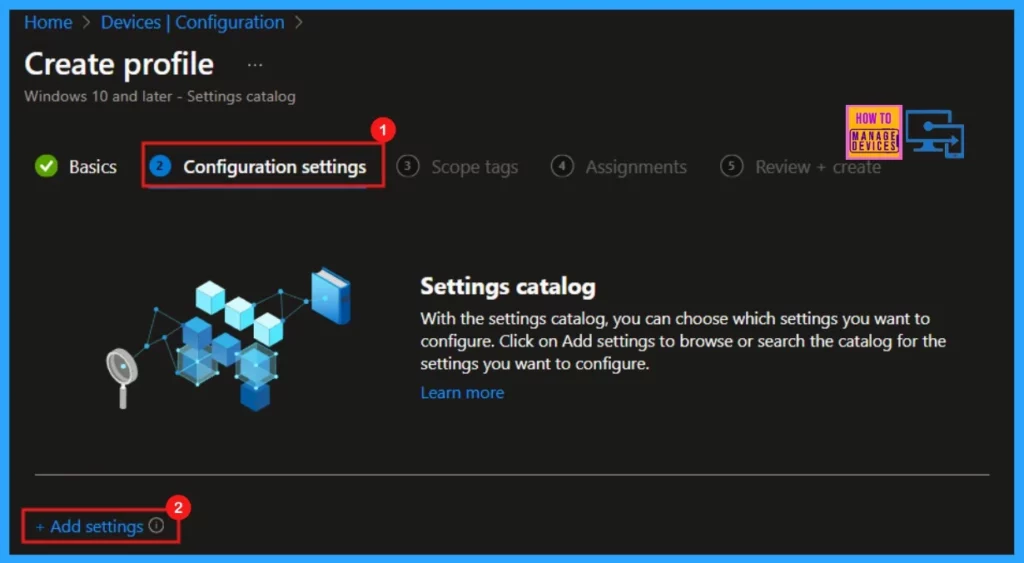
The next step is the Configuration settings section. Click +Add settings to choose the specific settings that we want to configure within the profile. This section is mandatory and must be completed before proceeding.
Settings Picker
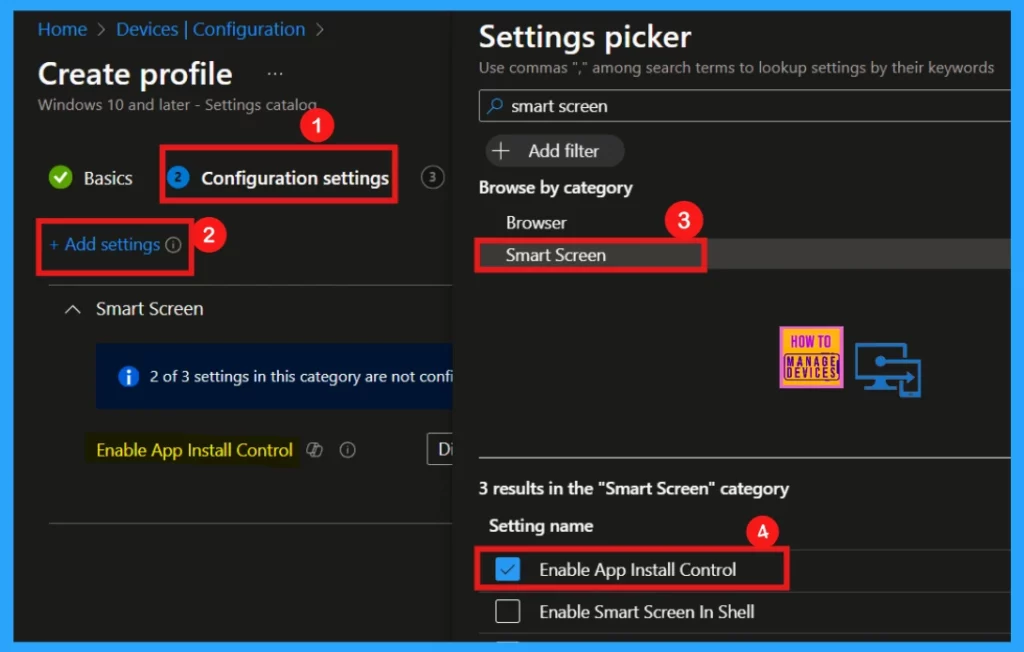
Upon clicking Add Settings, the Settings Picker window will appear. We can search for a specific policy by entering keywords. Once we have done that, we can also explore the available options by navigating through different categories.
In this instance, I will select Smartscreen as our chosen category. Within this section, we will find a variety of settings, including the App Install Control feature, which allows us to manage and restrict application installations for enhanced security.
- Close the Settings Picker window for next step.
Disable App Install Control
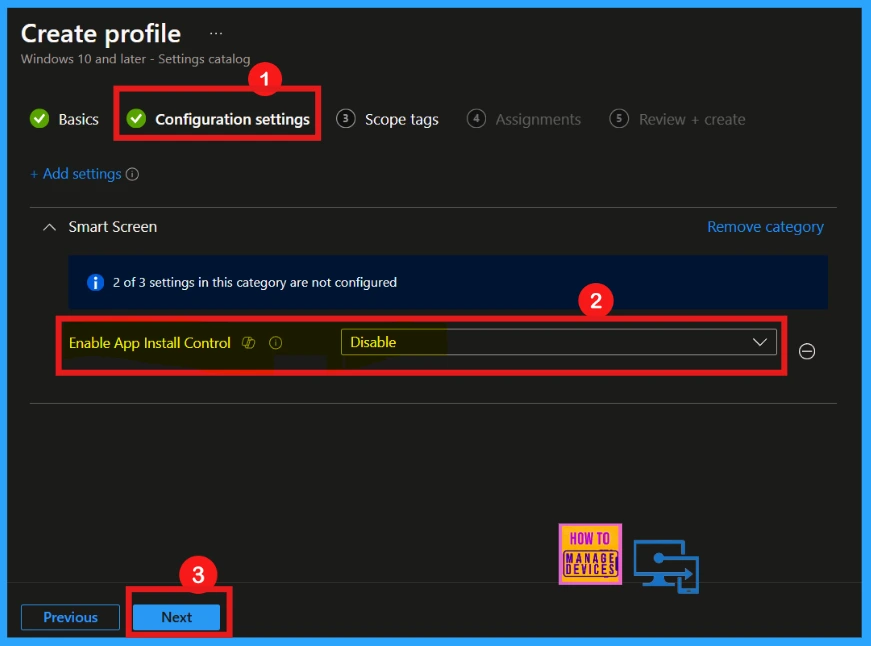
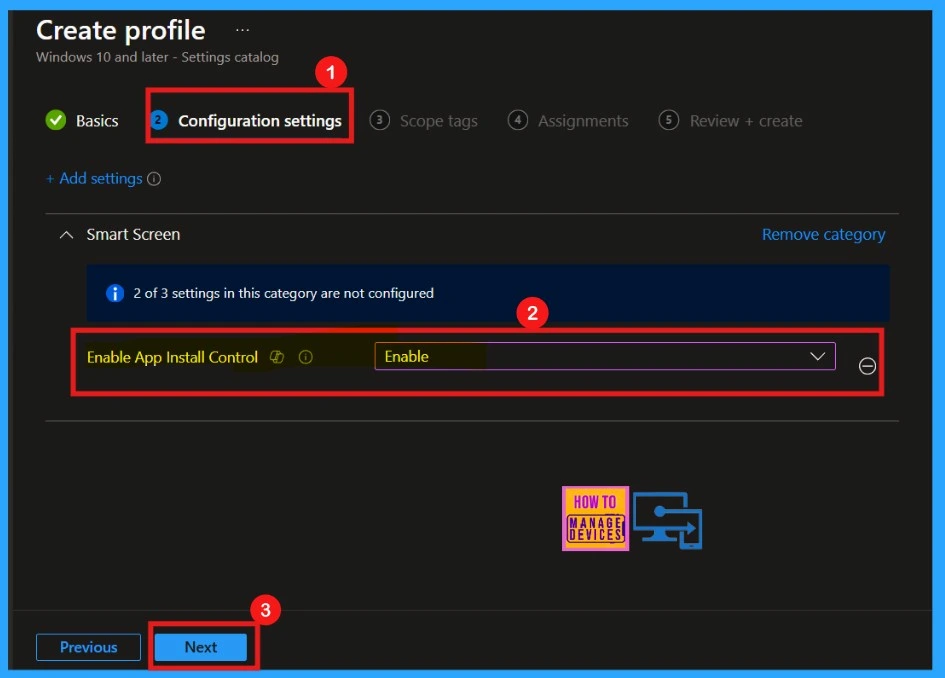
After closing the settings window, the main configuration screen shows up. This screen allows us to change various settings. Here, the Enable App Install Control is disabled by default. Click Next.
Enable App Install Control
As mentioned above, the Enable App Install Policy is disabled by default; we can change it. Here, I change the default disabled app install control policy to enabled by clicking the dropdown arrow.
- Click Next to proceed.
Scope Tags
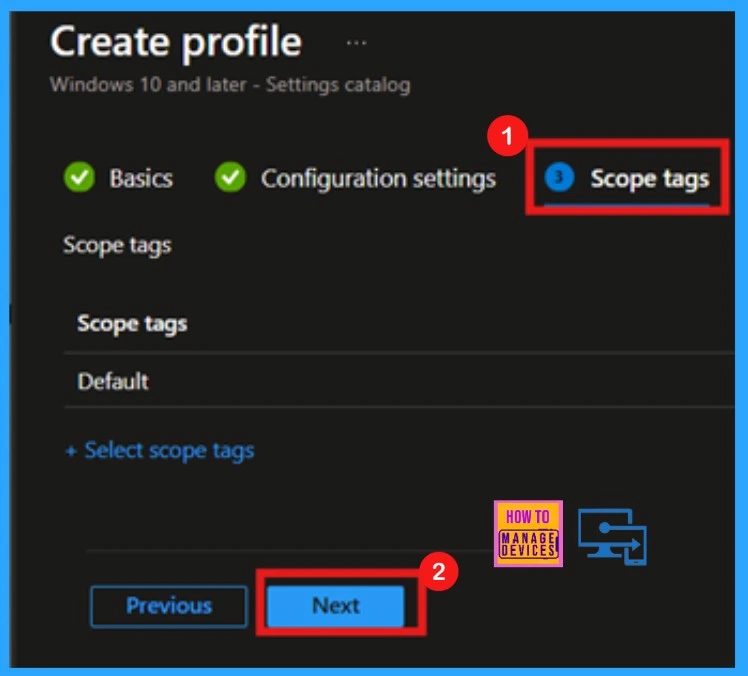
The Scope Tag section is the next step in configuring a policy in Intune. Intune scope tags help organize and control access to resources like profiles and policies, enabling management by criteria such as department or location. Adding scope tags is optional; you can skip it and click Next to continue.
Assignment
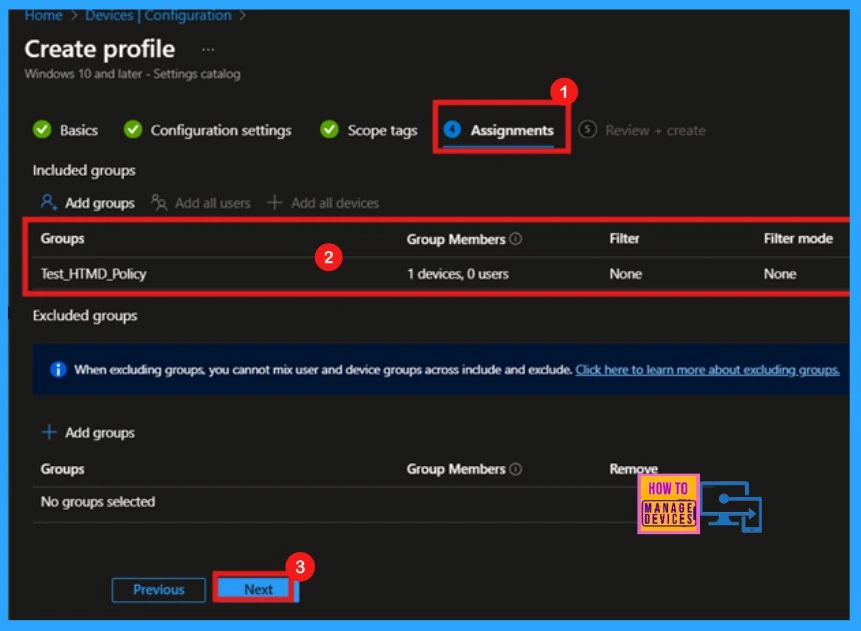
Next, we move to the Assignments section. Here, we can add groups to the Enable App Install Control Policy. To do this, click on the Add Group option under the Include Groups section. A new window will appear, allowing you to select a group.
- After making your selection, click the Select button.
- Then click on the Next button to proceed.
Review + Create
Once the policy is assigned to the appropriate device group, we will enter the Review + Create page. Here, we can review all the settings and configurations before finalizing the policy. If any adjustments are needed, click Previous to edit the settings. After confirming everything is correct, click Create to deploy the policy.
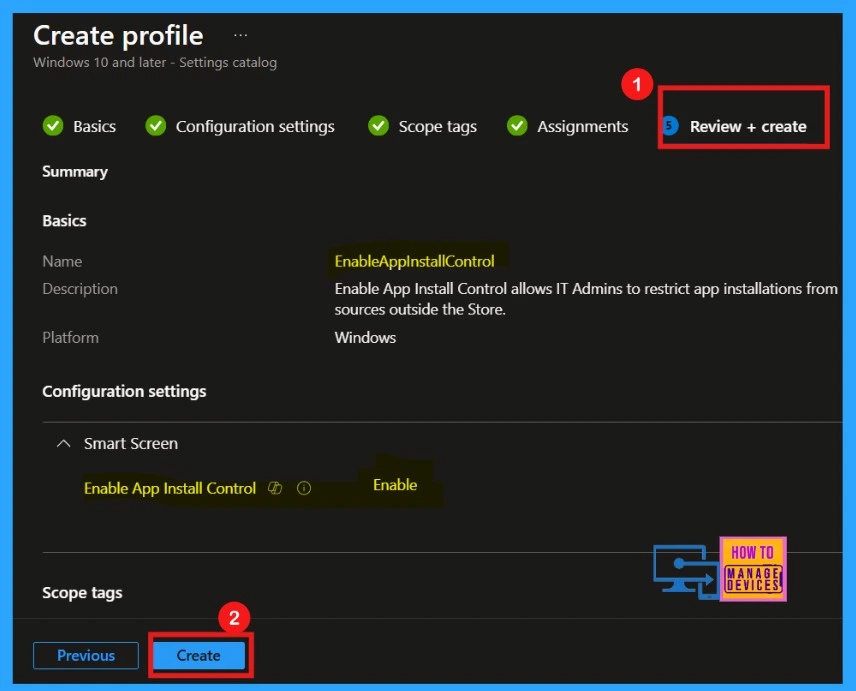
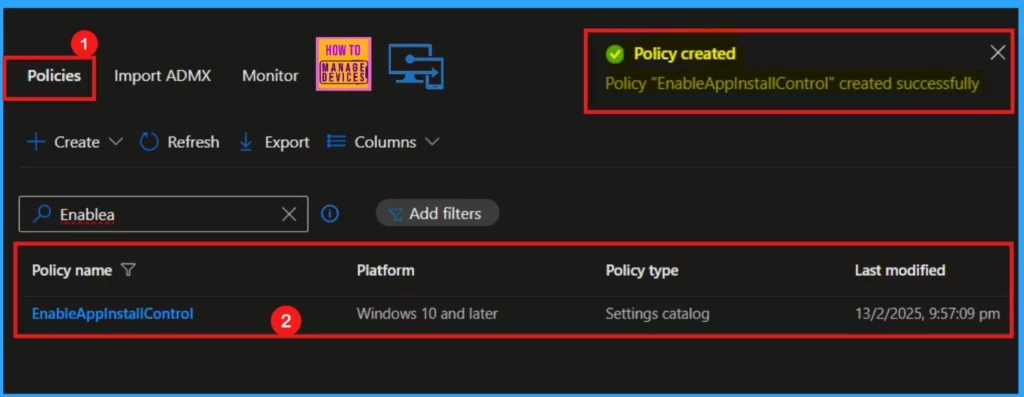
After clicking the Create option, a notification will be displayed saying that the Policy EnableAppInstallControl was created successfully. We can check the created policy in the Intune Portal: Devices > Configuration > Policies.
Device and User Check-in Status
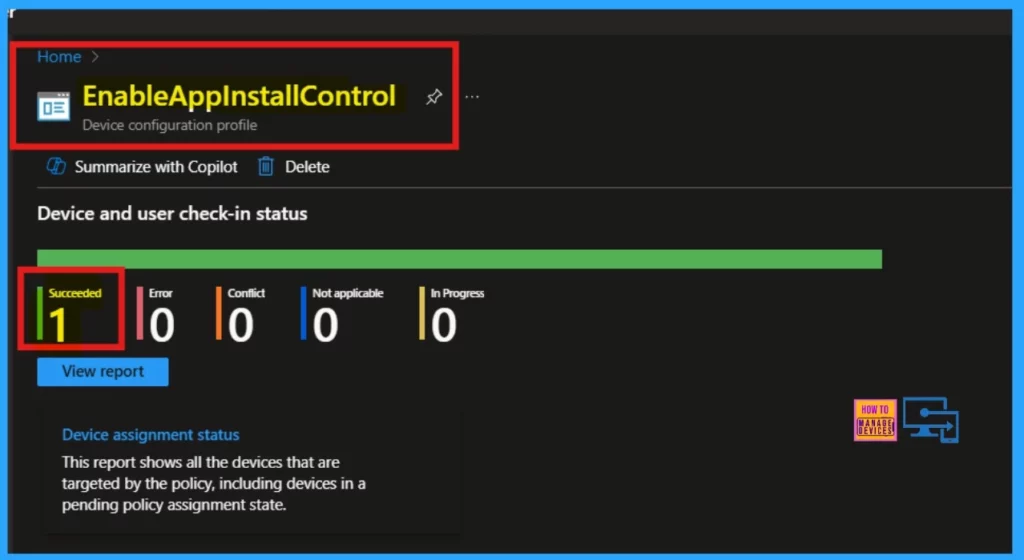
To monitor a created policy, start by opening it from the Configuration section. Before checking, sync your device with the Company Portal to expedite the policy application. Once synced, the results of the policy application will be visible on the Device configuration profile page.
- Navigate to Devices > Windows > Configuration and search for the created policy by name.
- The deployment status of the policy will be displayed under Device and user check-in status.
Client Side Verification
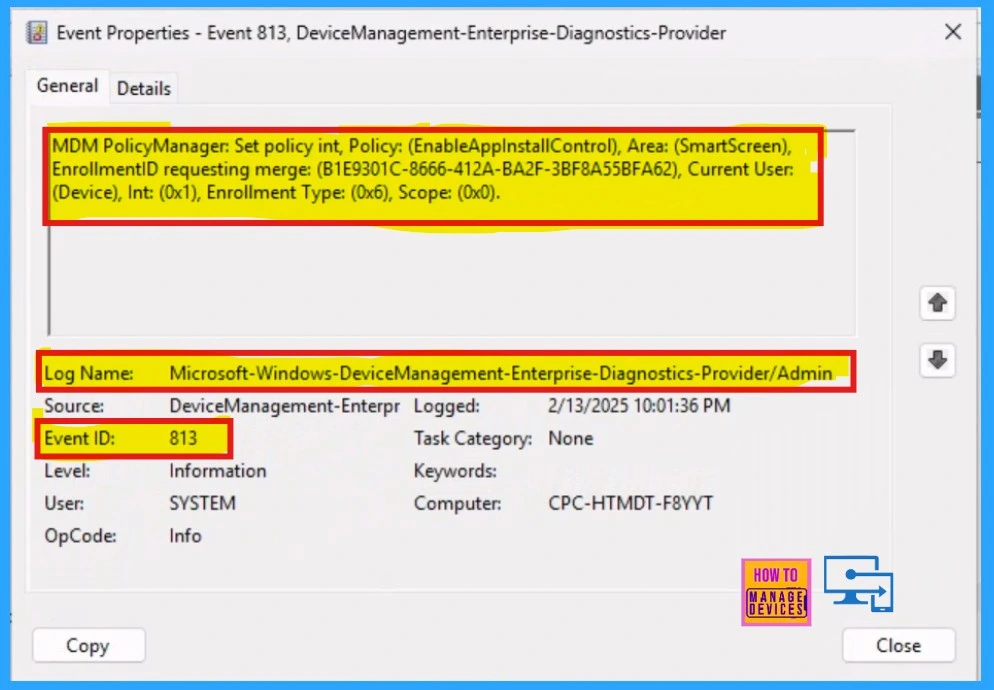
Intune event ID 813 confirms that a string policy has been successfully applied to Windows 10 or 11 devices, and it also shows the specific value of that policy. To verify this on the client side, use Event Viewer and navigate to Applications and Services Logs > Microsoft > Windows > Devicemanagement-Enterprise-Diagnostics-Provider > Admin.
Need Further Assistance or Have Technical Questions?
Join the LinkedIn Page and Telegram group to get the latest step-by-step guides and news updates. Join our Meetup Page to participate in User group meetings. Also, Join the WhatsApp Community to get the latest news on Microsoft Technologies. We are there on Reddit as well.
Author
Anoop C Nair has been Microsoft MVP for 10 consecutive years from 2015 onwards. He is a Workplace Solution Architect with more than 22+ years of experience in Workplace technologies. He is a Blogger, Speaker, and Local User Group Community leader. His primary focus is on Device Management technologies like SCCM and Intune. He writes about technologies like Intune, SCCM, Windows, Cloud PC, Windows, Entra, Microsoft Security, Career, etc.
