Let’s discuss enable disable Application Locale Value (ApplicationLocaleValue) in Microsoft Edge using the Microsoft 365 Admin Center Policy. In computing, a locale is a set of rules that tell a computer how to display and handle information based on the user’s location and language preferences.
Normally, a locale identifier consists of at least a language code and a country/region code. It covers various settings, including Language, Country, Region, script, Currency, Date and time formats. Locale is an important aspect of i18n.
I18n is a short form for internationalization, which means designing products adaptable to different languages, cultures, and regions. It’s frequently used in software development but can also apply to other products like websites and apps.
We can set it through Group Policy, Registry Editor, and the Microsoft 365 Admin Center Policy to prevent users from changing the application locale in Microsoft Edge. In this blog post, I will explain how to configure the Application Locale Value (ApplicationLocaleValue) in Microsoft Edge using the Microsoft 365 Admin Center Policy.
Table of Contents
What are the Windows Registry Settings of ApplicationLocaleValue?
The Windows Registry database stores settings and configuration information for the Windows operating system. Below are the registry setting details of the ApplicationLocaleValue.
Value Name : ApplicationLocaleValue
Mandatory Path : SOFTWARE\Policies\Microsoft\Edge
Recommended Path : SOFTWARE\Policies\Microsoft\Edge\Recommended
Value Type : REG_SZ
Application Locale Value in Microsoft Edge
Microsoft Edge uses the specified locale if we enable this policy (ApplicationLocaleValue). If the configured locale isn’t supported, ‘en-US’ (English as used in the United States) is used instead. If we disable or don’t configure this setting, Microsoft Edge uses either the user-specified preferred locale (if configured) or the fallback locale ‘en-US’. To configure the Application Locale Value in Microsoft Edge, follow the steps below.
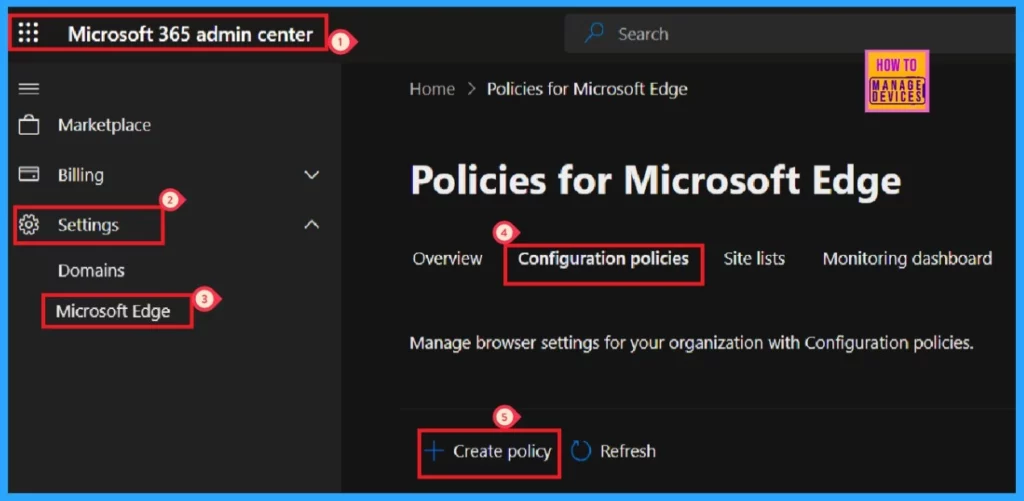
- Login to Microsoft 365 Admin Center > Settings >Microsoft Edge > Configuration Policies
- Click on + Create Policy
- Top 83 Windows 11 Desktop Admin Interview Questions
- Set Default Display Language for Windows 365 Using Provisioning Policy | Cloud PC
- Enhancing Security with Administrator Protection in Windows 11 using Intune
Basics
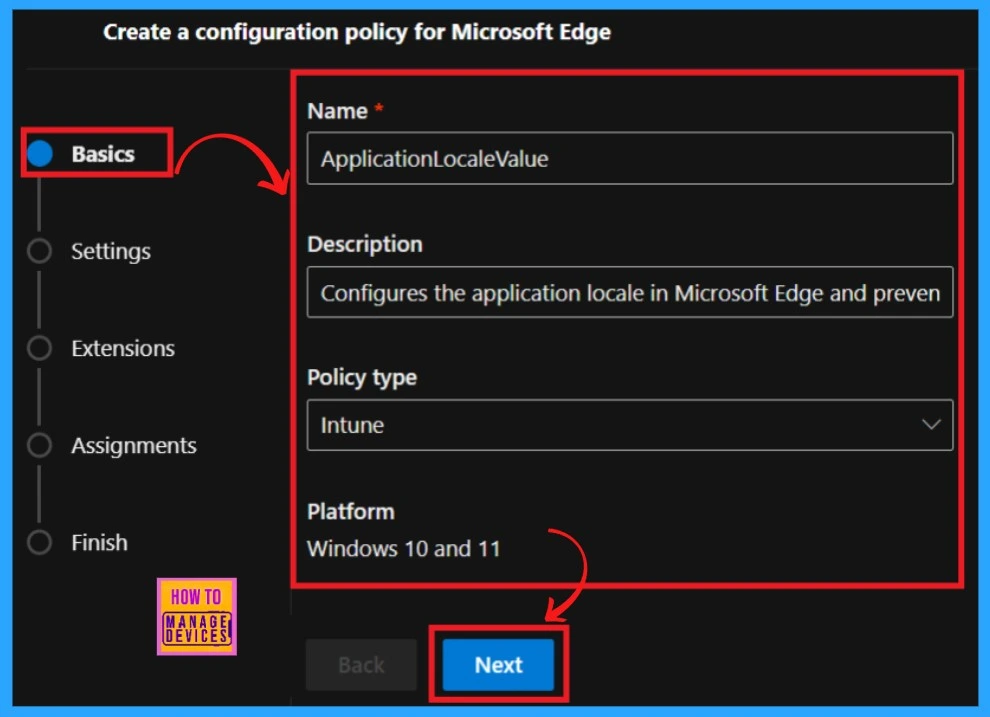
After clicking on the + Create policy, we will enter a new window with different tabs, such as Basics, Settings, Extensions, Assignments, and Finish, to create a Configuration policy.
In the Basics, we should Add the policy’s Name, Description, Type, and Platform. This will help later identify the Policy. Please refer to the screenshot below for the basic details of the ApplicationLocaleValue policy.
- Click Next
Settings
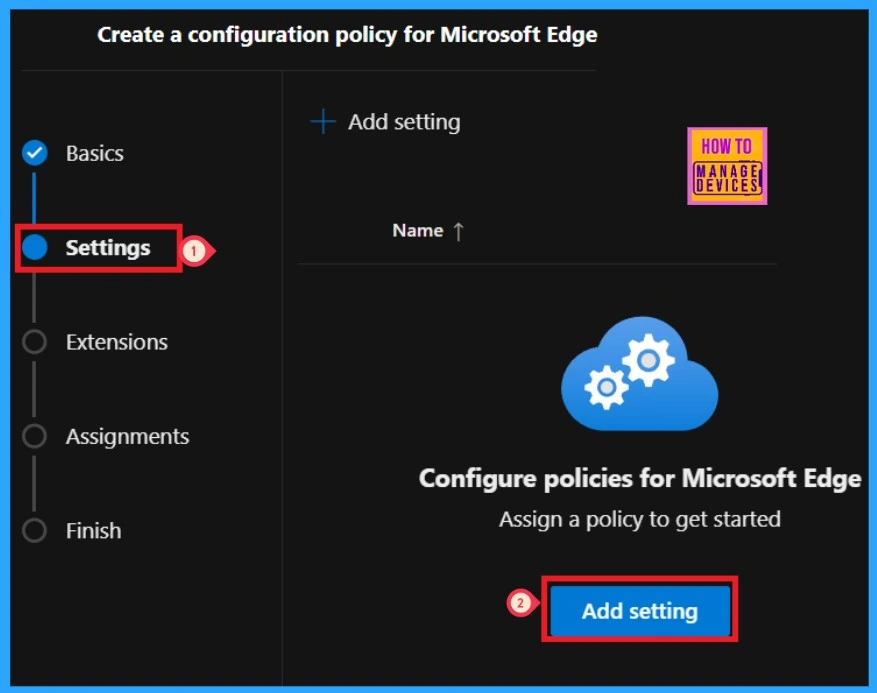
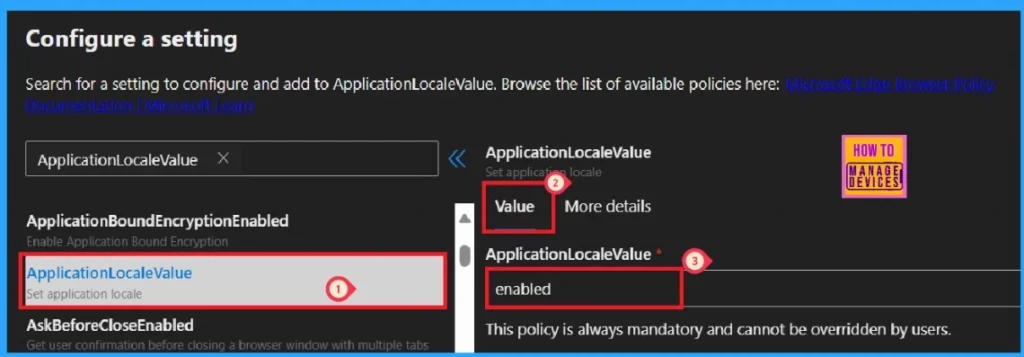
In Settings, the most important section, we can assign a configuration policy for Microsoft Edge. This window shows + Add Settings, which navigates us to the Configure a setting page. Here, we can search for the policy name under Additional settings.
- + Add Settings > Configure a setting page > Search the policy name under Additional settings.
Value and More Details
The left pane of the Setting window shows the Value and More Details options. We should add the mandatory value. The table and screenshot below give more details.
| Value | More Details |
|---|---|
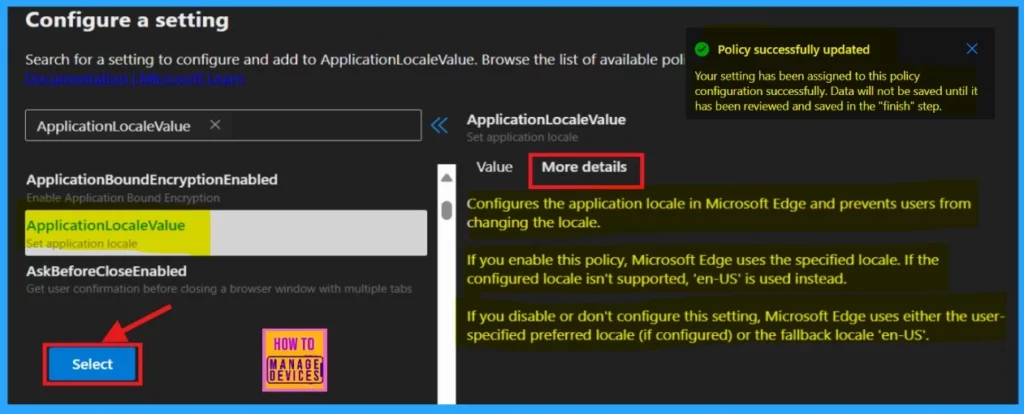
| Enabled | If you enable this policy, Microsoft Edge uses the specified locale. If the configured locale isn’t supported, ‘en-US’ is used instead. If you disable or don’t configure this setting, Microsoft Edge uses either the user-specified preferred locale (if configured) or the fallback locale ‘en-US’. |
After studying the More details, click the Select button. The portal will notify you that the Policy has been successfully updated. However, data will not be saved until received and saved in the Finish step.
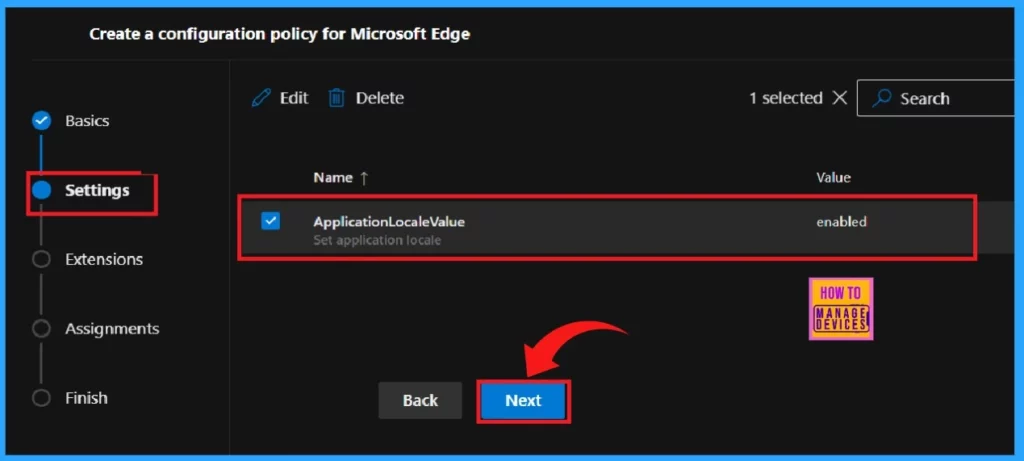
After clicking the select button, you can see the selected policy name and value in a new window. Here, you must click on the checkbox near the Policy name and click on the Next button.
Extensions
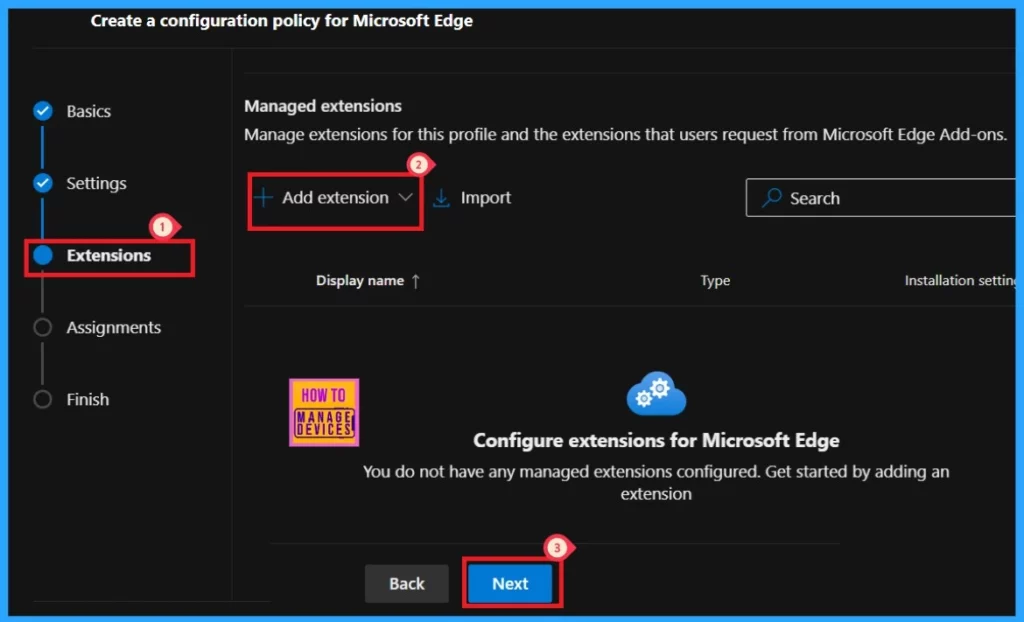
We are now on the third step, Extensions. Here, you can see the policy’s extensions, such as Permissions, URLs, and installation settings.
- Click the + Add extension button to add an extension.
- You can skip this section if you do not plan to add extensions.
Assignments
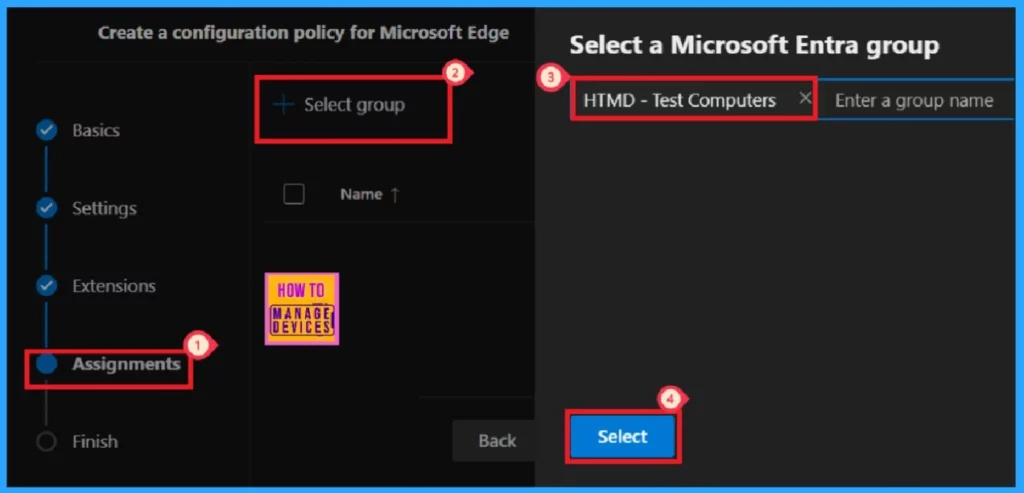
The assignments section lets us choose which user groups will be assigned the policy. If we select a group, the policy will apply only to that group. It helps to control who has access to specific features or settings. After clicking the select group option, we can select the group from the Microsoft Entra group provided by default.
- After selecting the group, click on the Select button for further procedure.
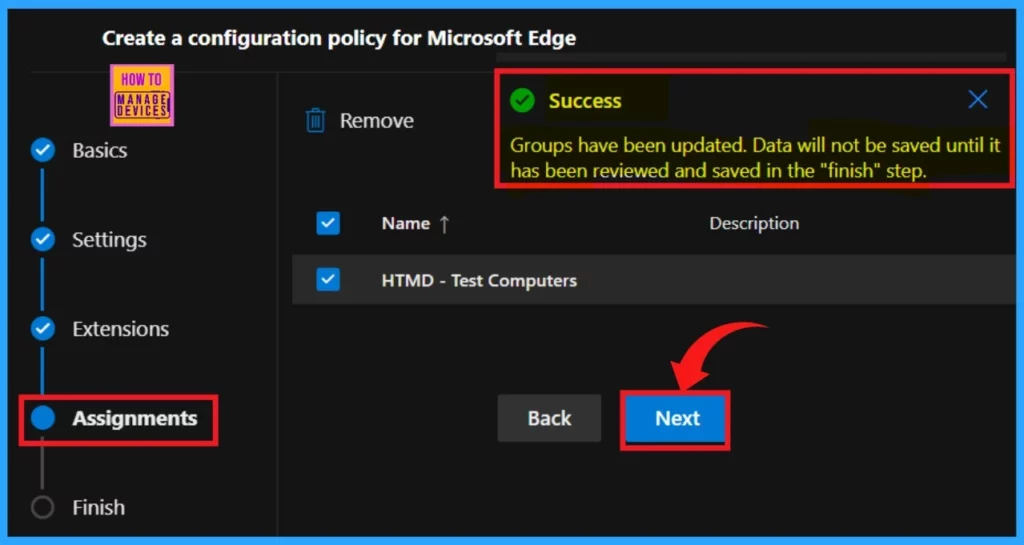
After clicking the Select button, we will be notified that the Group has been updated. Here, the group HTMD—Test Computers is assigned for this policy.
- Tap to Next
Finish
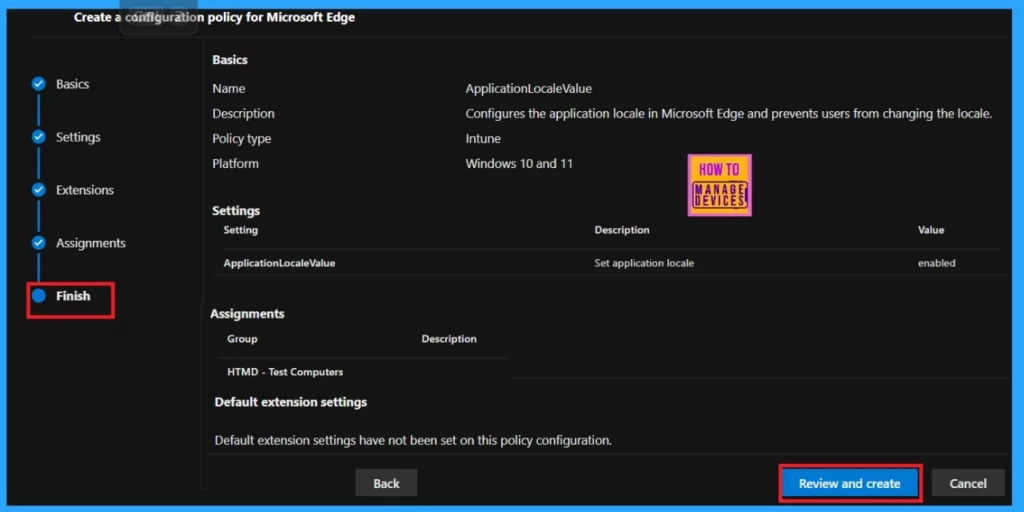
The Finish is the concluding step to creating a policy. In this section, you can review all the information you entered in the previous steps. If you need to make any changes, click the Back button to return to the last window. Once you have validated that all details are correct, click Review and Create to proceed.
Monitoring Status
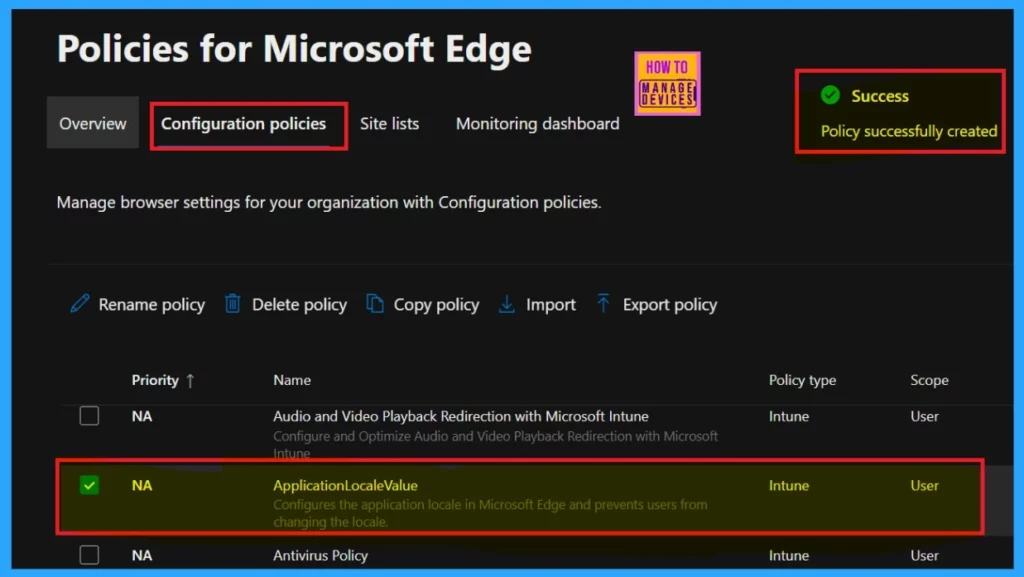
After clicking the Review and Create button, the system will notify you that the policy has been successfully created. This confirmation signals that the policy is ready to be deployed to the assigned groups. Yet, deploying it to the assigned group should wait some time. Alternatively, you can manually sync the policy through the company portal.
- For manually syncing, go to the company portal> Settings> Sync.
Client-Side Verification through Event Viewer
Event Viewer is a Windows tool that reveals information about important events on your computer, such as programs that don’t start as expected or downloaded updates. It helps troubleshoot Windows and application errors. The Event Viewer uses event IDs to define the uniquely identifiable events that a Windows computer can encounter.
Event IDs 813 and 814 indicate the successful application of string or integer policies. To verify this, navigate to the Event log path: Applications and Services Logs > Microsoft > Windows > Devicemanagement-Enterprise-Diagnostics-Provider > Admin.
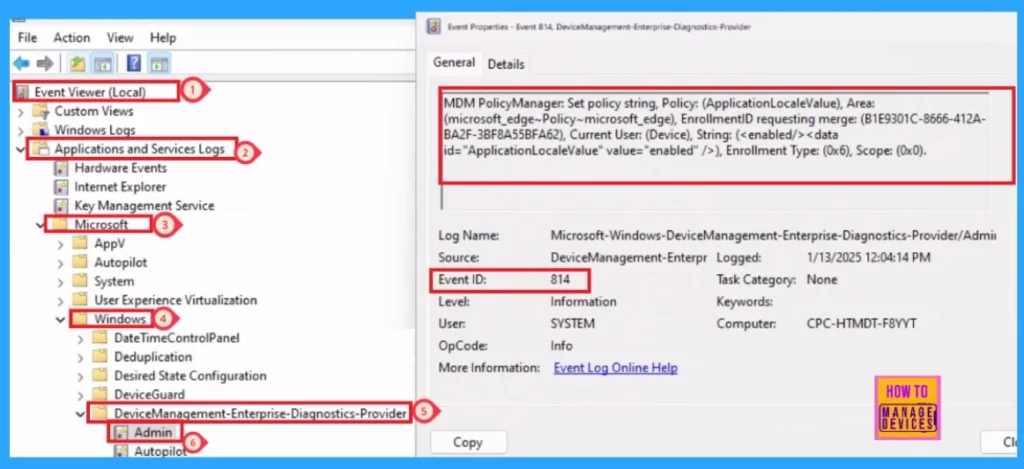
MDM PolicyManager: Set policy string, Policy: (ApplicationLocaleValue), Area: (microsoft_edge~Policy~microsoft_edge), EnrollmentID requesting merge: (B1E9301C-8666-412A-BA2F-3BF8A55BFA62), Current User: (Device), String: (), Enrollment Type: (0x6), Scope: (0x0).
End User Experience – How to Change the Locale in Microsoft Edge?
To see the end-user result, open Microsoft Edge. Then click Settings and More (… dots) in the right upper pane.
- Select Languages from the Settings list.
- To add a language to the list of Preferred languages, select Add languages.
- Once the language is added, select next to the language, and then choose Display Microsoft Edge in this language.

Need Further Assistance or Have Technical Questions?
Join the LinkedIn Page and Telegram group to get the latest step-by-step guides and news updates. Join our Meetup Page to participate in User group meetings. Also, Join the WhatsApp Community to get the latest news on Microsoft Technologies. We are there on Reddit as well.
Author
Anoop C Nair has been Microsoft MVP for 10 consecutive years from 2015 onwards. He is a Workplace Solution Architect with more than 22+ years of experience in Workplace technologies. He is a Blogger, Speaker, and Local User Group Community leader. His primary focus is on Device Management technologies like SCCM and Intune. He writes about technologies like Intune, SCCM, Windows, Cloud PC, Windows, Entra, Microsoft Security, Career, etc.
