Let’s learn the best way to use Bitwarden Password Manager. We are managing more and more of our real-world lives online, which means you all have too many passwords to remember. Are you tired of hitting that forgot password button? Or Are you looking for the safest password manager?
Bitwarden is a Password manager worth using, and it includes strong encryption, two-factor authentication (2FA), password security auditing, password breach monitoring, and cloud or local hosting options. You can easily access Bitwarden by entering a master password.
The feature of Bitwarden includes unlimited storage of logins, Cards, Identities, and Notes. Bitwarden provides an encrypted vault to store all your passwords. The platform of Bitwarden consists of a web interface, desktop applications, browser extensions, mobile apps, and a command-line interface.
Bitwarden is the best option to protect all your Passwords and quickly fix any security issues. Bitwarden is a free/freemium open-source password management solution for individuals, teams, and business organizations. It is one of the safest password managers and takes user security and privacy seriously.
- Bitwarden Deployment Using SCCM | Deploy EXE File
- Deploy New Microsoft Edge Chromium Browser Using Intune
What are the Advantages and Features of Bitwarden Password Manager?
Bitwarden is the password manager; it can easily generate, store, and secure unique usernames and passwords. The following are the advantages and features of the bitwarden password manager.
1. Secure and protect your online data
2. Allow all users to transmit data directly to others
3. Including unlimited storage of Logins
4. User-friendly and feature-packed password managers
5. Maintains secure, end-to-end encryption with zero knowledge
6. Allows you to share specific passwords with your team members
How to Create a Bitwarden Account Using a Master Password
You can easily create a Bitwarden Account by clicking the link https://bitwarden.com/download/. You can download Bitwarden on Desktop, Web Browser, Mobile, Command line, and Web.
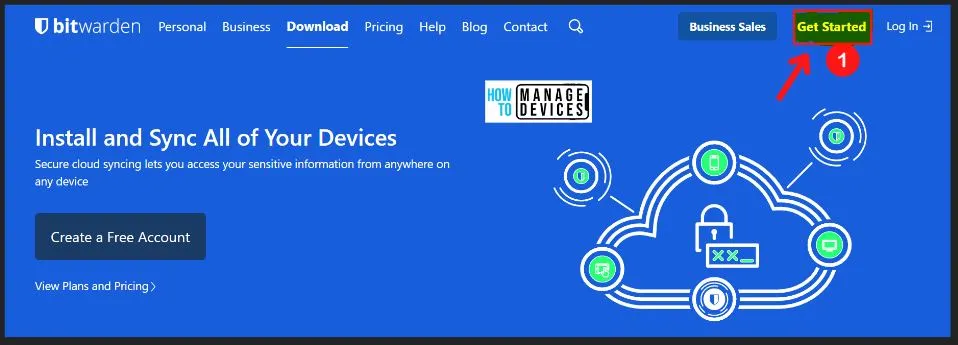
Before downloading Bitwarden, We have to create an Account; for creating a Bitwarden account, click the “Get Started” option from the Bitwarden window. The below steps and screenshot shows how to create an account in Bitwarden.
- Click the link to create a Bitwarden account https://bitwarden.com/download/
- Select Get Started option from the below screenshot
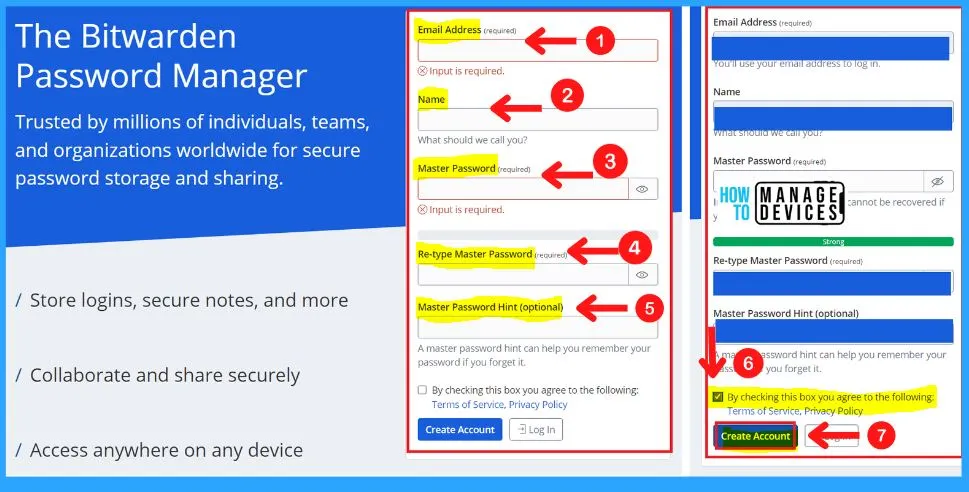
After selecting the “Get Started” option, the below screen will appear and ask for the information required to create the Bitwarden account. The following information is needed to create a Bitwarden account.
| Information | Used to |
|---|---|
| Email Address | Enter the Email Address to create Bitwarden Account |
| Name | Enter your Name in the name section |
| Master Password | Enter your strong Master Password |
| Re-type Master Password | Re-type your Master Password |
| Master Password Hint (Optional) | Give a hint for the Master Password; It helps you to remember your Password; if you forget it |
After entering all the above details, Check the below square box to agree to the following Terms of services, privacy policy, etc., and click the Create Account option to create a Bitwarden Account.
Note! – If you forget your Password, It is impossible to recover; your account will be lost forever, and all the data and passwords you have saved will be lost forever.
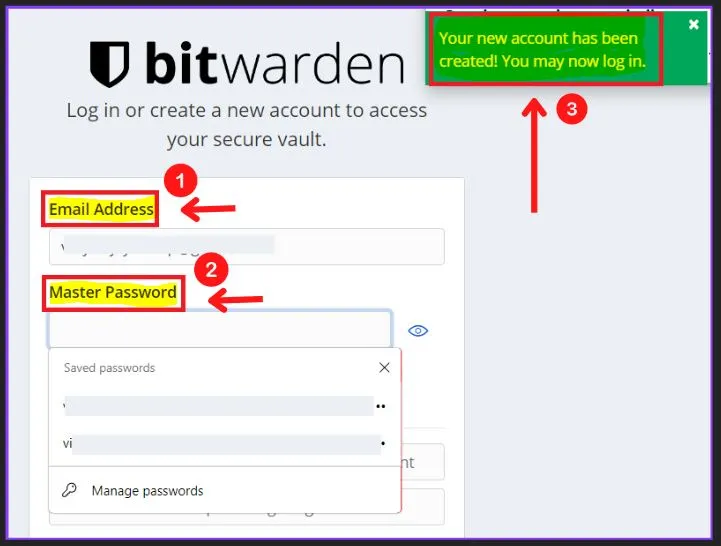
After clicking the Create Account option, you can get the message, “Your new account has been created! You may now log in”. To officially started Bitwarden, you should re-type your Email Address and Master Password.
Be very careful about the master password, and don’t forget it. If you forget the master password, your account will be lost forever.
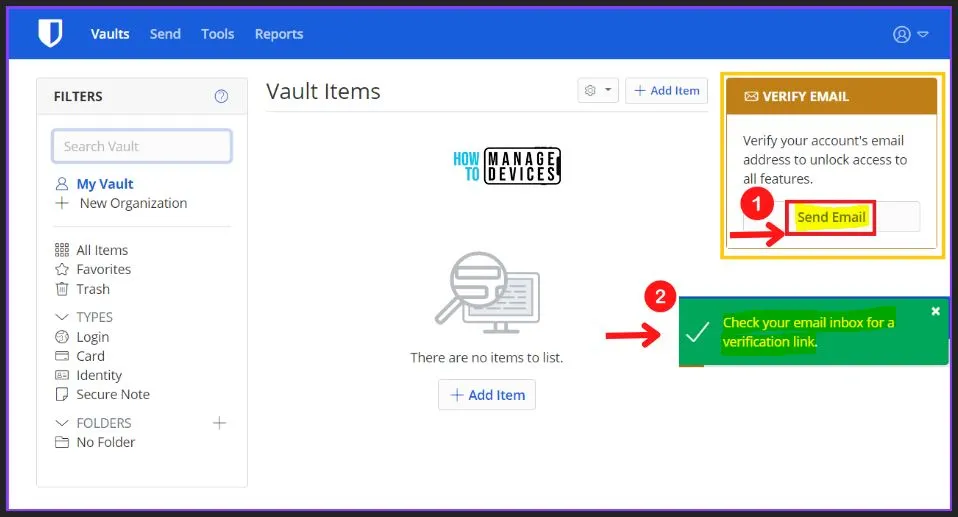
In the below Bitwarden window, first, you should verify your account’s email address to unlock access to all features.
- Click the Send Email option from the below Bitwarden window
- Check your email inbox for a verification link
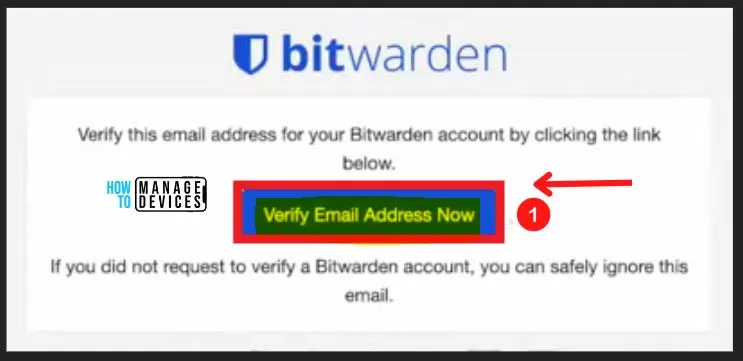
After entering the “Send Email” option, Click the “Verify Email Address Now” option to verify this email address for your Bitwarden account. You can safely ignore this email section if you did not confirm a Bitwarden account.
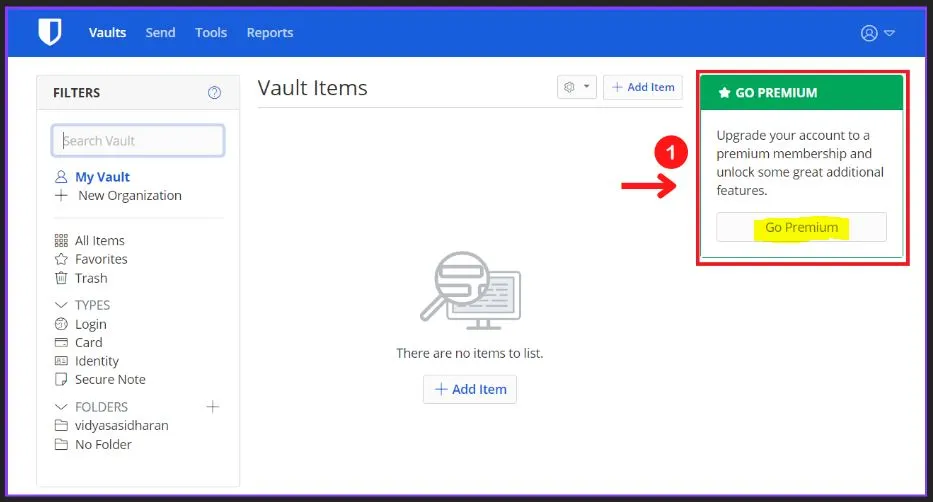
If you need to upgrade yBrowserount to a premium membership and also need to unlock some greater additional featBrowserelect the “Go Premium” option from the below screenshot.
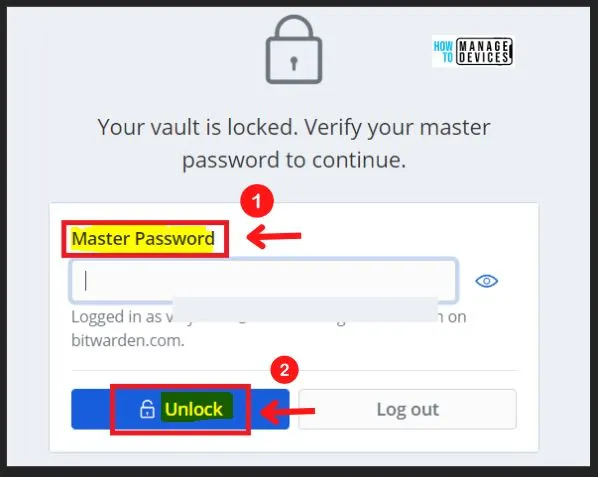
If your Bitwarden account vault is locked, enter your Master Password to unlock or continue and if you want to Log out from the Bitwarden account, type your MasBrowsersword and click the Log out option.
- Click the Unlock option from the below window
How to Install Bitwarden Browser Extension
As soon as you create a Browserount with Bitwextensione first thing you want to do is download the extension to your browser. Most Web Browsers allow you to install extensions in your browser.
Extensions are small applications that add features and functionality to your browser. The steps and screenshot below show how to add Bitwarden to your Web browser.
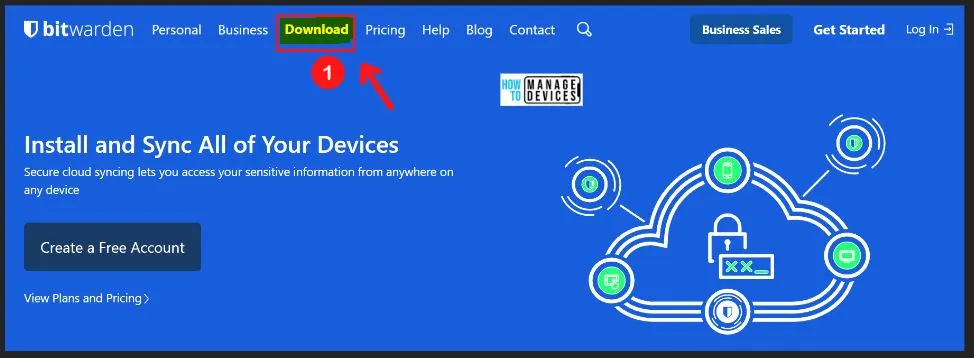
- Click the link to install Bitwarden Browser Extension https://bitwarden.com/download/
- Click the Download option from the below screenshot
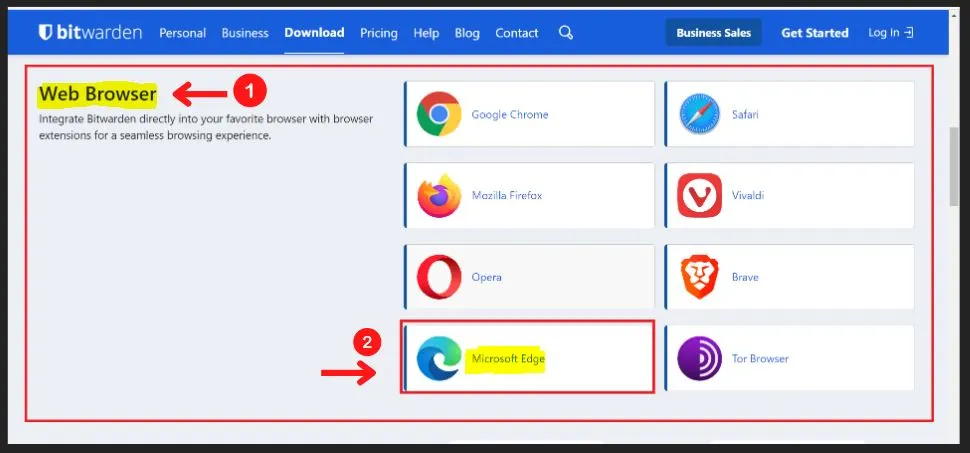
Go to the Web Browser section on the left side of the Bitwarden extension and choose the browser to install the browser extension. Here I selected the Microsoft Edge browser because I am commonly using that one.
- Chooextensibrowser to which you need to add the Bitwarden extension
- Select the Microsoft Edge browser from the set of browser
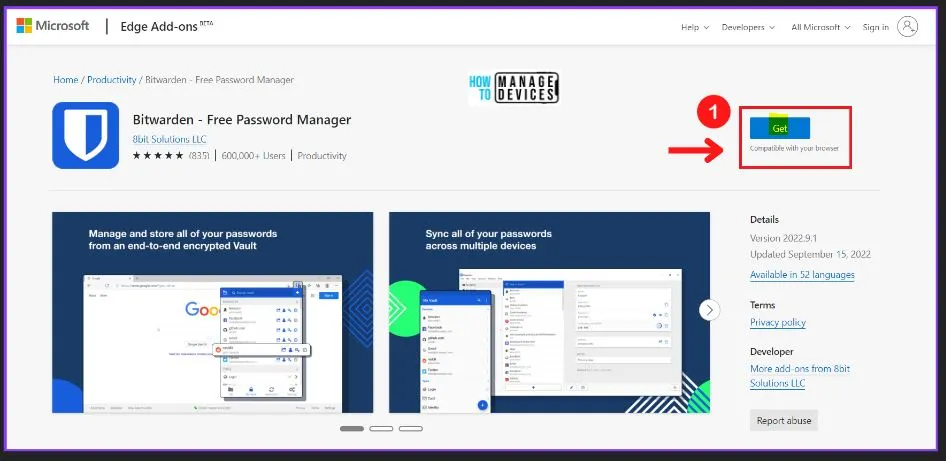
After selecting the Microsoft Edge Extension, Click the Get option to get the Bitwarden extension to your browser.
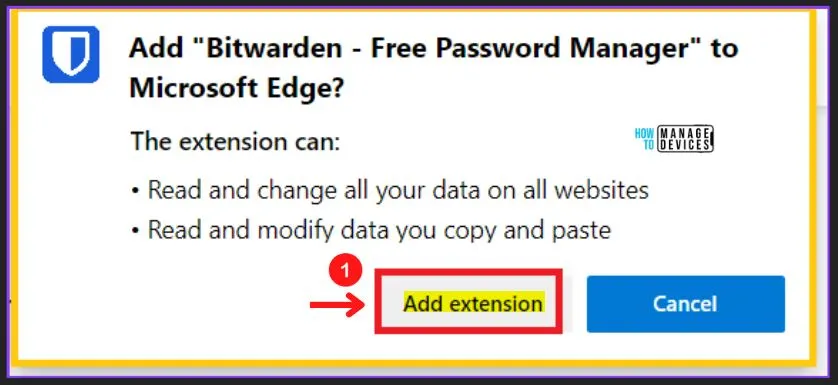
The “Add extension” option to add the Bitwarden extension to your Edge browser. While adding the Bitwarden free extension manager to your Microsoft Edge browser, the extension can do the following.
- Bitwarden can read and change all your data on all websites
- Bitwarden can read and modify data you copy and paste
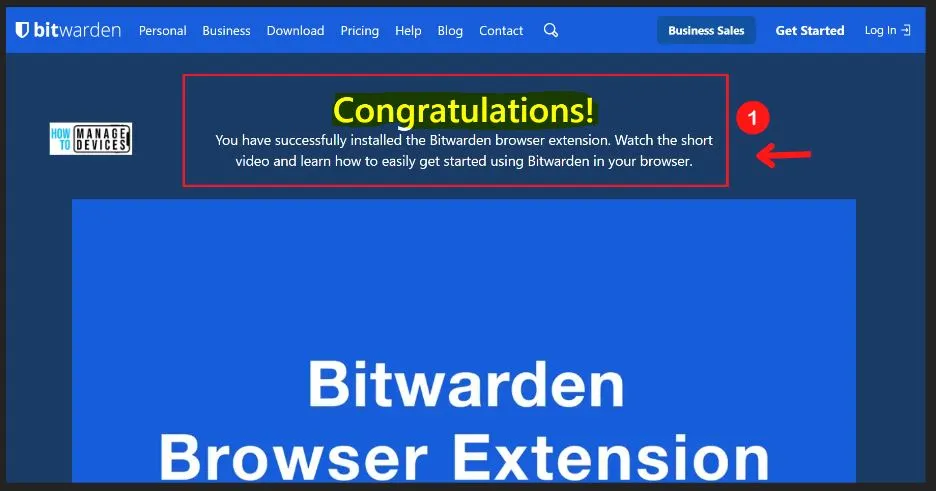
After clicking the Add extension option, you can see in the below screenshot that you have successfully installed the Bitwarden browser extension. It also gives a short video that helps you learn how to start using Bitwarden in your browser easily.
Extensions are small applications that help you to enhance and improve your browser’s functionality. Once you install an extension, you can see the extension icon on the toolbar.
You can easily hide them by clicking on the extensions menu and the extensions. Alternatively, you can right-click the extension’s icon on the extension and choose “Hide from toolbar” to hide that extension from the toolbar.
- Click the extension icon from the toolbar
- You can see all your extensions in your MS Edge browser
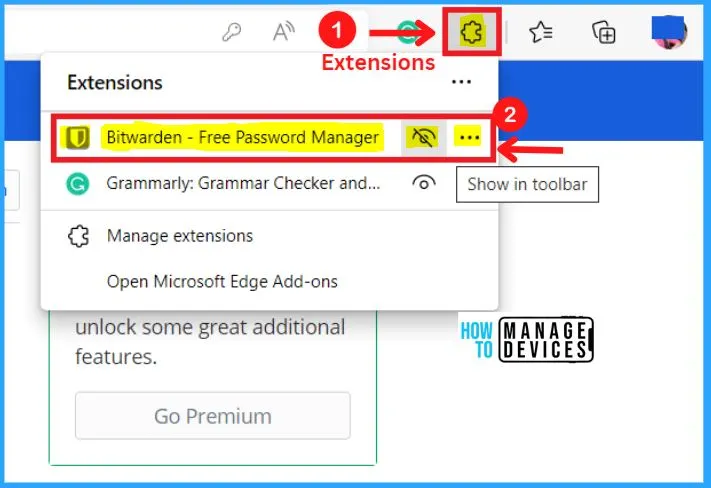
If you cannot see your Bitwarden extension on your MS Edge browser, you can do the following steps, and the below screenshot also shows how to add an Extension in your MS Edge browser.
- Click the Extension icon from the toolbar of your MS Edge browser
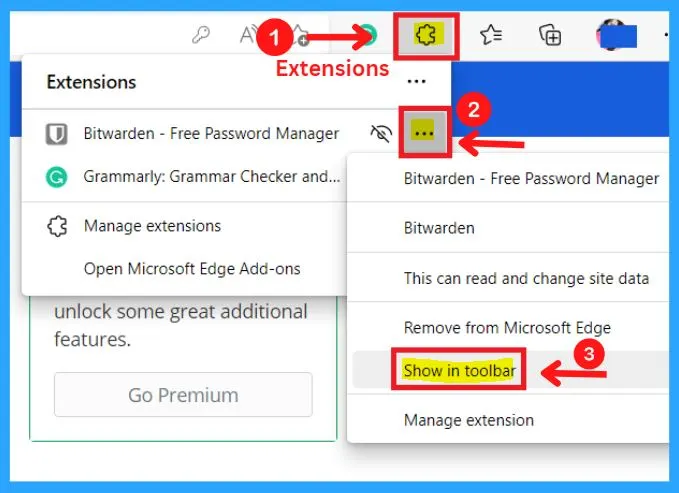
- Click the 3 dots on the right side of Bitwarden’s free password manager
- Select the “Show in toolbar” option from the set of all available options
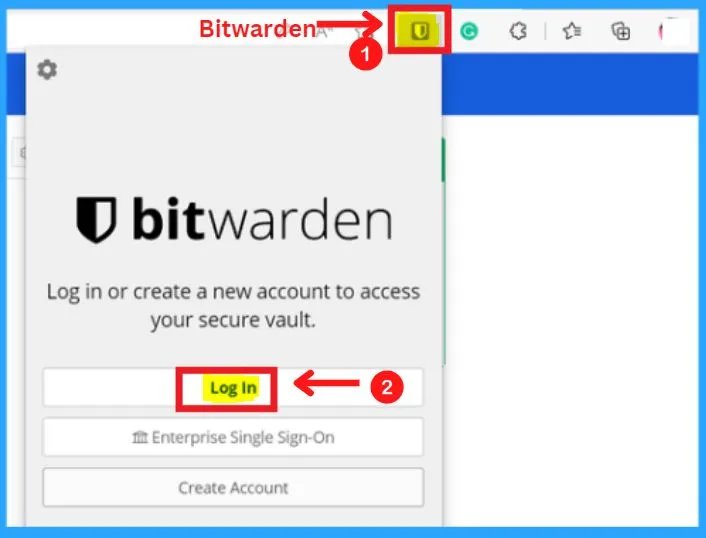
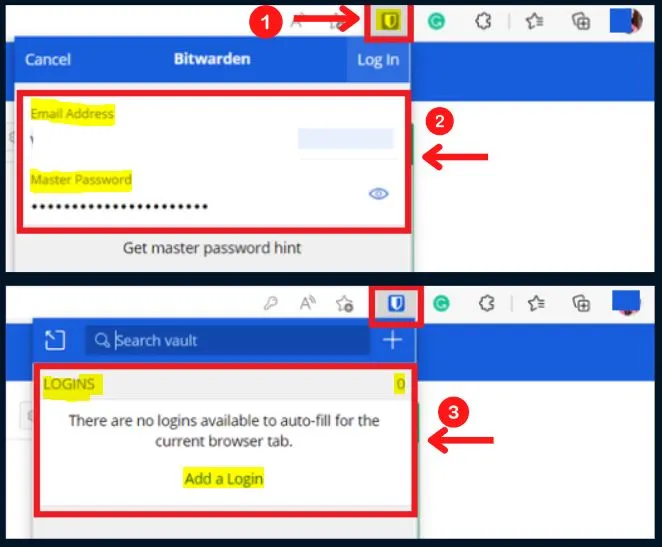
After showing the Bitwarden icon in the toolbar, you should need to log in the Bitwarden to activate the password manager in the Edge browser.
- Click the Bitwarden icon from the toolbar
- Click Log in option
Enter the Email address and Master password to log in to the Bitwarden account in the Edge browser. After entering the Email address and Password, you can see in the 2nd screenshot below that your Bitwarden password manager is activated successfully.
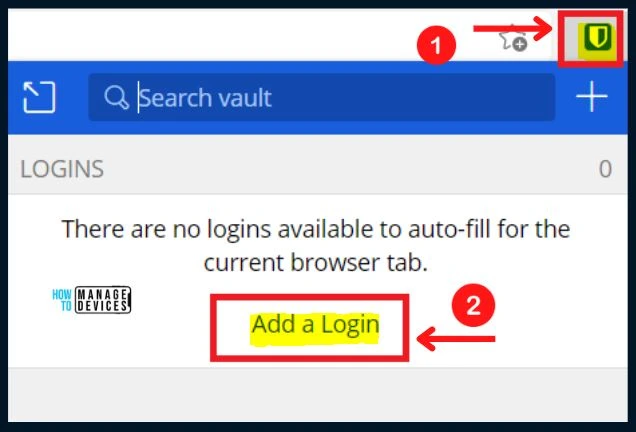
You can easily add logins in the Bitwarden password manager by clicking the “Add a Log-in” option from the below screenshot. You can also see the message: “There are no logins available to auto-fill for the current browser tab.
How to Unlock Bitwarden from MS Edge Browser
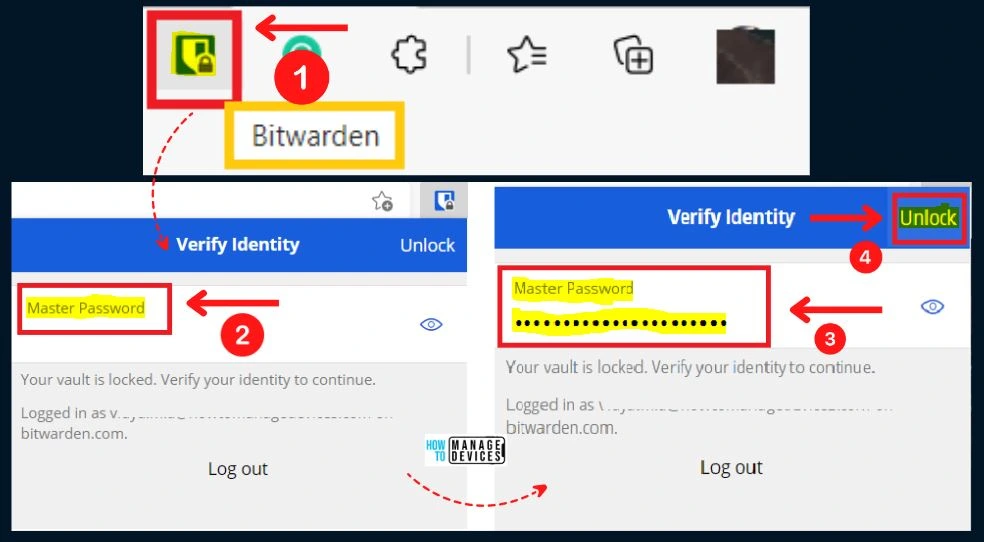
You can easily Unlock the BItwarden password manager from the MS Edge browser. You can see that your Bitwarden icon shown in the Edge toolbar is locked. The below steps and screenshot shows how to unlock the Bitwarden from the MS Edge browser.
- Click the Bitwarden icon from the Edge toolbar
- Enter your Master Password to unlock the Bitwarden from the Edge browser
How to Use Bitwarden in MS Edge Browser
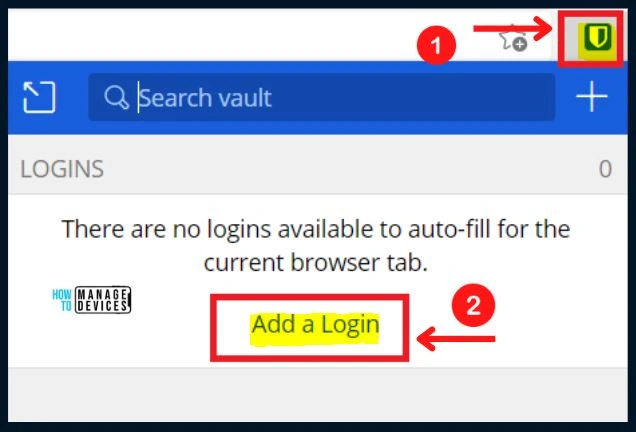
It is easy to add a Login, Card, Identity, and secure Note in the Bitwarden password manager. Follow the below steps and screenshot to add Login, card, identity, and secure note in the Bitwarden password manager.
- Click the Bitwarden from the Edge toolbar
- Click the “Add a Log-in” option from the Bitwarden window
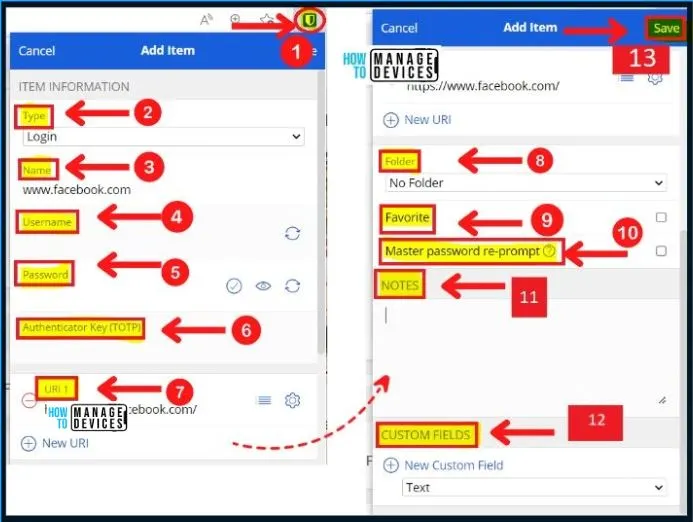
While adding an item in Bitwarden password manager in Edge browser, you should give the following information or data related to that item.
- Type of the Item such as Login, Card, Identity, and secure Note
- Name of the item
- Username
- Password
- Authenticator key
- URLs
- Folder
- Favorite
- Master password re-prompt
- Notes
- Custom fields
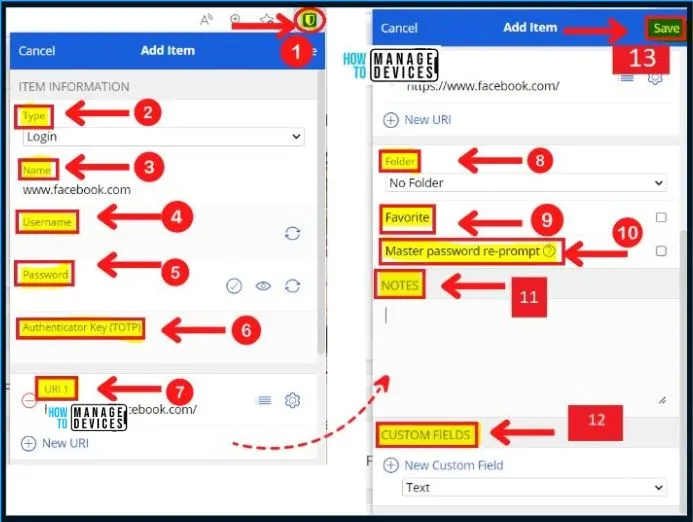
The Type option dropdown arrow shows the options such as Login, card, identity, and secure notes. Please enter the Name of the item in the name section (see the below screenshot) example www.facebook.com, or it will automatically populate the Name, which is the domain name.
Generate a Username by clicking the generate username icon on the right side of the username section. For a username, you have to enter your Email address.

How to Generate Password in Bitwarden
The Password section in Bitwarden shows the options such as “Check if the Password has been exposed,” Toggle visible and Generate Password.
- Check if the Password has been exposed – It helps to check if the Password has been compromised or exposed by data breaches or if it is safe to use
- Toggle visible – Helps you to reveal the Password
- Generate Password – Helps to generate a new password
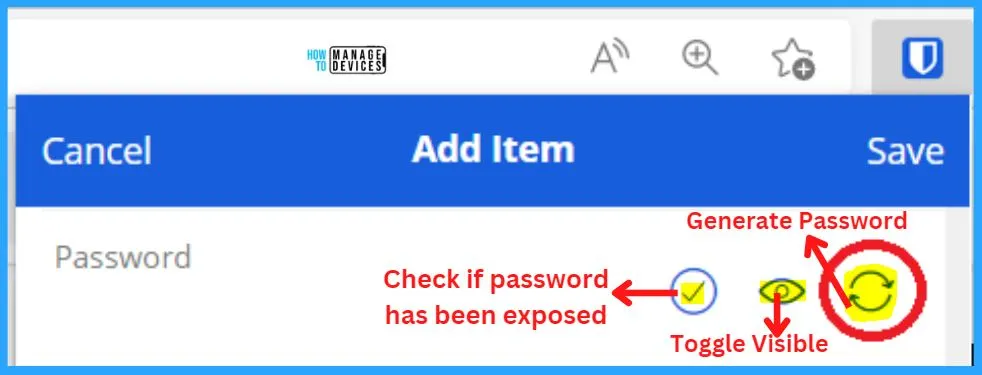
Generate Password
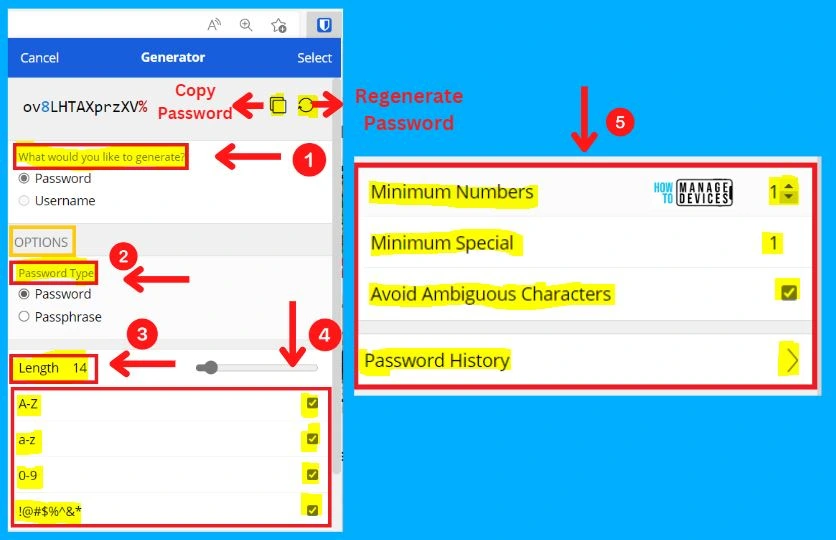
Click the Generate Password section shows the below options. All these password generator settings help you to create a password with super security. The generated Password is shown on the top of the Password generator window.
First, it would ask you what you would like to generate a password or a username. The Options head in the password generator window shows the following options.
- Password Type (Includes Password and passphrase)
- Password – Has at least 8 characters, including capital and lowercase letters
- Passphrase – Has at least 16 characters, including capital or number
- Length – The default Length of the Password is 14 digits. The maximum number of digits is 128; you can go anywhere between 14,16 and 18.
- A-Z – Helps to add Capital letters
- (a-z) – Helps to add Lower case letters
- 0-9 – Helps to add Numbers
- !@#$%^&* – Helps to add Special symbols
- Minimum Number – Helps you to add the minimum number
- Minimum special– Helps you to add the minimum special symbols
- Avoid Ambiguous character – Helps you to avoid ambiguous character
- Password history – Helps you to show the password history
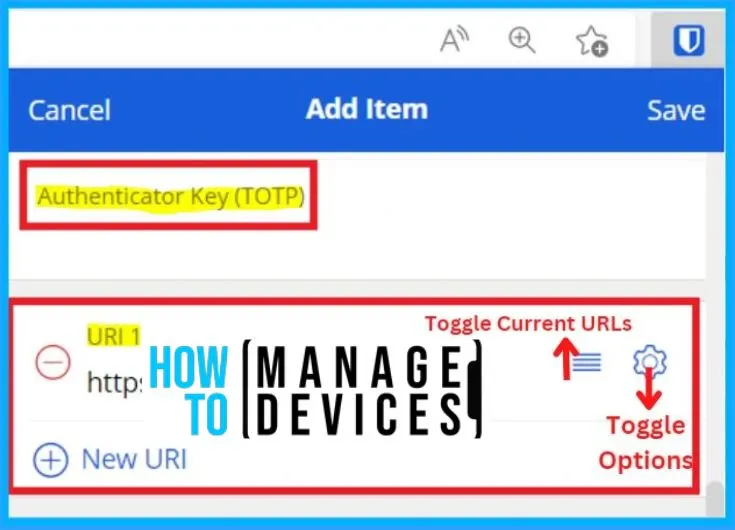
You can also set the Authentication key password; the below screenshot shows the Authentication option and the URLs of the item. You have the opportunity to add New URLs in the URL section.
How to Create Folders in Bitwarden
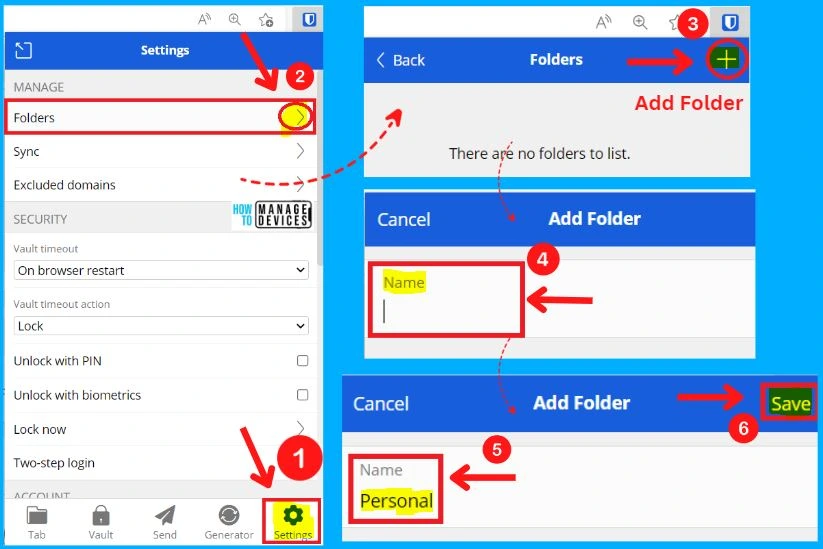
Folders in Bitwarden help you to keep your files organized and separate. If there is no folder, all the data and information are located in the same place, so it isn’t easy to find the data. The following are the steps to create a folder in Bitwarden.
- Click Settings from the Bitwarden window
- Click the Folder right arrow from the below screenshot
- Click the Plus (+) symbol to AdBrowserr
- Type a Name (personal) to the Folder
- Click the Save button to create the Folder
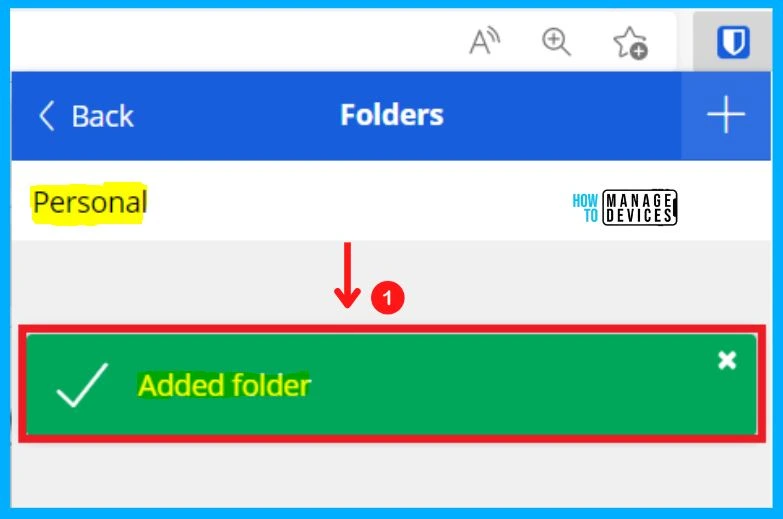
The below screenshot shows that the Personal Folder in Bitwarden has been added successfully. You have the option to create more than one Folder by clicking the Plus (+) symbol from the below screenshot.
How to Add Facebook Login in Bitwarden
The Bitwarden password manager helps you to add all types of Log in using usernames and passwords in different folders. Here I show one example of how to add the Facebook login in Bitwarden. The following are the steps to add a Facebook login in Bitwarden.
- Click the Bitwarden from the Edge toolbar
- Click the “Add a Login” option from the Bitwarden window
For adding Facebook in Bitwarden, you need to give information such as the type, Name, username, Password, URL, Folder, favorite, notes, etc. related to Facebook. After adding all these details, Select the Save option to add Facebook to the Bitwarden.
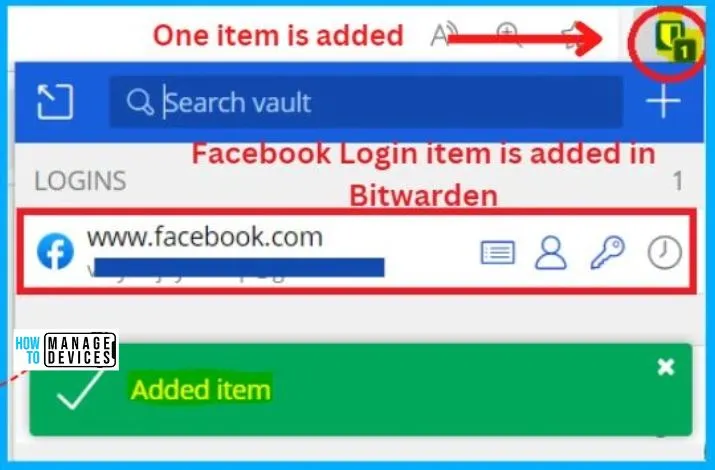
Here the Bitwarden in MS Edge shows that one item is added in the Bitwarden password manager. You can easily add more than one item in the Bitwarden password manager by clicking the Plus (+) symbol at the top right corner of the Bitwarden window.
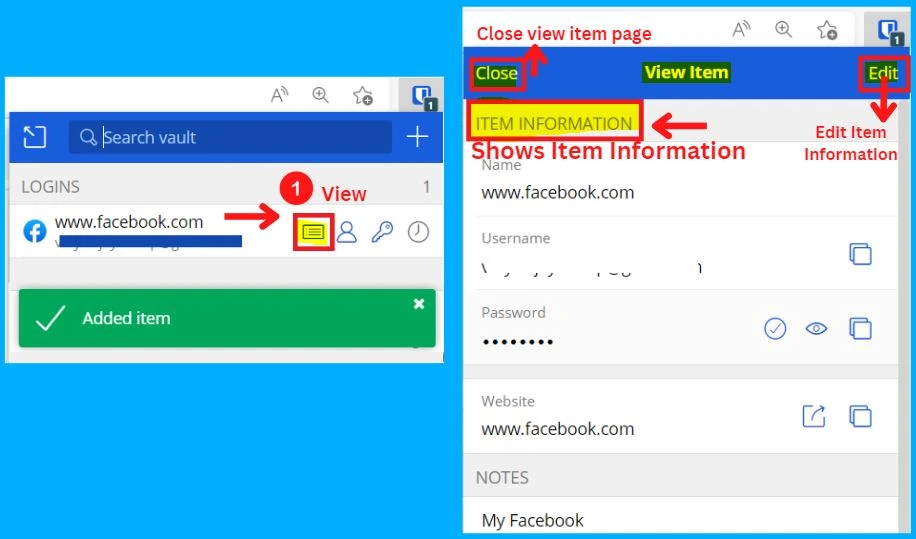
The Facebook item in Bitwarden shows the View option. The View option on Facebook helps you to show the information related to Facebook. You can easily Edit the information by clicking the Edit option from the below screenshot.
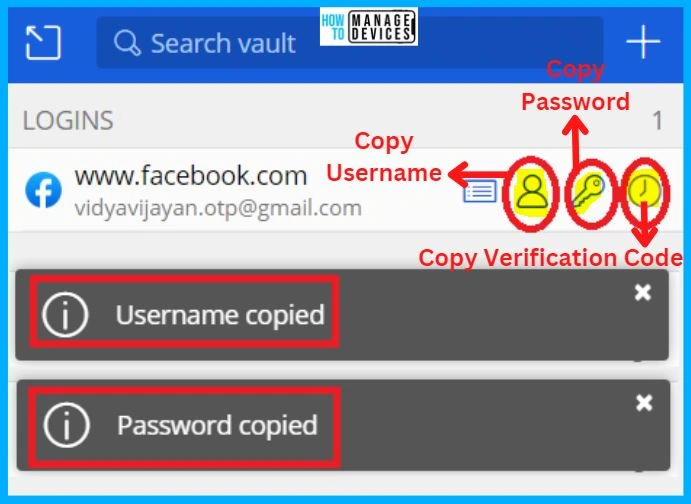
Facebook item in Bitwarden also shows the options such as Copy username, Copy password, and Copy verification code. Copy username option helps you to copy the username.
- Copy Password – Helps you to copy the Password
- Copy verification code – Helps you to copy the verification code
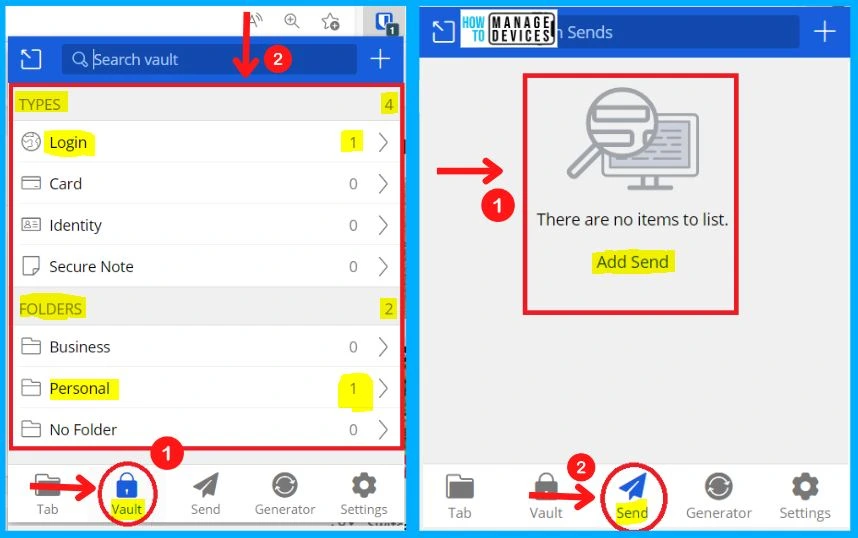
The Vault tab in Bitwarden helps you to show the Types and Folders. In the below screenshot, there are types of items 4 and folders 2. The Send tab in Bitwarden allows you to send the Bitwarden information.
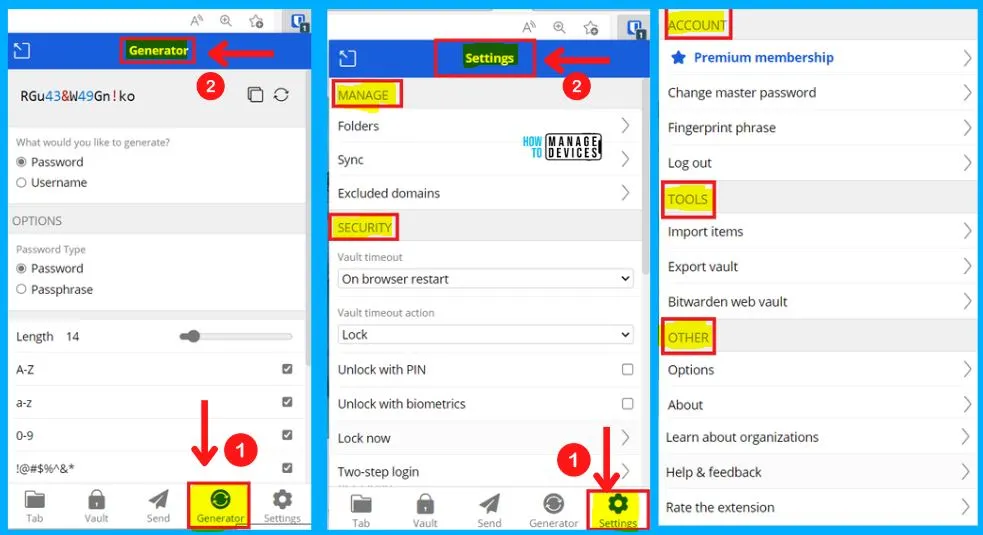
The Generator tab in Bitwarden helps you to generate a password or passphrase for your Bitwaden Login. The Settings tab in Bitwarden shows the options such as Manage, Security, Account, Tools, and others.
Logging on any Website on an Edge Browser
If you log in to any website on your Bitwarden attached browser, it will show the question: “Should Bitwarden remember this Password for you?” If you want Bitwarden to remember this Password, Click the Save option from the below screenshot. If you don’t want to save the login data, Click the Never option.
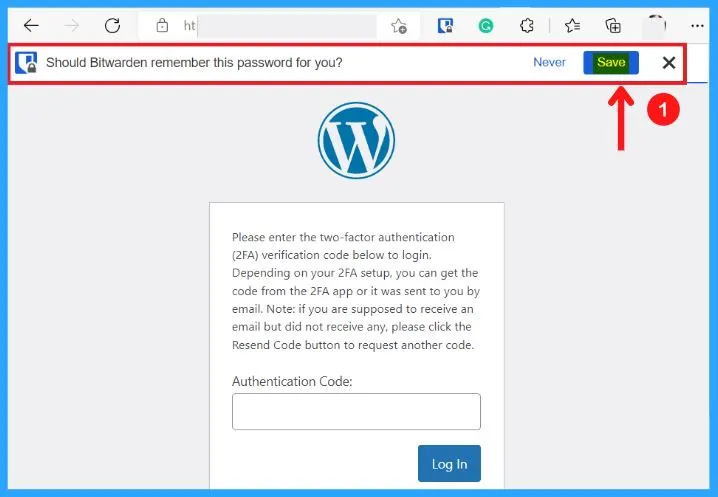
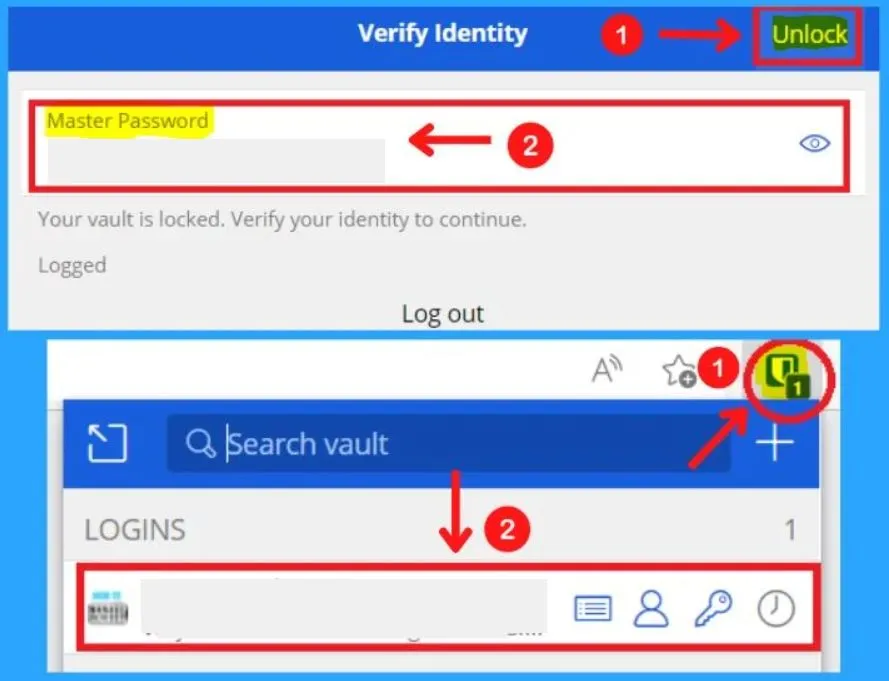
After clicking the Save option, you need to unlock the Bitwarden password manager. For Unlocking, First, enter your Master password and then click the Unlock option. The below 2nd screenshot shows that my Login is added in the Bitwarden.
Author
About Author – Vidya is a computer enthusiast. She is here to share quick tips and tricks with Windows 11 or Windows 10 users. She is also keen to find solutions to day-to-day tech problems and write about them.
