Hey there, let’s discuss enable disable browser guest mode in Microsoft edge browser using M365 Admin Center. Microsoft 365 is made to help us do more with cool apps, smart cloud services, and top-notch security.
Guest Mode is a feature in Microsoft Edge that allows users to browse on a device without the need to sign in. In guest mode, information about the visited websites will not be collected, and automatic suggestions will be disabled.
However, we can turn this feature off if the admin doesn’t let us search privately in the browser. When we use guest mode, it collects diagnostic data about our browsing and the websites we visit from the Microsoft Edge profile, which starts the guest mode session.
All browsing data from that specific guest mode session is cleared after all guest windows are closed. Here we are going to discuss about the steps for deploying Browse guest mode enabled policy through Microsoft 365 Admin Center.
Table of Contents
What Microsoft 365 Plans are Available?

Microsoft 365 has three cool plans for small businesses: Microsoft 365 Business Basic, Microsoft 365 Business Standard, and Microsoft 365 Business Premium. Each plan comes with unique features designed to meet the varying needs of small businesses.
Enable Disable Browser Guest Mode in Microsoft Edge Browser using M365 Admin Center
The Microsoft 365 Admin Center is the place where we handle our business in the cloud. This lets us add, remove users, change licenses, reset passwords, and do other tasks. We are going to deploy the ‘Browse guest mode enabled” policy through Microsoft 365 Admin Center.
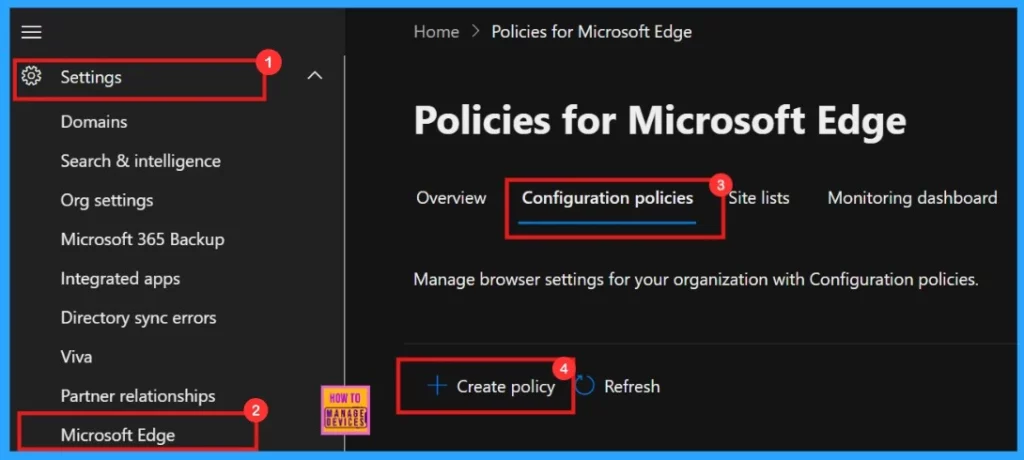
- Log in to Microsoft 365 Admin Center > Settings > Microsoft Edge > Configuration Policies > Create policy.
- Enable or Disable Full Screen Mode Policy in Edge Browser using Microsoft 365 Admin Center Policy
- Enable Autofill for Addresses in MS Edge Browser using Microsoft 365 Admin Center Policy
- Enable Drop Feature in Edge Browser Using Microsoft 365 Admin Center Configuration Policy
Basics
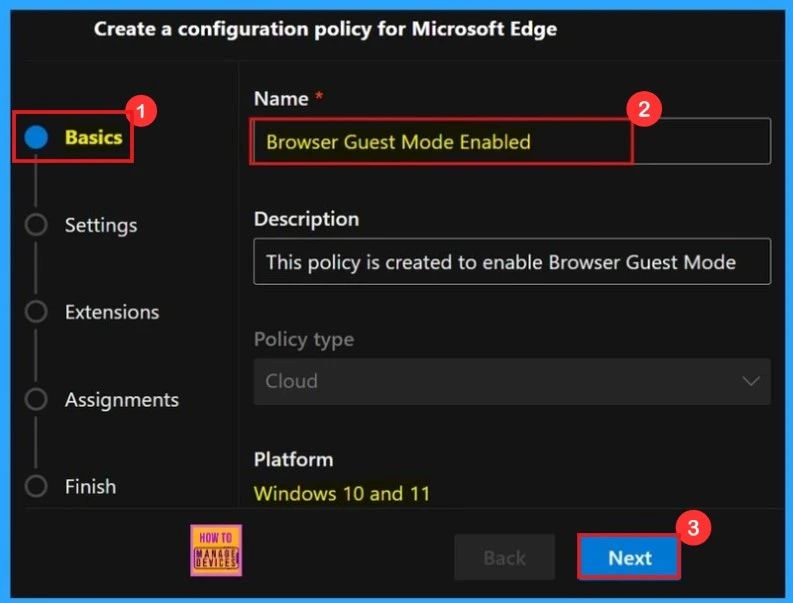
In the Basics, we can add the policy’s Name, Description, Type, and Platform. This will help us to identify the Policy later. We can find the basics details of the “Browse guest mode enabled“ policy in below screenshot. Click next to continue.
| Name | Descriprion | Policy Type | Platform |
|---|---|---|---|
| Browser guest mode enabled | This policy is created to enable browser guest mode. | Cloud | Windows 10 and 11 |
Settings
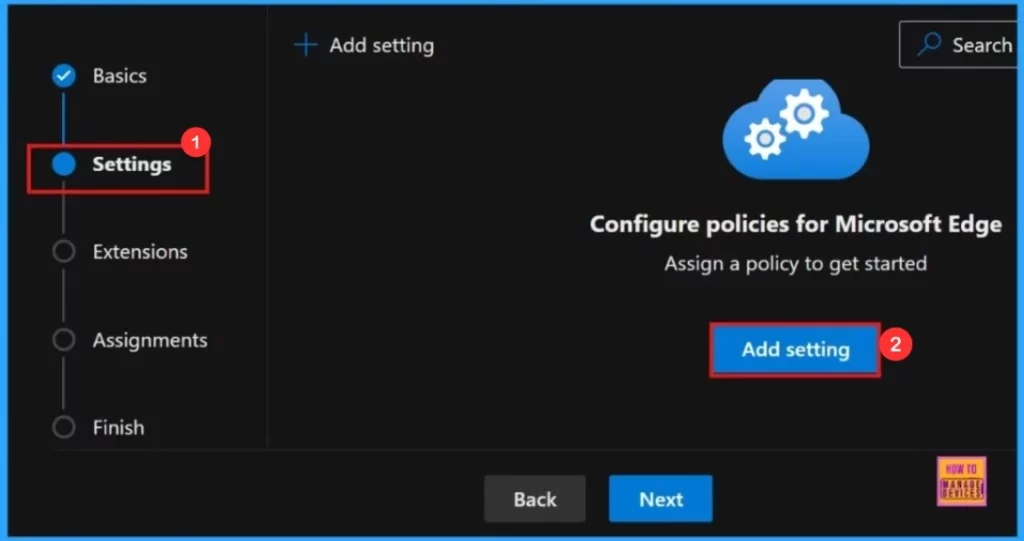
We can assign a configuration policy here, this window shows + Add Settings, which navigates us to the Configure a setting page. Here, we can search for the policy name under Additional settings.
- + Add Settings > Search the policy name under Additional settings.
Configure a Setting
The ‘configure a setting‘ window shows the Value of the policy and More Details options. We can enable or disable the policy. Here we select enabled ‘Browser guest mode enabled.’
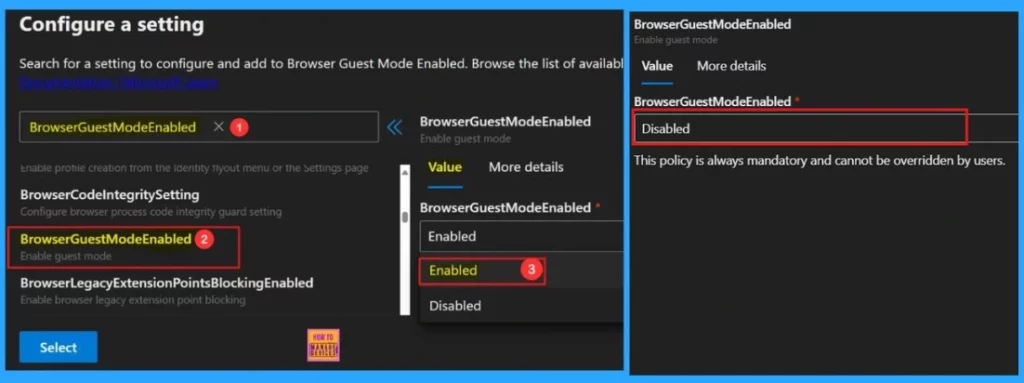
When we click on the ‘more details’ the full description of the policy is visible on the screen. Configuration setting is the most important section in creating a Policy. When we click Select, we will receive a notification indicating that the Policy has been successfully updated.
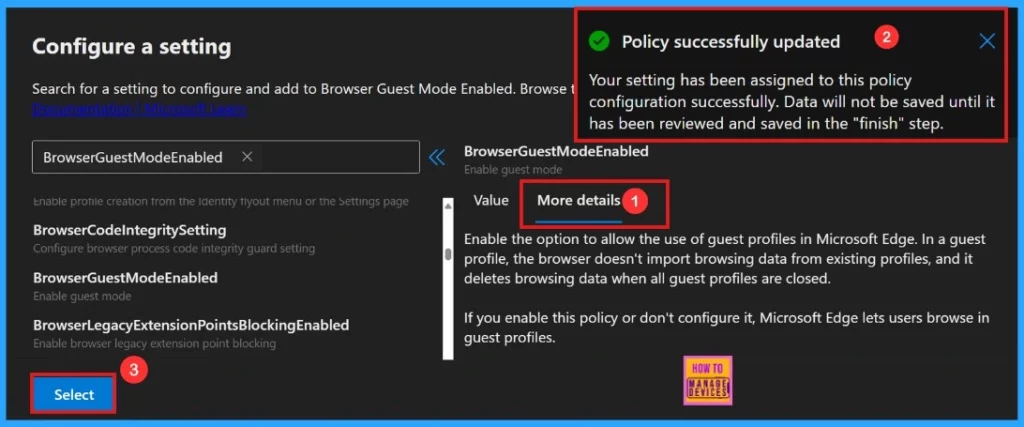
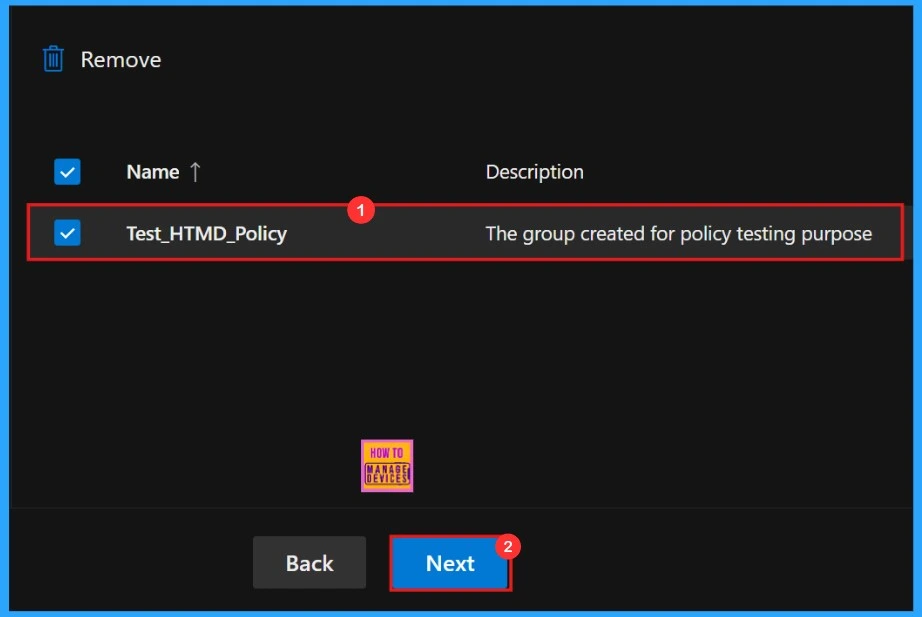
After clicking the select button, we will see the selected policy name and value in a new window. Here, we need to click on the checkbox near the Policy name and click on the Next button.

Extensions
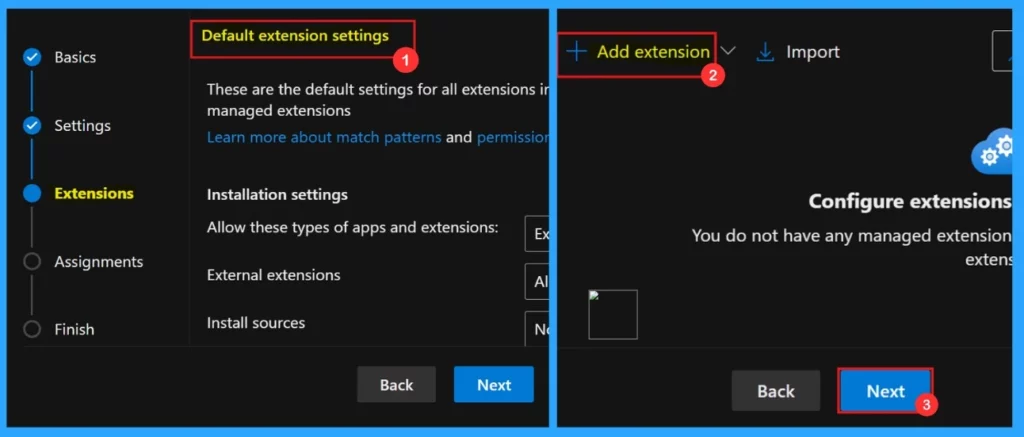
Installation settings, permissions, and URLs, etc are comes under policy extensions. If we need any extensions to the policy we can add extensions.
- Click the + Add extension to add an extension.
- We can skip this section if not needed extensions.
Assignments
In the assignments section, we can add user groups to the policy. If we select a group, the policy will apply only to that group. It helps to control who has access to specific features or settings. After clicking the select group option, we can select the group from the Microsoft Entra group provided by default.
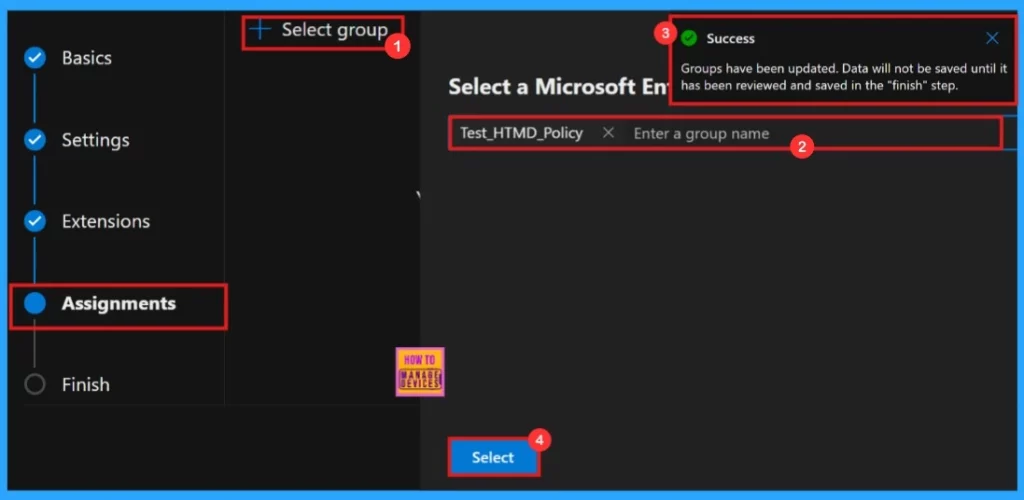
After clicking the Select button, a pop up notification shows that the Group has been updated. Here, the group Test_HTMD_Policy is assigned for this policy. We can see the group description as ‘The group created for policy testing purpose.’
Finish
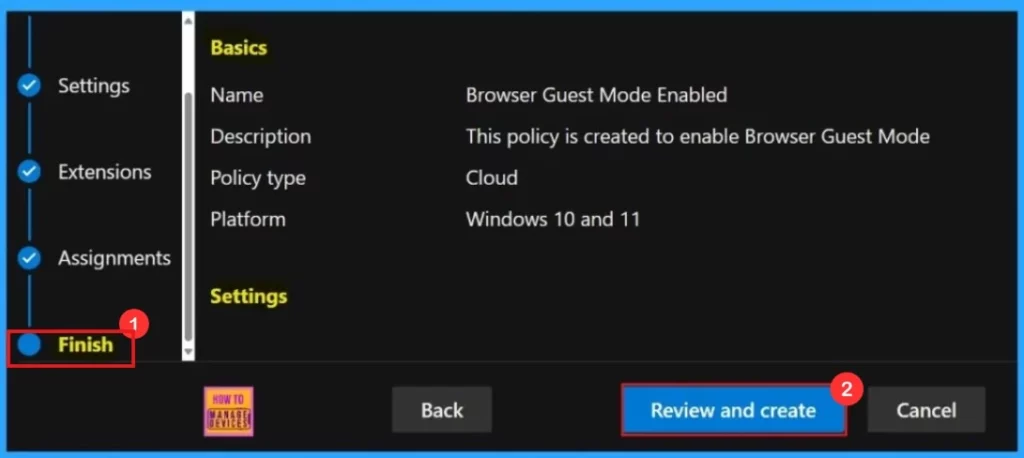
Finally we reached the finishing step of the policy creation. Here, we can review all the details we provided in the previous steps. If we need to make any changes, click the Back button to return to the previous window. Once reviewing we need to click Review and Create to proceed.
Monitoring Status
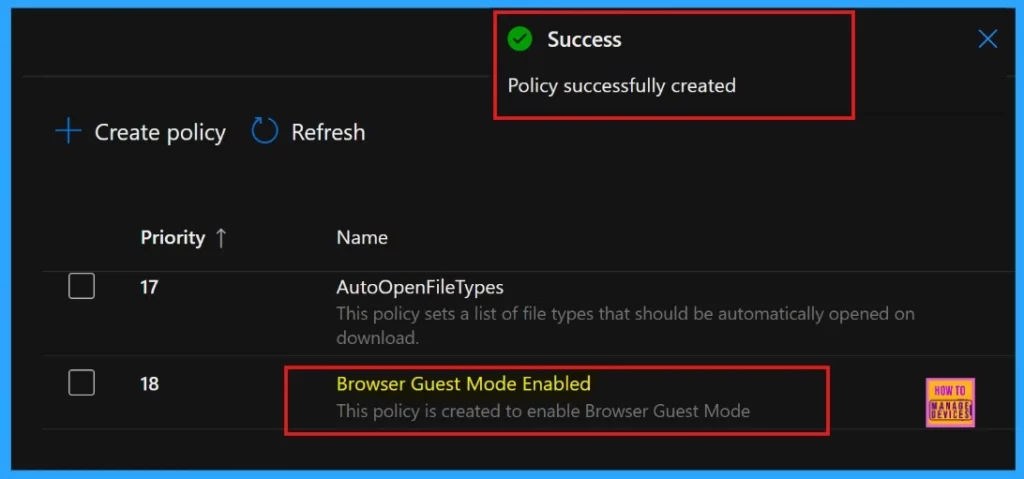
After the successful creation of policy, we need to sync the policy manually through the company portal. After the manual synchronisation, the new policy appears on the Policies for Microsoft Edge page.
End User Experience
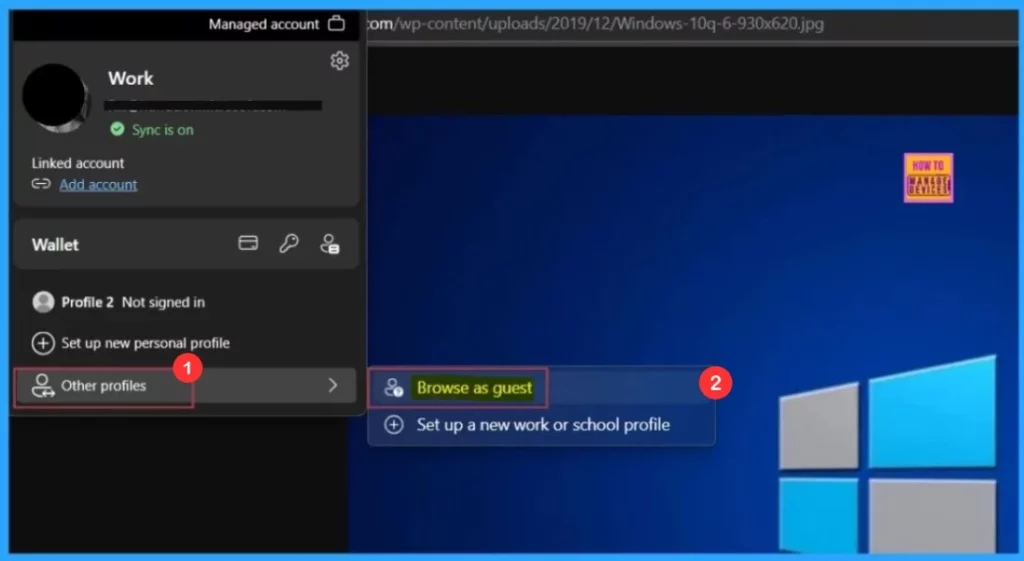
To see the end-user result, you should open Microsoft Edge. You can see if Browser guest mode enabled in Microsoft Edge.
- Open Microsoft Edge > Click The Profile Icon (in the top right-hand corner) > Select ‘Browse as guest’.
Need Further Assistance or Have Technical Questions?
Join the LinkedIn Page and Telegram group to get the latest step-by-step guides and news updates. Join our Meetup Page to participate in User group meetings. Also, Join the WhatsApp Community to get the latest news on Microsoft Technologies. We are there on Reddit as well.
Author
Anoop C Nair has been Microsoft MVP for 10 consecutive years from 2015 onwards. He is a Workplace Solution Architect with more than 22+ years of experience in Workplace technologies. He is a Blogger, Speaker, and Local User Group Community leader. His primary focus is on Device Management technologies like SCCM and Intune. He writes about technologies like Intune, SCCM, Windows, Cloud PC, Windows, Entra, Microsoft Security, Career, etc.
