ConfigMgr VPN boundary is the new functionality introduced in the ConfigMgr 2006 version. The new boundary type introduced with Configuration Manager 2006 is VPN. This helps the SCCM admin to support remote working scenarios more efficiently.
We have already learned how to create Boundaries and boundary Groups in ConfigMgr. What will happen when someone accidentally deletes all your SCCM CB boundaries and boundary groups? We have already learned to recover the boundaries as well.
Boundaries in Configuration Manager are specific network locations that contain devices you want to manage. Boundaries can be created based on criteria, such as an Active Directory site or a network IP address. The device is considered within that boundary when the Configuration Manager client identifies a matching network location.
Starting with SCCM 2111, you can have additional configurations. A new option called Start With enables more flexibility in having a unique identifier with the Connection Name or Connection Description options.
- How To Create Boundary Groups In ConfigMgr | SCCM Boundaries
- Use Existing SCCM Config To Help To Reduce VPN Bandwidth | ConfigMgr
- VPN Bandwidth Control Via BITs Throttling For SCCM DP | Client
| Index |
|---|
| Prerequisites |
| How to Create a VPN Boundary |
| Configure VPN Boundary |
| Auto Detect VPN |
| Connection Name for VPN Boundaries |
| Connection Description |
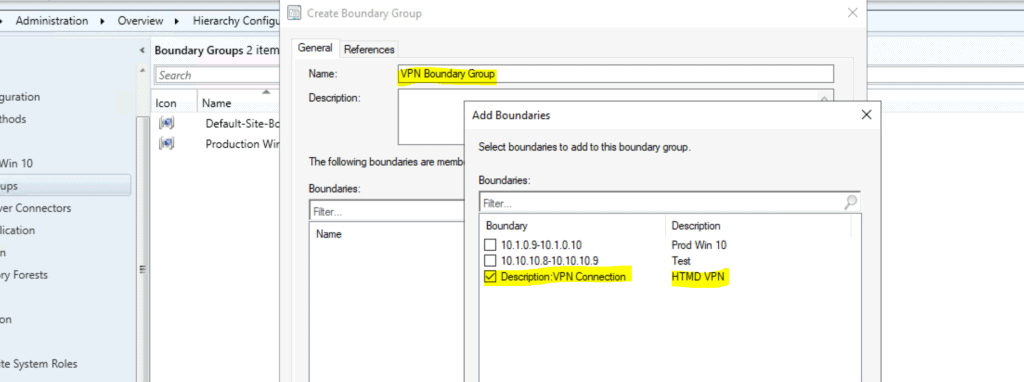
| Add VPN Boundary to Boundary Groups |
| Result |
Prerequisites
All the boundary details are selected based on the Windows 10 client configuration and connectivity. The VPN boundary also works with your Windows 10 device’s live connectivity. You can use the IPConfig command to learn more about this, which I have explained below.
- Server infrastructure should be 2006 or later.
- ConfigMgr 2006 or later Client
- Boot Image with client binaries for OSD scenarios
- Understanding VPN configuration in your organization
NOTE! – Although each SCCM boundary group supports site assignment and site system reference, create a separate set of boundary groups to use only for site assignment. Avoid overlapping boundaries for automatic site assignment.
How to Create a VPN Boundary
Let’s learn how to create VPN boundaries in this section:
- Launch Configuration Manager Console
- Navigate \Administration\Overview\Hierarchy Configuration\Boundaries
- Right-click on the Boundaries node
- Select Create New Boundary

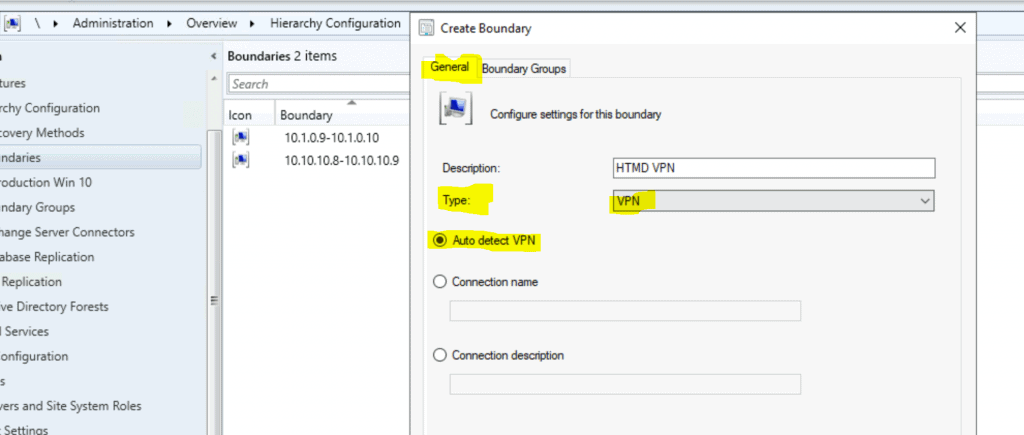
Select the General tab. Configure the setting for the boundary, then Enter Description– Name of the Boundary – HTMD VPN
- Select the type of boundary as VPN

Configure VPN Boundary
When creating a VPN boundary, you are given three options. Understanding each option in the SCCM VPN configuration is essential. Let’s dive into it!
Auto Detect VPN
Auto Detect VPN is the default option in the VPN boundary configuration. I don’t think many SCCM admins would use it.

Connection Name for VPN Boundaries
Now, let’s understand where you can get the VPN boundary configuration details called connection Name. You can log in to a Windows 10 device connected to a VPN network and, once logged in, try to run the command line “IPCONFIG“.
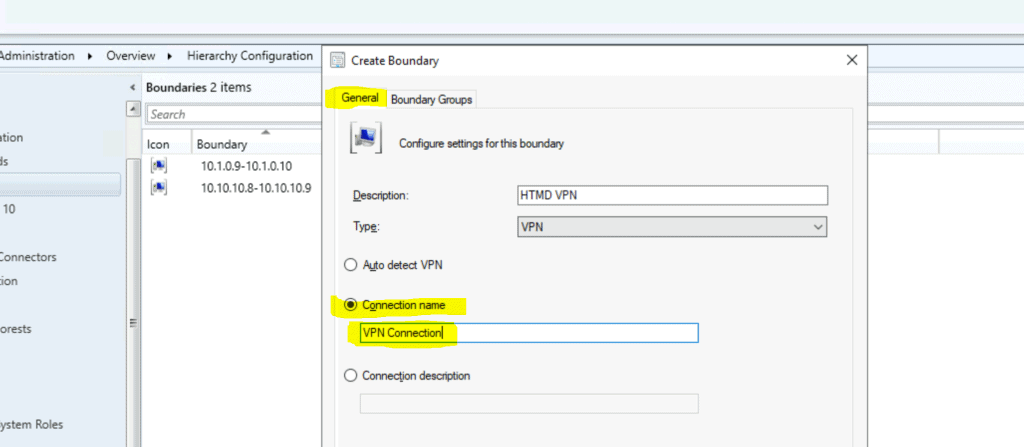
- Connection Name – You can use the connection name option in the boundary settings to specify the name of the VPN connection on the Windows 10 device.
- You can run the ipconfig command on the Windows 10 device to determine whether you can use this boundary configuration setting called Connection Name.

Enter the value for VPN configuration
- Connection Name = VPN Connection

Connection Description
Let’s understand the Connection Description field configuration from the SCCM VPN boundary. Log in to a Windows 10 device connected to a VPN network. Once logged in, try to run the command line “IPCONFIG.”
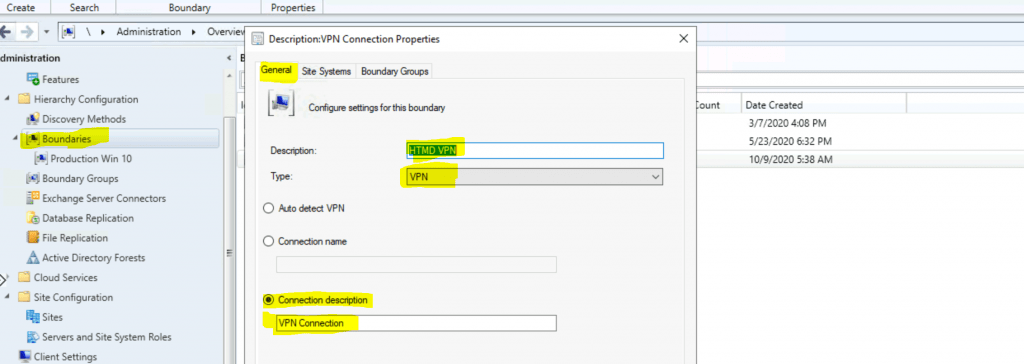
- Connection Description—The Connection Description option in the boundary settings allows you to specify the name of the VPN connection on the Windows 10 device.
- You can run the ipconfig command on the Windows 10 device to identify whether you can use this boundary configuration setting called Connection Description.

Connection Description (above screenshot) = VPN Connection

Complete the configuration by clicking on OK.
You have a new option called Start With with SCCM 2111, which enables more flexibility in creating a unique identifier with the Connection Name or Connection Description options.

Add VPN Boundary to Boundary Groups
The blog post below lets you learn how to create VPN boundary groups. Let’s learn how to generate boundary groups and how to configure the boundary groups.
https://www.anoopcnair.com/create-boundary-groups-in-configmgrsccm-boundar/#Create_Boundary_Groups

Result
You can confirm the server-side configuration from the ConfigMgr console. After creating VPN boundaries, you can check results from the console (\Administration\Overview\Hierarchy Configuration\Boundaries).
- Type – VPN
- Boundary – Description: VPN Connection

Client-side validation can be done using locationservices.log. The main things to notice here are given below. One of the two attributes mentioned below can be used while configuring the VPN boundary.
- Adapter Name=“Ethernet”
- Description=“Microsoft Hyper-V Network Adapter”
NOTE! This Client (following log snippet) is disconnected from the VPN. ConfigMgr should have collected the VPN adapter and description information via location services if it was a connected VPN network.
WSUSLocationRequest : <WSUSLocationRequest SchemaVersion="1.00" BGRVersion="1"><Content ID="{1074285A-82C7-474F-B242-1EE20F8C3CE5}" Version="11"/><AssignedSite SiteCode="MEM"/><ClientLocationInfo OnInternet="0"><ADSite Name="Default-First-Site-Name"/><Forest Name="memcm.com"/><Domain Name="memcm.com"/><IPAddresses><IPAddress SubnetAddress="10.1.0.0" Address="10.1.0.9"/></IPAddresses><Adapters><Adapter Name="Ethernet" IfType="6" PhysicalAddressExists="1" DnsSuffix="reddog.microsoft.com" Description="Microsoft Hyper-V Network Adapter"/></Adapters><BoundaryGroups BoundaryGroupListRetrieveTime="2020-10-09T10:33:31.803"><BoundaryGroup GroupID="16777218" GroupGUID="b1995968-348a-4fa4-9aaf-26be9f06ff98" GroupFlag="2"/></BoundaryGroups></ClientLocationInfo></WSUSLocationRequest>
Resource
- VPN Bandwidth Control via BITs Throttling for SCCM DP | Client
- Use Existing SCCM Config to Help to Reduce VPN Bandwidth | ConfigMgr
We are on WhatsApp. To get the latest step-by-step guides and news updates, Join our Channel. Click here –HTMD WhatsApp.
Author
Anoop C Nair is Microsoft MVP! He is a Device Management Admin with more than 20 years of experience (calculation done in 2021) in IT. He is a Blogger, Speaker, and Local User Group HTMD Community leader. His primary focus is Device Management technologies like SCCM 2012, Current Branch, and Intune. He writes about ConfigMgr, Windows 11, Windows 10, Azure AD, Microsoft Intune, Windows 365, AVD, etc.
