How to Create Windows Firewall Inbound Rules for SCCM ConfigMgr Client Configuration Manager ConfigMgr. Creating Windows Firewall Rules for SCCM or ConfigMgr clients is pretty straightforward.
I was trying to deploy a client in my lab, and I don’t want to disable the Windows Firewall to get the SCCM 2012 client to work.
Usually, I used to disable Windows Firewall in the LAB environment to have an easy life ;). In this case, the SCCM 2012 client push was not working because the Firewall was getting in between.
The TechNet documentation for creating Windows Firewall Rule Settings is excellent. For more details, see the TechNet documentation. However, this kind of post would be beneficial for newbies.
- How to Create Windows Firewall Inbound Rules for SCCM ConfigMgr Client Configuration Manager ConfigMgr
- 4 New Intune Windows Firewall Logging Configuration Policies
- Ways to Allow an App through Windows Defender Firewall
- Best Antivirus for Windows 11 Microsoft Defender | App Browser Protection | Firewall Protection
| Index |
|---|
| Create Windows Firewall Inbound Rules |
| How to Create Windows Firewall Inbound Rules for SCCM |
| How Do We Create the WMI Inbound Windows Firewall Rule for SCCM ConfigMgr 2012 Client Push? |
Create Windows Firewall Inbound Rules
This will help them create and master Inbound rules in Windows Firewall settings. Another post discusses “How to Create Windows Firewall Outbound Rules Using PowerShell for SCCM ConfigMgr 2012 Client.”
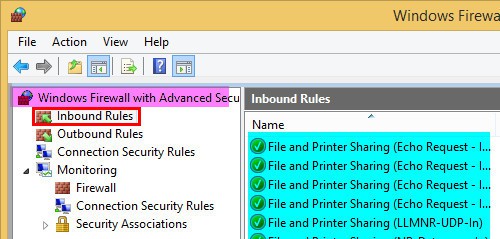
This post teaches us to create Inbound Windows Firewall Rules for SCCM (ConfigMgr) clients. SCCM client uses components like WMI, RPC End Point Mapper, Remote Control, ICMP for wakeup lan & File, and Printer Sharing to communicate with SCCM site servers.
These connections/communications are blocked by Windows Firewall (by default), so we need to specifically open the required ports and applications, whichever is needed.
This step-by-step guide (not very specific to SCCM/ConfigMgr) will help anyone create an Inbound Windows Firewall rule(s). We can make Windows firewall inbound Rules with different rule types, such as Program, Port, Predefined, and Custom. In the next post, I’ll cover the guide to creating Outbound Rules in Windows Firewall.
How to Create Windows Firewall Inbound Rules for SCCM
In this post, I’m going to cover the following step-by-step guides. I’ve not covered all the Firewall rules required for all the features of SCCM 2012. However, I tried to cover one example each with all scenarios.
- How do you create a “WMI” Inbound Windows Firewall Rule for the SCCM ConfigMgr 2012 client push?
- How do you create a “File and Printer Sharing” Inbound Firewall Rule for the SCCM ConfigMgr client?
- How do you configure the Windows firewall to “Allow ICMP or Ping Response”?
- How do we create an inbound “custom port TCP or UDP in Windows Firewall?
How Do We Create the WMI Inbound Windows Firewall Rule for SCCM ConfigMgr 2012 Client Push?
Type WF from the command prompt to launch Windows Firewall with Advanced Security.

2. On the Windows Firewall with Advanced Security page, Right-click on Inbound Rules and click on the new rule.

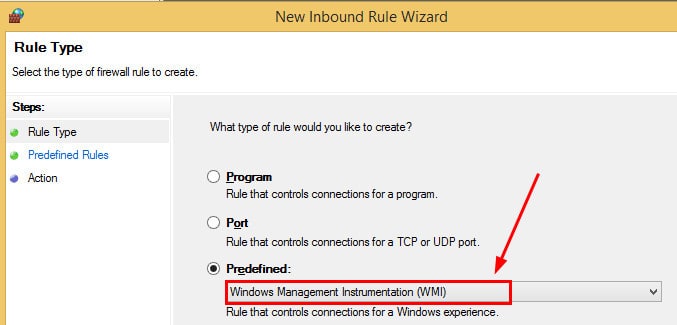
3. On the Rule Type page, Select the Predefined Rule Creation option and from the drop-down list, select the Windows Management Instrumentation (WMI) rule and click NEXT.
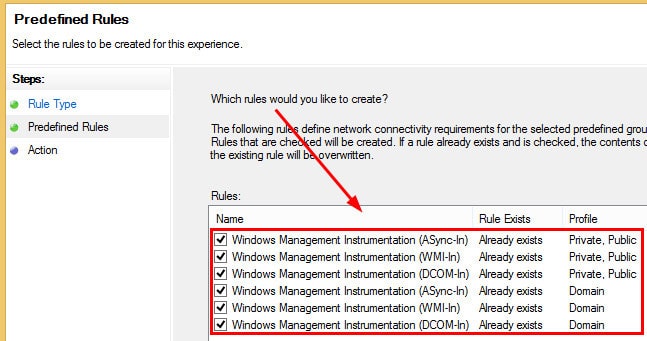
4. On the Predefined Rules page, we need to select all the rules of WMI Inbound connections, which we need to enable for Client push and other SCCM ConfigMgr-related activities, and then Click NEXT.
We’re going to create the rules Windows Management Instrumentation (ASync-In), Windows Management Instrumentation (WMI-In), Windows Management Instrumentation (DCOM-In), Windows Management Instrumentation (ASync-In), Windows Management Instrumentation (WMI-In), and Windows Management Instrumentation (DCOM-In).
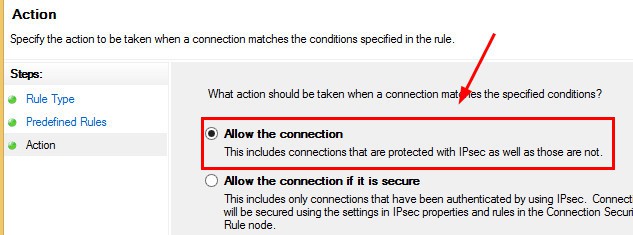
5. On the Action page, Select Allow the Connection option in the WMI inbound rule and click FINISH.
On the Windows Firewall with Advanced Security page, Right-click on Inbound Rules and click on the new rule.

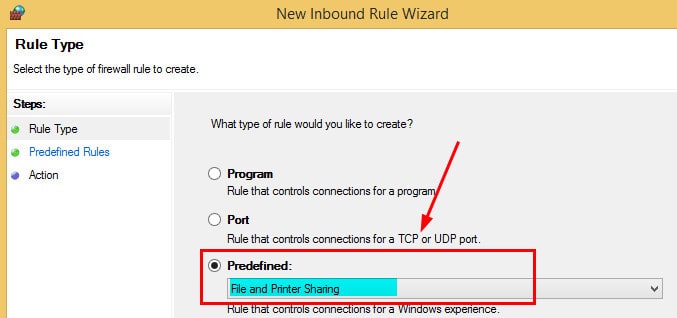
2. On the Rule Type page, Select the Predefined Rule Creation option and from the drop-down list, select the File and Printer Sharing rule and click NEXT
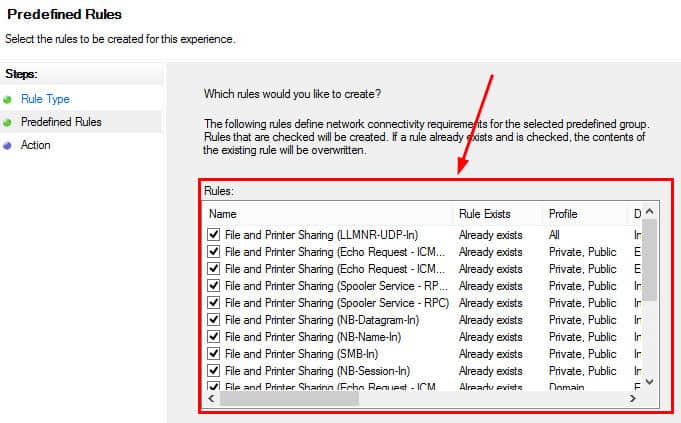
3. On the Predefined Rules page, we need to select all the File and Printer Sharing Inbound connections rules to enable the Client to push and other SCCM ConfigMgr-related activities, then Click NEXT.
4. select Allow the Connection option on the Action page on the inbound rule page and click FINISH.

- On the Windows Firewall and Advanced Security page, Right-click on Inbound Rules and click on the new rule.
Note : When you're running SCCM /ConfigMgr 2012 R2 and above then you don't need to create this inbound Windows Firewall rule for Wakeup Proxy at SCCM Client side.

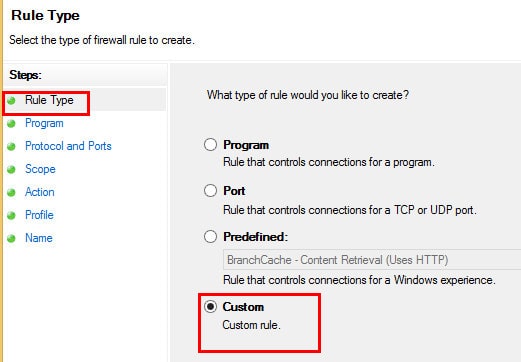
2. Select Rule Type as Custom on the Rule Type page, then click Next.
3. On the PROGRAM page, Select All Programs and click NEXT.

4. On the Protocols and Ports page, click the drop-down for Protocol type, select ICMPv4, and click the Customize button.
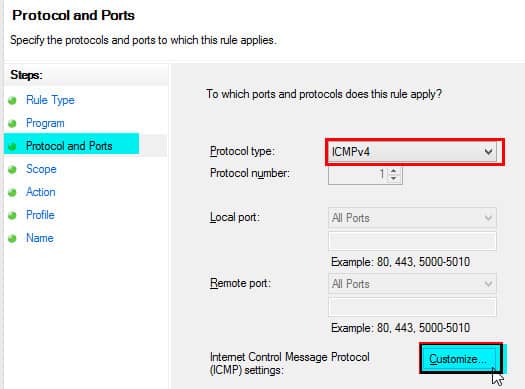
5. In the Customize ICMP Settings dialog box, click on Specific ICMP types, select Echo-Request, and click OK. Then, on the Inbound Wizard page, click NEXT.
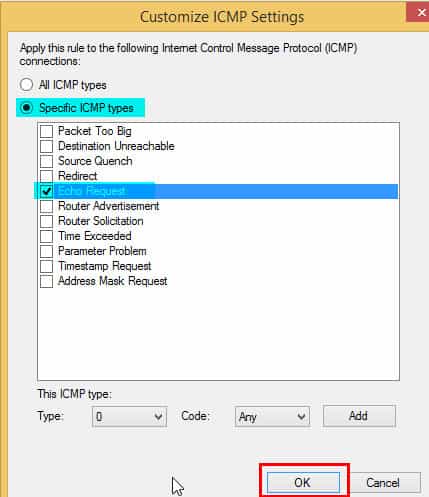
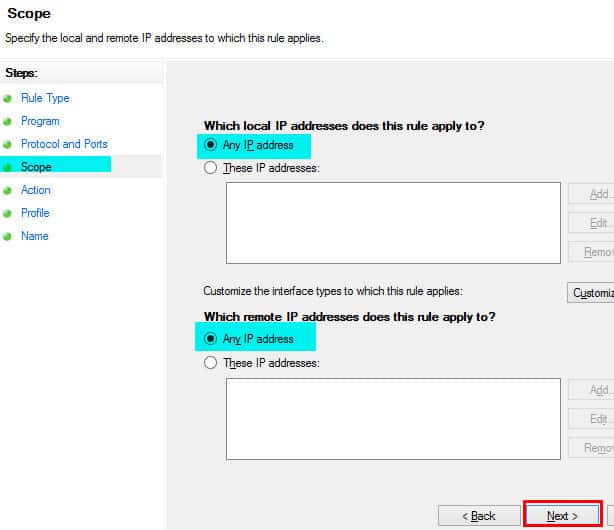
6. On the SCOPE page, we need to select Any IP Address under the session “which local IP addresses this rule applies to” and Any IP Address under the session “which remote IP addresses does this rule apply to”.
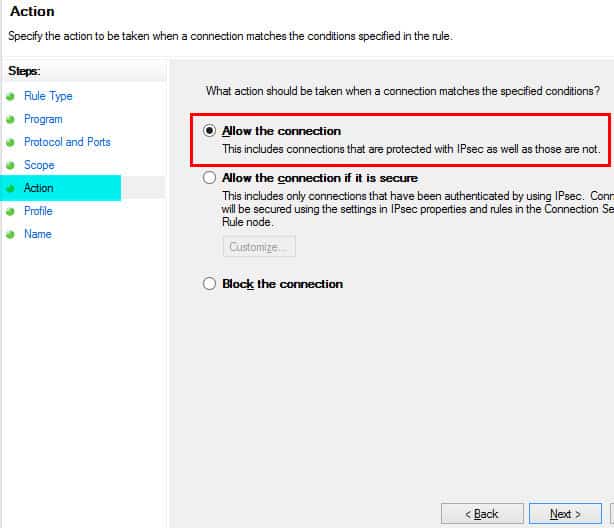
7. Select Allow the connection and click on the action page.
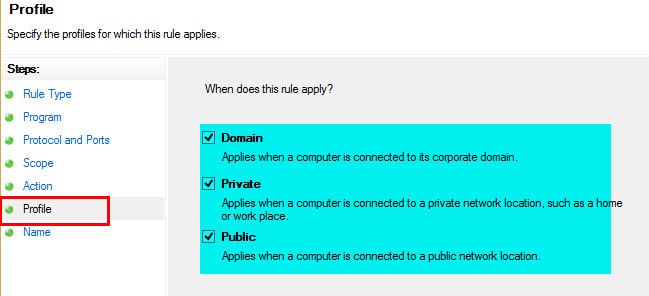
8. On the Profile page, select all the profiles (Domain, Private and Public); however, to wake up a proxy, you would require only Domain and hit NEXT.
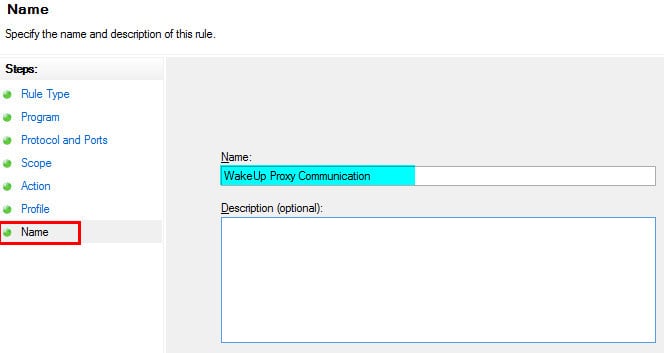
9. Select a suitable name for the Inbound rule on the Name page and then click FINISH.
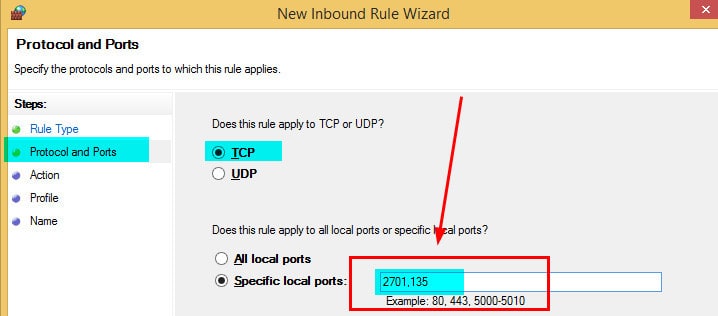
From the ConfigMgr SCCM client perspective, we need to create Inbound rules for the following ports: TCP Port 2701 for Remote Control and TCP port 135 for Remote Assistance and Remote Desktop.
- On the Windows Firewall and Advanced Security page, Right-click on Inbound Rules and click on the new rule.

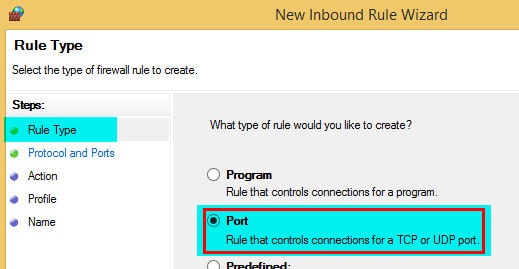
2. Select Rule Type as Port on the Rule Type page, then click Next.
3. On the Protocol and Ports page, we must specify the protocols and ports to which this rule applies. Select TCP or UDP protocol depending upon your requirements. After that, type in the local ports, then click next.
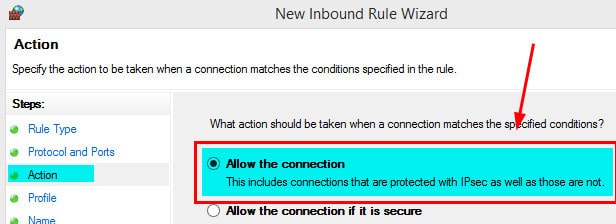
4. Select Allow the connection on the Action page and click NEXT.
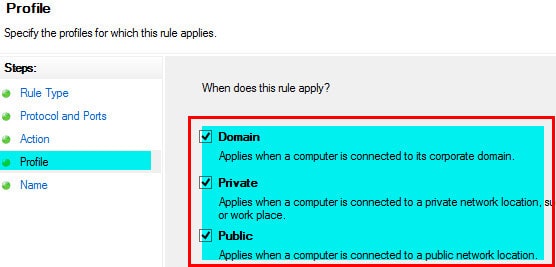
5. select all the required profiles on the profile page according to your requirements. I selected all three available profiles and then clicked NEXT.
6. Select a suitable name for the Inbound rule on the Name page and click FINISH.
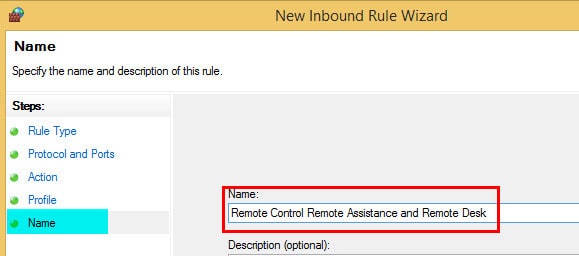
Following are the Names of the Inbound rules I’ve created for SCCM ConfigMgr.
| Name | Group | Profile | Enabled | Action |
|---|---|---|---|---|
| ICMP Wake-up proxy communication | All | Yes | Allow | |
| RPC End Point Mapper | All | Yes | Allow | |
| Configuration Manager remote control | All | Yes | Allow | |
| Windows Management Instrumentation (ASync-In) | Windows Management Instrumentation (WMI) | Private, Public | Yes | Allow |
| Windows Management Instrumentation (WMI-In) | Windows Management Instrumentation (WMI) | Private, Public | Yes | Allow |
| Windows Management Instrumentation (DCOM-In) | Windows Management Instrumentation (WMI) | Private, Public | Yes | Allow |
| Windows Management Instrumentation (ASync-In) | Windows Management Instrumentation (WMI) | Domain | Yes | Allow |
| Windows Management Instrumentation (WMI-In) | Windows Management Instrumentation (WMI) | Domain | Yes | Allow |
| Windows Management Instrumentation (DCOM-In) | Windows Management Instrumentation (WMI) | Domain | Yes | Allow |
| File and Printer Sharing (LLMNR-UDP-In) | File and Printer Sharing | All | Yes | Allow |
| File and Printer Sharing (Echo Request – ICMPv6-In) | File and Printer Sharing | Private, Public | Yes | Allow |
| File and Printer Sharing (Echo Request – ICMPv4-In) | File and Printer Sharing | Private, Public | Yes | Allow |
| File and Printer Sharing (Spooler Service – RPC-EPMAP) | File and Printer Sharing | Private, Public | Yes | Allow |
| File and Printer Sharing (Spooler Service – RPC) | File and Printer Sharing | Private, Public | Yes | Allow |
| File and Printer Sharing (NB-Datagram-In) | File and Printer Sharing | Private, Public | Yes | Allow |
| File and Printer Sharing (NB-Name-In) | File and Printer Sharing | Private, Public | Yes | Allow |
| File and Printer Sharing (SMB-In) | File and Printer Sharing | Private, Public | Yes | Allow |
| File and Printer Sharing (NB-Session-In) | File and Printer Sharing | Private, Public | Yes | Allow |
| File and Printer Sharing (Echo Request – ICMPv6-In) | File and Printer Sharing | Domain | Yes | Allow |
| File and Printer Sharing (Echo Request – ICMPv4-In) | File and Printer Sharing | Domain | Yes | Allow |
| File and Printer Sharing (Spooler Service – RPC-EPMAP) | File and Printer Sharing | Domain | Yes | Allow |
| File and Printer Sharing (Spooler Service – RPC) | File and Printer Sharing | Domain | Yes | Allow |
| File and Printer Sharing (NB-Datagram-In) | File and Printer Sharing | Domain | Yes | Allow |
| File and Printer Sharing (NB-Name-In) | File and Printer Sharing | Domain | Yes | Allow |
| File and Printer Sharing (SMB-In) | File and Printer Sharing | Domain | Yes | Allow |
| File and Printer Sharing (NB-Session-In) | File and Printer Sharing | Domain | Yes | Allow |
Resources
SCCM Related Posts Real World Experiences Of SCCM Admins
We are on WhatsApp now. To get the latest step-by-step guides, news, and updates, Join our Channel. Click here. HTMD WhatsApp.
Author
Anoop C Nair is Microsoft MVP from 2015 onwards for consecutive 10 years! He is a Workplace Solution Architect with more than 22+ years of experience in Workplace technologies. He is a Blogger, Speaker, and Local User Group Community leader. His main focus is on Device Management technologies like SCCM and Intune. He writes about technologies like Intune, SCCM, Windows, Cloud PC, Windows, Entra, Microsoft Security, Career etc…

Hi,
So you are opening WMI, File print and sharing, RDP,…on the Public profile of the firewall, that means your clients are vulnerable when outside the corporate network.
Isn’t it a security risk to allow all these for laptops of roaming users?
Some of the ports are required only when you use client push. If you don’t client push, you don’t need to open those ports file print etc..
There has to be a more minimal set of rules to allow Client Push but disable other unsafe rules.
Excellent site, by the way!
This article should be called “How to ensure that you get hacked”
No one should be exposing all these ports to the public profile, you’re just asking to get compromised.
OK. We also ask MS to remove this information from their docs as well.
Nowhere does Microsoft say to open up the Public profile for these rules. Can you point to where that is specified in the documentation?