Let’s Discuss the Default Profile Setting Enabled Policy in MS Edge using Intune Policy. As we know, Microsoft Intune is a cloud-based service that provides organizations with different types of policies to improve security and management.
By using the Settings Catalog policies, organizations can ensure stronger security, better control, and improved performance across all managed devices. Today we are discussing the Identity and Sign-in category of MS edge in setting catalog.
Default Profile Settings policy for Microsoft Edge allows you to configure which profile the browser should open with, instead of always swiching back to the last profile used. By setting a value such as “Default“, administrators can ensure a specific profile is launched when Edge starts, unless the “profile-directory” parameter is explicitly defined.
This helps keep things consistent for employees and gives organizations more control. Some profiles, like “Edge Kids Mode” and “Guest Profile“, cannot be set as defaults. These are blocked because they are not meant for regular work use. This makes sure employees only use proper, managed profiles.
Table of Contents
Edge Kids Mode or Guest Profile be Set as Default Profiles?
No, these values are not valid defaults because they are not designed to be used as default profiles.
What Happens if the Policy is Enabled and the Specified Profile Exists?
If you enable this policy and configure it with a specific profile name and the specified profile can be found, Microsoft Edge will use the specified profile when launching and the setting of “Default profile for external link” is changed to the specified profile name and greyed out.
Default Profile Setting Enabled Policy in MS Edge using Intune Policy
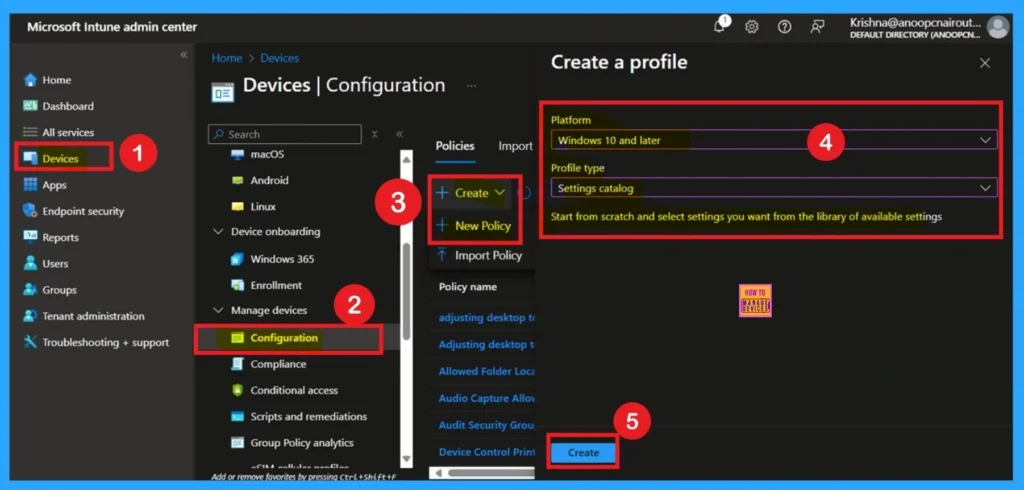
Above, we discussed the details and purpose of the default profile settings policy. Now, let’s look at how this policy can be deployed through the Microsoft Intune Admin Center. First, go to Devices > Configuration profiles and click Create policy. In the Create profile window, select Profile type as Settings catalog and set the Platform to Windows 10 and later.
- After filling in these details, click Create to continue.
- Allow or Block Hardware Keyboard Text Suggestions in Text Input using Intune Policy
- Enable Disable Defender SmartScreen For Microsoft Store Apps In Windows 11
- Turn On or Off Microsoft Defender SmartScreen for Microsoft Edge in Windows 11
Get Started with Basic Information
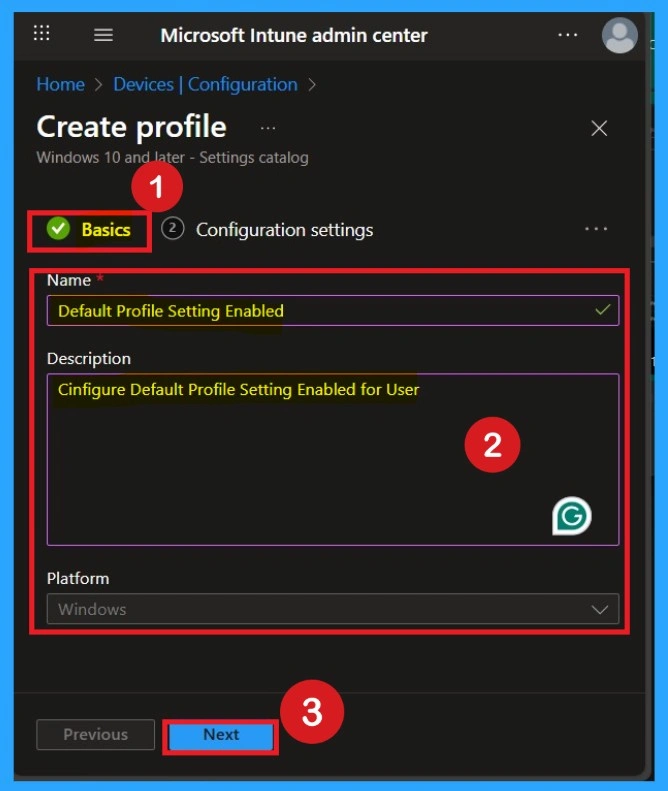
To get started with the Basics step, you will see options for the policy name, description, and platform. You need to provide a meaningful name for the policy, as this will help you easily identify which policy has been deployed. You can also add a description to make the purpose of the policy clearer for better understanding.
- The platform is set to Windows by default, so you can proceed without making changes to it.
- Click on the Next.
Configuration Settings – Settings Picker
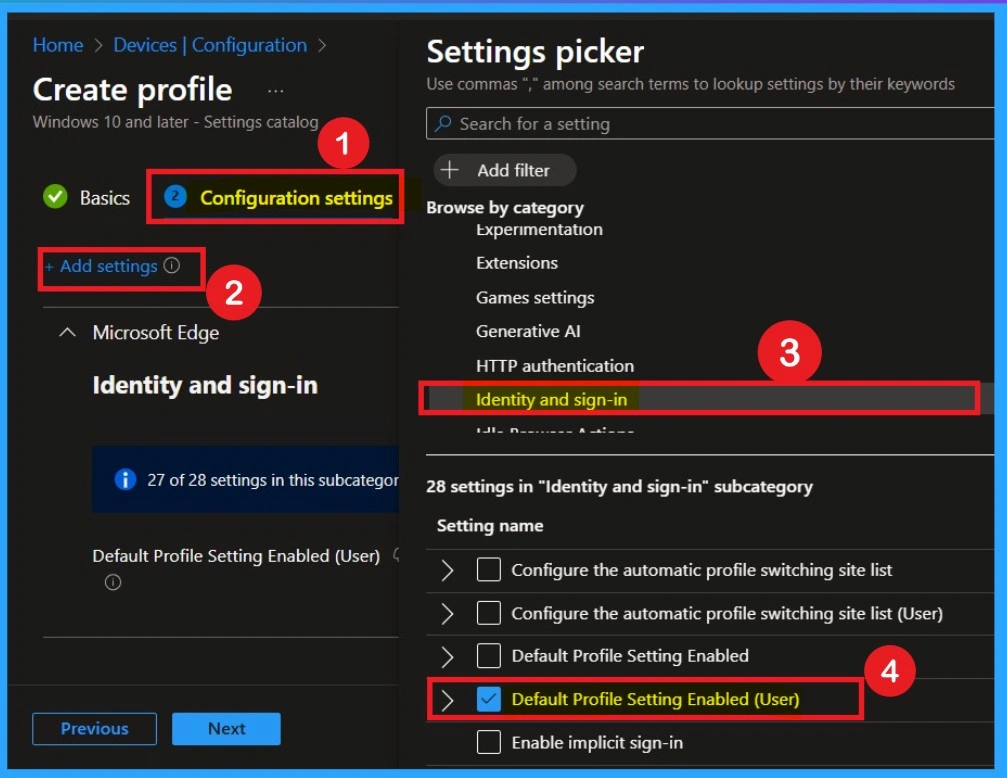
The next step is Configuration settings, which is very important because this is where you add the required settings for the deployment. Click on the Add settings hyperlink, then select the category Microsoft Edge. Within Microsoft Edge, you will see different subcategories; here, you need to choose Identity and sign-in.
Under this section, several settings will be available, and you should select the Default profile setting enabled for user option. Once selected, close the settings picker window.
Defaulted Mode
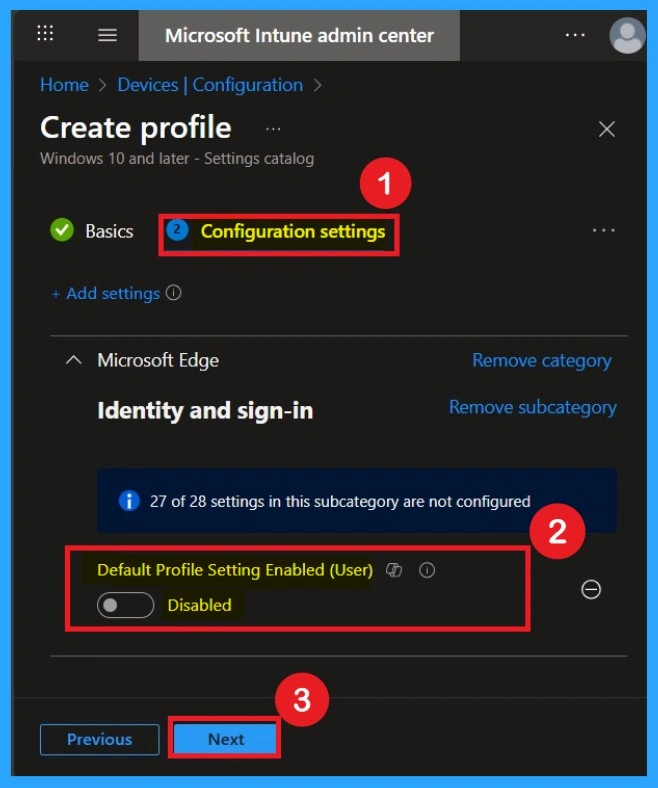
The next step is the Default mode, which is set to Disabled by default. You will notice that the policy appears in a disabled state. If you want to keep it that way, simply click Next to continue. You can verify the screenshots.
Enable Mode
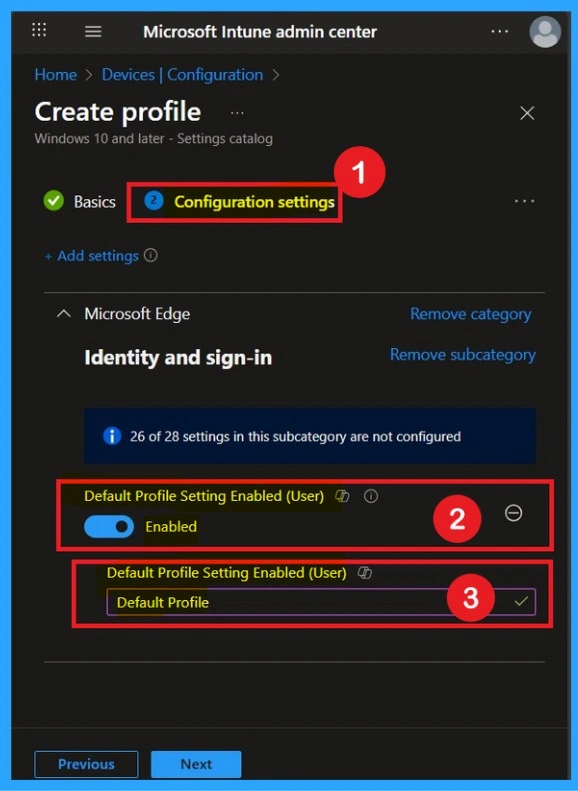
You can enable the settings policy easily by toggling the switch from left to right. Once enabled, the policy will display a blue color with the Enabled label. When the policy is enabled, an additional text box will appear where you need to enter Default as the value. After entering the value, click Next to continue.
Understand the Scope Tags
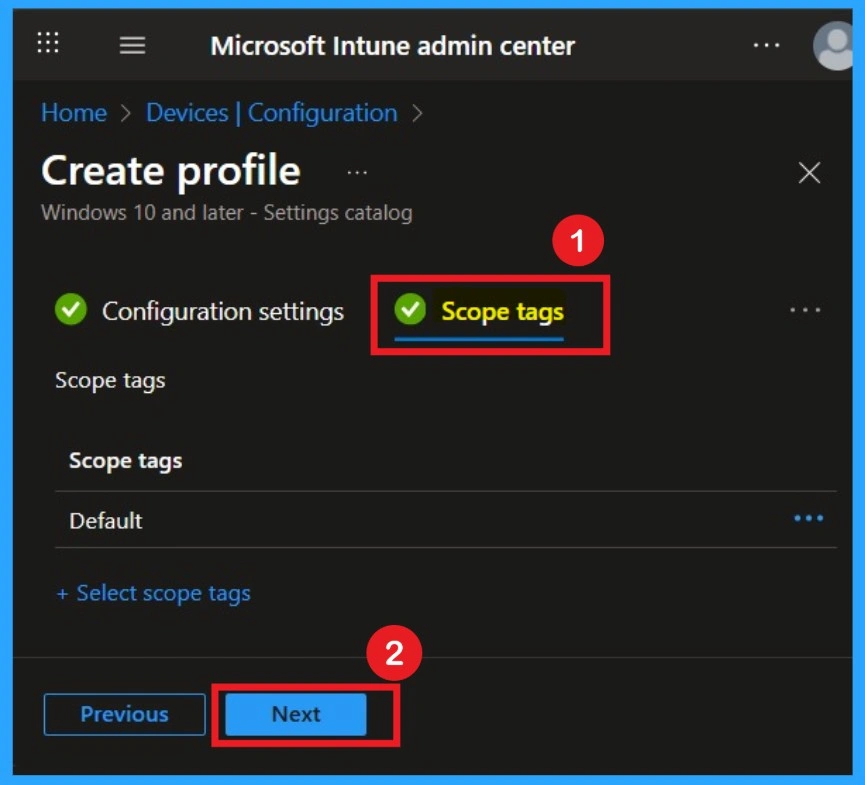
Now your are on the Scope tags section. Scope tags are used to assign policies to specific admin groups for better management and filtering. If needed, you can add a scope tag here. However, for this policy, I chose to skip this section.
Know the Importance of Assignemnts
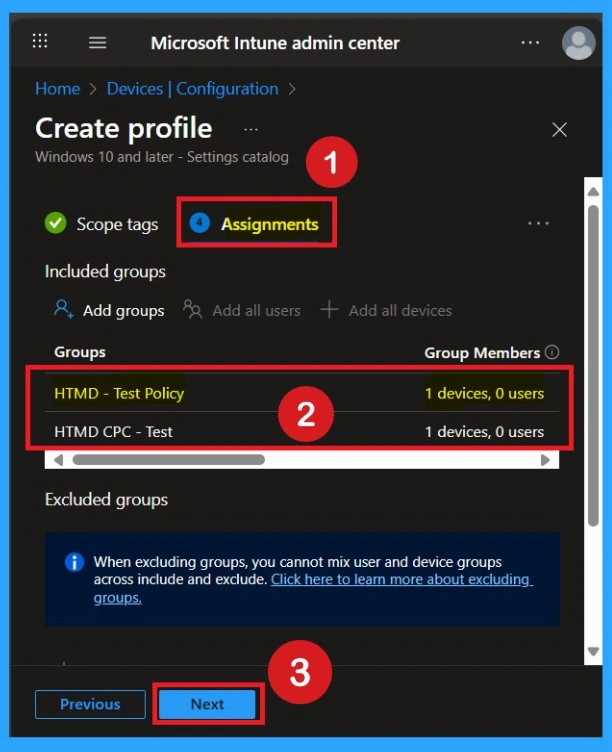
Next, you’ll reach the Assignments section, which is a very important step. This is where you decide which user or device groups should receive the policy. In this case, I selected the specific group I wanted to apply the policy to. After selecting the group, click Next to continue.
Review + Create
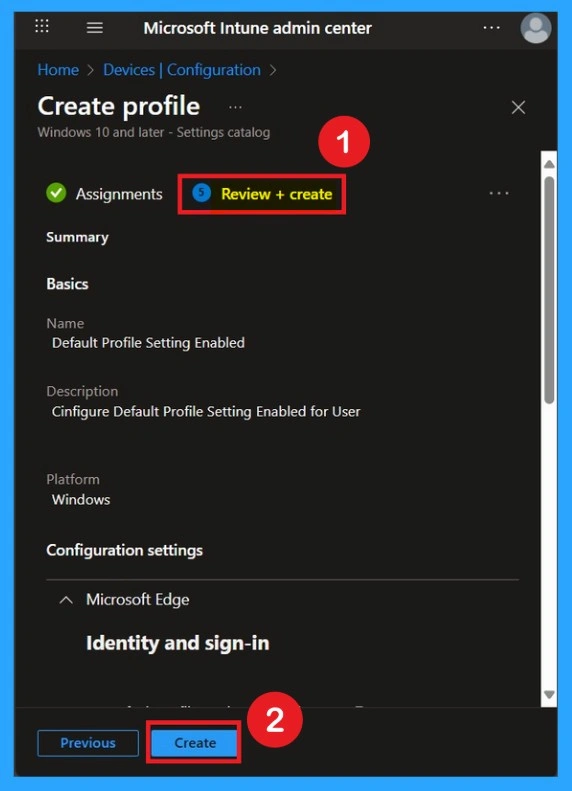
The final step is the Review + Create tab, also known as the Summary tab. Here, you’ll find a complete overview of all the details and settings you’ve configured for the policy. Take a moment to review everything carefully. If everything looks fine, click Create to complete the process.
Monitoring Status of a Policy
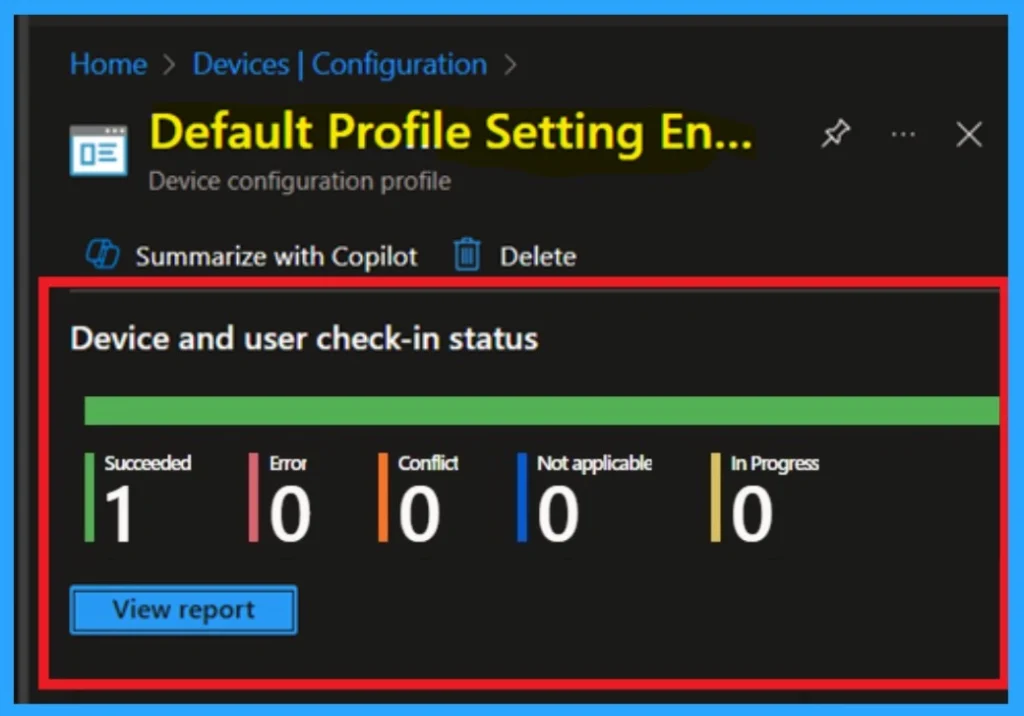
To check the status of a policy in the Intune portal, navigate to Devices > Configuration, then select the policy by name. Look for a status of Succeeded 1, which indicates that the deployment was successful.
If you want to speed up the update, you can use a manual sync from the Company Portal. Keep in mind that the status may not update that time and wait a few minutes for the sync to finish before checking again.
Client Side verification through Event Viewer
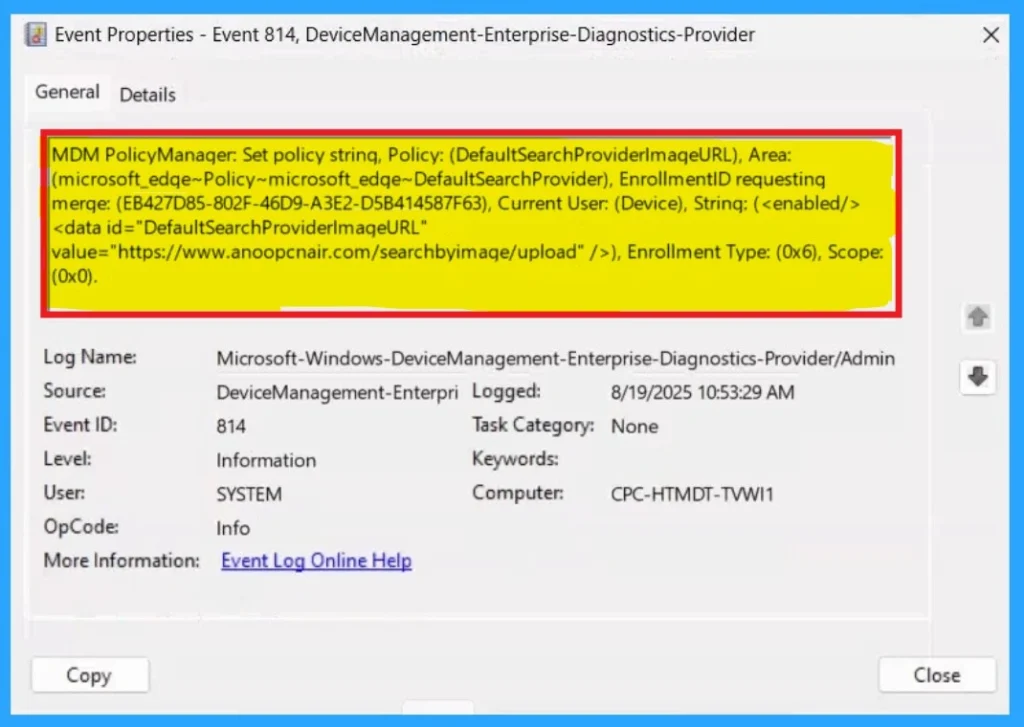
You can verify the confirmation in the Event Viewer by looking for Event ID 813 or 814. To access this, open Event Viewer and navigate to Applications and Services Logs > Microsoft > Windows >Device Management Enterprise Diagnostic Provider > Admin.
- You can see a list of policy-related events now.
- I found the policy details in the Event ID 814.
| Policy Details |
|---|
| MDM PolicyManaqer: Set policy string, Policy: (DefaultSearchProviderlmaqeURL), Area (microsoft_edqe~Policy~microsoft_edqe~DefaultSearchProvider), EnrollmentID requestinq merqe: (EB427D85-802F-46D9-A3E2-D5B414587F63), Current User: (Device), Strinq: (), Enrollment Type: (0x6), Scope:(0x0). |
How to Delete the Policy You Created
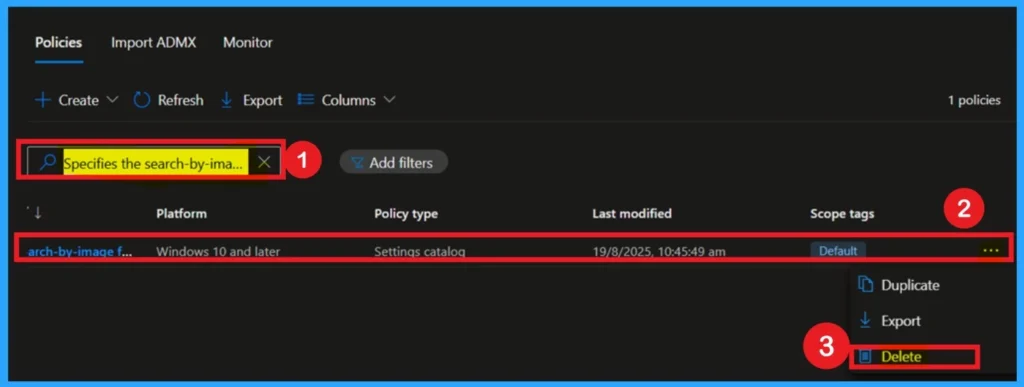
If you want to delete a policy permanently, you can do it easily. First, go to Configuration and select the profile (the policy you created). When you select the policy name, you will see a 3-dot menu. Click on it, and you will find three options: Duplicate, Export, and Delete. Choose Delete, and the policy will be permanently removed.
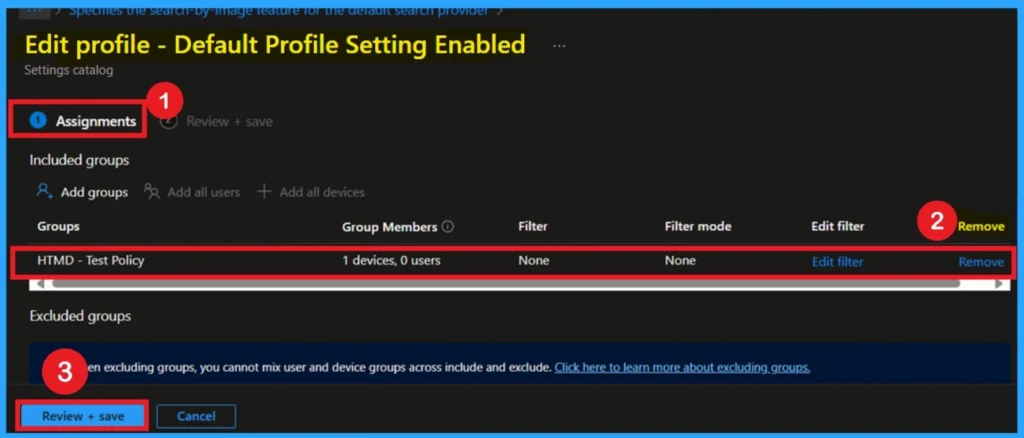
Remove a Assigned Group from the Policy
If you want to remove a policy group from the organization, you can do this through the Configuration section. First, select the policy you created, and then go to the Monitoring status page. Scroll down the window until you find the Assignments section and click Edit. From here, you can remove the policy group. Finally, click on Review + Save to apply the changes.
Need Further Assistance or Have Technical Questions?
Join the LinkedIn Page and Telegram group to get the latest step-by-step guides and news updates. Join our Meetup Page to participate in User group meetings. Also, join the WhatsApp Community to get the latest news on Microsoft Technologies. We are there on Reddit as well.
Author
Anoop C Nair has been Microsoft MVP for 10 consecutive years from 2015 onwards. He is a Workplace Solution Architect with more than 22+ years of experience in Workplace technologies. He is a Blogger, Speaker, and Local User Group Community leader. His primary focus is on Device Management technologies like SCCM and Intune. He writes about technologies like Intune, SCCM, Windows, Cloud PC, Windows, Entra, Microsoft Security, Career, etc.

