Hi, let’s discuss how to enable or disable the Delivery of Organisational Messages Policy using Intune. As you know that Organizational messages in Windows 11 let administrators send custom messages to users through certain built-in Windows experiences.
These policies are very crucial for organizations with better productivity and security. Today we are on a new topic for deploying Delivery of Organizational Messages Policy through the Intune. You know A Delivery of Organizational Messages Policy is essential for maintaining clear, and effective communication within a company and it will help the overall productivity.
Organisational Messages in Windows lets IT administrators send custom messages directly to users within the Windows system. This helps businesses share important updates, instructions, or guidance in a way that feels natural and relevant to the user’s experience.
Organisational messages are available to Administrators via services like Microsoft Endpoint Manager. By default, this policy is disabled. this Delivery of Organizational Messages sets rules on who can send official messages, how they are approved, and where they should be shared.
Table of Contents
What is the Purpose of the Delivery of Organizational Messages Policy?
The Organizational Messages Policy helps companies send important messages directly to users clearly and effectively. It improves and boosts security awareness and helps with managing changes by delivering targeted messages.
How to Enable or Disable the Delivery of Organizational Messages Policy – Windows CSP Details
Above we discuss a lot of things about delivery of organizational message policy. Now, let’s look into a CSP details. Before deploying this policy, it is essential to know the CSP (Configuration Service Provider) details, and this is very important to know for a admins.
- This setting is only a placeholder and should not be used in a production environment.
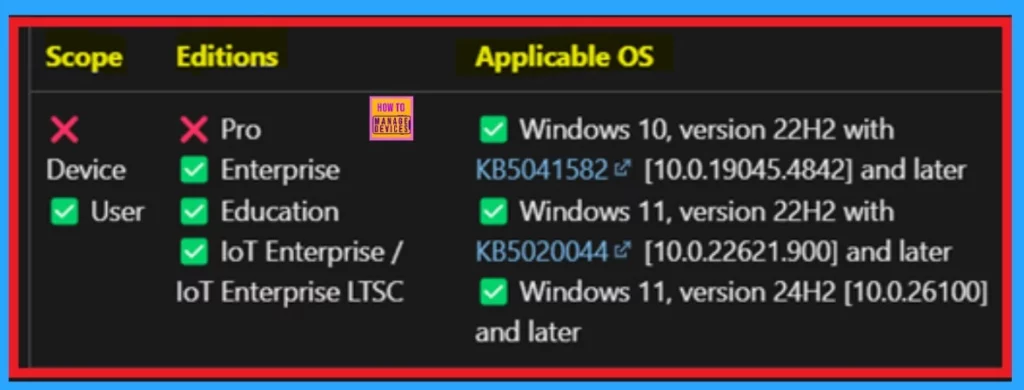
User: ./User/Vendor/MSFT/Policy/Config/Experience/EnableOrganizationalMessages
| Property name | Property value |
|---|---|
| Format | int |
| Access Type | Add, Delete, Get, Replace |
| Default Value | 1 |
- Configure Organizational Messages from the Intune Portal
- Send Notifications for Noncompliant Devices in Intune
- Organizational Messages Now Available on Microsoft 365 Admin Center
Create a Profile
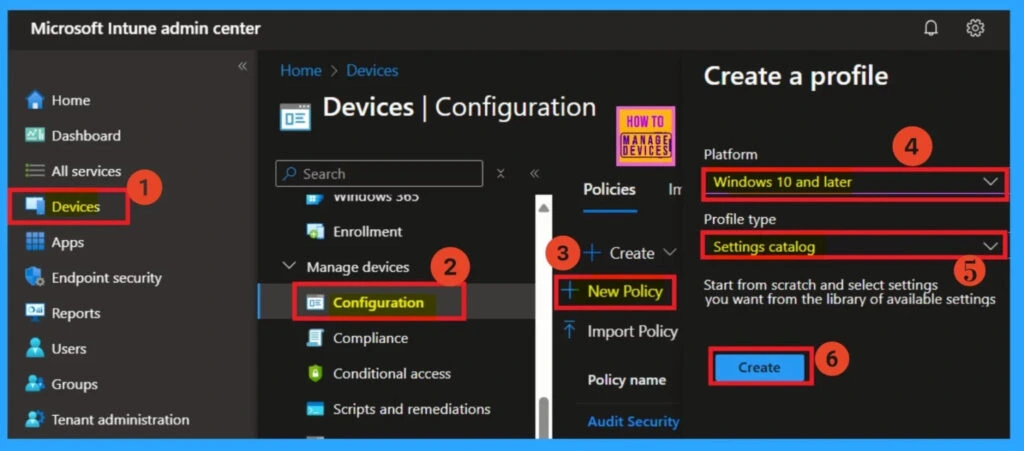
Creating a profile is the first step you need to complete in the Intune portal. Start by signing in to the Microsoft Intune Admin Center. Then, navigate to Devices > Configuration profiles, and click on + New policy. In the “Create a profile” window, select Windows 10 and later as the platform and choose Settings catalog as the profile type.
- Finally, click on the Create button to proceed.
Basic Details
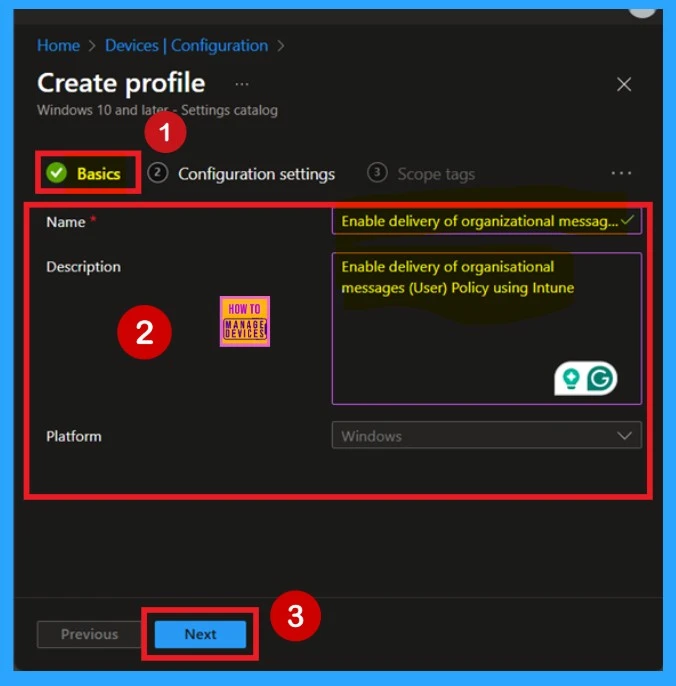
Basic details are the next step when you start deploying a policy. First, you need to enter the basic information for the policy. This includes providing a name for the policy and an optional description, which can help you understand the purpose of the policy later. The platform is set to Windows by default, so you only need to focus on entering the policy name.
- Once the details are done, click Next to proceed.
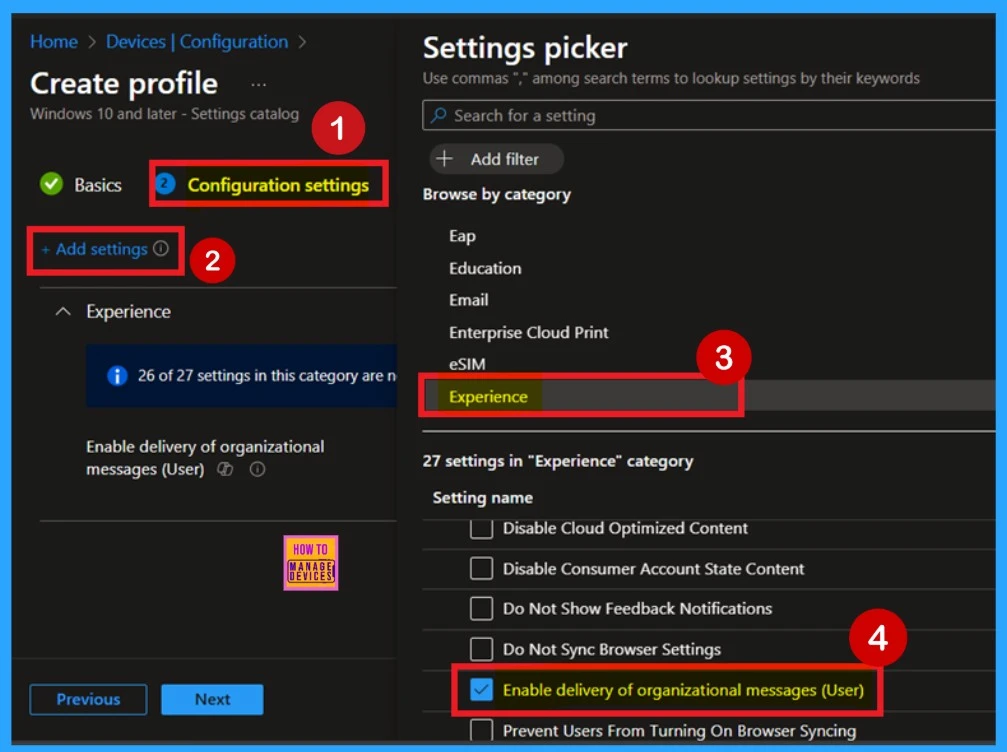
Configuration Settings – Intune Settings Picker
After completing the basics, you will be taken to the Configuration settings page. Here, you’ll see an “Add settings” button highlighted in blue color and click on it. This opens the Settings Picker window, which is a crucial step for deploying the policy correctly. In the Settings Picker window, click on the Experience category. Once selected, you will see various policy options.
Look for and select the Enable delivery of organizational messages (users) option. When you click on it, a blue check mark will appear next to the setting. Then, click the Close button on the Settings Picker to continue.
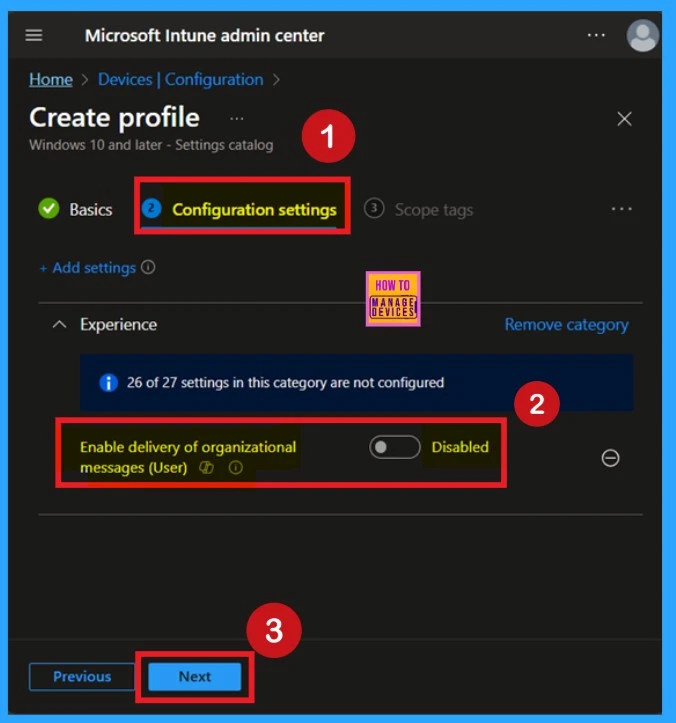
Disabled the Policy
After closing the Settings Picker, you will return to the Configuration settings page. Here, you can see that the selected policy has now appeared. By default, it is set to “Disabled“. If you want to proceed with the policy in its disabled mode, you can simply click Next to continue.
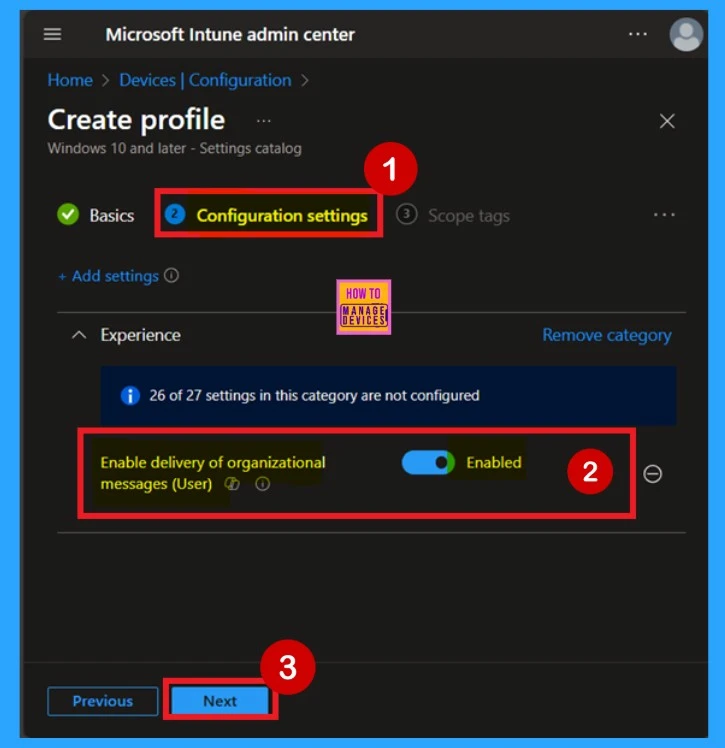
Enable the Policy
On the Configuration settings page, you’ll see the policy name. Next to it, there is a toggle button. When the policy is disabled, the toggle appears in a faded color. To enable the policy, simply click and drag the toggle to the right. It will then turn blue and be labelled “Enabled“, indicating that the policy is now active.
- After enabling it, click Next to continue.
- In this guide, I Continue with the Enable mode of the policy.
Scope Tags
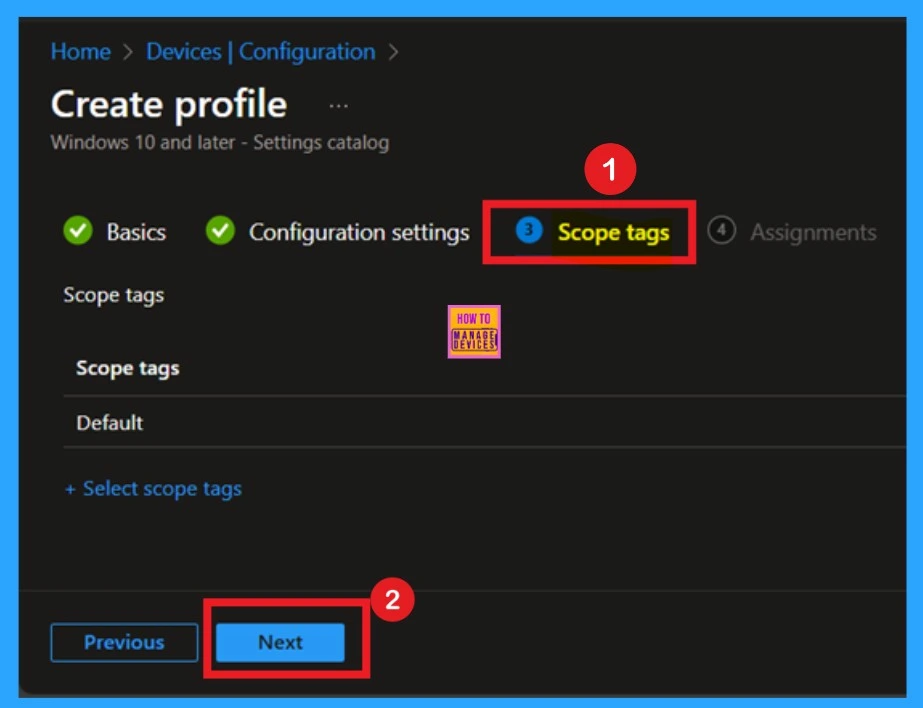
Now, you are on the Scope tags page. Scope tags can be important in certain cases for policy deployment. In this example, I chose to skip this section. However, if you want to add a scope tag to the policy, you can select the “Add scope tag” option, which is highlighted in blue.
- Here, I’m skipping this step, so I click Next to continue.
Assignments
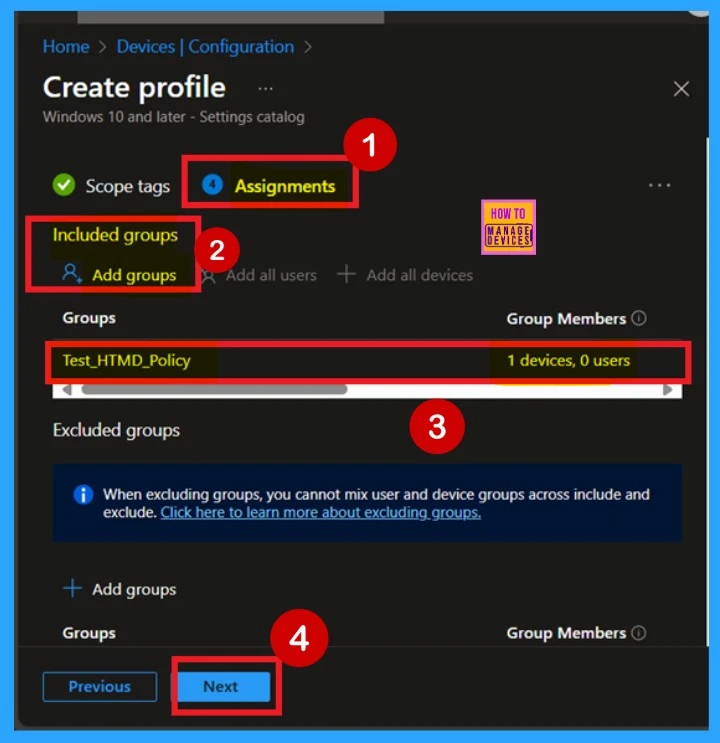
When deploying a policy, the main goal is to specify which organizational group the policy should be applied to. This is done in the Assignments section, which allows administrators to deploy the policy to a specific group. In this tab, you can easily make your selection by clicking on “Add groups” under the Include section.
Once you click on that, you’ll see a list of available groups. Here, I selected our Test_ HTMD_ Policy group. After selecting the group, the assignment is complete, and you can click Next to proceed.
- Always remember you can add 1 or more groups for the policy.
Review + Create
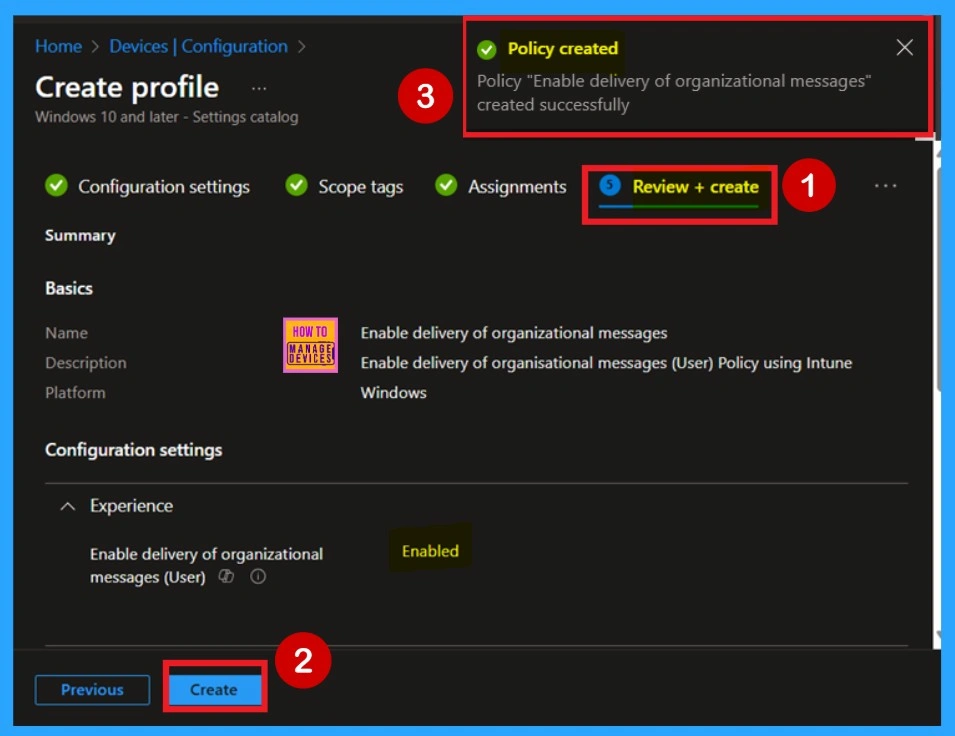
The final stage is the Review + Create section. In this step, you don’t need to make any changes. You can review a summary of the deployment you configuring. This includes the basic details, configuration settings, assignment details, and more. If you need to make any changes, you can easily go back to the previous tabs and edit them.
- Once everything looks correct, click on Create.
- You will then receive a notification confirming that the policy has been created successfully.
Device and User Check-in Status
After creating the policy, our main concern is whether the policy has been successfully deployed, right? You can verify this after the policy creation. Always remember that policy deployment may take up to 8-hour waiting period. If you’ve synced the policy in through the Company Portal, you can easily check the deployment status.
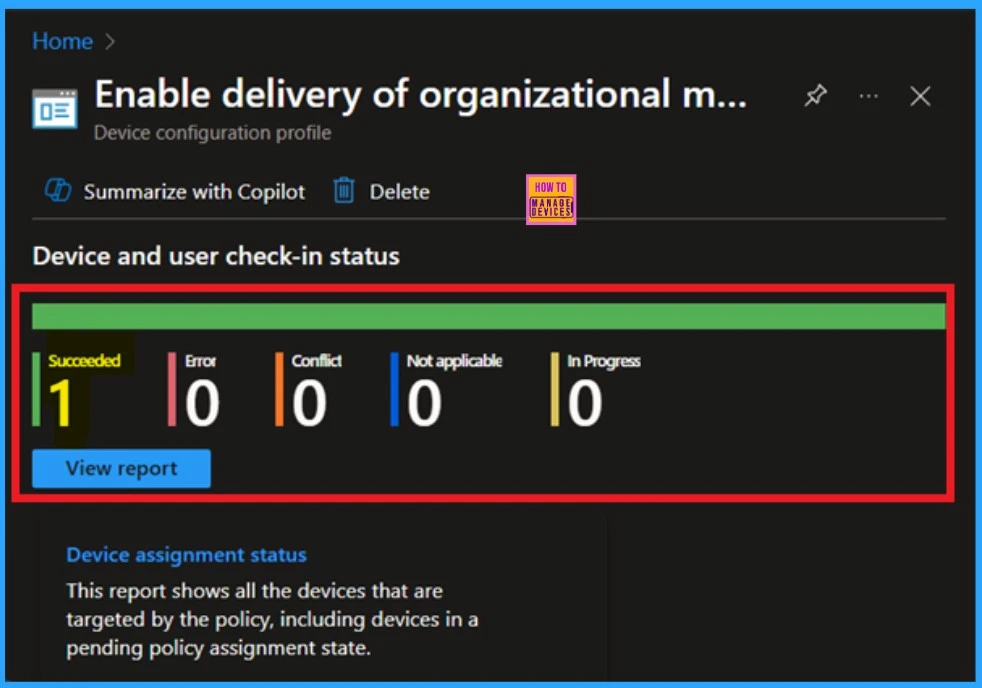
To do this, go to Devices > Configuration and in the list of configuration policies, search for the name you give to your policy. Once you find it, click on it to view the device and user check-in status.
- Here, you can see the screenshot below to see whether the policy has been successfully not.
- It shows “Succeeded: 1” It indicates that the policy is deployed successfully.
Client-Side Verification
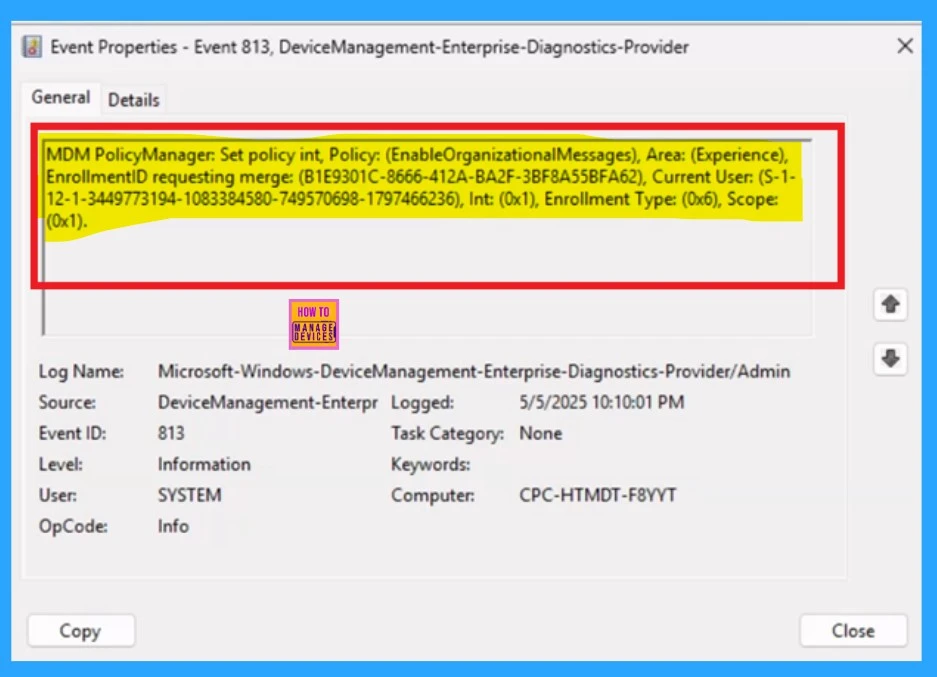
The next you can check the confirmation through the Event viewer. Here first go to the Event Viewer and check the Event ID that is usually in 813 or 814. Navigate to Applications and Services Logs > Microsoft > Windows > Device Management > Enterprise Diagnostic Provider > Admin.
Then you will get a list of policy information. Sometimes it’s very difficult to understand the policy in which Event ID have the results. So you can use the filter current log located in the right pane. Now you can filter the results easily.
- Here I get the policy details from the 813 Event ID.
| Policy Details |
|---|
| MDM PolicyManager: Set policy int, Policy: (EnableOrganizationalMessages), Area: (Experience), EnrollmentID requesting merge: (B1E9301C-8666-412A-BA2F-3BF8A55BFA62), Current User: (S-1- 12-1-3449773194-1083384580-749570698-1797466236), Int: (0x1), Enrollment Type: (0x6), Scope: (0x1). |
How to Delete Delivery of Organizational Messages Policy
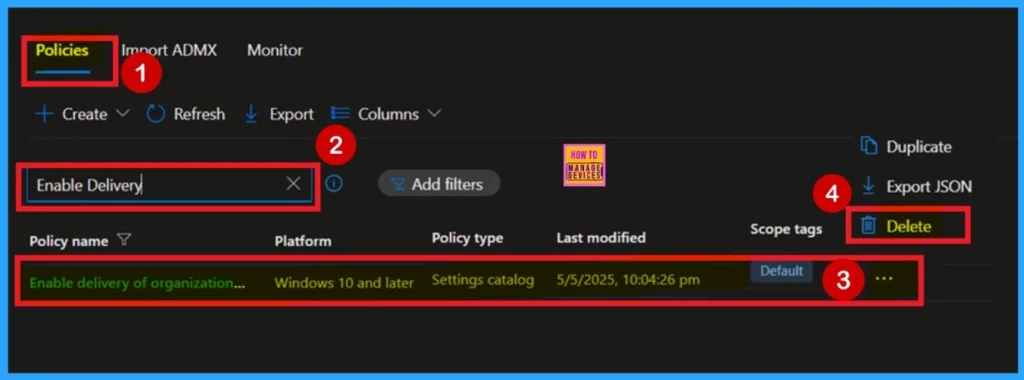
First, sign in to the Microsoft Intune Admin Center. Then, navigate to Devices > Configuration profiles, and select the policy you created or the one you want to delete. In the policy details page, you will see a 3-dot menu.
Click on the 3 dots, and you will see a Delete option. Click on it to remove the policy. You can also refer to the screenshot below for better understanding.
For more information, you can refer to our previous post – How to Delete Allow Clipboard History Policy in Intune Step by Step Guide.
How to Remove Delivery of Organizational Messages Policy
You have to know about the Remove the Delivery of Organizational Messages Policy. To do this, open the policy from the Configuration tab and click on the Edit button on the Assignment tab. Click on the Remove button on this section to remove the policy.
For detailed information, you can refer to our previous post – Learn How to Delete or Remove App Assignment from Intune using by Step-by-Step Guide.

Need Further Assistance or Have Technical Questions?
Join the LinkedIn Page and Telegram group to get the latest step-by-step guides and news updates. Join our Meetup Page to participate in User group meetings. Also, Join the WhatsApp Community to get the latest news on Microsoft Technologies. We are there on Reddit as well.
Author
Anoop C Nair has been a Microsoft MVP for 10 consecutive years from 2015 onwards. He is a Workplace Solution Architect with more than 22+ years of experience in Workplace technologies. He is a Blogger, Speaker, and Local User Group Community leader. His primary focus is on Device Management technologies like SCCM and Intune. He writes about technologies like Intune, SCCM, Windows, Cloud PC, Windows, Entra, Microsoft Security, Career, etc.

