Let’s discuss How to Enable Device Enumeration Policy to Block Untrusted DMA Devices using Intune. Microsoft Intune provide Device Enumeration Policy setting to enhance security against malicious Direct Memory Access (DMA) attacks from external devices.
This policy dictates how external devices capable of DMA, but incompatible with DMA remapping, are handled by the system. Organizations can configure this policy for several reasons. This policy helps to his policy to mitigate a specific type of attack known as a “cold boot attack” or “DMA attack“.
In DMA attacks, an attacker can connect a malicious device (like a custom USB drive or a Thunderbolt device) to a target computer while it’s locked or in a low-power state. The device can then use DMA to bypass the operating system’s security and directly read sensitive data from the computer’s memory, such as encryption keys or login credentials.
The policy ensures that only devices with DMA remapping-compatible drivers are allowed to perform DMA at all times. Devices without this capability are either blocked entirely or restricted to specific times, such as after a user has logged in, which significantly reduces the attack surface.
Table of Contents
How to Enable Device Enumeration Policy to Block Untrusted DMA Devices using Intune
This policy is intended to provide additional security against external DMA capable devices. It allows for more control over the enumeration of external DMA capable devices incompatible with DMA Remapping/device memory isolation and sandboxing. Device memory sandboxing allows the OS to leverage the I/O Memory Management Unit (IOMMU) of a device to block unallowed I/O, or memory access, by the peripheral.
In other words, the OS assigns a certain memory range to the peripheral. If the peripheral attempts to read/write to memory outside of the assigned range, the OS blocks it. This policy only takes effect when Kernel DMA Protection is supported and enabled by the system firmware.
- Kernel DMA Protection is a platform feature that cannot be controlled via policy or by end user.
- It has to be supported by the system at the time of manufacturing.
- To check if the system supports Kernel DMA Protection, please check the Kernel DMA Protection field in the Summary page of MSINFO32. exe. NoteThis policy does not apply to 1394/Firewire, PCMCIA, CardBus, or ExpressCard devices.
- Enable Disable Auto Deletion of Memory Dumps on Low Disk Space in Windows 11
- Enable Component Updates in MS Edge to Enhance Browser Security using Intune
- Enable Security State Policy to Prevent Data Leakage in MS Edge Browser using Intune
Start Policy Creation from Intune Portal
This policy act as a crucial tool for admins to implementing a proactive security posture. Instead of reacting to a potential data breach, they can prevent a specific attack vector entirely. Follow the Steps to Start policy configuration.
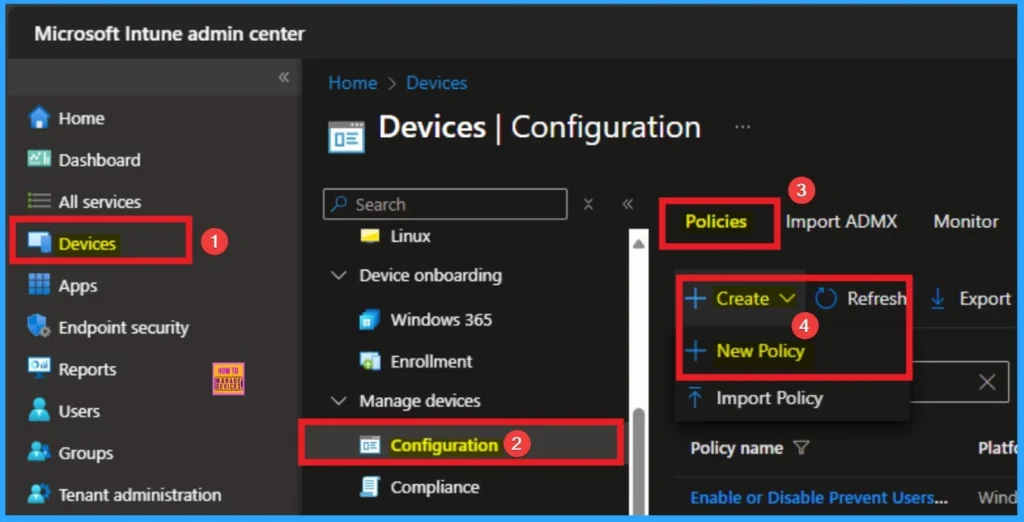
- Sign in with Microsoft Intune Admin center.
- Go to Devices > Configuration > +Create >+ New Policy.
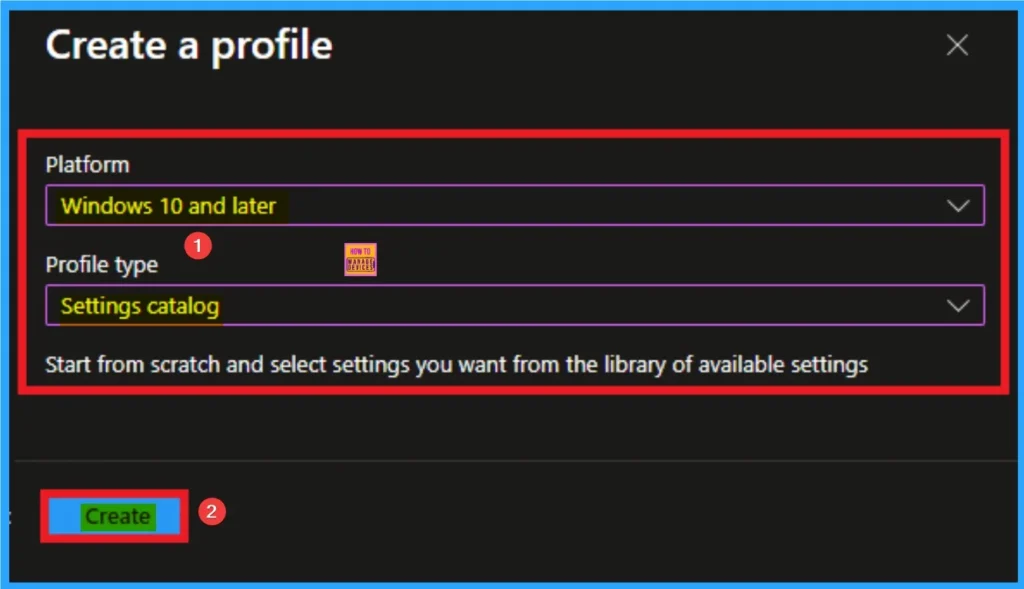
Selecting Platform and Profile Type
Selecting Platform and Profile Type is the next step we have to do. This is very essential to apply the policy to appropriate Platform and Profile Type. Here I would like to configure the policy to Windows 10 and later platform and settings catalog profile. Then click on the Create button.
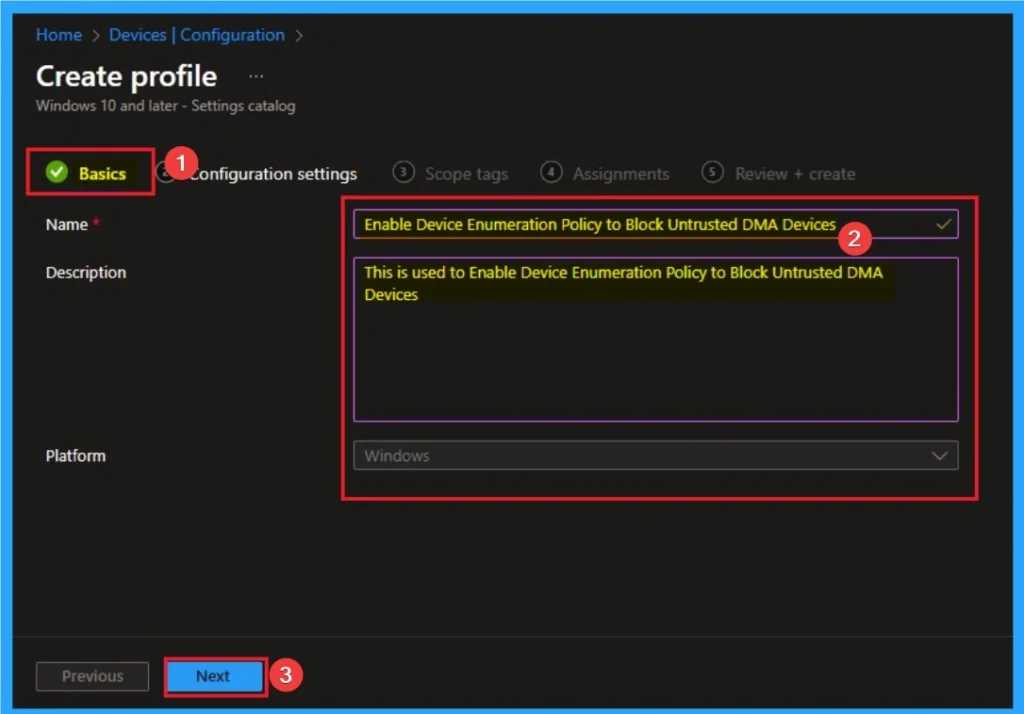
Beginning of Policy with Basic Tab
As per the heading, basic tab is the begging stage that helps you to add basic details like name and description for the policy. Here is Name is mandatory and description is optional. After adding this click on the Next button.
Configuration Settings for Selecting Settings
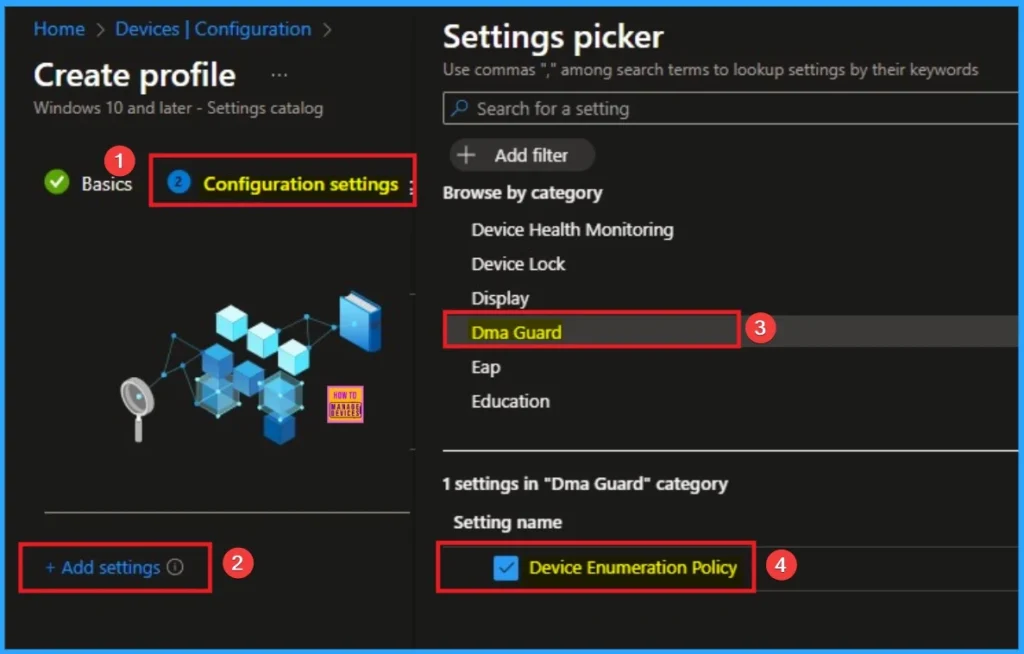
From the configuration settings tab you can access settings picker to select specific settings for policy creation. To get the Settings Picker, click on the +Add settings hyperlink. Here, I would like to select the settings by browsing by Category. I choose Dma Guard. Then, I choose Device Enumeration Policy settings.
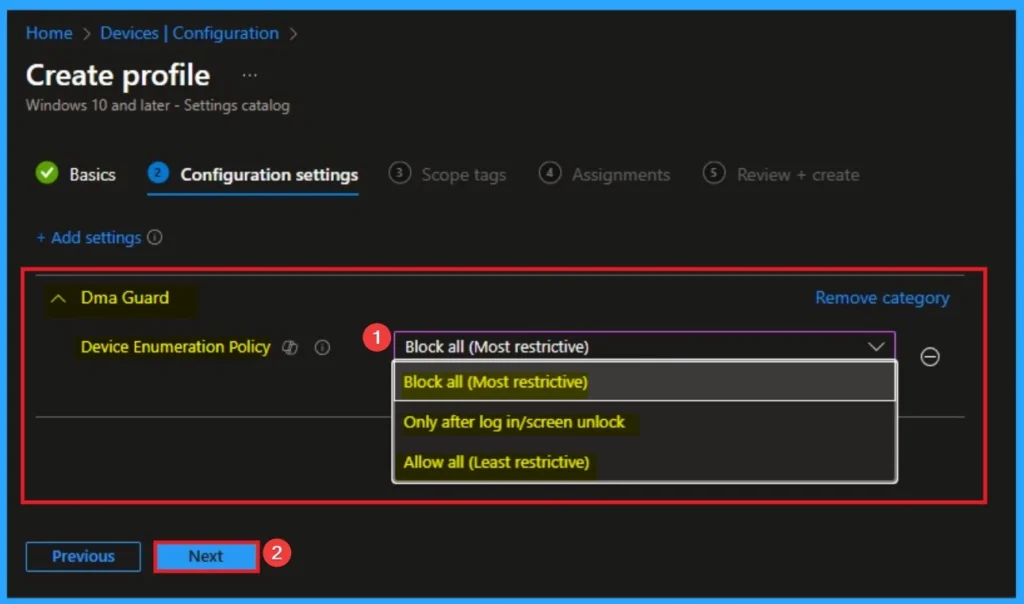
Choose Value for Device Enumeration Policy
With the policy enabled (especially at the default or most restrictive setting), this attack is prevented. Without this policy, the malicious device could use DMA to bypass the operating system’s lock screen and steal sensitive data directly from the system’s memory. There are 3 values available for this policy and you can choose according to your preferences. Here I select Block all (Most restrictive) value. The below table shows all valuea avialble for this policy.
| Values | Details |
|---|---|
| (0) Block all (Most restrictive | Devices with DMA remapping compatible drivers will be allowed to enumerate at any time. Devices with DMA remapping incompatible drivers will never be allowed to start and perform DMA at any time |
| (1) Only after log in/screen unlock (Default): | Devices with DMA remapping compatible drivers will be allowed to enumerate at any time. Devices with DMA remapping incompatible drivers will only be enumerated after the user unlocks the screen |
| 2 – Allow all (Least restrictive): | All external DMA capable PCIe devices will be enumerated at any time |
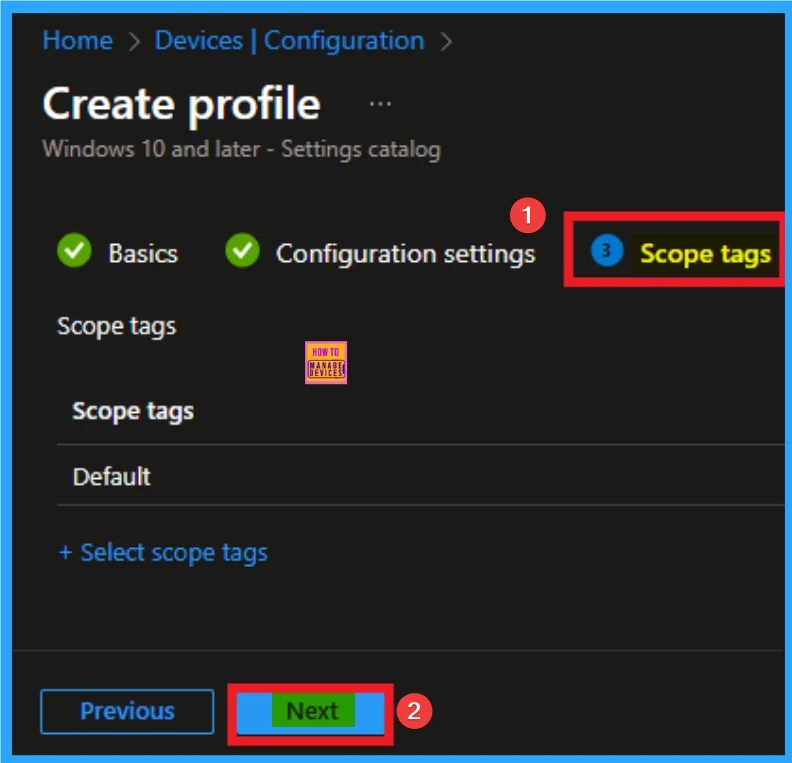
Adding Scope Tags
Scope Tags sections help you add restrictions to the visibility of the Policy. But it is not a mandatory step, so you can skip this step. Here, I don’t add scope tags for Device Enumeration Policy. Click on the Next button.
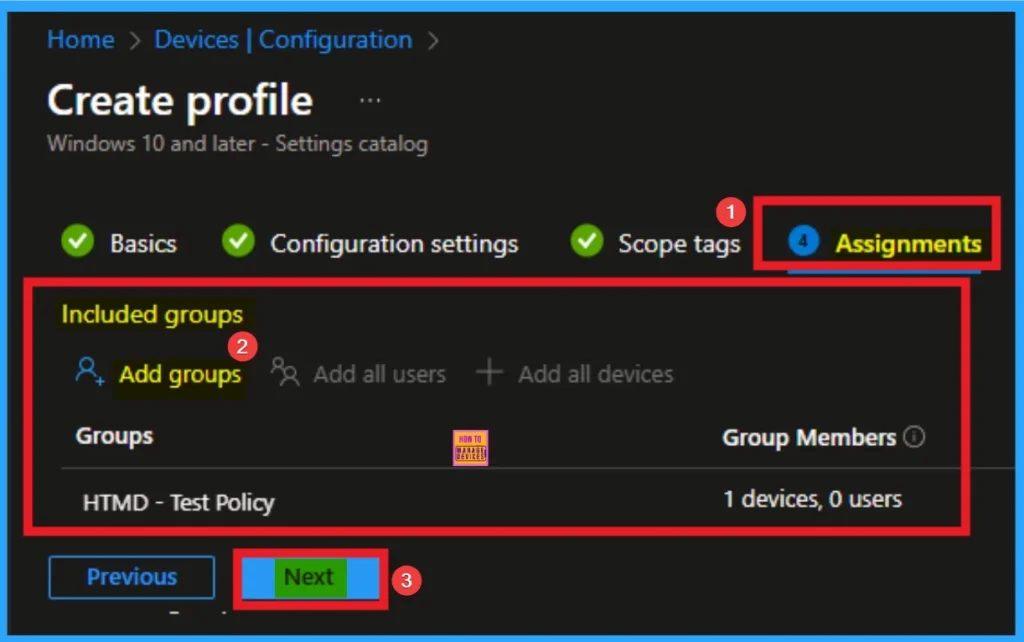
Selecting Group from the Assignment Tab
To assign the policy to specific groups, you can use the Assignment Tab. Here I click, +Add groups option under Included groups. I choose a group from the list of groups and click on the Select button. Again, I click on the Select button to continue.
Review + Create Tab
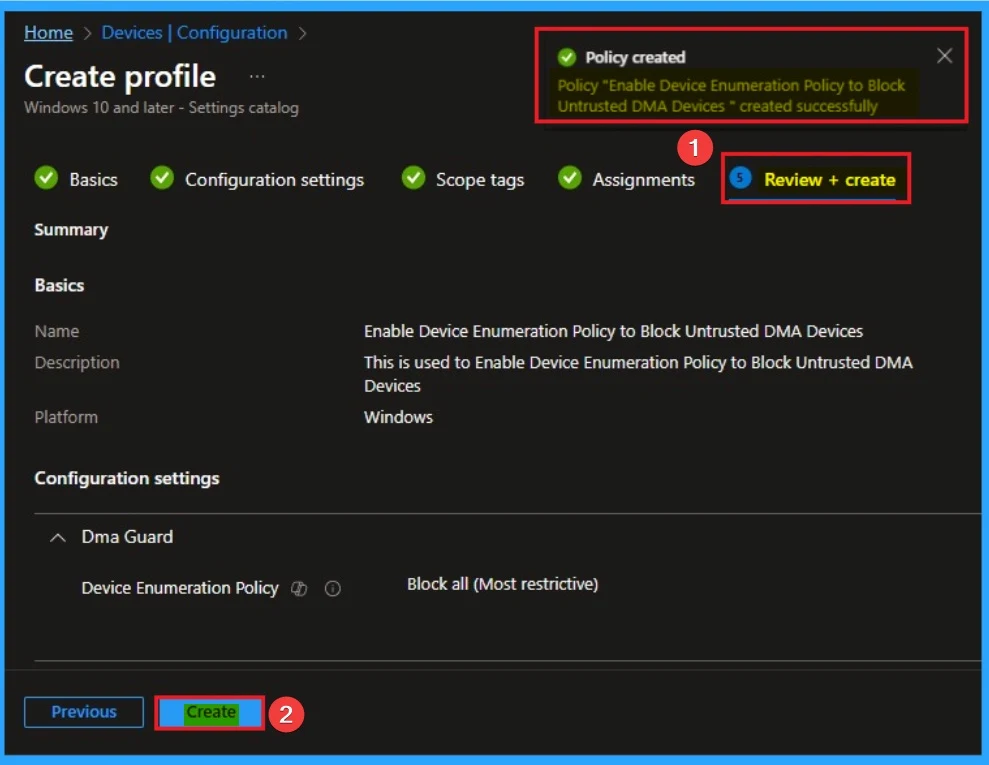
Before completing the policy creation, you can review each tab to avoid misconfiguration or policy failure. After verifying all the details, click on the Create Button. After creating the policy, you will get a success message.
Monitoring Status
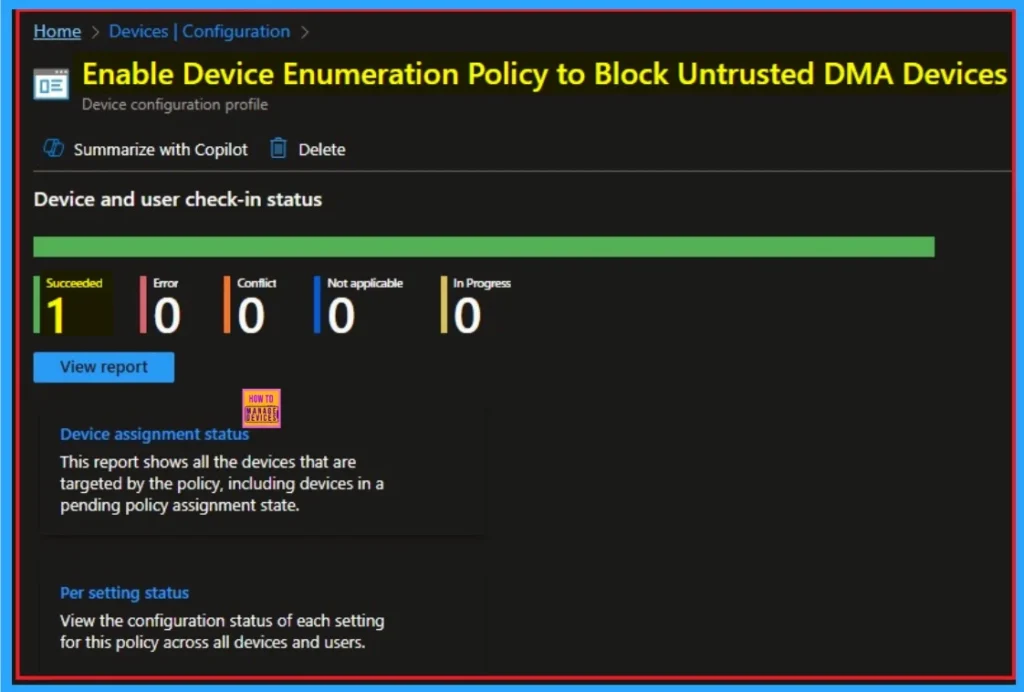
The Monitoring Status page shows whether the policy has succeeded or not. To quickly configure the policy and take advantage of the policy sync, the device on the Company Portal, Open the Intune Portal. Go to Devices > Configuration > Search for the Policy. Here, the policy shows as successful.
Event Viewer
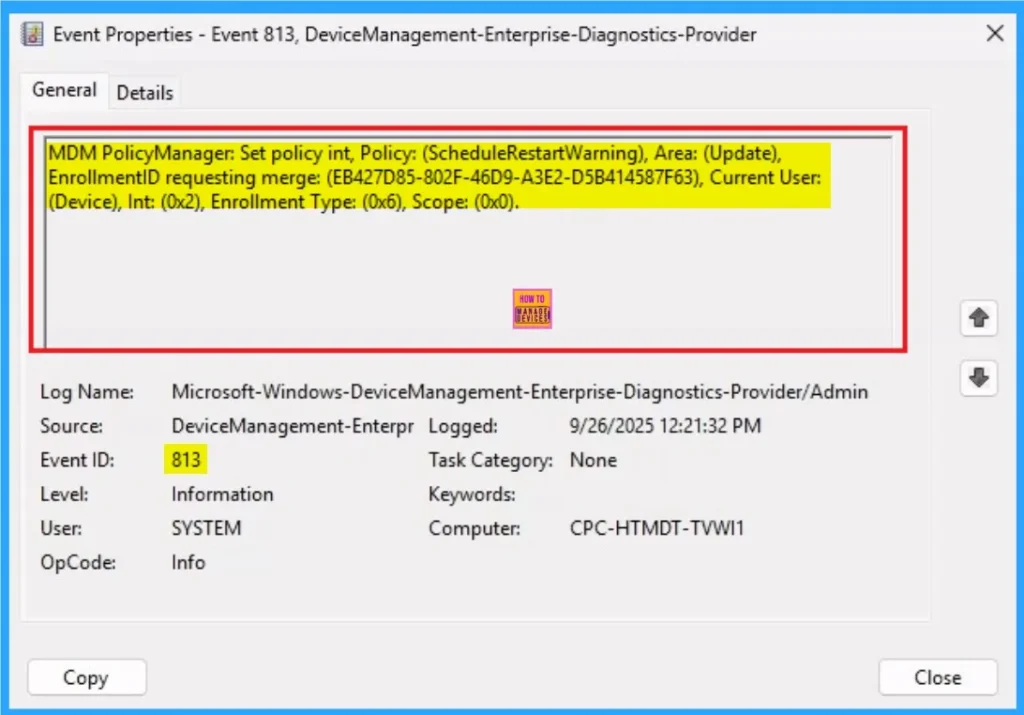
It helps you check the client side and verify the policy status. Open the Client device and open the Event Viewer. Go to Start > Event Viewer. Navigate to Logs: In the left pane, go to Application and Services Logs > Microsoft > Windows > DeviceManagement-Enterprise-Diagnostics-Provider > Admin.
- You will get the success result on Event ID 813
Removing the Assigned Group from Device Enumeration Policy Settings
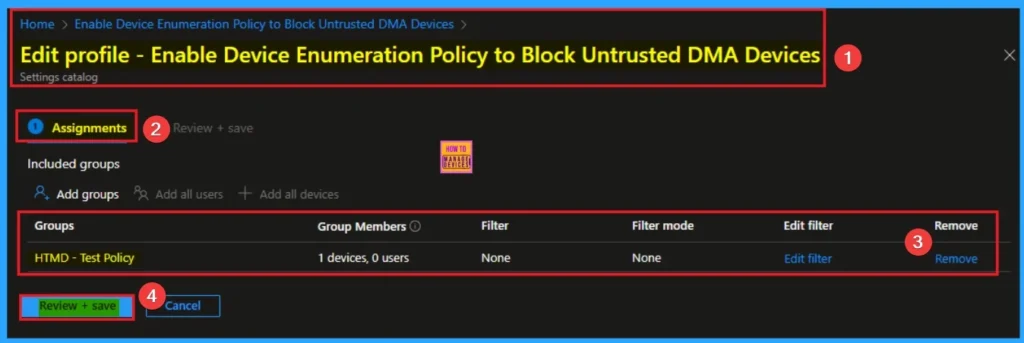
If you want to remove the Assigned group from the policy, it is possible from the Intune Portal. To do this, open the Policy on Intune Portal and edit the Assignments tab and the Remove Policy.
To get more detailed information, you can refer to our previous post – Learn How to Delete or Remove App Assignment from Intune using by Step-by-Step Guide.
How to Delete Device Enumeration Policy
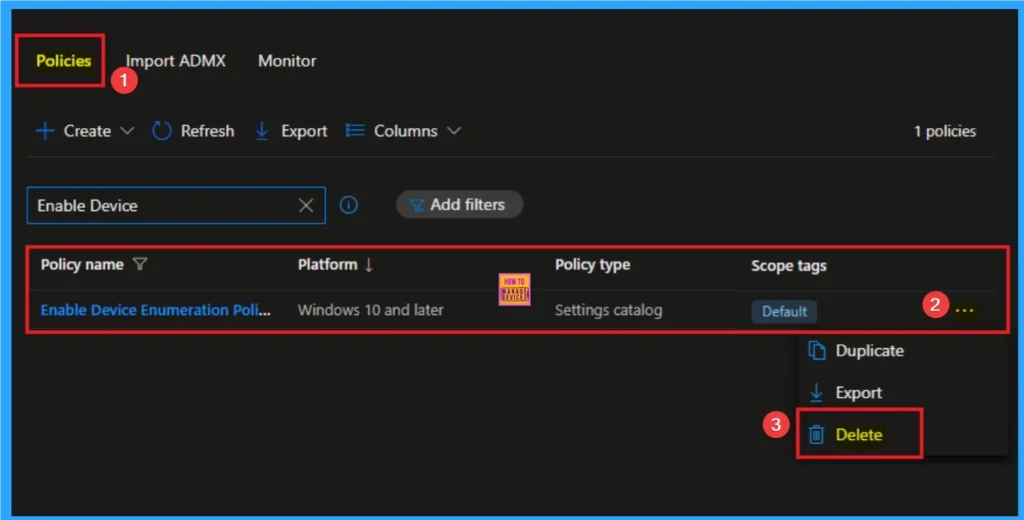
You can easily delete the Policy from the Intune Portal. From the Configuration section, you can delete the policy. It will completely remove it from the client devices.
For detailed information, you can refer to our previous post – How to Delete Allow Clipboard History Policy in Intune Step by Step Guide.
Windows CSP Details
Enumeration policy for external DMA-capable devices incompatible with DMA remapping. This policy only takes effect when Kernel DMA Protection is enabled and supported by the system. Note this policy doesn’t apply to 1394, PCMCIA or ExpressCard devices.
This policy is intended to provide more security against external DMA capable devices. It allows for more control over the enumeration of external DMA capable devices that are incompatible with DMA Remapping, device memory isolation and sandboxing.
Description Framework Properties
The Description framework properties of Device Enumeration Policy shows the Property name Property value. The below table shows more details.
| Property name | Property value |
|---|---|
| Format | int |
| Access Type | Add, Delete, Get, Replace |
| Default Value | 1 |
Group Policy Mapping
This policy requires a system reboot to take effect. The below table shows the group policy mapping details of Device Enumeration Policy.
| Name | Value |
|---|---|
| Name | DmaGuardEnumerationPolicy |
| Friendly Name | Enumeration policy for external devices incompatible with Kernel DMA Protection |
| Location | Computer Configuration |
| Path | System > Kernel DMA Protection |
| Registry Key Name | Software\Policies\Microsoft\Windows\Kernel DMA Protection |
| ADMX File Name | DmaGuard.admx |

OMA URI Settings
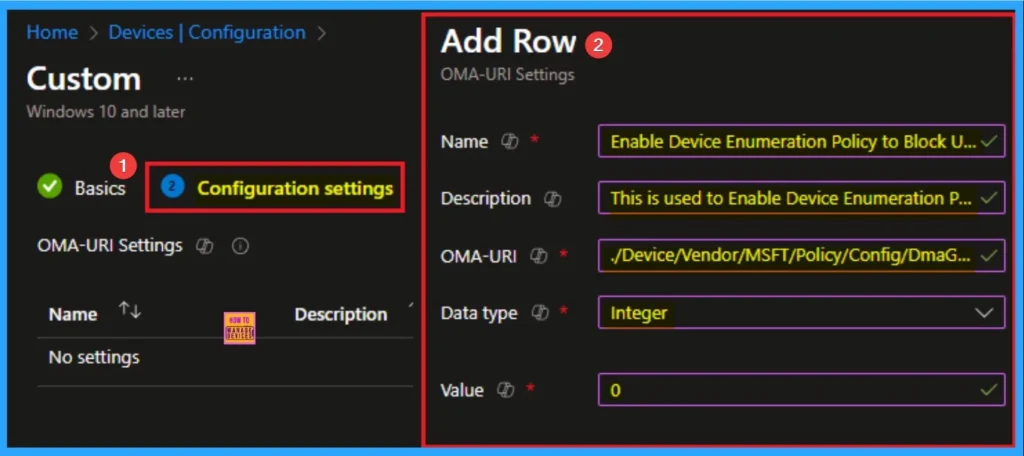
It can be easily configured throug CSP. You can create OMA URI Settings by Sign in Intune Portal. Devices > Configuration. Click on Create to start a new policy. Choose the platform as Windows 10 or later. For the Profile type, select Templates, then choose Custom. Provide a name for the policy, such as Enable Device Enumeration Policy and add a description if needed.
- Click on + Add under OMA-URI Settings to configure the specific setting.
- To Configure the OMA-URI Setting Enter Name and Description
- Enter the following OMA-URI path:
- ./Device/Vendor/MSFT/Policy/Config/DmaGuard/DeviceEnumerationPolicy
- Enter the value
- 1 – (Default)Only after log in/screen unlock.
- 0 Block all (Most restrictive).
- 2 Allow all (Least restrictive).
- After entering the above details, click the Save button.
Need Further Assistance or Have Technical Questions?
Join the LinkedIn Page and Telegram group to get the step-by-step guides and news updates. Join our Meetup Page to participate in User group meetings. Also, Join the WhatsApp Community to get the latest news on Microsoft Technologies. We are there on Reddit as well.
Author
Anoop C Nair has been Microsoft MVP for 10 consecutive years from 2015 onwards. He is a Workplace Solution Architect with more than 22+ years of experience in Workplace technologies. He is a Blogger, Speaker, and Local User Group Community leader. His primary focus is on Device Management technologies like SCCM and Intune. He writes about technologies like Intune, SCCM, Windows, Cloud PC, Windows, Entra, Microsoft Security, Career, etc

