In this article, am going to discuss, how to create elevate as current user EPM rules policy using Microsoft Intune. Endpoint Privilege Management (EPM) allows companies to manage elevation requests for standard users securely. With the October 2025 update, a new elevation type, elevate as current user was added to the policy configuration options.
This feature enables processes to run with elevated privileges under the current user context, rather than using a virtual administrator account. This is particularly useful for scenarios where applications require access to user-specific resources like registry keys or network shares authenticated via Kerberos.
When using Elevate as the current user elevation type, files or processes run with elevated permissions under the signed-in user’s account, rather than a virtual account. This approach preserves the user’s profile paths, environment variables, and personalized settings, ensuring that installers and tools that depend on the active user profile function properly.
Since the elevated process retains the same user identity both before and after elevation, the audit trails remain consistent and accurate. Before elevation occurs, the user must enter their credentials for Windows Authentication, which supports multifactor authentication (MFA) for added security.
Table of Contents
EPM Rules Policy Elevation Types
Microsoft Intune Endpoint Privilege Management (EPM) supports five elevation types in its rules policy configuration. Here’s a breakdown of each elevation type available in Intune’s EPM rules policy. These elevation types are selectable when defining a new elevation rules policy in Intune. The choice depends on the level of trust, user interaction, and administrative control required for the targeted executable or script.
| Rules Policy Elevation Types | Description |
|---|---|
| User confirmed | The default option. Prompts the user to confirm elevation before proceeding. Useful for semi-trusted tasks where user awareness is important. |
| Automatic | Elevation occurs silently without user interaction. Ideal for trusted applications or scripts that need to run without interruption. |
| Deny | Explicitly blocks elevation for the specified file or script. Helps enforce security boundaries by preventing unauthorized elevation. |
| Support approved | Requires approval from IT support before elevation is granted. Adds a layer of oversight for sensitive operations. |
| Elevate as current user | Introduced in October 2025, this option allows elevation within the current user context rather than using a virtual administrator account. It’s especially useful for apps that rely on user-specific resources like HKCU registry keys or Kerberos-authenticated shares. |
- How to Configure Support Approved EPM Elevation using Intune | Highly secured option
- Configure User Confirmed EPM Elevation Settings Policy using Microsoft Intune
- Configure Endpoint Privilege Management EPM Reusable Settings Policy using Intune
- Most Restrictive Elevation Behaviour with Intune Endpoint Privilege Management using Intune
Create a Current User EPM Elevation Rules Policy in Intune
To create a policy for Endpoint Privilege Management Current User Elevation Rules from scratch, begin by signing into the Microsoft Intune Admin Center using your administrator credentials.
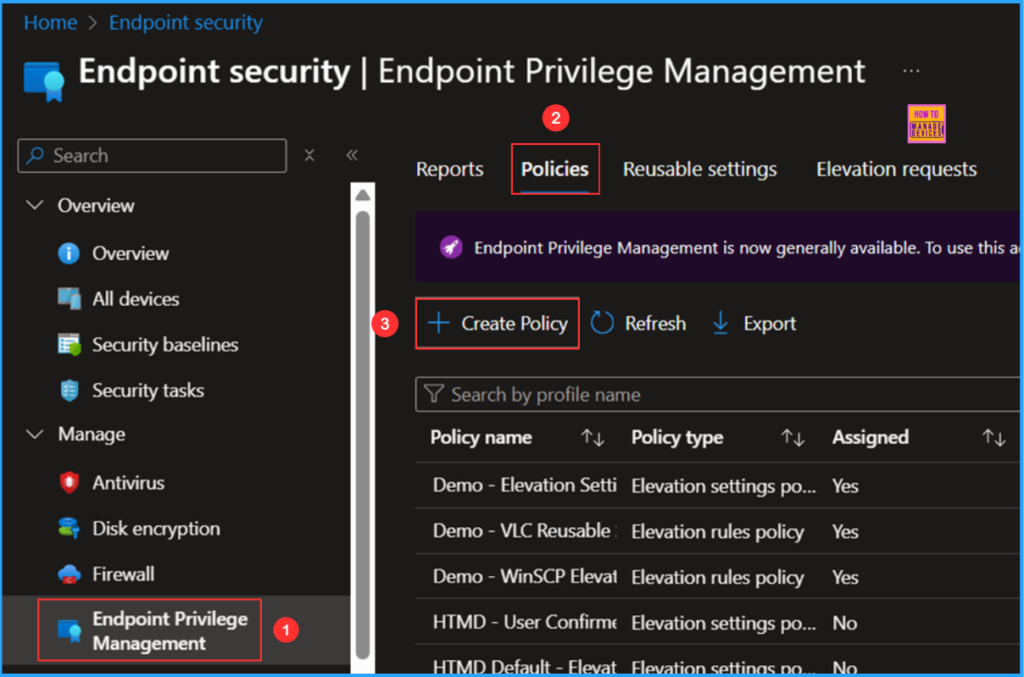
- Navigate to Endpoint Security > Endpoint Privilege Management > Choose Policies
- Click on +Create policy
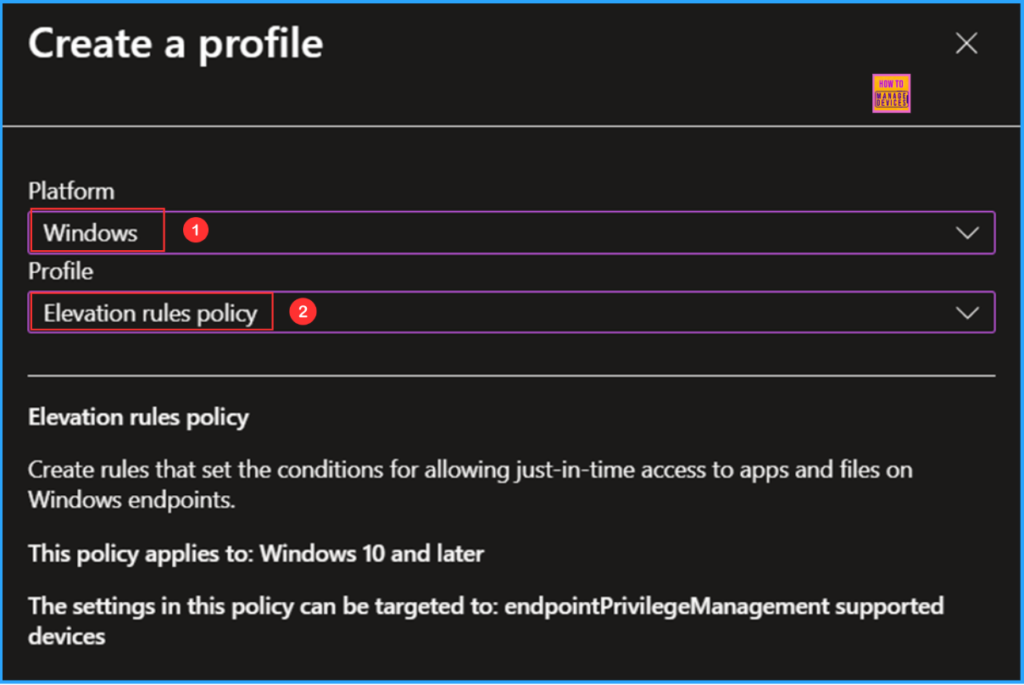
In the Create a profile window, select Platform as Windows and choose Profile as Elevation rules policy. An other option is the Elevation Settings Policy, which configures and enables the EPM service. For now, we will focus exclusively on the Elevation Rules Policy.
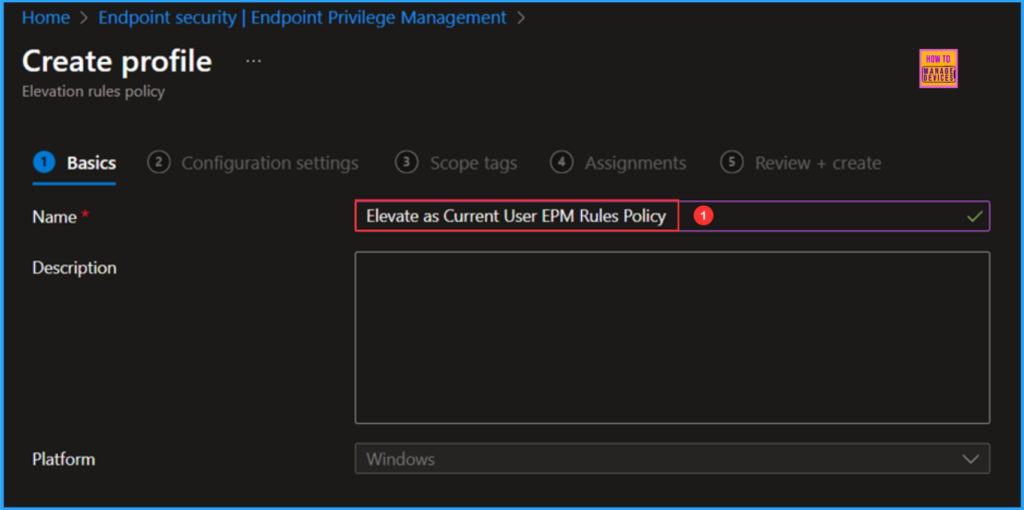
On the Basics page, I will enter our policy name as Elevate as Current User EPM Rules Policy. If necessary, provide a brief description of the policy and then click Next.
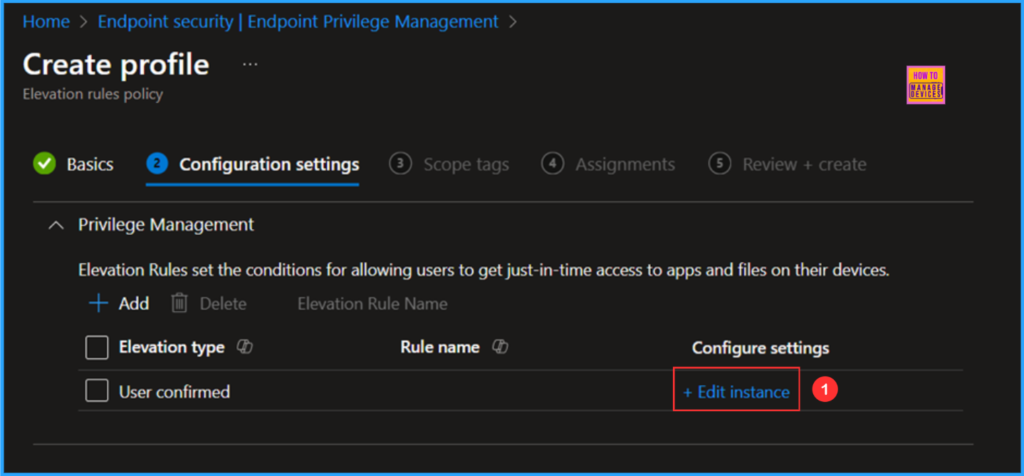
On the Configuration settings page, Elevation Rules define the conditions that allow users to gain just-in-time access to apps and files on their devices. By default, the Elevation type will show as User Confirmed. To change the settings, click the +Edit instance under the Configure settings option.
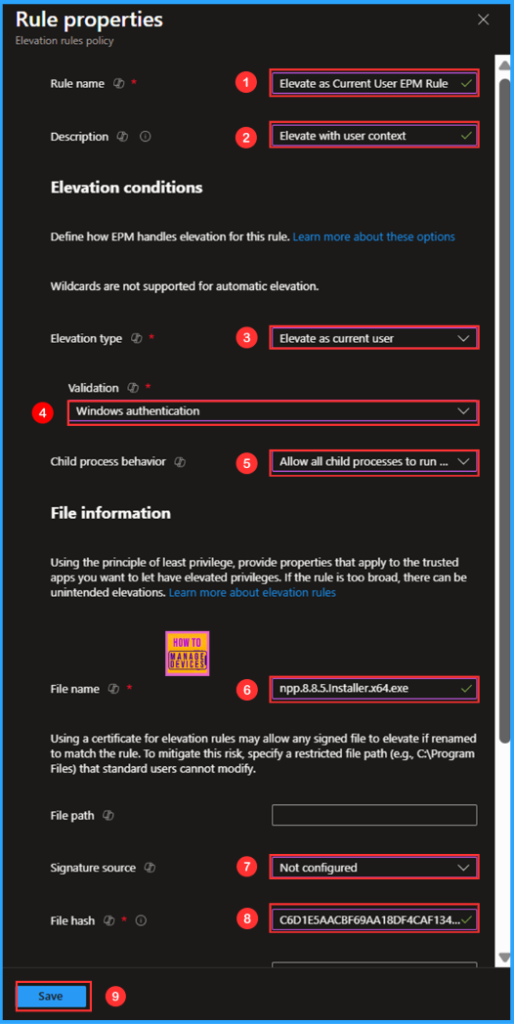
We will now configure the Rule Properties screen using the “Elevate as Current User” elevation type. Several options are mandatory, so please review the following selections carefully. In this case, I will be allowing the application Notepad ++ through the Elevation Rules policy.
Note: To obtain the file hash, you must first install the EPM PowerShell module. Import-Module “C:\Program Files\Microsoft EPM Agent\EpmTools\EpmCmdlets.dll”. To retrieve the File Attributes for the application binary, use the following PowerShell command line: Get-FileAttributes -Filepath “File Path”
PowerShell Command for EPM to Retrieve File Attributes of Notepad++

PS C:\Windows\system32> Get-FileAttributes -Filepath "C:\Users\Vaishnav\Downloads\npp.8.8.5.Installer.x64.exe"
WARNING: Unexpected exception while trying to fetch certificate chains: System.ApplicationException: Failed to get
certificate chain for file: C:\Users\Vaishnav\Downloads\npp.8.8.5.Installer.x64.exe.
   at
Microsoft.Endpoint.Management.PrivilegeManagement.Common.Certificates.CertificateUtility.GetCertificateChains(String
requestedFilePath)
WARNING: Could not load certificate due to error: Failed to get certificate chain for file:
C:\Users\Vaishnav\Downloads\npp.8.8.5.Installer.x64.exe.


FileName      : npp.8.8.5.Installer.x64.exe
FilePath      : C:\Users\Vaishnav\Downloads
FileHash      : C6D1E5AACBF69AA18DF4CAF1346FD69638491A5AD0085729BAE91C662D1C62BB
HashAlgorithm : Sha256
ProductName   : Notepad++
InternalName  :
FileVersion   : 8.8.5.0
Description   : Notepad++ : a free (GNU) source code editor
CompanyName : Don HO don.h@free.fr- Rule name: Elevate as Current User EPM Rule
- Description: Elevate with user context
- Elevation type: Elevate as current user
- Validation: Windows authentication
- Child process behavior: Allow all child processes to run elevated
- File name: npp.8.8.5.Installer.x64.exe
- Signature Source: Not configured
- File hash: C6D1E5AACBF69AA18DF4CAF1346FD69638491A5AD0085729BAE91C662D1C62BB
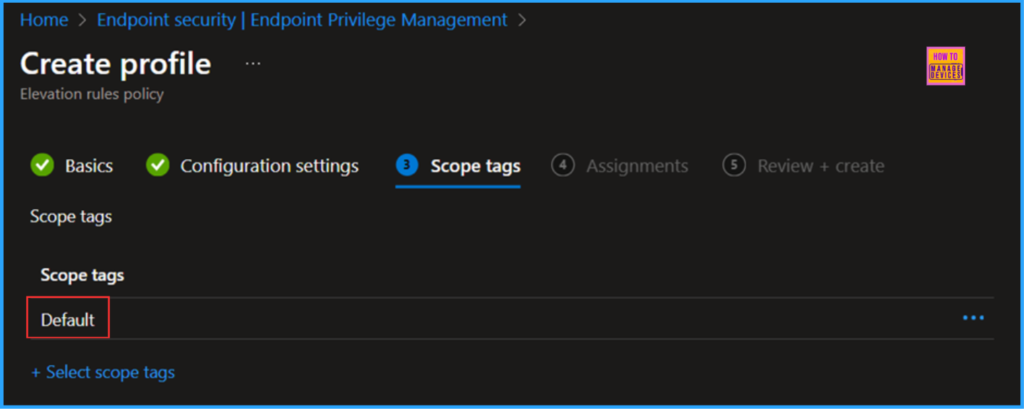
On the next page, keep the default scope tags. If you have any other custom scope tags available, you can select one according to your requirements.
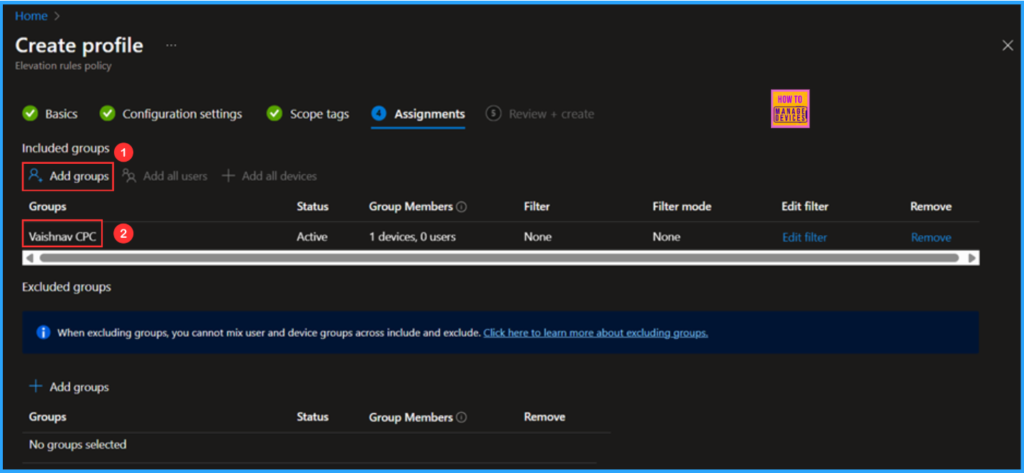
Click Next and assign the Elevate as Current User EPM Rules Policy to either a Device Group or a User Group, as both options are supported. In this example, I will be deploying it to a Device Group called Vaishnav – CPC, a Windows 365 Cloud PC group. To do this, click Add groups under the Included Groups section, and then select the desired device group.
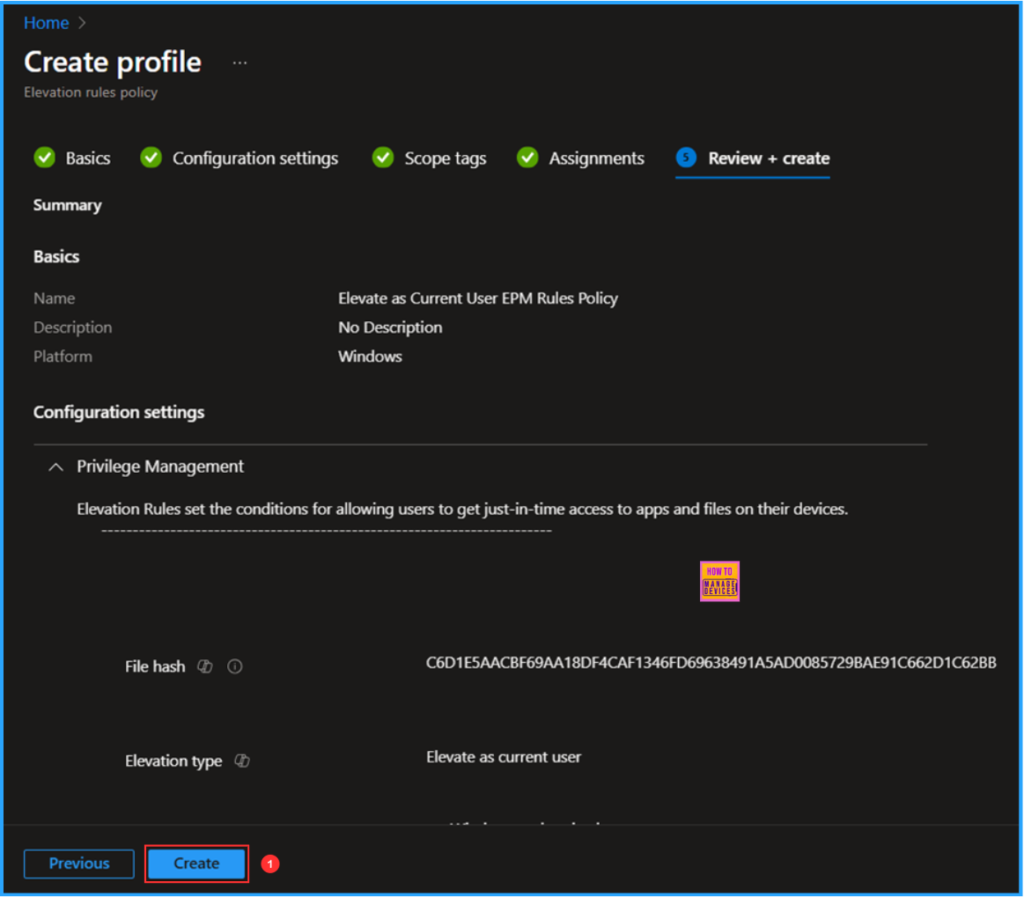
On the Review + create pane, carefully check all the settings defined for the Elevate as Current User EPM Rules Policy. Once you have confirmed everything is correct, select Create to deploy the policy.
- Copilot with Endpoint Privilege Manager to Identify Potential Elevation Risks using Intune
- How to Configure Explicitly Deny EPM Rule with Microsoft Intune | New Updates | Demo
- Configure Windows Backup and Restore for Organizations using Intune
Monitor the Elevate as Current User EPM Rules Policy Deployment
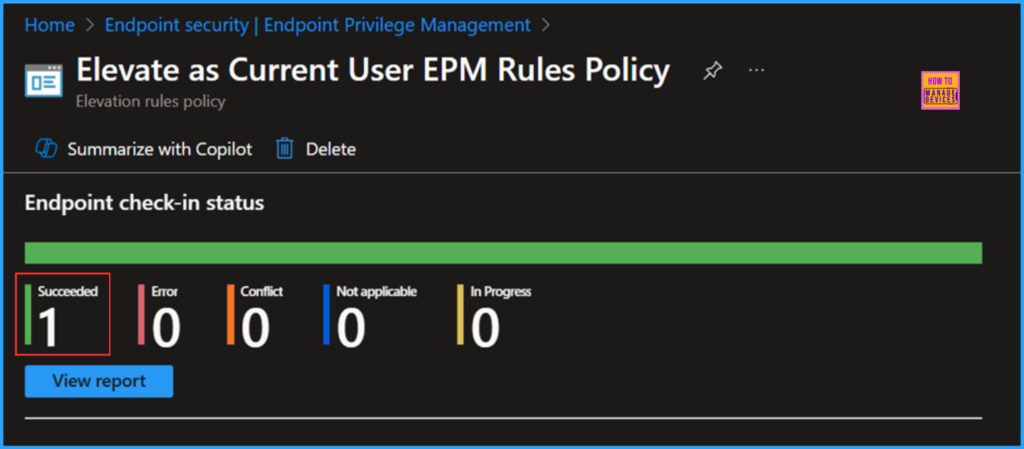
The newly created EPM rule policy has been deployed to the Microsoft Entra ID group. The policy will take effect as soon as the device has been synced. To monitor the status of the policy deployment, please follow the steps below in the Intune Portal.
- Navigate to Endpoint Security > Under Manage > Endpoint Privilege Management > Policies
Search for the Elevate as Current User EPM Rules Policy. Click on it to view the policy’s Endpoint check-in status. Selecting View report allows you to explore the deployment, Device name, Logged in user, Check-in status, and more.
End User Experience of Elevate as Current User EPM Rules Policy
We need to verify if the Elevate as Current User EPM Rules Policy is functioning properly. To do this, login to the device that the policy targets. In this example, I downloaded npp.8.8.5.Installer.x64.exe and saved it in my Downloads folder. Next, I attempted to install it as a standard user (without admin rights). Please follow the steps outlined below.
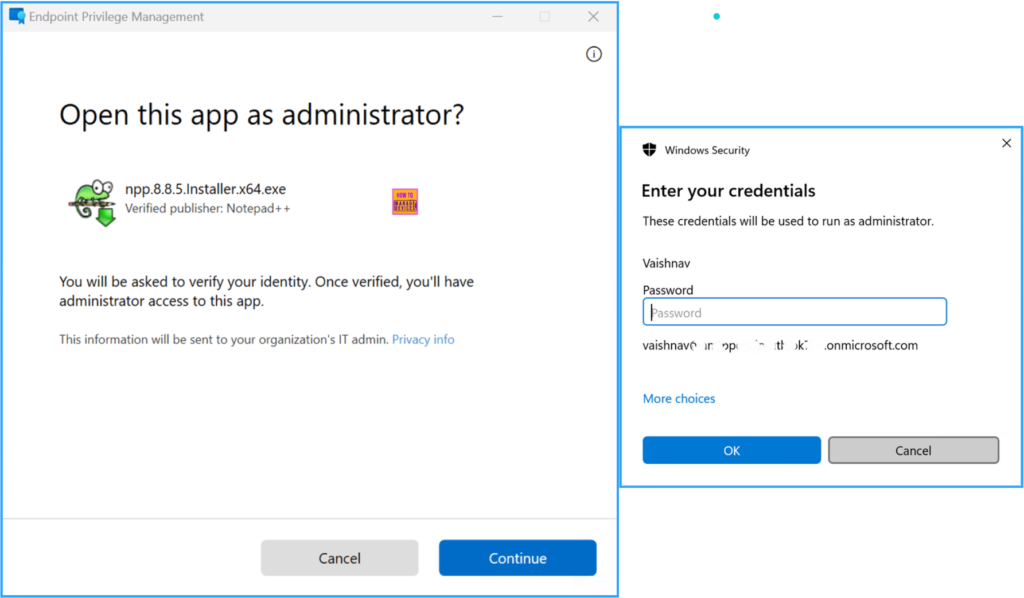
- Right-click on the npp.8.8.5.Installer.x64.exe App binary and choose “Run with elevated access“
You will see a message stating, “You will be asked to verify your identity. Once your identity is verified, you will gain administrator access to the app“. Click on Continue, and then you will be prompted to authenticate using your user credentials. Enter your password and click OK. At this point, you will be able to install the specific app as an Administrator. Therefore, we can conclude that our policy is functioning properly!
Need Further Assistance or Have Technical Questions?
Join the LinkedIn Page and Telegram group to get the latest step-by-step guides and news updates. Join our Meetup Page to participate in User group meetings. Also, Join the WhatsApp Community to get the latest news on Microsoft Technologies. We are there on Reddit as well.
Author
Vaishnav K has over 12 years of experience in SCCM, Intune, Modern Device Management, and Automation Solutions. He writes and shares knowledge about Microsoft Intune, Windows 365, Azure, Entra, PowerShell Scripting, and Automation. Check out his profile on LinkedIn.

