Today, we will discuss Fix ConfigMgr Tenant Attach Error 401 403 | Missing Config | SCCM. After the ConfigMgr Tenant attached, I received an error 401 (403) when I tried to access Run Script or CMPivot blade from the Intune portal. Try to fix ConfigMgr Tenant Attach Error 401 403 (Missing Config) through this post.
Tenant attaches a connection between your Azure tenant and your on-premises SCCM environment, enabling you to conveniently oversee and manage devices directly from the Intune Admin Center. This integration also empowers you to access crucial data and perform administrative tasks within your SCCM environment.
Tenant Attach offers instant benefits by storing your device records in the cloud and enabling you to manage these devices from a cloud-based console. Additionally, you can access real-time data from Configuration Manager clients, including those connected to the internet.
I tried to explain how to enable the SCCM Run scripts Feature from Intune Portal when running the 2006 version of ConfigMgr. It would help if you allowed this script to be an option by following the guide.
- SCCM Tenant Attach Step-by-Step Guide Troubleshooting
- What is ConfigMgr SCCM Tenant Attach Architecture?
- Free Intune LAB Setup Trial Tenant Forever | Renewable Intune Tenant with 25 Microsoft E5 Licenses for Free
Issue – Tenant Attach Error 401 / 403
Scripts – Configuration Missing:
I could not access the script blade from Intune Portal (a.k.a. Microsoft Endpoint Manager admin centre). Let’s find more details about this issue: “Configuration missing Error Code 401/403.”
{ "shellProps": { "sessionId": "69f3c2eab1e64c05b556a897614e67b7", "extName": "Microsoft_Intune_DeviceExplorer", "contentName": "ScriptsBlade", "code": 403 }, "error": { "message": "Configuration missing", "code": 401, "details": { "htmlTemplate": "\n <span>The necessary configuration is missing in Azure Active Directory. Make sure to attach the Configuration Manager site to your Azure tenant, and assign the proper user role in Azure AD.<span>\n <a href =\"https://aka.ms/cmdeviceexplorerdoc_aadconfig\"> More information</a>" } }}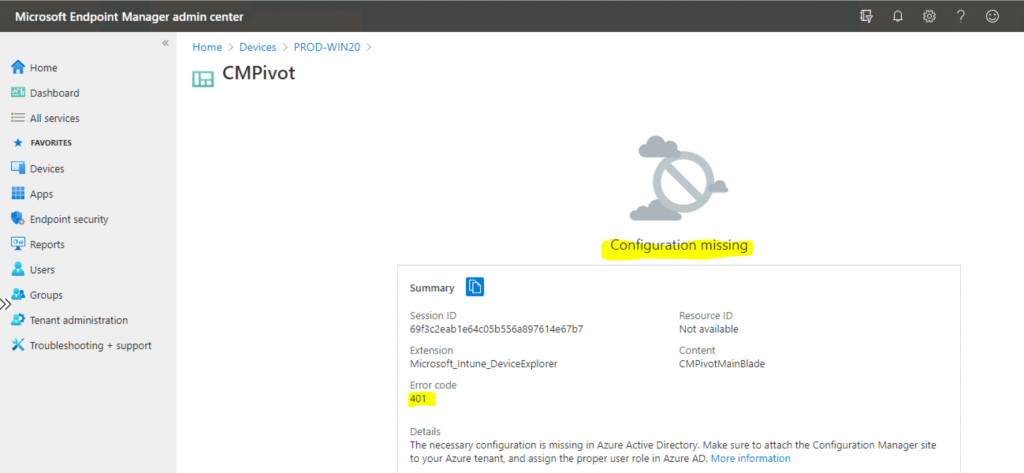
Understand Service Account
Let’s find the correct service principal account or Azure application that provides access to SCCM so we can use the Tenant attach feature from the SCCM console and Azure portal.
NOTE! The permissions for the Tenant attached have been updated. You don’t need to give permissions to Configuration Manager Microservice https://docs.microsoft.com/en-us/mem/configmgr/tenant-attach/client-details#permissions
From SCCM Console
How do you run CMPivot from the SCCM admin console? You have to follow the steps mentioned below.
- Launch Console
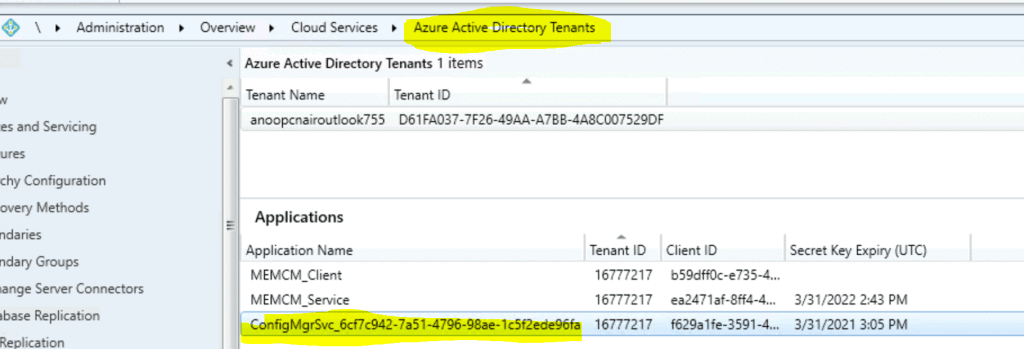
- Navigate \Administration\Overview\Cloud Services\Azure Active Directory Tenants
- Select Application or service account or service principle account – ConfigMgrSvc_6cf7c942-7a51-4796-98ae-1c5f2ede96fa used for Tenant attach.
I could see three (3) service accounts under Azure Active Directory Tenant in the console. I selected the one highlighted in yellow because the other two service accounts were part of Azure’s active directory discovery-related services.
Azure AD Service Principal Permissions
Now, let’s learn how to launch CMPviot from ConfigMgr. The steps and Azure AD Service Principal Permissions are listed below.
Open the Azure AD Portal, navigate to the Azure Active Directory blade, and select Enterprise Applications inside the Enterprise Applications node.
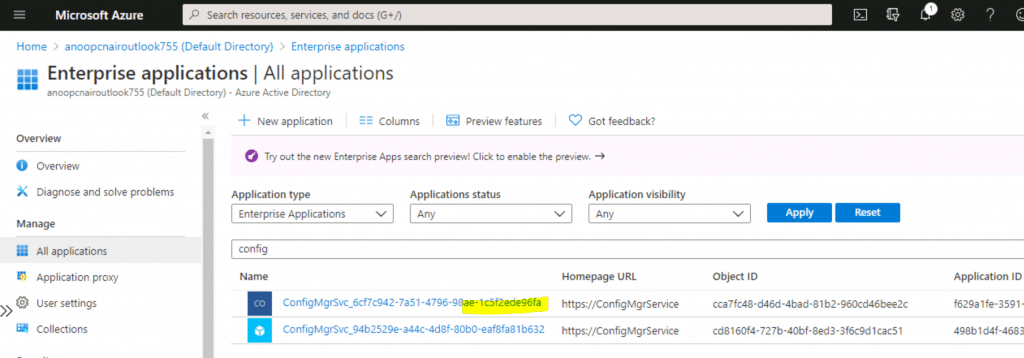
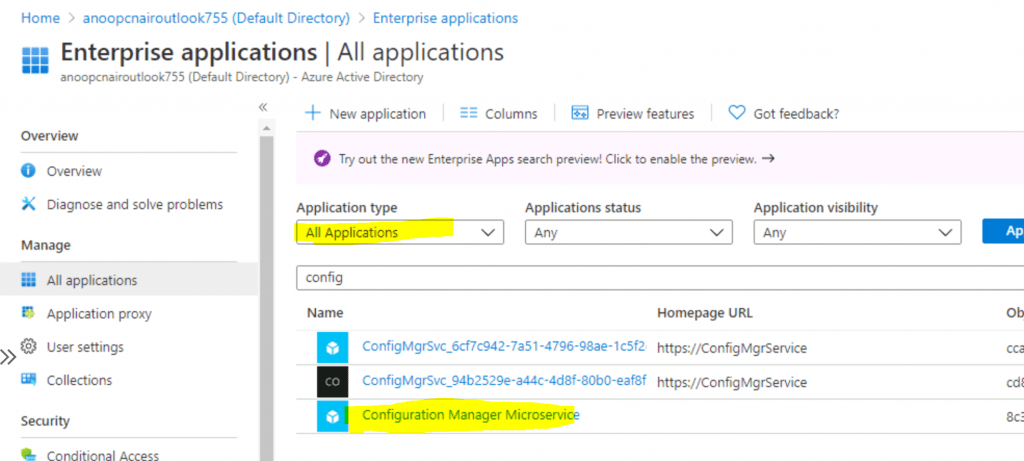
Use “Config” as the search word to find the service accounts in Azure AD enterprise applications. Select the same app ConfigMgrSvc_6cf7c942-7a51-4796-98ae-1c5f2ede96fa that we selected in the above section.
You can’t find the Configuration Manager Microservice. Why?
NOTE: To view the details of Configuration Manager Microservice, you will have to select Application Type All applications instead of the default one Enterprise app.
Check Permissions
Let’s check the permissions for the Azure Application (the selected account we specified in the above section).
Open the Azure portal. Navigate to the Azure Active Directory blade. Select Enterprise Applications. Inside the Enterprise Applications node, select All Applications.
Use “Config” as the search word to find the service accounts in Azure AD enterprise applications. Click on the same app Configuration Manager Microservice that we selected above. Select the Users and Groups option.
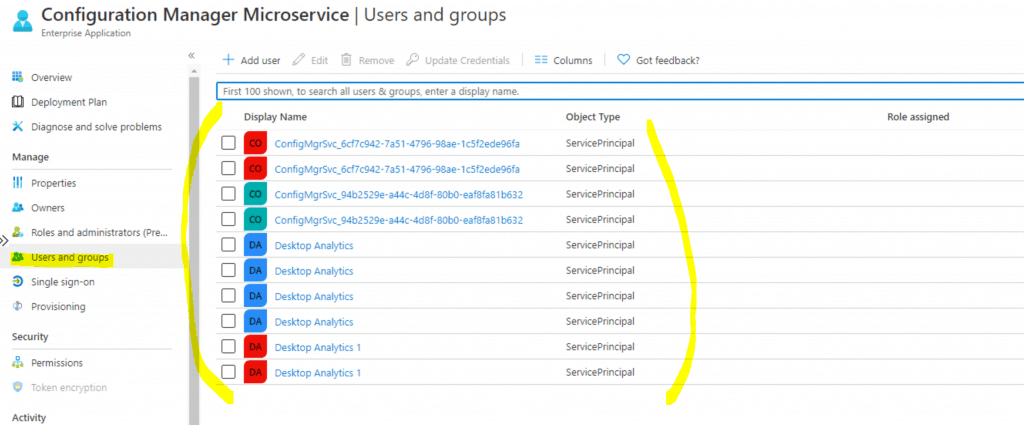
- Check whether your admin account (anoopb) is added to this section.
- In the above screenshot, you can’t see any users or groups! Only service Principle accounts are available.
Fix ConfigMgr Tenant Attach Error 401 403
Now let’s Fix ConfigMgr Tenant Attach Error 401 403 related to configuration settings.
Open the Azure portal. Navigate to the Azure Active Directory blade. Select Enterprise Applications. Inside the Enterprise Applications node, select All Applications.
Use “Config” as the search word to find the service accounts in Azure AD enterprise applications. Click on the same app Configuration Manager Microservice that we selected above. Select the Users and Groups option.
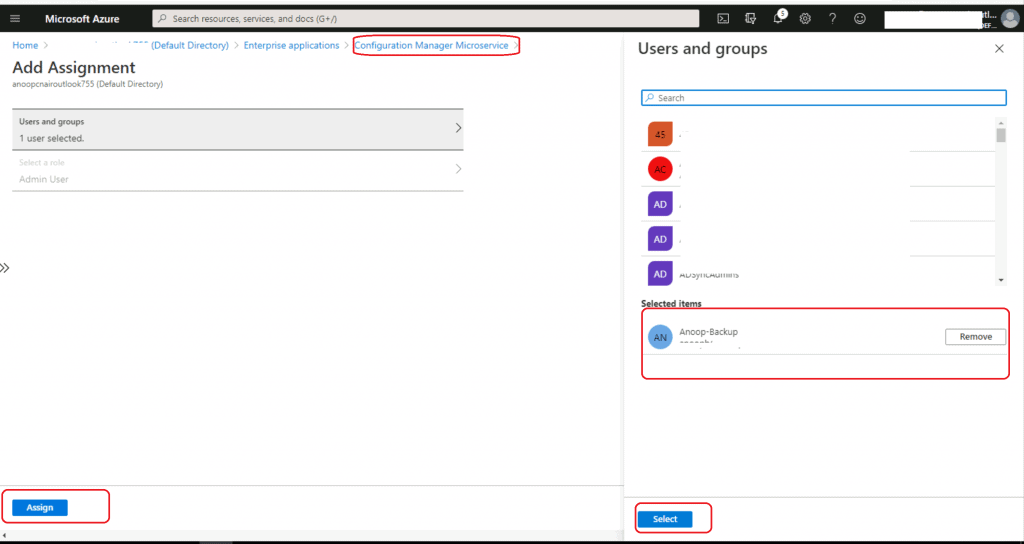
Click on Add Users.
Click on Users and Groups from Add Assignment. Search for the Group or User you want to add as an Admin user for the Running script or CMPivot. Select the Group or User.
Click on the Assign button.
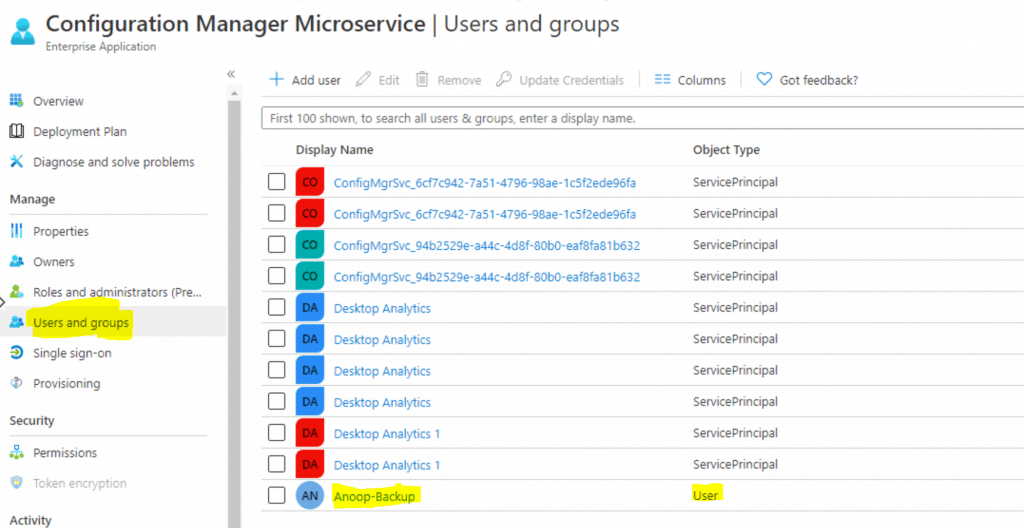
The user and account Anoop-Backup have been added to the Users and Groups section.
This account is synced from On-prem to Azure AD using Azure AD Connect.
Confirm SCCM Azure AD User Discovery
Let’s check Azure AD user discovery for this account, Anoop-Back. AAD user discovery should be enabled from SCCM, and this user should be discovered with appropriate details, as mentioned below.
Azure Active Directory Tenant ID: This value should be a GUID for the Azure AD tenant. Azure Active Directory User ID: This value should be a GUID for this Azure AD account.
User Principal Name: The format of this value is anoopb@domain. For example, anoopb@memcm.com. A user still shows UPN as @xyz.onmicrosoft.com UPN, but it worked OK for me.
NOTE! – If the Azure AD Tenant ID and Azure AD User ID are not populated, ensure you have enabled Azure AD user discovery from SCCM.

Logs Details
Tenant Attach Guide for SCCM Logs Data Flow Troubleshooting Intune from Vimal to understand the log flow and internal processes for Tenant attach.
Results
Let’s check the results of Run Script and CMPivot.
Run Script
Let’s check another option to have a Run Script and proactive remediation option.
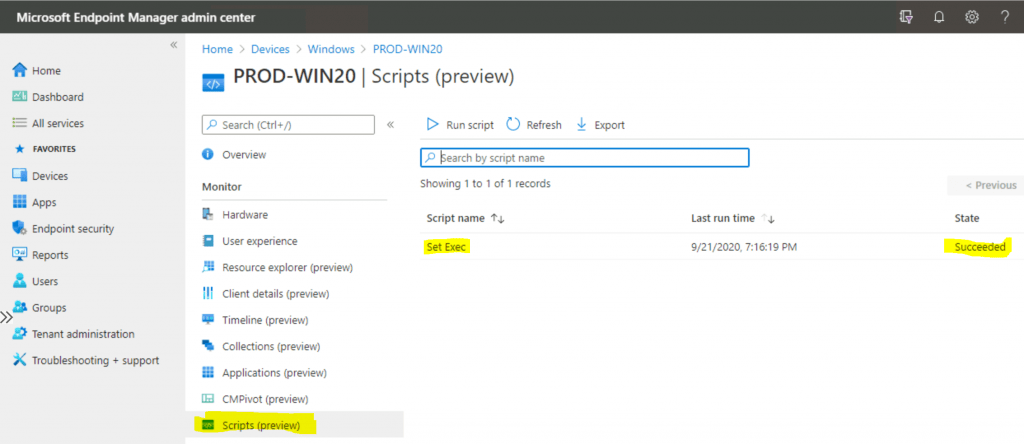
Open https://endpoint.microsoft.com with an admin user ID already discovered via SCCM Azure AD User. Select Devices, then All Devices. Select a device that is synced from SCCM via Tenant Attach.
Select Scripts.
Click on the Run script button to show all the approved scripts. Click on one of the scripts to run. Click on the Run button to execute the script on the device.
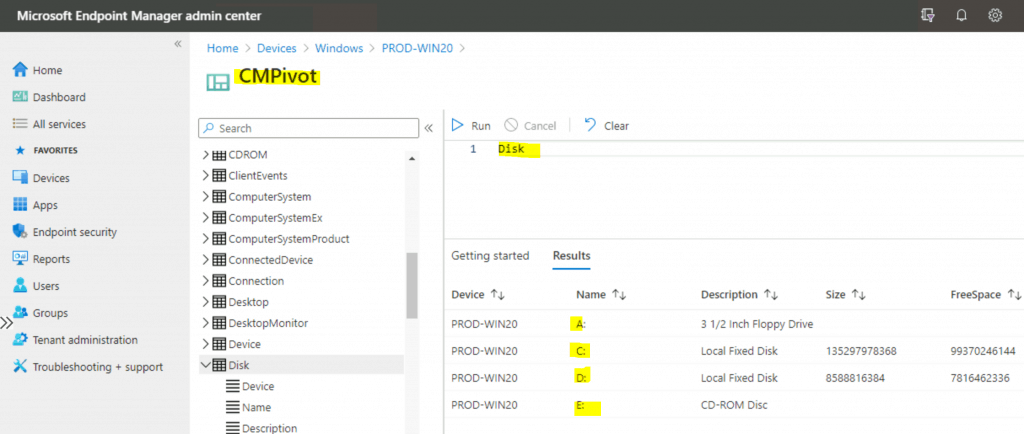
CMPivot from MEM Admin Center
Let’s learn how to use CMPivot from the MEM Admin Center. Open https://endpoint.microsoft.com with an admin user ID already discovered via SCCM Azure AD User.
Select Devices, then All Devices. Select a device that is synced from SCCM via tenant attachment. Click on CMPivot and select any sample queries.
Resources
We are on WhatsApp. To get the latest step-by-step guides and news updates, Join our Channel. Click here –HTMD WhatsApp.
Author
Anoop C Nair is Microsoft MVP! He is a Device Management Admin with more than 20 years of experience (calculation done in 2021) in IT. He is a Blogger, Speaker, and Local User Group HTMD Community leader. His primary focus is Device Management technologies like SCCM 2012, Current Branch, and Intune. He writes about ConfigMgr, Windows 11, Windows 10, Azure AD, Microsoft Intune, Windows 365, AVD, etc.
