Hey there, Let’s Discuss How to Deploy the Garden Gnome Package Viewer app in the Intune Enterprise App Catalog App. As we know, we can easily deploy our desired applications to our system or organization through the Intune portal.
The Garden Gnome Package Viewer is a versatile desktop application designed to open and explore Pano2VR and Object2VR packages, commonly called GGPKG files. This powerful tool allows users to effortlessly view immersive virtual tours and various types of offline content
With an intuitive interface and user-friendly features, the Garden Gnome Package Viewer enhances your experience by providing seamless navigation through stunning panoramic images and interactive 3D environments. To experience this, we need to deploy the app in Intune.
It is Ideal for both casual users and professionals, this application is perfect for anyone looking to dig into the world of virtual reality and rich multimedia presentations. In this post we can see the easy method to deploy the app in Intune.
Table of Contents
What is Garden Gnome Package Viewer?

The Garden Gnome Package Viewer is a desktop application that opens Pano2VR and Object2VR packages (GGPKG) to view virtual tours and other offline content.
How to Deploy Garden Gnome Package Viewer App in Intune Enterprise App Catalog App
The Package Viewer is useful for viewing projects offline, so there is no need of internet to use this app. And The packages can also be uploaded into a WordPress. Learn how to download and install the Garden Gnome Package viewer app.
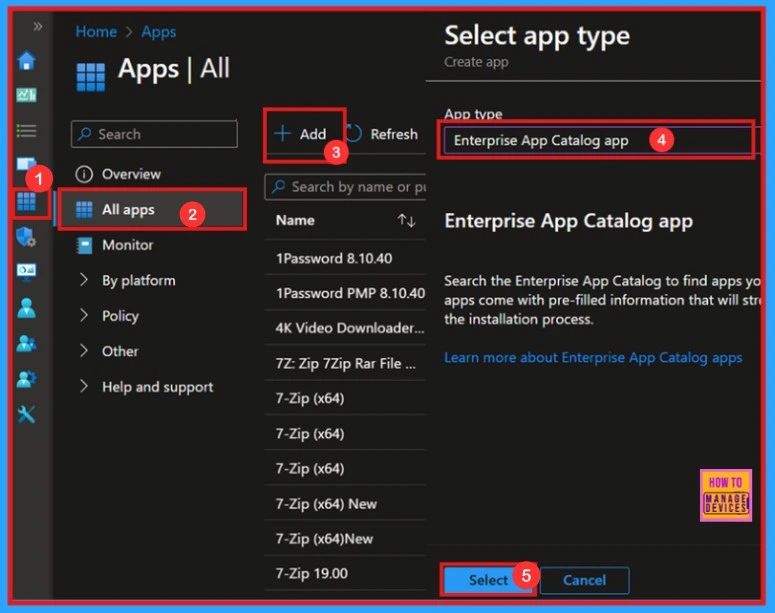
When we click on “All apps,” we see the +Add option on the right side. By clicking on that option, a new window titled “Select app” will open. In this window, we can choose the type of app we want to select. We have chosen the “Enterprise app catalog ” as the app type.
- Microsoft Admin Center > Apps > All apps > Add > Enterprise App Catalog app
- How to Block Allow Toasts Notifications in Windows using Intune Settings Catalog
- Deploy Windows Catalog App type using Intune Enterprise Application Catalog
- Best way to Install Bullzip PDF to Word App using Intune Enterprise App Catalog App
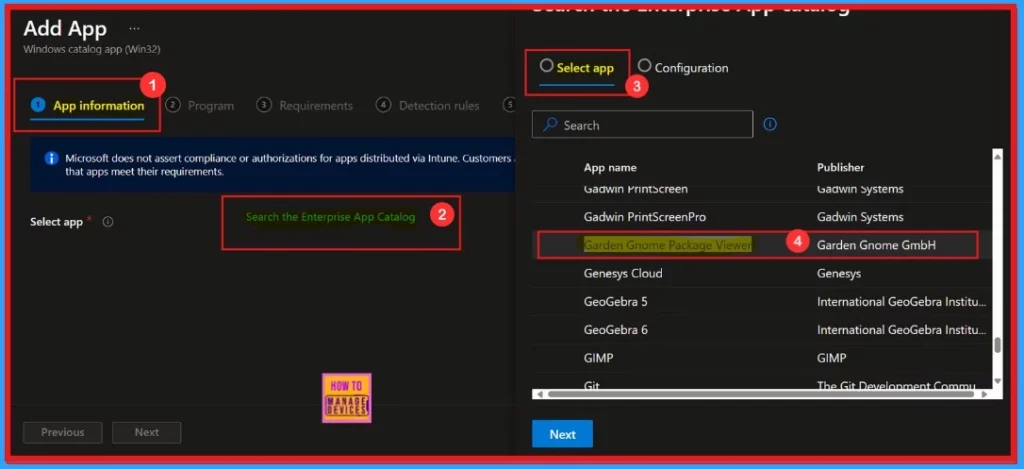
To deploy an app in Intune, we need to start with app information. After selecting the enterprise catalog app, we entered a new window titled “Select App“. We need to select the “Garden Gnome Package” from the app. Then move on to the next section.
Configuration
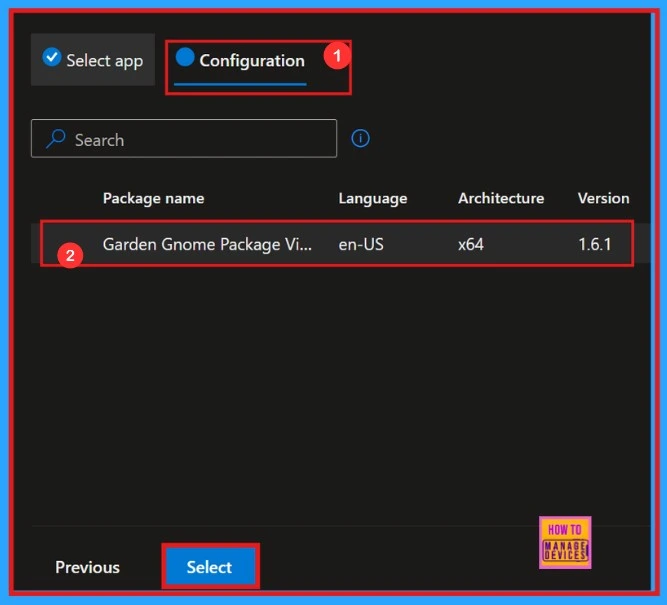
In the next section of the app deployment, we will configure the application. We will gather some information about the app, such as its package name, programming language, architecture, version, etc.
| Package name | Language | Architecture | Version |
|---|---|---|---|
| Garden Gnome Package Viewer | en-US | x64 | 1.6.1 |
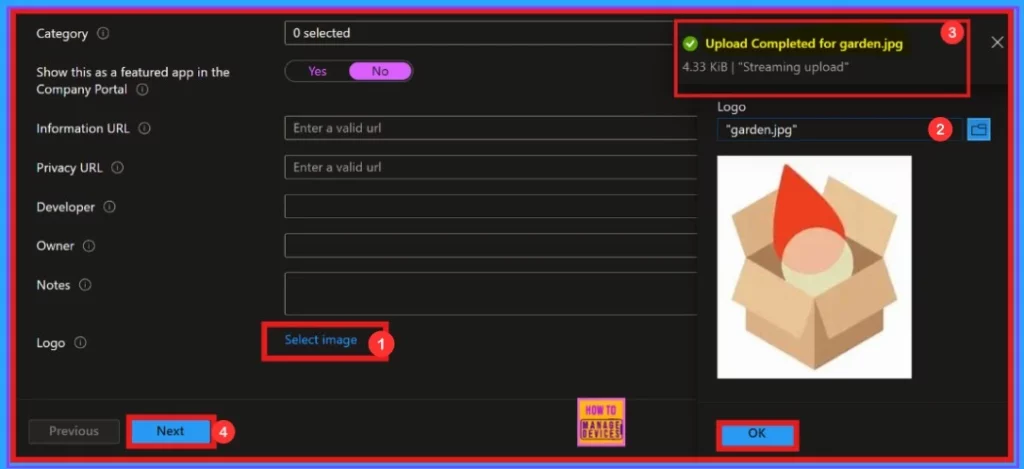
After that, we need to add the application’s logo. Scroll to find the option “Select an image.” This “Select Image” option enables you to upload an app logo for our application. First, we need to click on “Select Image” and then add the logo.
Next, we enter the Program section, where we can see the details of the installed command, uninstalled command, required installation time, install behavior, device restart behavior, and a toggle button to allow available uninstall.
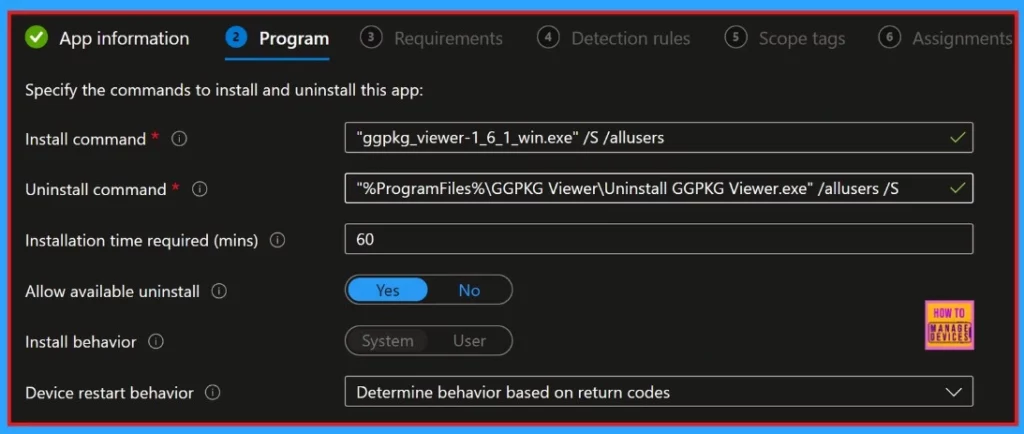
Below is a screenshot showing the continuation of the Program window. In this window, we can see a table of return codes and Code type. For a return code of “0”, the status is “Success”. For a return code of “3010”, the code type indicates a “Soft reboot”.

Requirement
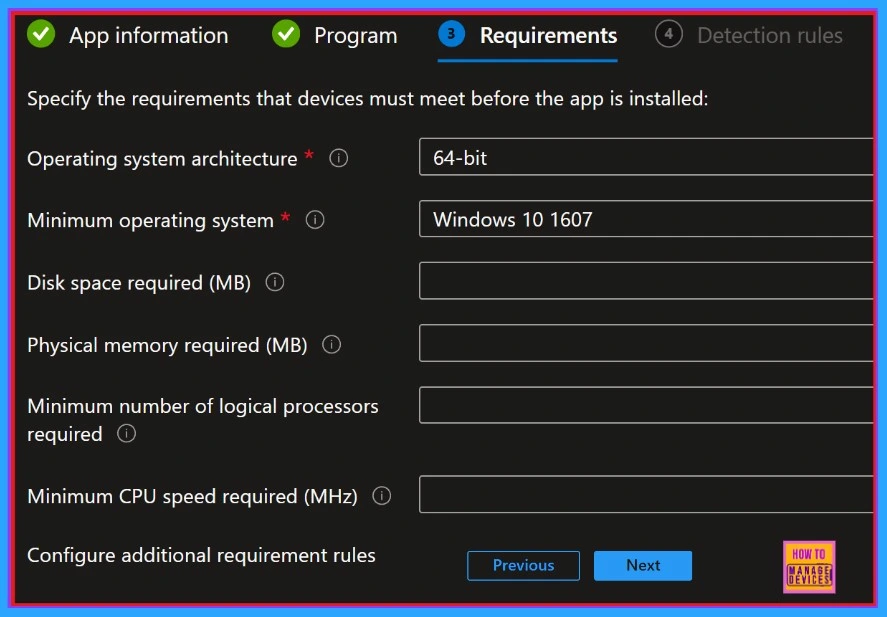
There is a mandatory tab called Requirements located after the program section. This tab provides information about the operating system architecture of a 64-bit operating system, specifying a minimum operating system, Windows 10 version 1607.
Detection Rules
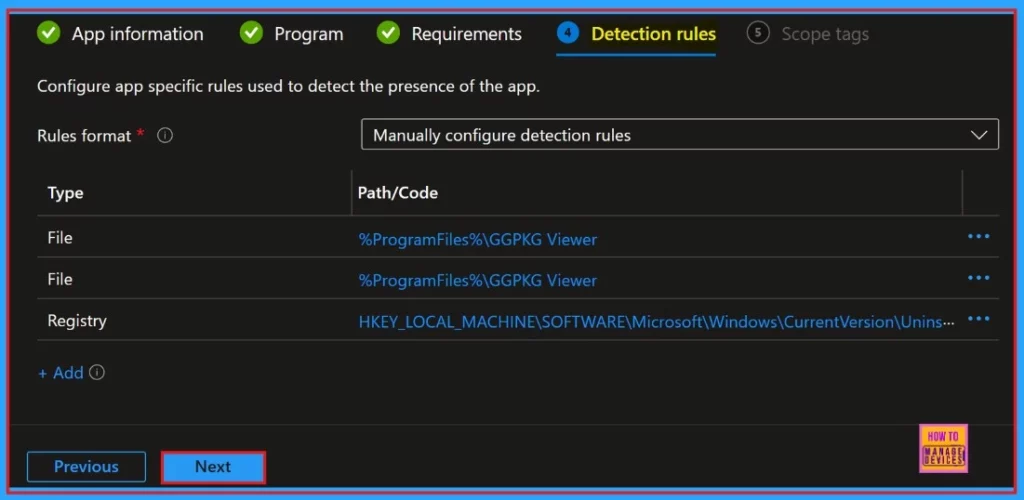
The Detection rules came after the Requirements section. Here, we can view the format for the detection rules, which are mandatory, just like the requirements. We can also find the configuration path or code for files and registries.
Scope Tags
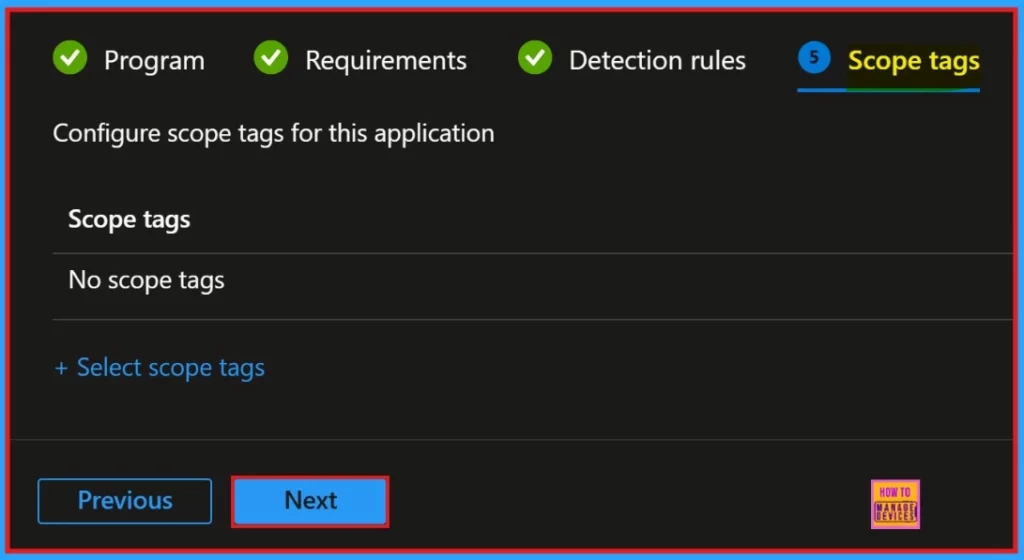
The scope tags section appears after the detection rule. No action is required here, as this is a non-mandatory option. This section is typically used to add a scope tag to a group. Click the next button to continue
Assignments
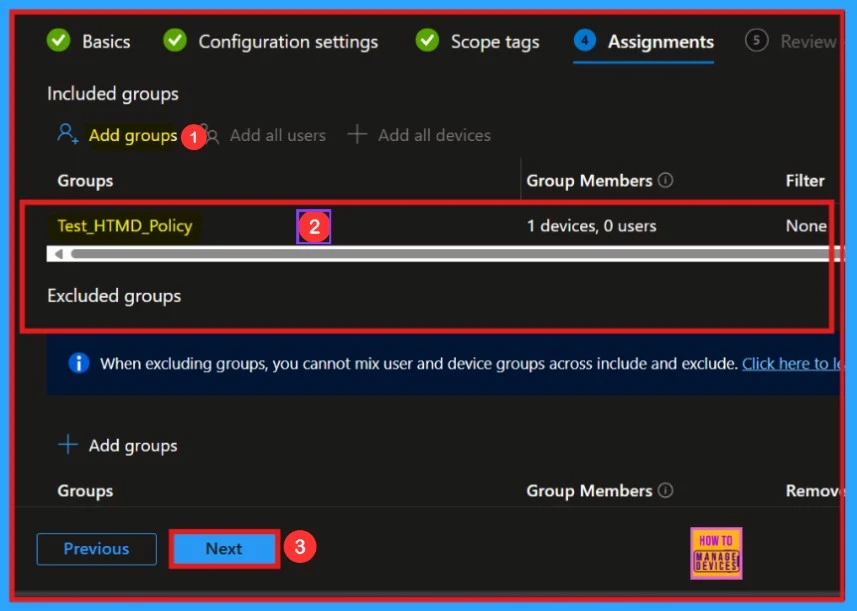
In this section, we want to assign groups to the policy. We can see the option to add a group in the designated area. Click on “included groups” option and select the group for which you want to install the application. Then click next.
Review + Create
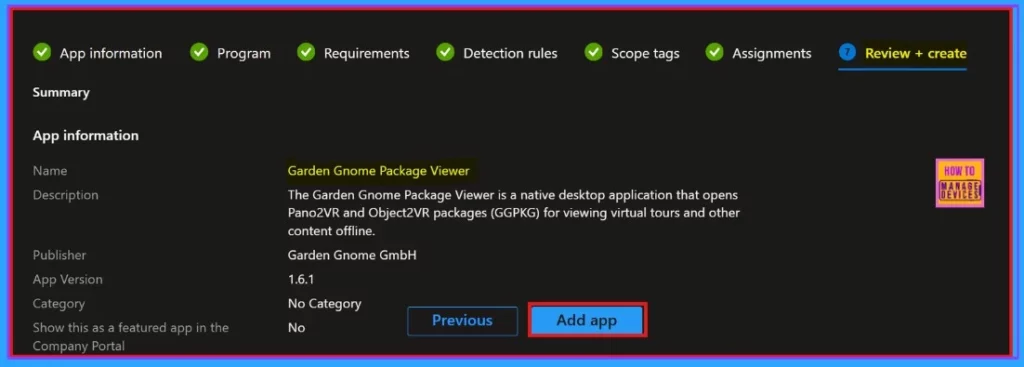
The “Review + Create” section is the final step in the installation process. It provides a summary of all the information we have entered for the app installation. In this section, we can view important details such as the app name, description, publisher, and version.
Monitoring Status
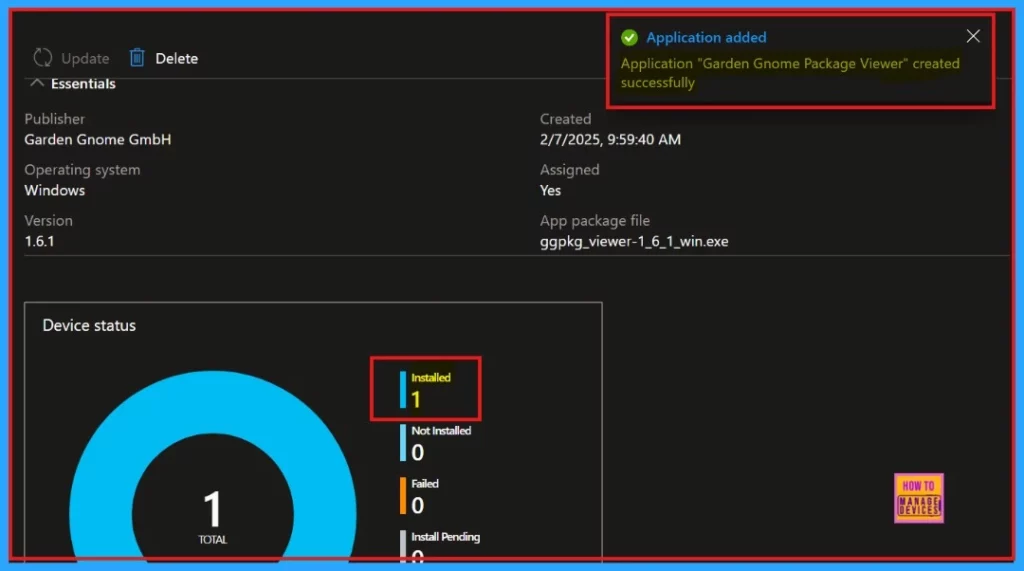
After adding the application, monitoring status provides information on whether the app installation succeeded or not and other details. With the help of the company portal, we can sync the app manually to the system to reduce the time period. Usually, it takes 8 hours to show the installation status on our device.
End User Experience
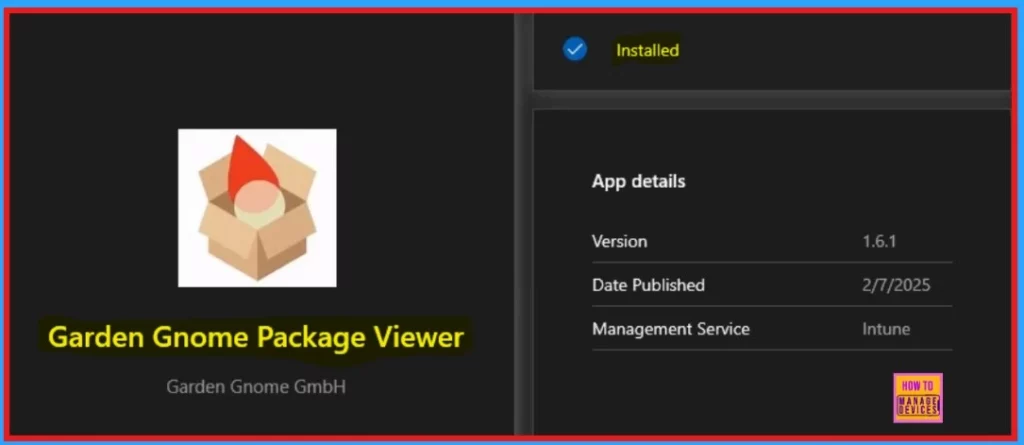
Open the company portal, click on the “Download and Update” option, and search for the app you installed. We need to search for the app “Garden Gnome Package Viewer.” The results will include details of the app, such as the version and the published date and Management Service.
Need Further Assistance or Have Technical Questions?
Join the LinkedIn Page and Telegram group to get the latest step-by-step guides and news updates. Join our Meetup Page to participate in User group meetings. Also, Join the WhatsApp Community to get the latest news on Microsoft Technologies. We are there on Reddit as well.
Author
Anoop C Nair has been Microsoft MVP from 2015 onwards for 10 consecutive years! He is a Workplace Solution Architect with more than 22+ years of experience in Workplace technologies. He is also a Blogger, Speaker, and Local User Group Community leader. His primary focus is on Device Management technologies like SCCM and Intune. He writes about technologies like Intune, SCCM, Windows, Cloud PC, Windows, Entra, Microsoft Security, Career, etc.
