This is a detailed post about “PowerBI Live Dashboard Integration with SCCM.” This post will discuss how PowerBI connects with SCCM SQL Database integration, how to prepare a live dashboard, and details about PowerBI Data Source options.
I conducted a Session on the Basics of PowerBI Integration with SCCM (Integrate PowerBI with SCCM) at the How To Manage Device Live Teams event. Many How To Manage Device Community members were looking for the session recording, How to Integrate PowerBI with SCCM Video.
In this post, you can learn about PowerBI, PowerBI data sources, how to Get Data from SCCM DB, how to prepare a PowerBI dashboard (Demo), and sample Dashboards in detail.
NOTE – You need an enterprise license to Publish and Share live Dashboards.
| Index |
|---|
| What is PowerBI |
| PowerBI Data Sources |
| Data Sources |
| File data sources |
| Database data sources |
| Power Platform data sources |
| Azure data sources |
| Online Services data sources |
| Other data sources |
| Other data sources |
| Connecting to a data source |
| Using PBIDS files to get data |
| PBIDS file examples |
| PowerBI License information |
| Prepare SQL custom view in SCCM DB |
| Get Data to PowerBI from SCCM SQL DB by using Direct Query |
| Get Data to PowerBI from SCCM SQL DB by using Import Query |
| Get Data to PowerBI from Exel file |
| Create Custom Columns in PowerBI |
| Add Last Refresh Date & Time Query for PowerBI |
| Publish PowerBI Dashboard |
| To publish a Power BI Desktop dataset and reports |
| Republish or replace a dataset published from Power BI Desktop |
| What is PowerBI Gateway |
| Configure Auto Refresh schedules |
| Getting Refresh Failure Notifications |
| Checking Refresh Status and History |
| Resources |
What is PowerBI
PowerBI is a business analytics solution that lets you visualize your data and share insights across your organization or embed them in your app or website. PowerBI Can connect to hundreds of data sources and bring your data to life with live dashboards and reports.
PowerBI Data Sources
With Power BI Desktop, you can connect to data from many different sources. For a full list of available data sources, see Power BI data sources.
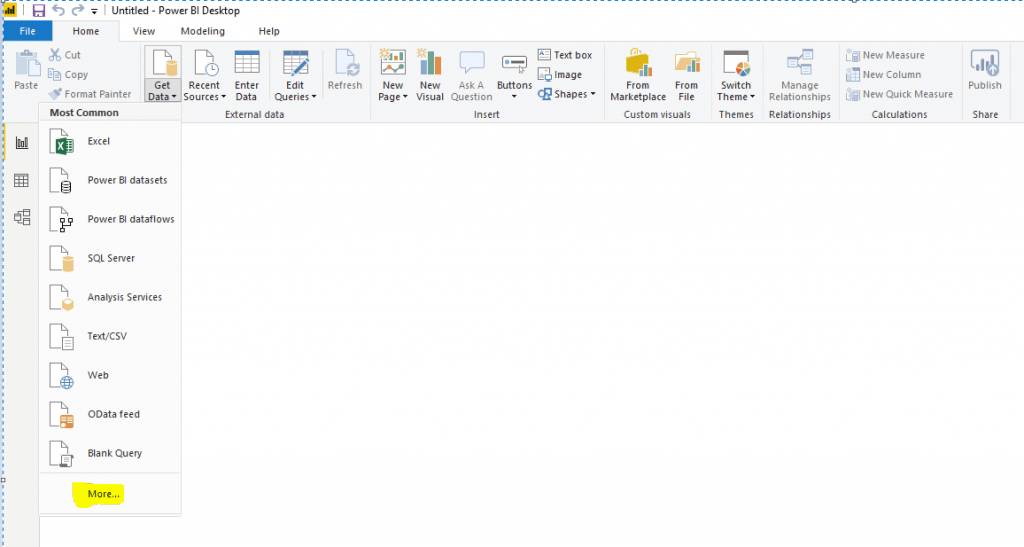
You connect to data by using the Home ribbon. Select the Get Data button label or the down arrow to show the Most Common data types menu.
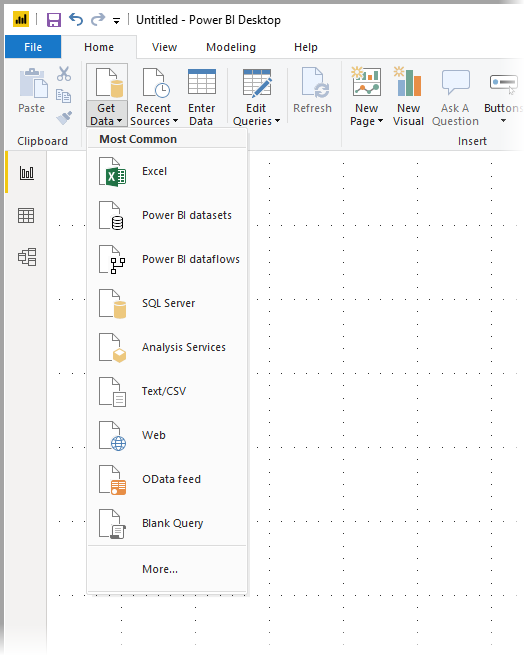
Go to the Get Data dialog box, show the Most Common data types menu and select More. You can also directly select the Get Data icon to open the Get Data dialog box (bypassing the Most Common menu).
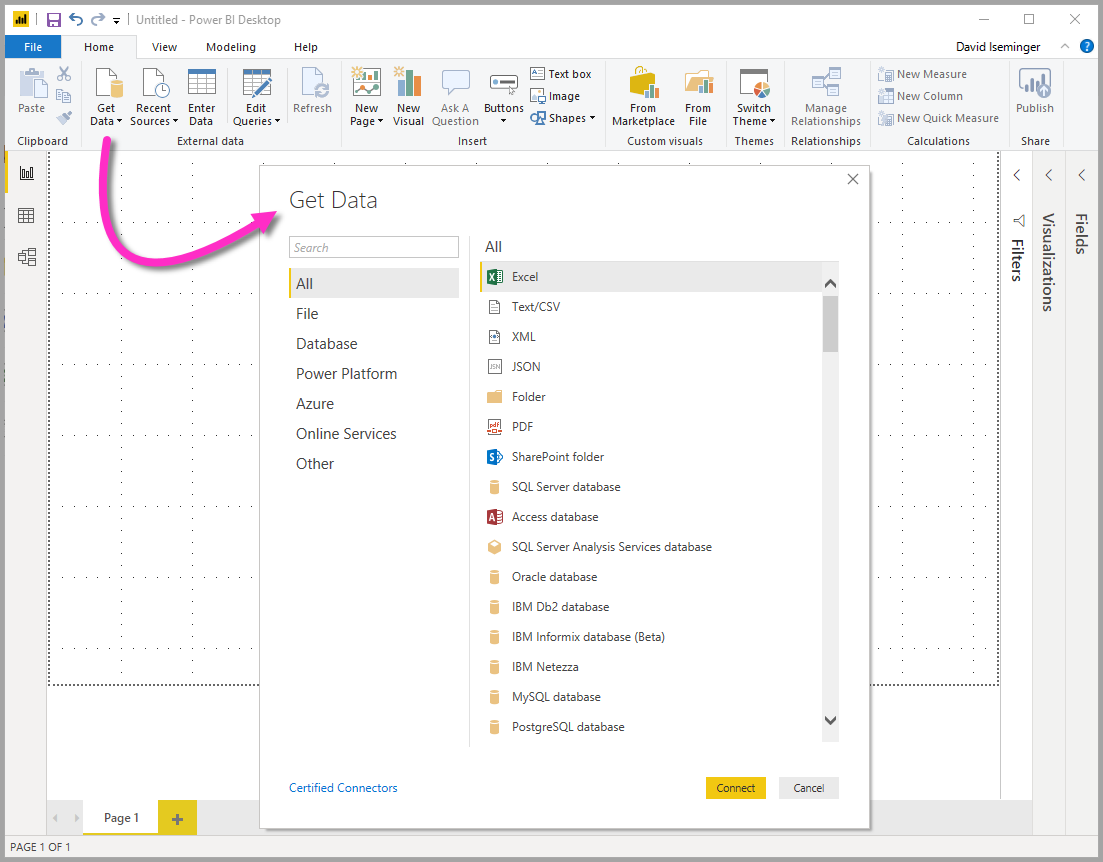
The Power BI team continually expands the data sources available to the Power BI Desktop and service. As such, you’ll often see early versions of work-in-progress data sources marked as Beta or Preview. Any data source marked as Beta or Preview has limited support and functionality and shouldn’t be used in production environments.
Additionally, any data source marked as Beta or Preview for Power BI Desktop may not be available for use in the Power BI service or other Microsoft services until the data source generally becomes available (GA).
NOTE! – There are many data connectors for PowerBI Desktop that require Internet Explorer 10 (or newer) for authentication
Data Sources
The Get Data Dialog box organizes data types in the following categories.
- All
- File
- Database
- Power Platform
- Azure
- Online Services
- Other
The All category includes all data connection types from all categories.
File data sources
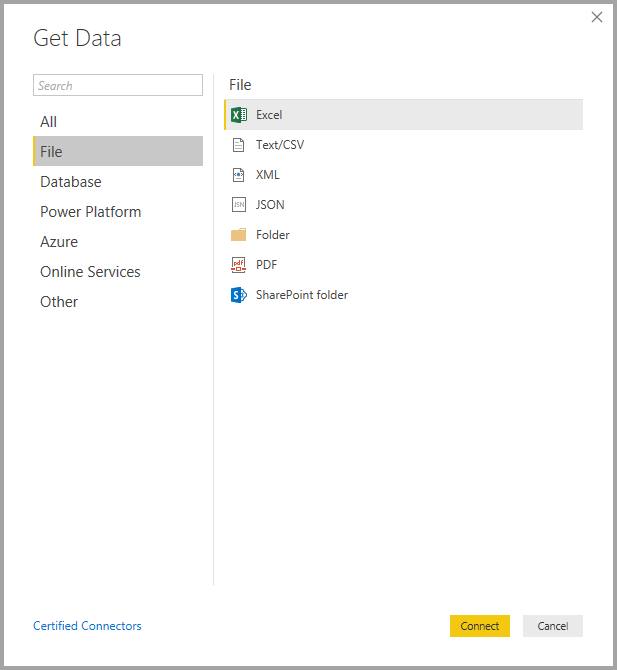
The File category provides the following data connections:
- Excel
- Text/CSV
- XML
- JSON
- Folder
- SharePoint folder
The following image shows the Get Data window for File.
Database data sources
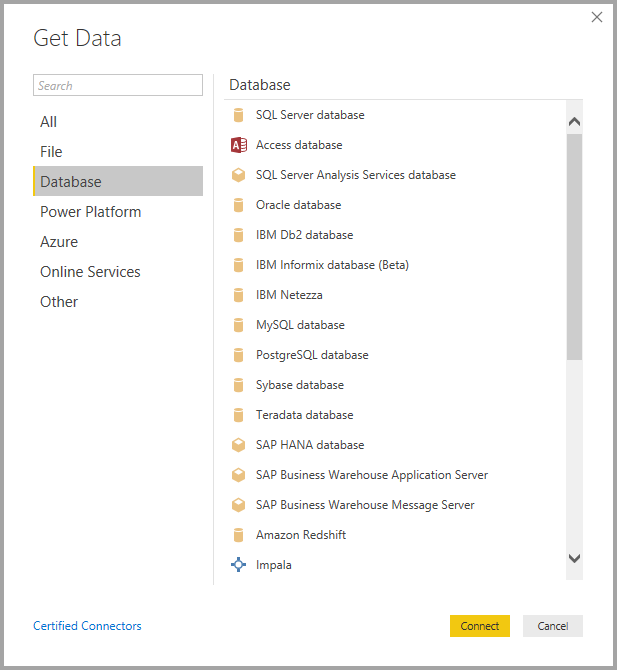
The Database category provides the following data connections:
- SQL Server database
- Access database
- SQL Server Analysis Services database
- Oracle database
- IBM DB2 database
- IBM Informix database (Beta)
- IBM Netezza
- MySQL database
- PostgreSQL database
- Sybase database
- Teradata database
- SAP HANA database
- SAP Business Warehouse Application Server
- SAP Business Warehouse Message Server
- Amazon Redshift
- Impala
- Google BigQuery
- Vertica
- Snowflake
- Essbase
- AtScale cubes
- BI Connector
- Data Virtuality LDW (Beta)
- Denodo
- Dremio
- Exasol
- Indexima (Beta)
- InterSystems IRIS (Beta)
- Jethro (Beta)
- Kyligence
- MarkLogic
Note – Some database connectors require that you enable them by selecting File > Options and settings > Options, then setting Preview Features and allowing the connector to.
- Check your Preview Features settings if you don’t see some of the connectors mentioned above and want to use them.
- Also, note that any data source marked as Beta or Preview has limited support and functionality and should not be used in production environments.
- The following image shows the Get Data window for the Database.
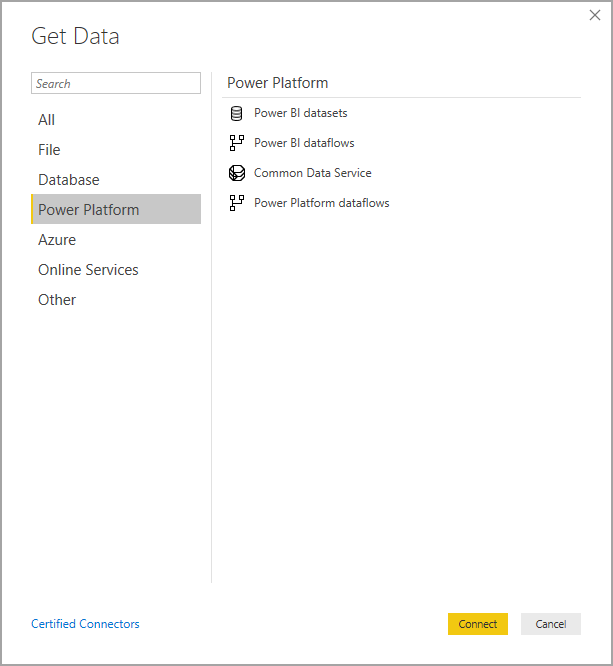
Power Platform data sources
The Power Platform category provides the following data connections:
- Power BI datasets
- Power BI dataflows
- Common Data Service
- Power Platform dataflows
The following image shows the Get Data window for the Power Platform.
Azure data sources
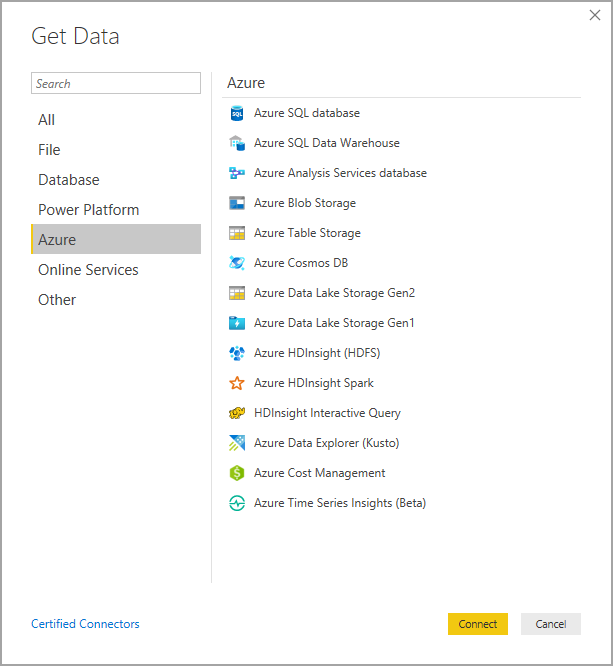
The Azure category provides the following data connections:
- Azure SQL Database
- Azure SQL Data Warehouse
- Azure Analysis Services database
- Azure Database for PostgreSQL
- Azure Blob Storage
- Azure Table Storage
- Azure Cosmos DB
- Azure Data Lake Storage Gen2
- Azure Data Lake Storage Gen1
- Azure HDInsight (HDFS)
- Azure HDInsight Spark
- HDInsight Interactive Query
- Azure Data Explorer (Kusto)
- Azure Cost Management
- Azure Time Series Insights (Beta)
The following image shows the Get Data window for Azure.
Online Services data sources
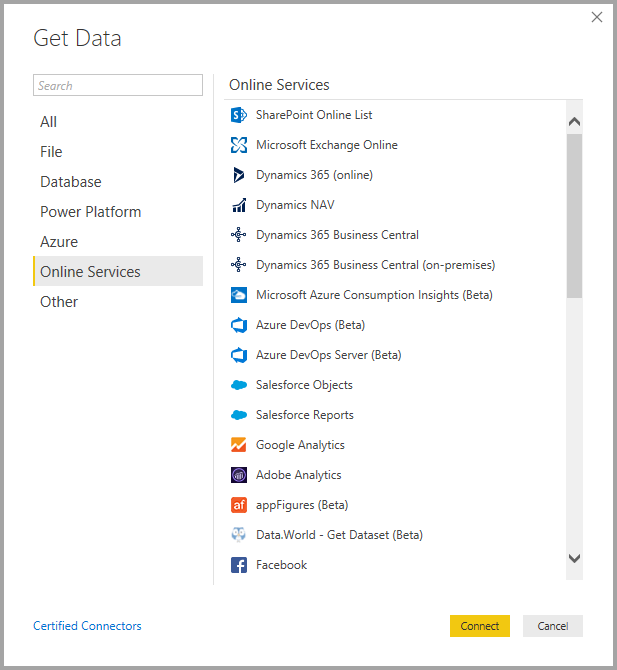
The Online Services category provides the following data connections:
- SharePoint Online List
- Microsoft Exchange Online
- Dynamics 365 (online)
- Dynamics NAV
- Dynamics 365 Business Central
- Dynamics 365 Business Central (on-premises)
- Microsoft Azure Consumption Insights (Beta)
- Azure DevOps (Boards only)
- Azure DevOps Server (Boards only)
- Salesforce Objects
- Salesforce Reports
- Google Analytics
- Adobe Analytics
- appFigures (Beta)
- Data.World – Get Dataset (Beta)
- GitHub (Beta)
- LinkedIn Sales Navigator (Beta)
- Marketo (Beta)
- Mixpanel (Beta)
- Planview Enterprise One – PRM (Beta)
- Planview Projectplace (Beta)
- QuickBooks Online (Beta)
- Smartsheet
- SparkPost (Beta)
- SweetIQ (Beta)
- Planview Enterprise One – CTM (Beta)
- Twilio (Beta)
- tyGraph (Beta)
- Webtrends (Beta)
- Zendesk (Beta)
- Asana (Beta)
- Dynamics 365 Customer Insights (Beta)
- Emigo Data Source
- Entersoft Business Suite (Beta)
- FactSet Analytics (Beta)
- Industrial App Store
- Intune Data Warehouse (Beta)
- Microsoft Graph Security (Beta)
- Product Insights (Beta)
- Quick Base
- TeamDesk (Beta)
- Workplace Analytics (Beta)
The following image shows the Get Data window for Online Services.
Other data sources
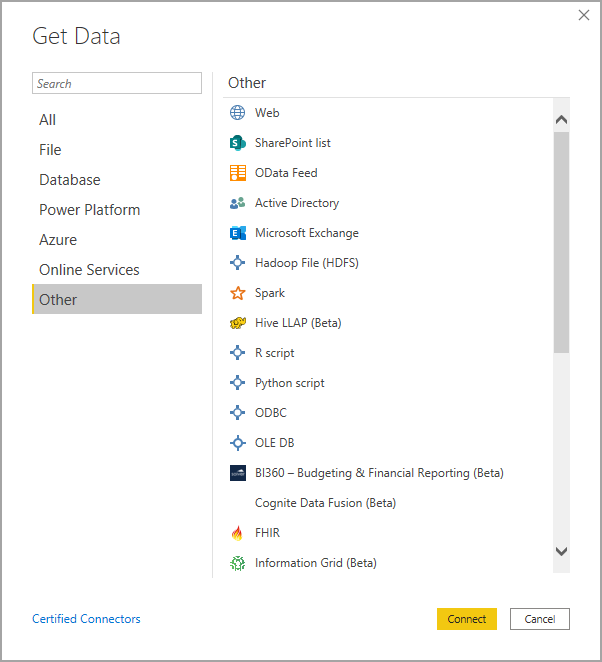
The Other category provides the following data connections:
- Web
- SharePoint list
- OData Feed
- Active Directory
- Microsoft Exchange
- Hadoop File (HDFS)
- Spark
- Hive LLAP (Beta)
- R script
- Python script
- ODBC
- OLE DB
- BI360 – Budgeting & Financial Reporting (Beta)
- FHIR
- Information Grid (Beta)
- Jamf Pro (Beta)
- MicroStrategy for Power BI
- Paxata
- QubolePresto (Beta)
- Roamler (Beta)
- Siteimprove (Beta)
- SurveyMonkey (Beta)
- Tenforce (Smart)List (Beta)
- TIBCO(R) Data Virtualization (Beta)
- Vena (Beta)
- Workforce Dimensions (Beta)
- Zucchetti HR Infinity (Beta)
- Blank Query
The following image shows the Get Data window for Other.
Connecting to a data source
Select the data source from the Get Data window and select Connect to a data source. The following image selects the web from the Other data connection category.

A connection window is displayed, specific to the type of data connection. If credentials are required, you’ll be prompted to provide them. The following image shows a URL being entered to connect to a Web data source.

Enter the URL or resource connection information, and then select OK. Power BI Desktop connects to the data source and presents the available data sources in the Navigator.
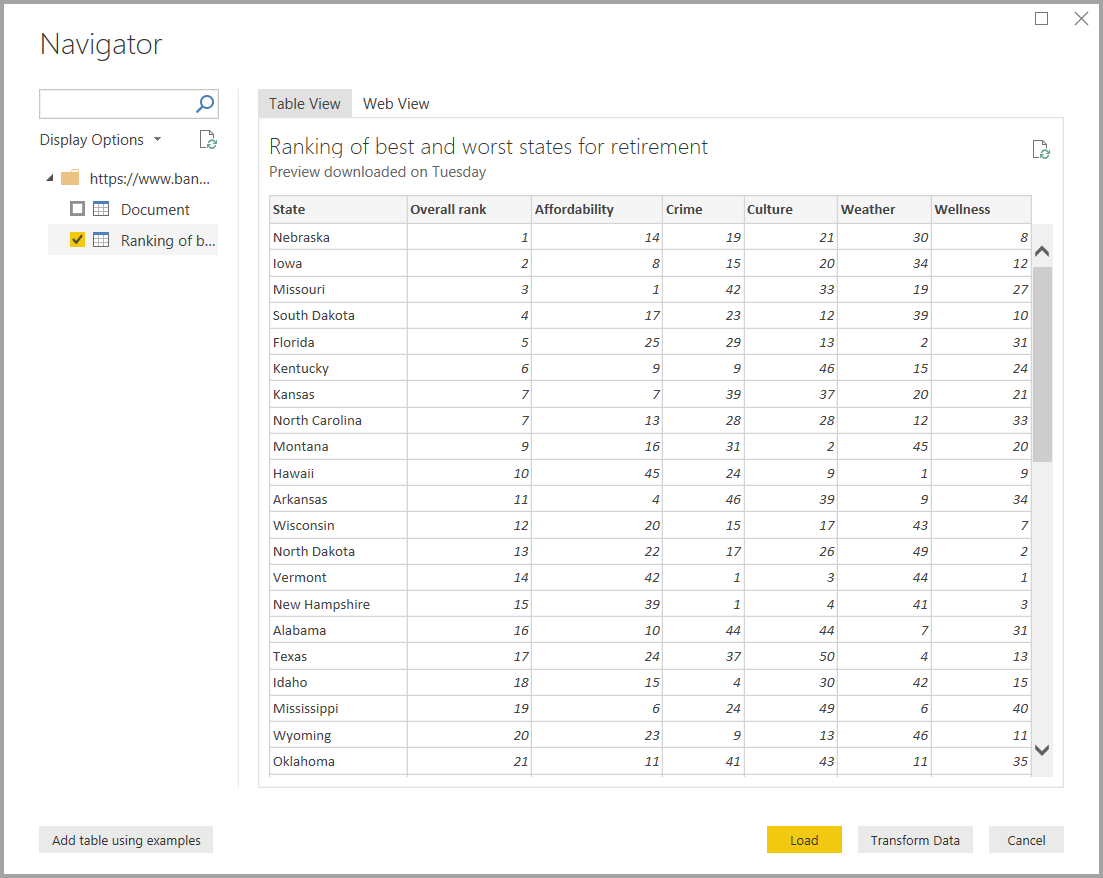
Select the Load button at the bottom of the Navigator pane to load the data. Before loading the data, select the Transform Data button to transform or edit the query in Power Query Editor.
That’s all there is to connecting to data sources in Power BI Desktop! Try connecting to data from our growing list of sources, and check back often—we continue to add to this list.
Using PBIDS files to get data
PBIDS files are Power BI Desktop files with a specific structure. They have a .PBIDS extension to identify them as a Power BI data source file.
You can create a PBIDS file to streamline the Get Data experience for report creators in your organization. To make it easier for a new report author to use PBIDS files, we recommend that an administrator create them for commonly used connections.
When an author opens a PBIDS file, Power BI Desktop prompts the user for credentials to authenticate and connect to the data source specified in the file. The Navigation dialog box appears, and the user must select the tables from that data source to load into the model. Users may also need to choose the database(s) if none was specified in the PBIDS file.
The user can begin building visualizations or select Recent Sources to load a new set of tables into the model from that point forward.
Currently, PBIDS files only support a single data source in one file. They are specifying more than one data source results in error.
To create the PBIDS file, an administrator must specify the required inputs for a single connection. They can also specify the connection mode as either DirectQuery or Import. If the mode is missing or null in the file, the user who opens the file in Power BI Desktop is prompted to select DirectQuery or Import.
PBIDS file examples
This section provides some examples from commonly used data sources. The PBIDS file type only supports data connections that are also supported in Power BI Desktop, with two exceptions: Live Connect and Blank Query.
The PBIDS file doesn’t include authentication information and table and schema information.
The following code snippets show several common examples of PBIDS files, but they aren’t complete or comprehensive. You can refer to the Data Source Reference (DSR) format for protocol and address information for other data sources.
These examples are for convenience only, aren’t meant to be comprehensive, and don’t include all supported connectors in DSR format. An administrator or organization can create their own data sources using these examples as guides, from which they can create and support their own data source files.
PowerBI License information
Power BI service features by license type
In the Power BI service, users have defined capabilities based on the type of per-user license they have and whether the content they are acting on is in a workspace assigned to a Power BI Premium capacity.
- Per-user – Power BI Pro and Power BI (free) licenses. A Power BI Pro license enables a user to collaborate with other Power BI Pro users by consuming content from and sharing content with other users of a Power BI Pro license. Only users with a Power BI Pro license can publish content to app workspaces, share dashboards, and subscribe to dashboards and reports. A free license enables a user to consume content in a workspace assigned to a Power BI Premium capacity and access some of the features of the Power BI service for their own personal content in their My Workspace. For more information, see Sign up for Power BI as an individual and Purchase and assign Power BI Pro user licenses.
- Power BI Premium capacity – Power BI Premium licensing. Power BI Premium provides dedicated capacity to deliver more consistent performance and support larger data volumes in Power BI. Power BI Premium also enables the widespread distribution of content by Pro users without requiring users who view the content to have Power BI Pro licenses. For more information, see What is Power BI Premium?
Prepare SQL custom view in SCCM DB
Connect SCCM SQL DB and Create a view
The below query will help create a location view by using the starting letters of computer names; you can modify the query by using IP Address, AD Site Name, or any unique settings per your org requirements.
USE [CM_PRI] GO
SET ANSI_NULLS ON GO
SET QUOTED_IDENTIFIER ON GO
CREATE VIEW [dbo].[Assets_Location] AS
Select DISTINCT
vrs.ResourceID as 'ResourceID', vrs.name0 as 'Machine Name', vrs.Resource_Domain_OR_Workgr0 as 'Domain', CASE when vrs.Name0 LIKE 'IND%' then 'Arcade' when vrs.Name0 LIKE 'CHI%' then 'China'
when vrs.Name0 LIKE 'USA%' then 'NEW-York' when vrs.Name0 LIKE 'LON%' then 'London' when vrs.Name0 LIKE 'UAE%' then 'Dubai' when vrs.Name0 LIKE 'JAP%' then 'Japan' when vrs.Name0 LIKE 'ITA%' then 'Italy' when vrs.Name0 LIKE 'AUS%' then 'Austria' when vrs.Name0 LIKE 'BRI%' then 'Brizal' when vrs.Name0 LIKE 'CAN%' then 'Cannada' else 'Other' end as 'Location'
from v_R_System as VRS
GO
Get Data to PowerBI from SCCM SQL DB by using Direct Query
Install PowerBI Desktop
Open PowerBI Desktop using the Home ribbon. Select the Get Data button label or the down arrow and choose SQL Server
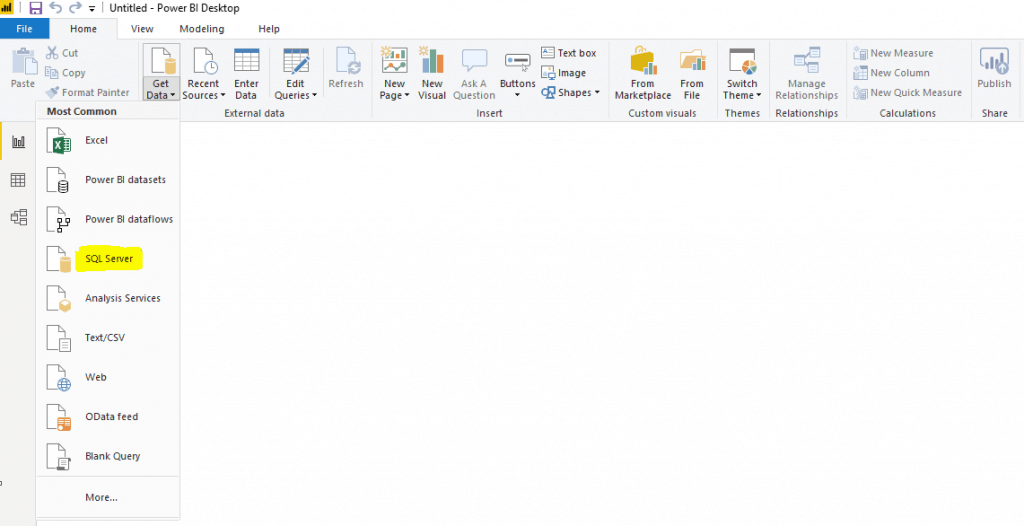
Connect your SQL Server and provide an SCCM SQL DB Instance if you have multiple Databases in your SQL Server.
Select DirectQuery and past your selected query on the SQL Statement page to get data from SCCM DB to the PowerBI Desktop application

PowerBI Desktop application will load data from the SCCM SQL Server and shows in the below table to import data into PowerBI Desktop.

Get Data to PowerBI from SCCM SQL DB by using Import Query
Open PowerBI Desktop using the Home ribbon. Select the Get Data button label or the down arrow and select SQL Server.
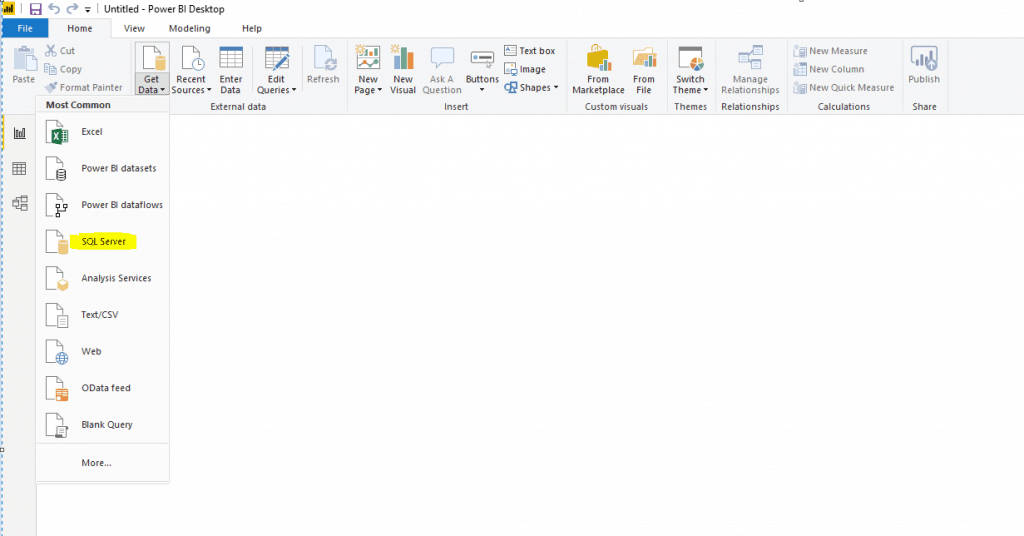
Connect your SQL Server and provide an SCCM SQL DB Instance if you have multiple Databases in your SQL Server.
Select Import to get data from SCCM DB SQL views to PowerBI

Select the required view and click Load to import data to PowerBI Desktop

Get Data to PowerBI from an Excel file
Open PowerBI Desktop using the Home ribbon. Select the Get Data button label or the down arrow and select Excel
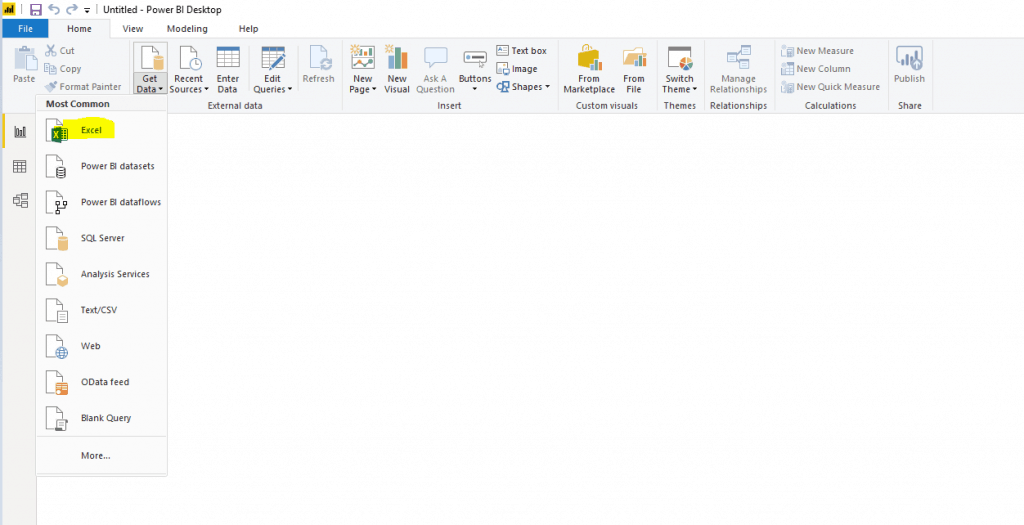
Select the Excel file and Select the Sheet in which you want to import data into PowerBI

Select Load to import data into PowerBI from the Excel file

Create Custom Columns in PowerBI
Creating custom columns in PowerBI for a count of machines Compliant% and count of devices Non-Compliant%
Right-click on Patch Compliance Query, select “New Column,” and use the below queries to create a count of Patch Compliant and Non-Compliant Count of machines, which will help prepare Graphical design tiles in PowerBI.

Count of Non-Compliant% = CALCULATE(COUNT('Patch Compliance'[Compliant%]), 'Patch Compliance'[Compliant%] < "100.00%")Count of Compliant% = CALCULATE(COUNT('Patch Compliance'[Compliant%]), 'Patch Compliance'[Compliant%] = "100.00%")Apply filter to show patch compliance location-wise on each tile.

Add Last Refresh Date & Time Query for PowerBI
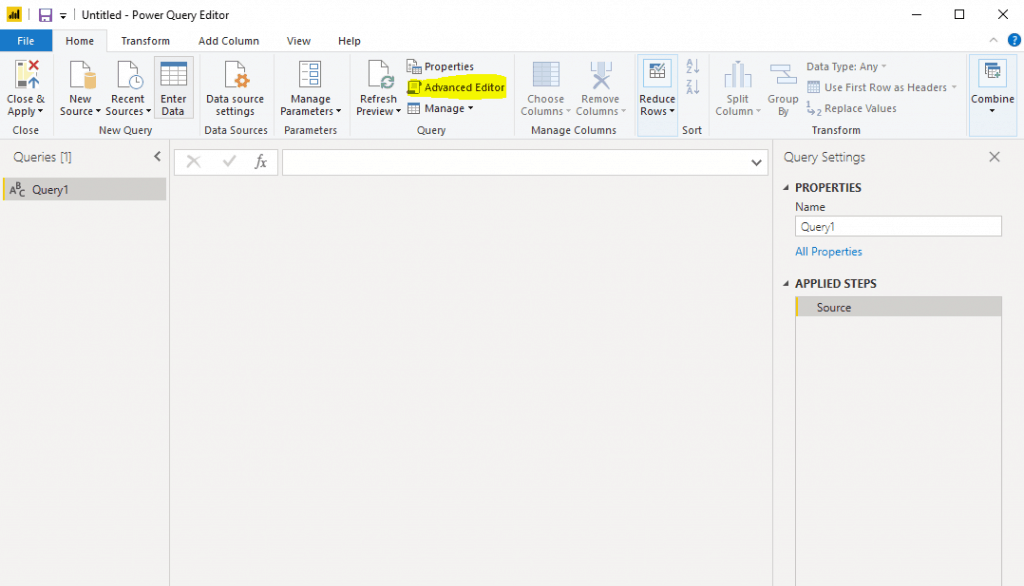
Open PowerBI Desktop using the Home ribbon. Select the Get Data button label or the down arrow and select More. Then go to Others and Select “Blank Query.”

Select Advanced Editor to Add a Date and Time sync query in PowerBI
Given Query in below for Last Data & Refresh in PowerBI.
let
TodaysDate = DateTime.From(DateTimeZone.SwitchZone(DateTimeZone.FixedLocalNow(),-8)),
#"Converted to Table" = #table(1, {{TodaysDate}}),
#"Renamed Columns" = Table.RenameColumns(#"Converted to Table",{{"Column1", "Last Refresh Date Time"}}),
#"Changed Type" = Table.TransformColumnTypes(#"Renamed Columns",{{"Last Refresh Date Time", type datetime}})
in
#"Changed Type"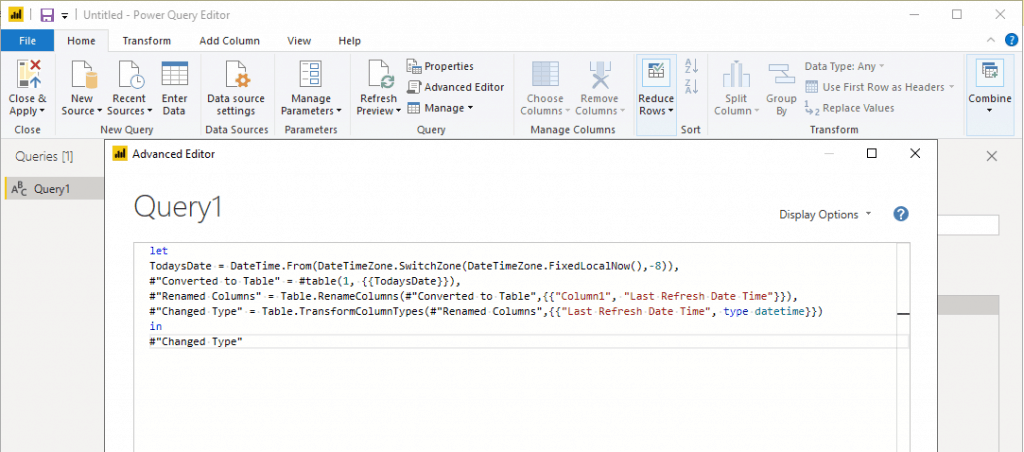
Add Tile for the Last Refreshed Date and Time and Select the suitable visualization.

Publish PowerBI Dashboard
When you publish a Power BI Desktop file to the Power BI service, you publish the data in the model to your Power BI workspace. The same is true for any reports you create in Report View. You’ll see a new dataset with the same name and any reports in your Workspace navigator.
Publishing from Power BI Desktop has the same effect as using Get Data in Power BI to connect to and upload a Power BI Desktop file.
NOTE! Any changes you make to the report in Power BI will not be saved back to the original Power BI Desktop file. This includes adding, deleting, or changing visualizations in reports.
To publish a Power BI Desktop dataset and reports
In Power BI Desktop, choose File > Publish > Publish to Power BI or select Publish on the ribbon.

Sign in to Power BI. Select the destination.

When publishing is complete, you receive a link to your report. Select the link to open the report on your Power BI site.

Republish or replace a dataset published from Power BI Desktop
The dataset and any reports you created in Power BI Desktop are uploaded to your Power BI site when you publish a Power BI Desktop file. When you republish your Power BI Desktop file, the dataset in your Power BI site is replaced with the updated dataset from the Power BI Desktop file.
What is PowerBI Gateway
The gateway connects Power BI cloud-based data analysis technology and the data source located on-premises. It is an application that can be installed on any server in the local domain. The gateway is responsible for creating the connection and passing data through.
Configure Auto Refresh schedules
The Scheduled Refresh section defines the frequency and time slots to refresh a dataset. As mentioned earlier, you can configure up to eight daily time slots if your dataset is on shared capacity or 48 time slots on Power BI Premium. The following screenshot shows a refresh schedule at a twelve-hour interval.

After you have configured a refresh schedule, the dataset settings page informs you about the next refresh time, as in the screenshot above.
If you want to refresh the data sooner, such as test your gateway and data source configuration, perform an on-demand refresh by using the Refresh Now option in the dataset menu in the nav pane. On-demand refreshes don’t affect the next scheduled refresh time.
Note that the configured refresh time might not be the exact time when Power BI starts the next scheduled process. Power BI starts scheduled refreshes on a best-effort basis.
The target is to initiate the refresh within 15 minutes of the scheduled time slot, but a delay of up to one hour can occur if the service can’t allocate the required resources sooner.
NOTE! Power BI deactivates your refresh schedule after four consecutive failures or when the service detects an unrecoverable error that requires a configuration update, such as invalid or expired credentials. The consecutive failure threshold cannot be changed.
Getting Refresh Failure Notifications
By default, Power BI emails refresh failure notifications to the dataset owner, prompting them to act promptly should refresh issues occur.
Power BI also sends you notifications when the service disables your schedule due to consecutive failures. Microsoft recommends that you leave the checkbox Send refresh failure notification emails to be enabled.
It is also good to specify additional recipients by using the Email these users when the refresh fails textbox. The specified recipients receive refresh failure notifications in addition to the dataset owner. This might be a colleague taking care of your datasets while on vacation.
It could also be the email alias of your support team, which takes care of refresh issues for your department or organization. Sending refresh failure notifications to others in addition to the dataset owner is helpful to ensure issues are noticed and addressed promptly.
Note that Power BI sends notifications on refresh failures and when the service pauses a scheduled refresh due to inactivity. After two months, Power BI considers the dataset inactive when no user has visited any dashboard or report built on the dataset.
In this situation, Power BI sends an email message to the dataset owner indicating that the service paused the refresh schedule for the dataset. See the following screenshot for an example of such notification.
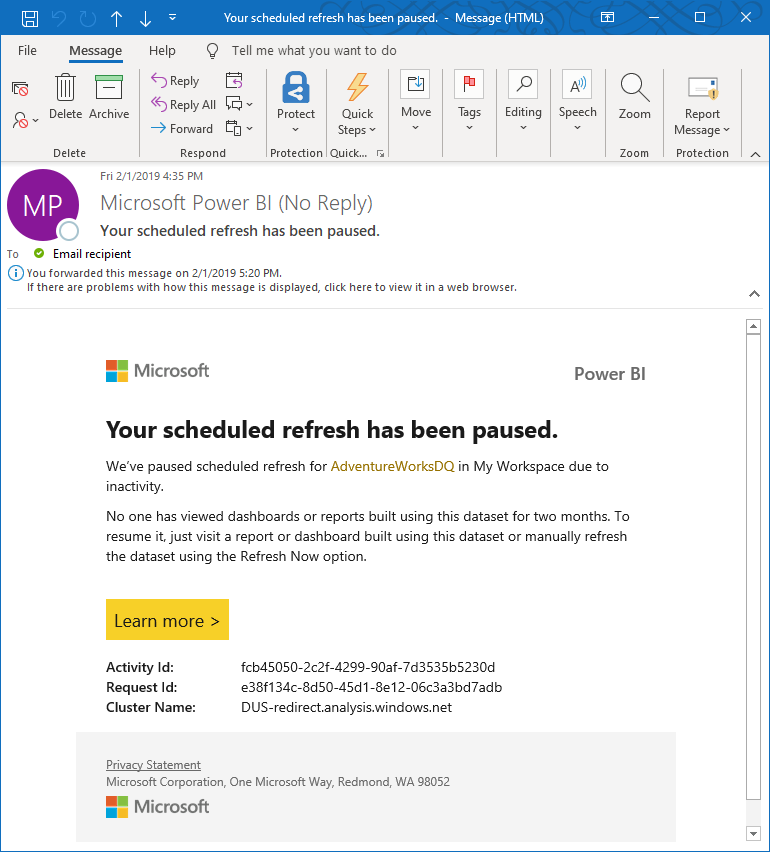
To resume scheduled refresh, visit a report or dashboard built using this dataset or manually refresh the dataset using the Refresh Now option.
Checking Refresh Status and History
In addition to failure notifications, it’s a good idea to periodically check your datasets for refresh errors. A quick way is to view the list of datasets in a workspace. Datasets with errors show a small warning icon.
As in the following screenshot, select the warning icon to obtain additional information. For more information about troubleshooting specific refresh errors, see Troubleshooting refresh scenarios.
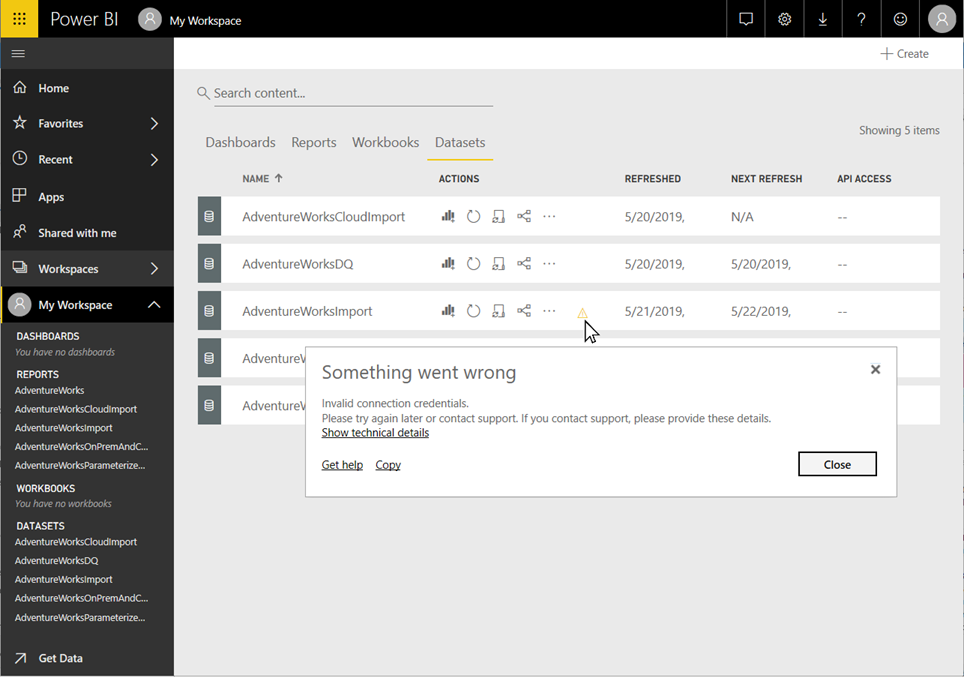
The warning icon helps indicate current dataset issues, but occasionally checking the refresh history is also a good idea. As the name implies, the refresh history lets you review past synchronization cycles’ success or failure status.
For example, a gateway administrator might have updated an expired set of database credentials. As you can see in the following screenshot, the refresh history shows when an affected refresh started working again.
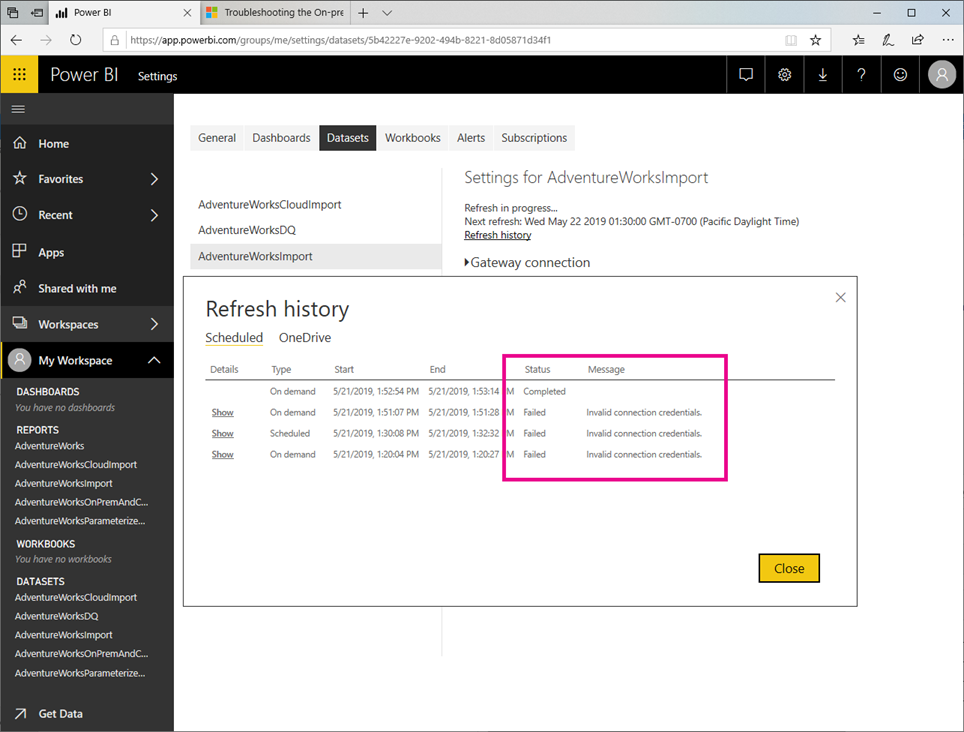
NOTE! – You can find a link to display the refresh history in the dataset settings. You can also retrieve the refresh history programmatically using the Power BI REST API. Using a custom solution, you can monitor the refresh history of multiple datasets in a centralized way..
Resources
- How to Integrate PowerBI with SCCM Video Recording by Mohan ConfigMgr
- Getting Started with SCCM & Power BI
Author
Mohan Kumar is a Technical Architect with more than 12 years of experience as an Endpoint Manager Configuration Manager (MEMCM) and has hands-on experience in SCCM, SCOM, SCORCH, SCVMM, SCEP, SQL, Azure, Intune, Update Management, etc. The main area of interest is designing and implementing ConfigMgr, OpsManager, Orchestrator, and Azure Infrastructure. He is having a vast knowledge of On-perm to Azure migration, SCOM to Azure Monitor, Migration On-Perm SQL to Azure SQL Always on setup, Configure serverless Database in Azure, Configure and Fix the ConfigMgr infrastructure related issue & troubleshooting.

Thanks for this Mohan
Any chance you could publish the direct sql query statement you have above – it looks as though that will pull in the data I need into powerbi – I am trying to pull in SCCM data showing Windows Update states and OS info (and compare that up with what is in our CMDB, which I also pull into powerbi).
I am not a sql whiz at all, so any additional guidance you have would be appreciated!