In this post, let’s discuss How to Deploy MS Teams Using ConfigMgr Step-by-Step Guide|SCCM.
The following steps help you create an MS Teams client package and deploy it for your organization using SCCM. Let’s dive into the Deploy MS Teams using the ConfigMgr Step-by-Step Guide.
Microsoft announced that Skype for Business will support it by July 31, 2021. Thus, most organizations have started migrating to Microsoft Teams. ConfigMgr allows admins to easily deploy the application to Windows 10 devices.
MS Teams has all the features your users need to continue business continuity. Teams have more features, and we have found that most of our end users are happier with the MS Teams experience over Skype.
NOTE! I got feedback that this installation downloads 2 GB of the complete Office suite no matter what product you want to install from the wizard. I think in the specific case of Teams, the best way to deploy is to download only the MSI from Microsoft (around 150 MB) and deploy it.
Create MS Teams Application in SCCM
Launch the SCCM console from an internet-connected machine
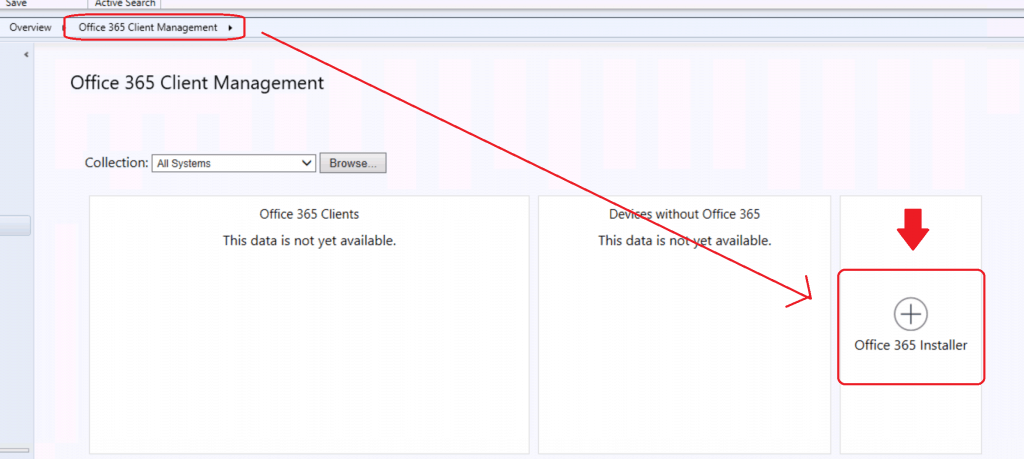
Navigate to \SoftwareLibrary\Overview\Office 365 Client Management dashboard
Click on the + Office 365 Installer from the Office 365 Client Management Dashboard
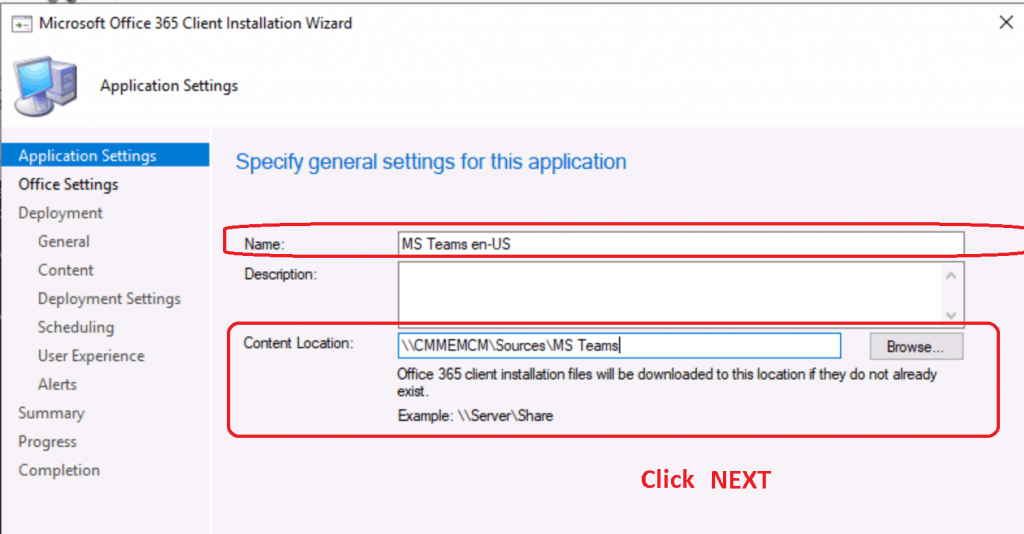
Specify General Settings for MS Teams package
Enter the Name for the package “MS Teams en-US“
Content-Location where this wizard will download MS Teams source files “\\CMMEMCM\Sources\MS Teams“
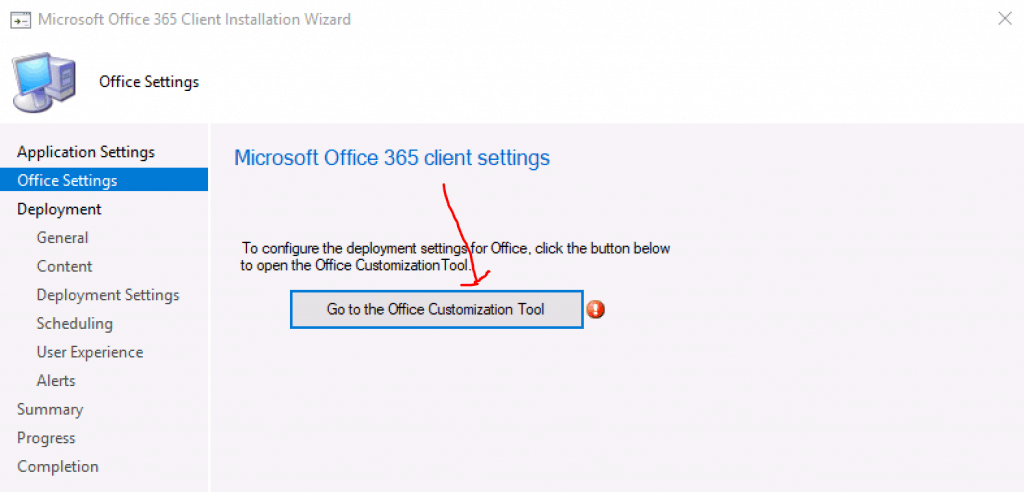
This is the main step in the MS Teams client package creation from Microsoft Office 365 Client Settings
Click on the Office Customization tool (More details about the office customization tool in the below section of this post) to customize and import your XML to the SCCM application engine.
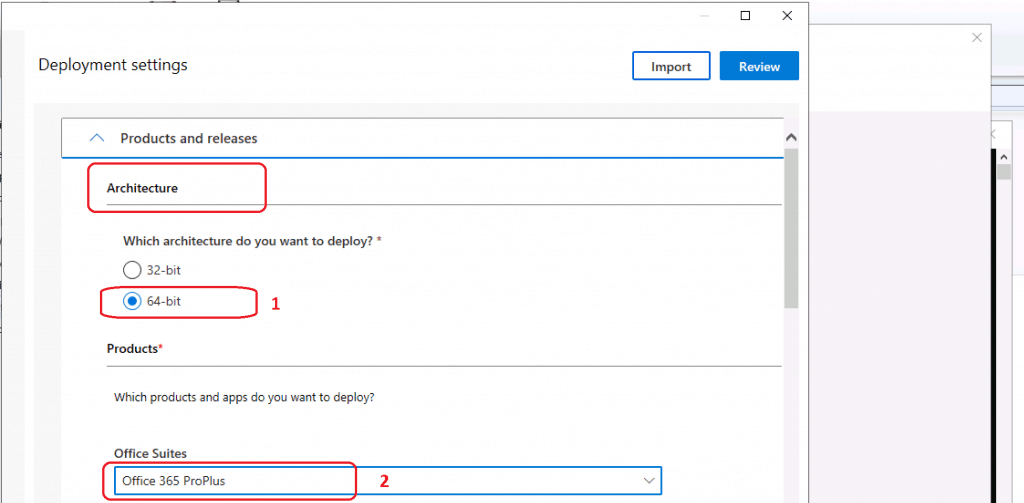
Product & Releases
Select the Architecture of MS Teams application you want to install in Office Customization Tool – x64
Select – Which Products & Apps do you want to deploy
MS Teams application is part of Office Suite – Office 365 ProPlus
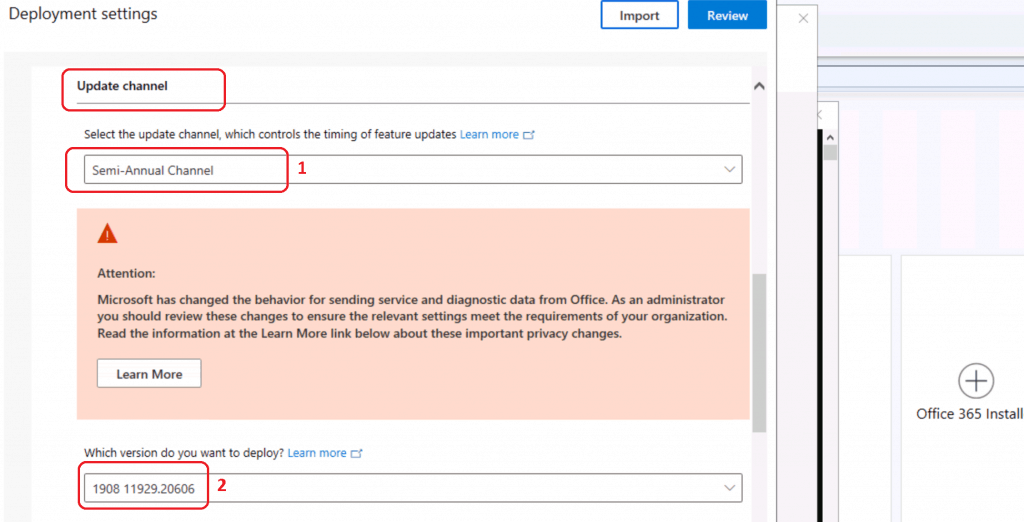
Select the update Channel
Semi-Annual Channel
Select the MS-Teams version to deploy as per the office 365 ProPlus version
1908.11929.20606
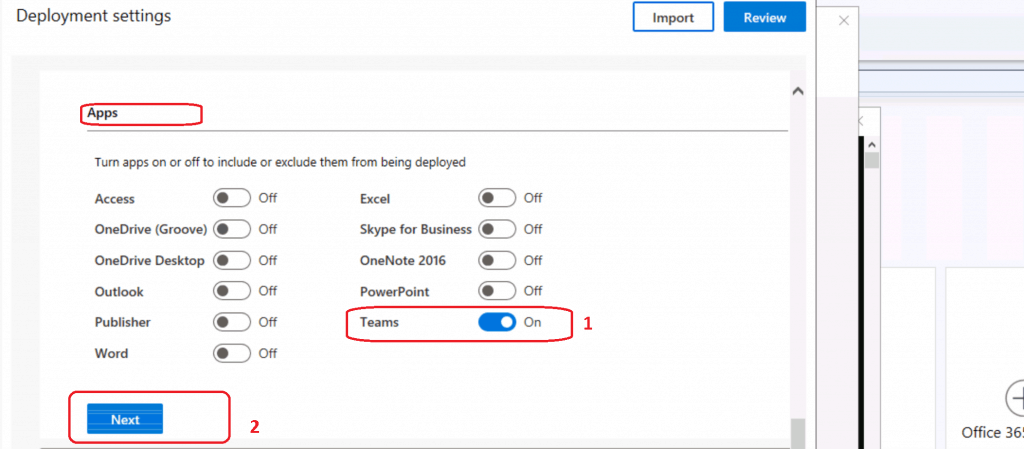
Select the apps from Office 365 ProPlus package
I selected ONLY MS Teams
Click NEXT
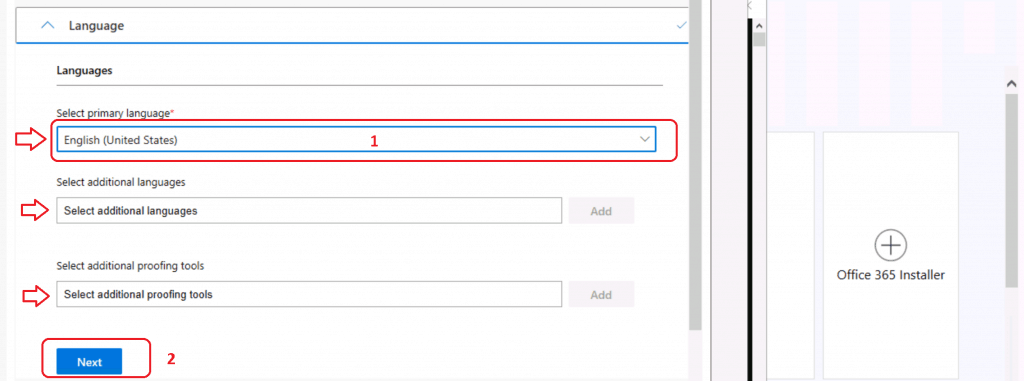
Languages
Select the Language settings for MS Teams application
Select Primary Language
English (United States)
Select Additional Languages
Select Additional Languages
Select Additional Proofing Tools
Select Additional proofing tools
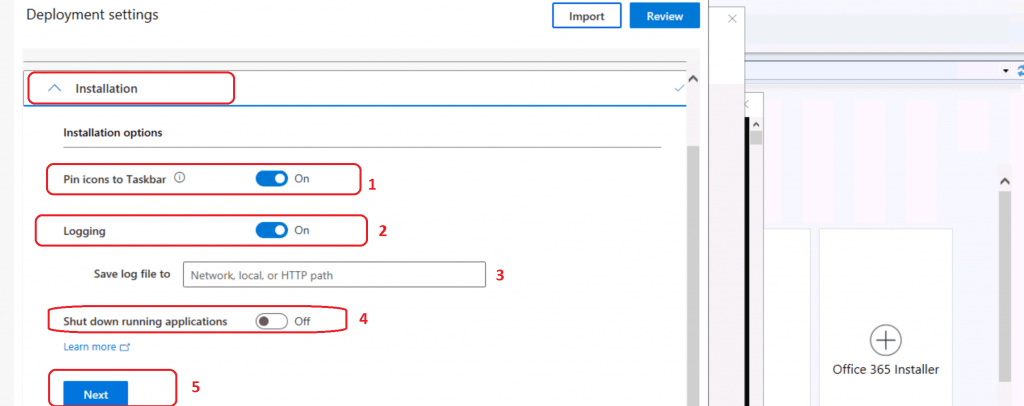
MS Teams Installation Options
Select MS Teams Installation Options
Pin Icons to Task-bar – ON
The logging option is ON
You can select the option to save log files
Shut down running application option is kept as OFF
Click NEXT
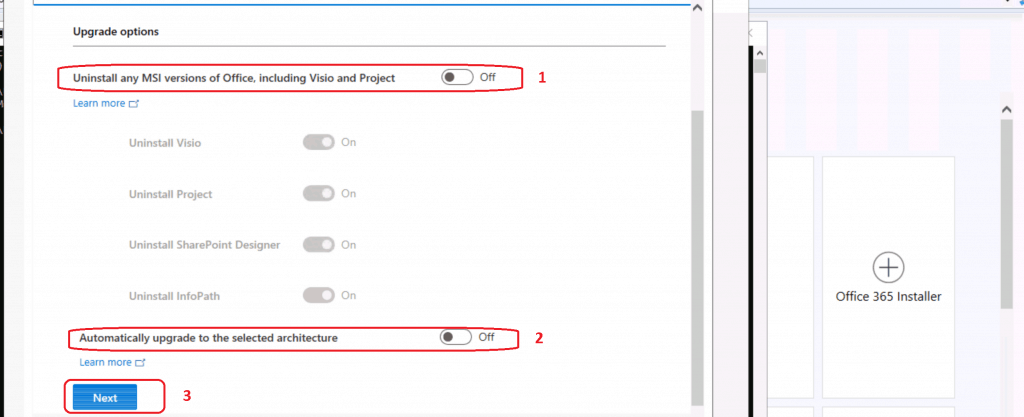
Uninstall Any MSI Versions of Office
Upgrade Options? I didn’t want to upgrade or Uninstall any existing applications
Click on the NEXT button to continue
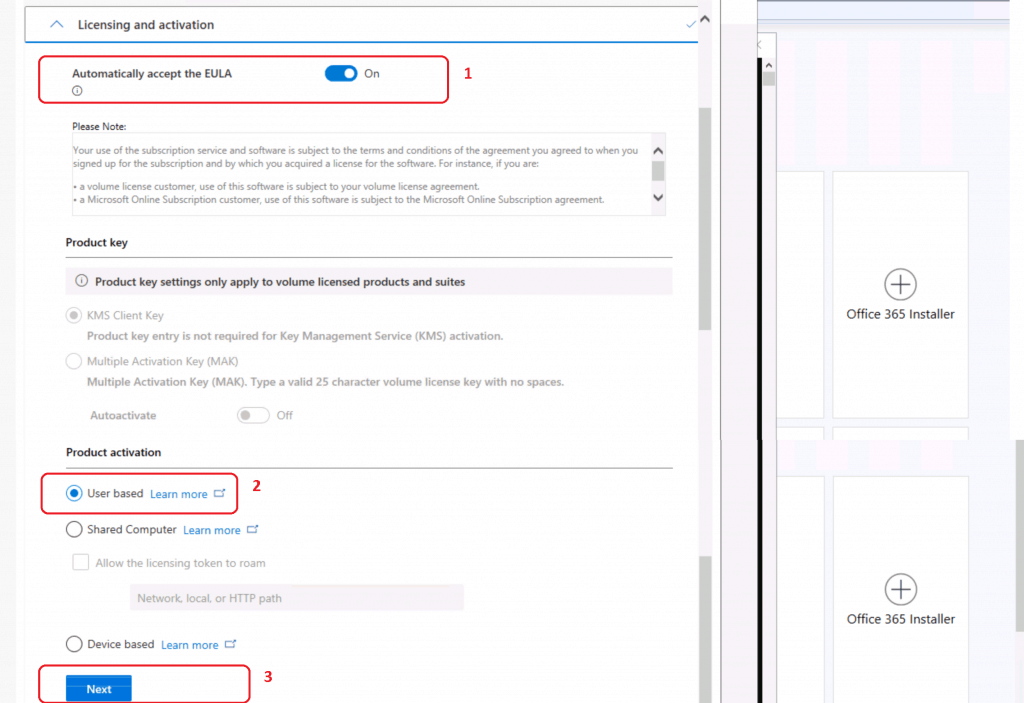
Licensing & Activation
Automatically Accept the EULA
I want MS Team to get automatically updated with subscription licenses
You can also use the KMS option if you still use KMS to activate
Select Product Activation Options
Select User-Based (If you are ok with it). It’s better to select Shared computer if multiple users are using the same computer
Click on NEXT to continue
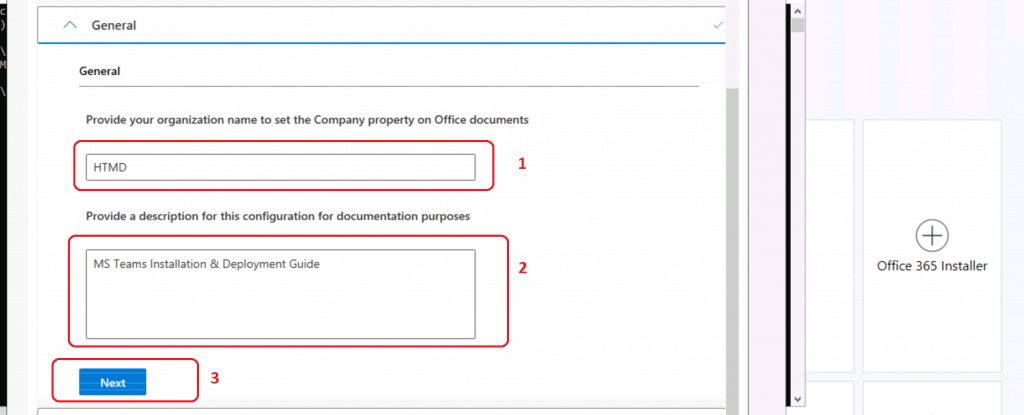
General Options
Provide your organization name to set the company property in MS Teams
Provide a Description
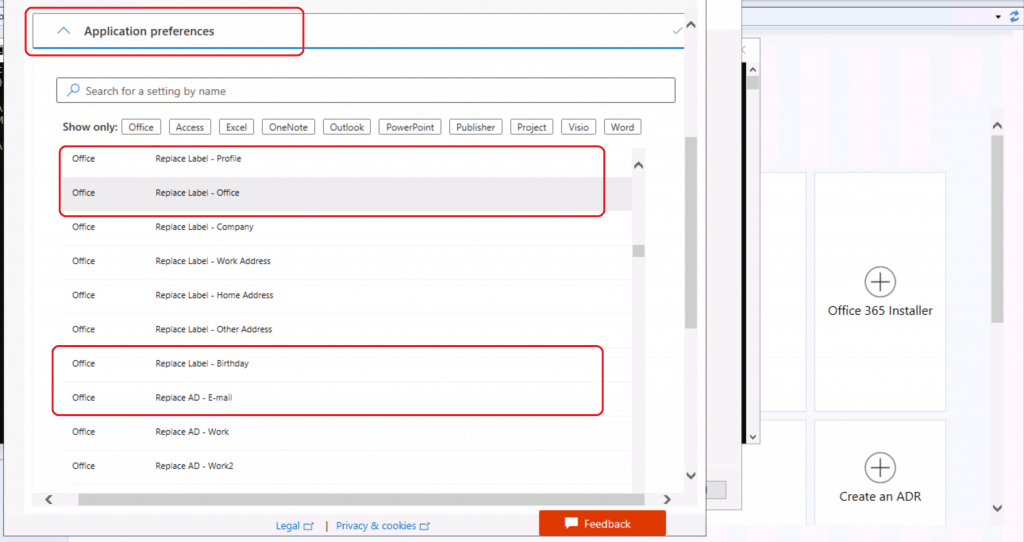
Application Preferences for MS Teams
Select the application preferences configuration for MS Teams
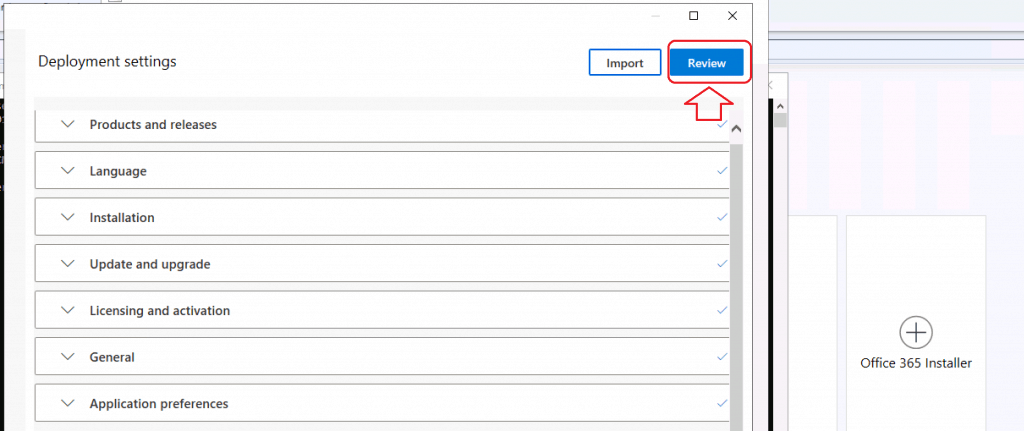
Click on the FINISH button to continue
Click on REVIEW to continue
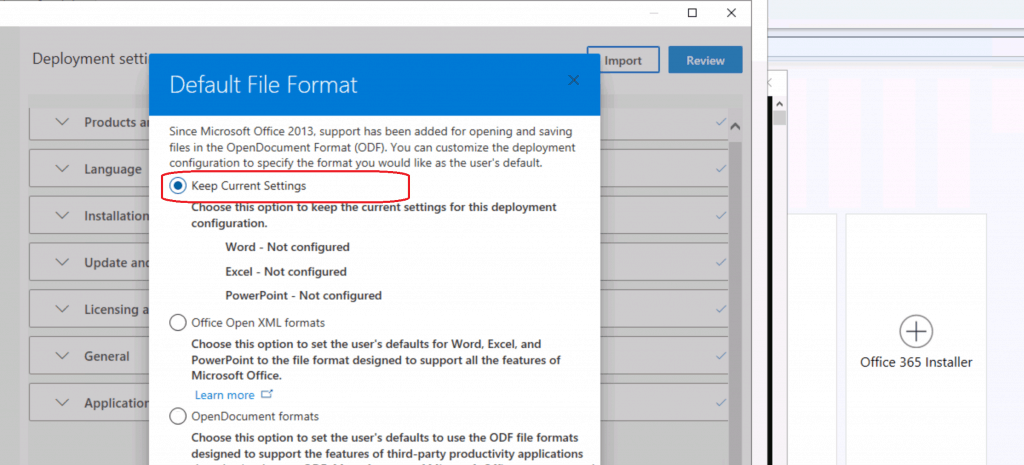
Select Keep current settings from Default file format options
Click on OK to continue
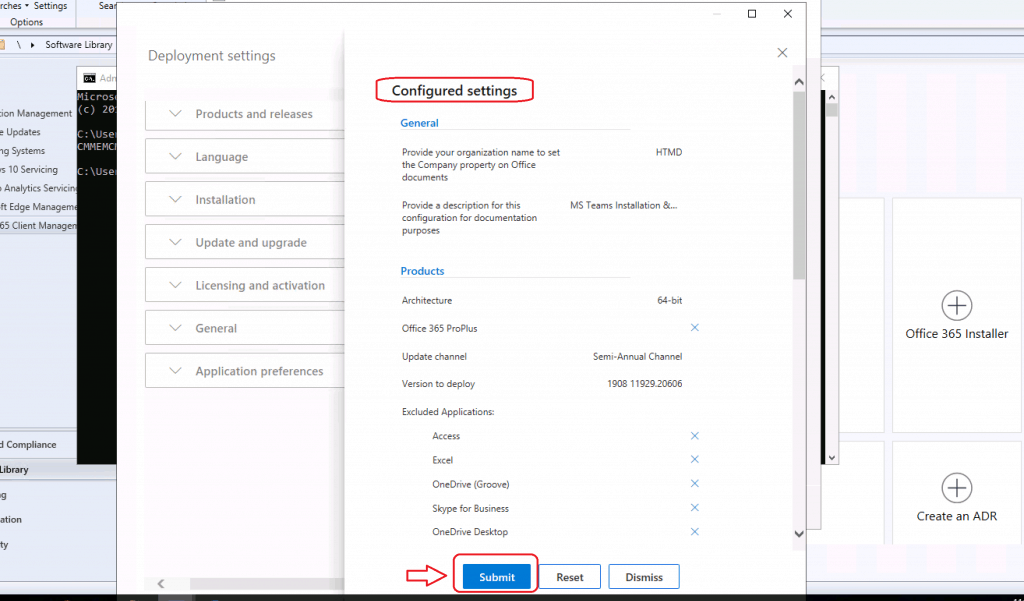
Submit MS Teams Install Configurations
Click on SUBMIT button from Configured settings
Configuration XML is saved and click on the NEXT button from Microsoft Office 365 Client Settings page
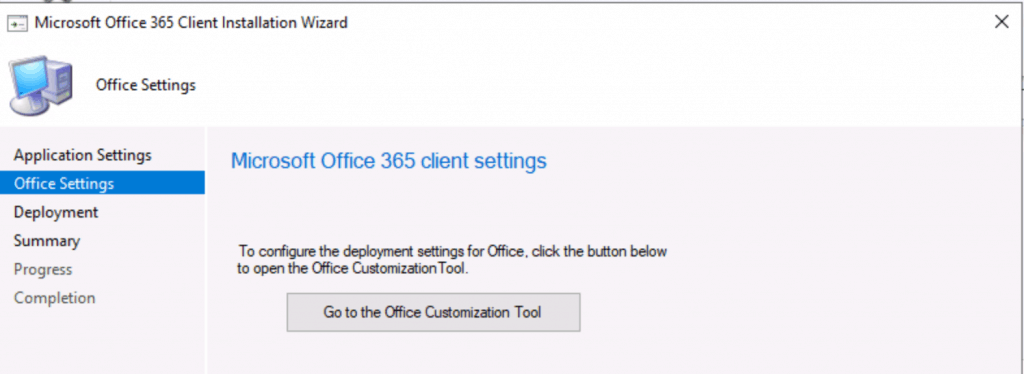
Deploy MS Teams Using ConfigMgr
Click on Yes to create a deployment for the MS Teams application
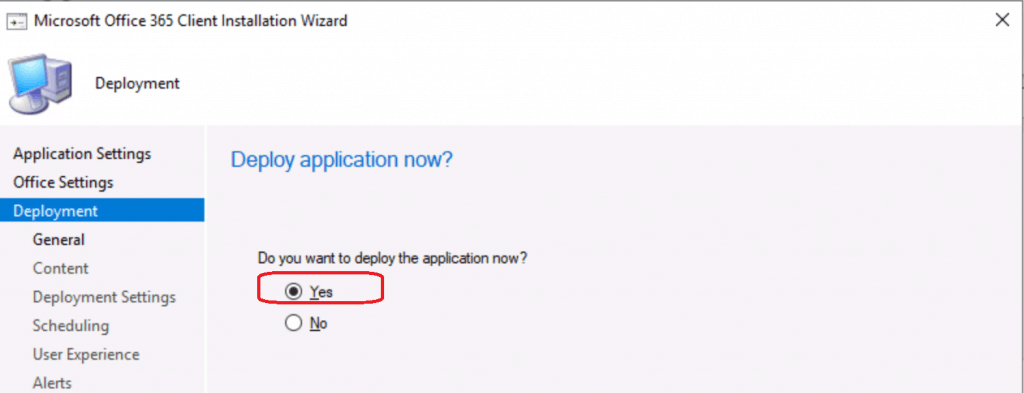
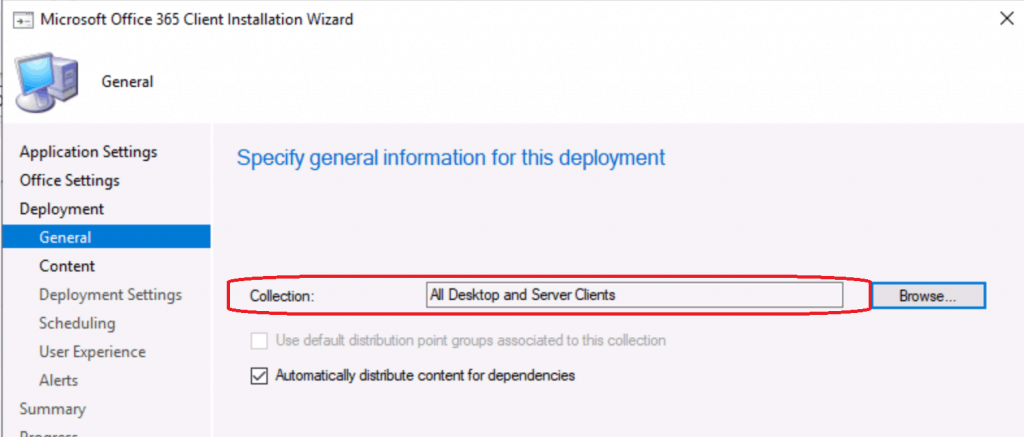
Select the Collection to Deploy MS Teams
Click on the Browse button to select the collection of Devices or Uses you want to deploy MS Teams
Select the Collection from the drop-down menu
Click on the NEXT button
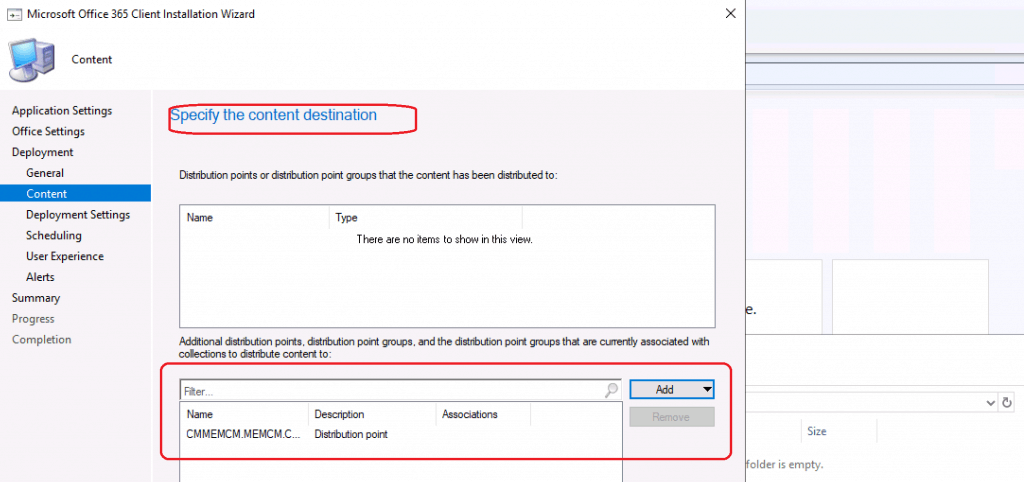
Select Distribution Point
Select the Content Destination
Add Distribution Point
Click on NEXT
Required Vs Available Deployment
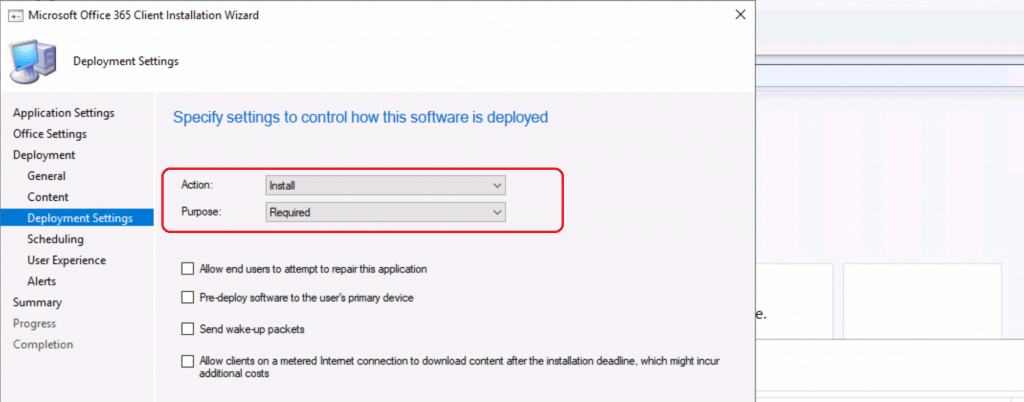
Specify Settings to Control How MS Teams is deployed
Select Action – Install
Select Purpose – Required
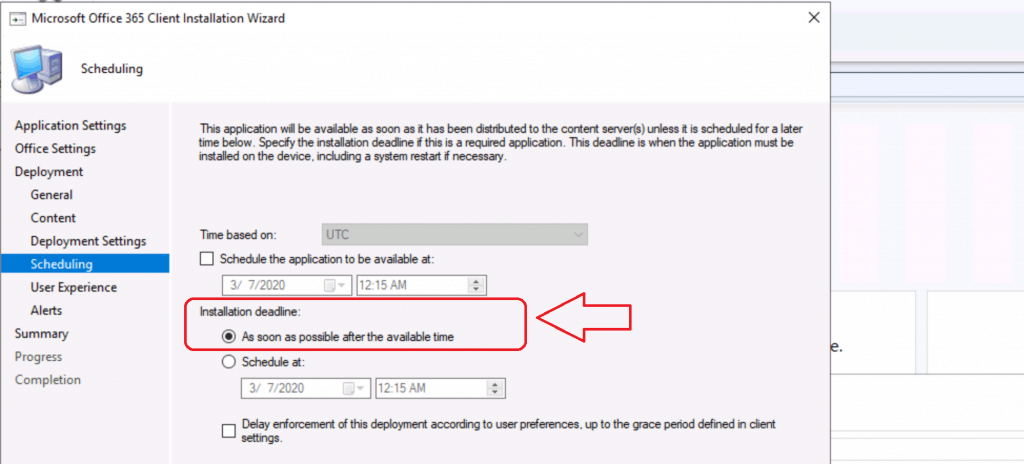
Scheduling Options of MS Teams Installation Using SCCM
Set Installation Deadline as per your application deployment schedule
For this example, I have set this up as the Installation Deadline
As Soon As Possible after the available time
Click NEXT to continue
Click NEXT from Specify User Experience page
Click NEXT from the Alerts page
Click NEXT from the Summary page
Wait until the Wizard connects to OFFICE CDN and complete the download of the source files of MS Teams – Progress
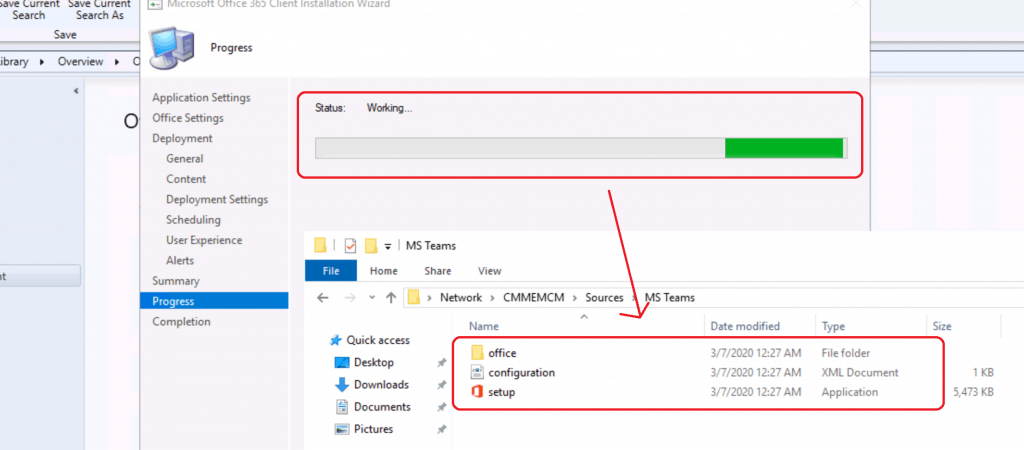
Verify MS Team Download
You can verify PatchDownloader.log from the %TEMP% folder.
Checking machine config  $$<03-07-2020 00:33:09.697+00>
Cert revocation check is disabled so cert revocation list will not be checked.
To enable cert revocation check use: UpdDwnldCfg.exe /checkrevocation
Verifying file trust C:\Users\anoop.MEMCM\AppData\Local\Temp\CAB9BFC.tmp
File trust C:\Users\anoop.MEMCM\AppData\Local\Temp\CAB9BFC.tmp verified
Successfully moved C:\Users\anoop.MEMCM\AppData\Local\Temp\CAB9BFC.tmp to \CMMEMCM\Sources\MS Teams\office\data\16.0.11929.20606\stream.x64.en-us.dat.cat
Downloading file \CMMEMCM\Sources\MS
.
File trust C:\Users\anoop.MEMCM\AppData\Local\Temp\CAB9C4B.tmp verified:
Successfully moved C:\Users\anoop.MEMCM\AppData\Local\Temp\CAB9C4B.tmp to \CMMEMCM\Sources\MS Teams\office\data\16.0.11929.20606\stream.x64.en-us.proof.dat.cat
Results
Click on CLOSE to complete the following
Deploy MS Teams Using ConfigMgr – A Step-by-Step Guide
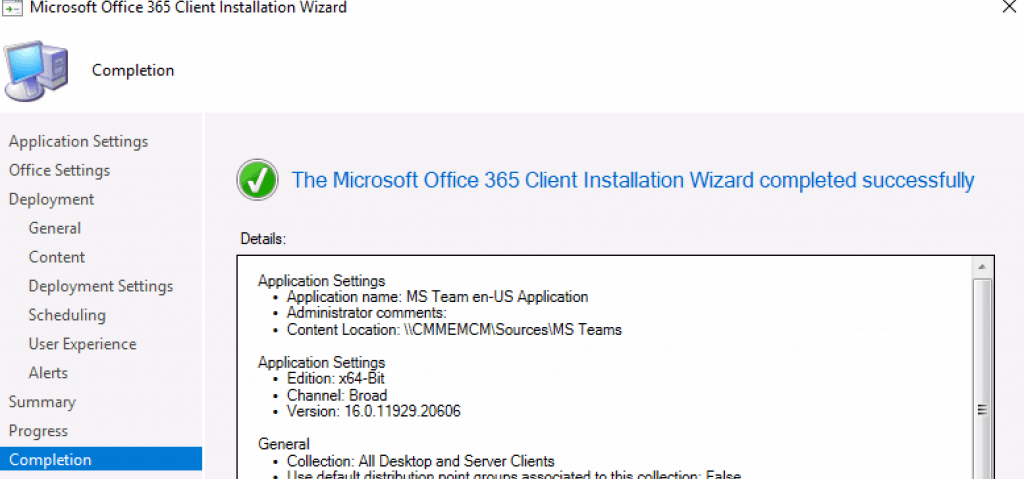
End User Results – Windows 10
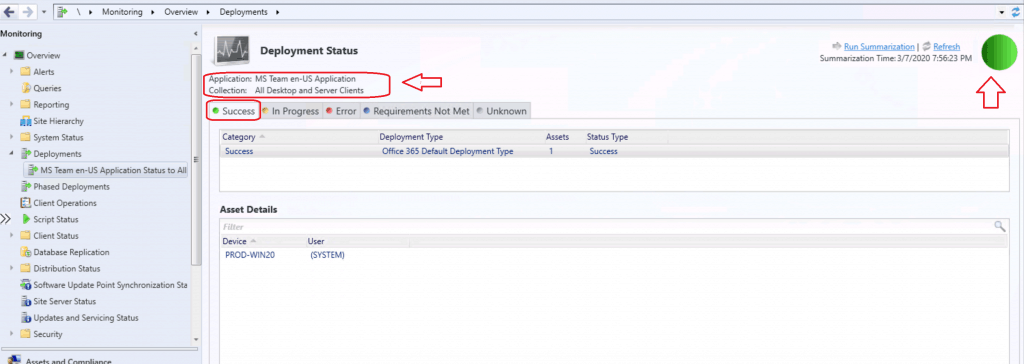
End-User Results – Windows 10 – MS Teams Successfully Completed
Resources
- How to Install Office 365 ProPlus Client Package
- Skype for Business Online – End of Life – July 31, 2021
- Install Microsoft Teams using Microsoft Endpoint Configuration Manager
Config File XML
NOTE! The following is the sample “Configuration.xml” file that I created for MS Teams deployment using ConfigMgr | Microsoft Endpoint Manager.
<Configuration ID="2fff8b8d-3c01-4fc2-a2ee-ad00d1a2b207" Host="cm">
 <Info Description="Anoop HTMD" />
 <Add OfficeClientEdition="64" Channel="Broad" OfficeMgmtCOM="TRUE" Version="16.0.11929.20606">
 <Product ID="O365ProPlusRetail">
 <Language ID="en-us" />
 <ExcludeApp ID="Access" />
 <ExcludeApp ID="Excel" />
 <ExcludeApp ID="Groove" />
 <ExcludeApp ID="Lync" />
 <ExcludeApp ID="OneDrive" />
 <ExcludeApp ID="OneNote" />
 <ExcludeApp ID="Outlook" />
 <ExcludeApp ID="PowerPoint" />
 <ExcludeApp ID="Publisher" />
 <ExcludeApp ID="Word" />
 </Product>
 </Add>
 <Property Name="SharedComputerLicensing" Value="0" />
 <Property Name="PinIconsToTaskbar" Value="TRUE" />
 <Property Name="SCLCacheOverride" Value="0" />
 <Property Name="AUTOACTIVATE" Value="0" />
 <Property Name="FORCEAPPSHUTDOWN" Value="FALSE" />
 <Property Name="DeviceBasedLicensing" Value="0" />
 <AppSettings>
 <Setup Name="Company" Value="HTMD" />
 </AppSettings>
 <Display Level="Full" AcceptEULA="TRUE" />
</Configuration>
We are on WhatsApp. To get the latest step-by-step guides and news updates, Join our Channel. Click here –HTMD WhatsApp.
Author
Anoop C Nair is Microsoft MVP! He is a Device Management Admin with more than 20 years of experience (calculation done in 2021) in IT. He is a Blogger, Speaker, and Local User Group HTMD Community leader. His main focus is on Device Management technologies like SCCM 2012, Current Branch, and Intune. He writes about ConfigMgr, Windows 11, Windows 10, Azure AD, Microsoft Intune, Windows 365, AVD, etc.

I followed the same steps to package Microsoft 365 Teams. However, it will remove the entire Office 365 Suite once its installed.
Not sure what caused the issues.