
Key Takeaways
- Control Automatic Updates: Microsoft Intune maintenance windows help control when automatic Windows Update downloads, installations, and restarts can begin.
- Flexible Scheduling: Administrators can configure one-time or recurring maintenance windows (daily, weekly, or monthly) based on organizational requirements.
- Three Update Actions: Choose Download, Install and Restart; Install and Restart; or Restart Only to control which actions are restricted to the maintenance window.
- Supported Update Types: Maintenance windows apply to quality updates, feature updates, Hotpatch updates, .NET updates, drivers, and firmware.
- Device Availability: Maintenance windows help minimize interruptions during business hours. However, updates started within the window can continue after it ends, and users may still initiate updates outside the scheduled period.
Microsoft Intune maintenance windows help IT administrators decide when Windows updates can download, install, and restart on managed devices. For example, if an organization uses shared computers, kiosks, or manufacturing devices, those devices may need to work without interruption during business hours. Administrators can schedule updates to happen during a specific time, such as after working hours. They can create a one-time schedule or set it to repeat daily, weekly, or monthly.
Table of Content
Table of Contents
MS Intune Maintenance Windows to Control Automatic Windows Update Downloads Installations and Restarts
Maintenance windows apply to different types of Windows updates, including quality updates, feature updates, Hotpatch, .NET updates, drivers, and firmware. However, maintenance windows only control when updates can happen, not which updates are approved or available for devices.
- How to Set Pause Start Date for Quality Updates using Intune Policy
- How to Configure Engaged Restart Snooze options for End Users during Monthly Patch Cycle using Intune
- Easy way to Block Pause Updates Ability in Windows Update for Business via Intune
- Best way Intune to Stop Sending New Policy Updates to Windows Devices Pause Config Refresh Feature
- Simplifying Windows Update Management Integration of Intune and Autopatch
Prerequisites for Configuring Maintenance Windows in Intune
Before creating a maintenance window policy, make sure your devices are enrolled in Microsoft Intune and running a supported version of Windows. The below table helps you to show more details.
| Prerequisites | Details |
|---|---|
| Intune Enrollment | Make sure devices are enrolled in Microsoft Intune. |
| Windows Version Devices | must run Windows 11 24H2 with KB5077181 (Build 26100.7840) or later. |
| Intune Permissions | You need permission to create and assign policies. |
| Test Devices | First, apply the policy to a small group of devices and test it. |
| Existing Update Policies | Check existing update settings, such as deadlines, grace periods, and deferrals, before applying the new policy. |
Understanding the 3 Update Options
Suppose a company wants to avoid Windows updates during office hours. The IT administrator can schedule a maintenance window. This helps reduce interruptions while employees are working. There are 3 update options; all 3 actions are shown below.

| Update Action | Details |
|---|---|
| Download, Install and Restart | Windows can download updates, install them, and restart the device only during the scheduled window. |
| Install and Restart | Windows can download updates at any time, but installation and restart happen during the scheduled window. |
| Restart Only | Windows can download and install updates at any time, but the automatic restart happens only during the scheduled window. |
How to Create a Maintenance Window Policy in Microsoft Intune
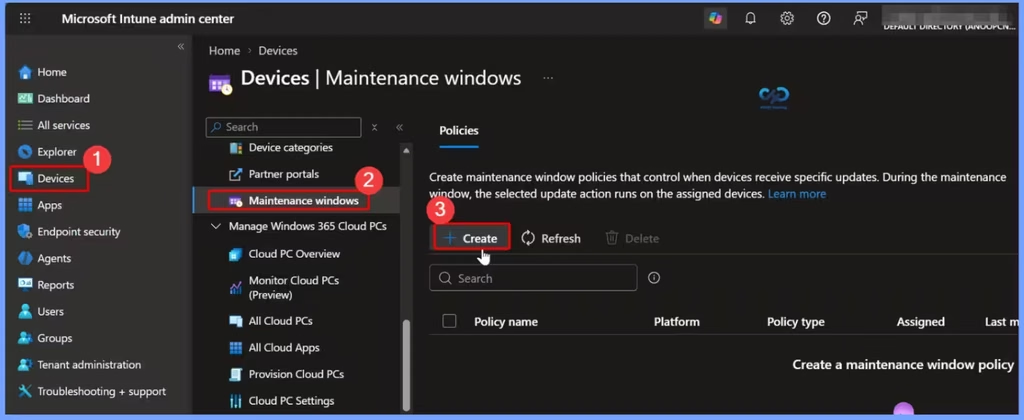
You can create a maintenance window policy from the Microsoft Intune admin center. This policy allows administrators to configure when automatic Windows update actions can begin on managed devices.
- Sign in to the Microsoft Intune admin center.
- Navigate to Devices > Manage devices > Maintenance windows.
- Select Create policy.
Configure the Policy Name and Description
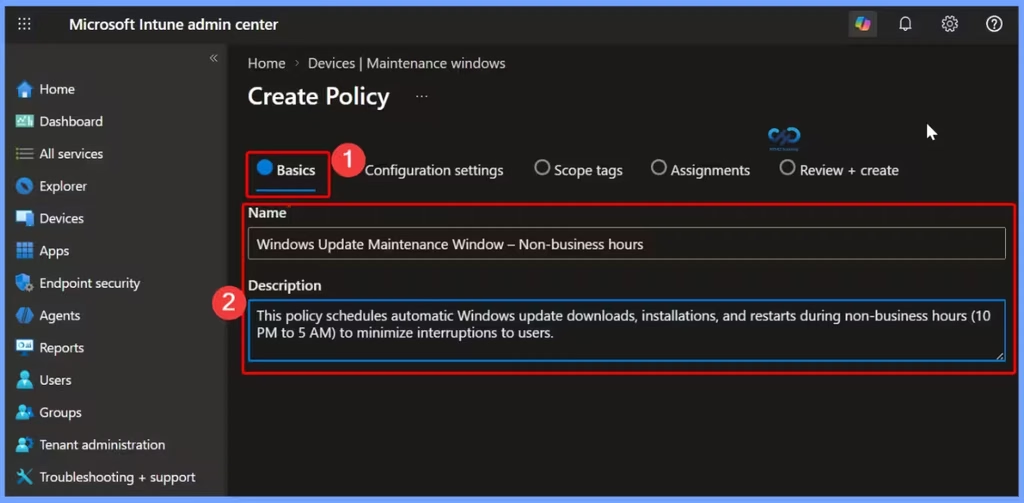
On the Basics tab, enter the policy name as Windows Update Maintenance Window – Non-Business Hours. In the Description field, provide an optional description: This policy schedules automatic Windows update downloads, installations, and restarts during non-business hours (10 PM to 5 AM) to minimize interruptions to users. Once you have entered the details, select Next to continue.
Configure Maintenance Window Settings
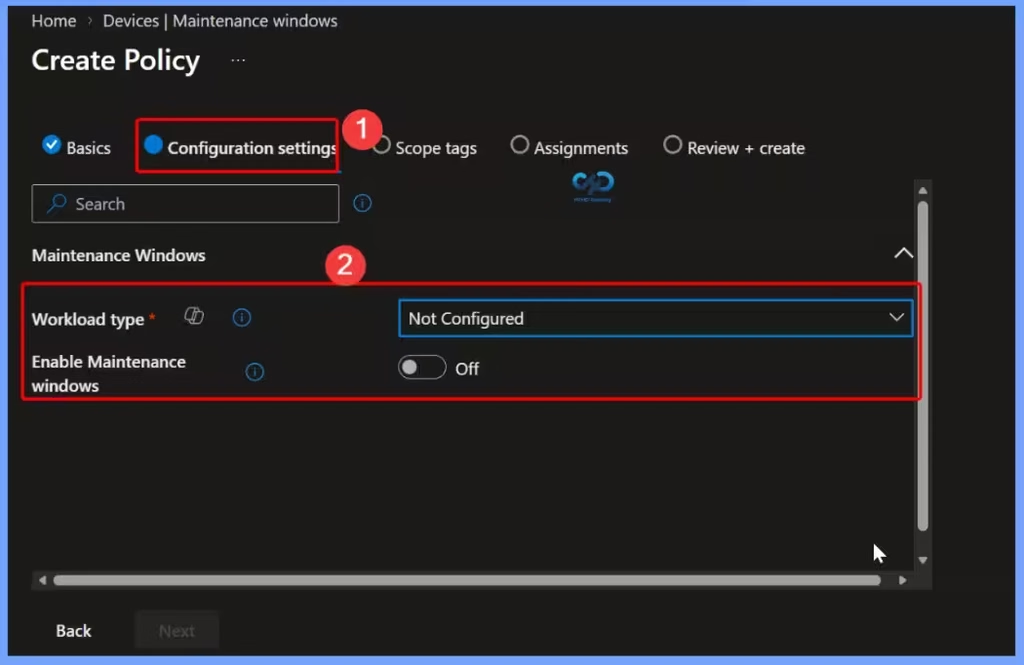
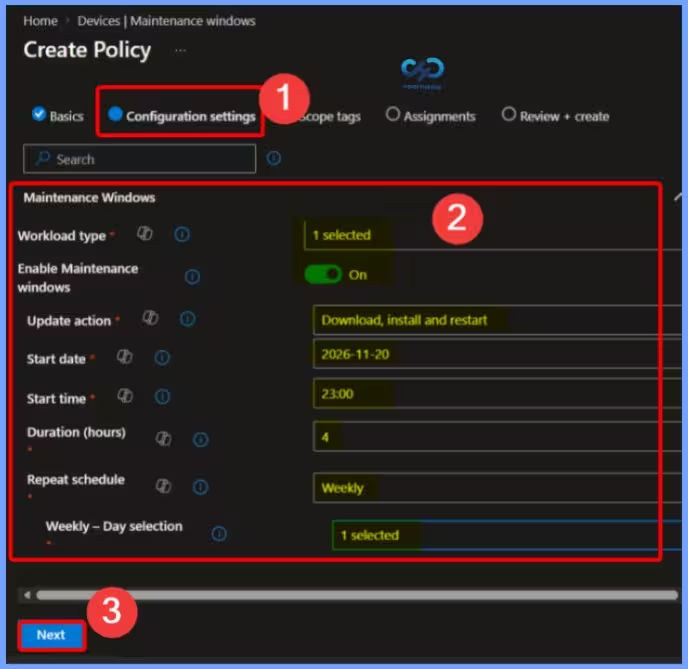
On the Configuration settings page, expand the Maintenance Windows section to configure the required settings. Under Workload type, select Updates, then turn Enable Maintenance windows to On to activate the maintenance window feature for Windows updates.
- Workload type – Not Configured
- Enable Maintenance windows – Off
Configure Maintenance Window Schedule and Update Actions
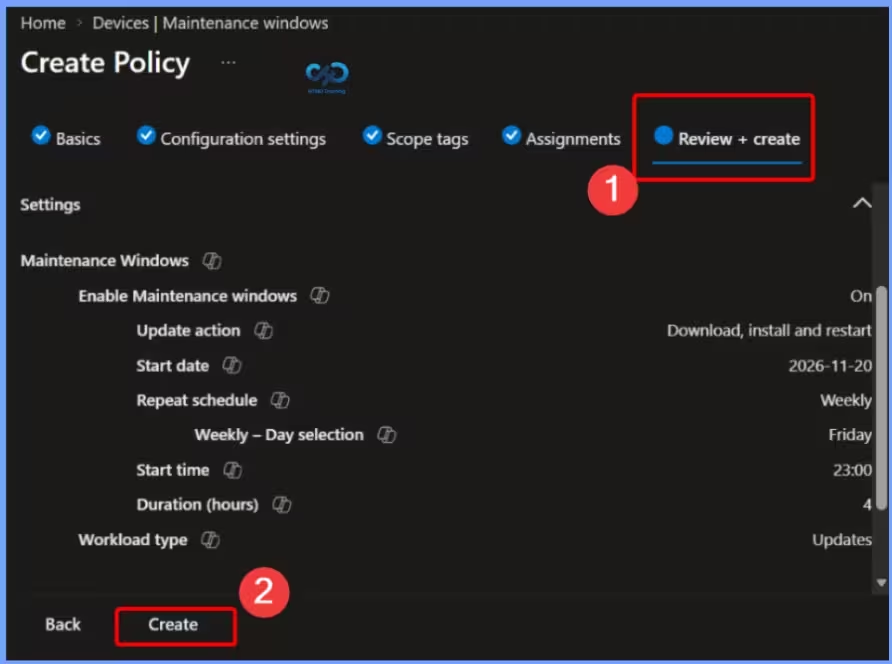
With these settings, the maintenance window is scheduled to run weekly from 11:00 PM to 3:00 AM, on the selected day. Automatic update downloads, installations, and restarts are restricted to this window.
- Workload type: Select Updates.
- Enable Maintenance windows: Set it to On.
- Update action: Select Download, install and restart.
- Start date: Enter 2026-11-20.
- Start time: Enter 23:00 (11:00 PM).
- Duration (hours): Enter 4 (the maintenance window will last four hours).
- Repeat schedule: Select Weekly.
- Weekly – Day selection: Select the required day of the week.
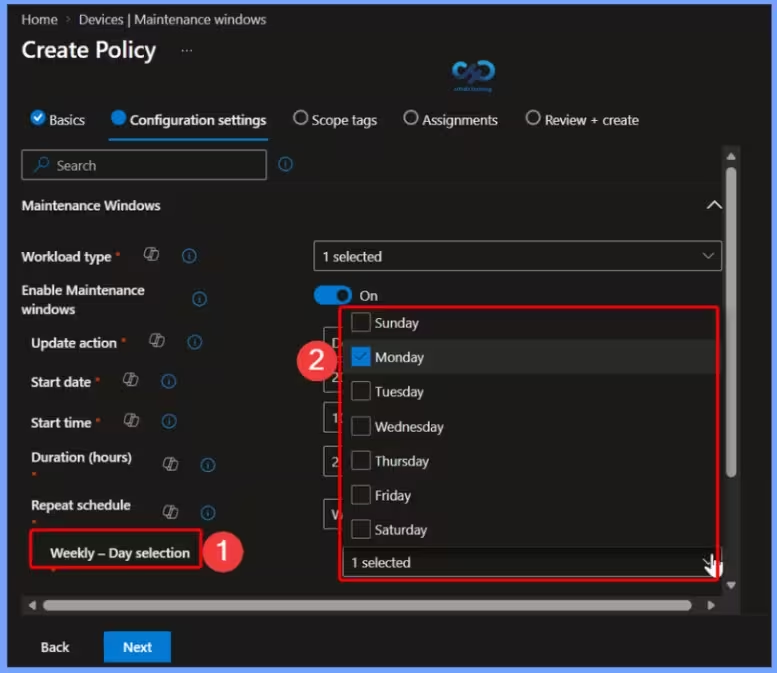
Select the Weekly Maintenance Window Day
Under Weekly – Day selection, choose the day on which you want the maintenance window to run. Select one or more days based on your organisation’s update schedule. In this example, Monday is selected, so the maintenance window will repeat every Monday based on the configured start time and duration.
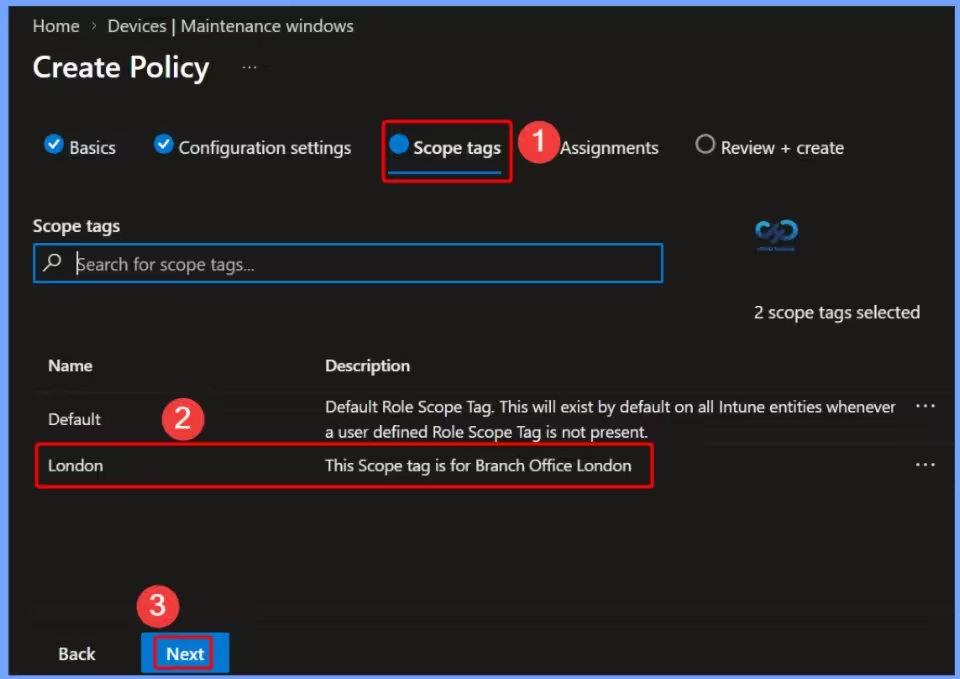
Configure Scope Tags
On the Scope tags page, you can select the appropriate scope tag to determine which administrators can access and manage the policy based on their assigned permissions. In this example, we are selecting the London scope tag. After selecting the required scope tag, click Next to continue.
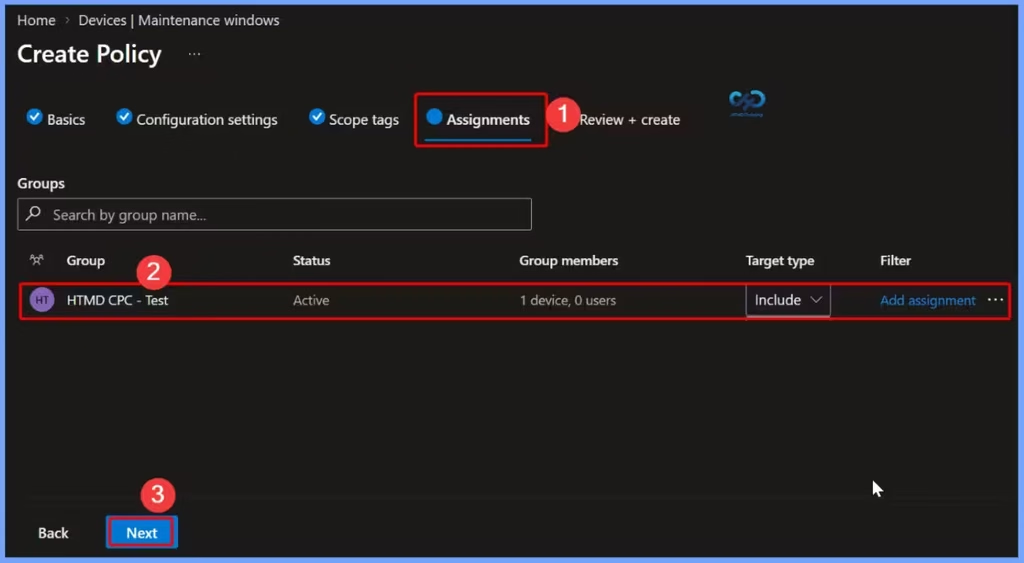
Assign the Maintenance Window Policy to a Device Group
On the Assignments page, select the device group to which you want to deploy the maintenance window policy. You can also add group exclusions if you want to prevent specific devices from receiving the policy. In this example, we are selecting the HTMD CPC Test group to apply the policy to the targeted devices. Once selected, click Next to continue.
Review and Create the Maintenance Window Policy
On the Review + create page, carefully review all the configured settings, including the update action, maintenance window schedule, scope tags, and group assignments. Make sure all the details are correct before proceeding. Once you have verified the configuration, select Create to create the maintenance window policy in Microsoft Intune.
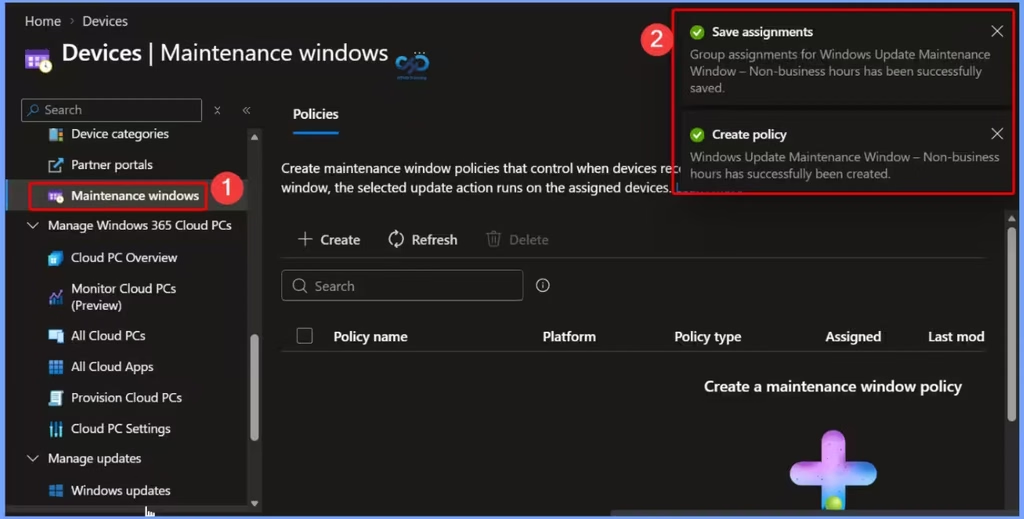
Successful Creation of the Maintenance Window Policy
After selecting the Create button, Microsoft Intune displays two confirmation notifications. The first notification confirms that the group assignments have been successfully saved. The second notification confirms that the Windows Update Maintenance Window – Non-Business Hours policy has been successfully created. This indicates that the policy creation and group assignment steps are completed successfully.
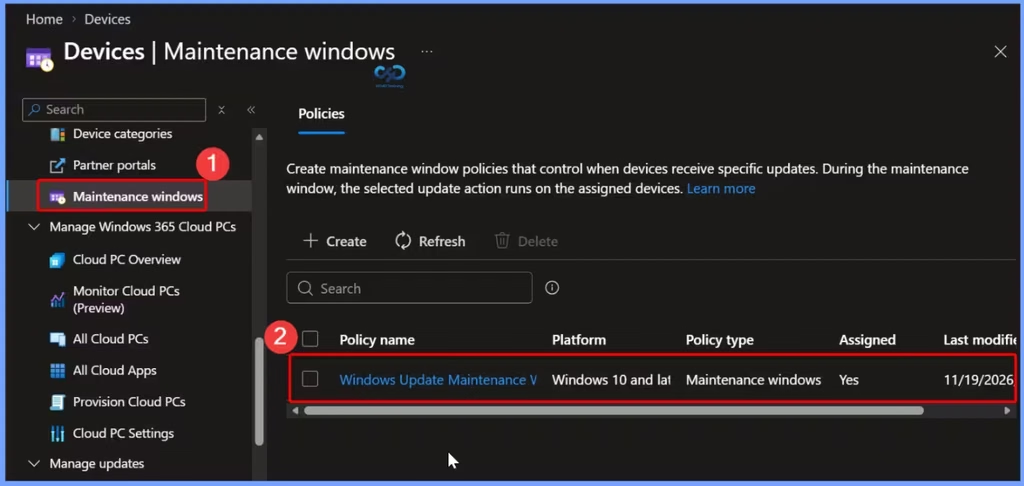
Verify the Created Maintenance Window Policy
After creating the policy, refresh the Microsoft Intune admin center page. You can now see the newly created policy in the maintenance windows list, along with its details, such as Policy Name, Platform, Policy Type, Assigned Groups, and Last Modified Date. This helps administrators confirm that the policy has been created and assigned successfully.
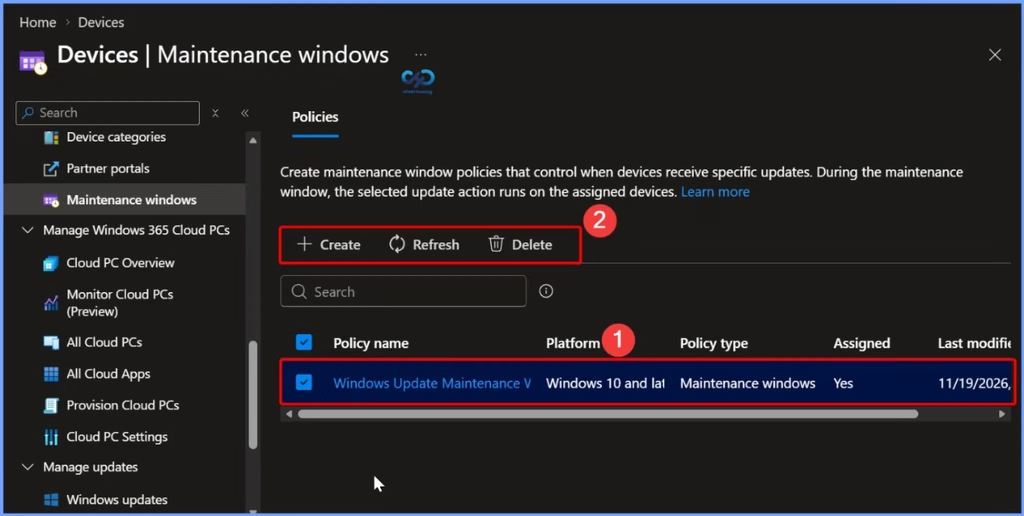
Delete Option Enabled for the Selected Policy
When you select the created maintenance window policy, you can see that the Delete option is enabled. This allows administrators to delete the selected policy when it is no longer required. Before deleting, make sure the policy is not needed by the assigned device groups.
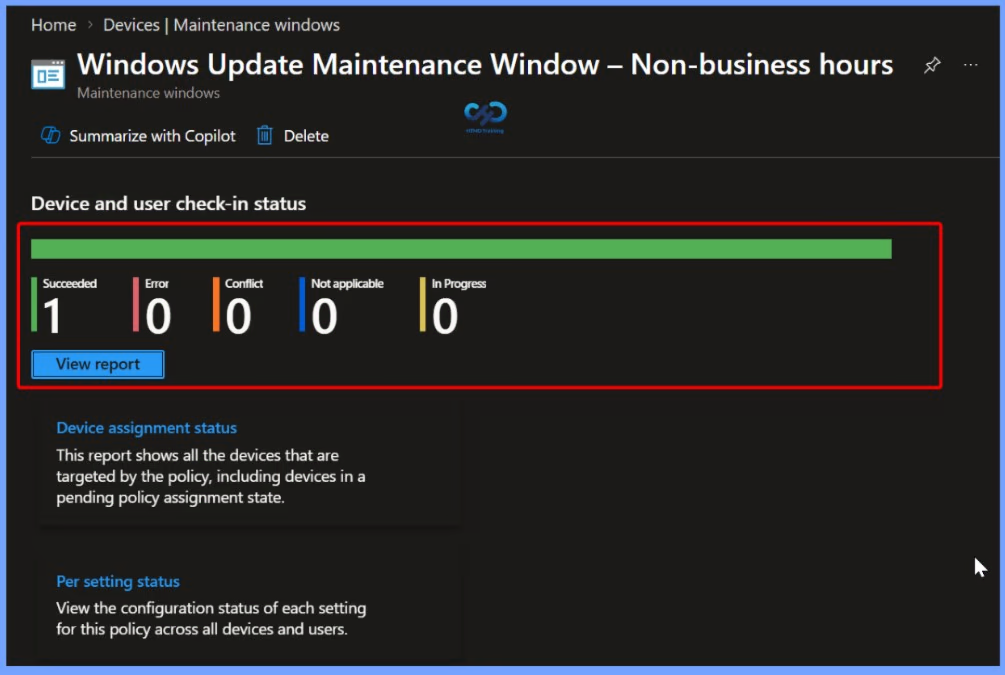
Device and User Check-in Status
This section displays the check-in status of devices and users targeted by the Windows Update Maintenance Window policy. The report shows the deployment status, including the number of devices that have successfully completed the update, encountered errors, reported conflicts, are not applicable, or are still in progress. In this example, 1 device succeeded, with 0 errors, 0 conflicts, 0 not applicable, and 0 in progress.
Client Side Verification
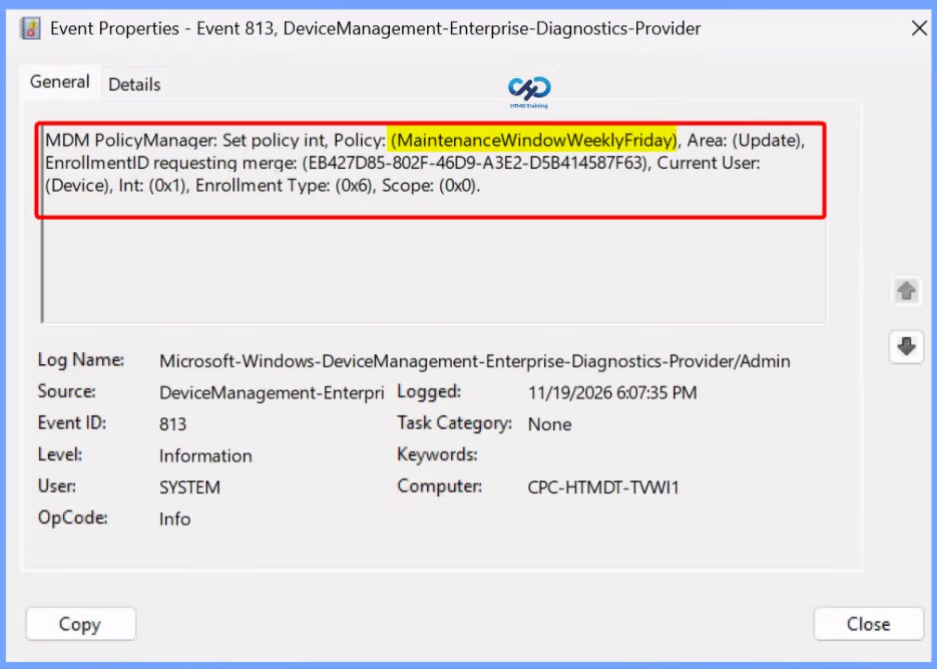
To confirm the policy is successful or not, you can use the Event Viewer. First, open Event Viewer and navigate to Applications and Services Logs > Microsoft > Windows > Device Management > Enterprise Diagnostic Provider > Admin. Look for Event IDs 813 or 814, as these typically contain policy-related information
MDM PolicyManager: Set policy int, Policy: (MaintenanceWindowWeeklyFriday), Area: (Update),
EnrollmentID requesting merge: (EB427D85-802F-46D9-A3E2-D5B414587F63), Current User:
(Device), Int: (0x1), Enrollment Type: (0x6), Scope: (0x0).
Need Further Assistance or Have Technical Questions?
Join the LinkedIn Page and Telegram group to get the latest step-by-step guides and news updates. Join our Meetup Page to participate in User group meetings. Also, join the WhatsApp Community and the Whatsapp channel to get the latest news on Microsoft Technologies. We are there on Reddit as well.
Author
Anoop C Nair is Workplace Technology solution architect with 25+ years of experience in global enterprise organizations such as JP Morgan, Capgemini, etc. He is Microsoft Certified Trainer. Microsoft MVP from 2015 onwards for consecutive 11 years! He also conducts Intune and modern workplace tech training for enterprise organizations. He is Blogger, Speaker, and Founder of HTMD Community and HTMD Conference. His focus is on Device Management technologies such as Intune, Windows, Cloud PC. He writes about technologies like Intune, SCCM, Windows, Cloud PC, Windows, Entra, Microsoft Security.