Let’s discuss Step-by-Step Guide to Mandating SMB Encryption on Every Windows Device with Intune. Require Encryption is a Intune settings catalog policy under Lanman Workstation category. It governs the security posture of the SMB (Server Message Block) client when it initiates an outbound connection to an SMB server (like a file share).
The Require Encryption policy dictates whether the Windows SMB client will mandate the use of SMB encryption for all outbound connections. This feature is a powerful, client-side control for enforcing high-security standards across your fleet of managed devices.
This policy is combined with per-share, per-server, and per mapped drive connection properties, through which SMB encryption may be required. The SMB server must support and enable SMB encryption. For example, should this policy be disabled (or not configured), the SMB client may still perform encryption if an SMB server share has required encryption. Important: SMB encryption requires SMB 3.0 or later.
Organizations choose to enable or disable this policy based on a classic security-vs.-compatibility or performance trade-off. Organizations can enforce this policy for several reasons. The organization benefits from a significantly reduced overall risk profile and improved security posture.
Table of Contents
Step-by-Step Guide to Mandating SMB Encryption on Every Windows Device with Intune
This policy is beneficial for different scenarios. Let me explain with an example, Imagine you are an Admin in Financial firm and enable SMB Encryption. It ensures that highly sensitive data (client records, financial reports) is always encrypted in transit, regardless of the target file server.
If a department accidentally spins up an older, non-compliant file server without encryption enabled, the client devices will refuse to connect, preventing a major security and compliance breach (no unencrypted data ever leaves the client).
- Configure Windows 11 SMB compression improvements to Compress File Aggressively
- Enforce Windows Credential UI for Edge and Negotiate Challenges using Intune
- Allow Basic Authentication for HTTP Using Setting Catalog in Intune
Configure Policy from Intune Portal
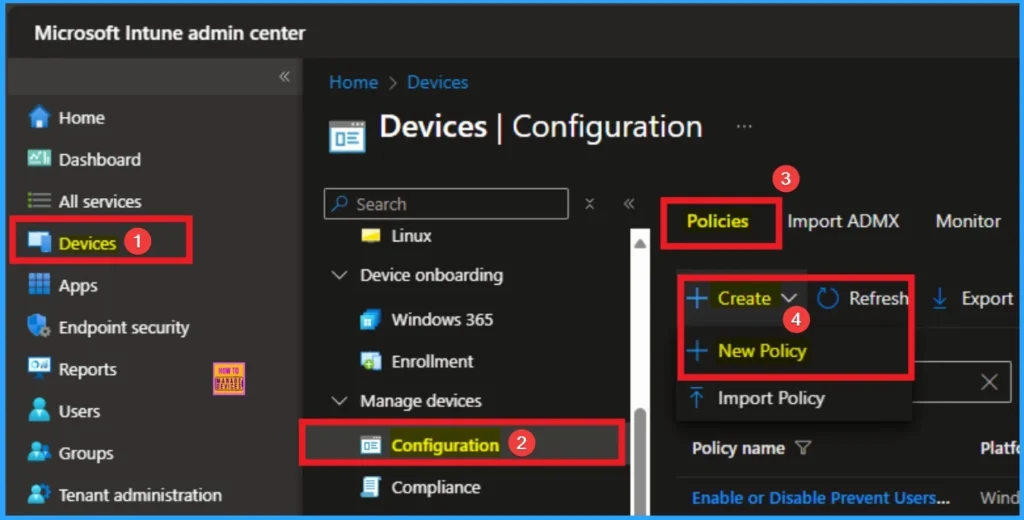
As an admin, you can easily configure this policy from Intune Portal. For this, Sign in to Microsoft Intune Portal with your credentials. Then go to Devices > Configuration > +Create >+ New Policy.
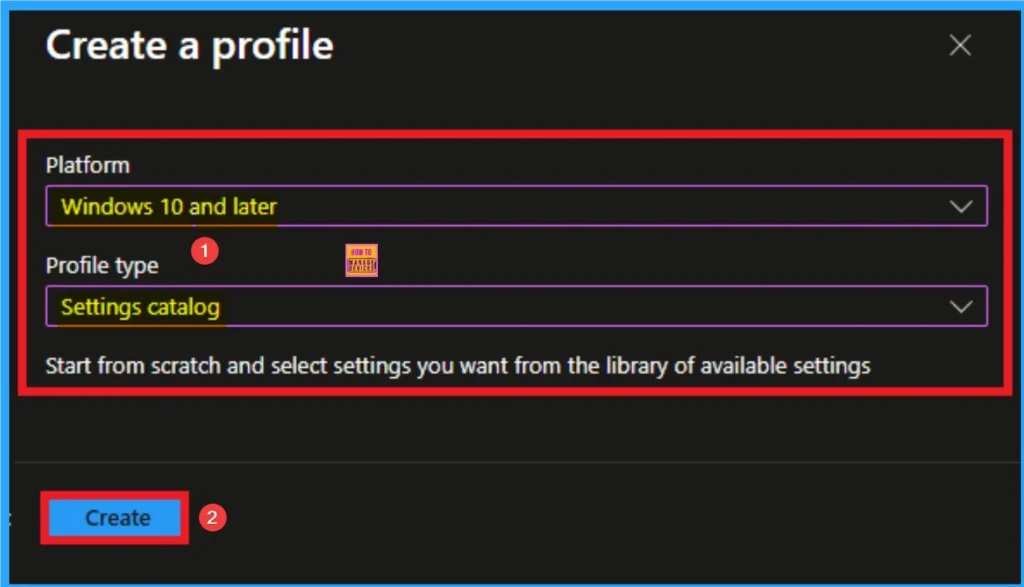
Choosing Platform and Profile Type
Choosing Platform and Profile is the next step after selecting New policy. It is very necessary step to effectively configure the policy to appropriate platform. Here I would like to configure the policy to Windows 10 and later platform and settings catalog profile. Then click on the Create button.
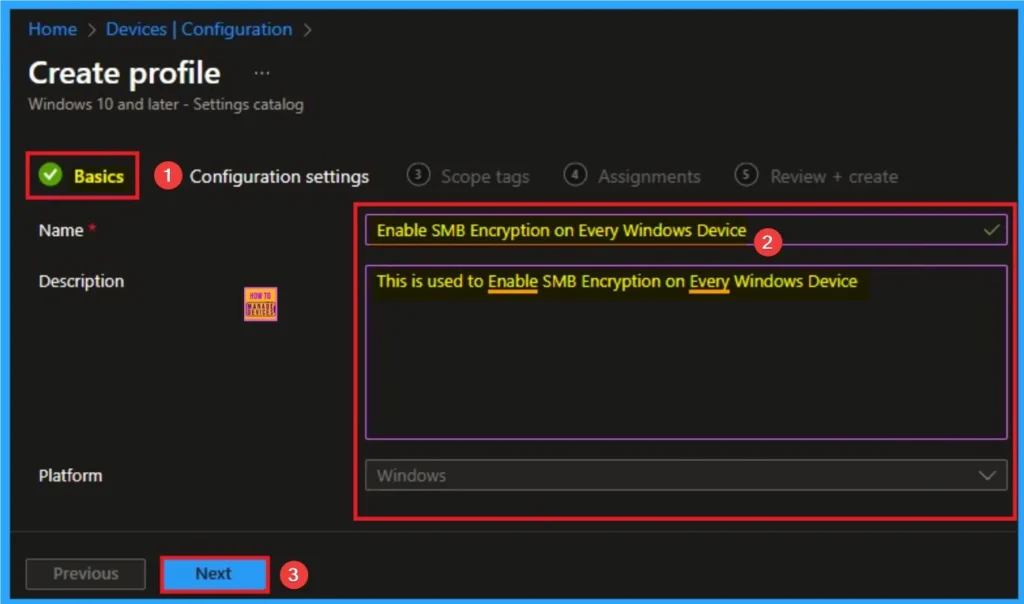
Basic Tab for Naming Policy
Basic Tab is used to give an identity for the policy by adding name and description. Here Name is Mandatory and Description is optional. After adding these details click on the Next button.
Configure SMB Encryption
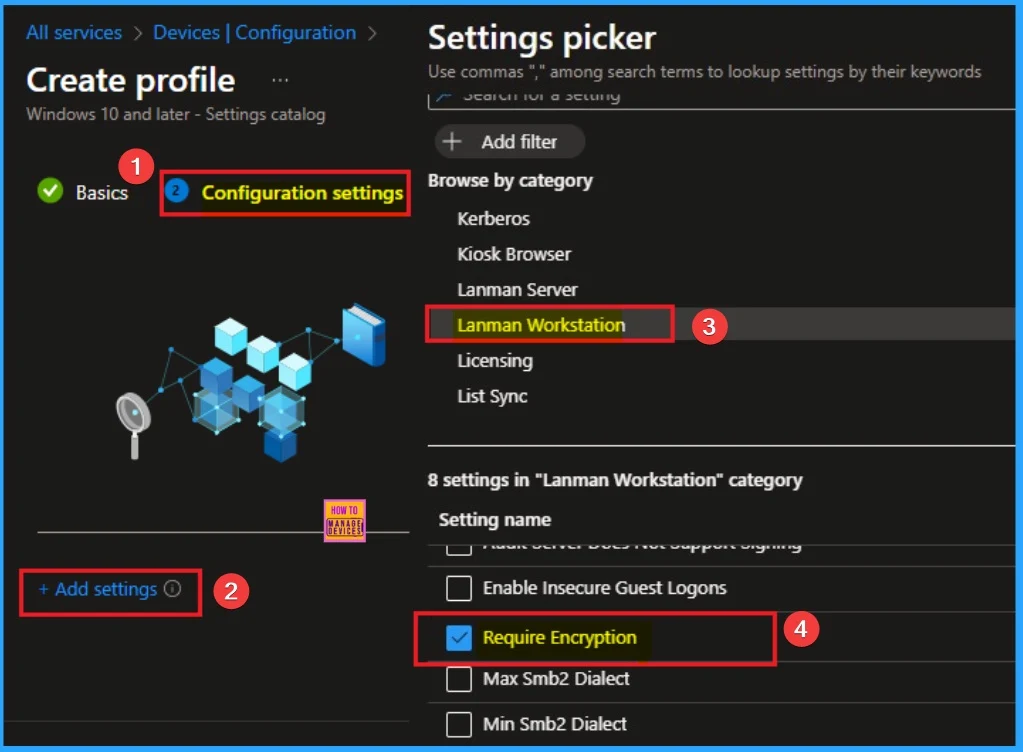
On this tab you can access +Add settings hyperlink to access specific settings. When you click on this hyperlink, you will get Settings Picker. Here, I would like to select the settings by browsing by Category. I choose Lanman Workstation. Then, I choose Require Encryption settings.
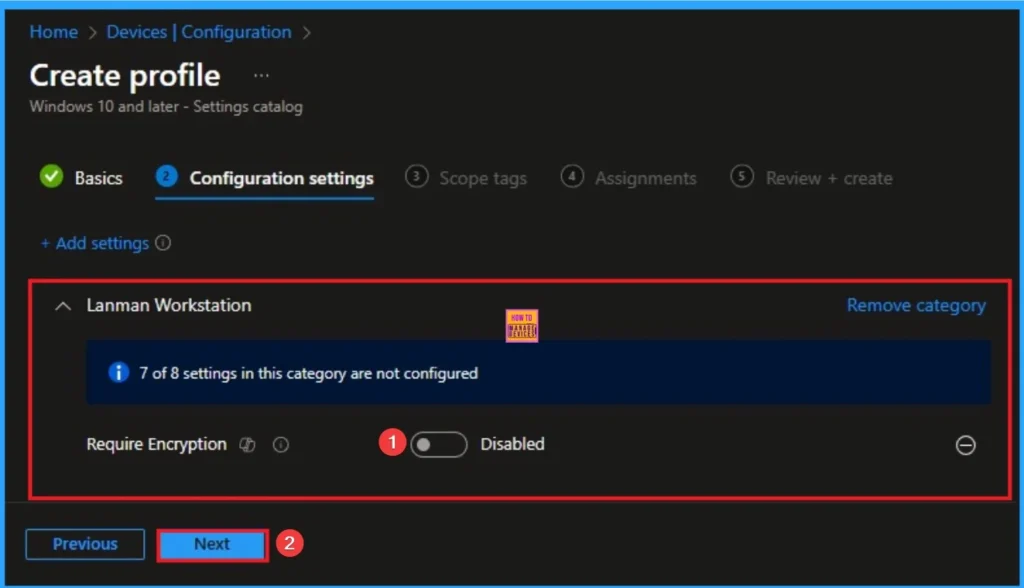
Disable SMB Encryption
Encryption and decryption consume CPU cycles on both the client and server. While modern hardware acceleration makes this minimal, in highly latency-sensitive or high-throughput environments.
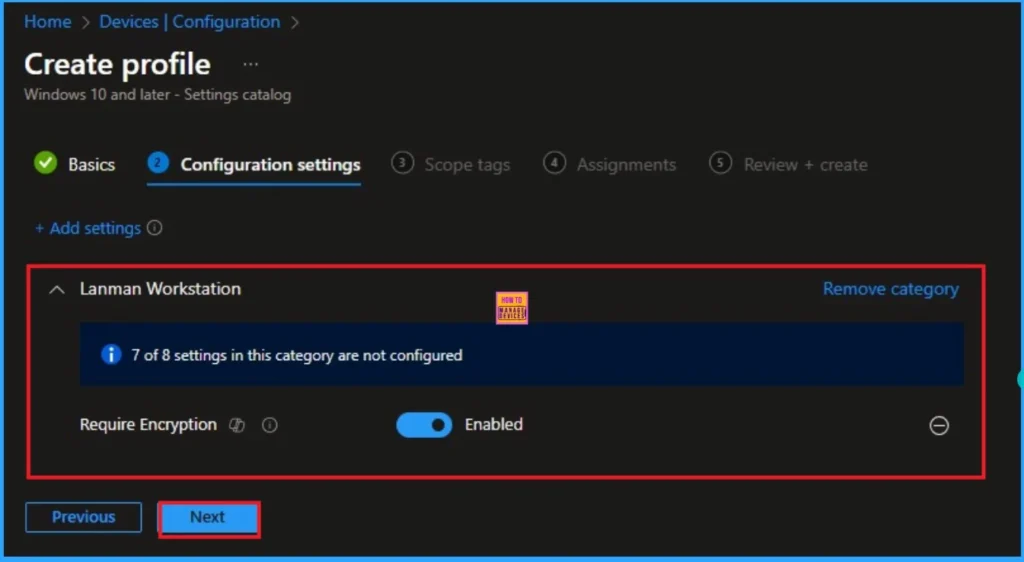
Enable SMB Encryption
SMB encryption effectively prevents attackers from intercepting and tampering with the data packets as they travel between the client (user’s PC) and the file server. Here I would like to Enable the Policy.
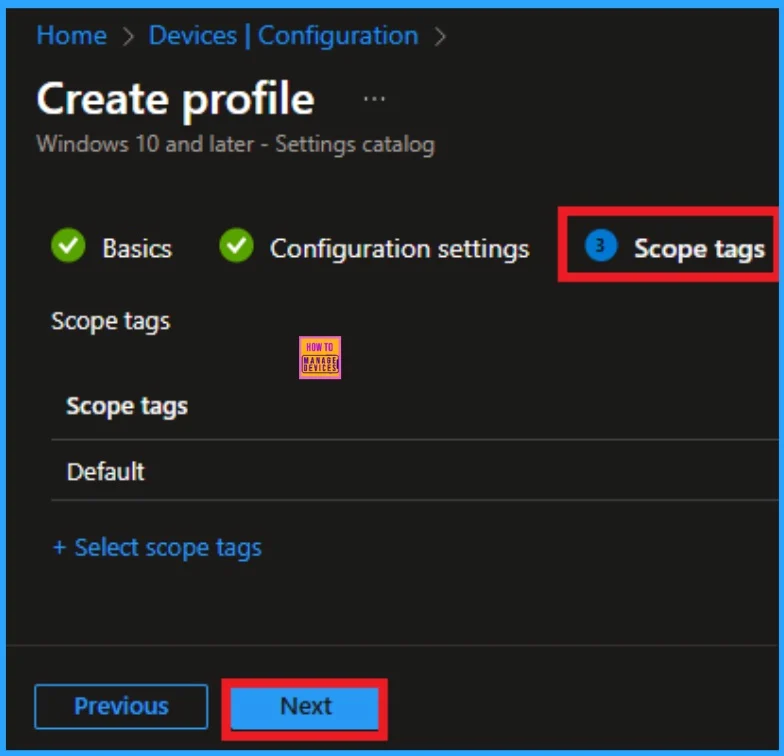
Scope Tag for SMB Encryption Policy
Scope Tags sections help you add restrictions to the visibility of the Policy. But it is not a mandatory step, so you can skip this step. Here, I don’t add scope tags for SMB Encryption Policy. Click on the Next button.
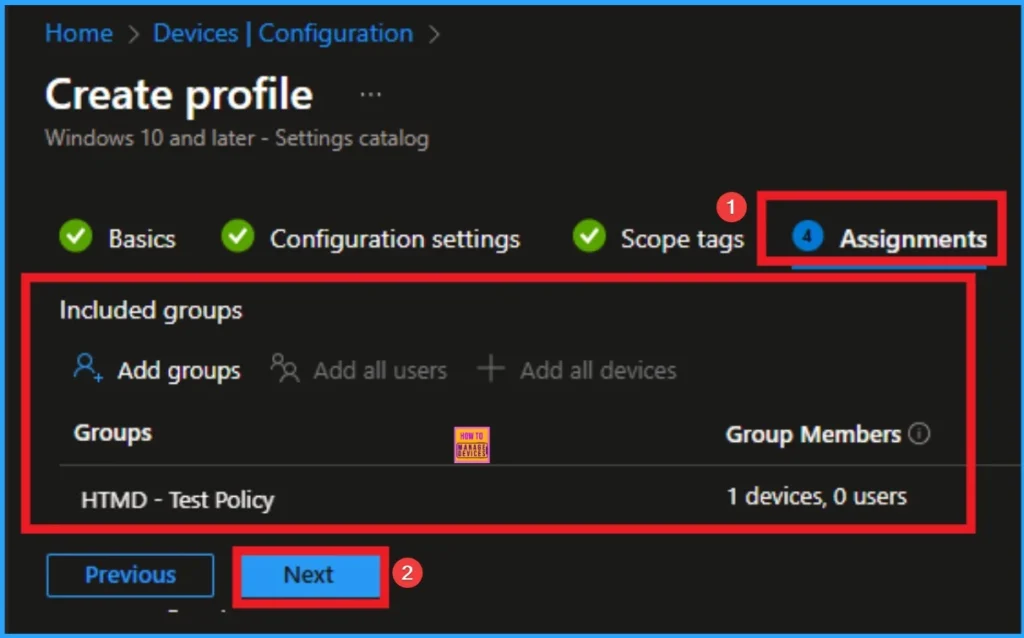
Assignment Tab for Selecting Group
To assign the policy to specific groups, you can use the Assignment Tab. Here I click, +Add groups option under Included groups. I choose a group from the list of groups and click on the Select button. Again, I click on the Select button to continue.
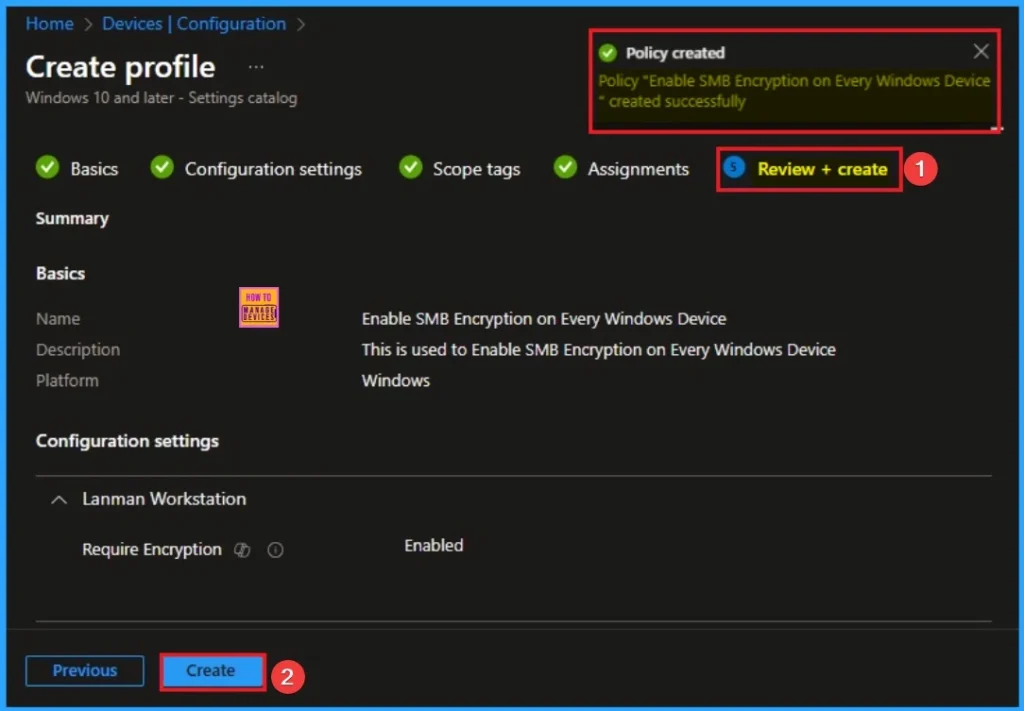
Review + Create Tab
Before completing the policy creation, you can review each tab to avoid misconfiguration or policy failure. After verifying all the details, click on the Create Button. After creating the policy, you will get a success message.
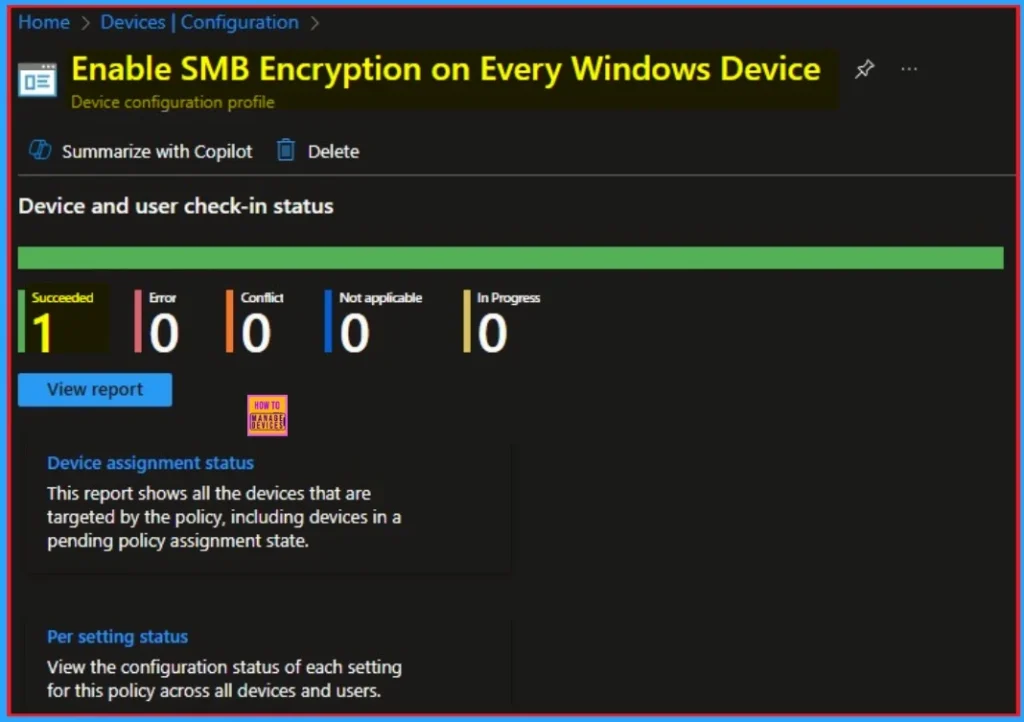
Monitoring Status
The Monitoring Status page shows whether the policy has succeeded or not. To quickly configure the policy and take advantage of the policy sync, the device on the Company Portal, Open the Intune Portal. Go to Devices > Configuration > Search for the Policy. Here, the policy shows as successful.
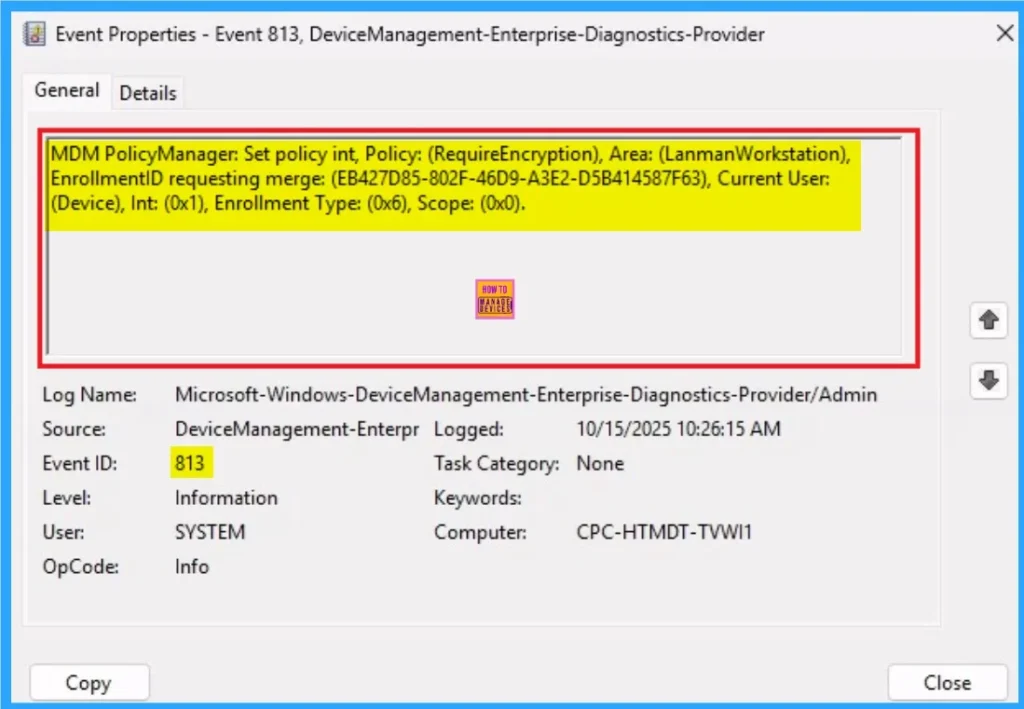
Client Side Verification through Event Viewer
It helps you check the client side and verify the policy status. Open the Client device and open the Event Viewer. Go to Start > Event Viewer. Navigate to Logs: In the left pane, go to Application and Services Logs > Microsoft > Windows > DeviceManagement-Enterprise-Diagnostics-Provider > Admin.
| Event Viewer Details |
|---|
| MDM PolicyManager: Set policy int, Policy: (RequireEncryption), Area: (LanmanWorkstation), EnrollmentID requesting merge: (EB427D85-802F-46D9-A3E2-D5B414587F63), Current User: (Device), Int: (0x1), Enrollment Type: (0x6), Scope: (0x0). |
Removing the Assigned Group from SMB Encryption Settings
If you want to remove the Assigned group from the policy, it is possible from the Intune Portal. To do this, open the Policy on Intune Portal and edit the Assignments tab and the Remove Policy.
To get more detailed information, you can refer to our previous post – Learn How to Delete or Remove App Assignment from Intune using by Step-by-Step Guide.

How to Delete SMB Encryption
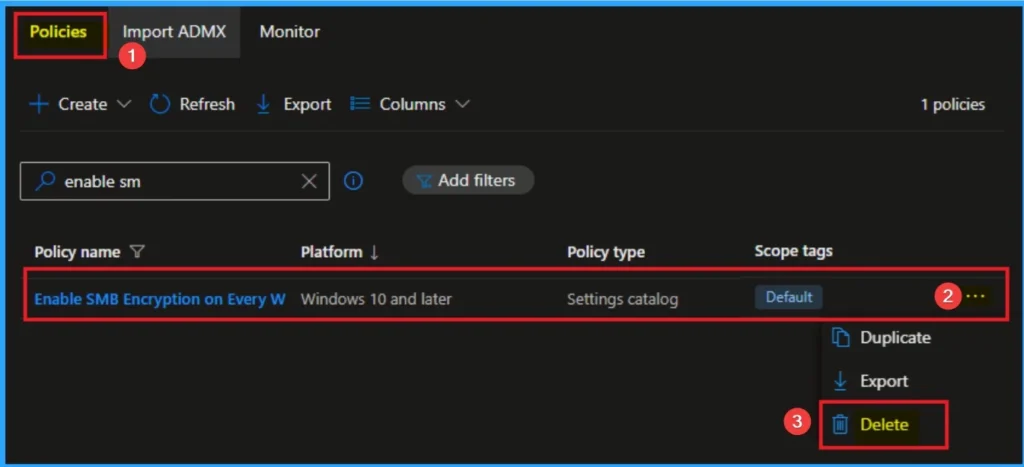
You can easily delete the Policy from the Intune Portal. From the Configuration section, you can delete the policy. It will completely remove it from the client devices.
For detailed information, you can refer to our previous post – How to Delete Allow Clipboard History Policy in Intune Step by Step Guide.
CSP Details
The CSP Details of Required Encryption policy helps you to know more about policy. This policy controls whether the SMB client will require encryption. This policy is applicable for Windows 11, version 24H2 [10.0.26100.3613] and later.
./Device/Vendor/MSFT/Policy/Config/LanmanWorkstation/RequireEncryption
| Name | Value |
|---|---|
| Name | Pol_RequireEncryption |
| Friendly Name | Require Encryption |
| Location | Computer Configuration |
| Path | Network > Lanman Workstation |
| Registry Key Name | Software\Policies\Microsoft\Windows\LanmanWorkstation |
| Registry Value Name | RequireEncryption |
| ADMX File Name | LanmanWorkstation.admx |

Need Further Assistance or Have Technical Questions?
Join the LinkedIn Page and Telegram group to get the step-by-step guides and news updates. Join our Meetup Page to participate in User group meetings. Also, Join the WhatsApp Community to get the latest news on Microsoft Technologies. We are there on Reddit as well.
Author
Anoop C Nair has been Microsoft MVP for 10 consecutive years from 2015 onwards. He is a Workplace Solution Architect with more than 22+ years of experience in Workplace technologies. He is a Blogger, Speaker, and Local User Group Community leader. His primary focus is on Device Management technologies like SCCM and Intune. He writes about technologies like Intune, SCCM, Windows, Cloud PC, Entra, Microsoft Security, Career, etc.

