Let’s learn how to modify value of WaitToKillServiceTimeout in Windows 11. The WaitToKillServiceTimeout value is set to 5 seconds (default), and Windows waits for background services to stop gracefully on their own when you turn off your device.
If all services stop before the WaitToKillServiceTimeout value expires, the system will automatically continue to shut down without waiting for this value to expire. When the WaitToKillServiceTimeout value expires, then Windows will automatically force-stop all background services that did not stop in time.
For example, if services require more than 5 seconds to shut down after being forced to stop, you need to increase the WaitToKillServiceTimeout value to allow greater than 5 seconds. Some apps change the WaitToKillServiceTimeout value when you install them, giving their background service some extra time to stop.
The WaitToKillServiceTimeout registry value does not work on a computer that is running Windows 7 or Windows Server 2008 R2. Therefore, some services that require more than 5 seconds to shut down do not shut down gracefully.

- New feature Join Microsoft Teams Rooms with Meeting ID and Passcode on Windows
- Updated Windows 11 End-of-Life Dates
What is WaitToKillServiceTimeout ?
The WaitToKillServiceTimeout specifies how long the operating system will wait for applications and services running in the background to shut down normally before forcing them to stop. This value is measured in milliseconds (ms) and is 5000 ms or 5 seconds by default.
Modify Value of WaitToKillServiceTimeout Using Registry Editor
In Windows, a service has 30 seconds to shut down after it receives a shutdown notification. After 30 seconds, the Service Control Manager forces the service to shut down. Where the Distributed File System Replication (DFSR) service is concerned, a busy hub server may need more than 30 seconds to commit outstanding changes to the database.
If the DFSR service does not commit all changes in the 30 seconds that are allotted by the Service Control Manager, the service is forcibly closed, and this triggers a dirty shutdown recovery.
Power outages or any other hard reboot of a DFSR server may also trigger a dirty shutdown recovery. To reduce the chances of a dirty shutdown, make sure that your DFSR servers are connected to an uninterruptible power supply (UPS) to allow them to gracefully shut down.
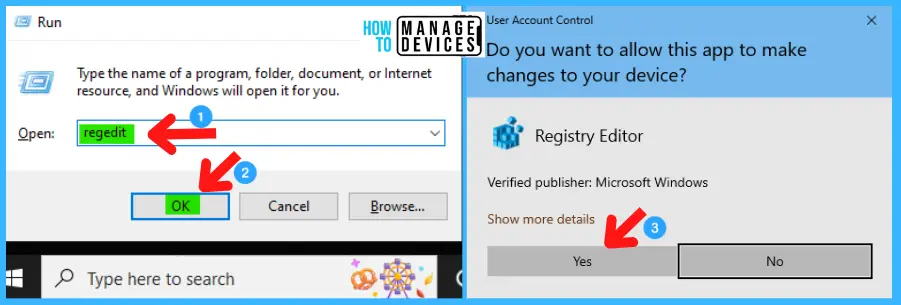
Using the Registry Editor you can modify the value of WaitToKillServiceTimeout in Windows 11. You can able to increase or decrease the value as required for modification. To do so, you need to open the registry editor. Follow the process listed below to enter the registry editor to modify changes.
- Window Key + R (To open run command)
- Type ‘regedit‘ and press OK.
- Administrator (UAC) permission press Yes.
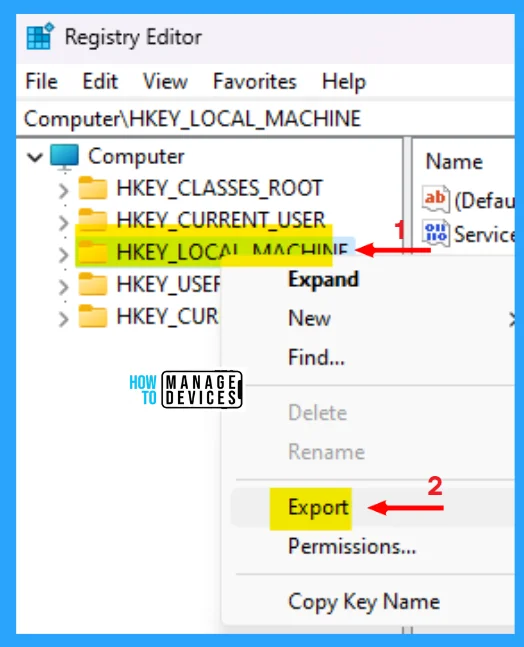
NOTE! Take Backup—If any mistake occurs in the Registry Editor, it may affect the system. It is advisable to take a backup of the Registry before proceeding. In the Registry Editor, go to File in the left top corner for backup. Click on it, then select Export and save the backup.
When the registry editor opens, you must take the backup for your registry editor. Follow the steps below to make a backup for your registry editor.
- Go to File.
- Right-click on HKEY_LOCAL_MACHINE
- Click on Export.
- Save it.
In the registry editor, follow a certain path for certain applications. The trail to reach the required folder for further modification is listed below. Under the Registry Editor, there is a folder named Computer expand the Computer folder and process further.
- Expand the HKEY_LOCAL_MACHINE
- Expand SYSTEM under HKEY_LOCAL_MACHINE
- Expand CurrentControlSet under SYSTEM
- Click on Control under CurrentControlSet and find the WaitToKillServiceTimeout
The path is HKEY_LOCAL_MACHINE\SYSTEM\CurrentControlSet\Control.
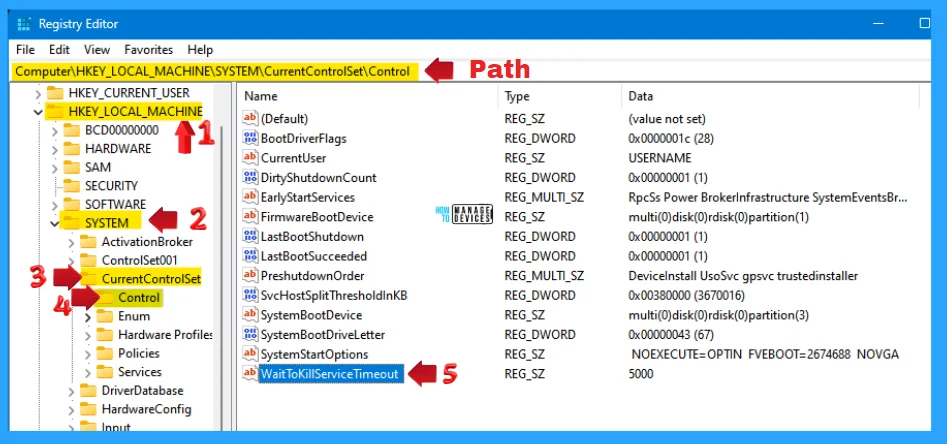
As you see, the WaitToKillServiceTimeout registry key is in string format; double-click on it to open. When it opens, you can see the value data set to 5000 is the default value of it.
NOTE! The value data is represented as Milliseconds; 5000 milliseconds is 5 seconds. In Simple terms, 1 second is represented as 1000 milliseconds. Multiply 1000 by the number of seconds you want to fill the value data.
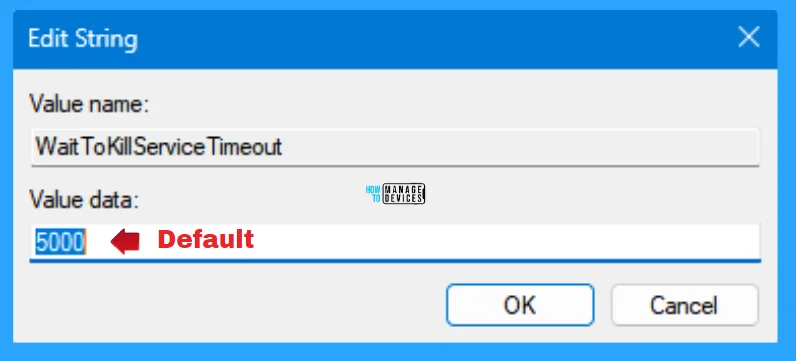
If you want to reduce the WaitToKillServiceTimeout from the default set value data, then you can enter a lower number than the default value and press OK to set it.
Modifying the value data is risky. If you set it too low, it interrupts the closing of important applications and services, which may lead to data corruption, job loss, or other problems. Therefore, you must be careful and wise when modifying the value data.
NOTE! Not setting the value data below 2000 milliseconds (2 seconds) is recommended.
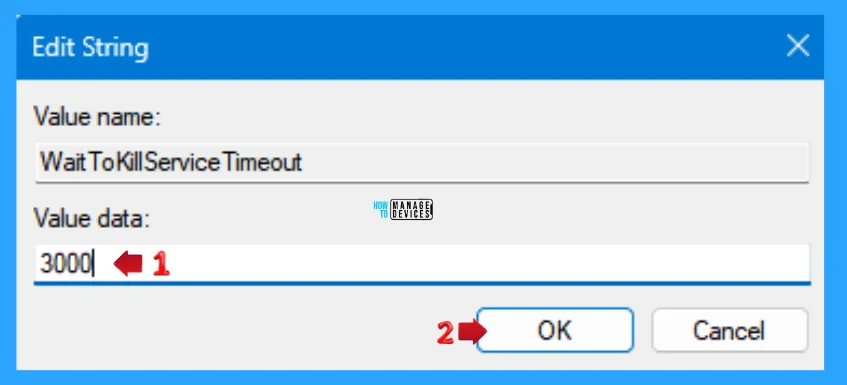
The value data can affect the speed of the shutdown process because the longer the operating system waits, the longer it will take to complete the shutdown. Therefore, reducing the value can speed up the shutdown process by reducing the wait time.
If you want more than the default time, increase the milliseconds to increase the time it takes to shut down the device and press OK to continue and close the registry editor.
NOTE! The WaitToKillServiceTimeout setting has a maximum value of one hour. If it exceeds one hour, SCM reverts to the default setting of 5 seconds for service shutdown.
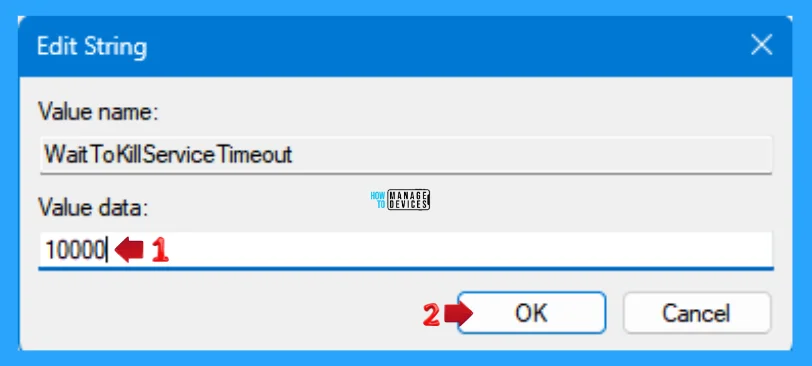
NOTE! Restart your device after making such modifications in the Registry Editor.
I hope the information on How to Modify the Value of WaitToKillServiceTimeout in Windows 11 is helpful. Please follow us on the HTMD Community and visit our website, HTMD Forum, if you like our content. Suggest improvements, if any, and we would love to know which topic you want us to explore next.
We are on WhatsApp. To get the latest step-by-step guides and news updates, Join our Channel. Click here – HTMD WhatsApp.
Author
Alok is a Master of Computer Applications (MCA) graduate. He loves writing on Windows 11 and related technologies. He likes to share his knowledge, quick tips, and tricks with Windows 11 or Windows 10 with the community.
