Hi, today I will explore how to enable or disable the PDF Secure Mode policy for MS Edge using the Microsoft 365 admin center. As many of you are aware, the Microsoft 365 admin center plays a vital role in deploying policies for Edge.
PDF Secure Mode Policy activates a secure environment for validating certificate-based digital signatures in PDF files, ensuring accurate display of the signature’s validation status. Essentially, it enhances PDF security by verifying digital signatures reliably.
When activated (enabled), this policy ensures that users can confidently examine and confirm the validity of certificate-based digital signatures in PDF files. Disabling or leaving this policy unconfigured will prevent users from viewing and verifying digital signatures in PDF files.
Through this blog post, I will guide you how to enable or disable PDF Secure Mode Policy in MS Edge Browser using M365 Admin Center. This guide will provide a step-by-step walkthrough of deploying PDF Secure Mode Policy in Edge.
Table of Contents
What are the Windows Registry Settings of PDF Secure Mode Policy in MS Edge Browser?
The Windows registry is a central database in Windows that stores configuration settings and manages resources for applications, user interfaces, security services, and device drivers. It’s a hierarchical system vital for Windows operation. The Windows Registry Settings of PDF Secure Mode Policy are given below:
Mandatory Path : SOFTWARE\Policies\Microsoft\Edge
Recommended Path : N/A
Value Name : PDFSecureMode
Value Type : REG_DWORD
Steps to Enable or Disable PDF Secure Mode Policy in MS Edge Browser using M365 Admin Center
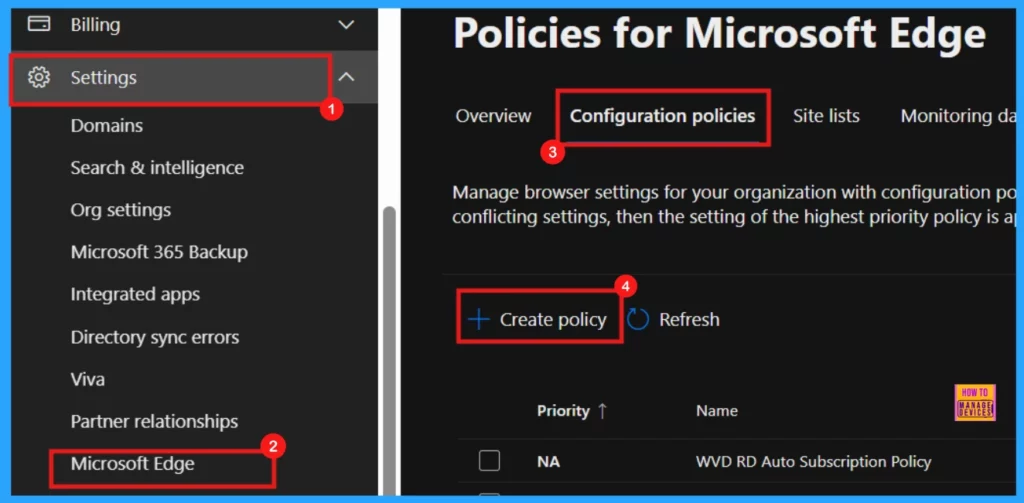
To enable the Microsoft PDF Secure Mode policy through the Microsoft 365 Admin Center, you need to log in to the Microsoft Admin Center with your credentials.
- Navigate to Settings in the left-hand menu.
- Select Microsoft Edge.
- Choose Configuration Policies.
- Click + Create Policy to begin creating a new policy.
- Enable Microsoft Translation in Edge Browser via Microsoft 365 Admin Center Policy for Windows and macOS
- How to Enable or Disable Read Aloud Feature in MS Edge Browser through the Microsoft 365 Admin Center Policy
- Enable or Disable Mouse Gesture Policy in MS Edge Browser using M365 Admin Center
Basics
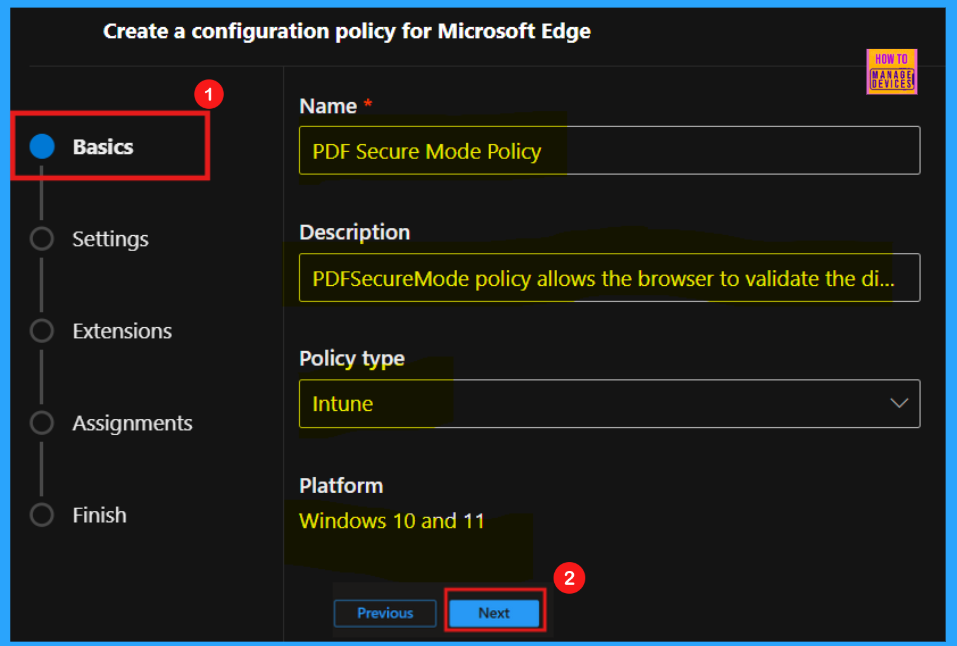
Upon clicking + Create Policy, we will be presented with various tabs to configure our new policy. The initial Basics tab requires specifying the policy’s Name, Description, Type, and Platform. These details are crucial for easily identifying and managing the policy in the future.
- Name of the Policy : PDF Secure Mode
- Description: PDF Secure Mode policy allows the browser to validate the digital signature of PDF files without needing extra software.
- Policy Type: Intune
- Platform : Windows 10 and 11
- Once filled in the necessary information on the Basic tab, proceed by clicking Next.
Settings
Following the Basic setup, we will move to the Settings section, where we can define the specific configuration policy for Microsoft Edge. This is the second configuration step.
- Click + Add Settings to begin adding a setting.
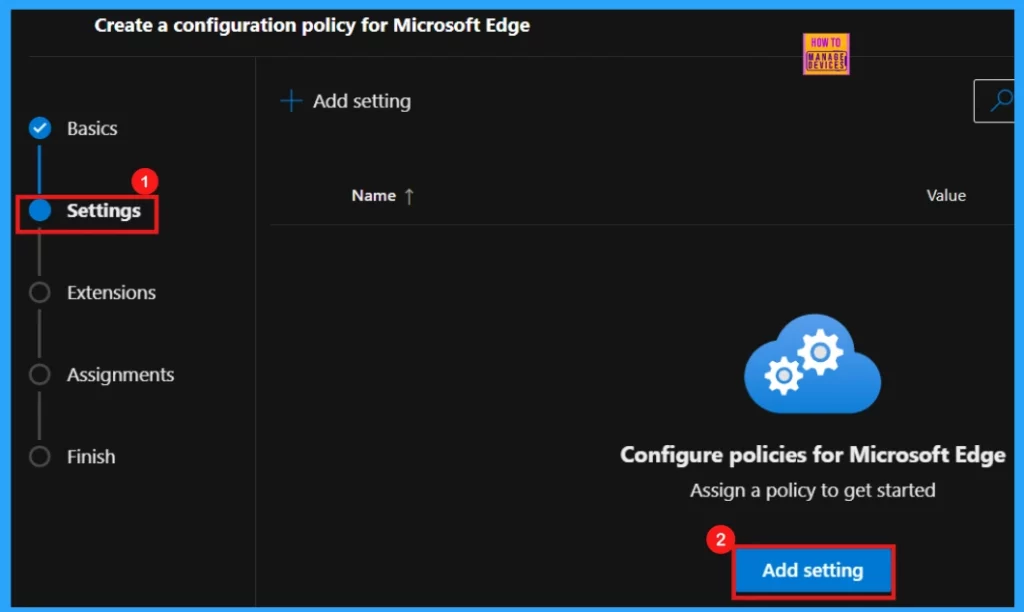
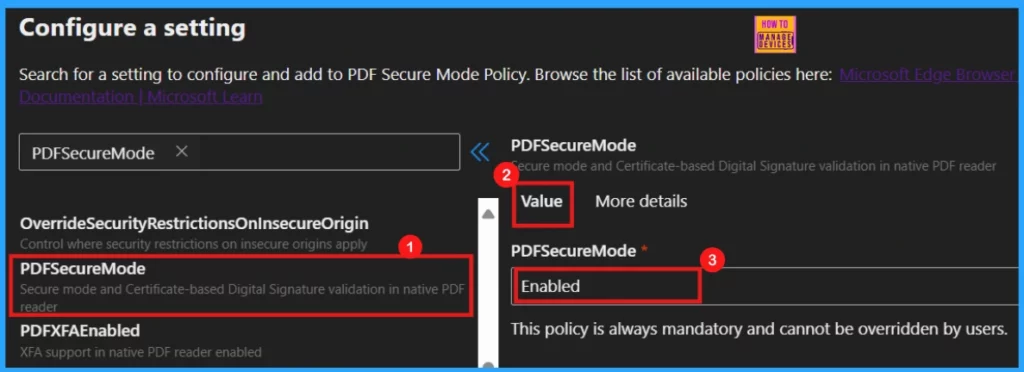
Upon clicking Add Settings, we will entered into another window where we can search for desired policy to configure. Enter the policy’s name in the search field to locate it.
- The policy name will appear on the right side of the window; select it.
- We will then see the Value and More details options for that policy.
- In the Value field, use the dropdown menu to choose either Enabled or Disabled.
- For this scenario, select Enabled.
You can choose Disabled to deactivate the PDF Secure Mode feature entirely.
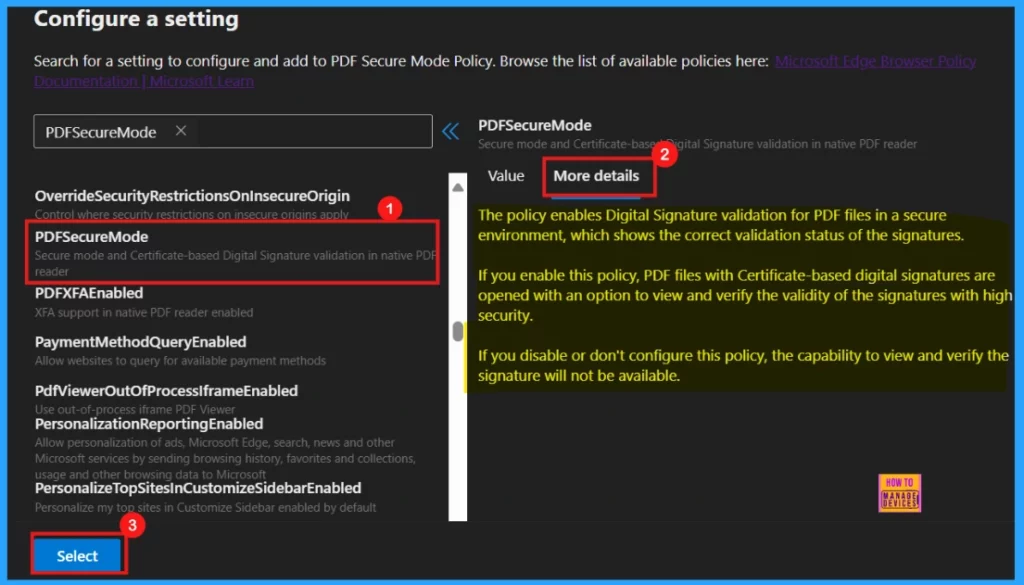
More Details
The More Details section gives a detailed view of the policy which we want to configure. An overview of the PDF Secure Mode policy is given below.
PDF Secure Mode policy activates a secure environment for validating digital signatures in PDF files, ensuring accurate display of their validation status. Enabling it allows users to securely view and verify certificate-based digital signatures in PDFs. Disabling or not configuring this policy removes the ability to view and verify these signatures.
- Click Select to update the policy.
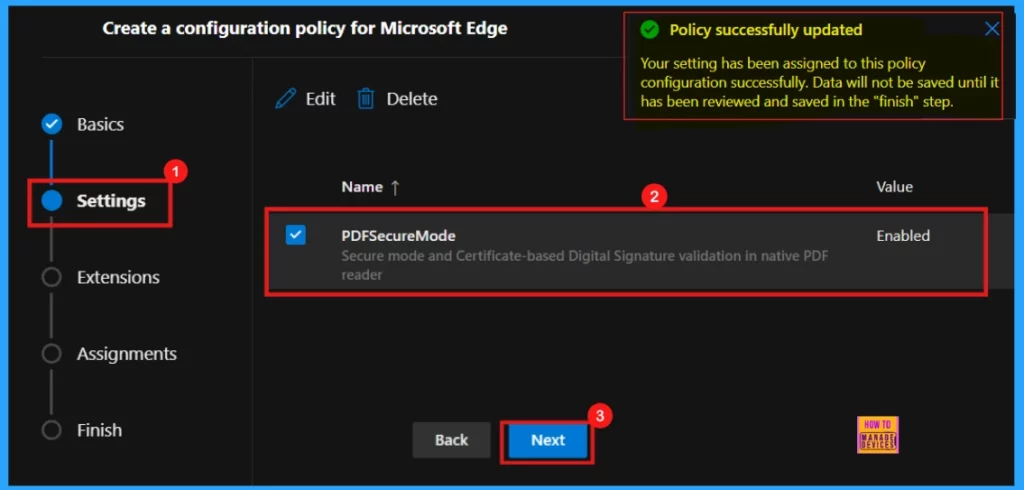
After selecting and configuring the desired policy, we will receive a confirmation message indicating a successful policy update. However, it’s crucial to remember that these changes are not permanently saved until we review and confirm them in the final Finish step.
- Click Next to proceed.
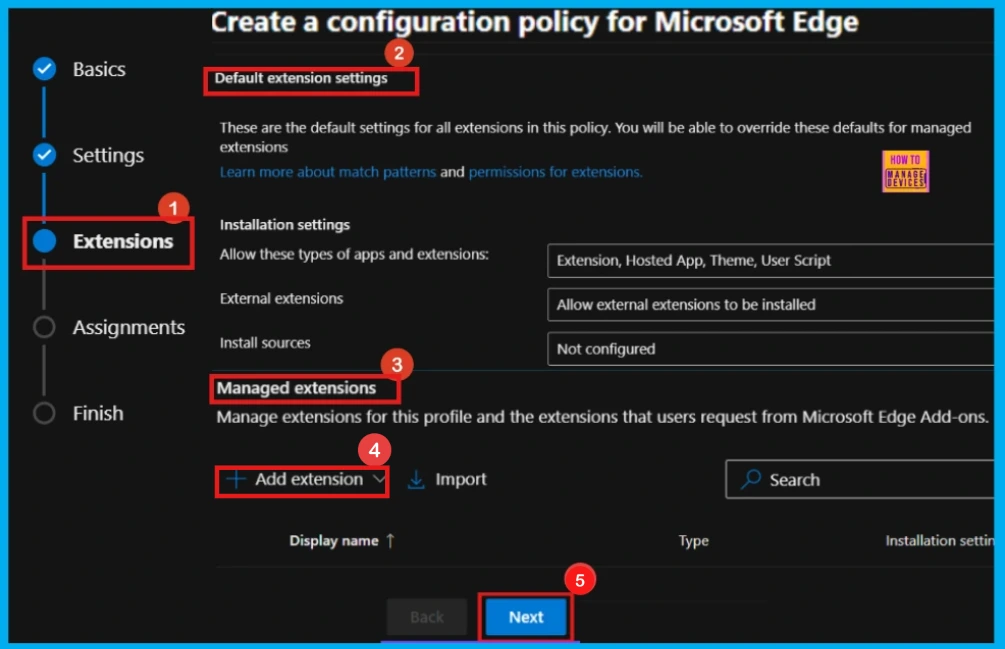
Extensions
This area shows the default and managed extension settings for this policy. We can customize the settings for managed extensions by clicking +Add Extensions. To proceed without making changes, click Next.
Assignments
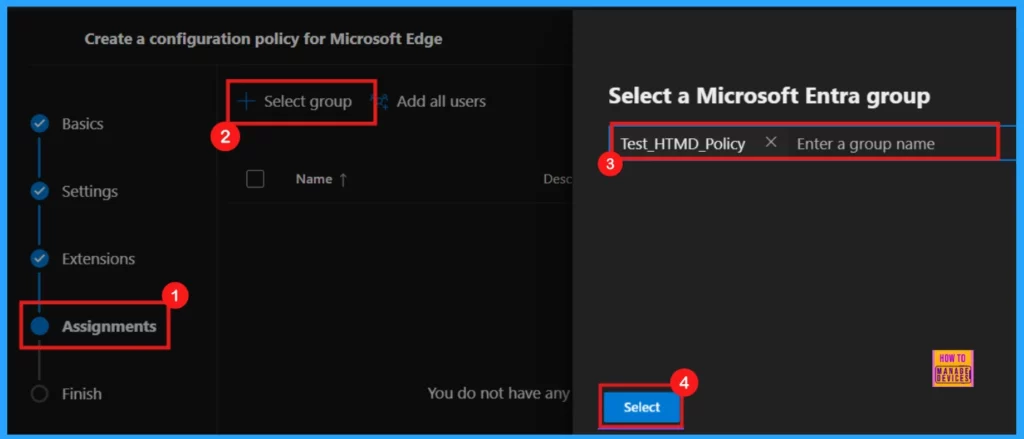
In the Assignment step, we can define the target groups for the policy. Click Select group to choose from the available Microsoft Entra groups, thereby determining which users or devices will be affected.
- Click Select
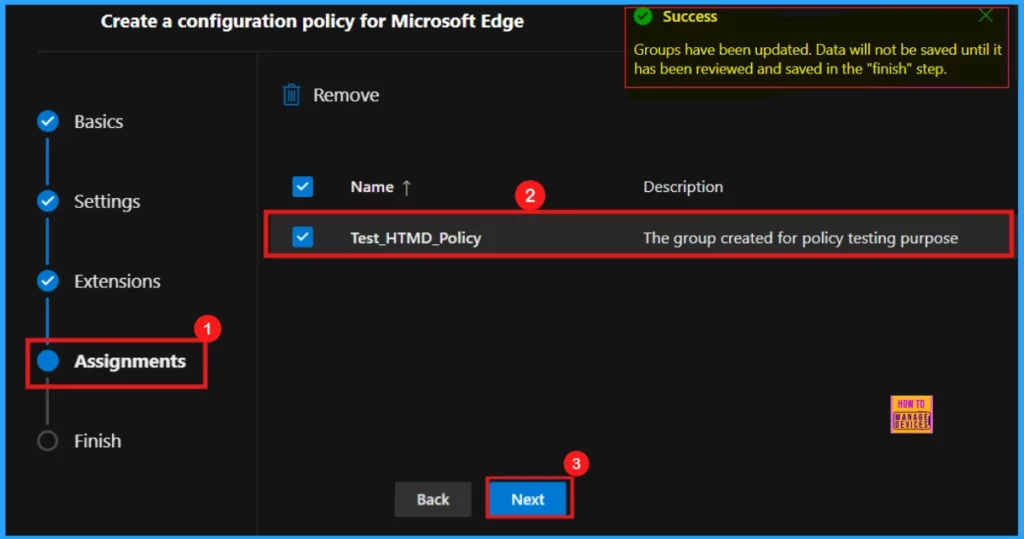
After clicking Select, we will receive a confirmation message indicating that the group selection was successful. On the subsequent screen, we will see the selected group’s name along with a checkbox. Ensure that we mark this checkbox to confirm the assignment.
Finish
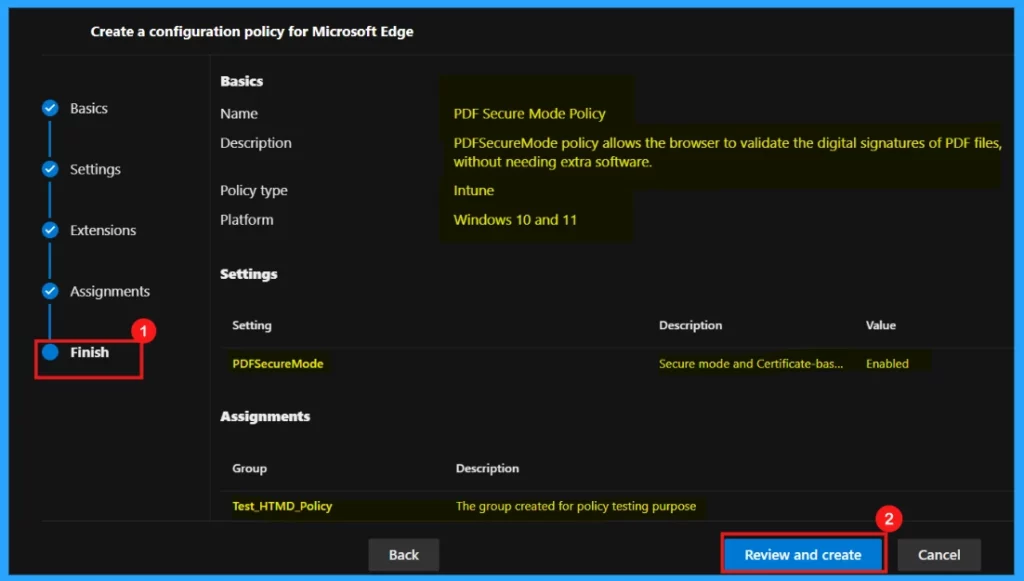
The Finish tab represents the concluding step of the policy creation. Here, we will have the opportunity to review all the settings and configurations made in the preceding steps. If any adjustments are necessary, use the Back button to return to the appropriate section. When we are satisfied with the settings, click Review and Create to finalize the policy.
Monitoring Status
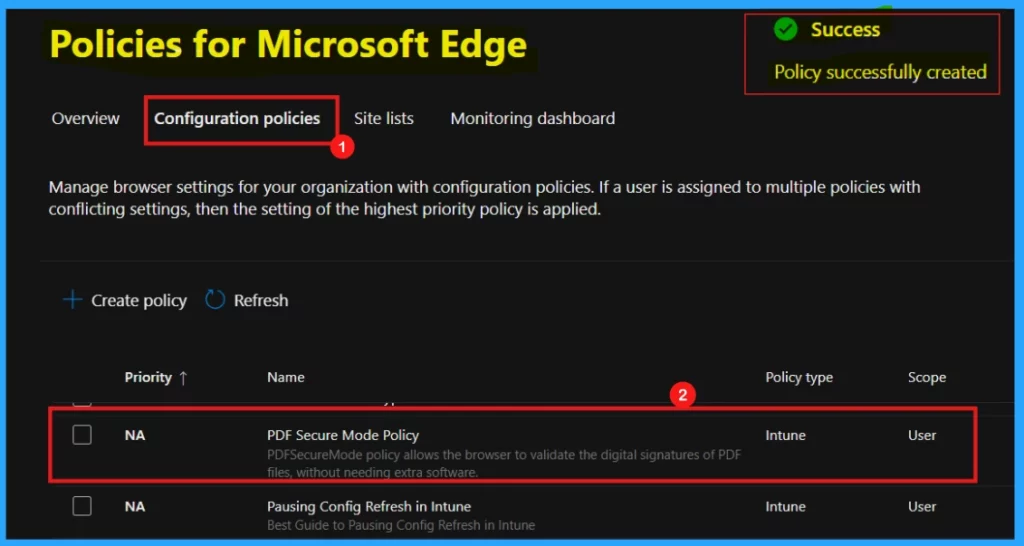
After selecting Review and Create, a notification will appear, confirming the policy’s creation. The newly created policy will then appear in the Configuration Policies section. A reference screenshot is included below.
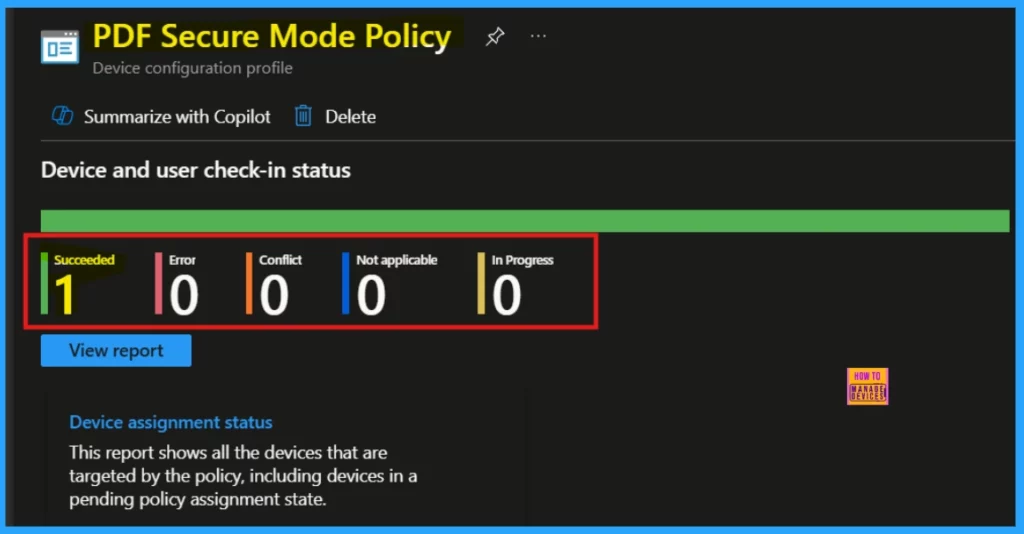
Device and User Check-in Status
To track policy deployment and compliance in real-time, refer to the Device and User Check-in Status. Once we have manually synced devices via the company portal, we can confirm the policy’s status in the Intune Portal.
Client-Side Verification
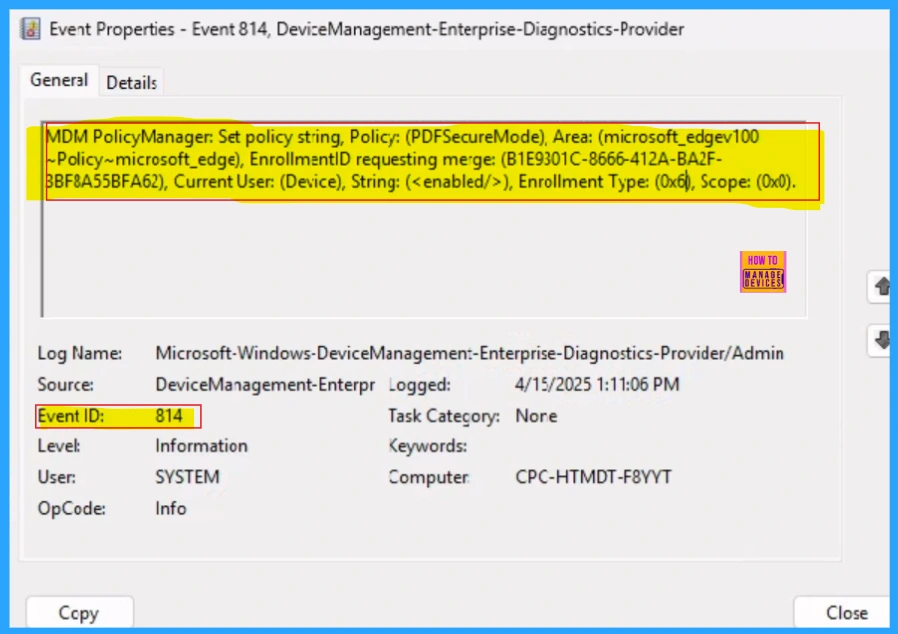
Administrators can confirm policy application on specific devices by using the Windows Event Viewer. To verify client-side compliance, navigate to the following path within Event Viewer:
Applications and Services Logs > Microsoft > Windows > DeviceManagement-Enterprise-Diagnostics-Provider > Admin.
Need Further Assistance or Have Technical Questions?
Join the LinkedIn Page and Telegram group to get the latest step-by-step guides and news updates. Join our Meetup Page to participate in User group meetings. Also, Join the WhatsApp Community to get the latest news on Microsoft Technologies. We are there on Reddit as well.
Author
Anoop C Nair has been Microsoft MVP for 10 consecutive years from 2015 onwards. He is a Workplace Solution Architect with more than 22+ years of experience in Workplace technologies. He is a Blogger, Speaker, and Local User Group Community leader. His primary focus is on Device Management technologies like SCCM and Intune. He writes about technologies like Intune, SCCM, Windows, Cloud PC, Windows, Entra, Microsoft Security, Career, etc.
