Today we are discussing the Configure Pinning Programs to the Taskbar using Intune Policy. This policy setting helps IT administrators control how users interact with the Taskbar in Windows devices. The Taskbar is an important part of the desktop where users can easily access their recently used apps.
By using this policy, admins can decide whether users are allowed to pin or unpin applications on the Taskbar. As we know that MS Intune has the setting catalog feature to apply this in a organization. This policy is especially helpful in organizations where maintaining a consistent desktop environment.
When this policy is enabled, users cannot make any changes to the Taskbar pins. This means that if some apps are already pinned, they will stay there. Users will not be able to remove them or add new ones. This gives organizations full control over which applications appear on the Taskbar for their employees.
If the policy is disabled or not configured, users can freely pin or unpin programs from the Taskbar. They can customize it according to their needs or preferences. However, this may lead to inconsistency in the user interface and productivity setup across devices.
Table of Contents
Can Users Change Pinned Apps when Enabled?
No, users can’t change or remove existing pinned apps. They also can’t add new ones. This keeps the setup fixed.
What’s the Main Benefit for Organizations?
It ensures consistency and control across all company devices. Helps maintain a professional desktop look. And supports better productivity management.
Configure Pinning Programs to the Taskbar using Intune Policy
You know this policy helps maintain a uniform Taskbar setup across all users. This ensures only work-related apps are pinned. It reduces distractions and improves focus. Also,it prevents users from cluttering the Taskbar with personal or unnecessary applications that could slow down work.
- How to Clear the Start Menu Recommended Section in Windows 11
- Enable or Disable Add the Run Command to the Start Menu User Policy using Intune Policy
- Enable or Disable Restrict App to System Volume Policy using Microsoft Intune
Real Word Example – Corporate Office Environment
By controlling which programs appear on the Taskbar, IT teams can make sure only approved, work-related apps are pinned. This reduces distractions and keeps employees focused on their tasks. If users can’t pin unauthorized software, it lowers the chance of them using unapproved or risky applications. so that it increase the security level in organizations.
- In large organizations, IT admins can pin essential apps like Outlook, Teams, and Excel for all employees. This ensures everyone has quick access to communication and work tools without adding personal apps for entertainment purpose.
- Institutions can pin educational tools.
Create a Profile
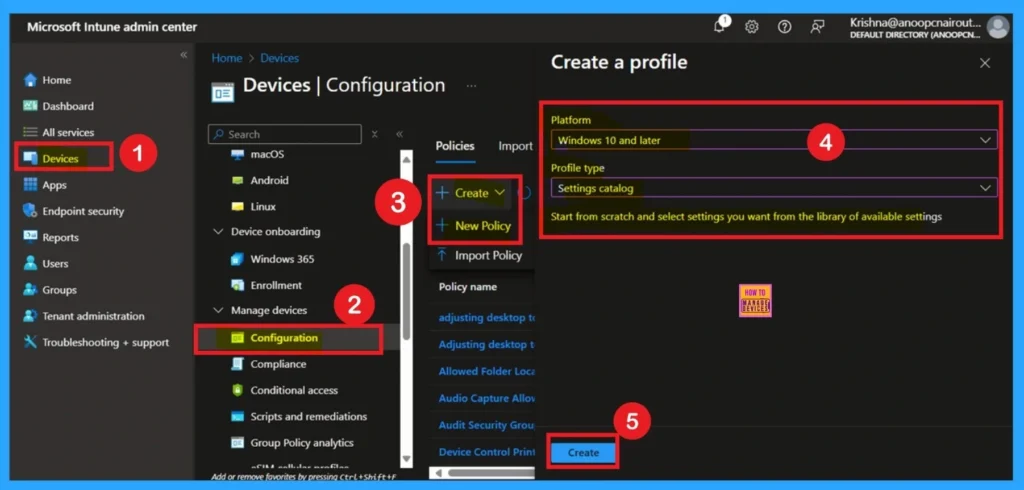
First, you need to configure this policy. Start by signing in to the Microsoft Intune Admin Center. Then, click on Devices. Under the Devices section, go to the Configuration tab, where you will find a + Create option. Click on it, and you will see 2 options, such as the new policy and the Import policy.
- Select New policy, and this will open a new window titled Create a profile.
- Here, you need to enter the Platform and Profile type details.
- After that, click Create.
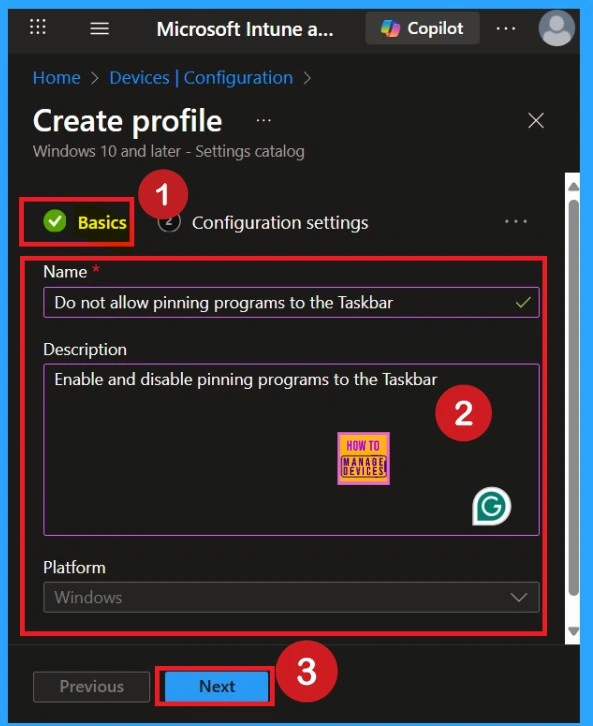
Basic Tab
The first step is Basics, in this section, you need to enter the basic details of the policy. First, provide an appropriate name such as Do not allow pinning programs to the Taskbar for the policy .You should also enter a description for better clarity. Then, set the Platform as Windows and click Next.
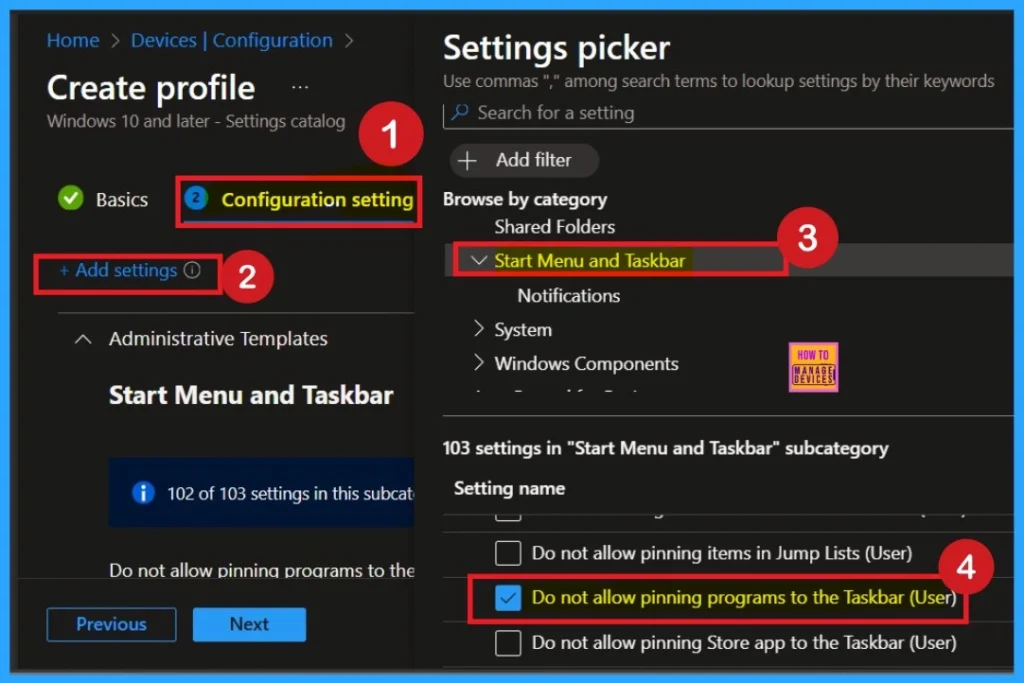
Know the Settings Picker
After completing the basic steps, you’ll now on to the Configuration Settings section. Here, click on the Add Setting option and this will open the Settings Picker window. From the administrative templates select Startmenu and Taskbar option. Then select the policy “Do not allow pinning programs to the Taskbar (User)”
Disabled By Default
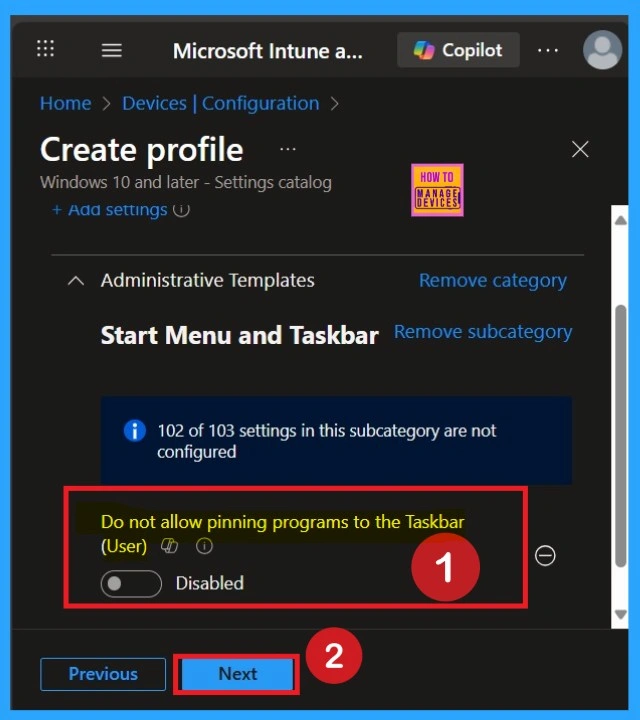
After selecting the settings, close the settings picker window. Now you are on the Configuration Settings main page. You will see that the policy has appeared on your screen. By default, this policy is disabled. If you want to continue with this default setting, you can click Next.
Enable Pinning Programs to the Taskbar Policy
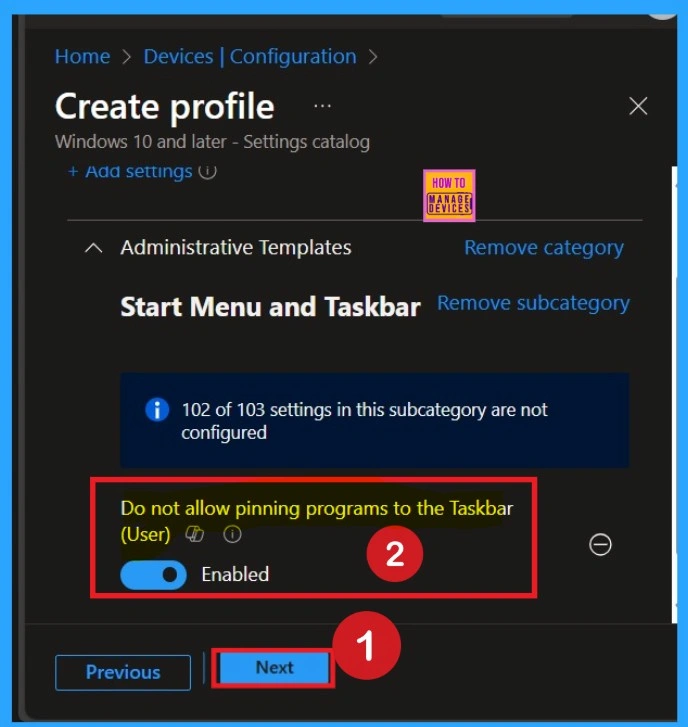
By default, this toggle is set to Disabled. To activate the policy, you just drag the toggle from left to right. Once enabled, the toggle will turn blue and change to Enabled. Then click Next to continue.
Scope (Optional Step)
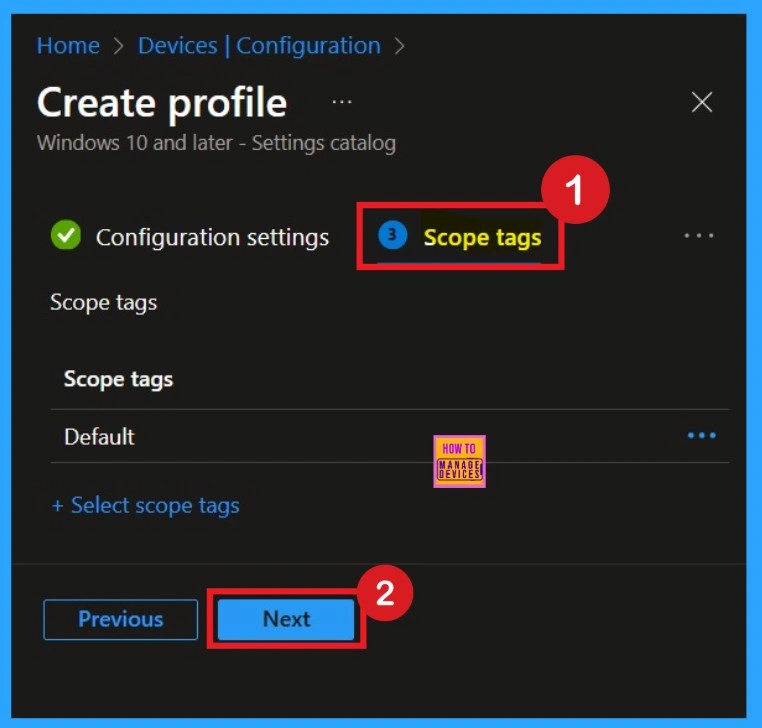
The scope is an important part of policy creation, but it is not mandatory. If you want to add a scope type to the policy, you can do so here. However, if you don’t need it in your configuration, you can simply skip this section. In my case, I don’t need this setup, so I skipped it.
Know Assignments
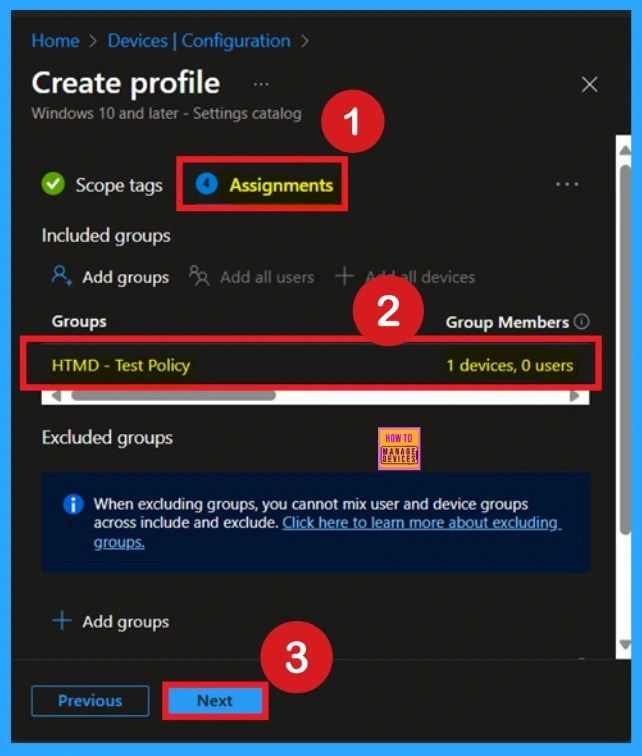
The assignment step is very important when creating a policy. In this section, you can assign the policy to specific organization groups. This ensures that the policy applies only to the selected users or devices. You can add groups under the Include Groups section. One or more groups can be added here based on your organization’s requirement.
- After selecting the groups, click on Next to continue.
What is Review + Create
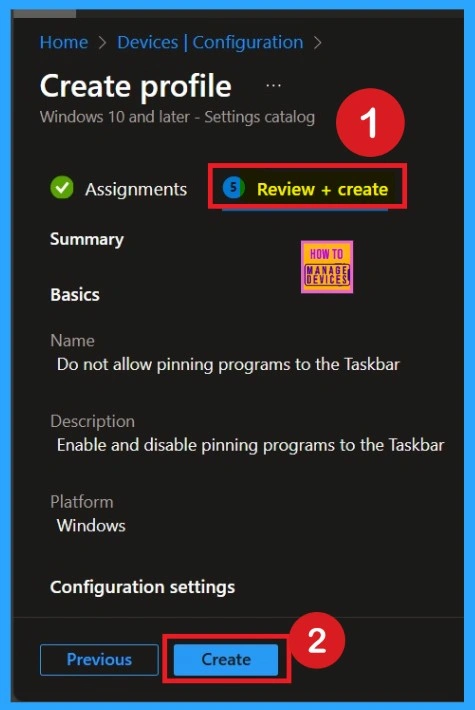
This is the final step in policy creation.The Review + Create page acts as a summary page, where you can see all the settings and steps you went through. If you find any mistake or want to make changes, you can easily go back to the previous tabs and update the settings. Once everything looks correct, click on Create. Your policy will now be successfully created and applied to the assigned groups.
Monitoring Details
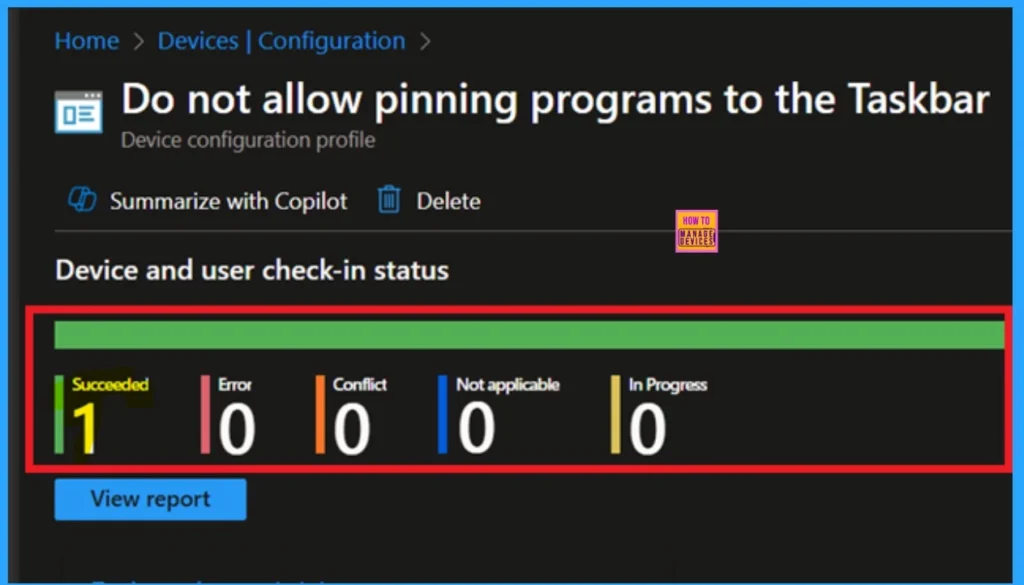
Using this method ensures the policy is applied more quickly and you can confirm the outcome without waiting the full sync time. To check the Monitoring status follow the steps; Navigate to Devices > Configuration Policies. In the Configuration Policies list, look for the policy you created. Click on the policy to view its deployment status and details.
Client Side Verification through Event Viewer
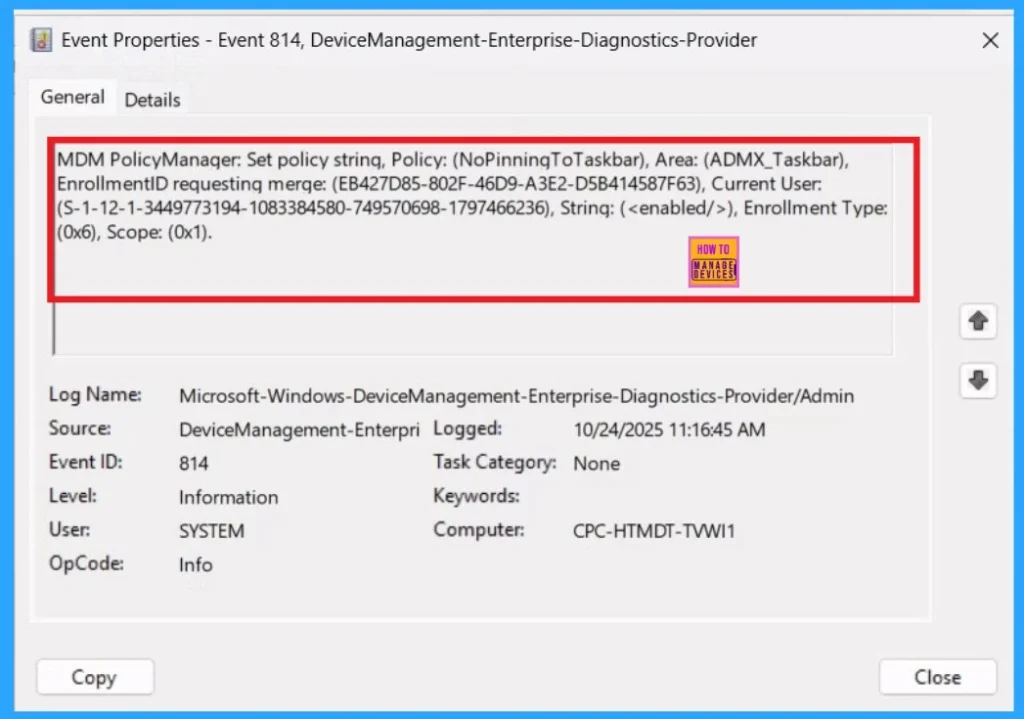
It helps you check the client side and verify the policy status. Open the Client device and open the Event Viewer. Go to Start > Event Viewer. Navigate to Logs: In the left pane, go to Application and Services logs> Microsoft> Windows >DeviceManagement-Enterprise-Diagnostics-Provider > Admin.
| Policy Information |
|---|
| MDM PolicyManager: Set policy strinq, Policy: (NoPinningToTaskbar), Area: (ADMX_Taskbar), EnrollmentID requestinq merqe: (EB427D85-802F-46D9-A3E2-D5B414587F63), Current User: (S-1-12-1-3449773194-1083384580-749570698-1797466236), Strinq: (), Enrollment Type: (0x6), Scope: (0x1). |
Removing a Wrong Organizational Group from a Policy
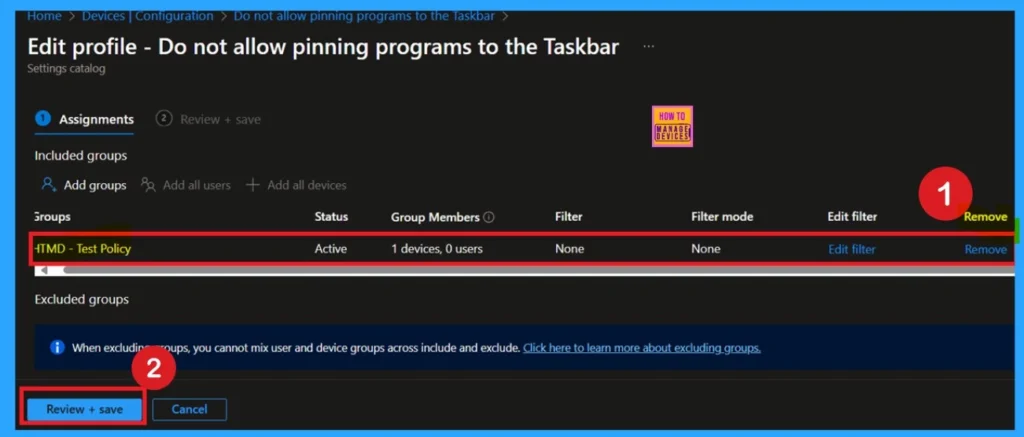
Sometimes, when creating a policy, we might accidentally add the wrong organizational group. Don’t worry and it’s easy to fix this mistake. To remove a group from a policy, first, search for the policy name in the Configuration Settings page. Next, go to the Monitoring Status page of that policy. Scroll down to find the Assignments section. Here, click on the Edit option.
You will see the list of groups currently assigned to the policy. Simply remove the unwanted group, then click on Review + Save to apply the changes. Your policy will now be updated, and the removed group will no longer be part of that configuration.
How to Delete the Policy that you created
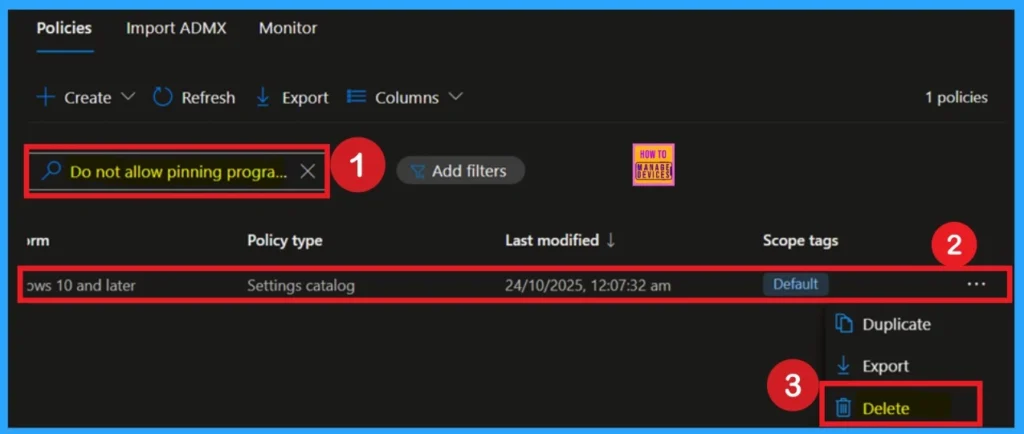
To delete a policy in Microsoft Intune, first sign in to the Microsoft Intune Admin Center. Navigate to Devices and then select Configuration. Locate and select the specific policy you want to remove. Once you’re on the policy details page, click the 3 -dot menu in the top right corner and choose Delete from the available options.
Need Further Assistance or Have Technical Questions?
Join the LinkedIn Page and Telegram group to get the step-by-step guides and news updates. Join our Meetup Page to participate in User group meetings. Also, Join the WhatsApp Community to get the latest news on Microsoft Technologies. We are there on Reddit as well.
Author
Anoop C Nair has been Microsoft MVP for 10 consecutive years from 2015 onwards. He is a Workplace Solution Architect with more than 22+ years of experience in Workplace technologies. He is a Blogger, Speaker, and Local User Group Community leader. His primary focus is on Device Management technologies like SCCM and Intune. He writes about technologies like Intune, SCCM, Windows, Cloud PC, Windows, Entra, Microsoft Security, Career, etc.

