Hi folk, let us discuss how to use Power Automate to Import Autopilot Devices Hash via eMail. Most Intune engineers know the manual process of uploading the device hash. Here, we are going to share how we can automate this process.
As we all know, we can run the PowerShell script to get the hash file and upload it into the Intune tenant. But apart from this, we tried to search for other blog posts and how we can upload them through email so that not only the admins but also the users can upload the hash in Intune without logging into the tenant.
Here, we used a PowerShell script to generate the hash file and Power Automate in the backend to upload the hash. We basically created a Power Automate flow for this automatic email process. We can also restrict the user who can send the email to the specified email ID, and this can be restricted on the Office 365 portal.
This is an automated way of uploading the Hash file to the Intune tenant. This will specifically help admins to upload the hash file without login into the Intune portal. The User/Admin can just send an email to a specific shared email ID, and once the email is received, the Power Automate flow will be triggered.
- Step by Step Guide Windows Autopilot Process with Intune
- PS Script to Add or Modify Group Tag of Autopilot Devices in Intune
Prerequisites to Autopilot Device Hash Import
Now, we will discuss the prerequisites that are required to upload the Autopilot device hash in an automatic way. As part of the prerequisite, a few configurations are required to be done on the Microsoft Entra Admin portal. Let’s discuss one by one below.
Login into Microsoft Azure Portal https://portal.azure.com. Navigate to Microsoft Entra ID > Search for Enterprise applications. Enterprise Application (Clientid): This will be used to upload Hash files to the Intune tenant.

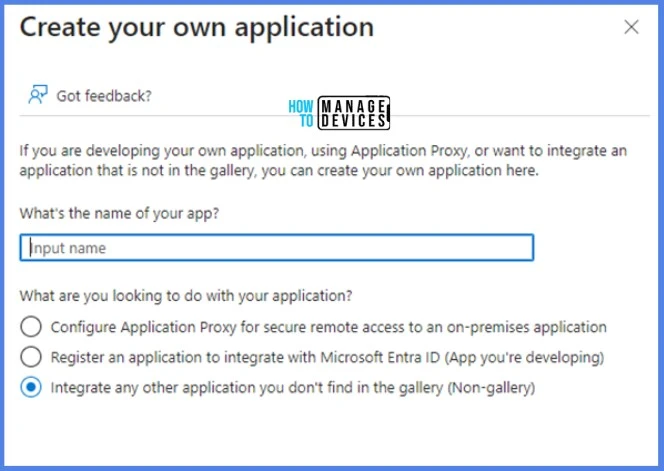
Create a New application and select Create your application.

Provide the name of the application you want to use. Then select the radio button with “Integrate any other application you don’t find in the gallery (Non-gallery)“
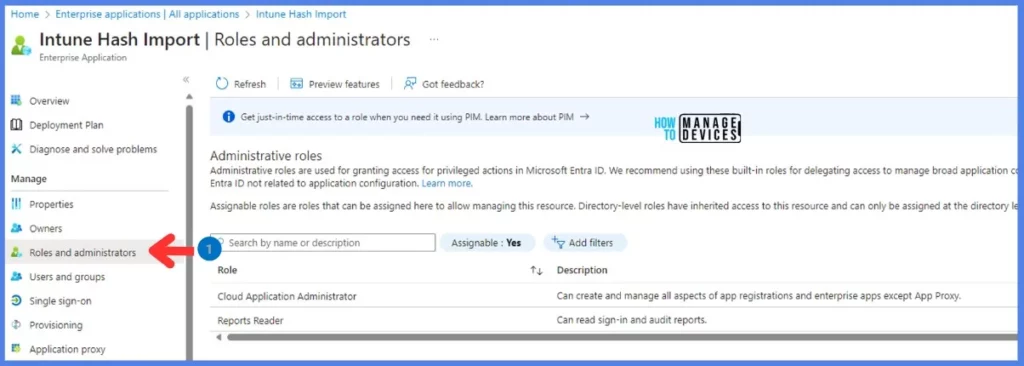
Once you create the application, open it and go to the “Roles and Administrators” section.
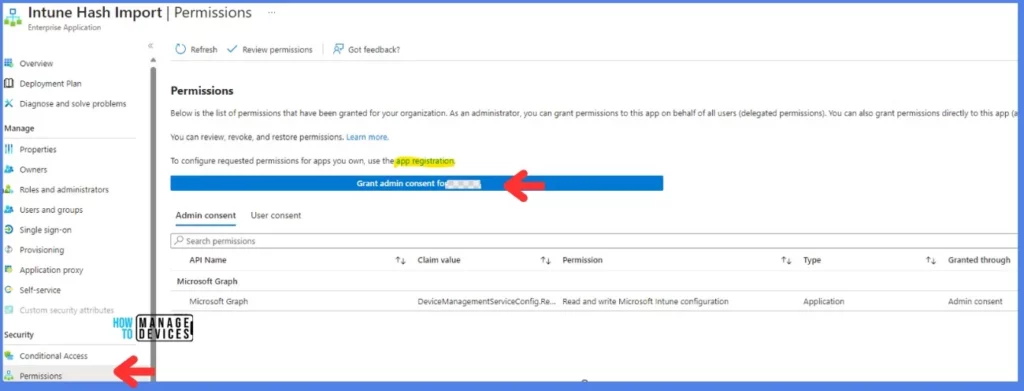
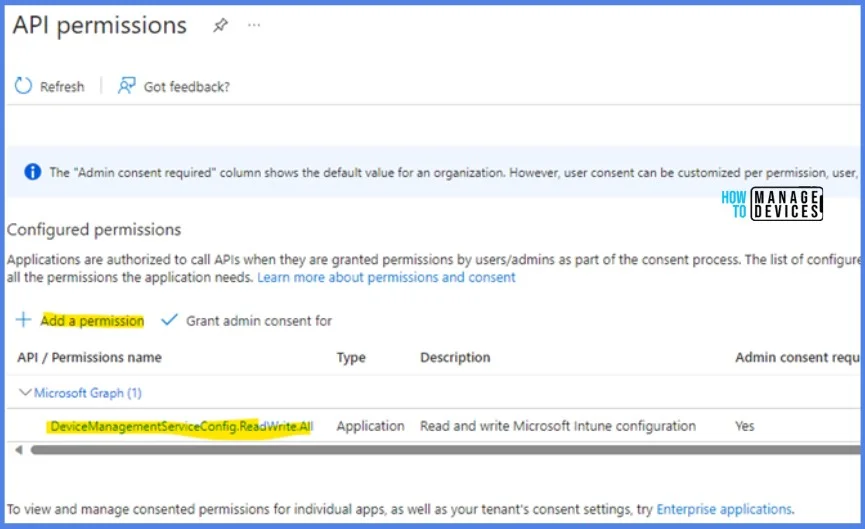
In the Permission tab, provide app registration access. You will be navigated to API permission, where you will have to provide access to “DeviceManagementServiceConfig.ReadWrite.All”.
This is how it looks once you add the permission. We should provide Read and Write access to the API so that we can upload and delete the hash file using this ID.
Now, we are done with the prerequisites and basic information of automation. In further steps, we can look forward to implementing the automation, where we will gain insight into Power Automate.
Implementation of Import Autopilot Device Hash using Power Automate
Now we will see how to implement this through Power Automate. For this, you need to have basic free access to Power Automate, which usually comes through an O365 E3 license. For our automation, we have used Automated cloud flow, which helps in automating one or more tasks through a triggered event. The triggered event can be an email sent or Sending a message on teams. There are multiple events freely available for you to set.
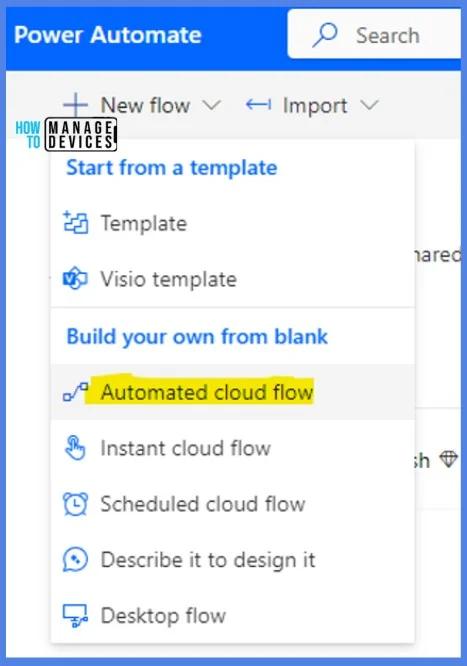
Login to Power Automate https://flow.microsoft.com and Click on Create and select Automated Cloud Flow.
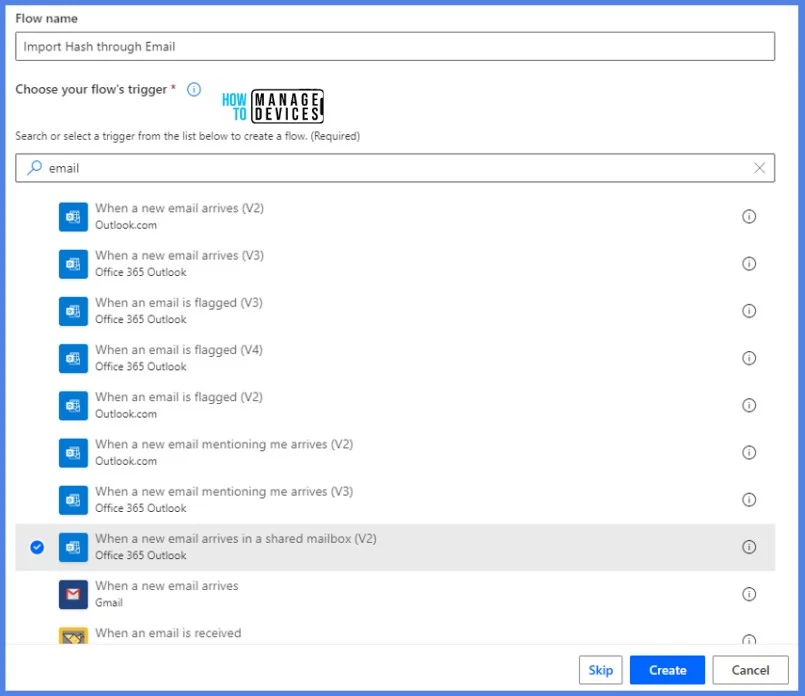
Enter the Flow name and choose your flow trigger. When a new email arrives in a shared mailbox (V2), our automation is based on an email sent to a shared mailbox, so that will act as a trigger point for this flow.
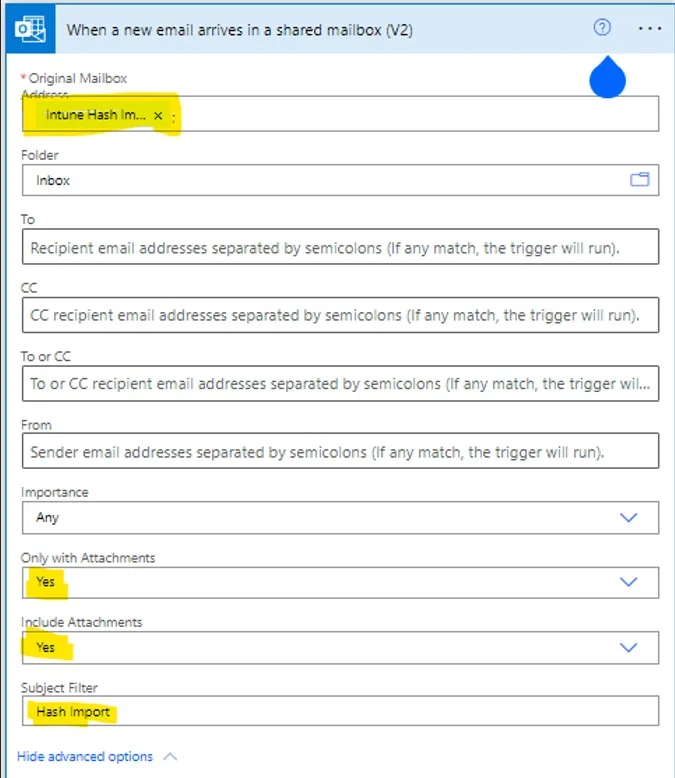
You will get a dialog box to add the shared email to the Original Mailbox Address. Select Only with Attachments as Yes and Include Attachment as Yes. Also, enter the Subject Filter as Hash Import.
This is the first step and also the trigger event. The best part is you can always change the event trigger points, such as you can later set a different shared mail box or the subject filter. If this trigger does not suit your requirements, you can add a new step altogether.
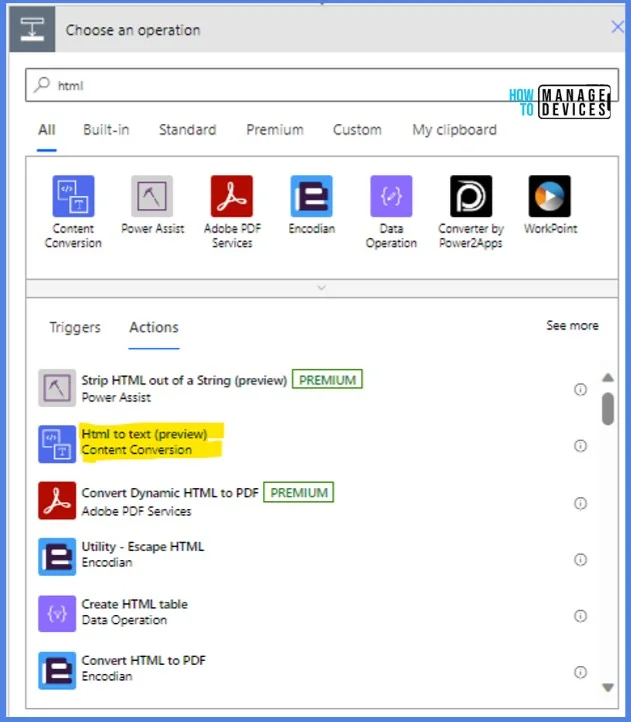
In the Next Step, search for HTML and select HTML to text. This will convert your email, which is HTML, to a text format.
Once it is created, choose Body from the list, which means that you are converting your email body from HTML to Text format.

Create a new step search for Compose and paste the below code. This will split the email body wherever there is a “|” symbol so that we get the group tag details. You can use any other character to split the body.
@{split(outputs(‘Html_to_text’)?[‘body’],’|’)}

Repeat the above step and paste the code below. This will get you the group tag mentioned in the email sent so that you can assign different group tags.
@{outputs(‘Compose’)[1]}

Next, search for Variable and Select Initialize variable in the New step. Add Name as Clienid, Type as String, Value as the ID of application created during pre-requisite.
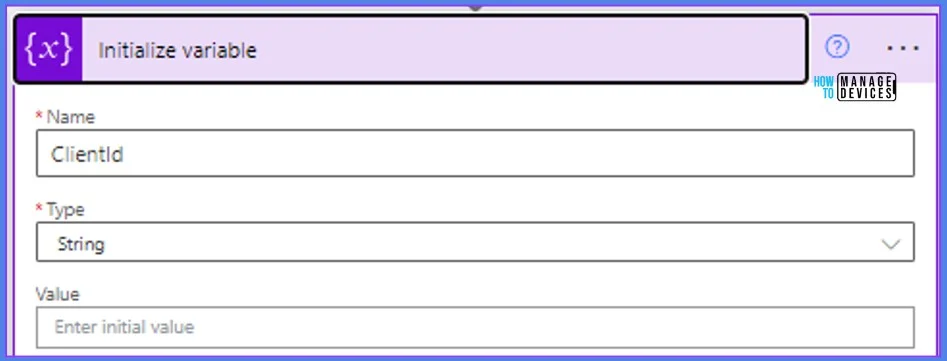
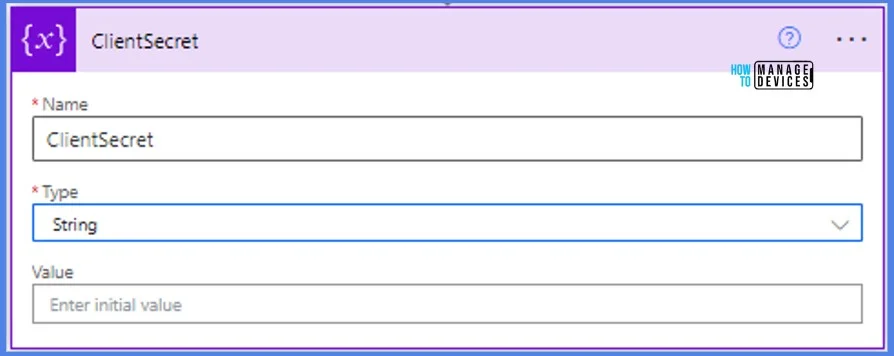
Repeat the above step and add as below entries. The Value will be the application’s secret key created during the pre-requisite.
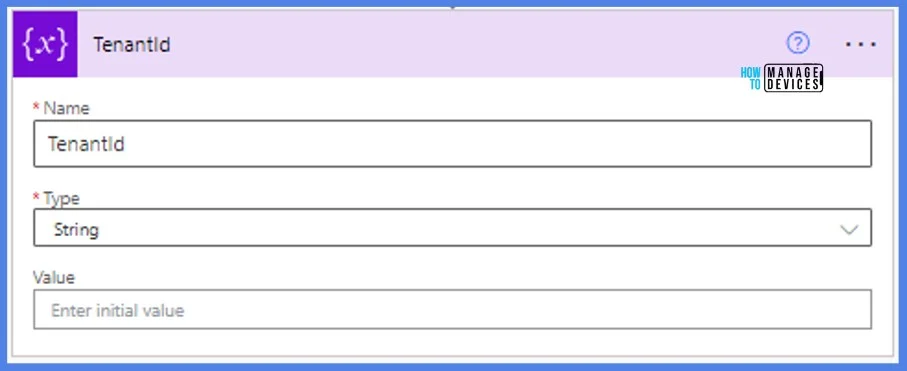
Repeat the above step and add the Intune tenant id in the Value field. You can get this from Azure portal https://portal.azure.com/. Home > Microsoft Entra ID > Overview . Here you will see the Tenant ID information.
Repeat the above step and add the below entries. Keep the Value empty, we will be setting this in later stages with the serial number of laptop.
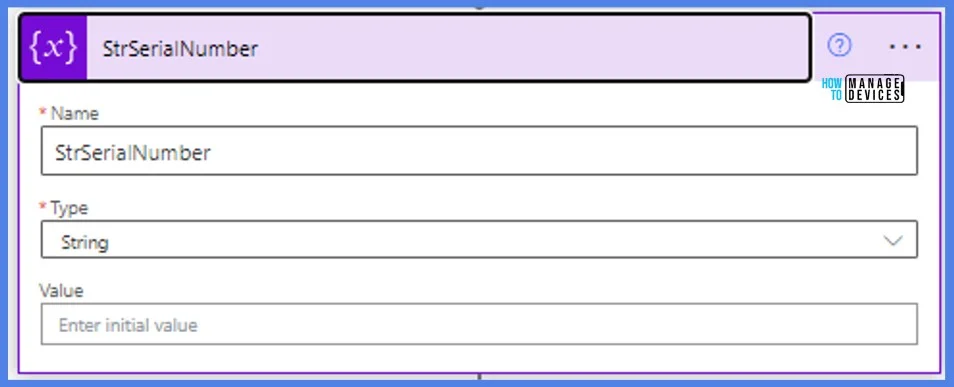
Repeat the above step and add the below entries. Keep the Value empty.
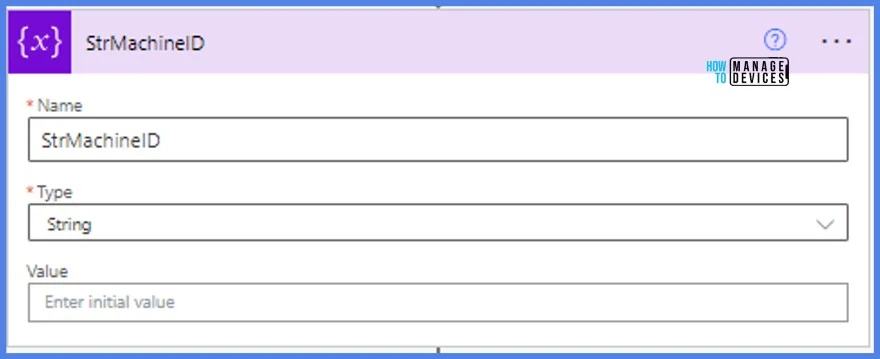
Now Choose operation Control and Apply to each. Later select Attachments from the list. This will get each of the attachments if you have sent multiple Hash files to upload.
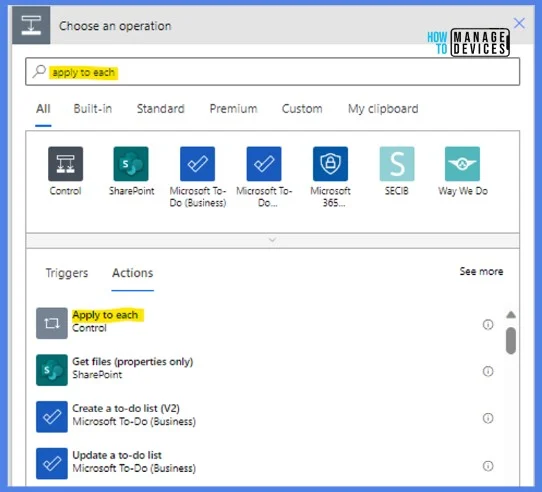

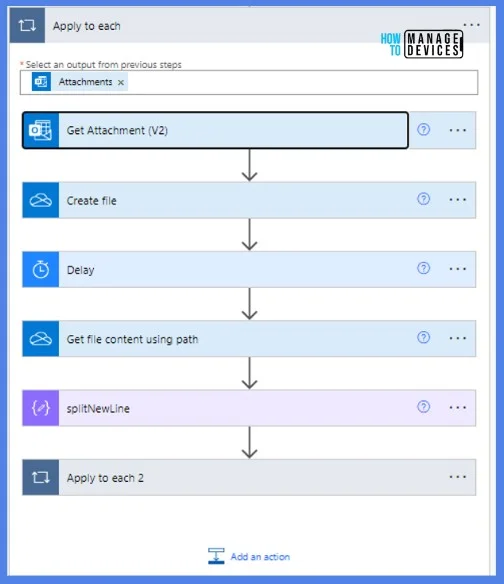
Now start adding New steps in the Apply to each condition as shown below.
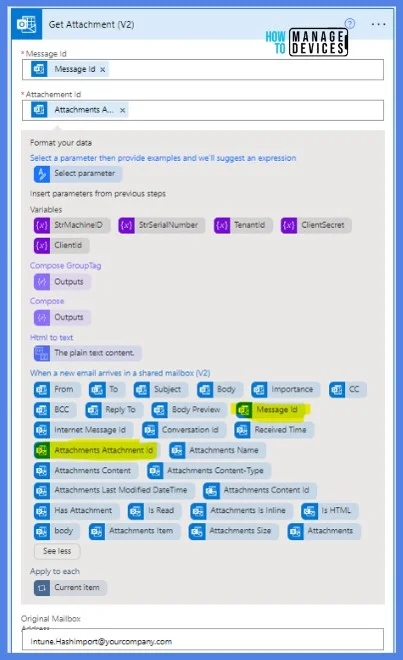
Let’s start with adding the new step for getting the attachment in the email.
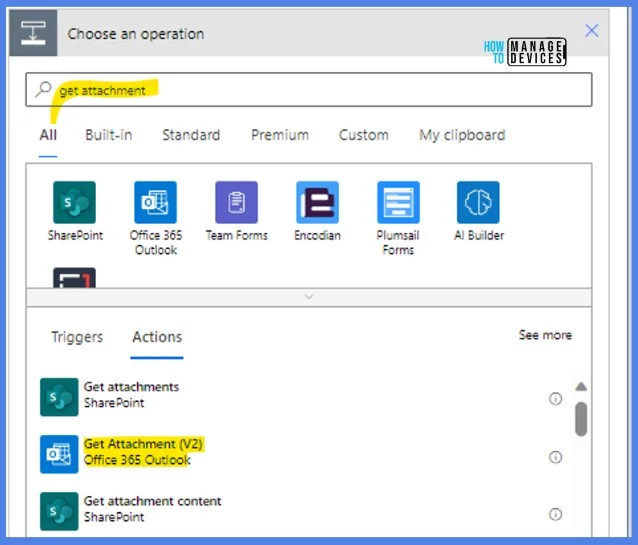
You can select the Message ID and Attachment Attachment ID. These are 2 unique IDs that can be used for accessing the mail and attachment.
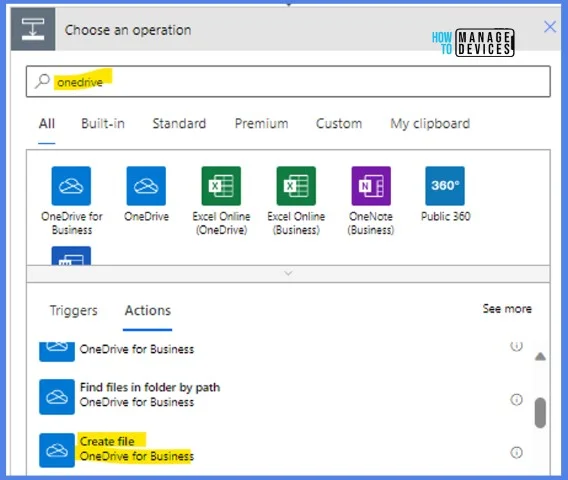
As we are creating the Hash file in a OneDrive path. Select Create file in One Drive for business. We are creating the file in OneDrive so that we will have a backup of this Hash file for further Admin related activities if needed.
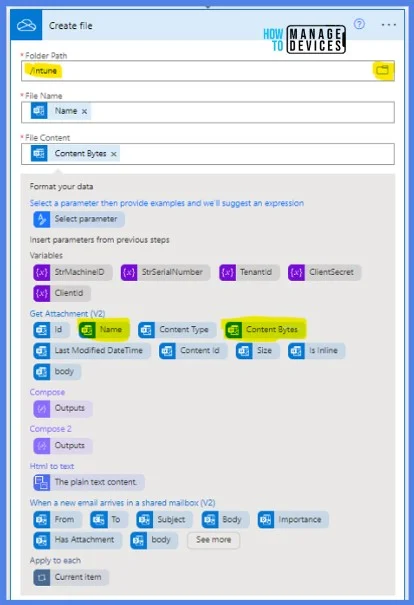
Browse the OneDrive path where you want to create the Hash file. Select the Name and Content Bytes. This will create a file with the name and content that is being extracted from the email.
Adding a Delay of 10 seconds so that the file gets created in the meantime.

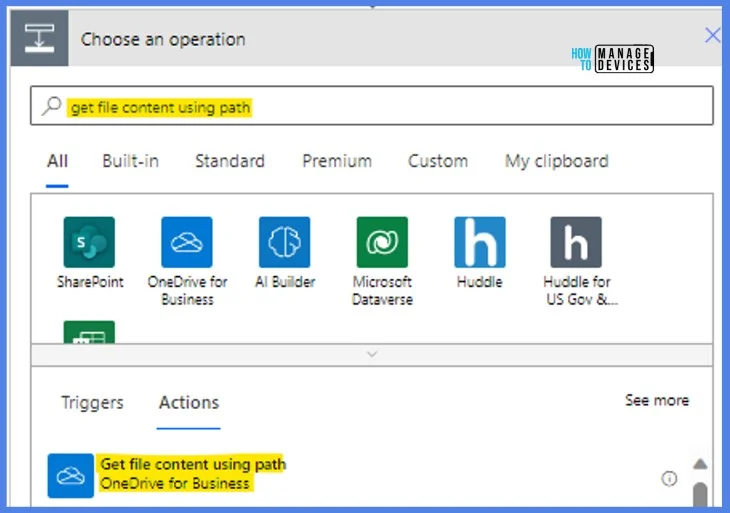
Create the next step and Select ” Get file content using the path. ” Later, select ” Path ” from the list. This gets the Hash file content created in the path above.
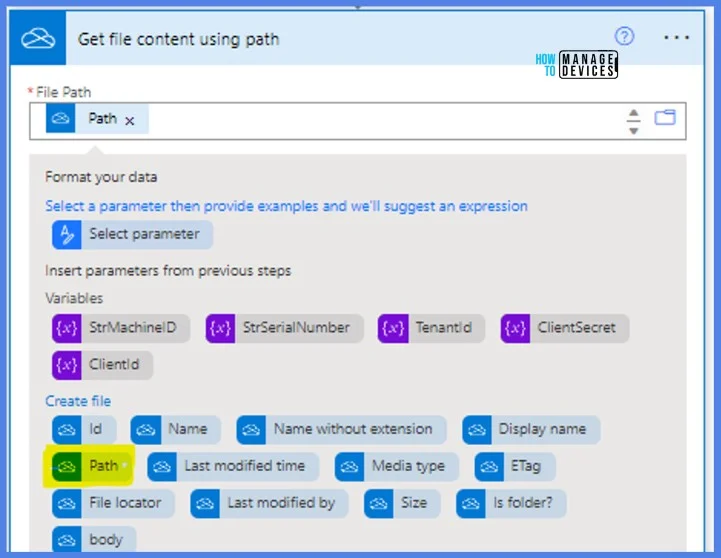
Now we will have to split the content in the HASH file so that it can be decoded and read line by line. Create a new step and search for Compose, and then you can copy and paste the code below.
@{split(outputs(‘Get_file_content_using_path’)?[‘body’], decodeUriComponent(‘%0A’))}

Again, add Apply to each control so that each line in the Hash file will be checked. As there is a header in the CSV file, we will have to skip the first line by adding the code below.
@{skip(outputs(‘splitNewLine’), 1)}

Now we have to split the CSV content by comma so that we get each value in a row.
@{split(item(), ‘,’)}

In the next step, add a condition that will check if the Value is null. This is done specifically to ignore the null value that gets created at the end of each Hash file. Power Automate tries to upload the null value and fails.
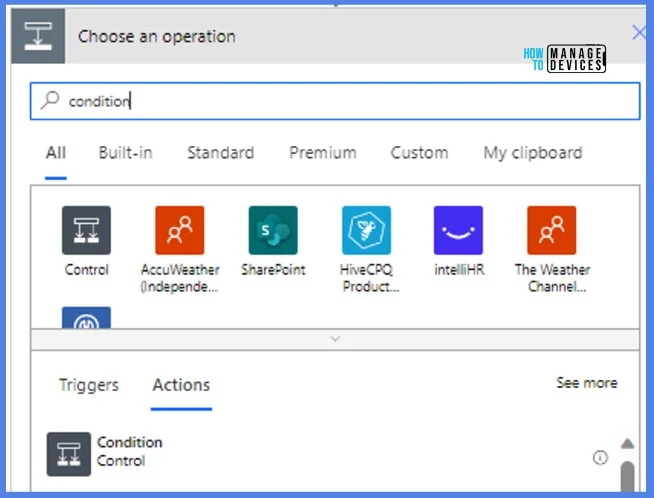
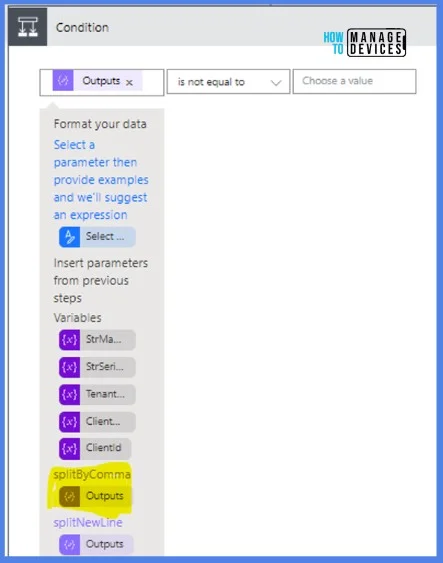
In condition, select Outputs (splitByComma). And check if the value is not equal to.
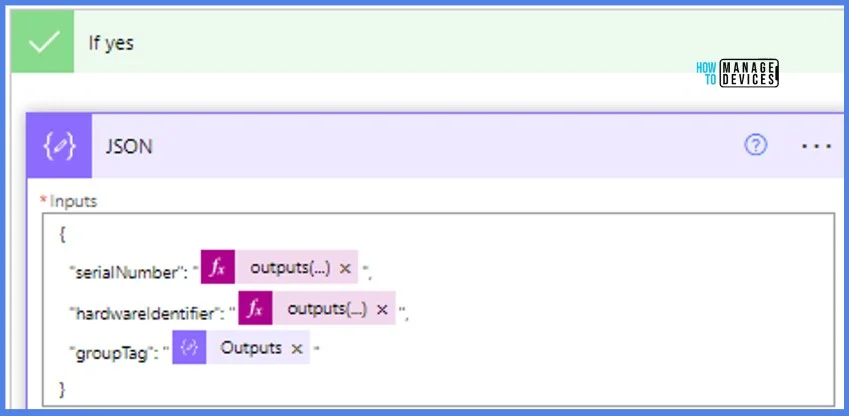
Then, in the If yes block, Add an action Compose and, in the Input, add as below so that input to the Graph API is in JSON format because the Graph API understands JSON format.
 {
  "serialNumber": "@{outputs('splitByComma')?[0]}",
  "hardwareIdentifier": "@{outputs('splitByComma')?[2]}",
  "groupTag": "@{outputs('Compose_GroupTag')}"
}
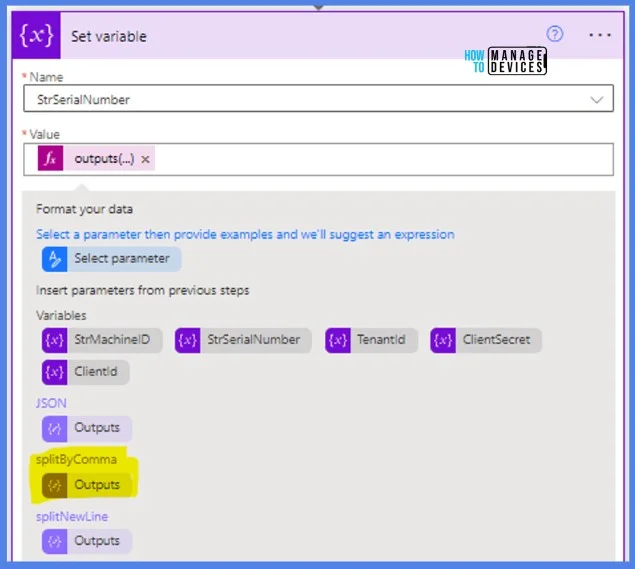
Now, we must set a variable for the Next step so that the serial number is assigned to a variable that can be used in later steps. Search for Set Variable. In the Name, select StrSerialNumber, and in the Value, select Outputs (splitByComma).
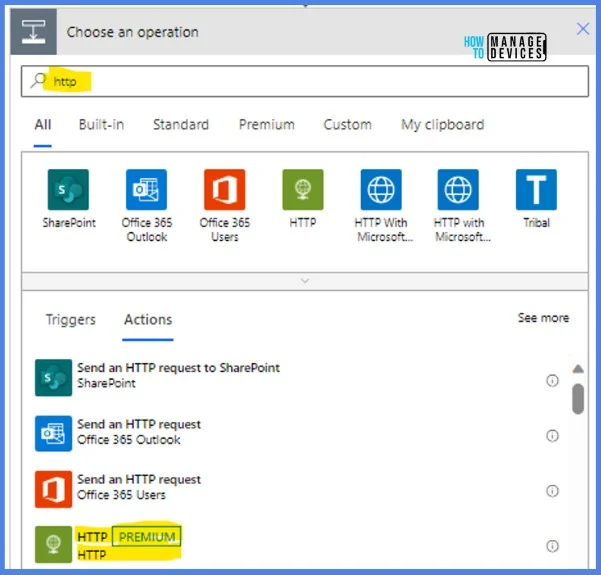
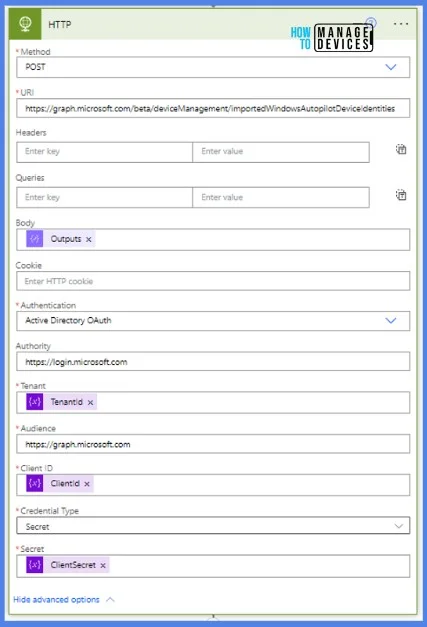
We are using the HTTP method to upload the Hash through Graph API. The HTTP entries are as follows.
You can either select the options below from the list appearing or directly copy past (check the names in your flow) the below.
| Field | Value |
|---|---|
| Method | POST |
| URI | https://graph.microsoft.com/beta/deviceManagement/importedWindowsAutopilotDeviceIdentities |
| Body | @{outputs(‘JSON’)} |
| Authentication | Active Directory OAuth |
| Authority | https://login.microsoft.com |
| Tenant | @{variables(‘TenantId’)} |
| Audience | https://graph.microsoft.com |
| Clientid | @{variables(‘ClientId’)} |
| Credential Type | Secret |
| Secret | @{variables(‘ClientSecret’)} |
You can fill in all the fields in the table. Make sure you provide all the required information.
Now you can give a delay of 15 minutes for the upload of the Hash.

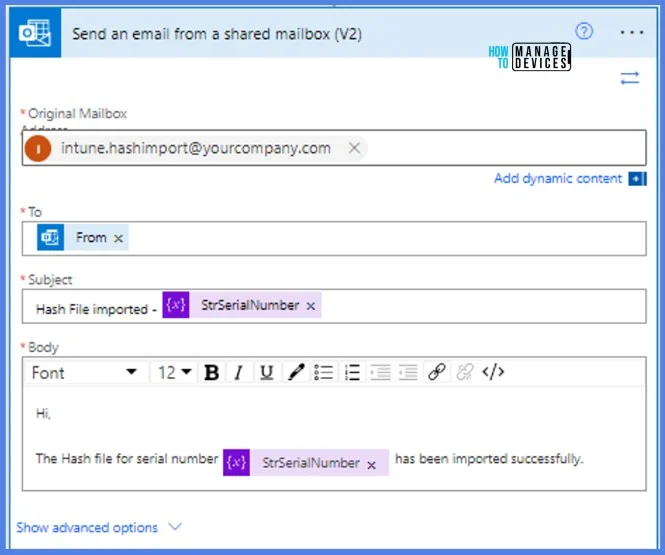
In the Next step, you can add Send an email from a shared mailbox (V2), which will send an email after the hash upload.
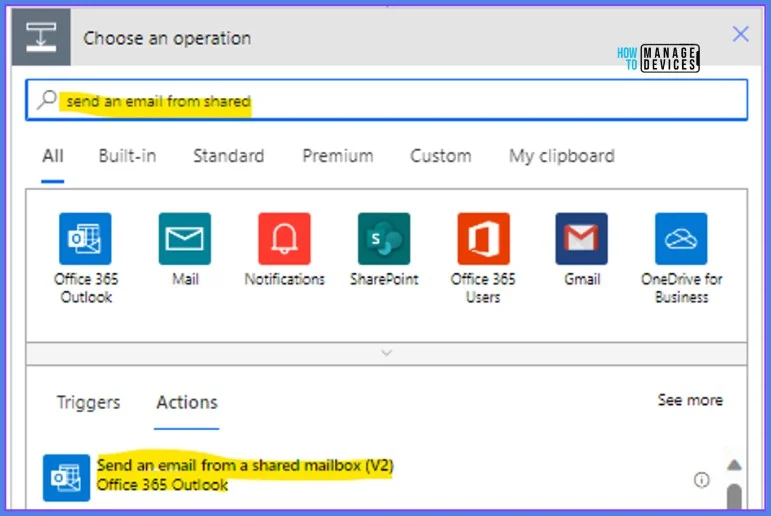
You can modify this according to your requirements so that the user or the admin will receive an email at the end after the hash upload. This is a confirmation email, and the user or admin can then start their enrollment process on the laptop.
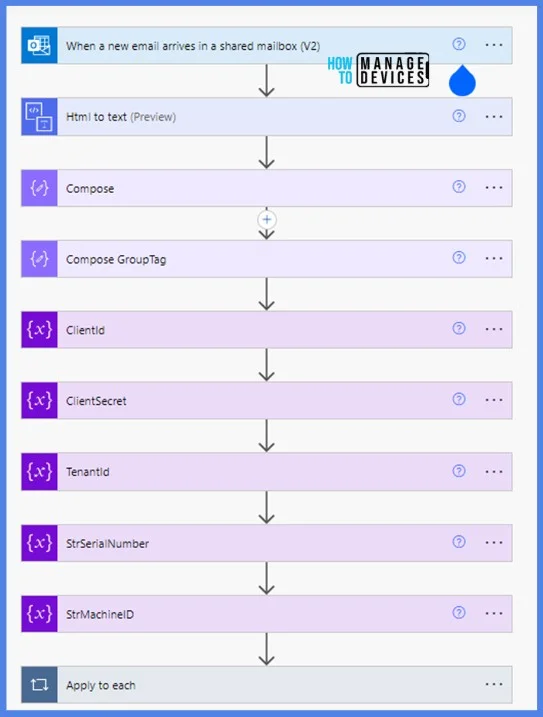
Follow the above steps to implement the automation. Now, I will show you how to write an email according to the automation. We will see what to keep in the subject line and body of the email. Let’s discuss this in detail.
End-User Experience Template to Sent Email – Use Power Automate to Import Autopilot Devices Hash via eMail for Intune Engineers
Here, I’m going to explain the format/template the user should use to send an email with a hardware hash to import inside Intune. Make sure you use the format below to send an email.
- Subject: Hash Import
- Body: Group Tag: |Admin|
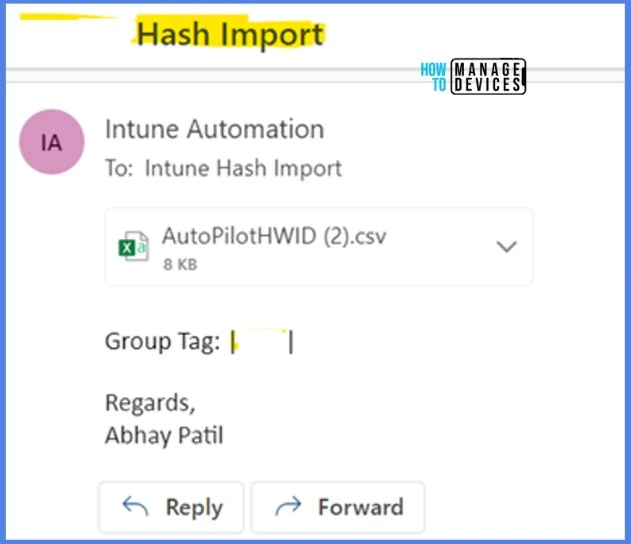
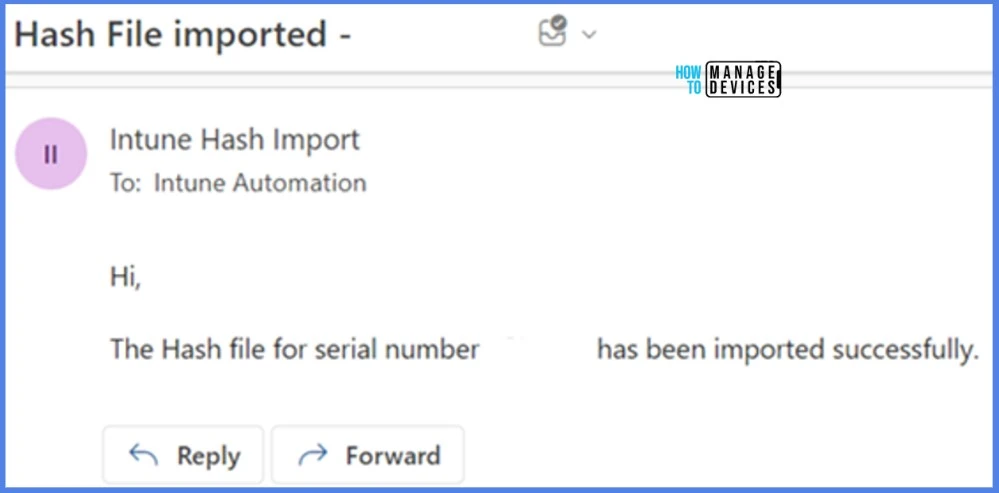
Once the email is sent, you will get a reply saying that the hash was imported into Intune successfully. The expected time maximum is 15 minutes.
Troubleshooting – Use Power Automate to Import Autopilot Devices Hash
Let’s check how to troubleshoot the method of adding device hash to Autopilot using Power Automate, as explained in this blog post.
Note! If you are not getting any reply, then there must be some issue with the hardware hash. There must be some error while importing the hash.
You can follow the above-detailed blog post on how to fix the Autopilot Device Import issue. Most of the time, I have seen 806 and 808 errors if the hash is not imported successfully.
We are on WhatsApp. To get the latest step-by-step guides and news updates, Join our Channel. Click here –HTMD WhatsApp
Author
About Author – Abhay Patil working in IT industry since 2011. Have good knowledge of SCCM, Intune PowerShell, W365, Power Automate, SQL, VBScript, and Batch Script. I like to Automate activities and reduce manual tasks.

Very article article. I followed the same steps, but group tag is not working.
1. Have you already created a group tag which you are mentioning in the email ?
2. You can check the below steps where you need to read and collect the data
@{split(outputs(‘Html_to_text’)?[‘body’],’|’)} …… This splits the body of the email where there is ‘|’ (pipeline) symbol
and
@{outputs(‘Compose’)[1]} ……. This gets you the Group tag mentioned in the
3. Once the Power automate is run you can go in the results section and see if the ‘Compose_GroupTag’ is assigned with the tag you mentioned in the email.
{
“serialNumber”: “@{outputs(‘splitByComma’)?[0]}”,
“hardwareIdentifier”: “@{outputs(‘splitByComma’)?[2]}”,
“groupTag”: “@{outputs(‘Compose_GroupTag’)}”
}
4. The best way to debug issue in Power Automate is to check the Run history of a flow which is already run. You can go step by step and see where the group tag is actually missing or the Power Automate is not able to collect the Group tag
We tried this and the code for for Composes do not work:
@{split(outputs(‘Html_to_text’)?[‘body’],’|’)} did not work
@{outputs(‘Compose’)[1]} did not work
Any sugesstions???
1. @{split(outputs(‘Html_to_text’)?[‘body’],’|’)}
a)The email body must contain ‘|’ (pipeline) symbol
b)I can see the single quotes you have entered are not the correct ones. If this is the issue then change this everywhere in your flow.
2. @{outputs(‘Compose’)[1]}
a)First see if the Compose[1] step is collecting any data. You can check the Run history for that. If it is not then problem is with
Compose[1] step
Thanks, resolved group tag.
Able to import hash file with group tag, but getting flow error in http action.
In a first http page, getting proper serial number and hardwareidentifier wihout error but in second page its throwing error without serial number and hardwareidentifier
First page inputs
“body”: {
“serialNumber”: “\”xxxxxxxx”,
“hardwareIdentifier”: “AAxxxxxjlkjlkjkljlkA5hS”,
“groupTag”: “test”
}
Second page inputs
“body”: {
“serialNumber”: “”,
“hardwareIdentifier”: “”,
“groupTag”: “India”
}
Good to know you were able to implement it.
You can ignore the second page. It is giving error because the Hash file contains a NULL value at the end(Try to open the file in Notepad you will see a NULL value). And Power Automate reads it and considers it as another value.
Thanks Abhay,
Is there any way where we can resolve the second page flow error as we are getting failed flow error alert in email.
I have post this issue in Power automate forum
https://powerusers.microsoft.com/t5/Using-Flows/Ignore-the-null-value/m-p/2628392#M45999
For that you must not add “Appy to each 2” and just use the @{skip(outputs(‘splitNewLine’), 1)} code . So that it does not iterates in the loop.
“Apply to each” is just like your “For each loop” in coding.
Abhay Patil,
What are the advantages of using this Use Power Automate to Import Autopilot Devices Hash via eMail for Intune Engineers
1. You do not have to login to Intune portal for Importing the hash. Just the grab the hash and send an email directly from any email ID.
2. If you do not want any local admins/Users to have access to Intune but allow them to import hash then this will help.
My use case: We were going through a migration from one tenant to another tenant and also from co-managed to Autopilot. I had already backed up all the Hash files to SharePoint location through PowerShell + PowerAutomate. So whenever there was a need to configure an machine directly get the hash from SharePoint and send an email
Do you have a script which can be rolled out from intunes to all machines to generate the Hash ID without the user running the script manually?
Hi Abhay,
Execellent content,
i am stuck at the below error
Unable to process template language expressions in action ‘SpiltNewLine’ inputs at line ‘0’ and column ‘0’: ‘The template language expression ‘split(outputs(‘Get_file_content_using_path’)?[‘body’],decodeUriComponent(‘%0A’))’ cannot be evaluated because property ‘body’ cannot be selected. Array elements can only be selected using an integer index.
Can you please help
Thanks Rashmi
I can see single quotes being used are not correct. Its better to type it by yourself. Below is difference . Also there is a space after [‘body’],
Your code: split(outputs(‘Get_file_content_using_path’)?[‘body’],decodeUriComponent(‘%0A’))
Correct code: split(outputs(‘Get_file_content_using_path’)?[‘body’], decodeUriComponent(‘%0A’))
Hi,
I’m unable to process ‘Apply to Each 2’ because it’s showing empty information or data. Additionally, the ‘Split By’ command is throwing an error.
InvalidTemplate. Unable to process template language expressions in action ‘splitByComma’ inputs at line ‘0’ and column ‘0’: ‘The template language function ‘split’ expects its first parameter to be of type string. The provided value is of type ‘Null’. Please see https://aka.ms/logicexpressions#split for usage details.’.
could you please me to fix the issue?
Hi,
The splitNewLine compose function seems to be outputting a string.
Here is the code:
split(trim(outputs(‘Get_file_content_using_path’)?[‘body’]), ‘\r\n’)
I have also tried several variants:
split(trim(outputs(‘Get_file_content_using_path’)?[‘body’]), ‘%0A’)
and
split(trim(outputs(‘Get_file_content_using_path’)?[‘body’]), ‘%0D%0A’)
any tips?
Action ‘Compose_GroupTag’ failed: Unable to process template language expressions in action ‘Compose_GroupTag’ inputs at line ‘0’ and column ‘0’: ‘The template language expression ‘outputs(‘Compose’)[1]’ cannot be evaluated because property ‘1’ cannot be selected. Property selection is not supported on values of type ‘String’. Please see https://aka.ms/logicexpressions for usage details.’.
InvalidTemplate
Unable to process template language expressions in action ‘Compose_GroupTag’ inputs at line ‘0’ and column ‘0’: ‘The template language expression ‘outputs(‘Compose’)[1]’ cannot be evaluated because property ‘1’ cannot be selected. Property selection is not supported on values of type ‘String’. Please see https://aka.ms/logicexpressions for usage details.’.
I get that error when testing the flow. Below is the code view for Compose Grouptag
{
“type”: “Compose”,
“inputs”: “@{outputs(‘Compose’)[1]}”,
“runAfter”: {
“Compose”: [
“Succeeded”
]
}
}