Today we are discussing How to Prevent Automatic Typo Corrections to Maintain User Control using Intune Policy. This policy is part of Windows settings that help organizations manage how text correction works on employee devices.
The autocorrect feature usually helps users by automatically fixing spelling mistakes while typing. However, through this policy, IT administrators can control whether users can use this option or not. The autocorrect misspelled words feature is commonly used in Windows and various applications like Microsoft Word, Outlook, or Teams.
This policy, however, allows IT administrators to disable that feature completely. When the policy is Enabled, the option to autocorrect misspelled words is turned off, and users cannot modify it from their settings. In simple terms, even if users try to enable autocorrect, the system will not allow it once the policy is enforced.
If the policy is Disabled or Not Configured, then the user will be free to change the setting according to their preference. Note that the availability and function of this setting is dependent on supported languages being enabled.
Table of Contents
How this Policy Helpful to the Organization?
Organizations that helps on documentation, report writing, or technical writing may prefer to disable autocorrect and instead use spelling checkers that highlight mistakes without automatically changing them.
Turn Off Autocorrect Misspelled Words using Intune Policies
Above we discussed a overall things about the policy. This policy is especially useful in environments where accuracy of is critical, such as healthcare, legal, or engineering sectors. In these industries, incorrect autocorrections could lead to, data entry errors, or even compliance issues. So let’s look how this policy to be deployed through MS Intune admin center.
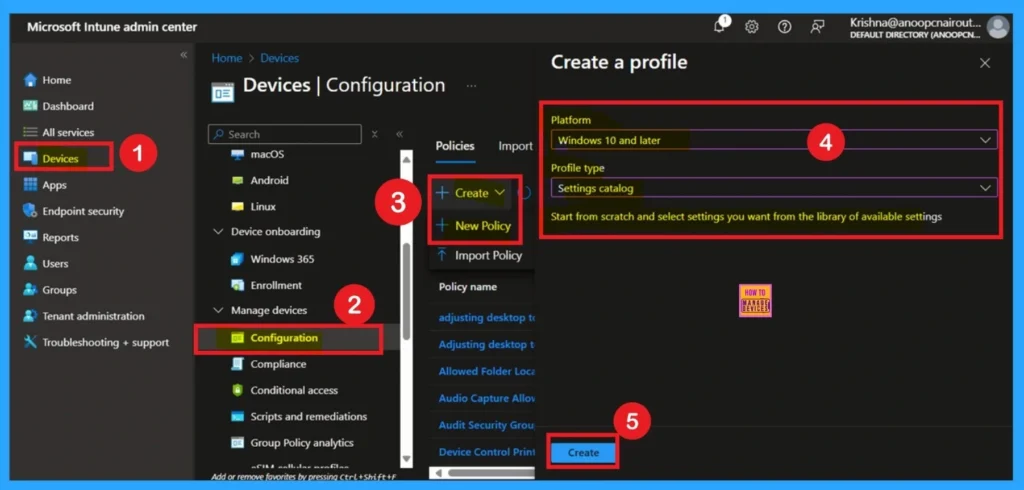
- First, go to the Devices section. In Devices, select Configurations. In Configurations, click on the + Create policy option.
- Next, fill in the Platform and Profile type details in the Create profile window.
- Set Platform to Windows 10 and later and set Profile type to Settings catalog.
- Then click Create.
- How to Restrict OneDrive Sync Speed in a Fixed Rate via Intune Policy
- Prevent users from Moving their Windows Known Folders to OneDrive
- Allow Manual Start of Microsoft Account Sign In Assistant Using Intune Settings Catalog
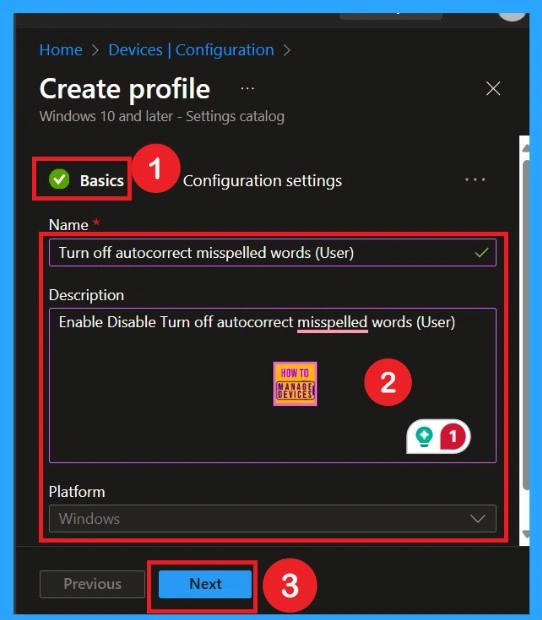
Basics
You know Basic details are very important here you have to enter the basic details such as name and description. The Description is mandatory, but you can enter the description to understand the policy later. The platform is already selected as Windows so you don’t need to do anything.
- Click on Next.
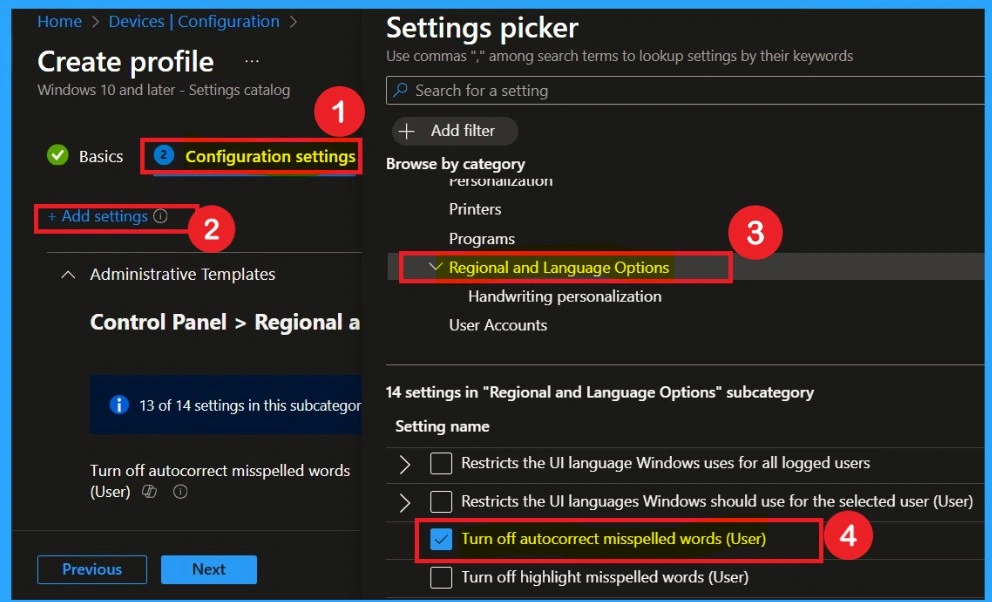
Configuration Settings
The Configuration tab is very crucial it helps you to select a specific setting. On the Configuration tab, click on the +Add settings hyperlink, and then you will get the Settings Picker. From the Settings Picker, you can choose settings quickly by browse by category or Search bar. Follow the navigation Path Administrative Templates> Control Pannel> Regional and Language Options>Turn Off Autocorrect Misspelled Words.
Disable the Policy
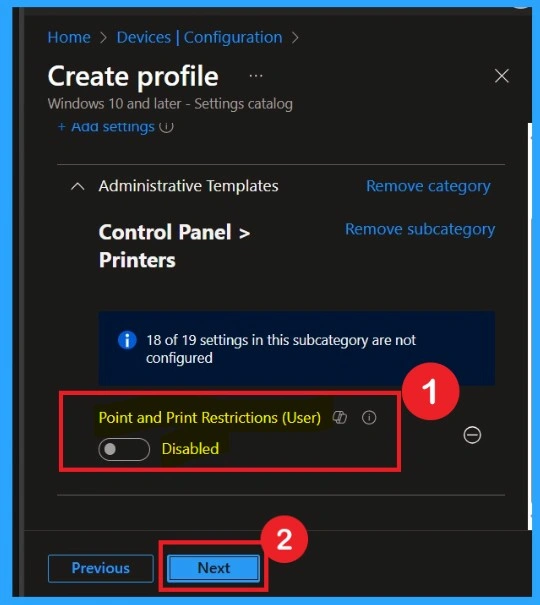
By default, you should understand that a policy can be either enabled or disabled. In this case, the policy is disabled by default. If you want to keep it in the disabled mode, you have to click Next to continue. Whe you disabling this always remeber that If the policy is Disabled or Not Configured, then the user will be free to change the setting according to their preference.
Enable the Policy
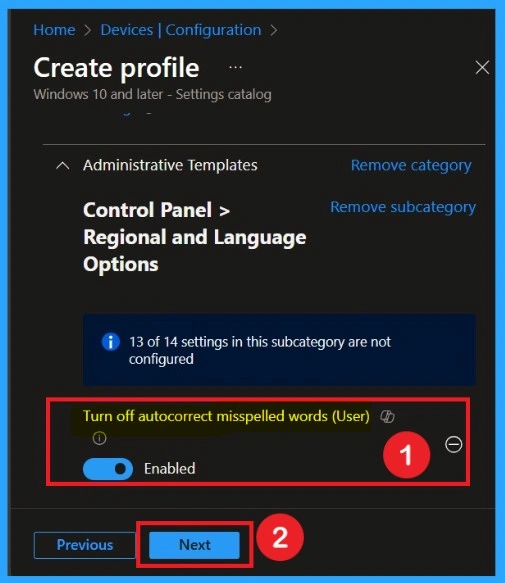
You can also enable a policy that is disabled by default. To do this, toggle the switch from left to right. Once enabled, the switch will turn blue and display the label Enabled. Remember that. If the policy is Enabled, then the option will be locked to not autocorrect misspelled words.
What is Scope Tag
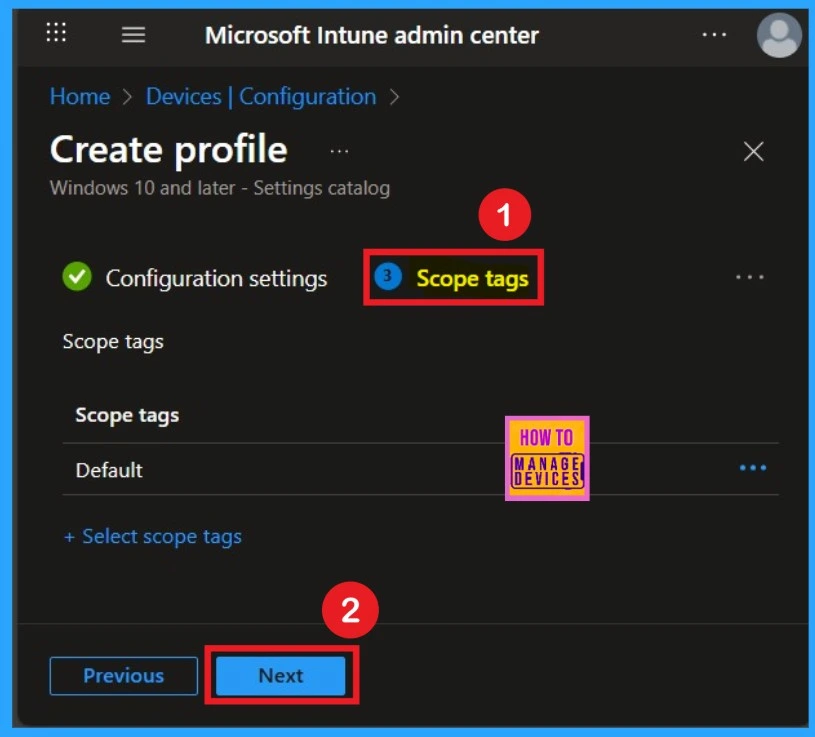
Now your are on the Scope tags section on the Autocorrect Misspelled Words policy. Scope tags are used to assign policies to specific admin groups for better management and filtering. If needed, you can add a scope tag here. However, for this policy, I chose to skip scope tag section.
Assignment Tab
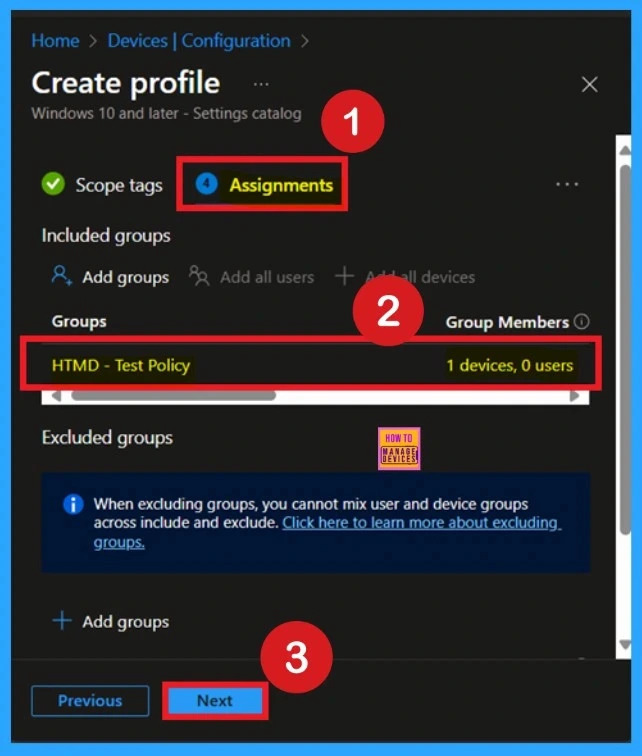
To assign the policy to specific groups you can use Assignment Tab. Here I click, +Add groups option under Included groups. I choose a group from the list of group and Click on the Select button. Again I click on the Select button to continue.
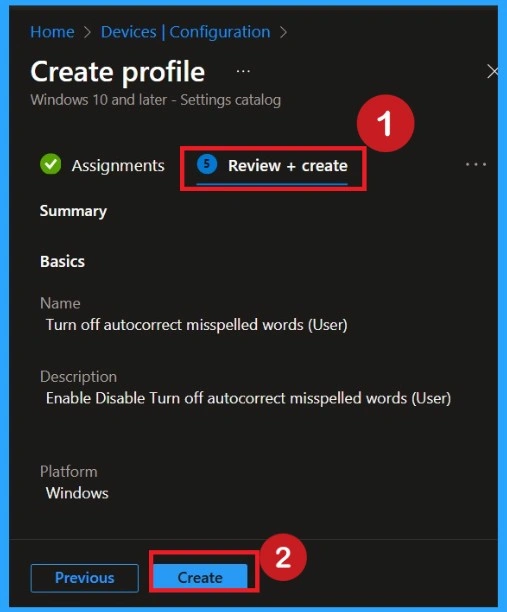
Review + Create
This is the last step of a policy creation. This page can be considerd as a summary page for all the sections that we gone through in a policy creation. . You can review all the information, and if anything needs to be changed, you can go back to the previous steps and edit them easily.
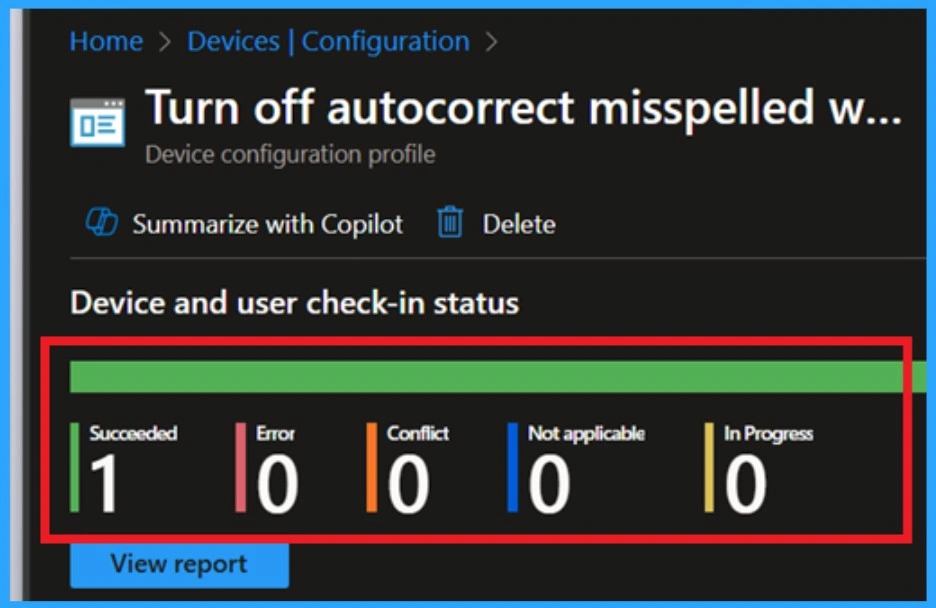
Monitoring Status
The Monitoring Status page shows whether the policy has succeeded or not. To quickly configure the policy and take advantage of the policy sync, the device on the Company Portal, Open the Intune Portal. Go to Devices > Configuration > Search for the Policy. Here, the policy shows as successful.
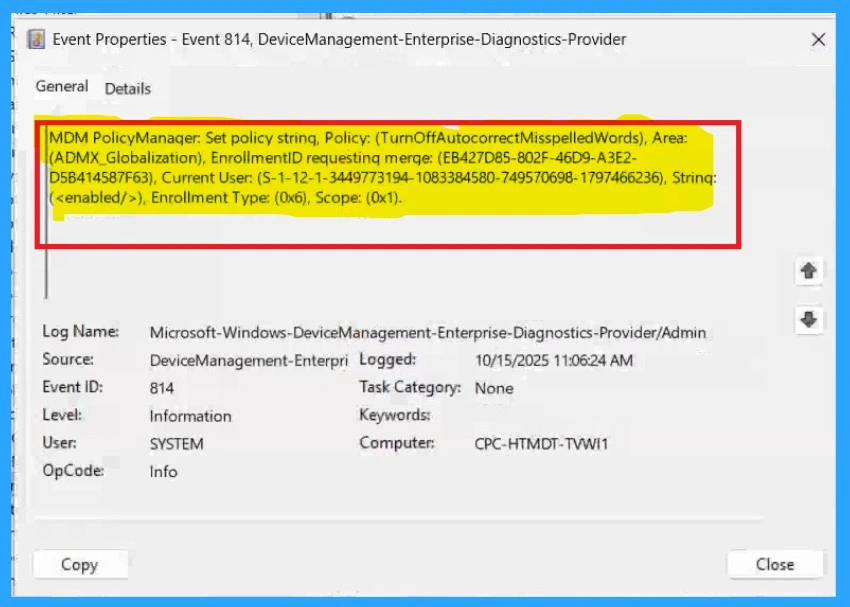
Client Side Verification with Event Viewer
If you get success message, that doesn’t meansthe policy is succeeded. To varify the policy successfully configured to client device check the Event Viwer. Open Event Viewer: Go to Start > Event Viewer. Navigate to Logs: In the left pane, go to Application and Services Logs > Microsoft > Windows > DeviceManagement-Enterprise-Diagnostics-Provider > Admin.
- In the right pane, click Filter Current Log, enter 814 in the Event IDs field, and click OK.
| Policy Info |
|---|
| MDM PolicyManager: Set policy string, Policy: (TurnOffAutocorrectMisspelledWords), Area: (ADMX_Globalization), EnrollmentID requestinq merge: (EB427D85-802F-46D9-A3E2- D5B414587F63), Current User: (S-1-12-1-3449773194-1083384580-749570698-1797466236), Strinq: (), Enrollment Type: (0x6), Scope: (0x1). |
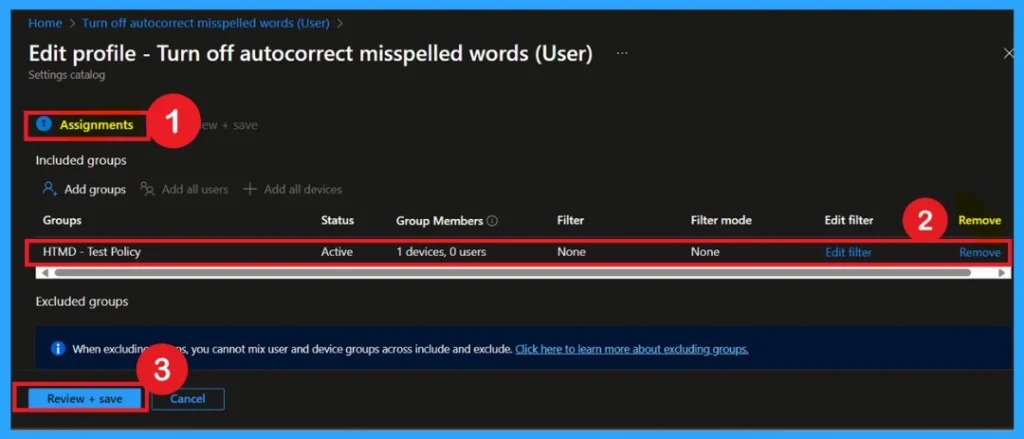
Remove the Autocorrect Misspelled Words Policy
Removing an assigned group from a policy is sometimes necessary for security, compliance, or operational efficiency. So in this case we have to remove the group, for that ,Search for the policy by name and click on it to open its monitoring details. Scroll down to the Assignments section and click Edit and then and the Remove Policy.
Delete the Policy
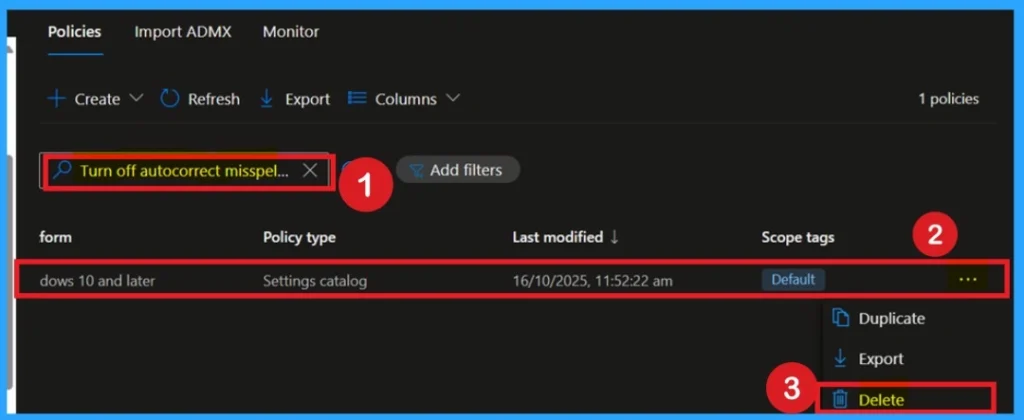
To delete a policy in Microsoft Intune, first sign in to the Microsoft Intune Admin Center. Navigate to Devices and then select Configuration. Locate and select the specific policy you want to remove. Once you’re on the policy details page, click the 3 -dot menu in the top right corner and choose Delete from the available options.
Need Further Assistance or Have Technical Questions?
Join the LinkedIn Page and Telegram group to get the step-by-step guides and news updates. Join our Meetup Page to participate in User group meetings. Also, Join the WhatsApp Community to get the latest news on Microsoft Technologies. We are there on Reddit as well.
Author
Anoop C Nair has been Microsoft MVP for 10 consecutive years from 2015 onwards. He is a Workplace Solution Architect with more than 22+ years of experience in Workplace technologies. He is a Blogger, Speaker, and Local User Group Community leader. His primary focus is on Device Management technologies like SCCM and Intune. He writes about technologies like Intune, SCCM, Windows, Cloud PC, Entra, Microsoft Security, Career, etc.

