Let’s discuss Unlock Optimal Remediation Action for High-Severity Threats using Intune. Remediation Action for High severity threats policy defining organization’s automated response to severe security threats detected by Microsoft Defender Antivirus.
This setting determines the specific action Microsoft Defender Antivirus will automatically take when it detects a threat categorized as “High severity.” High severity threats typically include serious malware that poses an immediate risk of data compromise, system disruption, or significant security breach, such as Trojans, advanced spyware, or certain types of ransomware.
Organizations can enforce this policy for several reasons. An organizations primarily concerned with two competing goals when setting this policy. They are Maximum Security, Speed and Minimum Disruption or False Positives.
Organization can ensures a quick and standardized response across all devices, regardless of user input or the threat’s specific signature by enabling this policy. This is critical for Zero Trust architectures and meeting compliance requirements.
Table of Contents
Unlock Optimal Remediation Action for High-Severity Threats using Intune
Remediation Action for High-Severity Threats Policy is beneficial for users, admins and organization. There are 6 values available for this policy and each value can be configured according to the organizations preferences. The most recommended and common value for the “Remediation action for High severity threats” policy is Quarantine.
- 5 Methods to Enable or Disable Automatic Sample Submission for Microsoft Defender Antivirus in Windows Devices
- How to Install Microsoft Defender Browser Protection Extension using Intune PowerShell Script
- How to Enforce Defender SmartScreen to Block Potentially Unwanted Apps in MS Edge Browser using M365 Admin Center
Real Word Example – Setting Remediation Action to Quarantine
Imagine a user accidentally downloads a High severity Trojan embedded in a compressed file from a phishing email. By setting Remediation action for High severity threats is set to Quarantine, Microsoft Defender detects the file. Instead of deleting it or letting the user decide, it immediately moves the malicious file to the quarantine folder.
Configure Policy from Intune Portal
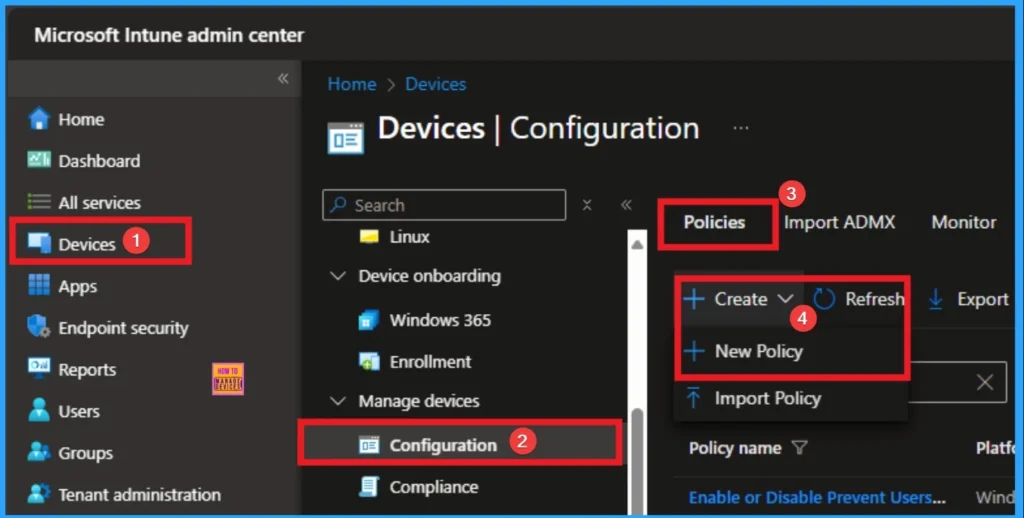
Setting Remediation Action for High-Severity Threats policy via Intune overrides local user settings, preventing a local administrator or user from accidentally or maliciously weakening the security response. Sign in to Microsoft Intune Portal with your credentials. Then go to Devices > Configuration > +Create >+ New Policy.
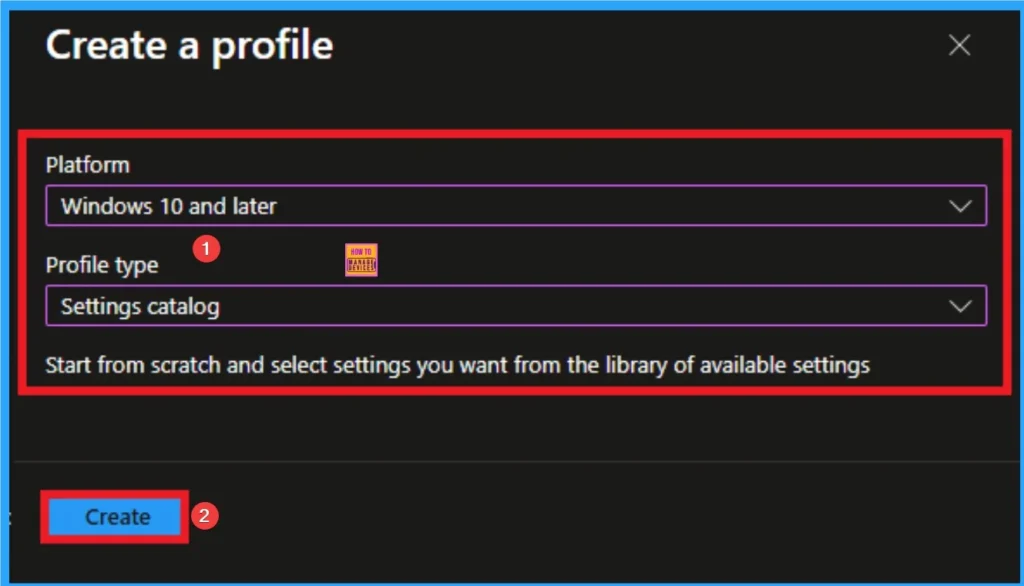
Selecting Platform and Profile Type
Selecting Platform and Profile is the next step after selecting New policy. It is very necessary step to effectively configure the policy to appropriate platform. Here I would like to configure the policy to Windows 10 and later platform and settings catalog profile. Then click on the Create button.
Adding Name and Description
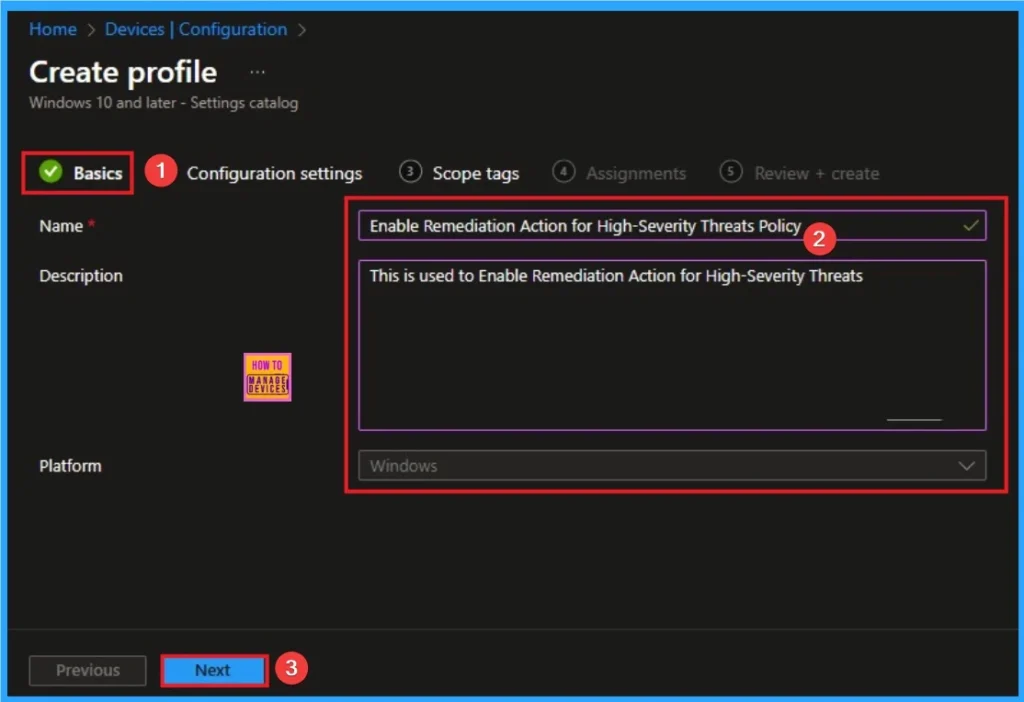
Using Basic tab, you can add name and description for the policy. This section helps everyone to know about the policy and its purpose clearly. Here Name is Mandatory and Description is optional. After adding these details click on the Next button.
Configure Remediation Action for High Severity Threats
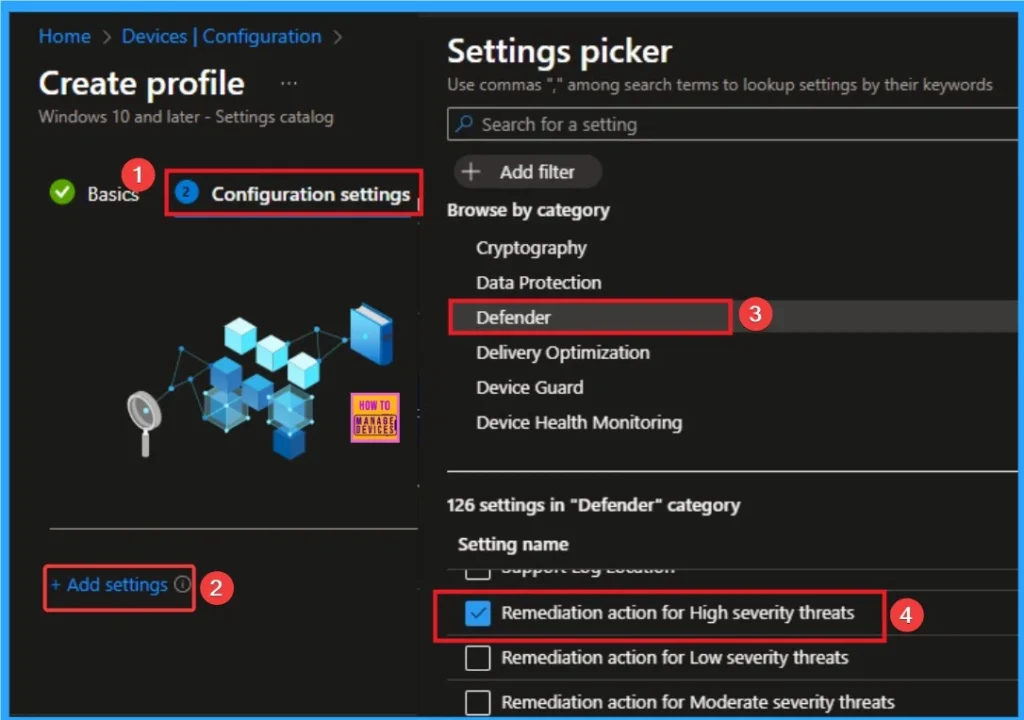
On this tab you can access +Add settings hyperlink to access specific settings. When you click on this hyperlink, you will get Settings Picker. Here, I would like to select the settings by browsing by Category. I choose Defender. Then, I choose Remediation Action for High Severity Threats settings.
Selecting Values for Policy
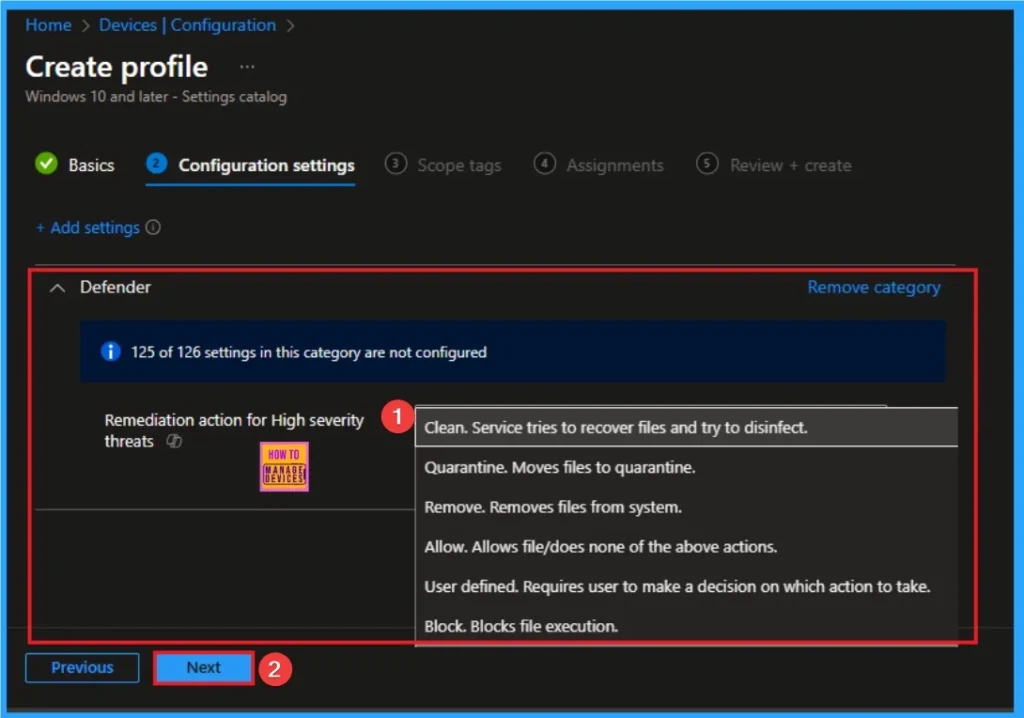
There are 6 Values are available for this policy. They are, Clean – Service tries to recover files and try to disinfect,
Quarantine – Moves files to quarantine, Remove – Removes files from system, Allow – Allows file/does none of the above actions, User defined – Requires user to make a decision on which action to take, Block – Blocks file execution.
Here I choose, Clean – Service tries to recover files and try to disinfect value. By choosing this value, disinfection is possible. Microsoft Defender Antivirus attempts to remove only the malicious code from the infected file, leaving the original, benign content of the file intact.
| Value | Detailed Action & Impact | Best-Practice Usage Scenario |
| Clean | The Antivirus engine attempts to disinfect the file by removing the malicious code while leaving the original file in place (if possible). This is a complex operation and is not always successful. | Use Case: Highly critical system files (like core Windows DLLs or executables) that are infected but essential for the OS or a major application to run. |
| Quarantine | The malicious file is moved to a secure, encrypted folder where it cannot execute or spread. The file is kept for a default of 90 days (configurable) before being permanently removed. | Use Case (Recommended Default): The most common and balanced choice for High severity threats. It immediately neutralizes the threat while providing a vital safety net to recover the file if it is later found to be a false positive (an innocent file mistakenly flagged). |
| Remove | The malicious file is permanently and immediately deleted from the device. This provides the highest guarantee of eradication. | Use Case: Environments with an extremely low tolerance for risk where security outweighs potential data loss. Often used for generic, known, or catastrophic malware (like advanced ransomware) where the chance of a false positive is low and the cost of allowing it to linger is too high. |
| Allow | The file is ignored and allowed to execute and remain on the system. No action is taken. | Use Case: Exclusively for files that have been absolutely verified as a false positive by the security team. It is a highly dangerous setting for a High severity threat and should be avoided or used only for specific file hash exclusions rather than as a default for the entire severity category. |
| User defined | A prompt appears on the user’s screen requiring them to choose an action (Clean, Quarantine, Remove, or Allow). | Use Case (Generally Discouraged): Almost never recommended for High severity threats in a corporate environment. It puts the final security decision in the hands of an end-user who lacks the necessary context, potentially leading to a threat being Allowed or a critical file being Removed. |
| Block | The Antivirus prevents the file from being executed or accessed. It does not automatically clean, quarantine, or delete the file. | Use Case: Used primarily as an initial prevention step, often paired with other automated remediation actions. If chosen alone, it can leave the malicious file on the disk, requiring a subsequent scan or automated investigation to complete the actual remediation. |
Scope Tag for Remediation Action for High Severity Threats Policy
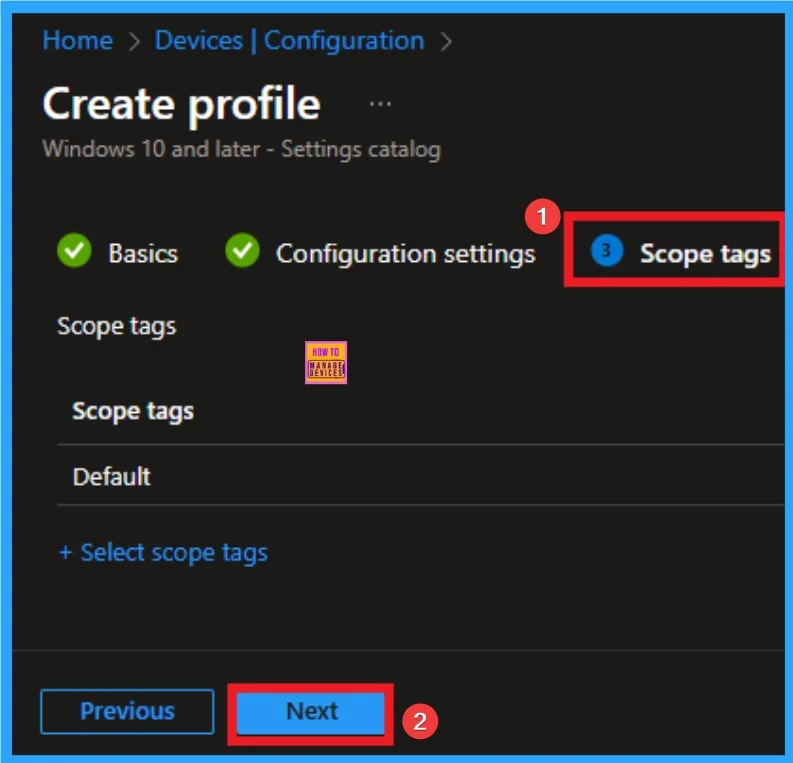
Scope Tags sections help you add restrictions to the visibility of the Policy. But it is not a mandatory step, so you can skip this step. Here, I don’t add scope tags for Remediation Action for High Severity Threats Policy. Click on the Next button.
Assignment Tab for Selecting Group
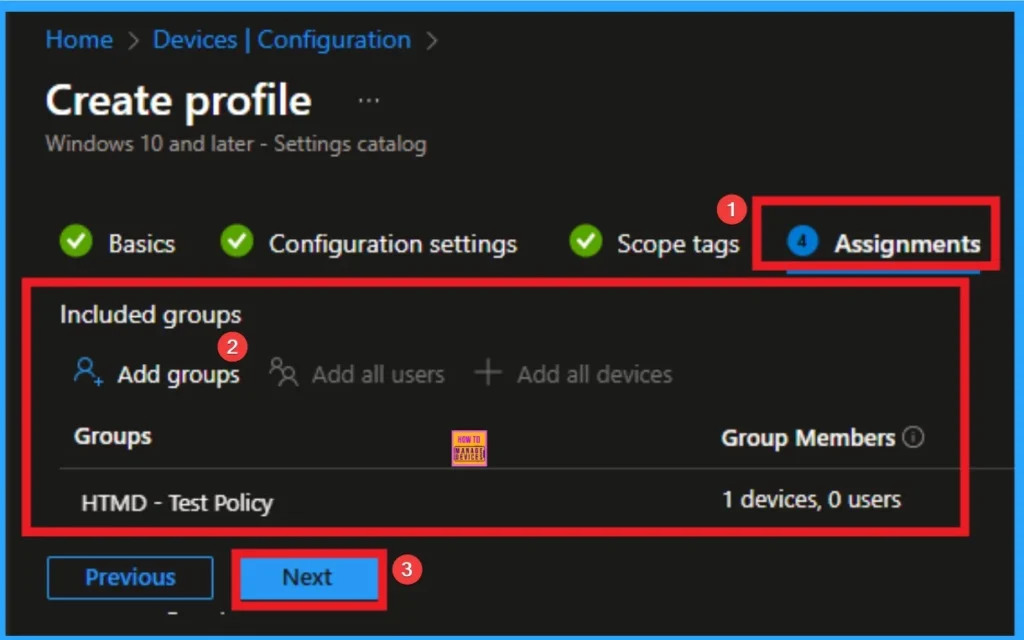
To assign the policy to specific groups, you can use the Assignment Tab. Here I click, +Add groups option under Included groups. I choose a group from the list of groups and click on the Select button. Again, I click on the Select button to continue.
Review + Create Tab
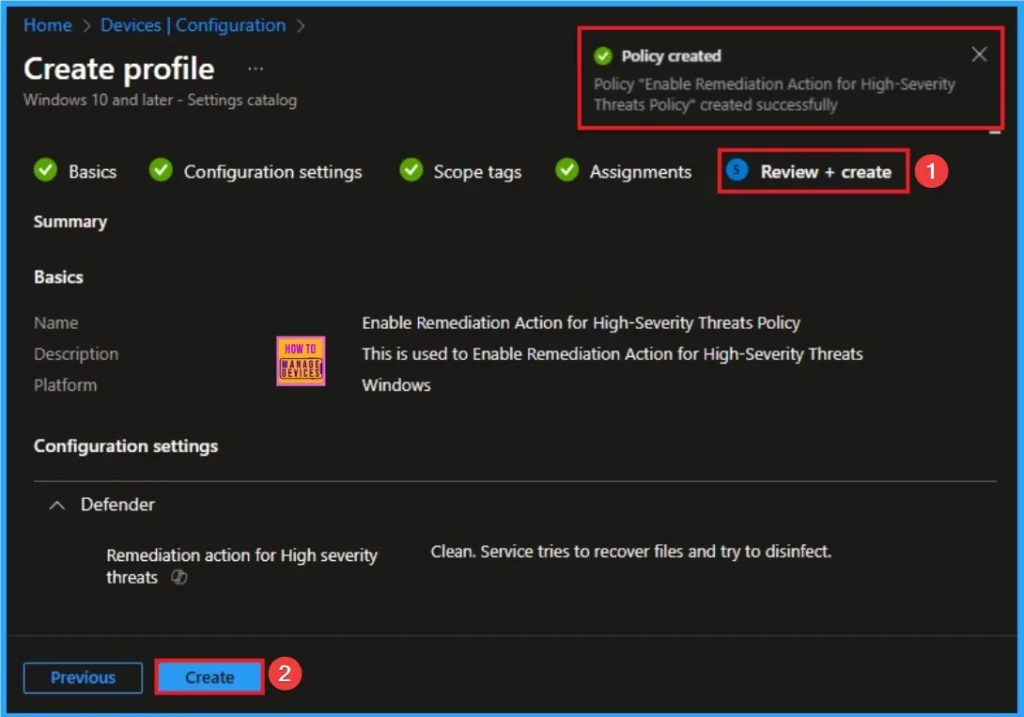
Before completing the policy creation, you can review each tab to avoid misconfiguration or policy failure. After verifying all the details, click on the Create Button. After creating the policy, you will get a success message.
Monitoring Status
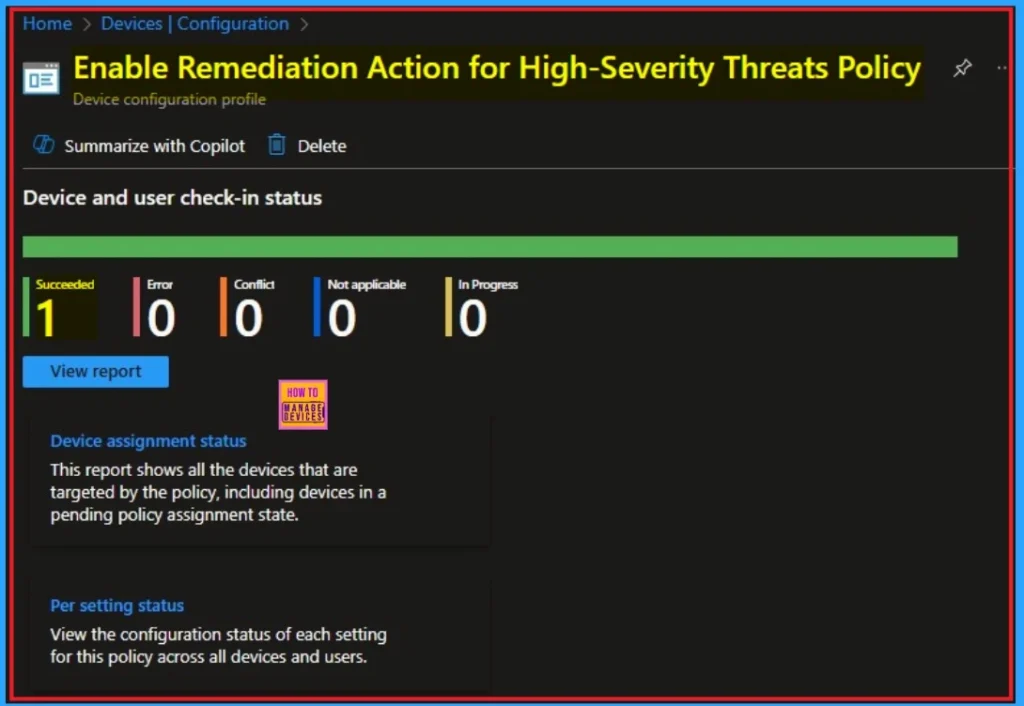
The Monitoring Status page shows whether the policy has succeeded or not. To quickly configure the policy and take advantage of the policy sync, the device on the Company Portal, Open the Intune Portal. Go to Devices > Configuration > Search for the Policy. Here, the policy shows as successful.
Client Side Verification through Event Viewer
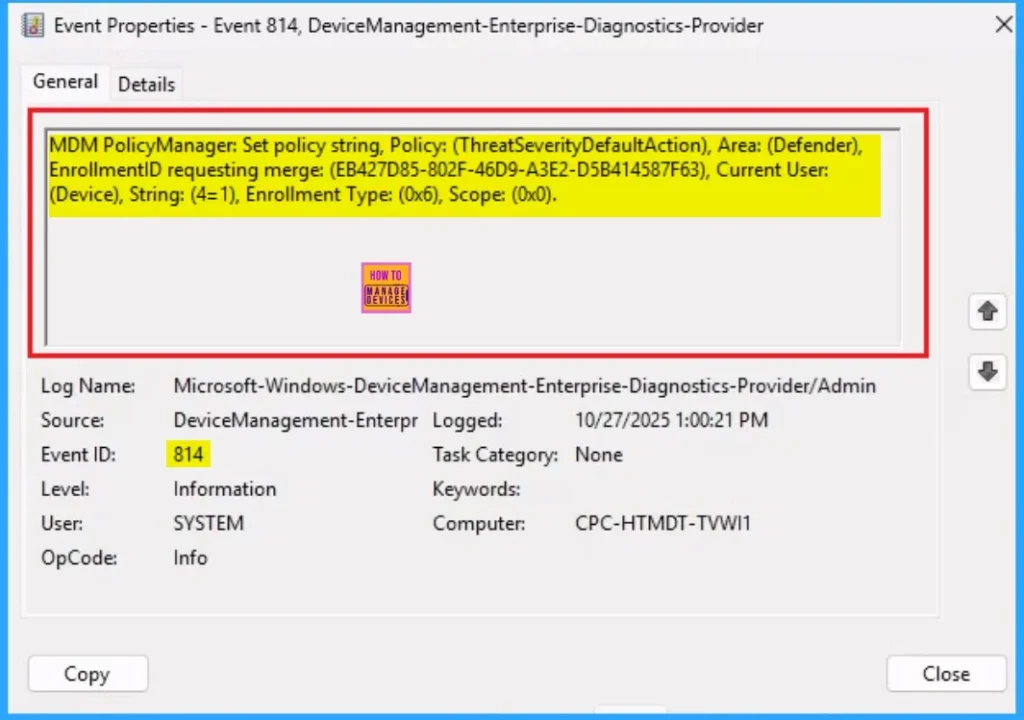
It helps you check the client side and verify the policy status. Open the Client device and open the Event Viewer. Go to Start > Event Viewer. Navigate to Logs: In the left pane, go to Application and Services Logs > Microsoft > Windows > DeviceManagement-Enterprise-Diagnostics-Provider > Admin.
MDM PolicyManager: Set policy string, Policy: (ThreatSeverityDefaultAction), Area: (Defender),
EnrollmentID requesting merge: (EB427D85-802F-46D9-A3E2-D5B414587F63), Current User:
(Device), String: (4=1), Enrollment Type: (0x6), Scope: (0x0).
Removing the Assigned Group from Remediation Action for High Severity Threats
If you want to remove the Assigned group from the policy, it is possible from the Intune Portal. To do this, open the Policy on Intune Portal and edit the Assignments tab and the Remove Policy.
To get more detailed information, you can refer to our previous post – Learn How to Delete or Remove App Assignment from Intune using by Step-by-Step Guide.

How to Delete Remediation Action for High Severity Threats
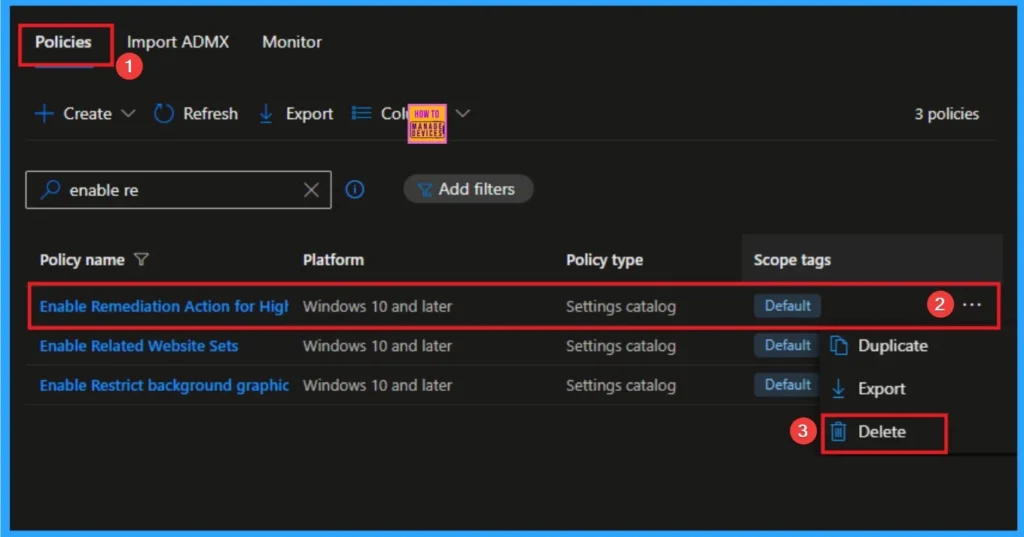
You can easily delete the Policy from the Intune Portal. From the Configuration section, you can delete the policy. It will completely remove it from the client devices.
For detailed information, you can refer to our previous post – How to Delete Allow Clipboard History Policy in Intune Step by Step Guide.
Need Further Assistance or Have Technical Questions?
Join the LinkedIn Page and Telegram group to get the step-by-step guides and news updates. Join our Meetup Page to participate in User group meetings. Also, Join the WhatsApp Community to get the latest news on Microsoft Technologies. We are there on Reddit as well.
Author
Anoop C Nair has been Microsoft MVP for 10 consecutive years from 2015 onwards. He is a Workplace Solution Architect with more than 22+ years of experience in Workplace technologies. He is a Blogger, Speaker, and Local User Group Community leader. His primary focus is on Device Management technologies like SCCM and Intune. He writes about technologies like Intune, SCCM, Windows, Cloud PC, Entra, Microsoft Security, Career, etc.

