Let’s learn Server Patching with Azure Update Management for Azure Servers (Windows and Linux). How many of you are wondering what the solution for server patching is? Fortunately, SCCM (a.k.a. ConfigMgr) can handle Windows server patching using Orchestration groups.
Update Management is available for both Windows and Linux. The solution uses the Microsoft Monitoring Agent (MMA) for Windows or Linux, PowerShell Desired State Configuration (DSC) for Linux, an Automation Hybrid Runbook Worker, and Microsoft Update or Windows Server Update Services (WSUS) for Windows servers.
You can manage both LINUX and Windows servers with the Azure Update Management (AUM) solution. AUM solution can be used for both on-prem and Azure servers.
NOTE! – Let’s use this method to patch SCCM servers hosted in Azure and On-Prem SCCM servers. What do you think? Note down in the comments section or ask a question over https://forum.howtomanagedevices.com/
Supported Operating System Versions for Azure Update Management
Let’s see what are the supported OS versions of the Azure Update Management solution.
| Operating system | Notes |
|---|---|
| Windows Server 2019 (Datacenter/Datacenter Core/Standard) | Linux agents require access to an updated repository. |
| Windows Server 2016 (Datacenter/Datacenter Core/Standard) | |
| Windows Server 2012 R2(Datacenter/Standard) | |
| Windows Server 2012 | |
| Windows Server 2008 R2 (RTM and SP1 Standard) | Update Management only supports performing assessments for this operating system. Patching is not supported as the Hybrid Runbook Worker is not supported for Windows Server 2008 R2. |
| CentOS 6 (x86/x64) and 7 (x64) | Linux agents require access to an update repository. Classification-based patching requires yum to return security data that CentOS doesn’t have in its RTM releases. For more information on classification-based patching on CentOS, see Update classifications on Linux. |
| Red Hat Enterprise 6 (x86/x64) and 7 (x64) | Linux agents require access to an updated repository. |
| SUSE Linux Enterprise Server 11 (x86/x64) and 12 (x64) | Linux agents require access to an updated repository. |
| Ubuntu 14.04 LTS, 16.04 LTS, and 18.04 (x86/x64) | Linux agents require access to an updated repository. Classification-based patching requires yum to return security data that CentOS doesn’t have in its RTM releases. For more information on classification-based patching on CentOS, see Update classifications on Linux. |
Unsupported Operating System Versions for Azure Update Management
Let’s see what are the unsupported OS version of the Azure Update Management solution.
| Operating system | Notes |
|---|---|
| Windows client | Client operating systems (such as Windows 7 and Windows 10) aren’t supported. |
| Windows Server 2016 Nano Server | Not supported. |
| Azure Kubernetes Service Nodes | Not supported. Use the patching process described in Apply security and kernel updates to Linux nodes in Azure Kubernetes Service (AKS) |
Client Requirements – Azure Update Management
The following information describes OS-specific client requirements. For additional guidance, see Network Planning.
Windows agents must be configured to communicate with a WSUS server, or they require access to Microsoft Update.
You can use Update Management with Configuration Manager. See Integrate Configuration Manager with Update Management to learn more about integration scenarios. The Log Analytics Windows agent is required. The agent is installed automatically if you’re onboarding an Azure VM.
By default, Windows VMs that are deployed from the Azure Marketplace are set to receive automatic updates from Windows Update Service. This behavior doesn’t change when you add this solution or add Windows VMs to your workspace. If you don’t actively manage updates by using this solution, the default behavior (to automatically apply updates) applies.
Note! – A user can modify Group Policy so that machine reboots can be performed only by the user, not by the system. Managed machines can get stuck if Update Management doesn’t have rights to reboot the machine without manual interaction from the user.
For more information, see Configure Group Policy settings for Automatic Updates.
Update classifications
The following tables list the update classifications in Update Management, with a definition for each classification.
| Classification | Description |
|---|---|
| Critical updates | An update for a specific problem that addresses a critical, non-security-related bug. |
| Security updates | An update for a product-specific, security-related issue. |
| Update rollups | A cumulative set of hotfixes that are packaged together for easy deployment. |
| Feature packs | New product features that are distributed outside a product release. |
| Service packs | A cumulative set of hotfixes that are applied to an application. |
| Definition updates | An update to virus or other definition files. |
| Tools | A utility or feature that helps complete one or more tasks. |
| Updates | An update to an application or file that currently is installed. |
How to add a computer to Azure Update Management
You must have a subscription to Microsoft Azure. If you don’t have a subscription, you can create a free one.
Get workspace ID and Key for Log Analytics
Connecting the computer to Azure Log Analytics requires a workspace ID and Key for each installation method. This ensures proper configuration to communicate with Azure Monitor in both the Azure commercial and US Government cloud.
- In the Azure portal, search for and select Log Analytics workspaces.
- In your list of Log Analytics workspaces, select the workspace to which you intend to configure the agent to report.
- Select Advanced Settings.
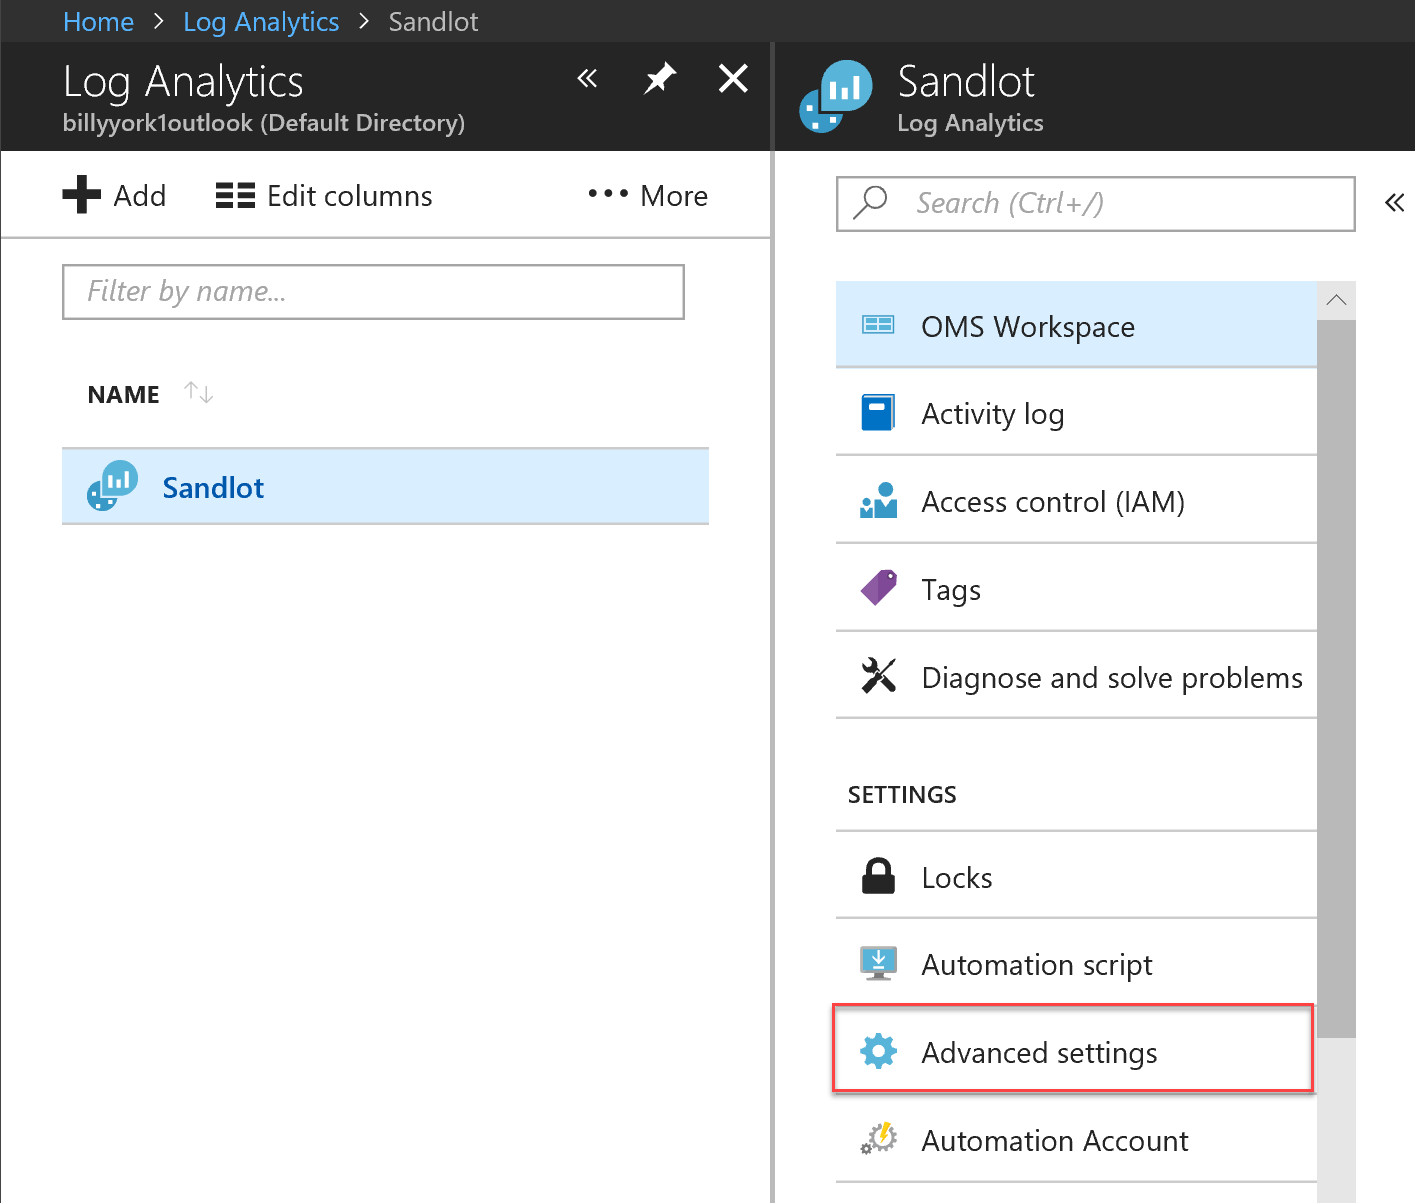
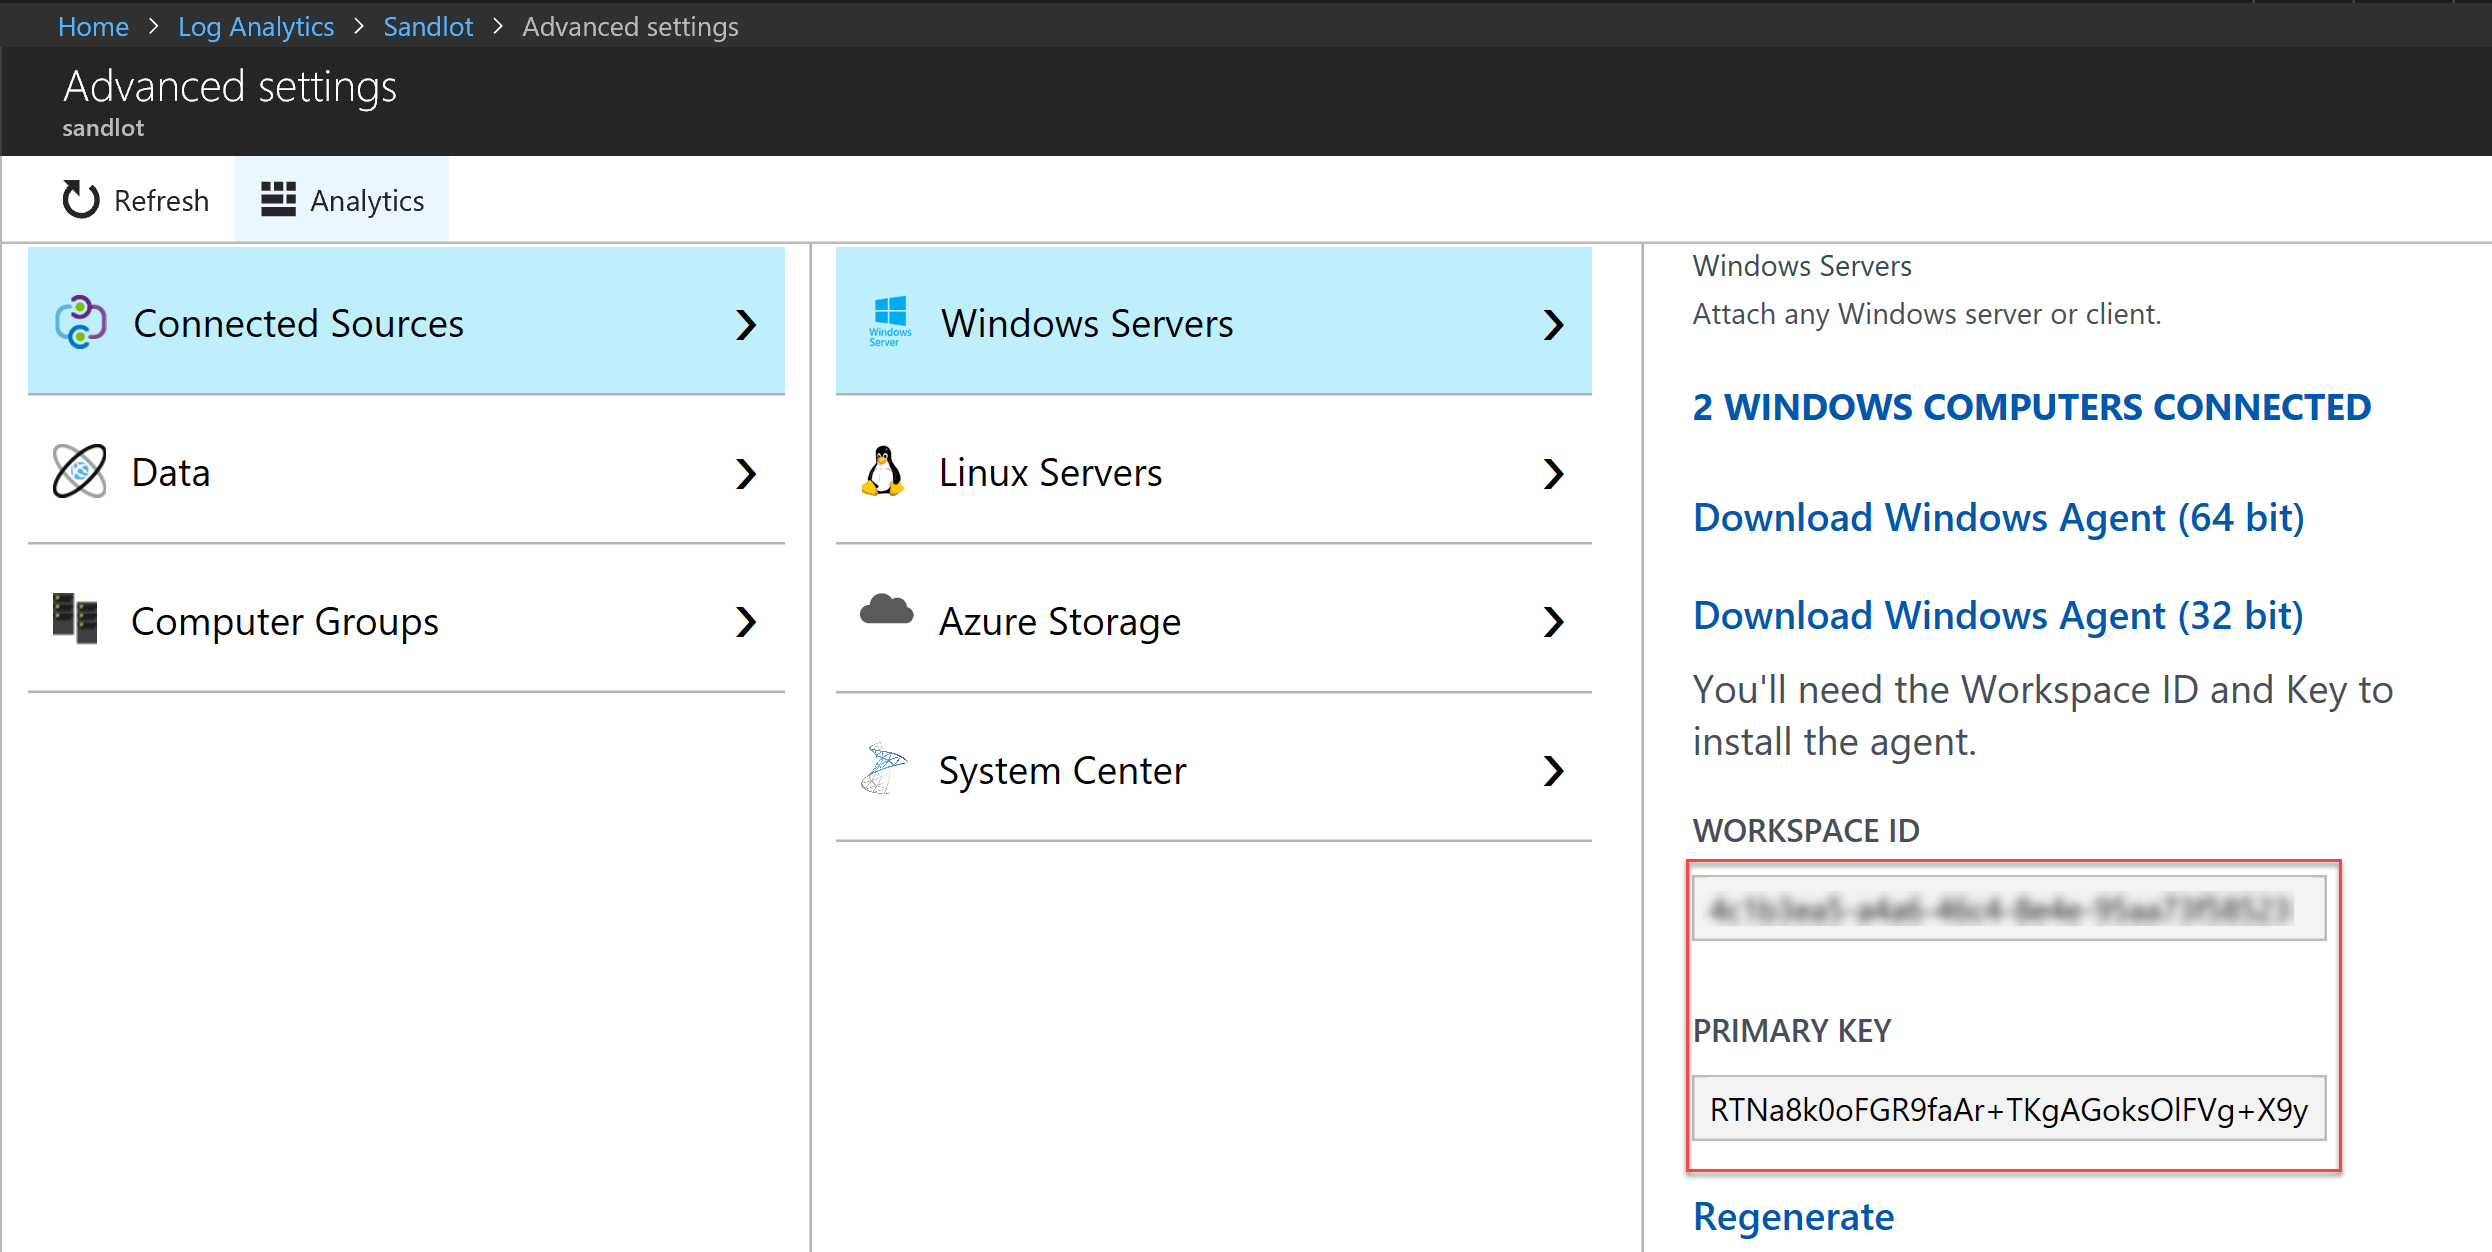
- Select Connected Sources, and then select Windows Servers.
- Copy and paste into your favourite editor, the Workspace ID, and the Primary Key.
Are you still using the old workspace? You might want to consider moving to portal.azure.com, as I imagine the workspace will disappear.
That is how you find those keys. Remember, when reading any documentation for Azure Log Analytics, CustomerID = Workspace ID and Shared Key = Primary Key.
Configure Agent to use TLS 1.2
To configure the use of the TLS 1.2 protocol for communication between the Windows agent and the Log Analytics service, follow the steps below to enable it before or after the agent is installed on the virtual machine.
Note! – If you are configuring a VM running Windows Server 2008 SP2 x64 to use TLS 1.2, you first need to install the following SHA-2 code signing support update before performing the steps below.
- Locate the following registry subkey: HKEY_LOCAL_MACHINE\System\CurrentControlSet\Control\SecurityProviders\SCHANNEL\Protocols
- Create a subkey under Protocols for TLS 1.2 HKLM\System\CurrentControlSet\Control\SecurityProviders\SCHANNEL\Protocols\TLS 1.2
- Create a Client subkey under the TLS 1.2 protocol version subkey you created earlier. For example, HKLM\System\CurrentControlSet\Control\SecurityProviders\SCHANNEL\Protocols\TLS 1.2\Client.
- Create the following DWORD values under HKLM\System\CurrentControlSet\Control\SecurityProviders\SCHANNEL\Protocols\TLS 1.2\Client:
- Enabled [Value = 1]
- DisabledByDefault [Value = 0]
Configure .NET Framework 4.6 or later to support secure cryptography, which is disabled by default. Strong cryptography uses more secure network protocols like TLS 1.2 and blocks insecure protocols.
- Locate the following registry subkey: HKEY_LOCAL_MACHINE\SOFTWARE\Microsoft\.NETFramework\v4.0.30319.
- Create the DWORD value SchUseStrongCrypto under this subkey with a value of 1.
- Locate the following registry subkey: HKEY_LOCAL_MACHINE\SOFTWARE\WOW6432Node\Microsoft\.NETFramework\v4.0.30319.
- Create the DWORD value SchUseStrongCrypto under this subkey with a value of 1.
- Restart the system for the settings to take effect.
Install the Agent Using the Setup Wizard
The following steps install and configure the Log Analytics agent in Azure and Azure Government cloud by using the setup wizard for the agent on your computer.
- In your Log Analytics workspace, from the Windows Servers page you navigated to earlier, select the appropriate Download Windows Agent version to download depending on the processor architecture of the Windows operating system.
- Run Setup to install the agent on your computer.
- On the Welcome page, click Next.
- Read the license on the License Terms page and then click I Agree.
- Change or keep the default installation folder on the Destination Folder page and click Next.
- On the Agent Setup Options page, select Connect the Agent to Azure Log Analytics and click Next.
- On the Azure Log Analytics page, perform the following:
- Paste the Workspace ID and Workspace Key (Primary Key) that you copied earlier. If the computer should report to a Log Analytics workspace in Azure Government Cloud, select Azure US Government from the Azure Cloud drop-down list.
- If the computer needs to communicate with the Log Analytics service through a proxy server, click Advanced and provide the URL and port number of the proxy server. If your proxy server requires authentication, type the username and password to authenticate with the proxy server and then click Next.
- Click Next once you have completed providing the necessary configuration settings.

- Review your choices on the Ready to Install page and then click Install.
- On the Configuration completed successfully page, click Finish.
When complete, the Microsoft Monitoring Agent appears in the Control Panel. To confirm it is reporting to Log Analytics, review Verify agent connectivity to Log Analytics.
Install the Agent Using the Command Line – Azure Update Management
The downloaded file for the agent is a self-contained installation package. The setup program for the agent and supporting files are contained in the package and must be extracted to properly install using the command line shown in the following examples.
Note! – If you want to upgrade an agent, you need to use the Log Analytics scripting API. See the topic Managing and maintaining the Log Analytics agent for Windows and Linux for further information.
The following table highlights the specific parameters supported by setup for the agent, including when deployed using Automation DSC.
| MMA-specific options | Notes |
|---|---|
| NOAPM=1 | Optional parameter. Installs the agent without .NET Application Performance Monitoring. |
| ADD_OPINSIGHTS_WORKSPACE | 1 = Configure the agent to report to a workspace |
| OPINSIGHTS_WORKSPACE_ID | Workspace ID (GUID) for the workspace to add |
| OPINSIGHTS_WORKSPACE_KEY | Workspace key used to initially authenticate with the workspace |
| OPINSIGHTS_WORKSPACE_AZURE_CLOUD_TYPE | Specify the cloud environment where the workspace is located 0 = Azure commercial cloud (default) 1 = Azure Government |
| OPINSIGHTS_PROXY_URL | URI for the proxy to use |
| OPINSIGHTS_PROXY_USERNAME | Username to access an authenticated proxy |
| OPINSIGHTS_PROXY_PASSWORD | Password to access an authenticated proxy |
- To extract the agent installation files from an elevated command prompt, run MMASetup-<platform>.exe /c, which will prompt you for the path to extract files. Alternatively, you can specify the path bypassing the arguments MMASetup-<platform>.exe /c /t:<Full Path>.
- To silently install the agent and configure it to report to a workspace in Azure commercial cloud, from the folder you extracted the setup files to type:
setup.exe /qn NOAPM=1 ADD_OPINSIGHTS_WORKSPACE=1 OPINSIGHTS_WORKSPACE_AZURE_CLOUD_TYPE=0 OPINSIGHTS_WORKSPACE_ID="<your workspace ID>" OPINSIGHTS_WORKSPACE_KEY="<your workspace key>" AcceptEndUserLicenseAgreement=1
or to configure the agent to report to Azure US Government cloud, type:
setup.exe /qn NOAPM=1 ADD_OPINSIGHTS_WORKSPACE=1 OPINSIGHTS_WORKSPACE_AZURE_CLOUD_TYPE=1 OPINSIGHTS_WORKSPACE_ID="<your workspace ID>" OPINSIGHTS_WORKSPACE_KEY="<your workspace key>" AcceptEndUserLicenseAgreement=1
Note! – The string values for the parameters OPINSIGHTS_WORKSPACE_ID and OPINSIGHTS_WORKSPACE_KEY need to be encapsulated in double quotes to instruct Windows Installer to interpret as valid options for the package.
Install the Agent Using DSC in Azure Automation
You can install the Azure Automation DSC agent in the following script example. If you do not have an Automation account, see Get Started with Azure Automation to understand the requirements and steps for creating an Automation account required before using Automation DSC. If you are unfamiliar with Automation DSC, review Getting Start with Automation DSC.
The following example installs the 64-bit agent identified by the URI Value. You can also use the 32-bit version by replacing the URI value. The URIs for both versions are:
- Windows 64-bit agent – https://go.microsoft.com/fwlink/?LinkId=828603
- Windows 32-bit agent – https://go.microsoft.com/fwlink/?LinkId=828604
Note! – This procedure and script example do not support upgrading the agent already deployed to a Windows computer.
The 32-bit and 64-bit versions of the agent package have different product codes and new versions released also have a unique value. The product code is a GUID that is the principal identification of an application or product and is represented by the Windows Installer ProductCode property.
The ProductId Value in the MMAgent.ps1 script has to match the product code from the 32-bit or 64-bit agent installer package.
To retrieve the product code from the agent and install the package directly, you can use Orca.exe from the Windows SDK Components for Windows Installer Developers, which is a component of the Windows Software Development Kit, or use PowerShell following an example script written by a Microsoft Valuable Professional (MVP). For either approach, you must first extract the MOMagent.msi file from the MMASetup installation package. This is shown earlier in the first step under the section Install the agent using the command line.
- Import the xPSDesiredStateConfiguration DSC Module from https://www.powershellgallery.com/packages/xPSDesiredStateConfiguration into Azure Automation.
- Create Azure Automation variable assets for OPSINSIGHTS_WS_ID and OPSINSIGHTS_WS_KEY. Set OPSINSIGHTS_WS_ID to your Log Analytics workspace ID and set OPSINSIGHTS_WS_KEY to the primary key of your workspace.
- Copy the script and save it as MMAgent.ps1.
- Update the script’s ProductId value with the product code extracted from the latest version of the agent install package using the methods recommended earlier.
- Import the MMAgent.ps1 configuration script into your Automation account.
- Assign a Windows computer or node to the configuration. Within 15 minutes, the node checks its configuration, and the agent is pushed to the node.
Install the Agent by Using the PowerShell Script
Configuration MMAgent
{
    $OIPackageLocalPath = "C:\Deploy\MMASetup-AMD64.exe"
    $OPSINSIGHTS_WS_ID = Get-AutomationVariable -Name "OPSINSIGHTS_WS_ID"
    $OPSINSIGHTS_WS_KEY = Get-AutomationVariable -Name "OPSINSIGHTS_WS_KEY"

    Import-DscResource -ModuleName xPSDesiredStateConfiguration
    Import-DscResource -ModuleName PSDesiredStateConfiguration

    Node OMSnode {
        Service OIService
        {
            Name = "HealthService"
            State = "Running"
            DependsOn = "[Package]OI"
        }

        xRemoteFile OIPackage {
            Uri = "https://go.microsoft.com/fwlink/?LinkId=828603"
            DestinationPath = $OIPackageLocalPath
        }

        Package OI {
            Ensure = "Present"
            Path  = $OIPackageLocalPath
            Name = "Microsoft Monitoring Agent"
            ProductId = "8A7F2C51-4C7D-4BFD-9014-91D11F24AAE2"
            Arguments = '/C:"setup.exe /qn NOAPM=1 ADD_OPINSIGHTS_WORKSPACE=1 OPINSIGHTS_WORKSPACE_ID=' + $OPSINSIGHTS_WS_ID + ' OPINSIGHTS_WORKSPACE_KEY=' + $OPSINSIGHTS_WS_KEY + ' AcceptEndUserLicenseAgreement=1"'
            DependsOn = "[xRemoteFile]OIPackage"
        }
    }
}
Validate Agent Connectivity
Once the agent’s installation is complete, verifying that it is successfully connected and reporting can be accomplished in two ways.
In the Control Panel, find the item Microsoft Monitoring Agent. Select it, and on the Azure Log Analytics tab, the agent should display a message stating: The Microsoft Monitoring Agent has successfully connected to the Microsoft Operations Management Suite service.

Update Management Solutions for Patching – Creating Schedule job in Azure Update Management
Connect Azure Portal click on subscriptions – Automation Account – Update Management – Schedule Update Deployment
Scheduled Deployments
When you select Update Management on the Right page, Select “Schedule Update Deployment” to create a scheduled job for installing Windows patches.
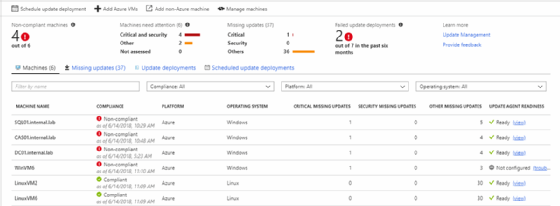
New Update Deployment – Azure Update Management
The New Update Deployment window will open as in the below screenshot.

Enter the deployment name based on the easily understandable naming convention,
Example: “MonthlyPatching_TEST_April2020“
One of the biggest asks from the community this year is for more flexibility in targeting update deployments, specifically support for groups with dynamic membership. Instead of specifying a static set of machines when you create an update deployment, groups allow you to specify a query that will be evaluated each time an update deployment occurs.

After selecting the required patch group, click OK
Update Classifications
Under Update classification, select update classifications that you want to install with scheduled deployments as per your requirement

Include / Exclude Updates
Under the Include/Exclude Section, any KB’s exclusive including or exclude can be done if required, enter the required KB on the respective tab and Click OK.

Schedule Time and Timezone settings
Under Schedule settings, select Time Zone and select time-based on the downtime provided by application teams. (The time schedule should be after 15 minutes for schedule deployment creation)

Maintenance Window – Azure Update Management
Select Maintenance window, a minimum of 30 mins and a maximum of 300 mins based on Windows Security patches count, and Servers count

Reboot Options – Azure Update Management
Select the Reboot option once the patch installation is completed.
- Always Reboot
- Reboot If required
- Never Reboot
- Only Reboot – Will not install updates

Schedule Deployment Validation
Once the scheduled deployment is created, go to Deployment schedules under Update management and you will be able to see the recently created schedule and its status, as the timing mentioned while creating the schedule.

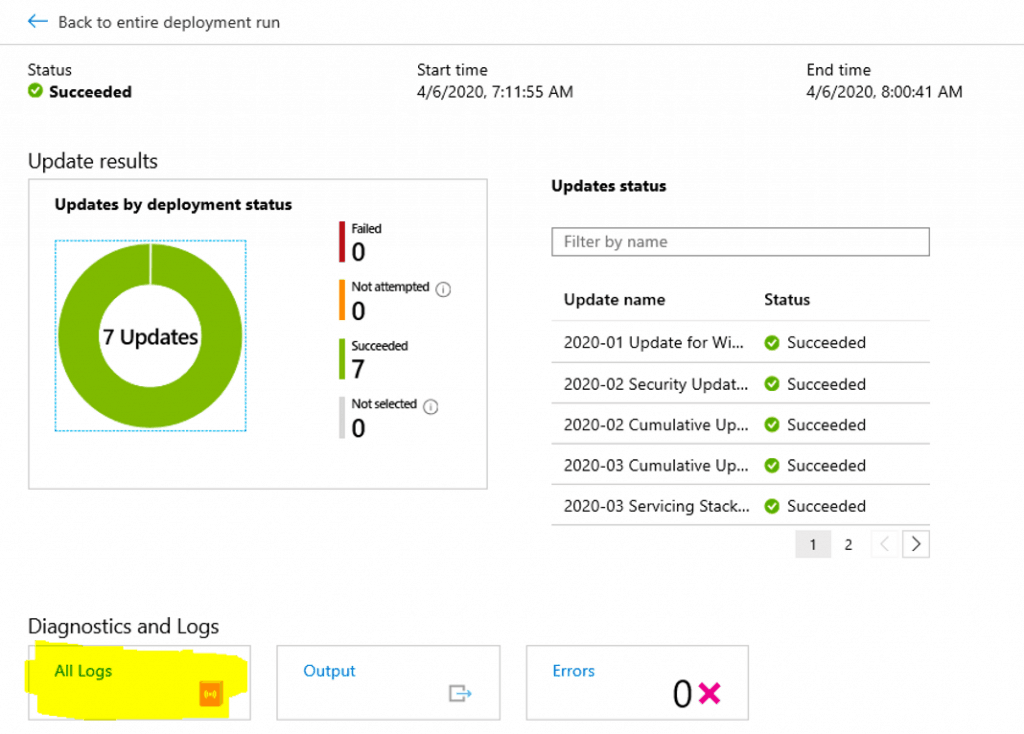
The schedule will begin at the time provisioned and we can find the progress of the schedule under the History tab

To find the status of the scan and each server’s patch status, we could able to see the server name and select the server name, to understand KB’s status (Progress, attempted, failed, succeeded, not attempted)
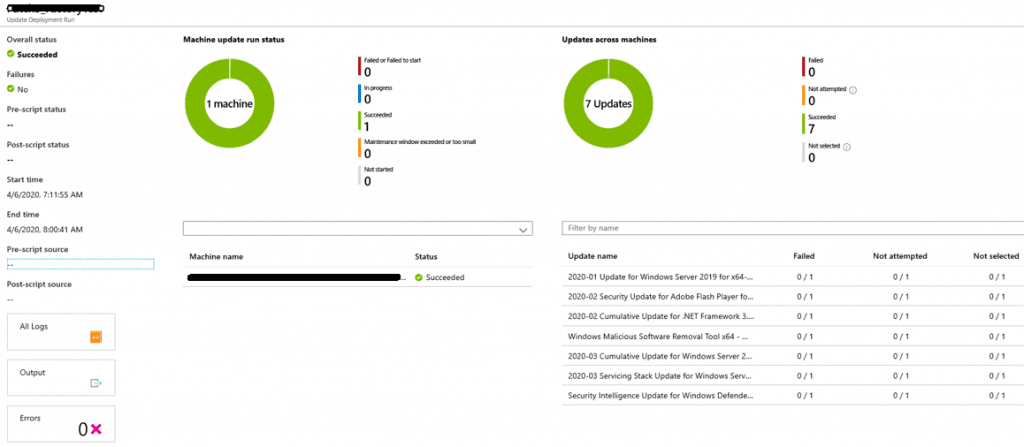
Update Management Schedule Deployment Logs
We can see the logs in under the logs tab below.

Resources
- SCCM Orchestration Group Setup Step-by-Step Guide for Server Patching
- Update Management solution in Azure – https://docs.microsoft.com/en-us/azure/automation/automation-update-management
- Manage updates and patches for your Azure VMs – https://docs.microsoft.com/en-us/azure/automation/automation-tutorial-update-management
We are on WhatsApp. To get the latest step-by-step guides and news updates, Join our Channel. Click here –HTMD WhatsApp.
Author
Mohan Kumar is a Technical Architect with over 12 years of experience as a System Center Configuration Manager and hands-on experience in SCCM, SCOM, SCORCH, SCVMM, SCEP, SQL, Azure, Intune, Update Management, etc. The main area of interest is the design and implementation of ConfigMgr, OpsManager, Orchestrator and Azure Infrastructure. He has vast knowledge of On-perm to Azure migration, SCOM to Azure Monitor, Migration On-Perm SQL to Azure SQL Always on setup, Configure serverless Database in Azure, Configure and Fix the ConfigMgr infrastructure related issue & troubleshooting.

Nice guide
Does this works on N-1 updates scenario?
Hi Praveen,
Can you please guide how to integrate WSUS with Azure Update manager
Regards
Suraj
Hi Praveen,
can you please explain how to integrate WSUS with Azure update management
Hi Suraj,
No options for integration WSUS with Update Management, you need to install WSUS in your environment and connect all machines with WSUS once patches are approved in WSUS you could see patches available in all Machine.
Then you can create scheduled job in Azure update management for patch installation.
WSUS GPO settings –
https://github.com/vFense/vFenseAgent-win/wiki/Registry-keys-for-configuring-Automatic-Updates-&-WSUS
http://woshub.com/group-policy-settings-to-deploy-updates-using-wsus/
Hello Praveen,
Can you help me to explain how to use RBAC with update management Automation account ? we have one centralize Update Management solution with multiple resource group . how we can manage permission where every resource group owner/Contributer can manage their respective workload with his ID only and cant do any modification in different resource group workload
Hi,
I was wondering if it is possible to automate the action for adding OnPremise machines to the deployment schedule.
I have created an AD group which is linked to the Deployment Schedule, but when new machines are added to the AD group they are not automatically added to the Deployment Schedule based on their group membership.
Currently I have to manually edit the schedule and reselect the group for processing of the newly added servers.
Kr Ruben
Hi,
How to patch 3rd party applications updates using UMC…?
Server patching with Azure Update Management for Azure servers is a great way to keep your servers patched and up to date.