Let’s learn how to Share Files folders On Network in Windows 11. Sharing any files and folders over a network is not an easy process. Then it became difficult to share documents, photos, or other files with your team, colleagues, family, friends, etc. But Windows 11 allows sharing within your local area network and over the internet.
Windows 11 provides multiple modes to share files and folders over a network. It has two of the best built-in features for sharing files & folders on the same network. File sharing and Nearby Sharing are the built-in features. These features make it easy to share files between computers within your local network.
In advanced features, it offers email and cloud features such as OneDrive to transfer files between computers through the Internet. In this post, the procedure of setting your PC compatible for sharing files & folders. The step-by-step guide is described hereunder.
- Different Ways to Fix Nearby Sharing Not Working in Windows 11
- Share Files using Nearby Sharing in Windows 11
How to Share Files Folders On Network in Windows 11
As the topic is on how to share files and folders over a network in Windows 11, there are various methods for sharing files and folders using Windows 11 settings. Windows developed the files and folders sharing technology. The list of processes for sharing files and folders is listed below.
- Method 1: Share Files and Folders in File Explorer Using Files Sharing
- Method 2: Share Files and Folders Using Nearby Sharing
- Method 3: Share Files and Folders Over a Network From File Explorer
- Method 4: Share Files and Folders Using Advanced Sharing
- Method 5: Share Drive on a Network
- Method 6: Share Folders or Drives Using Shared Folder Wizard
Method 1: Share Files and Folders in File Explorer Using Files Sharing
The first method is to share files and folders using File Explorer. So before sharing files and folders between computers, you need to set up some settings on your Windows 11 device. Ensure all the computers you want to share files and folders between are connected to the same network. The setups are discussed below.
NOTE! If you use Windows 11 with a Microsoft Account and a PIN, face recognition, or no password sign-in, it becomes tricky to share files and folders. To avoid such a situation, use a local account or create a new one to set up sharing.

Setting 1: Enable Network Discovery and Files Sharing
Network Discovery and File Sharing are the two features that allow devices on the same network to find and communicate with another device and share files and other resources. To transfer files or folders between devices, you need to turn on some settings.
Open the Settings window by pressing Win Key + I, then click the Network & Internet option from the left side, scroll down, and select Advanced network settings on the right panel.
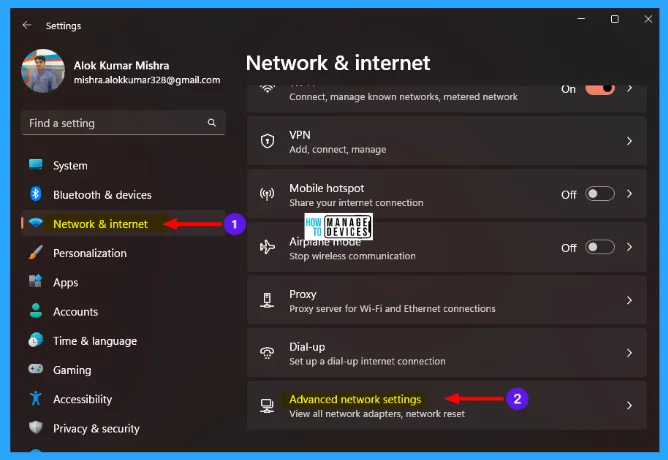
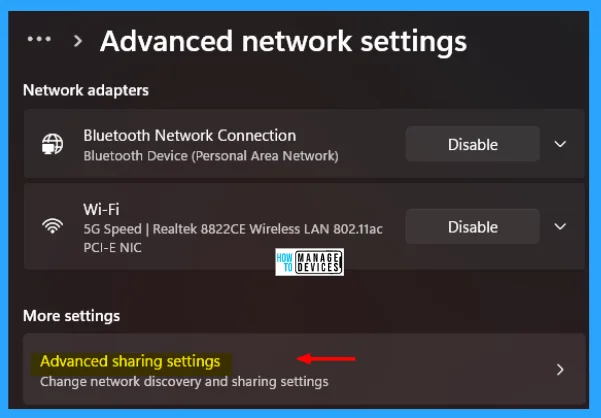
Advanced network settings help users view all network adapters and network reset. Under the Advanced network settings scroll down and find the Advanced sharing settings option under the More Settings menu.
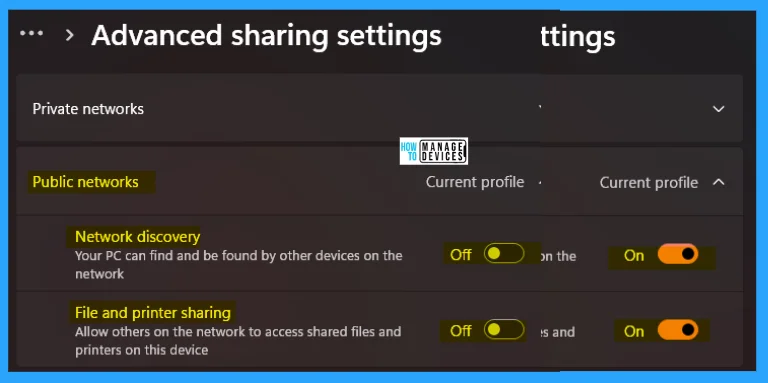
When you open advanced sharing settings, which are used to change network discovery and sharing settings, scroll down under Public Networks toggle the key to turn on the Network discovery and File and Printer sharing.
- Network discovery: Your PC can find and be found by other devices on the network.
- File and Printer sharing: Allow others on the network to access shared files and printers on this device.
Setting 2: Sharing with Password Protection
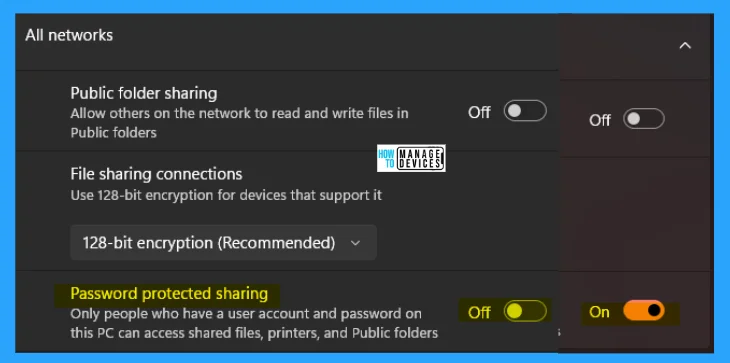
You can now share files and folders by protecting them with a password. To do so, go to Advanced sharing settings as discussed earlier, scroll down for the All networks menu and expand it, then toggle the button to Turn ON or OFF as per your choice, the option Password protected sharing.
Password-protected sharing: Only people who have a user account and password on this PC can access shared files, printers, and Public folders.
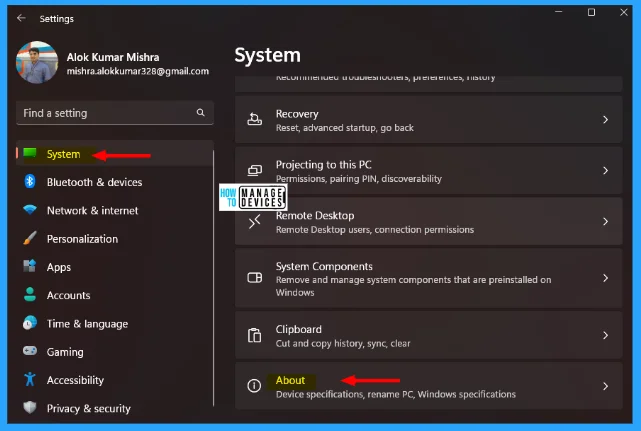
Then you must ensure that your device is on the same workgroup as the computers you want to share with. To do that, go to settings by pressing Win Key + I, click on the System tab, and click on the About option on the right pane.
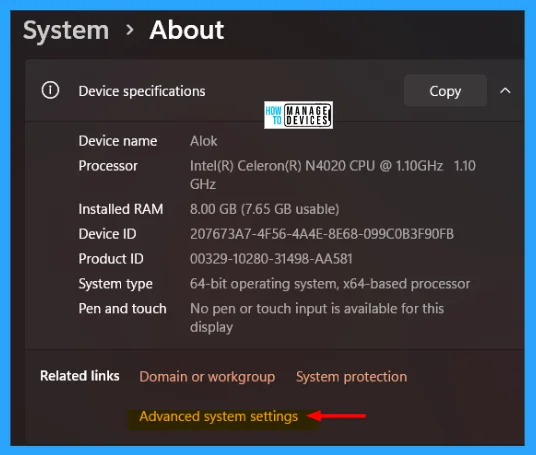
The About section contains the basic system information. Move down, click on Advanced system settings, and navigate to the System Properties.
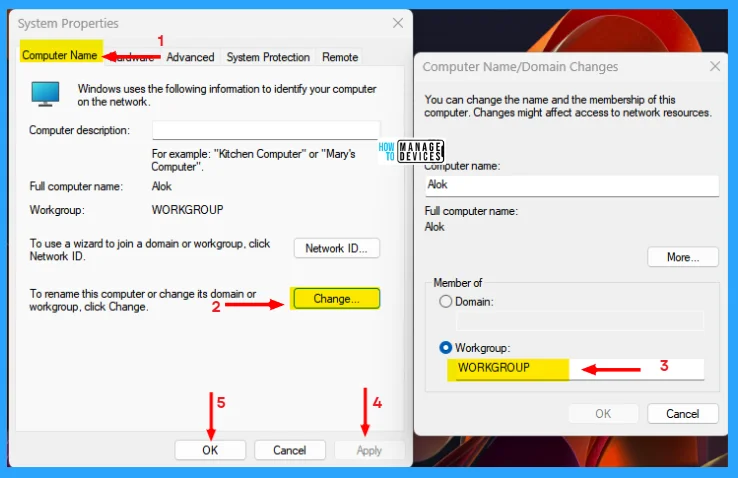
The System Properties window opens, click the Change button as illustrated in the image. Then the Computer Name/Domain Changes window opens. Check the workgroup name and click OK. Again you are in the System Properties window. Now click on Apply and OK for the changes made.
Setting 3: Enable Server Message Box (SMB) Features
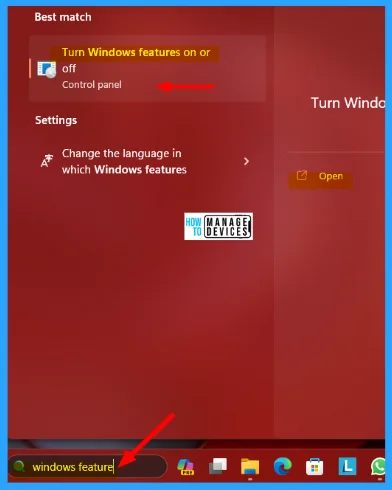
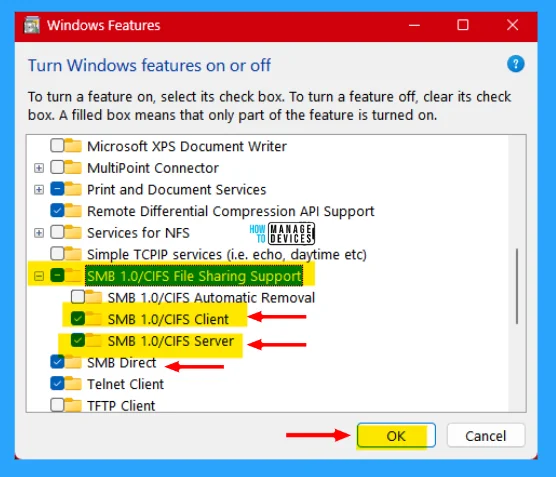
Server Message Box (SMB) is a protocol that provides a route for computer client applications to read and write files from a server in a computer network. To enable SMB, type Windows Feature on the search bar on the taskbar the click on the Turn Windows features on or off.
When the Windows Features window opens, search for the SMB Direct option in the list of optional features and enable it. If you want to share files with older versions of Windows, search for SMB 1.0/CIFS File Sharing Support and expand it. Then check both options as SMB 1.0/CIFS Client and SMB 1.0/CIFS Server and press OK.
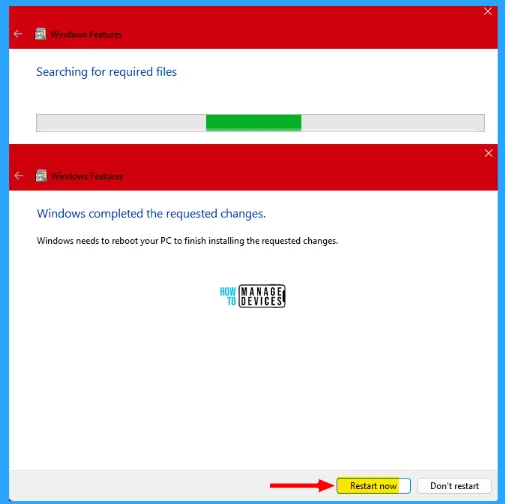
After making necessary changes to optional features, it is recommended to restart your computer to ensure the changes take effect, as illustrated in the image below.
Setting 4: Start Required Services
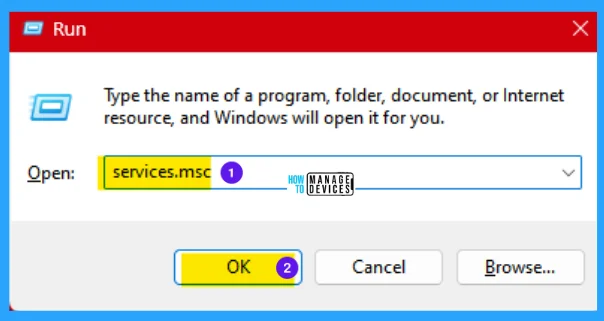
The services needed to be started under the services.msc. Open the Run dialog box by pressing Win Key + R, then type services.msc and press OK. When the service window opens, scroll down and look for the following services one by one.
- Function Discovery Provider Host
- Function Discovery Resource Publication
- Server
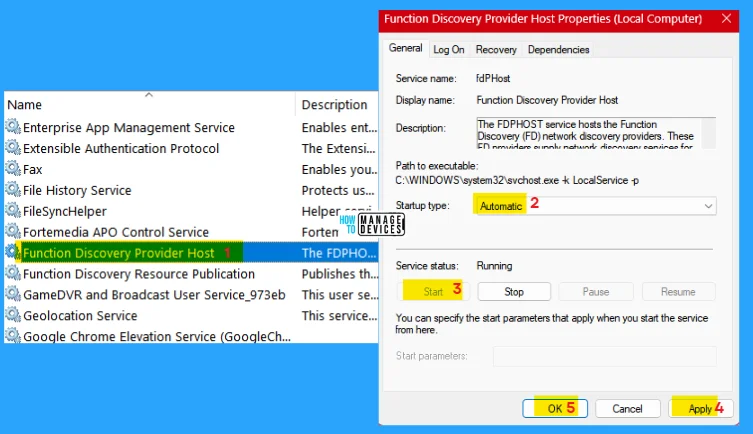
Function Discovery Provider Host
The FDPHOST service hosts the Function Discovery (FD) network discovery providers. These FD providers supply network discovery services for the Simple Services Discovery Protocol (SSDP) and Web Services – Discovery (WS-D) protocol. Stopping or disabling the FDPHOST service will disable network discovery for these protocols when using FD. When this service is unavailable, network services using FD and relying on these discovery protocols will be unable to find network devices or resources.
Double-click on Function Discovery Provider Host now select Startup type to Automatic, click on Start under Service status, then click on Apply and OK to make the changes.
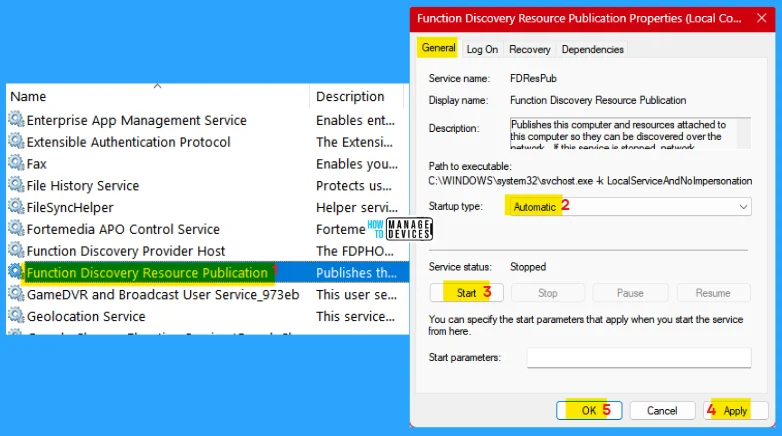
Function Discovery Resource Publication
Publish this computer and the resources attached to this computer so they can be discovered over the network. If this service is stopped, network resources will no longer be published, and they will not be discovered by other computers on the network.
Double-click on Function Discovery Resource Publication now select Startup type to Automatic, click on Start under Service status, then click on Apply and OK to make the changes.
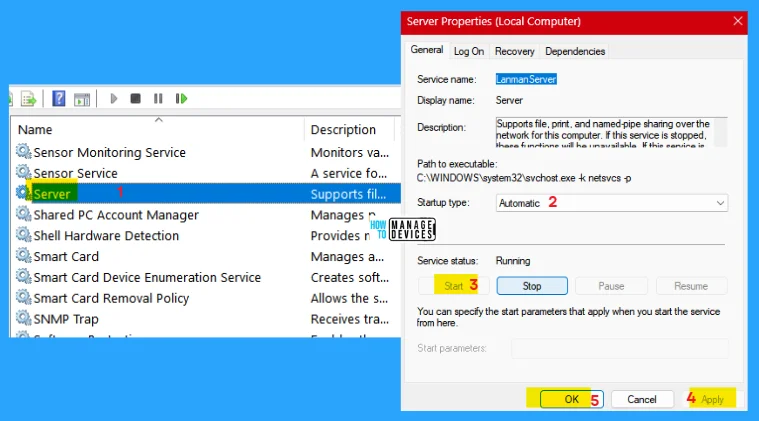
Server
Supports file, print, and named-pipe sharing over the network for this computer. If this service is stopped, these functions will be unavailable. If this service is disabled, any services that explicitly depend on it will fail to start.
Double-click on Server now select Startup type to Automatic, click on Start under Service status, then click on Apply and OK to make the changes.
Setting 5: Set a Static IP Address
Setting up a static IP address can make it easier to share files between two computers over a network, but it is not necessary it is an optional feature. When sharing files over a network, whether you need to set up a static IP address depends on your specific situation and preferences.
Static IP helps to easily set up shortcuts, bookmarks, or saved network locations with a single, fixed address, and it makes accessing sharing files more effective. Using static IP is like providing a fixed address to each device, which makes file sharing more efficient as the devices know where to find the shared device.
To do so, open Windows Settings by pressing Win Key + I, then go to the Network & Internet tab in the left pane and click on the current network connection (Ethernet or Wi-Fi) on the right pane.
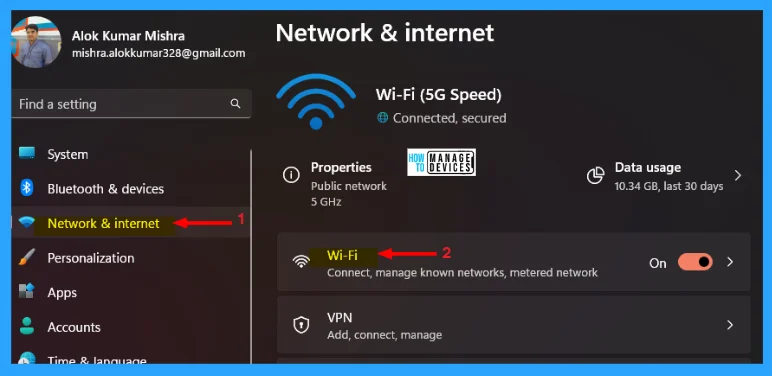
Under the current network connection, click on the option named Hardware Properties, which helps to view and manage Wi-Fi adapter properties. Under Wi-Fi properties, click the Edit button near IP assignment Automatic (DHCP).
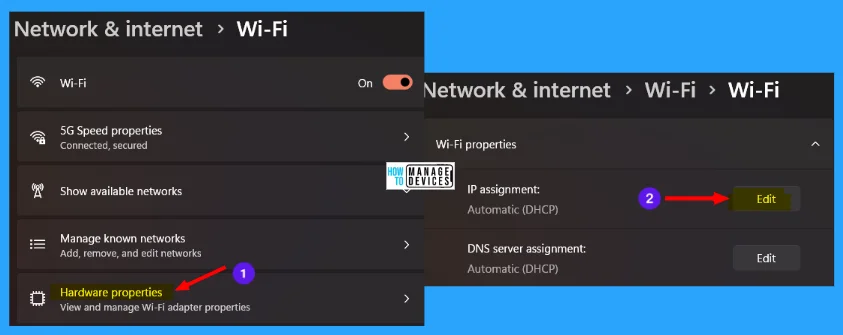
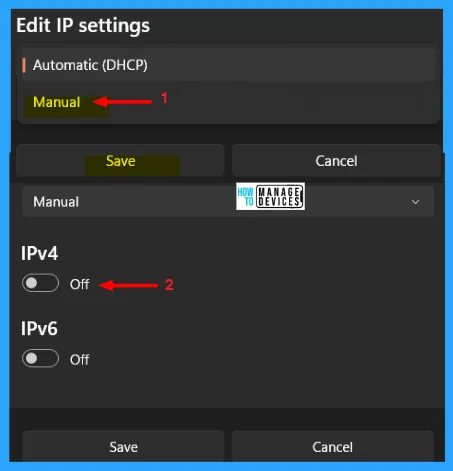
Now the Edit IP settings window is open, from the drop-down menu, select Manual as shown in the image below and then toggle the button to turn on IPv4 option.
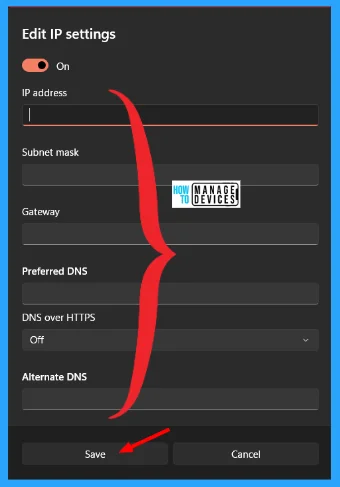
Then the IP Edit details pane opens, now it’s time to fill in the IP address details in the format illustrated in the image below.
- IP address: Select any number between 192.168.0.0 to 192.168.255.255.
- Subnet mask: Provide a Subnet mask – e.g., 255.255.255.0.
- Gateway: Enter the IP address of your router or modem, which is either 192.168.0.1 or 192.168.1.1.
- Preferred DNS: Type the IP address of a DNS server or DNS service provider. You can use 1.1.1.1 for the Cloudflare DNS service.
- Alternate DNS: Fill in the IP address of an alternative DNS server or DNS service provider. Use 1.0.0.1 for the Cloudflare DNS service.
After filling up the details as guided in the list above, click on Save to apply the manual setting of IP configuration.
Method 2: Share Files and Folders Using Nearby Sharing
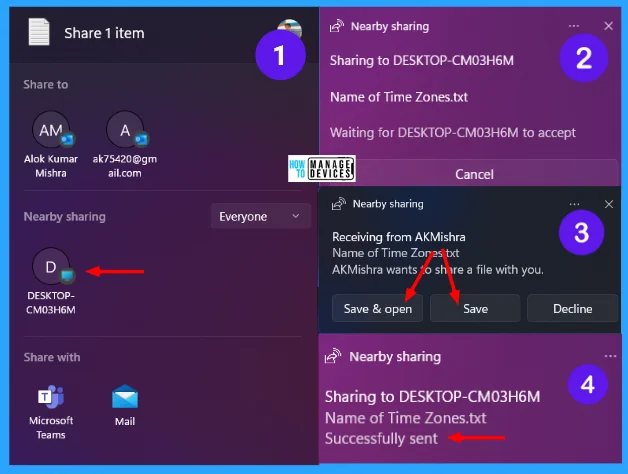
Nearby sharing in Windows 11 lets you share your needed documents, photos, website links, and more with the nearby devices you want to move using Bluetooth or Wi-Fi. You can share files between PCs that are running Windows 10 or Windows 11.
This sharing does not need any network connection, it shares files using Wi-Fi or Bluetooth, so it is very reliable while sharing anything—fast data transfer with nearby sharing. Before moving towards it, check the Windows version you are using because it does not work with older versions of Windows. To know the detailed process visit the link here – Nearby Sharing.
Method 3: Share Files and Folders Over a Network From File Explorer
In Windows 11, File Explorer provides two methods for sharing files. You can use the basic settings for file sharing with minimal setup or go for the advanced sharing to personalize permissions and explore more advanced settings.
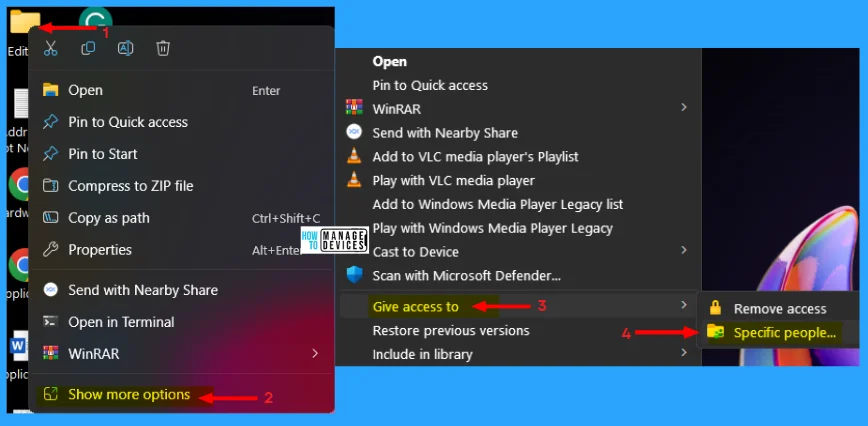
To do so, right-click on a file, then click on Show more options, find the Give access to option, and click on it. There are two options available under it Remove access and Specific people, now click on Specific people.
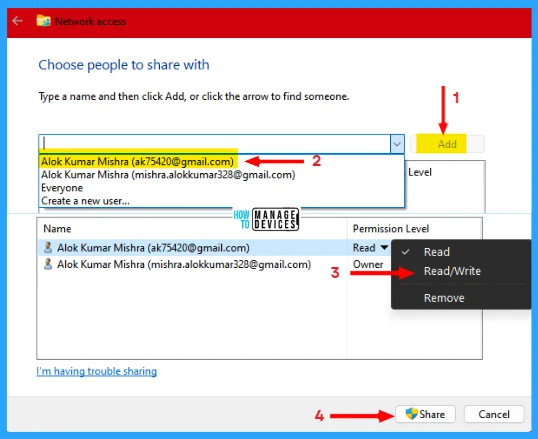
Then the Network access window opens, where you can choose people to share with. As shown in the image, click on Add number as 1, then select the user you want to share with. Then at the permission level, you can give permission to the user to either the user only read the file or read/write in the file, you can remove them as well. Then click on the Share button to share your desired files and folders.
- Read: Users can browse and open files.
- Read/Write: Users can browse, open, edit, and remove content within the folder that is shared.
- Remove: You can remove any user present in the list.
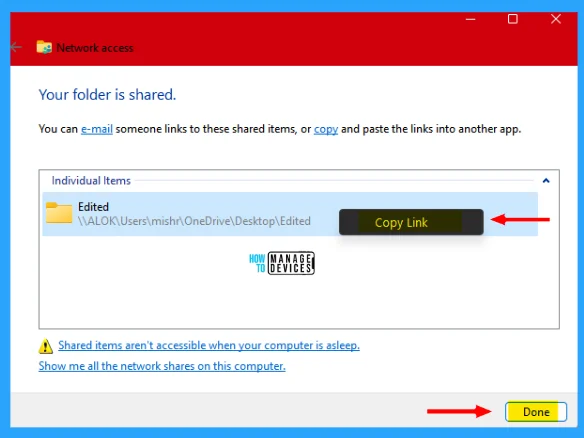
Now your file or folder that you want to share is shared successfully with the device you choose, and the item is shown to you can right-click on it to copy the link and share it using e-mail, and press Done to close the window.
Method 4: Share Files and Folders Using Advanced Sharing
Advanced Sharing lets you provide a unique name to the folder you want to share. You have control over how many people can use it at the same time. You can also decide who can access it, and it enables caching for faster access, which includes comments or notes.
NOTE! If you use the Advanced Sharing option to share a folder, it does not change anything for the people you have already shared with using basic settings. This method works separately for a different group of people you are sharing the folder with.
Move to the folder you want to share and right-click on the folder, then select Properties from the context menu or you can press Alt + Enter for the same result.
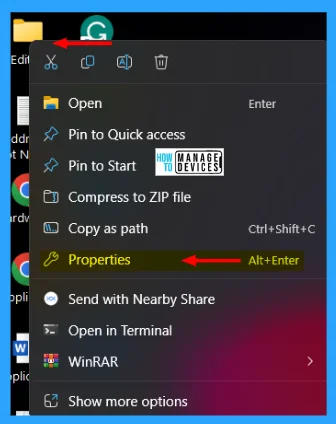
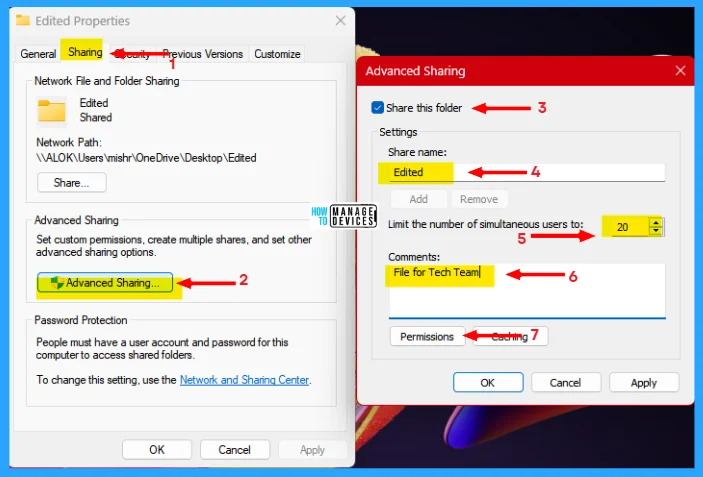
The properties window opens. Now follow the step-by-step process listed below to allow sharing option.
- Click on the Sharing tab on the Properties window.
- Click on the Advanced Sharing.. option, which helps to set custom permissions, create multiple shares, and set other advanced sharing options, also known as configure advanced sharing options.
- When the Advanced Sharing window opens, check the Share this folder option.
- This shows the name of the Drive you want to share if you want to set a different name than the actual name of the folder.
- Here you can limit the number of simultaneous users authorized to access the file at the same time. 20 is set as the default value.
- You can add comments, if any, in the comment box.
- Now click on the Permissions option to allow permission to the user.
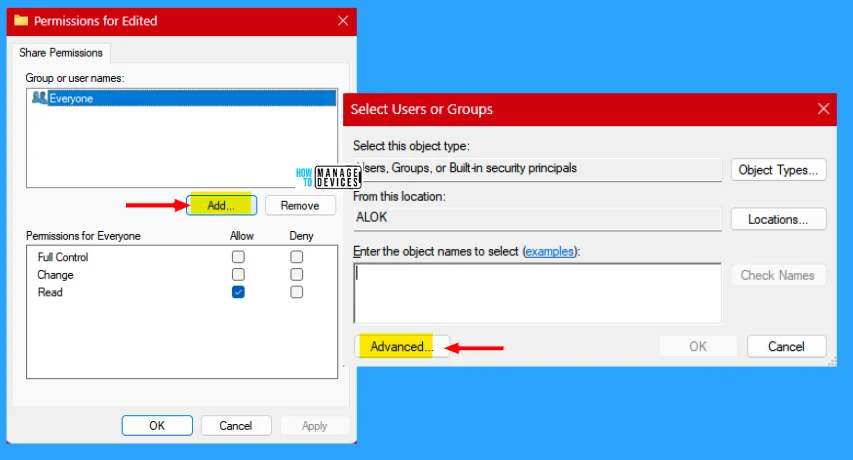
In the Permissions window, you can select the user or group who gets access to the folder. Then, check the permissions you want for the selected user or group. The default is Everyone that is given only Read permission by default.
- Full Control: This permission allows users to view, modify, and adjust permissions, even take ownership of files.
- Change: Users can read, execute, write, and remove files and folders within the shared area.
- Read: Users have permission to open and view the contents of the files and folders.
To facilitate access to a specific user, click the Add button. The Select Users or Groups window opens, here, click on Advanced for further action.
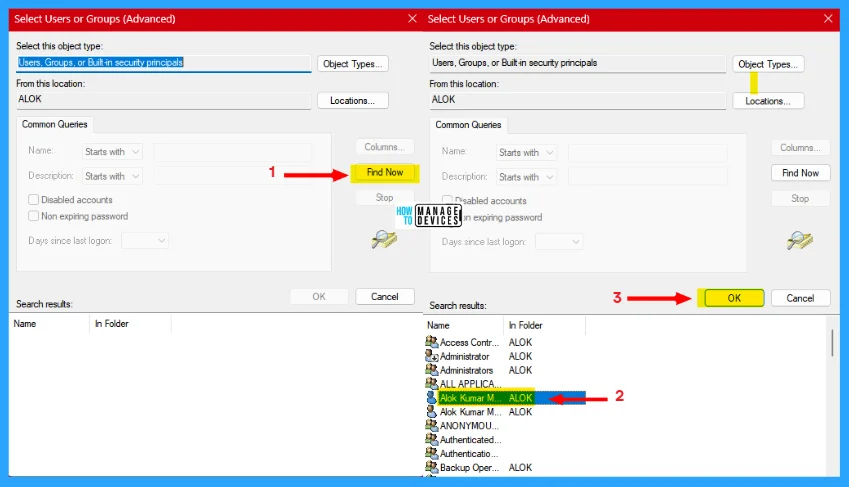
In the next, click the Find Now button to list all the accounts on the computer. Under Search results, select the user, and click OK. You can select multiple users by pressing and holding the Ctrl key. Then, click OK again to confirm the users.
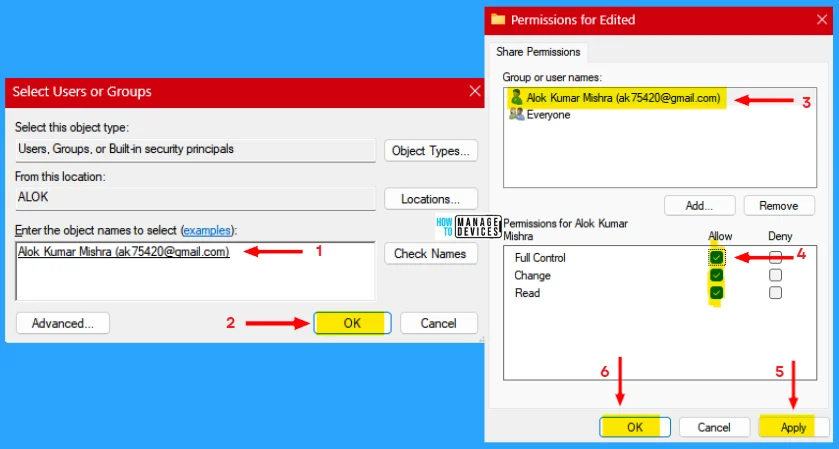
After that, the list of groups or user names is shown, from the list, select the added user you want to and specify the basic permissions, then click Apply and then OK.
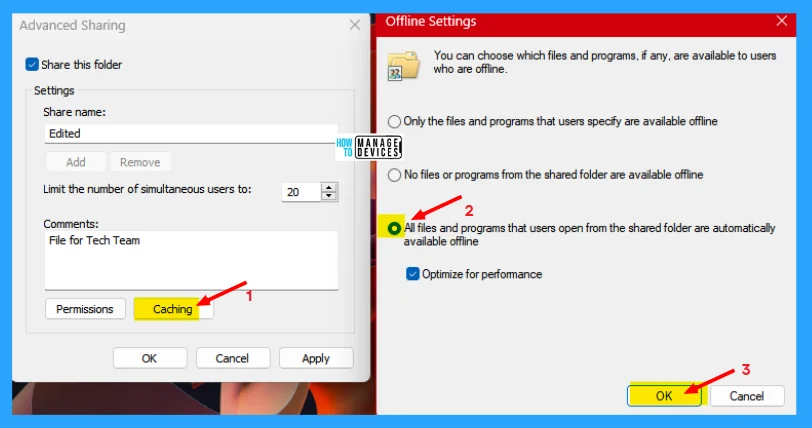
If you want the shared content available on the computer that accesses it even when the shared computer is offline, then you need to configure the caching settings, enabling caching means that copies of the shared files are stored locally on the computers that access the shared folder.
To do this, click on the Caching button in the Advanced Sharing window. In the Offline Settings, three caching options are shown that allow you to control how files and folders are being cached for offline access. Select your preferred Offline settings and click OK.
- Only the files and programs that users specify are available offline: Using this setting, users can manually choose specific files and programs to be cached and available offline. Other files are not cached until the user specifies them.
- No files or programs from the shared folder are available offline: If you select this option, no files will be cached for offline access. When you select this option, no files will be cached for offline access.
- All files and programs that users open from the shared folder are automatically available offline: This option caches all files and programs that opened from the shared folder, ensuring they are accessible offline. When the Optimize for performance checkbox is selected, Windows will try to prioritize performance over storage space efficiency.
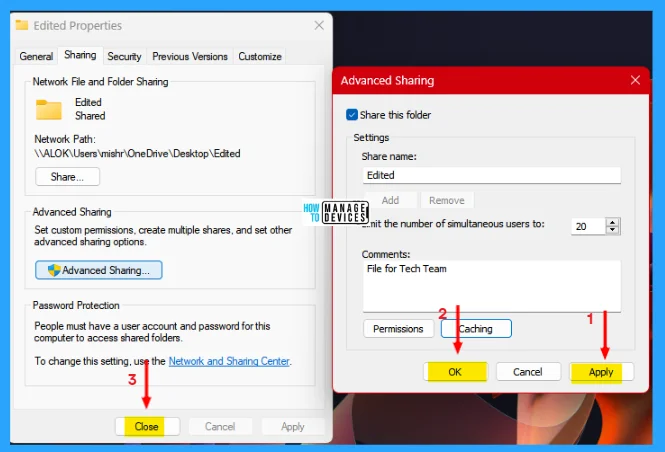
When all is completed then, click Apply to accept the changes made and then press OK to close the Advanced Sharing window and save the settings. It returns to the properties windows, click on Close to exit from the properties menu.
Method 5: Share Drive on a Network
A user can share a drive also in Windows 11 with a similar sharing process as folder sharing. It is a very easy process. To do so, open File Explorer by pressing Win Key + E, then right-click on the drive you want to share and select its Properties option, as illustrated in the image below.
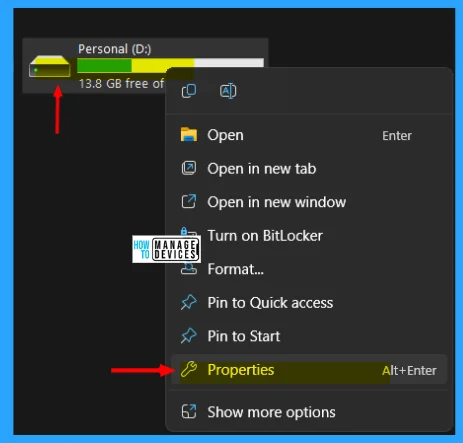
When clicking on the Properties, the property of the selected drive opens. Now follow the step-by-step procedure that helps to share a drive on a device.
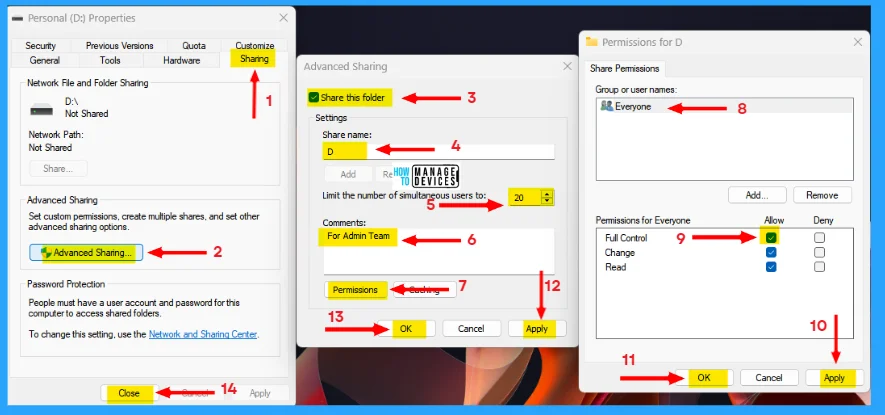
- Click on the Sharing tab on the Properties window.
- Click on the Advanced Sharing.. option, which helps to set custom permissions, create multiple shares, and set other advanced sharing options.
- When the Advanced Sharing window opens, check the Share this folder option.
- This shows the name of the Drive you want to share.
- Here you can limit the number of simultaneous users authorized.
- You can add comments, if any, here.
- Now click on the Permissions option to allow permission to the user.
- The Share Permissions window opens, and you can select the user you want to provide permission.
- From the list of permission options as Full Control, Change, and Read, you have to decide which type of permission you need to provide to the shared device.
- Click the Apply button to apply the changes to the setting.
- Click OK to close the permission window.
- Now Click Apply, and the changes made under the Advanced Sharing window take effect.
- Click OK to close the Advanced Sharing window and reach its parent window.
- Now click on the Close button to exit the properties window of the selected drive.
Now your device is ready to share files and folders over the network connected to the same network. The process is illustrated below.
Method 6: Share Folders or Drives Using Shared Folder Wizard
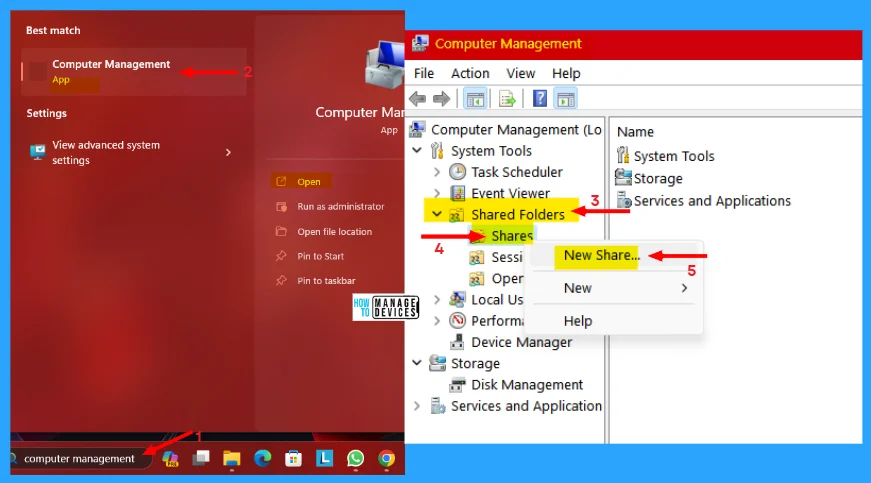
This is a built-in share method, you can use Shared Folder Wizard to share folders on Windows 11. To do this, type Computer Management in the Search bar on the Taskbar and click on the result to open the tool (Computer Management).
When the Computer Management window opens, from the left panel, expand the Shared Folders, now, right-click on the Shares option and select the option New Share.
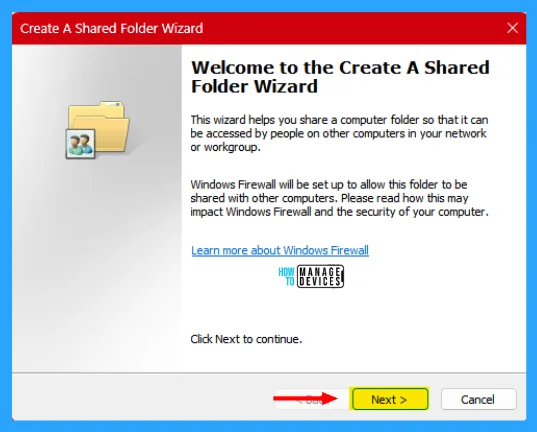
The Create A Shared Folder Wizard window opens. This wizard helps you share a computer folder so that it can be accessed by people on other computers in your network or workgroup. Windows Firewall will be set up to allow these folders to be shared with other computers. Now click on Next to continue.
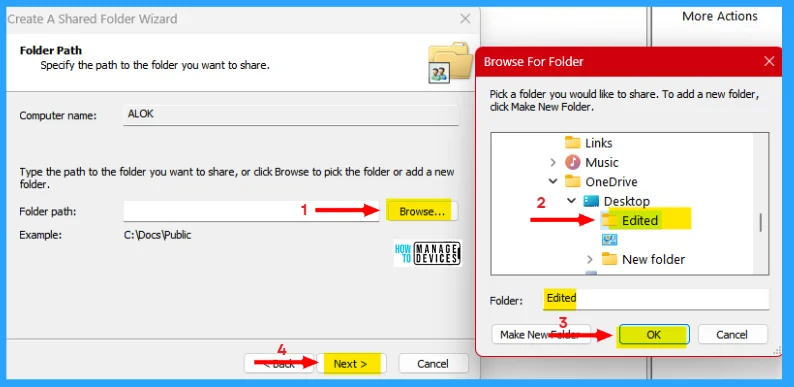
In the next window, enter the path of the folder you want to share and click the Browse button to select the folder. Forward and select the folder from the list of folders, then click the OK button. Then, click Next to continue.
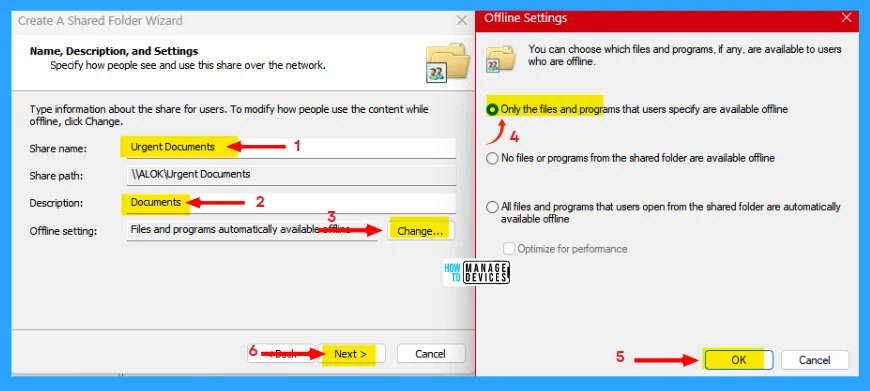
(1) In the Share name field, provide a name to the shared folder. This name is for other users on the network to see. (2) Include a description for the shared folder in the Description field. (3) To change the offline setting, if required, click the Change button. (4) Choose an offline setting from the options available, and (5) click OK. The default setting is Only the files and programs that users specify are available offline’. Then click Next.
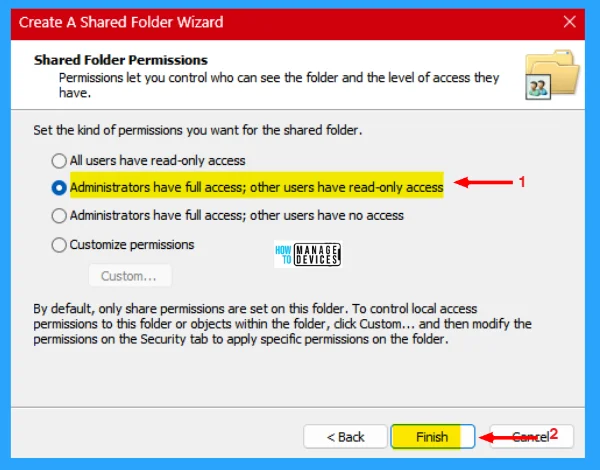
Now in the Shared Folder Permissions, the Permissions let you control who can see the folder and the level of access they have. From the options available in the list, choose one of them to categorize the permission, and click on Finish.
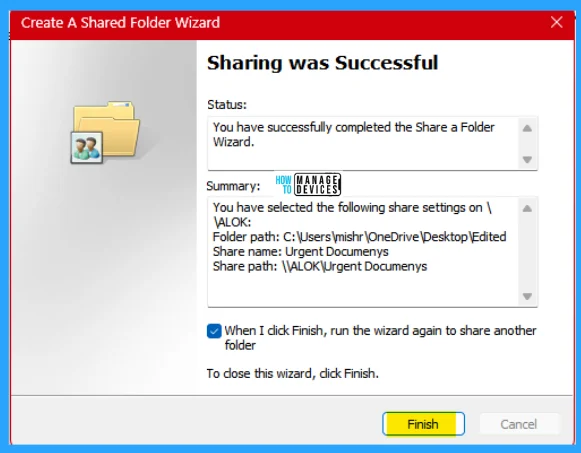
At last, the sharing was successful message appears, the status is you have successfully completed the Share a Folder Wizard. You can now copy or note down the share path that you can share with others in the same network. And finally, click on Finish to share the folder.
I hope the Easy Steps to Convert Word Documents into PDF information is helpful. Please follow us on the HTMD Community and visit our website HTMD Forum, if you like our content. Suggest improvements, if any, and we love to know which topic you want us to explore next.
We are on WhatsApp. To get the latest step-by-step guides and news updates, Join our Channel. Click here – HTMD WhatsApp.
Author
Alok is a Master of Computer Applications (MCA) graduate. He loves writing on Windows 11 and related technologies. He likes to share his knowledge, quick tips, and tricks with Windows 11 or Windows 10 with the community.
