This post is about the procedure of WinDirStat on Windows 11 | Install and Use. The WinDirStat stands for Windows Directory Status. The initial release of WinDirStat was on October 2003; the exact date is 01.10.2000. The stable update was provided by 16.07.2005.
The development of WinDirStat was stopped till the next release in September 2007. Further development was resumed in May 2009; the next update was done in the year 2016; during the year 2014, WinDirStat became the second most downloaded file system software on source forge.
The weekly download of the WinDirStat is more than 13,000; the source code is provided for all released versions on the source forge page in zip format. You can go ahead and download it from the desired website and install it into your system.
In this post, I will discuss how and where to download the WinDirStat, install it to your device, its features, and how to use it on Windows 11.
What is WinDirStat on Windows 11?
When the problem occurs, the hard disk is almost full, and you don’t know where the big files are, occupying all the space. They may well be hidden in sub-sub-directories. To find out this, using Windows Explorer is tiring:
1. You would have to expand and collapse directories over and over or
2. View the “Properties” of the directories, which always count just the size of a single subtree.
3. It’s hard to form a mental image of the hard disk usage in this way. This is where WinDirStat helps.
4. It shows where all your disk space has gone and helps you clean it up.
How to Install WinDirStat on Windows 11
There are many websites from where you can download the WinDirStat; from so many sites, you can download the WinDirStat from the SourceForge website. Click here to download the application. The details of the application are shown in the table below.
| WinDirStat | Related Information |
|---|---|
| Developer(s) | Bernhard Seifert and Oliver Schneider |
| Initial Release | 1st October 2003 |
| Stable Release | 16th July 2005 |
| Type | Disk Space Analyzer |
| Size | 1.07 KB |
| Website | windirstat.net |
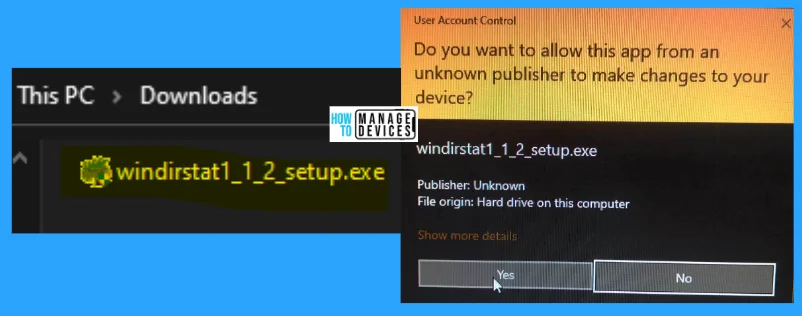
When you click the link, the downloads start automatically and store in the Downloads folder, the system’s default folder; now, navigate toward the downloads folder and search for the WirDirStat.exe file—Double-click on it to run.
- After double-clicking, administrative permission shows with the User Account Controlled message.
- If you need to install it, click YES to continue the process.
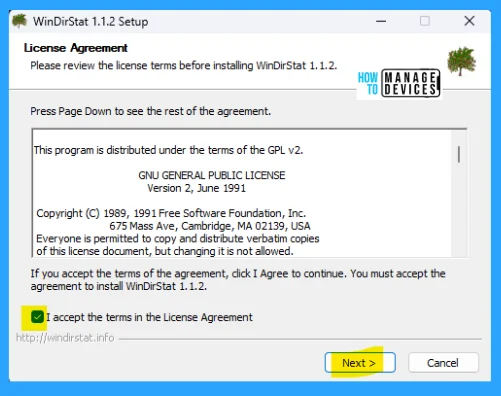
The next window is License Agreement; read the terms and conditions carefully, check the box with the dialogue “I accept the terms of the license agreement,” and click Next to continue.
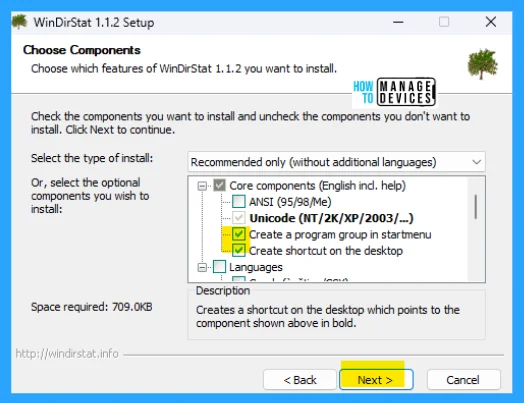
The next window is Choose Components; this allows users to choose the right components to install on their devices. There is also a choice about where you want to install the system software. Also, you can create shortcuts for the desktop, start button or pin to the taskbar.
- After completing the process, click Next to move to the next window.
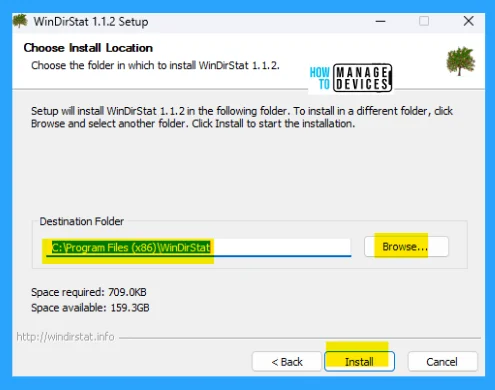
The next window is Choose Install Location. In this window, you can choose the specific location to install the system software by browsing the folder in which you want to install the system software.
- After successfully selecting the location to install the software,
- You can click Install to start the installation process.
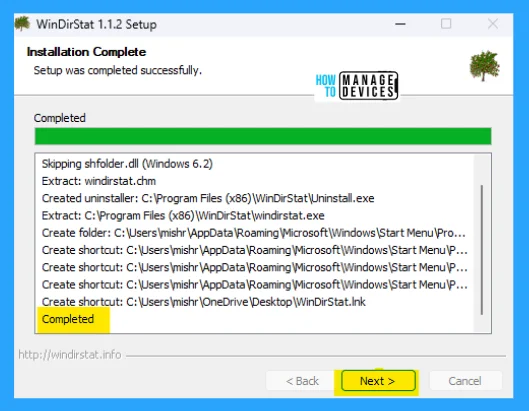
After clicking install, the next window is Installation Complete, where the Installation process starts and shows that the setup was completed successfully. Now click Next to finish the installation process.
- The WinDirStat shortcut is created on the desktop; double-click to launch the system software.
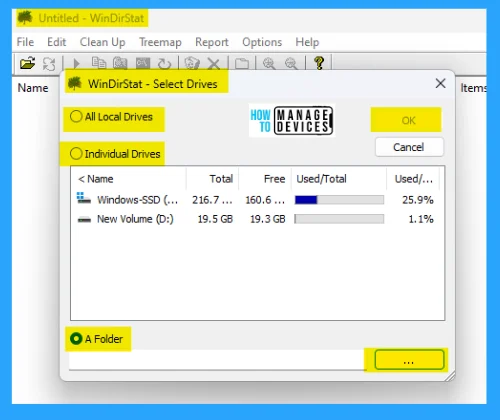
On startup, WinDirStat opens the Select Drives Dialog. Where you can choose which drives to include in the statistics. Select one or more movements from the list or choose a directory. The list shows all the present drives, including inserted disks, pen drives, and network drives. The columns of select drives are listed below:
| Columns | Description |
|---|---|
| Name | Name and drive letter of the drive |
| Total | The capacity of the drive |
| Free | Free space on the drive |
| Used/Total | Percentage of used area related to the capacity |
| Used/Total | The same information is in percentage |
Features of WinDirStat
- List of detected file extensions and each file extension’s percentage of space.
- Each extension has its color on the graphical map (TreeMap).
- This can scan internal, external, and networked drives.
- Portable version besides the installer
- User-created clean-up jobs
- Send report via email
As said before, you can choose the drives or select a directory. The dialog box has three radio buttons to choose Directory, drive, or folder are listed below with a description.
- All Local drives: This is the default; it scans all local drives, that is, all drives which are not network drives. Devices created with SUBST are also excluded.
- Individual drives: Here, you can explicitly select a set of drives.
- A folder: You can select a folder or UNC path here.
After selecting your desired drive, directory, or folder, click OK to begin the scan. The selection is persistent, i.e., when you open the dialog the next time, the default settings are that you made last time.
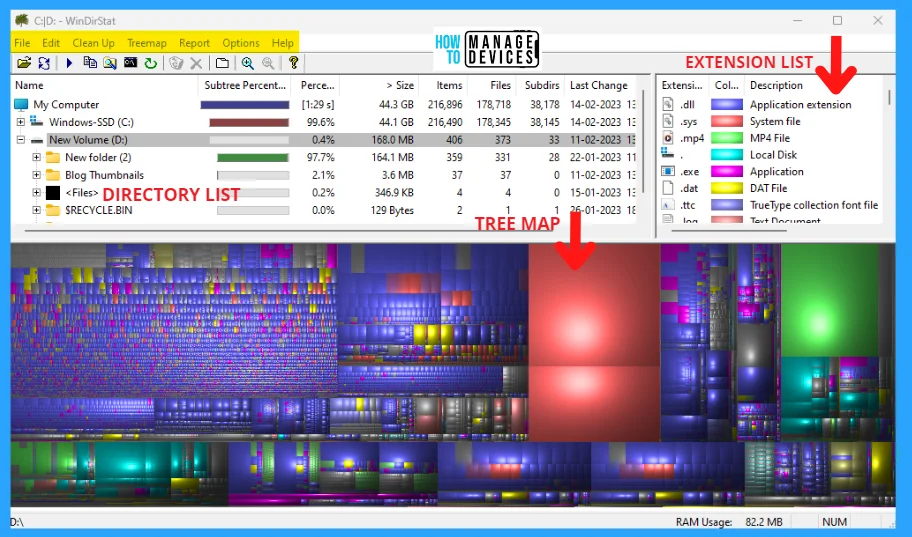
After approval, the WinDirStat reads in the whole directory tree once (the processing time depends upon the hard drive size) and then presents it in three useful views illustrated in the image and listed below.
- Directory List
- Extension List
- Treemap
Directory List
The directory list resembles the tree view of Windows Explorer, showing directories and files sorted by size descending. At the top, you see the directories and files that use the most space. The details of file sorting in columns are shown in the table below.
| Columns | Details |
|---|---|
| Name | This column shows the names of the files and directories and their tree structure. |
| Size | For files, this is the size of the file in bytes. For directories, this is the size of the subtree, that is, the sum of the sizes of all subdirectories and files. |
| Subtree Percentage | This column shows how the size of a subtree is composed of the dimensions of the sub-items. This information is comparable only within one level and is always related to the expanded parent item. [During the scanning, this column shows either a Pacman or the number of read jobs to do for the subtree.] |
| Percentage | The same information as in “Subtree Percentage,” in percent. [During the scanning, this column can optionally show the time spent for the subtree so far.] |
| Files | Number of files in the subtree |
| Subdirs | Number of sub-directories in the subtree. |
| Items | Several items in the subtree. A sum of “Files” and “Subdirs.” |
| Last Change | Date of the last modification in the subtree |
| Attributes | File/folder attributes. R = read-only, H = hidden, S = system, A = archive, C = compressed, E = encrypted. |

Extension List
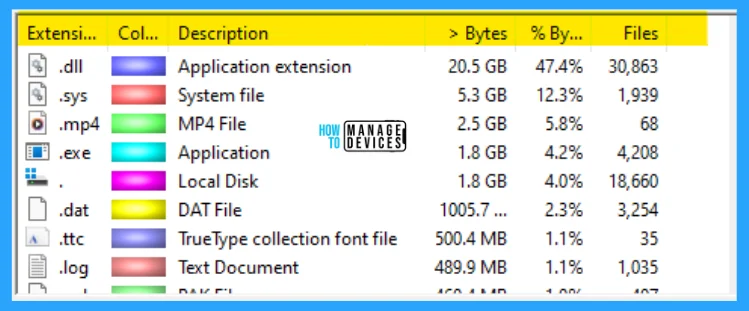
The extension list contains all types (filename extensions) occurring in the directory tree. For every file type, the column “Bytes” shows the sum of the file sizes. By default, the extension list is sorted descending by this column. So at the top are those file types, which, all in all, take up most space on the hard disk.
12 colors are assigned to the 12 file types that occupy the most space. The rest is grey. The Treemap shows the files in these colors—the columns of the extension list with details are presented in the table below.
| Columns | Details |
|---|---|
| Extension | Icon and filename extension |
| Color | The color, which the Treemap uses to display the files of this type |
| Description | Description of the file type. Corresponds to the description shown by the Windows Explorer |
| Bytes | The total volume of the file type in the directory tree. Some of the sizes of all files of this type |
| % Bytes | The same information as proportion related to the overall tree size |
| Files | Number of files of this type in the directory tree |
Treemap
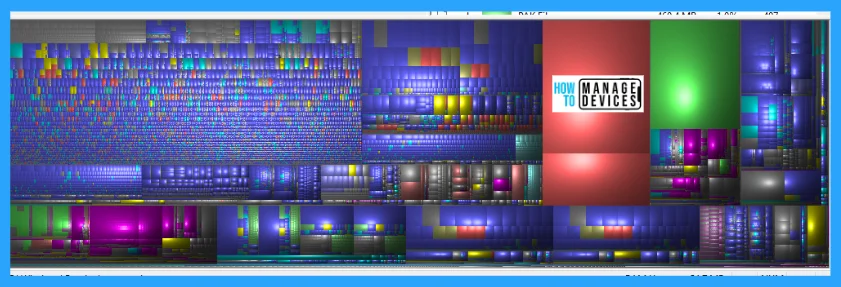
The Treemap shows the full contents of the directory tree straight away. It represents each file as a colored rectangle, the area of which is proportional to the file’s size.
The rectangles are arranged so that directories again make up rectangles containing all their files and subdirectories. So their area is proportional to the size of the subtrees.
- The rectangle’s color indicates the file type, as shown in the extension list. The cushion shading additionally brings out the directory structure.
You effortlessly see the big rectangles, the big files, even if they are hidden deeply in subdirectories in the directory tree. Click on them: the directory list opens the path to the file, and you can read its location and attributes and – if you like – apply a cleanup action on it, e.g., delete the file.
The three view types are discussed in detail above; the WinDirStat has some option tabs used to make some changes with these options; the options tabs are listed below.
- File
- Edit
- Clean Up
- Treemap
- Report
- Options
- Help
File Tab
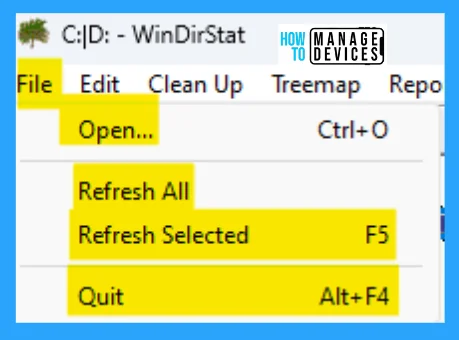
In the file tab, some options are available to modify or make changes in the WinDirStat setup. Under the file tab, there are several options available, detailed in the list below.
- Open: Opens the selected file. Note that in the case of an executable file (.exe), this means that the program is started.
- Refresh All: Refresh the currently contained list for all the directories.
- Refresh Selected: Possibly, an item has been deleted or modified outside of WinDirStat. “Refresh” makes WinDirStat re-read the article so that the display accords with the actual conditions on the hard disk again.
- Quit: Close the WinDirStat window.
Edit Tab
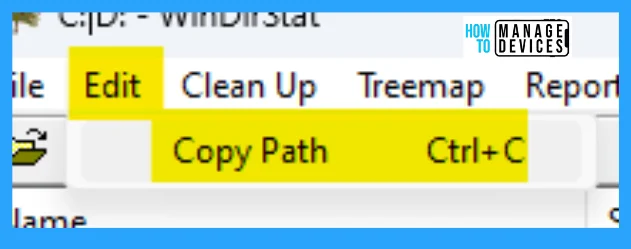
The edit tab is used to make any modifications to a specific program. Under the edit tab, one option as copy path is described below.
- Copy Path: Copies the path of the selected item into the clipboard.
Clean Up Tab
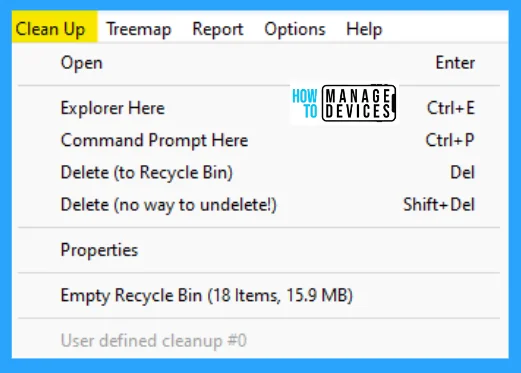
Several clean-up actions can be applied to a selected item. The cleanups are accessible through the main menu, the toolbar, and keyboard shortcuts. The options are present under the Clean Up tab listed below.
- Open: Opens the selected file. Note that in the case of an executable file (.exe), this means that the program is started.
- Explorer Here: Launches the Windows Explorer to show the selected item.
- Command Prompt Here: Launches the DOS prompt in the selected directory.
- Delete (to Recycle Bin): Moves the selected item into the recycle Bin. Then the item and the recycle bin directories are refreshed.
- Delete (no way to undelete!): Deletes the selected item irreversibly. Then the item is refreshed. Please delete only files and directories when you know neither you nor the system needs them anymore!
- Properties: Opens the ‘Properties’ dialog for the selected file.
- Empty Recycle Bin: Clear all the data stored in the Recycle Bin.
- User Define cleanup: This feature is for experts. You can define up to 10 custom cleanup actions. Command lines specify the cleanups. Select an entry in the list and set it to “enabled.” Choose a title; the title appears in the menus.
Treemap Tab
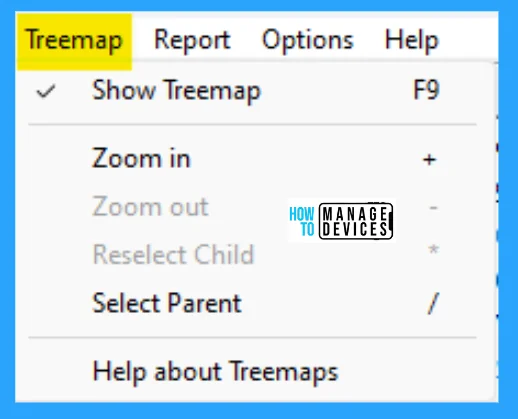
The details of the Treemap are described earlier in this post; the treemap tab helps to access the treemaps in the WinDirStat window. It has some options that are listed below:
- Show Treemap: Enable or disable the treemap view.
- Zoom in: The option “Zoom in” enlarges the Treemap, displaying a full-size subtree. As it were, you make a step toward the selected item. The directory list shows the root of this subtree with a blue frame…
- Zoom out: By “Zoom out,” you step back, and the parent element is shown again.
- Reselect Child: Very useful to navigate toward a file or folder.
- Select Parent: Very use full as reselect child.
- Help about Treemaps: Show the details of the treemaps.
Report
The Report tab in WinDirStat is a very useful option presented. Under Report Tab, an alternative is available as Send Mail to Owner is described below. The below list and screenshot show the Report tab in WinDirStat.
- Send Mail to Owner: It generates a textual report about the selected directory, which can be emailed to its owner. This is intended for network drives, which several people use. The report accurately contains the lines displayed in the directory list underneath the selected item in the same “expansion state” and in the same sort order.

Options Tab
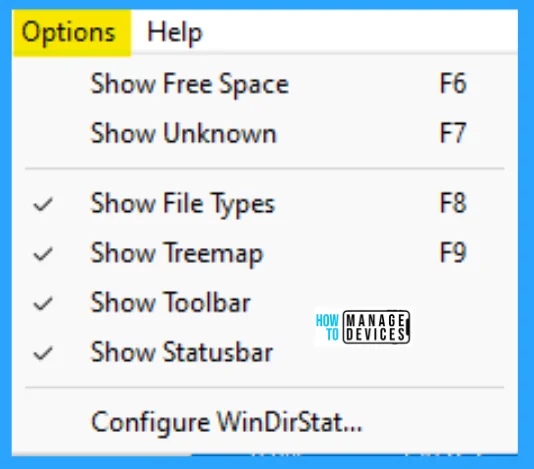
In the options tab, specific provisions are available, which are used to make some graphical changes to the particular window. The requirements are discussed in detail below.
- Show Free Space: Free up spaces be shown to the user.
- Show Unknown: Shows the unknown file, folders, etc.
- Show Files Types: Help to show the kind of files.
- Show Treemap: Present here to enable or disable the Treemap.
- Show Toolbar: This shows all the tools presented in the toolbar.
- Show Statusbar: It shows the status of all the processes going on.
- Configure WinDirStat: Used to configure the default settings to user define the state.
Help Tab
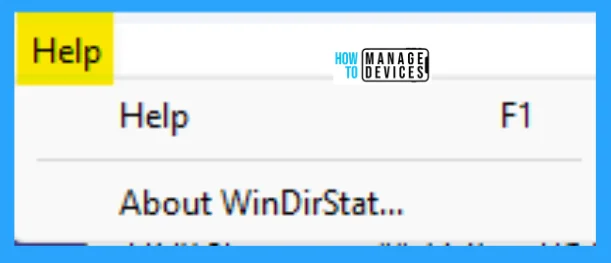
The help tab is used to find help or study for a particular application. The help application is most common with many applications. This option helps to know about that specific application.
- Help
- About WinDirStat
Coupling of the Views
The really strong point of WinDirStat is that the three views, Directory List, Extension List, and Treemap, are coupled with each other. Some of the couplings are listed below to describe the coupling.
- Directory List-> Treemap: When you select an item (directory or file) in the directory list, Treemap also shows this item by highlighting it with a colored frame. In particular, you can see the size of the directories.
- Treemap -> Directory List: When you click into the Treemap, the mouse always hits a file (a colored rectangle). After that, the directory list expands (if necessary) the appropriate nodes and selects this file. So you can, e.g., by clicking on a big rectangle, see the path and attributes of the corresponding big file in the directory list. So, because of this mutual coupling, the selections in the directory list and the Treemap are always the same.
- Directory List + Treemap -> Extension List: When you select a file in the directory list (or in the Treemap), the extension list shows the file type (the extension). The extension is set and scrolled into view. So you can see the description and the statistics for this file type.
- Extension List -> Treemap: When you select a file type in the extension list, Treemap highlights all files of this type.
The information on the Installation and Usage of WinDirStat on Windows 11 is helpful. Please follow us on HTMD Community and visit our website HTMD Forum if you like our content.
Author
Alok is a Master of Computer Applications (MCA) graduate. He loves writing on Windows 11 and related technologies. He likes to share his knowledge, quick tips, and tricks with Windows 11 or Windows 10 with the community.
