Let’s discuss Windows 10 Power Options and Intune. The community has a few queries about this topic. This step-by-step guide explains how to manage device power options using Intune, a.k.a. Endpoint Manager. Easily Manage Device Power Options Using Intune. As such, I am writing this short post to present my ideas.
Power Options is a valuable feature located in the Windows Control Panel. It allows you to personalize how your computer utilizes and conserves power. You can enhance performance or promote energy conservation by tailoring the settings to your preferences.
The Power Policies setting allows administrators to control whether users can change power settings on their devices. When not configured, Intune does not alter or update this setting. If enabled, users can hibernate the device, put it to sleep by closing the lid, and modify power settings as needed.
Power Management in Intune offers valuable assistance to organizations looking to monitor and actively decrease device power consumption. By configuring the power options in Intune, organizations can seamlessly apply a unified set of power settings to their managed devices. Additionally, organizations not utilizing Intune can still implement power plans on Windows devices using Configuration Manager.
Settings Configurable from the Portal (UI)–Manage Windows 10 Power Options using Intune
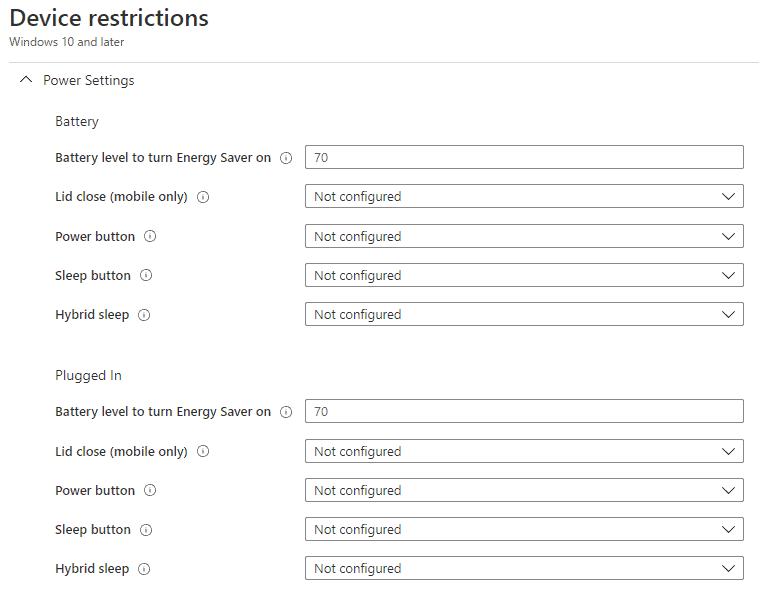
By default, Intune allows you to create a Device Restrictions profile type for Windows 10 to control the Power Options.
Windows 10 Power Options—The device restrictions profile will let you configure the settings for the Lid close action, Power button, Sleep button actions, Enabling Energy Saver, and Hybrid sleep from the UI.

For both Battery and Plugged In, you get to configure the actions for
| Power Settings | Configure the action for |
|---|---|
| Enable Energy Saver | Power/EnergySaverBatteryThresholdOnBattery Power/EnergySaverBatteryThresholdPluggedIn |
| Lid close | Power/SelectLidCloseActionOnBattery Power/SelectLidCloseActionPluggedIn |
| Power button | Power/SelectPowerButtonActionOnBattery Power/SelectPowerButtonActionPluggedIn |
| Sleep button | Power/SelectSleepButtonActionOnBattery Power/SelectSleepButtonActionPluggedIn |
| Hybrid Sleep | Power/TurnOffHybridSleepOnBattery Power/TurnOffHybridSleepPluggedIn |
- Enable Energy Saver
- Power/EnergySaverBatteryThresholdOnBattery
- Power/EnergySaverBatteryThresholdPluggedIn
- Lid close
- Power/SelectLidCloseActionOnBattery
- Power/SelectLidCloseActionPluggedIn
- Power button
- Power/SelectPowerButtonActionOnBattery
- Power/SelectPowerButtonActionPluggedIn
- Sleep button
- Power/SelectSleepButtonActionOnBattery
- Power/SelectSleepButtonActionPluggedIn
- Hybrid Sleep
- Power/TurnOffHybridSleepOnBattery
- Power/TurnOffHybridSleepPluggedIn
All these features were added to Policy CSP with Windows 10 1903
Settings configurable via OMA-URI –Manage Windows 10 Power Options using Intune
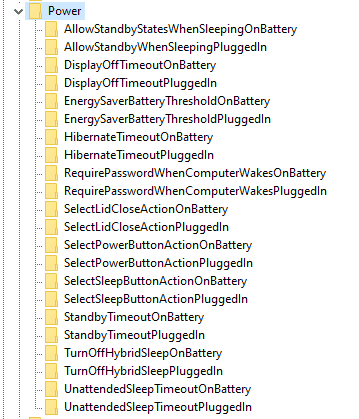
When writing this article, Policy CSP has 22 settings in total related to Power Options, of which 8 settings are configurable from the UI, as shown above.
Thus, if you need to control/configure the other 12 Power Option features that are not natively available in the UI, you must create a Custom OMA-URI profile for them.
You can easily create the OMA-URI path referring to the registry. OMA-URI Path Construction ./Device/Vendor/MSFT/Policy/Config/Power/<PolicySettingsName>

As Microsoft states, these are ADMX-backed policies, and as such, they require a special SyncML format to Enable or Disable.
Are Windows 10 workstations still running 1803 or 1809? Good Old PowerShell Way
It is quite possible that, as of today, due to Microsoft extending the support for 1803 and 1809 versions of Windows 10 Enterprise and Education SKU until May 11th, 2021((ref), a majority of your production environment workstations are still on either of these two versions. You have not yet made the move to 1903/1909.
However, if you check the documentation of Policy CSP for Power Option configurations, you will see that many nodes have been added since Windows 10 version 1903. There is no guarantee that those were also backported to the previous Windows 10 versions.
In such cases, the only other option I can think of is to use a PowerShell script deployment from Intune to configure the power-related settings instead.
For example, you may deploy a PS script to manage the Lid close action on an Intune-managed Windows 10 1803/1809 device. You would require only two lines of code to set the value you need for the lid close action in the format below.
Format
======

powercfg -SETACVALUEINDEX <Power Scheme GUID> <Subgroup GUID> <Power Setting GUID> <Index Value>
powercfg -SETDCVALUEINDEX <Power Scheme GUID> <Subgroup GUID> <Power Setting GUID> <Index Value>

Where Index Value is as

Index Value    Action
0                   Do Nothing
1                   Sleep
2                   Hibernate
3                   Shutdown
For those new to the command line, you can probably start by using the command to retrieve the system’s currently active power scheme.
powercfg -getactivescheme

Note the GUID and use it to query more details using the command.
powercfg -q <GUID of Power Scheme>
Note! the GUID and use it to query more details about it. The command powercfg -q <GUID of Power Scheme>
This results in a lot of output on the screen showing the various details of the current power scheme. The snap below shows the setting that we are talking about here.

Note the Subgroup GUID and the Power Setting GUID, which we will use to prepare the command to set the appropriate index value for the settings.
So for my system, which is in a Balanced power scheme, to set the “Lid close action” to “Do nothing“, I would require to run the following commands
powercfg -SETACVALUEINDEX 381b4222-f694-41f0-9685-ff5bb260df2e 4f971e89-eebd-4455-a8de-9e59040e7347 5ca83367-6e45-459f-a27b-476b1d01c936 0

powercfg -SETDCVALUEINDEX 381b4222-f694-41f0-9685-ff5bb260df2e 4f971e89-eebd-4455-a8de-9e59040e7347 5ca83367-6e45-459f-a27b-476b1d01c936 0
As such, for a particular feature, if you find there is no
- policy settings available to be configured from the UI
- CSP node available to create a custom OMA-URI profile
- ADMX template settings are available in Intune
you can always rely on your good old friend – PowerShell 🙂
You can also create a custom ADMX file about the settings you would want to control and manage, ingest the ADMX using Intune, and then use the custom OMA-URI to set the policy settings of the ingested ADMX policy. However, it is a complex and time-consuming process.
Manage Windows 10 Power Options using PowerShell script from Intune – Example Scenario.
Let’s take an example of a requirement I worked on in one of my assignments.
Requirement: Manage Power and Sleep settings for both Battery and Plug-in.
- Set “Turn off the display” to Never and Never
- Set “Put the computer to sleep” to Never and Never

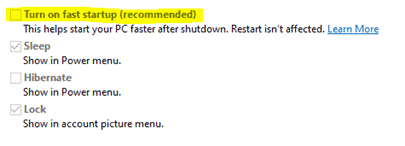
Uncheck “Turn on Fast Startup” from Startup options

Assessment: The first two settings are possible via a custom OMA-URI profile utilizing the Policy CSP. However, for the 3rd requirement, I could not figure out any node of PolicyCSP /Power that seemed to help me achieve the goal, so I decided to fall back to PowerShell.
Building the Script: Uncheck “Turn on Fast Startup” requires a registry edit to set the
DWORD value of reg_key HiberbootEnabled to 0. The reg_key is under reg_path HKEY_LOCAL_MACHINE\SYSTEM\CurrentControlSet\Control\Session Manager\Power
The commands to set the values for “Put the computer to sleep” and “Turn off the display” to Never for all scenarios are as
powercfg -change -monitor-timeout-ac 0
powercfg -change -monitor-timeout-dc 0
powercfg -change -standby-timeout-ac 0
powercfg -change -standby-timeout-dc 0
I am no scripting expert, so these script examples are only for illustration. You may find this elementary!
The Actual Script
powercfg -change -monitor-timeout-ac 0
powercfg -change -monitor-timeout-dc 0
powercfg -change -standby-timeout-ac 0
powercfg -change -standby-timeout-dc 0

$Path = "HKLM:\SYSTEM\CurrentControlSet\Control\Session Manager\Power"
$Name = "HiberbootEnabled"
$value = "0"

#Check if $Path exist. If not, create $Path and then add the item and set value.

If (!(Test-Path $Path))

{
    New-Item -Path $Path -Force | Out-Null
    New-ItemProperty -Path $Path -Name $Name -Value $value -PropertyType DWORD -Force | Out-Null
}

 ELSE
{
    New-ItemProperty -Path $Path -Name $Name -Value $value -PropertyType DWORD -Force | Out-Null
}
The End – Windows 10 Power Options and Intune – Discover with Joy
This post presented my ideas for managing Windows 10 Power Options from Intune. However, I would be very keen to hear from you about your ideas and your approach while working on this topic for any projects or within your environment.
Well, that was it for today.
If you are reading my article for the first time, here is a link to my profile from where you can access all my other articles. Please give them a read as well!
Last but not least, continue to stay safe…
We are on WhatsApp. To get the latest step-by-step guides and news updates, Join our Channel. Click here –HTMD WhatsApp.
Author
Anoop C Nair is Microsoft MVP! He is a Device Management Admin with more than 20 years of experience (calculation done in 2021) in IT. He is a Blogger, Speaker, and Local User Group HTMD Community leader. His primary focus is Device Management technologies like SCCM 2012, Current Branch, and Intune. He writes about ConfigMgr, Windows 11, Windows 10, Azure AD, Microsoft Intune, Windows 365, AVD, etc.

You script doesn’t correctly define $registryPath
Hi John,
Thanks for pointing out. Yeah, I noticed now, I made a mess of variables with $Path and $registryPath.
Must have made the mistake during editing. Will correct it.
Thanks again 🙂
Thanks for sharing. This guide helped me understand more about Power Options deployed by Intune.
Hi Joymalya, thanks for sharing your knowledge with us.
Would you recommend a way to work with OMA-URI for the following?
– edit Hard Disk > Turn off hard disk after On Battery/Plugged to 0(Never)
– edit Wireless Adapter Settings > Power Saving Mode > On Battery/Plugged to Maximum Performance
Thanks
Thiago
Is there a script or option to force WOL through Intune?