In my previous post (Autopilot FAQs), I tried to clarify the general misconceptions and give a clear overview of Windows Autopilot.
This post is part of a series and continuation where I want to talk about Windows Autopilot Behind the Scenes from the Admin end configuration perspective. Let’s get started.
Related Posts
- Part 1 Windows Autopilot FAQ Clarifying the General Misconceptions
- Part 2 Windows Autopilot from the perspective of IT Admin setup (This Post)
- Part 3 Windows Autopilot In-Depth Processes from Device Side (Coming Soon)
- Part 4 Coming Soon
Extracting the Hardware Hash from the end device
It all starts with extracting the Device hash from a device using the Get-WindowsAutopilotInfo script available on GitHub.
The CSV file generated by running this script is uploaded in Intune (or MSfB) to register the Device to Autopilot services.
What Information Does Autopilot CSV Contain?
The extremely large HEX value will catch your attention if you check the CSV contents. To see its contents, you would need to decode it. This can be done using the oa3tool.exe, part of the Windows ADK.
Related Post – Windows Autopilot FAQ Clarifying the General Misconceptions Part 1

How to Decode Autopilot CSV?
As I mentioned above, you can decode the Autopilot CSV file using oa3tool.exe. The decrypted hardware hash looks similar to the XML representation below.
<?xml version="1.0"?><HardwareReport><HardwareInventory><p n="ToolVersion" v="3" /><p n="HardwareInventoryVersion" v="131" /><p n="ToolBuild" v="10.0.17763.1" /><p n="OSType" v="FullOS" /><p n="OsCpuArchitecture" v="x64" /><p n="OsBuild" v="10.0.17763.1" /><p n="OsSystemTime" v="2019-03-05T12:25:49Z" /><p n="OsLocalTime" v="2019-03-06T18:25:49+30:00" /><p n="ProcessorModel" v="Intel(R) Core(TM) i7-8650U CPU @ 1.90GHz" /><p n="ProcessorPackages" v="1" /><p n="ProcessorThreads" v="1" /><p n="ProcessorCores" v="1" /><p n="ProcessorHyperThreading" v="false" /><p n="SmbiosRamArrayCount" v="1" /><p n="SmbiosRamSlots" v="1" /><p n="SmbiosRamErrorCorrection" v="None" /><p n="SmbiosRamMaximumCapacity" v="2048" /><p n="TotalPhysicalRAM" v="2" /><p n="SmbiosFirmwareVendor" v="Lenovo" /><p n="SmbiosSystemManufacturer" v="Lenovo" /><p n="SmbiosSystemProductName" v="Lenovo" /><p n="SmbiosSystemSerialNumber" v="PC0QX40X" /><p n="SmbiosUuid" v="1b0b2241-6194-4d64-9bab-173000ed6541" /><p n="SmbiosSkuNumber" v="None" /><p n="SmbiosSystemFamily" v="" /><p n="SmbiosSystemVersion" v="" /><p n="SmbiosBoardManufacturer" v="Intel" /><p n="SmbiosBoardProduct" v="" /><p n="SmbiosBoardVersion" v="" /><p n="ChassisType" v="0x0#" /><p n="InternalDiskCount" v="1" /><p n="DeviceNumber" v="0" /><p n="PrimaryDiskTotalCapacity" v="42" /><p n="PrimaryDiskType" v="HDD" /><p n="DiskSerialNumber" v=" 2b0b2241-6194-4d64-9bab-173000ed6541 " /><p n="OpticalDiskDriveType" v="true" /><p n="PhysicalMedium" v="Unspecified" /><p n="MacAddress" v="00:15:5D:BA:AE:00" /><p n="DisplayResolutionHorizontal" v="1024" /><p n="DisplayResolutionVertical" v="768" /><p n="DisplaySizePhysicalH" v="0" /><p n="DisplaySizePhysicalY " v="0" /><p n="DigitizerSupportID" v="IntegratedTouch, IntegratedPen, MultiInput" /><p n="PowerPlatformRole" v="Mobile" /><p n="TPMVersion" v="TPM-Version:2.0 -Level:0-Revision:1.16-VendorID:'MSFT'-Firmware:538247443.1394722" /><p n="TPM EkPub" v="s7+hJsgnlFQ+Jf4O7WZEh9AcZcJ9EXIBGeUSkzRXDkrSt2UBJ0P1FmA8V8PTp/TbY3dmn5IG1Z2spHlrGmu1AshGHlZyIMFPUeMN91/+mM3lqWsHOrOMHjGvZrdMCJxi3sXAqs16bo5BFoNWXHXZyCwWQ3204chGlOzm309hKV+l90t7ciqzfpaA2D7UcyYy8xHm0qbuI1pNaHYkP5mmdyKn5eoHtpNTY0zjVf+ZtZIJ6N2/VydcZ5olmSG2BRe5xxZhbYILkprzyit5ayPXmUlTYm5MV6zbuZYMeU0hu4HetDAL6G0XZQz+UH/ufuvEBCe44Q/uz2UdXlgQ0cfpTQ==" /><p n="Status" v="0x00000000" /><p n="OfflineDeviceIdType" v="TPM_EK" /><p n="OfflineDeviceId" v="2Q5jpb/RDYGngUglOzNZHh0bcv+oK08MpoOAFRtTYr8=" /><p n="DiskSSNKernel" v=" " /></HardwareInventory></HardwareReport>
All this information is used to register the Device with the Windows Autopilot service (also known internally as Device Directory Service—DDS).
NOTE: This is the exact info collected during the normal provisioning process. Replacing the system board changes the hardware hash for that particular Device. Post motherboard replacement, a device is subjected to new enrollment even if device records are present in Azure AD and Intune. The reason is that the WPJ (Work Place Join) re-evaluation, as performed by Azure DRS, fails because the device info stored in the Azure AD device object does not match with the present Device.
Get-WindowsAutopilotInfo Script
More information: This is the rough functioning of the Get-WindowsAutopilotInfo script.
$hh=(Get-CimInstance -ClassName MDM_DevDetail_Ext01 -Namespace root\cimv2\mdm\dmmap).DeviceHardwareData
 $serialnumber=(Get-WmiObject -Class win32_bios ).serialnumber
 $mm=(Get-WmiObject -class win32_computersystem)
 $details= New-Object psobject -Property @{
 Hardwarehash=$hh
 SerialNumber=$serialnumber
 Manufacturer=$mm.Manufacturer
 Model=$mm.Model
 }
 $details | Out-GridView
Let’s move to the next part, as the hardware hash is collected.
Autopilot Device Registration Part – Windows Autopilot Behind the Scenes
This is where an IT Admin will start registering the Device to the Windows Autopilot service by uploading the Device hash to Intune.
NOTE 1 – At this point, I need to clarify that the Intune service and the Autopilot service are mostly not the same. This is a misconception I have heard from many admins to date. Windows Autopilot is an entirely different independent service separate from the Intune service.
NOTE 2 – Intune provides the UI that allows Admins to register devices as Autopilot devices. The same is also possible from Microsoft Store for Business (MSfB). Thus, Intune and MSfB provide a mechanism to report devices to the Windows Autopilot service, but they are not the Autopilot service in itself.
Add Windows Autopilot Devices
To understand this better, let’s look into what happens in the back end (Windows Autopilot Behind the Scenes) when an Admin uploads a device hash into Intune.

Graph Query
The graph query that gets generated in the backend is:
RequestURL:https://graph.microsoft.com/beta/deviceManagement/importedWindowsAutopilotDeviceIdentities/importHTTP Version:HTTP/1.1Request method:POSTType:application/jsonRaw Content:{"importedWindowsAutopilotDeviceIdentities": [{"serialNumber": "#######","productKey": "","hardwareIdentifier": "#######"}]}
Post call to Register to Windows Autopilot Service
This is the POST call made by Intune to register the Device to the Windows Autopilot service (also known as DDS – Device Directory Service). The response to this POST call is:
{
"@odata.context": "https://graph.microsoft.com/beta/$metadata#Collection(importedWindowsAutopilotDeviceIdentity)",
"value": [{
"@odata.type": "#microsoft.graph.importedWindowsAutopilotDeviceIdentity",
"id": "4419d710-489d-4d36-bb1f-a3d0a4941727",
"orderIdentifier": "",
"groupTag": "",
"serialNumber": "8645-5788-4128-6899-2408-1523-89",
"productKey": "",
"importId": "adaf2068-abf1-4309-906a-c9b4ef250670",
"hardwareIdentifier": "",
"assignedUserPrincipalName": "",
"state": {
"deviceImportStatus": "unknown/pending/partial/complete/error",
"deviceRegistrationId": "",
"deviceErrorCode": 0,
"deviceErrorName": ""
}}]}
Get Call to Query Import Status
The GUID, as referred to by “id,” is the object identifier in the importedAutopilotDeviceIdentity collection namespace, but what is more important is the “imported” GUID with which Intune creates a GET call to query the import status.
RequestURL: https://graph.microsoft.com/beta/deviceManagement/importedWindowsAutopilotDeviceIdentitiesQuery arguments:$filterImportId eq 'adaf2068-abf1-4309-906a-c9b4ef250670'$selectid,stateHTTP Version:HTTP/1.1Request method:GEGET Response Content:{"@odata.context": "https://graph.microsoft.com/beta/$metadata#deviceManagement/importedWindowsAutopilotDeviceIdentities","value": [{"@odata.type": "#microsoft.graph.importedWindowsAutopilotDeviceIdentity","id": "4419d710-489d-4d36-bb1f-a3d0a4941727","orderIdentifier": "","groupTag": "","serialNumber": "8645-5788-4128-6899-2408-1523-89","productKey": "","importId": "adaf2068-abf1-4309-906a-c9b4ef250670","hardwareIdentifier": "","assignedUserPrincipalName": """state": {"deviceImportStatus": "complete","deviceRegistrationId": "f233b7c8-82bc-4839-8aed-6bbd98d7066f","deviceErrorCode": 0,"deviceErrorName": "None"}}]}
Autopilot Registration Completed
This registration process can take up to 15 minutes. So, what is happening in the back end?
- The POST call initiates the device registration to the Windows Autopilot service (DDS – Device Directory Service) using the hardware hash.
- DDS generates a unique ID known as ZTDID (Zero Touch Device Id, ZTD is the codename for Windows Autopilot in MS) against the registration, which is returned to Intune (via the GET call to query the status, in the form of the “device registration id” GUID)
The device entry appears under Microsoft Intune > Device enrollment > Windows enrollment > Windows Autopilot devices.
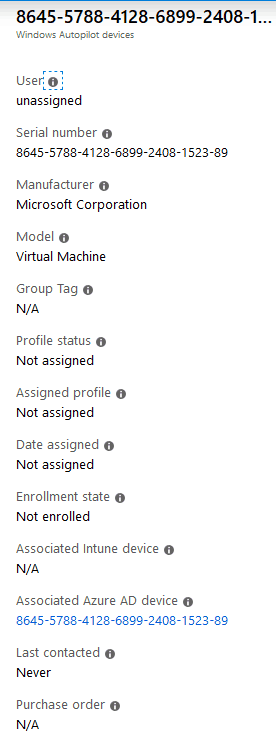
Completed? Not Completed? – Azure AD Windows Autopilot Behind the Scenes
But the story doesn’t end here. Noticed the Associated Azure AD device object in the Autopilot device properties. The Device has yet to start the provisioning process, and an Azure AD object has been created already?

Autopilot & Azure AD Device Registration Service (DRS)
With the Autopilot device object created, the Azure AD Device Registration Service (DRS) pre-creates an Azure AD device object stamping the ZTDID on it.
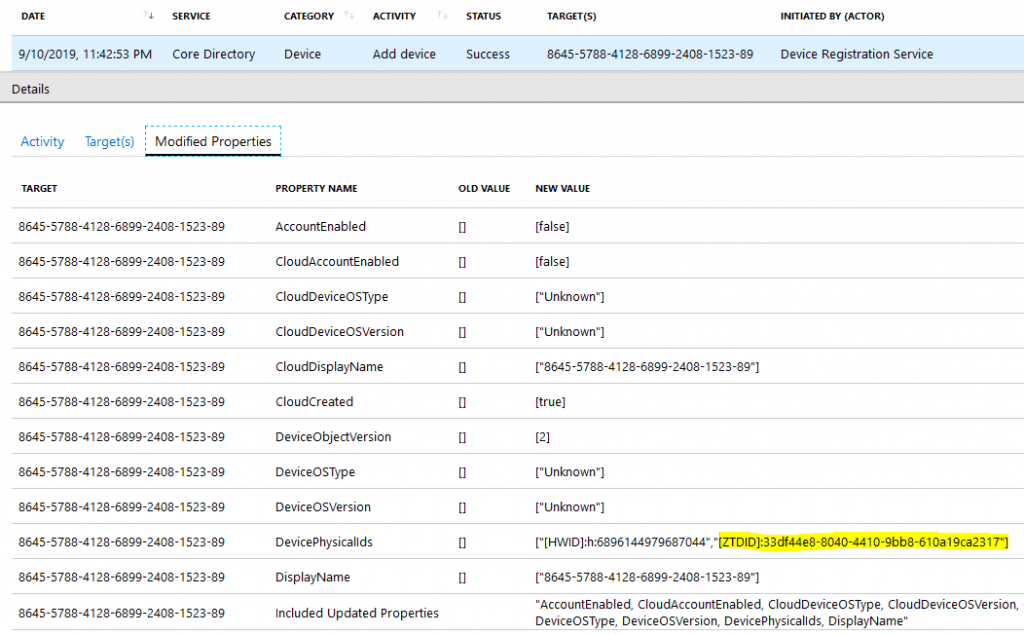
This blank device object appears under the Azure AD devices, with the Serial Number of the Device as its Name. At the moment, it is Disabled.
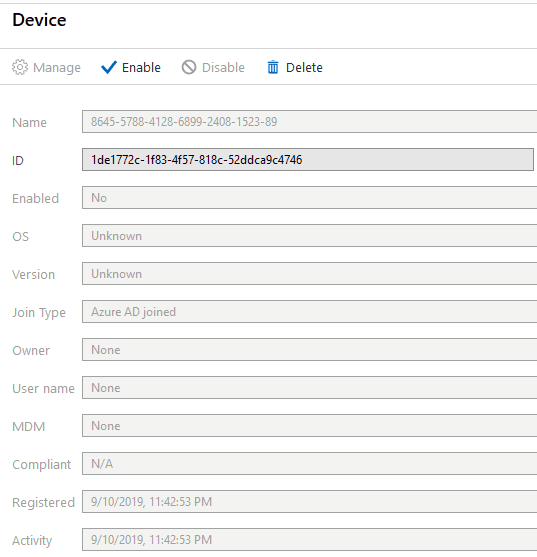
What makes the Windows Autopilot device become a member of the dynamic device group created against the query of ZTDID?
If you have any prior knowledge of the Windows enrollment flows, in the case of Azure AD joining an Azure AD registration, you would know that Azure DRS creates the Azure AD device object after the user initiates the join/registration activity on the Device.
But, Windows Autopilot is an exception where the Azure AD device object is pre-created.
This Azure AD device object makes the Device a member of the dynamic device group for Autopilot devices you create in Azure with the query (Device.devicePhysicalIDs—any _—contains “[ZTDId]”).
Move Autopilot Device Registered to One Tenant to Another Tenant?
The DDS registration ID (ZTDID) is universally unique based on hardware hash. What will happen when you have a device registered to Autopilot from one tenant and plan to move it to another tenant?
You would need to delete the device entry from the first tenant’s Autopilot devices, triggering a deregistration call from Intune and clearing the ZTDID from DDS.
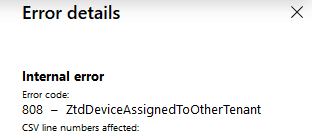
This will help register the same device with another tenant so that it can be added from another tenant. Failing to do so will always result in the error below.
Autopilot Error Code 808 – ZtdDeviceAssignedToOtherTenant. CSV line numbers affected
With the Device becoming a member of the Autopilot device AAD group, we can continue to the next part.
Profile Configuration and Assignment
This is where you, as an IT Admin, will create the Autopilot deployment profile from under Microsoft Intune > Device enrollment > Windows enrollment > Windows Autopilot deployment profiles to configure the OOBE as per the deployment requirements.
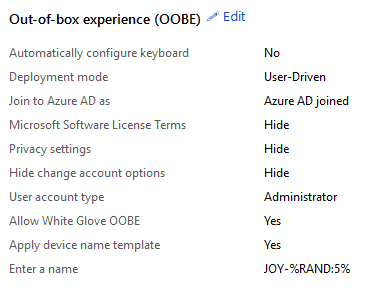
Graph Post Call with the Profile ID
The Graph call that works behind the scenes
RequestURL:https://graph.microsoft.com/beta/deviceManagement/windowsAutopilotDeploymentProfilesHTTP Version: HTTP/1.1 Request method: POST Type: application/json Raw Content: { "@odata.type": "#microsoft.graph.azureADWindowsAutopilotDeploymentProfile", "displayName": "WhiteGlove", "description": "Test", "deviceNameTemplate": "JOY-%RAND:5%", "language": "", "enableWhiteGlove": true, "extractHardwareHash": false, "roleScopeTagIds": [], "outOfBoxExperienceSettings": { "deviceUsageType": "singleUser", "hideEscapeLink": true, "hidePrivacySettings": true, "hideEULA": true, "userType": "administrator", "skipKeyboardSelectionPage": false } }
If everything is fine, the response to this POST call returns as 201 created. The content has the profile Id.
{"@odata.context": "https://graph.microsoft.com/beta/$metadata#deviceManagement/windowsAutopilotDeploymentProfiles/$entity","@odata.type": "#microsoft.graph.azureADWindowsAutopilotDeploymentProfile","id": "3e2b0a25-a332-4deb-83fb-60a0dc42e95e","displayName": "WhiteGlove","description": "Test","language": "os-default","createdDateTime": "2019-09-02T09:34:38.9238427Z","lastModifiedDateTime": "2019-09-02T09:34:38.9238427Z","enrollmentStatusScreenSettings": null,"extractHardwareHash": false,"deviceNameTemplate": "JOY-%RAND:5%","deviceType": "windowsPc","enableWhiteGlove": true,"roleScopeTagIds": ["0"],"outOfBoxExperienceSettings": {"hidePrivacySettings": true,"hideEULA": true,"userType": "administrator","deviceUsageType": "singleUser","skipKeyboardSelectionPage": false,"hideEscapeLink": true}}
Another Post Call – Assignment
The profile, as created, now waits for assignment to the group (the Autopilot dynamic device group). As the assignment is made, the Graph call works behind the scenes.
RequestURL: https://graph.microsoft.com/beta/deviceManagement/windowsAutopilotDeploymentProfiles/3e2b0a25-a332-4deb-83fb-60a0dc42e95e/assignmentsHTTP Version:HTTP/1.1Request method:POSTPost DataType:application/jsonRaw Content:{"target": {"@odata.type": "#microsoft.graph.groupAssignmentTarget","groupId": "6239fcb0-190e-431f-b618-b1510d71986a"}}
I noticed the data type in the Graph call – the profile namespace is azureADWindowsAutopilotDeploymentProfile and is not under deviceManagement, which is Intune. Intune provides a UI to create the autopilot deployment profile but is not the endpoint from where the Device gets the profile.
Where does the Device gets the profile from? Check this terrific blog from Michael Niehaus.
Profile Assignment Status – Not Assigned – Assigning – Assigned?
The response 201 Created states if the assignment is successful. Once the profile is assigned to the group, the Profile status of the Autopilot device object changes from “Not Assigned” to “Assigning.”

to finally “Assigned.”

You may not see this status change as it requires a continuous refresh of the page.
Autopilot Profile Assignment from MSfB (Microsoft Store for Business)
For profiles created in MSfB or profiles assigned from MSfB, the Profile status of the Autopilot device object will show as “Externally Assigned.”
Why will the Device Skip Autopilot provisioning?
Deleting the pre-created Azure AD device object will result in the device skipping/failing Autopilot provisioning.
Only the Device object pre-created by Azure DRS during Autopilot (DDS) registration has the ZTDID stamped to it.
User-Driven
For user-driven mode, when the Device starts OOBE setup and connects to the network, it checks with the Autopilot service for status and downloads the profile accordingly.
Because of this, you will still get the custom Azure sign-in page as pre-negotiated.
But as you sign in to perform the auth and the Device reaches out to the Azure DRS endpoint to request the Join process, Azure DRS will fail to find a match for the corresponding Azure AD device object as provided in the request.
In this case, the provisioning will not fail as Azure DRS will create a new device object. However, it will not have the ZTDID stamping. The provisioning will fall back to the consumer OOBE flow, which is the normal AAD join flow from OOBE.
More explanation is coming in the next post, Part 3 of this Autopilot series, so stay tuned!
Self-Deploy
For self-deploy mode, it will fail at the ESP stage. Device preparation on the AADEnroll task since the service will fail to get the associated Azure device object.
This security mechanism stops rogue devices from joining Azure AD with no credentials.
WhiteGlove?
The same is true for WhiteGlove enabled user-driven deployment because the WhiteGlove process is essentially carried out in the self-deploy mode process.
I will put more light on this in Part 4 of this series, specifically for WhiteGlove.
Enable Auto-Enrollment?
The profile is assigned, and the last thing that needs to be done is to enable Auto-enrollment.
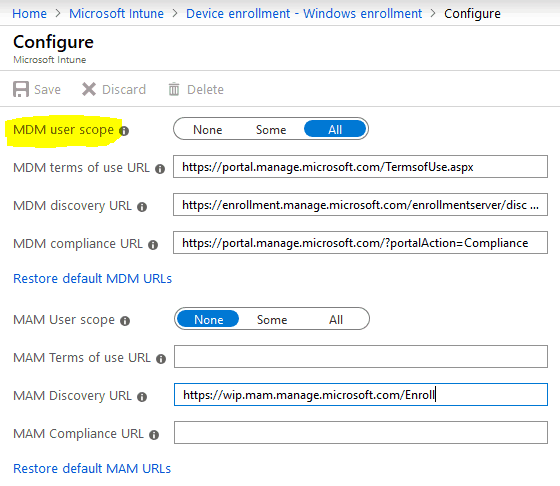
Windows Autopilot Architecture Schema
This completes the Admin-End configuration phase of Windows Autopilot. If you have read this, you can summarize the entire flow schematically, as shown below.
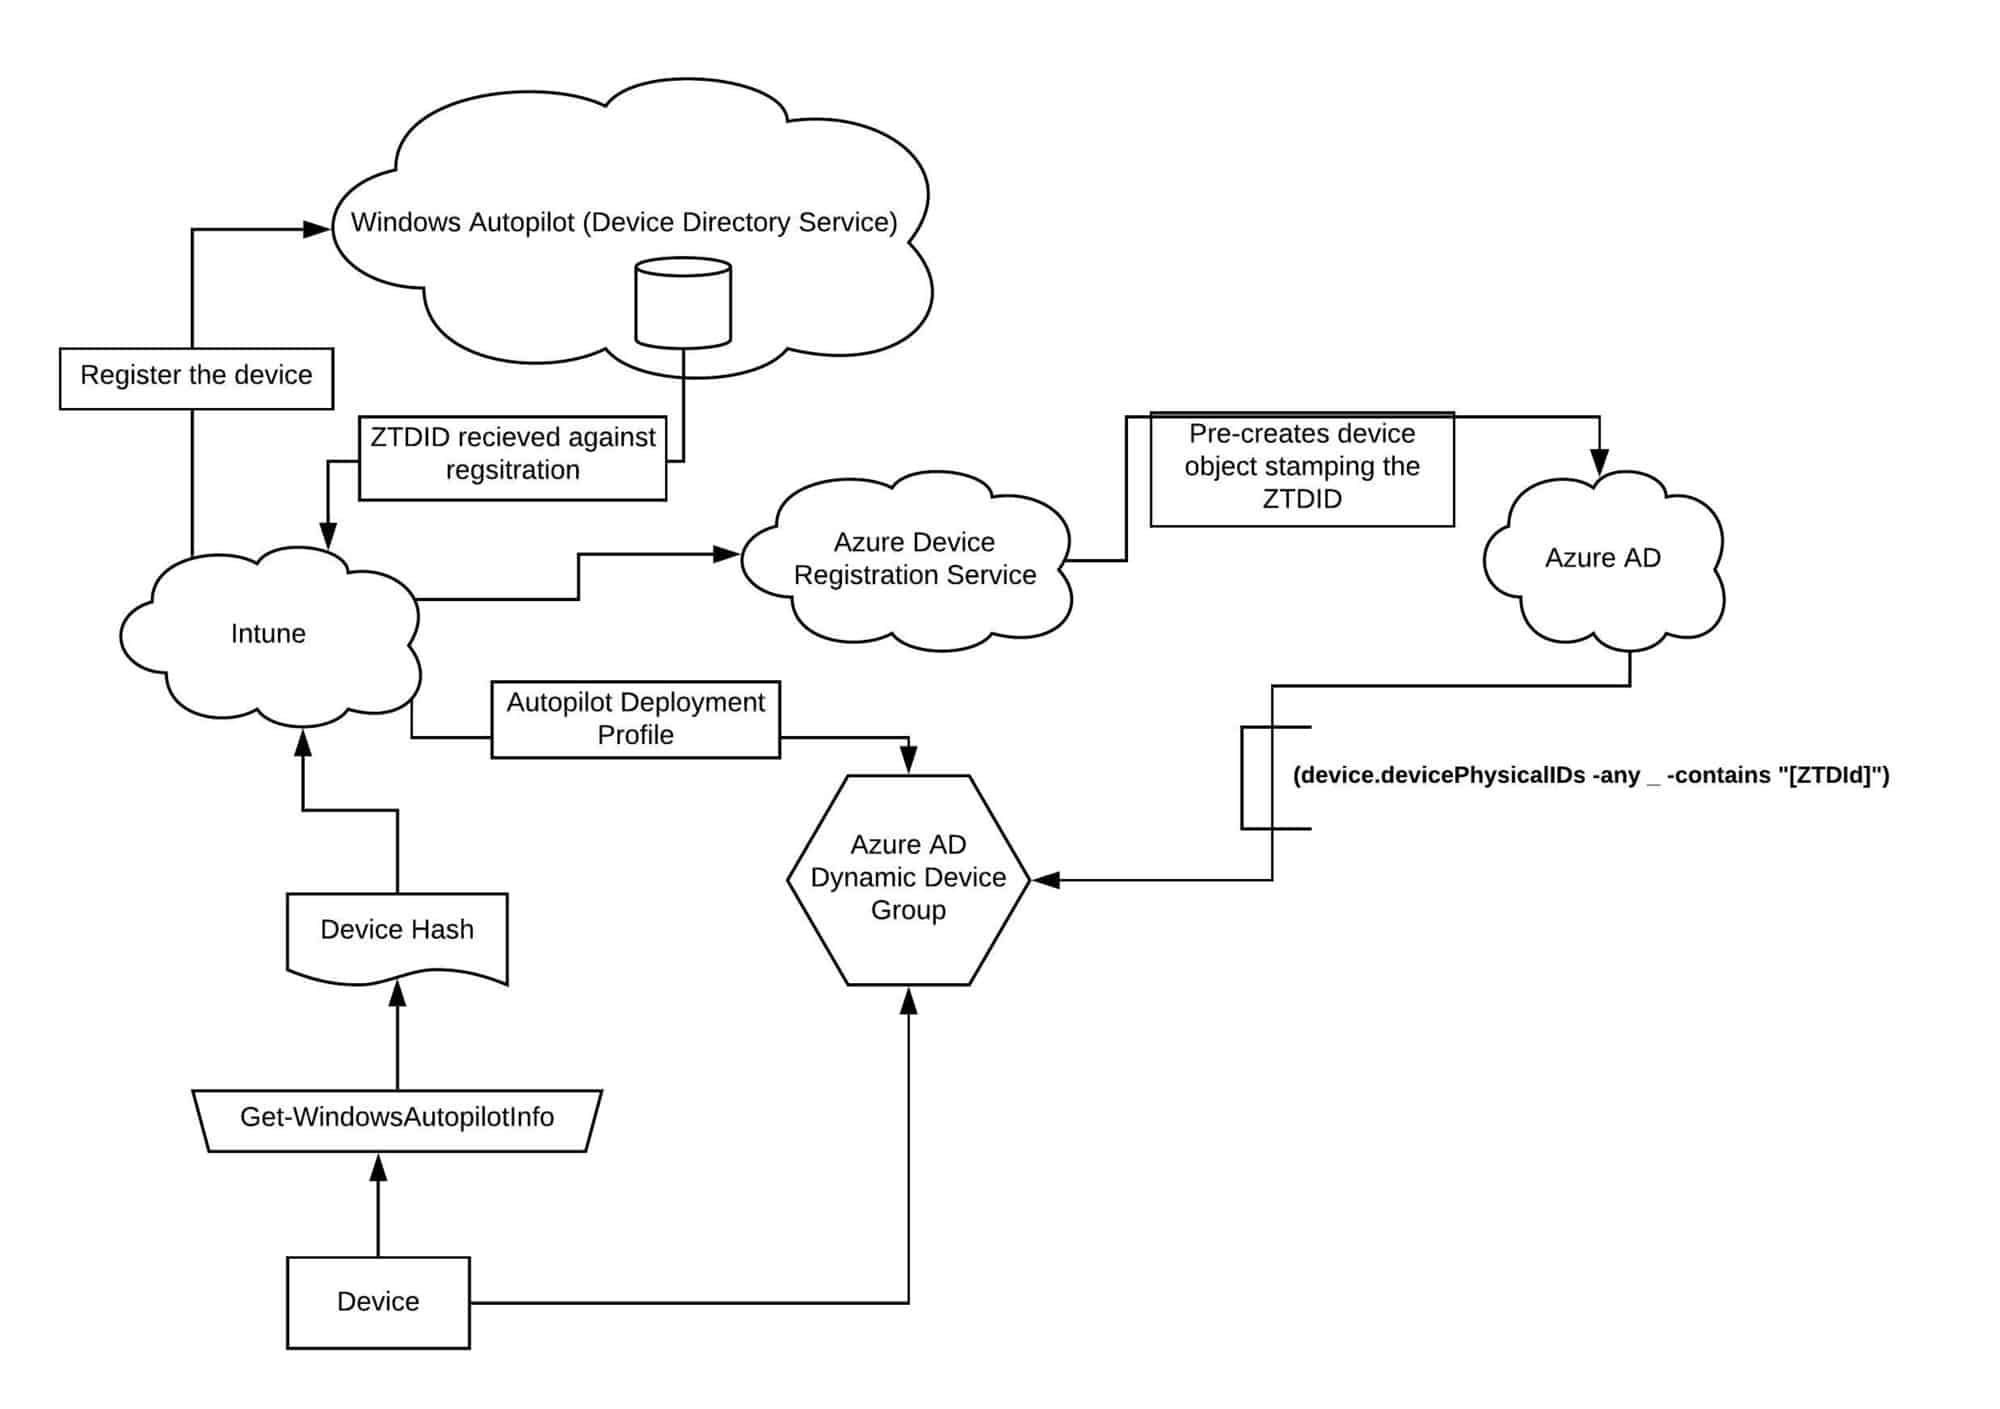
To be Continued…Windows autopilot Behind the Scenes Secrets
In my next post, I will continue discussing Windows Autopilot with respect to the device end implementation. Read and learn something new every day!
- DDS – Device Directory Service
- ZTDID – Zero Touch Device Id
- DRS – Device Registration Service
Resources
- Step-by-Step Guide Windows AutoPilot Process with Intune
- Beginners Guide Setup Windows AutoPilot Deployment
- Windows Autopilot Video Starter Kit
We are on WhatsApp. To get the latest step-by-step guides and news updates, Join our Channel. Click here –HTMD WhatsApp.
Author
Joymalya Basu Roy is an experienced IT service professional with almost 5 years of experience working with Microsft Intune. He is currently working as a Senior Consultant – Architect with Atos India. He is an ex-MSFT, where he worked as a Premiere Support Engineer for Microsoft Intune. He was also associated with Wipro and TCS in the early stages of his career. He was awarded the Microsoft MVP award for Enterprise Mobility in 2021. You can find all his latest posts on his own blog site MDM Tech Space at https://joymalya.com


FYI –
> The DDS registration Id (ZTDID) is universally unique based on hardware hash.
ZTDID is just a randomly generated GUID that ties the AzureAD object with the Autopilot ID (ZTDID *is* the GUID of the Autopilot Object), there’s nothing special about it.
If you look at the AzureAD devicePhysicalIDs array, the actual hardware hash is stored in [HWID].
If you import a device into Autopilot using a CSV and then delete it, it will get a different ZTDID each time. However, the HWID will be constant.