Let’s explore the Beginners Guide to Setup Windows Autopilot Deployment. Windows Autopilot is the buzzword; most device management folks talk about Windows Autopilot or Microsoft Autopilot.
I don’t know whether Autopilot will replace OSD, but learning a new technology is always good for IT Pros like me.
This blog has several posts about Windows Autopilot (Microsoft Autopilot). The Windows Autopilot section has links to all the Autopilot-related blogs.
The internal linking session includes some basic posts related to Autopilot. Hopefully, they will help you start the Windows Autopilot journey.
Table of Contents
Video Tutorial Windows Autopilot Deployment
The video tutorial provides an end-to-end experience of AutoPilot. Autopilot is a cloud service from Microsoft that controls the Windows OOBE screen.
- Dynamically Deploy Security Policies and Apps to Windows Autopilot Devices
- Where is Autopilot Assign Profile Button in Intune Portal
- Windows Autopilot End to End Process Guide
- Repurpose/Reprovision Existing Devices to Windows Autopilot
- Windows AutoPilot Profile AAD Dynamic Device Groups.
- Windows Autopilot License Requirements
What is Window Autopilot?
In layman’s words, “Windows Autopilot is a mechanism to simplify the OOBE. Windows Autopilot is a group of technologies to CONFIG operating system & deploy applications.”
This technology helps IT Pros deploy standard images across the organization modernly. Autopilot deployment won’t deploy the Operating system. The Operating System (OS) should be on your device!
Official Statement: Windows Autopilot is a collection of technologies for setting up and pre-configuring new devices. It can also reset, repurpose, and recover devices.
I recommend reading the Microsoft documentation to understand this more. What are the prerequisites for setting up Windows Autopilot? We have those listed in the above documentation.
Windows Autopilot Works with VMWare Airwatch and MobileIron?
Windows AutoPilot works with other MDM providers besides Microsoft, like Intune. However, I have never tested the Windows AutoPilot deployment solution with non-Microsoft MDM providers.
Windows Autopilot = OSD via SCCM or MDT?
Windows Autopilot is not equal to OSD via SCCM and MDT. OSD solutions in SCCM can cater to end-to-end OS deployment scenarios. As I mentioned above, Autopilot can’t deploy the Operating system to a machine.
The Operating system should already be on the device. Only AutoPilot can handle customization. However, SCCM/MDT OSD can deploy Boot images and OS images, Install Drivers, Configure the OS, Deploy applications, etc.
How to Setup Windows Autopilot Deployment?
In this post, I will walk you through setting up Windows AutoPilot. This is mainly for lab setup and test purposes. However, this idea can be used with physical machines as well. You don’t need to go through the following steps when you use physical machines.
Create Hyper-V Machine for Windows Autopilot Deployment
Enable the Hyper-V feature and create a virtual machine on your Windows 10 device. Then, as I showed in the video tutorial, run the following PowerShell commands.
This PS commands you to create a VM for Windows AutoPilot deployment. This step is not required if you perform an AutoPilot deployment of a physical machine.
I used the Windows 10 1803 version in the video and the post to explain the scenario.
- Enable-WindowsOptionalFeature -Online -FeatureName Microsoft-Hyper-V -All
New-VMSwitch -Name AutopilotExternal -NetAdapterName <Name of Network Adapter with internet access> -AllowManagementOS $true New-VM -Name WindowsAutopilot -MemoryStartupBytes 2GB -BootDevice VHD -NewVHDPath .\VMs\WindowsAutopilot.vhdx -Path .\VMData -NewVHDSizeBytes 80GB -Generation 2 -Switch AutopilotExternal Add-VMDvdDrive -Path <Path to Windows 10 ISO> -VMName WindowsAutopilot Start-VM -VMName WindowsAutopilot
Install Windows 10 1803. Once the installation is complete, create a checkpoint!
- Checkpoint-VM -Name WindowsAutopilot -SnapshotName “Finished Windows install”
Get the Hardware ID of the VM for Windows Autopilot Deployment
Log in to the Windows 10 virtual machine that you just created. Run the below PS commands to generate a CSV file with the VM’s hardware ID. The administrator should run the PowerShell commands. Make sure your virtual machine is connected to the internet.
Also, don’t forget to press Y & A whenever PowerShell prompt to do that 😉 The power shell will automatically download & run the required scripts from the internet. You can see this in the video tutorial.
The output of the following PS commands is C:\HWID\AutopilotHWID.csv
| C:\HWID\AutopilotHWID.csv |
|---|
| md c:\HWID |
| Set-Location c:\HWID |
| Set-ExecutionPolicy Unrestricted |
| Install-Script -Name Get-WindowsAutopilotInfo |
| Get-WindowsAutopilotInfo.ps1 -OutputFile AutopilotHWID.csv |
Import Devices into Intune Portal for Windows Autopilot
Copy the C:\HWID\AutopilotHWID.csv file from the virtual machine and copy it to the file share. This will help you upload the CSV file to Intune. Open the Intune blade from the Azure portal and Import the CSV file containing the machine hardware ID and other details.
Navigate via Azure Portal -> Microsoft Intune -> Device Enrollment – Windows Enrollment -> Windows AutoPilot Devices -> Click on IMPORT button -> select the CSV file and upload !
- Import Windows AutoPilot devices from a .CSV file.
- Formatting requirements
- <Serial Number>, <Windows Product ID>, <Hardware Hash>, (optional <Order ID>)
- 175 rows maximum allowed
Intune Enrollment Settings, Azure Portal Company Branding, and License
Following are the three (3) steps you need to complete before starting the Windows AutoPilot deployment process.
- Configure company branding
- Configure Microsoft Intune auto-enrollment
- Assign EMS or Microsoft 365 License to the user
You can configure the company branding from the Azure portal
You can configure Microsoft Intune Auto Enrollment whenever the machine joins Azure AD
Create Windows Autopilot Deployment Profiles
To explain the scenario, I will create an AutoPilot Deployment profile to customize the OOBE experience for the end-user.
The Windows AutoPilot profile provides only three (3) customization options. I hope there will be more options in the future. This is shown in the video tutorial.
- Navigate via Azure Portal -> Microsoft Intune -> Device Enrollment – Windows Enrollment
- Click on Deployment profiles under Windows Autopilot Deployment Program and select Create a profile.
- In the Create profile blade, set the name to “IT AutoPilot Profile 1“, click on Out-of-box experience (OOBE) and configure the following:
OOBE Customisation Settings
Privacy Settings >Value > Hide
End-user license agreement (EULA) >Value> Hide
User account type Standard or Administrator >Value> Standard User
Assign Devices to Autopilot Profiles
Devices will be assigned to those profiles once the AutoPilot Deployment profiles are created and configured. The video tutorial shows this.
Navigate via Azure Portal -> Microsoft Intune -> Device Enrollment – Windows Enrollment -> Windows AutoPilot Devices -> select (checkbox) one of the uploaded devices and click on the “Assign Profile” button.
On Assign Profile blade, select AutoPilot Profile from the drop-down list and pick the one you want to assign.
We can’t assign devices to Autopilot profiles. Instead, it would help if you gave Autopilot profiles to Azure AD groups. I have explained this process in the How to Assign Autopilot Profiles to Azure AD Groups blog post.
Configure AutoPilot Enrollment Screen for Windows AutoPilot Deployment
Configuring the AutoPilot Enrollment screen is pretty new to Autopilot deployment. This will give the user an indication of the timing of the enrollment process.
This is available for Windows 10 1803 and later, as shown in the video tutorial.
What is Windows Intune Enrollment Screen?
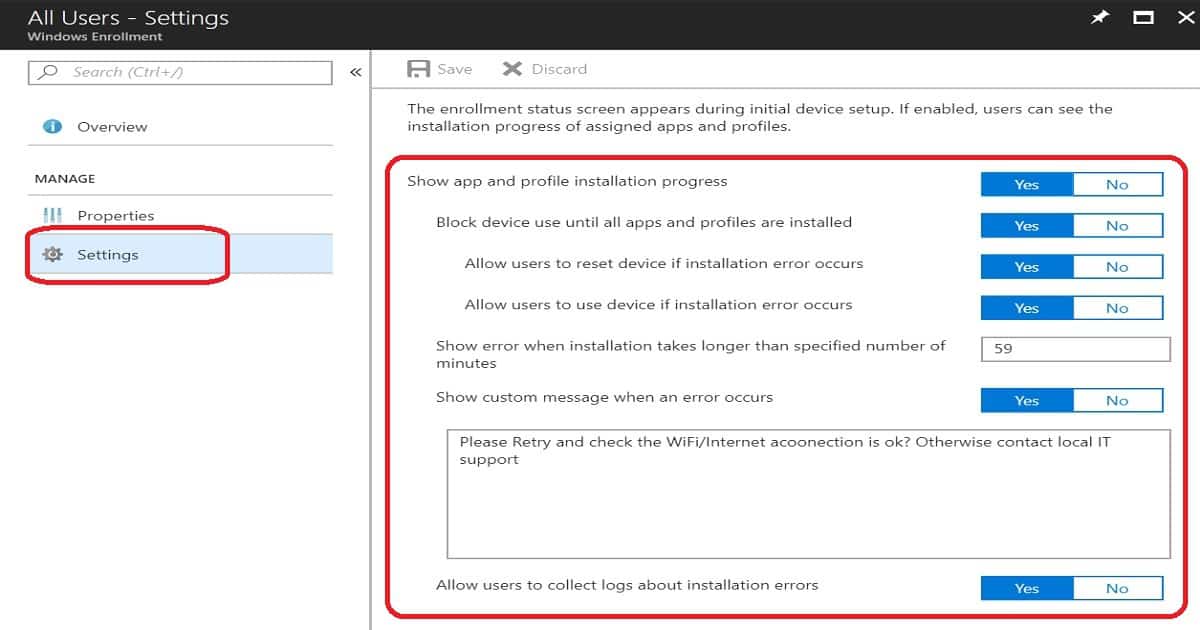
The enrollment status page appears during the initial device setup. If enabled, users can see the installation progress of assigned apps and profiles. I recommend reading Microsoft documentation.
- Navigate via Azure Portal -> Microsoft Intune -> Device Enrollment – Windows Enrollment -> Enrollment Status Page
- Choose Default > Settings.
- For Show app and profile installation progress, choose Yes.
- Choose the other settings you want to turn on and then choose Save.
By default, the enrollment status page is deployed to all users. Intune admins don’t have an option to deploy the Intune enrollment status page to the custom set of users.
At this moment, the Intune enrollment status page is a global setting for your tenant. Following are the setting customization options available on the Enrollment Status page. I’m sure this will evolve, and Microsoft will add new features.
| Setting Customization Options available on the Enrollment Status page |
|---|
| Show app & profile installation progress |
| Block device use until all apps and profiles are installed |
| Allow users to use the device if an installation error occurs |
| Show error when installation takes longer than the specified number of minutes |
| Show custom message when an error occurs |
| Allow Users to collect logs about installation errors |
End User Experience of Windows Autopilot Deployment
This section will discuss the end-user experience of Windows AutoPilot with the Intune enrollment status page or screen. You can also see this in the video tutorial.
To test the Intune Enrollment Status page, I have deployed some applications to all users, dynamic AAD user groups, and AAD device groups.
How to Reset Windows 10 1803 virtual machine
This is required ONLY when you are testing in your Hyper-V lab. When you have a physical machine, you should find a method to re-provision it to reach Windows 10 OOBE.
Once it’s on the OOBE screen, Windows AutoPilot will handle the predefined tasks.
Windows 10 devices can be reset from Windows 10 – Settings page.
Go to Settings > Update & Security > Recovery on the Virtual Machine and click on Get Started under Reset this PC. Select Remove Everything and remove my files. Finally, click on Reset.
How to Start Windows Autopilot Deployment
Make sure Windows 10 machine has an internet connection. Wi-Fi is the preferred option. The internet behind the corporate proxy can create some issues. You may have to open the required ports and raise proxy exception requests.
User Login and AAD Branding Page
The User Login and AAD branding page will show the details of the branding you have completed in the above stages. The user should log in with their corporate ID and password.
This will take care of the user identification and authentication part. For more security, you can enable MFA (Multi-Factor Authentication).
End-User Experience – Intune Enrollment Status Page
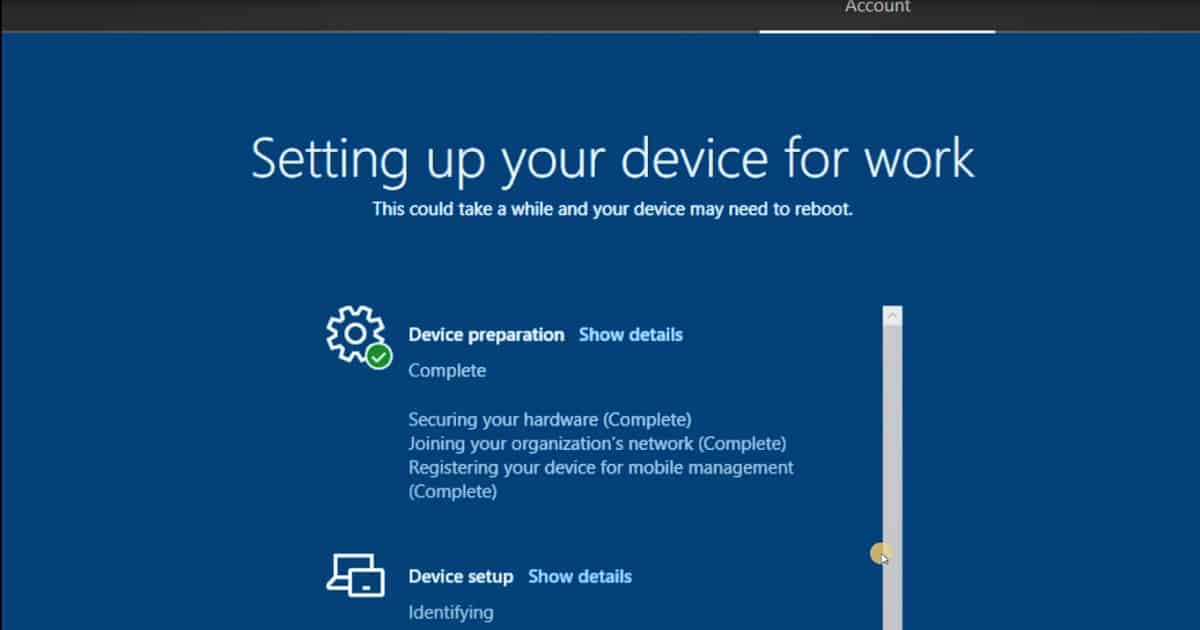
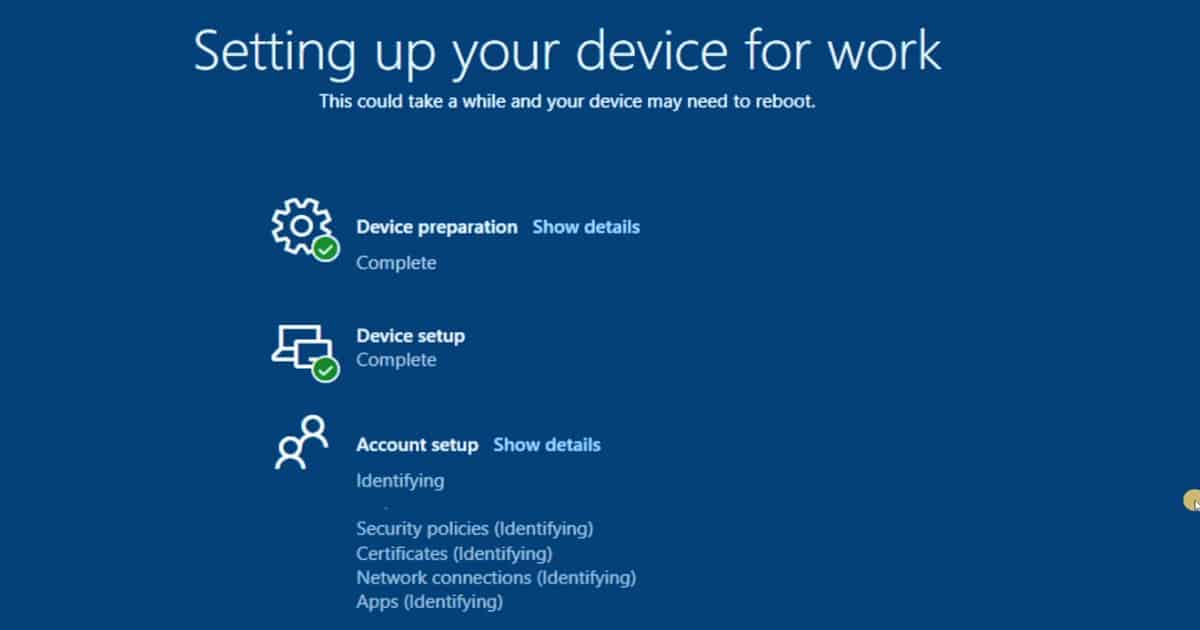
The Intune enrollment status page has 3 (three) parts.
- Device Preparation
- Device Setup
- User Account Setup
Device Preparation stage – Windows Intune Enrollment Status Page
Device Preparation and Device Setup. The device hardware verification, AAD Join, and MDM/Intune enrollment will happen at this stage.
- Securing your hardware
- Joining your organization’s network (Azure AD Join or Domain Join)
- Registering your Device for Mobile Device Management (Intune, Airwatch, etc..)
Device Setup – Intune enrollment status page
The device setup stage in the Intune enrollment status page is where device-targeted applications and security configurations will get deployed.
- Security Policies (Configuration/Compliance policies)
- Certificate Profile Deployments
- Network Connections (VPN Profile deployments?)
- Application Deployments
Account Setup (User Side) Windows Intune Enrollment Status Page
Account setup (User Side) is the last stage of the Autopilot enrollment status screen. Windows Autopilot Enrollment is the stage where the user profile creation and user-targeted deployments will kick in and install in the background.
This stage will start only after the user logs in to the device or Windows 10 1803 machine.
- Security Policies (Configuration/Compliance policies)
- Certificate Profile Deployments
- Network Connections (VPN Profile deployments?)
- Application Deployments
Verification of Windows AutoPilot Deployment
This is the final stage, where you will see the deployment of Windows Autopilot. You can log in to the Windows 10 1803 machine and confirm whether all the policies and apps are already on the device.
As mentioned, I tested the following deployment scenarios, and all worked well for me. However, I’m unsure whether dynamic device groups-based app installation happened during or after the AutoPilot enrollment status screen. That requires more testing!
- App Deployment to Azure AD Dynamic Device Groups
- App Deployment to All Devices
- Configuration/Security Policy (Disable Cortana) to All Users
Resources
- Evaluating/Testing/Demoing modern deployment with Windows Autopilot
- Airwatch and Intune Integration, along with Microsoft Autopilot scenarios
We are on WhatsApp. To get the latest step-by-step guides and news updates, Join our Channel. Click here –HTMD WhatsApp.
Author
Anoop C Nair is Microsoft MVP! He is a Device Management Admin with more than 20 years of experience (calculation done in 2021) in IT. He is a Blogger, Speaker, and Local User Group HTMD Community leader. His primary focus is Device Management technologies like SCCM 2012, Current Branch, and Intune. He writes about ConfigMgr, Windows 11, Windows 10, Azure AD, Microsoft Intune, Windows 365, AVD, etc.


great video and information
thanks
Fj
Thank you for the feedback !
Thanks Anoop. Easy to understand:)
Thank you for the feedback !
I cant see the Assign Profile button in my device overview..
I think all your imported devices are (already) assigned to at least one profile…
It seems some changes were made in the Intune console and we cannot Assign Profile. However this is possible from the Microsoft Store for Business (Strange).
Yes, I know. I have a post to explain this changes in AutoPilot framework. Azure AD object is created when you import a machine and they you can add that AAD object to AAD Group. Once the device is added to AAD group, then that group can be used in AutoPilot Profile assignments.
Hello,
Thanks for this very useful post.
I discover Windows AutoPilot and would like to know which methods to re-provision physical machines are available to reach Windows 10 OOBE
Hello Jean – Good Question. We can use SCCM or MDT to re-provision the existing devices and help them to reach Windows 10 OOBE screen. Once the devices are in Windows 10 OOBE screen, we can use AutoPilot to deploy machines using that workflow.
Hello, Mr. Nair!
If a user recives a new device from his/her organization. It is set up to enroll using widnows autopilot. When the user turns on the device, in order for the windows autopilot to work, does the user then need to have a wired connection to internet, or will the windows autopilot prompt the user to connect to wifi?
-Bendik G
Hi Bendik,
The user will be prompted to connect to a WiFi network if no wired network is detected. The user however does have the option to bypass the WiFi network selection page and proceed with OOBE setup during which no Autopilot profile information will be received due to lack of network connectivity. I confirmed with Microsoft that there is no way around this.
How to separate Client Apps installation during AutoPilot and post-enrollment. I don’t want them to get installed during AutoPilot but once the computer is enrolled and user logs into their desktop, then it should start installing the applications.
Are there special considerations for VMs created in VMWare ESXi? Solution works fine for physical hardware as well as Hyper-V VMs but VMWare ESXi VMs don’t want to take the reimage…
I have done this testing with Hyper-V but not sure about ESXi VMs. I never tested this. Also always check whether this is officially supported by both the vendors or not.