Let’s learn how to turn on Windows Device Protection with Core Isolation Memory Integrity. Memory integrity is a feature of core isolation. Turning on the Memory integrity setting can help prevent malicious code from accessing high-security processes in the event of an attack.
Windows Security provides built-in security options to help protect your device from malicious software attacks. Core isolation is a security feature of Microsoft Windows that protects important core processes of Windows from malicious software by isolating them in memory.
Memory integrity prevents attacks from inserting malicious code into some Windows Core processes. It does this by virtualizing some of those processes, which results in the processes being isolated from other parts of memory.
Memory integrity, also known as Hypervisor-protected Code Integrity (HVCI) is a Windows security feature that makes it difficult for malicious programs to use low-level drivers to hijack your computer.
Microsoft is continuously investing in improving the default security baseline for Windows. In the future update of Windows 11, you’re going to many security features for Windows that will help protect hybrid work, with the great addition. Here’s a look at New Security Features for Windows 11.
- Windows 11 Privacy Settings for Camera and Mic
- Security Baselines Download Configuration Guide
- Best Antivirus for Windows 11 Microsoft Defender | App Browser Protection | Firewall Protection
Device Protection with Core Isolation Memory Integrity In Windows
Let’s follow the steps to turn on or off Core Isolation Memory Integrity In Windows, and You must be signed in as an administrator.
- On your Windows 10 or Windows 11 Device, Click on the Start button.
- Type Windows Security in the search box. Click on Device security directly from search results or Select the Start button and type “Core isolation”.
- Select the Core Isolation system settings from the search results to open the Windows security app.
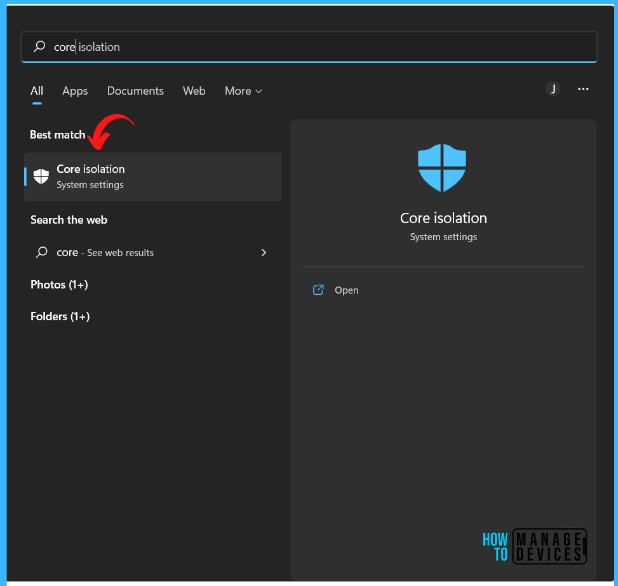
Core isolation protects against malware and other attacks by isolating computer processes from your operating system and device.
Under Device Security, Select Core isolation details. In the Memory integrity, toggle the switch to turn it on or off. The user account control may ask you to approve and click on Yes to proceed.
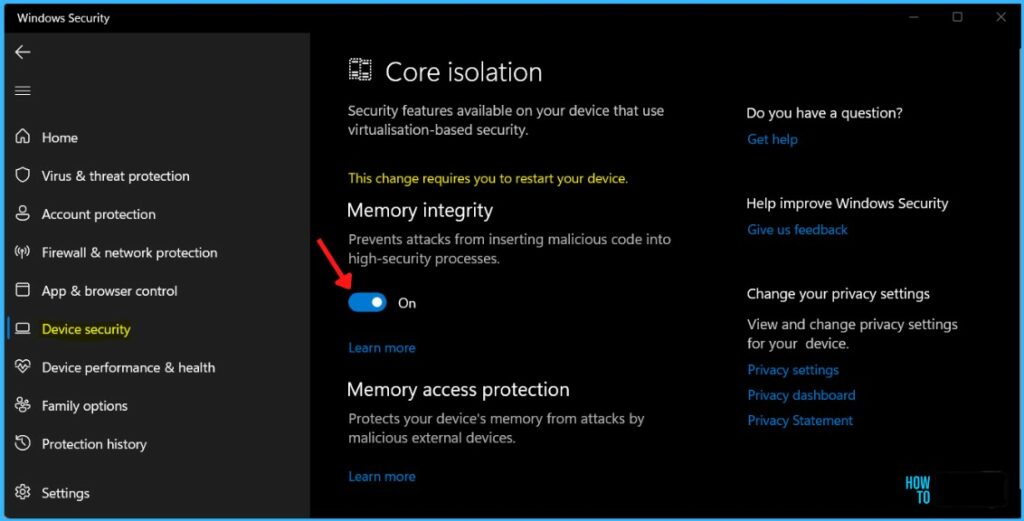
Memory integrity will start checking for incompatible drivers. Turned on the Memory Integrity and prompted to Restart your PC to apply the changes and validate the changes from windows security.
How to Resolve Incompatible Driver Warnings
If memory integrity fails to turn on, it may tell you that you already have an incompatible device driver installed. Check with the device manufacturer to see if an updated driver is available.
HP, Dell, Microsoft Surface, and Lenovo have done a fantastic job of providing technicians with driver cabs for use during deployment. You can utilize the Driver Pack file to deploy Windows images to several client systems.
If they don’t have a compatible driver available, you might be able to remove the device or app that uses that incompatible driver.

Note: If you try to install a device with an incompatible driver after turning on memory integrity, you may see the same message. If so, the same advice applies – check with the device manufacturer to see if they have an updated driver you can download, or don’t install that particular device until a compatible driver is available.
Enable Or Disable Core Isolation Memory Integrity in Windows using Registry
Let’s follow the steps below to Protect Devices with Core Isolation Memory Integrity in windows using the Registry –
Important – We recommend you create a backup before editing the Registry.
In Windows 10 or 11 devices, Click on the Start button, type regedit, and then press Enter.
In the Registry Editor Locate to HKEY_LOCAL_MACHINE\SYSTEM\CurrentControlSet\Control\DeviceGuard\Scenarios
Right-click the Scenarios key and select New > Key.
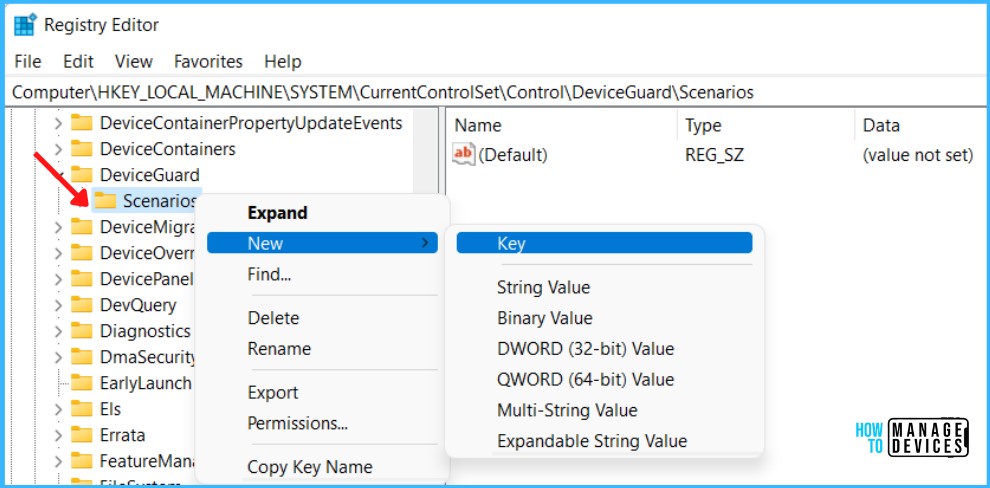
Enter the key value HypervisorEnforcedCodeIntegrity. Right-click on the HypervisorEnforcedCodeIntegrity Key and select New > DWORD (32-bit) Value, and provide the name Enabled.
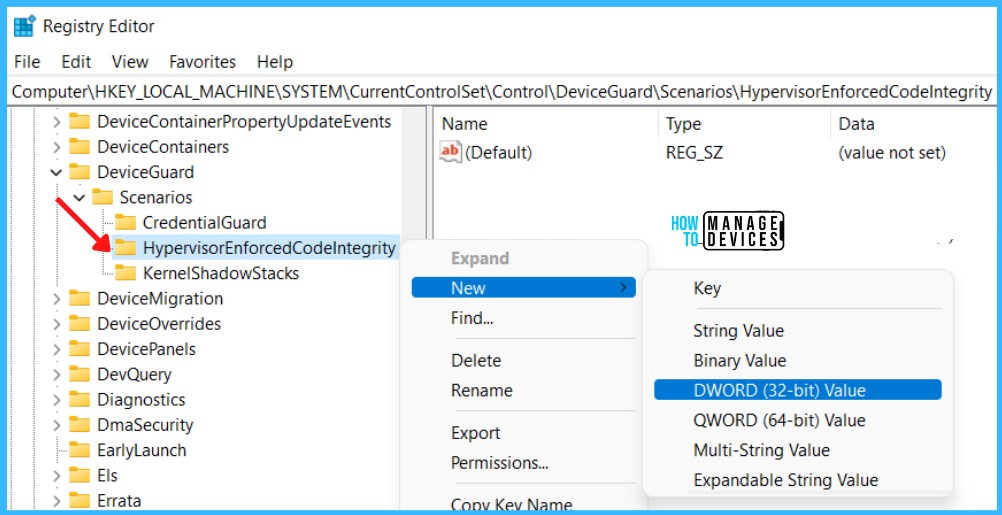
Double-click the newly created key and set Value data to 1 to enable or Value data to 0 to disable. After making these changes, restart the computer.
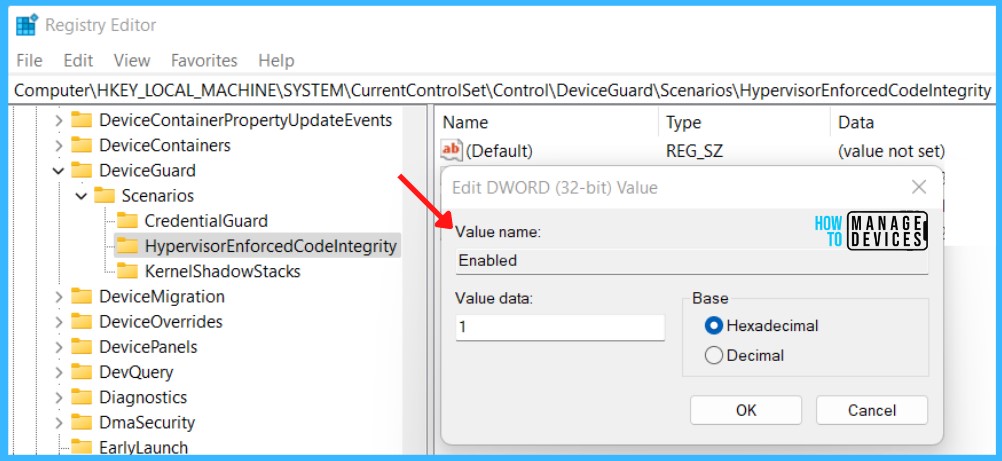
Note – Since adding the registry value manually may lead to an issue, it will take time for the system admin to process. You can also copy the below command and create a batch file to automate the settings.
Let’s follow the steps below to automate the changes via Registry. To add or import a registry value on Windows 10 or 11 PC, follow these steps –
Open Notepad, Copy and paste the registry value below into the text editor. Turn On Core Isolation Memory Integrity –
Windows Registry Editor Version 5.00

[HKEY_LOCAL_MACHINE\SYSTEM\CurrentControlSet\Control\DeviceGuard\Scenarios\HypervisorEnforcedCodeIntegrity]
"Enabled"=dword:00000001
To Turn Off Core Isolation Memory Integrity, Open Notepad, Copy and paste the registry value below into the text editor –
Windows Registry Editor Version 5.00

[HKEY_LOCAL_MACHINE\SYSTEM\CurrentControlSet\Control\DeviceGuard\Scenarios\HypervisorEnforcedCodeIntegrity]
"Enabled"=dword:00000000- In the File menu, select Save As and click Browse to your preferred folder or location. In the File name box, provide the appropriate name “FileName.reg” with the .reg extension and Choose Save as type “All” from the drop-down list. Click Save.
- The registry file will appear on your saved location. To start the execution, Double click or Right-click and select the Open option OR press Enter on the protected .reg file content to merge into the local registry.
- A warning box with the following messages prompted, Click Yes to continue.
- Once the information in the path of the Registry (.reg) file has been successfully entered into the registry below prompt will appear. Click OK.
This is especially useful for applying the same setting for multiple users to be distributed across the network.
- Restart Windows Explorer or restart Windows 10 or 11 PC to apply the changes.
