Today, let’s learn how to add new session hosts to the existing host pool. This post applies only to the Azure Virtual Desktop spring 2020 release (a.k.a. WVD v2). The Spring 2020 update uses the Azure Resource Manager (ARM) Windows Virtual Desktop objects.
After setting up a host pool, workspace, and application group, adding session hosts to the host pool is essential to enable user connections. Additionally, consider adding extra session hosts to accommodate increased capacity.
Host sessions are nothing but virtual machines part of the host pool. I plan to add two-session hosts to host pools using Azure Virtual Desktop’s new experience (a.k.a AVD).
NOTE! – Learn more about AVD v2 ARM model architecture.
Add New Session Hosts
Let’s check how to add a new session host to the existing AVD host pool.
- Login to portal.azure.com
- Search with “Azure Virtual Desktop“.
- Click on the Azure Virtual Desktop icon, as shown in the below screenshot.
- Click on the Session Host node. Select Host Pool.
- Click on the button Session Host.
- Click +Add.
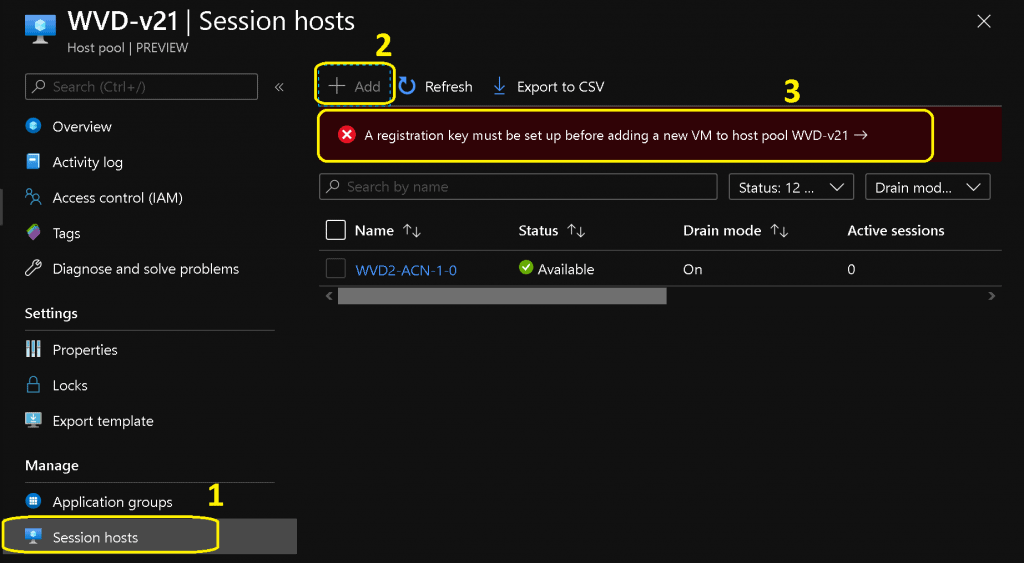
- Use a registration key to add additional virtual machines to this host pool. More details here.
- Expiration date
- No registration key has been generated for this host pool
Create a Registration key for the Host Pool
You can use the Generate new registration key from the Azure portal AVD application.
- Select the Expiration Date 07/07/2020.
- Select the Time 12:00:00 AM.
- Click on OK to generate the registration Key.
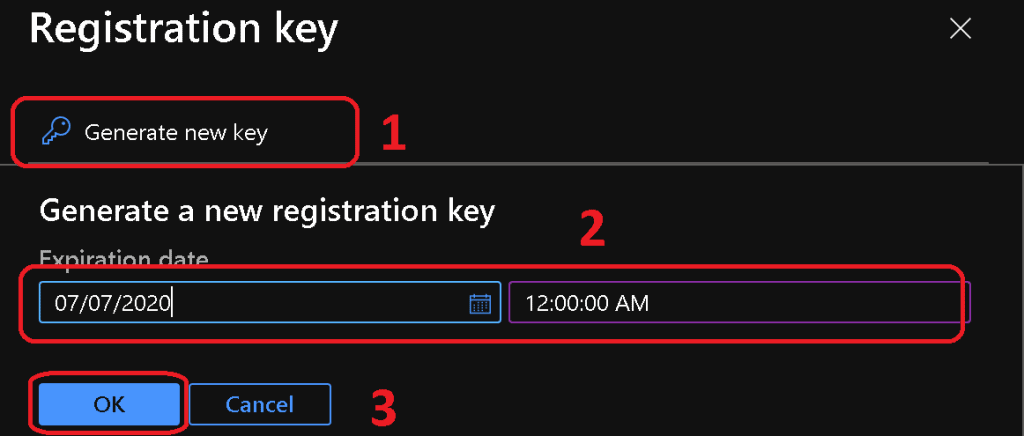
If you want to save the registration key, click the Download button.
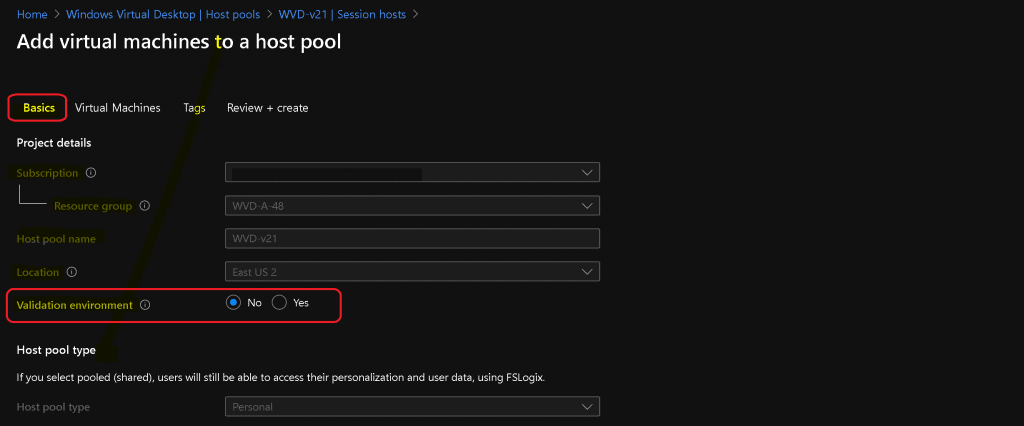
Click on the + Add button to create a new session host VM.
You cannot change the Subscription, Resource Group, Host Pool Name, Location, and Host Pool Type. The host pool has already selected these options.
Click on the next button to continue.
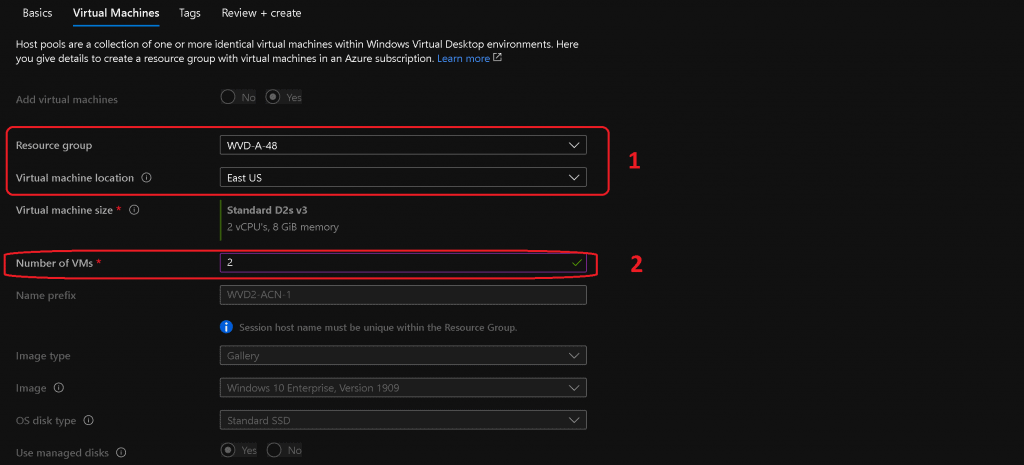
Virtual Machine Configuration
- You don’t have the option to change:
- Name Prefix (prefix name of the VM), Virtual Machine Size (Azure VM template), Image Type, Image, OS Disk Type, Use Managed Disks.
You have the option to select and change:
Resource Group, Virtual Machine Location (Azure Region), and Number of VMs for new session hosts.
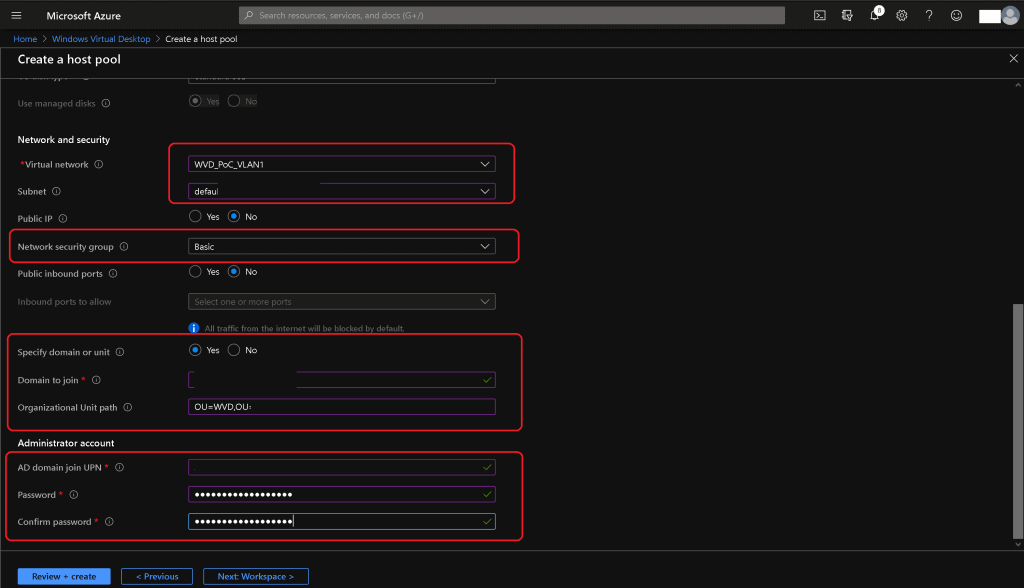
Network & Security Configurations
I usually keep all the following settings the same for all the VMs in the host pools. For more details, see the post, AVD v2 Admin Experience Create New Host Pool | Workspace | Session Host.
- Select the already created Virtual Network AVD_PoC_VLAN1.
- Select the Subnet from the drop-down Default.
- Select Public IP: NO.
- Select Network Security Group (NSG) per your organization’s standard: Basic.
- Select Public inbound ports option: No
- Specify Domain or unit to YES
- Select yes to join virtual machines to a specific domain or organization unit (OU).
- Select not to join the virtual machines to an OU.
- If you select no, the domain name will use the suffix of the Active Directory domain to join UPN by Default. For example, the user “vmjoiner@contoso.com” would get the default domain name “contoso.com”.
- Enter the Domain name for the Domain to join—HTMD. Local (where HTMD.local is my domain name).
- Enter the OU path: OU=WVD,OU=AAA UK,OU=Org,DC=HTMD,DC=local
- Enter the AD Domain and join UPN: anoop@HTMD.Local.
- Enter the password ********
- Click on the NEXT Tags button.
- Click on the NEXT Review + Create.
Click on the Create button after the validation passes the banner message.

Deployment in Progress AVD v2 – Session Host
Deployment in progress. Additional session hosts are being added.

Results
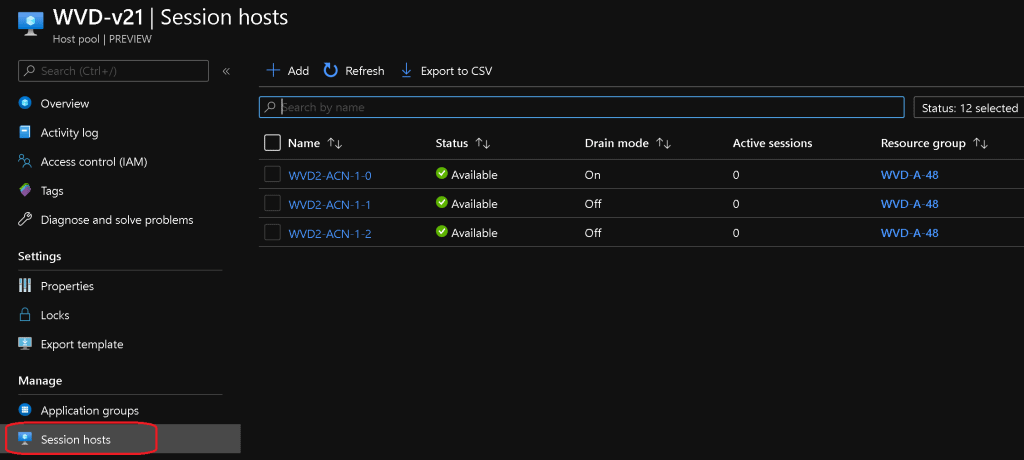
The new two Session hosts (VMs) are added to the host pool.
Personal Desktop Assignment
Update-AzWvdSessionHost -HostPoolName $hostpoolname -Name $sessionhostname -ResourceGroupName $resourcegroupname -AssignedUser $userupn
Resources
- WVD Architecture Changes for v2 | New Portal Admin Experience
- WVD Management Using Visual Studio Code Instead of PowerShell ISE
- More WVD Guides – https://www.anoopcnair.com/wvd/
We are on WhatsApp. To get the latest step-by-step guides and news updates, Join our Channel. Click here –HTMD WhatsApp.
Author
Anoop C Nair is Microsoft MVP! He is a Device Management Admin with more than 20 years of experience (calculation done in 2021) in IT. He is a Blogger, Speaker, and Local User Group HTMD Community leader. His primary focus is Device Management technologies like SCCM 2012, Current Branch, and Intune. He writes about ConfigMgr, Windows 11, Windows 10, Azure AD, Microsoft Intune, Windows 365, AVD, etc.

Hi Anoop ,
When I try and select the Virtual Network I only see None Available, have I missed something??
Great post by the way 🙂
I worked it out, I had the incorrect Virtual machine location set!!
Many thanks
Adam 🙂
Hi Anoop,
I have created the AVD in production and it’s working absolutely fine. The session hosts are joined to the domains.
However, I wish to have users connecting to specific host on every login. Is this possible via the above CLI?
Also correct me if I’m wrong, this goes in the Advances option of RDP properties.