Hello everyone, today let’s learn about “Zero Touch Enrolment for Corporate-Owned Android Devices in Intune”. Our previous articles discussed enrolling Corporate devices in Fully Managed Mode, Kiosk Single app and Multi-app mode.
In all the above articles, we have enrolled the device by scanning the enrollment token we created during the setup. The challenge in this method of enrolling devices is to provide the QR code to the end users, or local IT people should enrol the devices before handing them over to users. What If I say we can eliminate this overhead burden from you and set up a one-time activity? Sounds exciting.
Let’s learn how we can achieve this in this article. The Zero Touch Enrollment programme is similar to a Device Enrolment Programme by Apple and Auto Pilot for Windows devices, where the device enrols automatically to MDM solution from Out Of the Box. This will increase the end-user experience and eliminate the majority of tickets raised for enrolment issues in an organization.
In this ZTE(Zero Touch Enrolment Programme), devices will check for any Enterprise configuration on its first boot. If the devices have been assigned, it initiates the fully managed enrollment method and downloads the correct device policy controller app. In our case, it downloads the Microsoft Intune app.
Prerequisites
In this section, let’s learn the prerequisites To enable ZTE in your organization. An authorized dealer must procure the devices. Let’s see the other requirements below.
- A device running Android Pie (9.0) or later
- A zero-touch account created by an authorized zero-touch reseller partner
- Enterprise Mobility Management solution which supports ZTE
- Devices must be procured from the reseller of the Android Enterprise partner
Suppose your reseller is not part of Android Enterprise Partner. In that case, you ask them to register for the Android Enterprise Partner Program, where they can apply and register themselves to become Zero Touch Enrollment resellers.
Create Enrolment Profile
As mentioned above, Zero Touch Enrolment is a process for enrolling the device in Intune. To enable Zero Touch Enrolment for users, we need to create an Enrolment Profile for Corporate-owned, fully managed user devices, Corporate-owned dedicated devices, or Corporate-owned devices with a work profile.
We have discussed how to create an enrolment profile in our previous articles, and you can refer to Corporate-owned, fully managed user devices or Corporate-owned dedicated devices. Once created, please make a note of the Enrolment token. We require that in configuring the Zero Touch profile.
Add Devices to the ZTE Portal
Share a Google account with the reseller. The reseller will set up a zero-touch enrollment account for your organization. Do not use your admin’s personal Google account. You can create a Google account for your organization. Once the devices are procured from the authorized reseller, the reseller will add the devices to your organization.
Create Configuration in the Zero Touch Enrolment Portal
In this section, let’s learn how to create the required configurations for the ZTE portal. There are two ways to create the necessary configurations, one is linking your Intune tenant directly using ZTE iframe, and the other one is creating Configuration in the ZTE portal.
Create Configuration using Zero-touch iframe
In this article, we will discuss both methods of integrating the ZTE portal using Zero-touch iframe and with the help of JSON text. Let’s see how we can incorporate using Zero-touch Iframe.
- Login to Microsoft Intune Admin Center
- Click on Devices > Android > Android Enrolment
- Under the Bulk Enrolment section, click on Zero Touch Enrolment
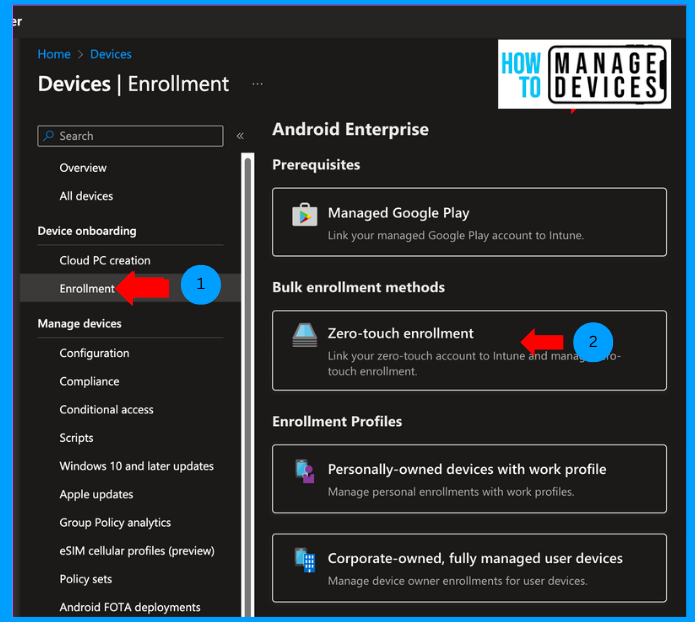
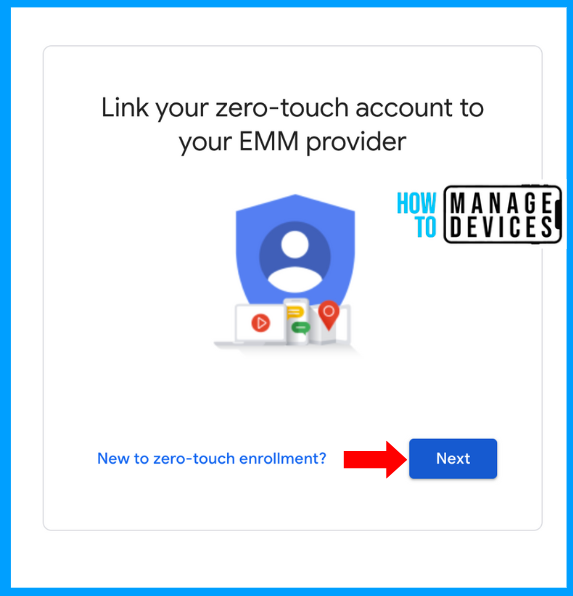
This will redirect you to the ZTE portal, where you have to sign in using the Google account that your reseller has provisioned, and the account should be an Admin account. Click on Next and sign in with the credentials.
On successful sign-in, you will be shown a message below, along with your organization name and the number of devices added and click on the link. This will create the link between the ZTE portal and your Intune tenant.
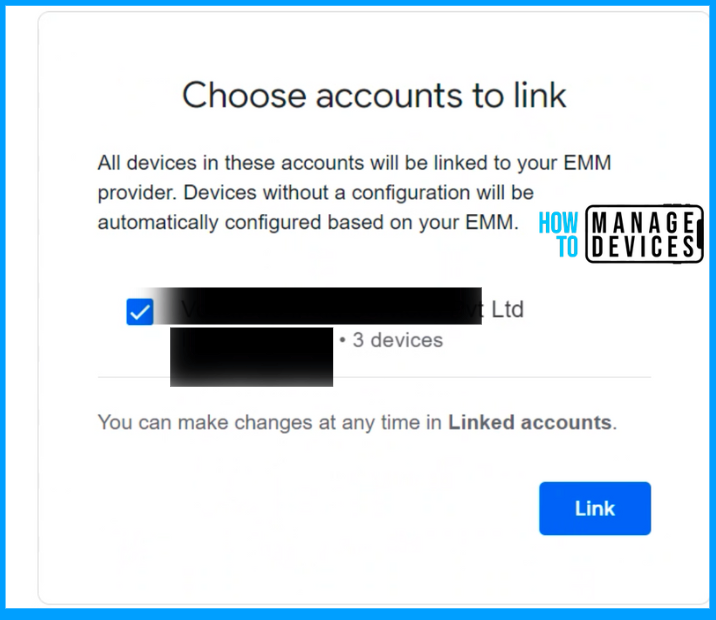
When we integrate this way, the EMM DPC in the ZTE portal will become the default EMM DPC and be assigned to all the devices. Devices added later will get this EMM DPC and enrol to this MDM tenant.
Create Configuration using the ZTE Portal
Let’s say you want to enable ZTE for testing or any other departments, and we can create a JSON text to create the Configuration in ZTE and assign devices to the newly created EMM DPC. Let’s see how we can create a manual configuration in the below steps
- Sign in to the ZTE portal with the credentials provided by the reseller
- Select configurations
- Click on Add New Configuration
- Provide a name for the Configuration
- Select Microsoft Intune as EMM DPC
- Now copy the JSON snippet below and replace “YourEnrolmentToken” with the token noted previously while creating the Enrolment token.
{
“android.app.extra.PROVISIONING_DEVICE_ADMIN_COMPONENT_NAME”: “com.google.android.apps.work.clouddpc/.receivers.CloudDeviceAdminReceiver”,
“android.app.extra.PROVISIONING_DEVICE_ADMIN_SIGNATURE_CHECKSUM”: “I5YvS0O5hXY46mb01BlRjq4oJJGs2kuUcHvVkAPEXlg”,
“android.app.extra.PROVISIONING_DEVICE_ADMIN_PACKAGE_DOWNLOAD_LOCATION”: “https://play.google.com/managed/downloadManagingApp?identifier=setup”,
“android.app.extra.PROVISIONING_ADMIN_EXTRAS_BUNDLE”: {
“com.google.android.apps.work.clouddpc.EXTRA_ENROLLMENT_TOKEN”: “YourEnrollmentToken”
}
}
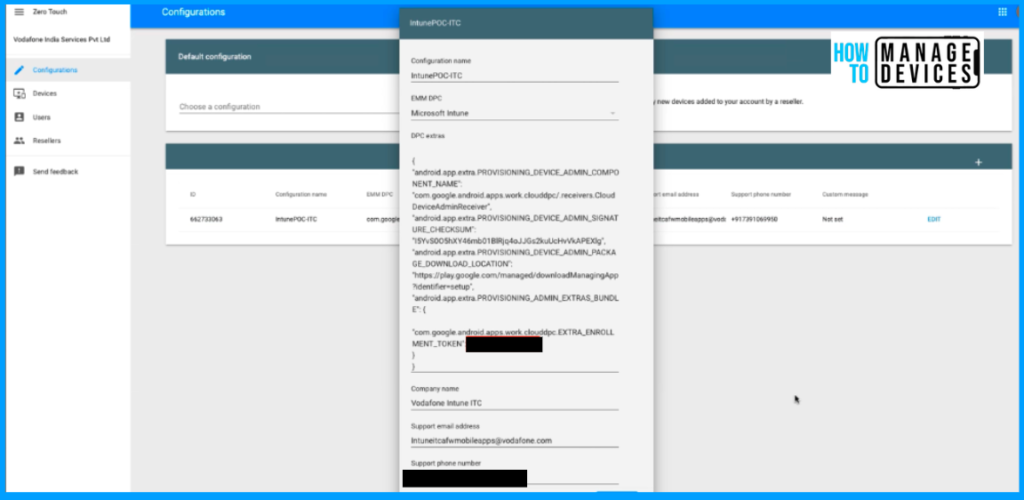
Provide the Support email address and mobile number, which will be shown on the device screen while setting up the device and saving the Configuration. Now, we must assign the Configuration to the devices added to the ZTE portal.
Assign ZTE Configuration to Devices
In the first method, the ZTE configurations are assigned to the devices as these would be default configurations. In this method, we need to add the configurations to the devices explicitly. Now, let’s see how to add our Configuration to the devices.
- Sign in to the ZTE portal with the credentials provided by the reseller.
- Search for the device with the serial number or IMEI number provided by the reseller.
- Select the devices to which you need to apply the Configuration
- Click on Configuration
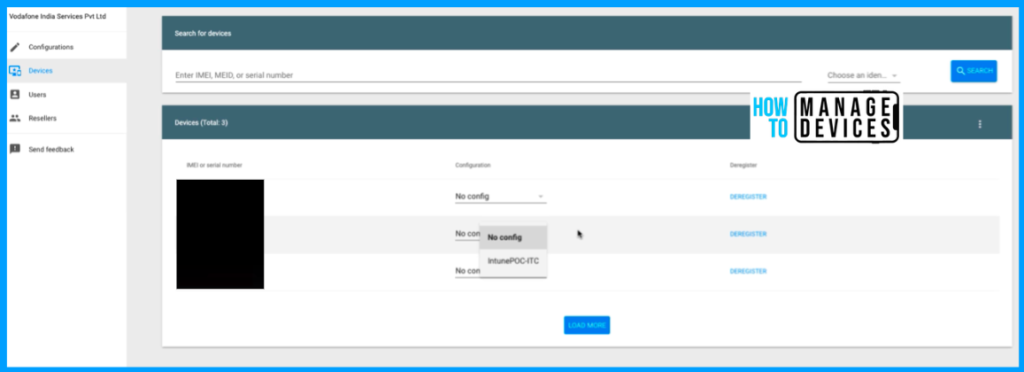
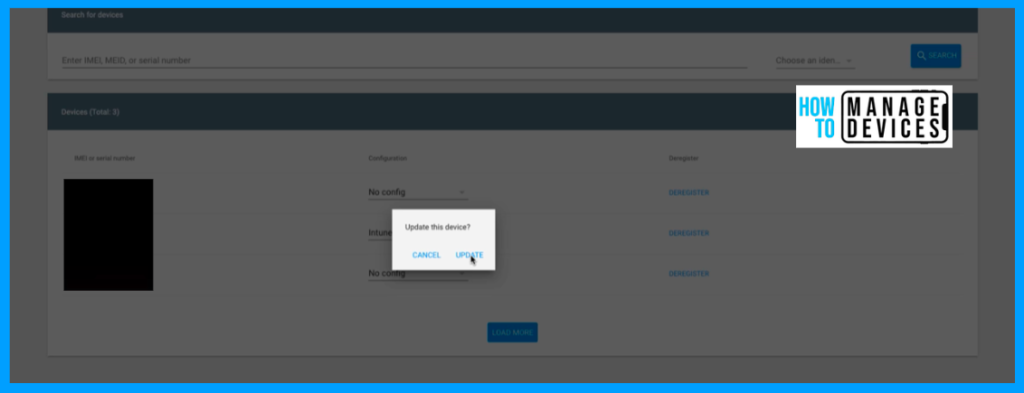
Under the configuration section, select the Configuration we created above and click Update. This will assign the ZTE configurations to the device chosen.
The required device configuration is now ready in the ZTE portal, and we have to create some configuration on the Intune end. We must create a Dynamic device group for the devices enrolled with the ZTE configuration. Let’s see below how to create the Dynamic group.
Create a Dynamic Device Group in Azure for ZTE Devices
We have discussed how to create a Dynamic device group in Azure in different posts. Once let’s see how. to create a Device Dynamic group in Intune
- Login to Microsoft Entra Admin Center
- Click on Groups > All Groups
- Click on New Group

Now Select the Group type as Security, and Provide the Name and Description for the group. Now, select the Membership type as Dynamic device and click on Add dynamic query to add the dynamic query.
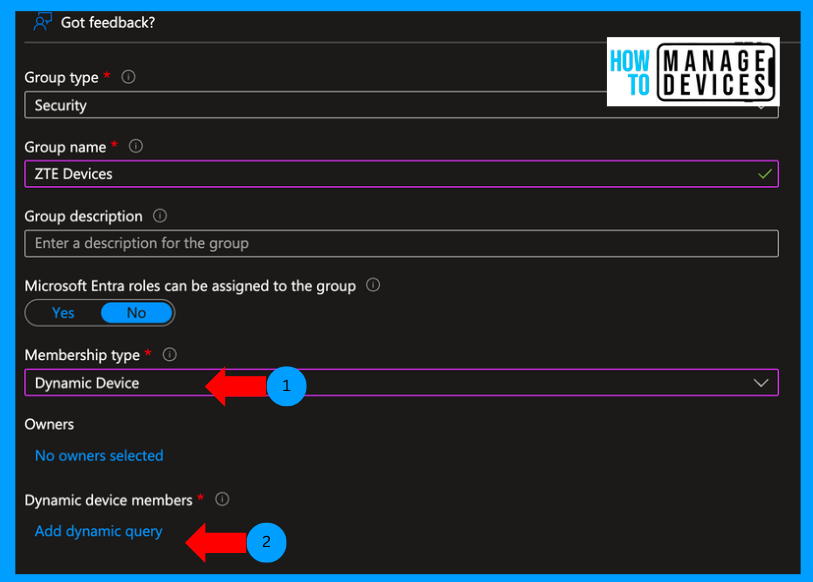
Declare the query as “(device.deviceOSType -eq “AndroidEnterprise”) and (device.enrollmentProfileName -eq Null)”. Click on Save and Click on Create.

Once the devices enrol to Intune, they will be part of this Dynamic group. We can use this group to assign different configuration and compliance policies per your organization’s requirements.
End User Experience
We have made all the required settings and are ready to enrol a device. Enrolling the device on ZTE mode must be wiped to factory default, or it should be a new device. Once the device is turned on, click on Start.
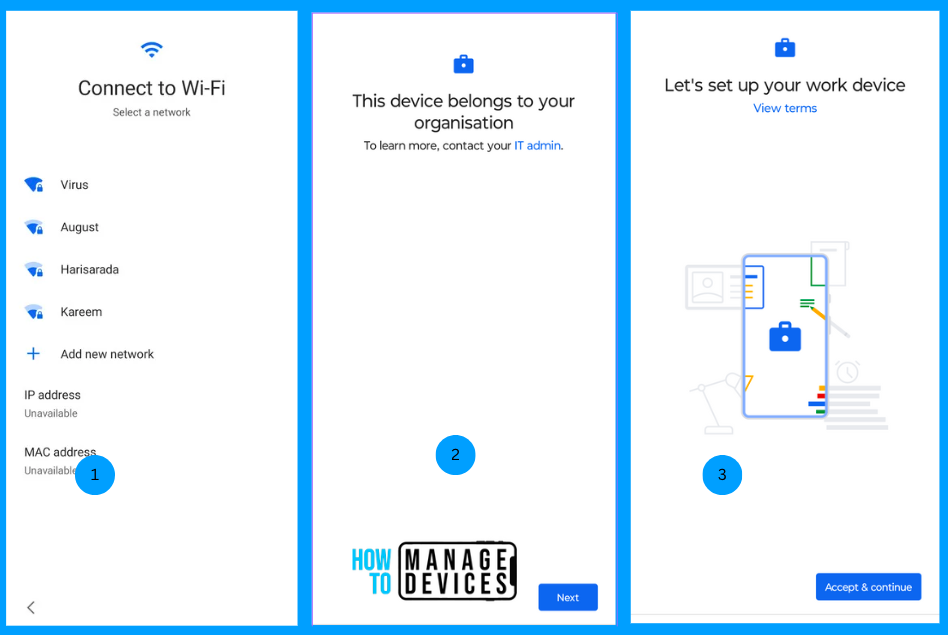
On the next screen, Choose Wi-Fi. As soon as the device connects to the internet, the device checks for any enterprise configurations assigned to it. As we have assigned Configuration. The above screens show that the device isn’t private and belongs to your organization. Click Next and Click on Accept & Continue to set up the Work device.
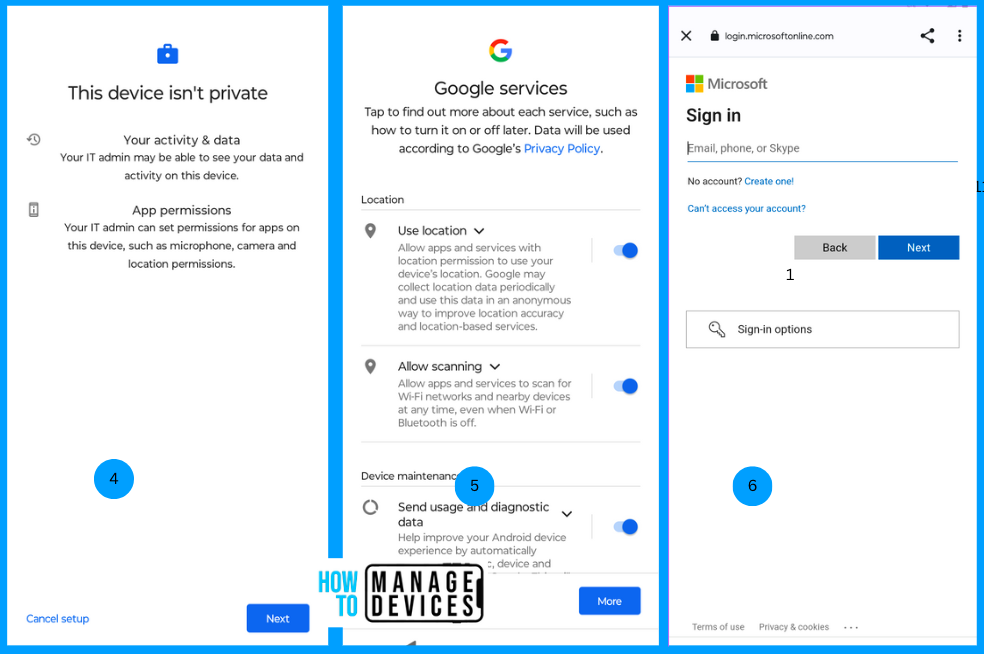
On the next screen, the user will be shown what activities that can be viewed by your organization’s admin. Click on Next. Accept the Google Privacy policies and click Next. Now, the user needs to authenticate using the corporate credentials and Authenticate.
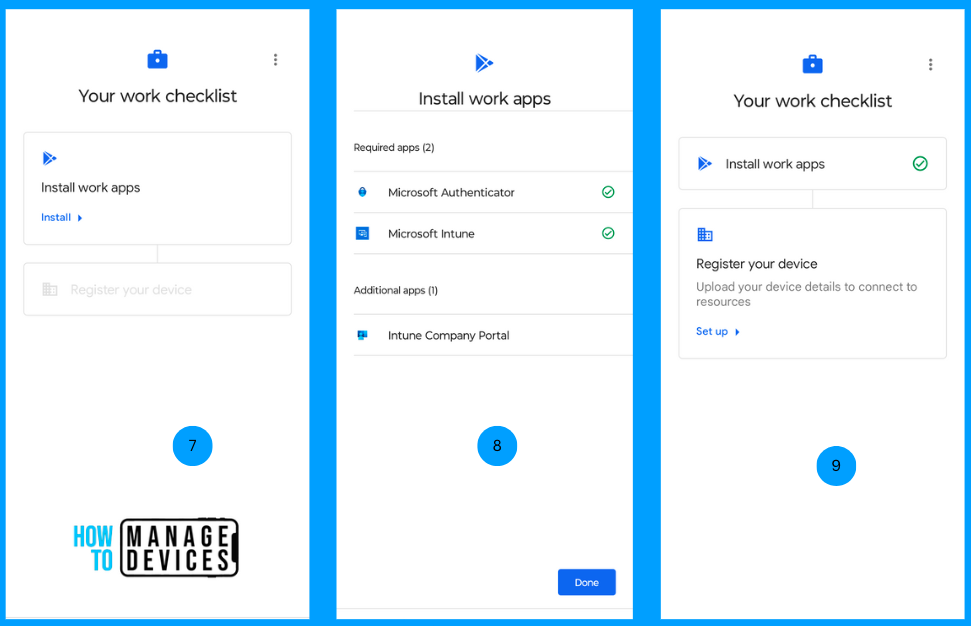
Users will be prompted to install Mandatory apps like Microsoft Intune and Microsoft Authenticator on successful authentication. It will be installed, and these are the apps pushed by Intune. We don’t need to push or assign them in Intune. After installing the apps, we need to register the device to Intune. Click on Setup
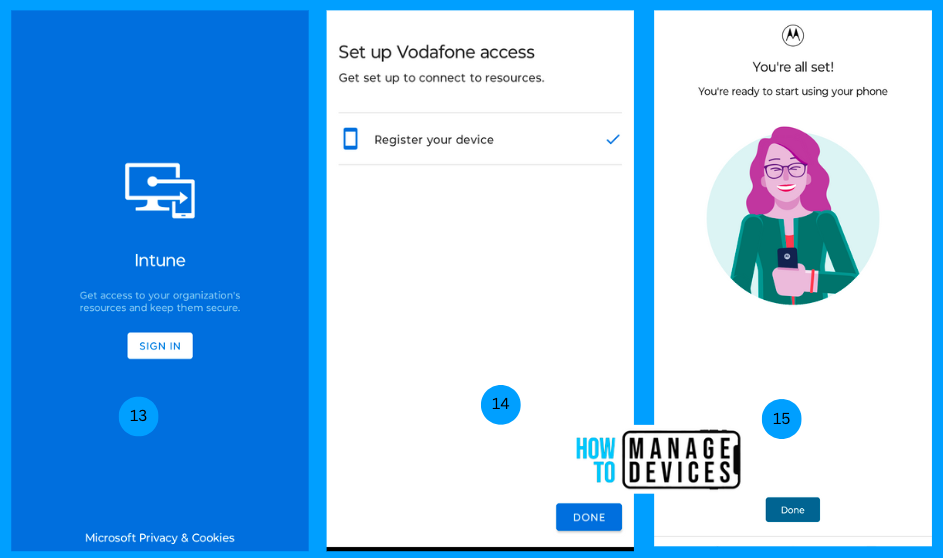
When we click on setup, the user will be taken to sign in to the Intune app. After successful authentication, Intune will start registering, and once registration is completed, click on Done. After a few seconds, the user will get a message stating you’re all set. Click on Done. This will take the user to the device’s home screen. Now, the user is all set to use the device.
Conclusion
Zero Touch Enrollment is one of the methods of enrolling the devices in Intune. This method will help users reduce the steps to set up the device and enrol the device in Intune. This method also allows organizations to hand over the device to the new user and never worry about the devices not being registered on Intune. I hope this article helps you learn something new today. Let’s meet with another article soon.
We are on WhatsApp. To get the latest step-by-step guides and news updates, Join our Channel. Click here – HTMD WhatsApp.
Author
About Author – Narendra Kumar Malepati (Naren) has 11+ years of experience in IT, working on different MDM tools. Over the last seven years, Naren has been working on various features of Intune, including migration from different MDMs to Intune. Naren mainly focuses on Android, iOS, and MacOS.

Great Article Naren,
we are just starting to use ZTE for Android devices, and it strikes me that there are far to many touches needed for a ZERO touch enrollment. Is there anything that can be added to the JSON configuration file that will pre configure and auto accept the google services page ?
Many thanks
Hello . Its the last tuto or there’s something new in 2025?
There are no changes in configuring the configurations. But Google has added few features like Audit logs and User Roles to ZTE portal